GENESIS G80 2018 Owner's Manual
Manufacturer: GENESIS, Model Year: 2018, Model line: G80, Model: GENESIS G80 2018Pages: 516, PDF Size: 81.01 MB
Page 471 of 516

7-70
Maintenance
Fuse NameFuse ratingCircuit Protected
S/HEATER
DRV25A Driver CCS Module, Driver Seat Warmer Control Module
4WD30A 4WD ECM
PRESAFETY
SEAT BELT 130A Pre-Active Seat Belt Module
PRESAFETY
SEAT BELT 230A Pre-Active Seat Belt Module
IG230A IG2 Relay
ECU 330A Engine Control Relay
MODULE 110A 4WD ECM, Smart Cruise Control Radar, Active Air Flap
WIPER 210A Metal Core Block (PCB #2 - Wiper Relay)
WASHER20A Washer Relay
SENSOR 210A G6DN : Oxygen Sensor #1/#2/#3/#4, Variable Intake Solenoid Valve #1/#2
G8BE : Oxygen Sensor #1/#2/#3/#4, Electronic Thermostat
G6DP : Oxygen Sensor #1/#2/#3/#4, RCV Control Solenoid Valve
SENSOR 110A Oil Control Valve #1/#2/#3/#4, Canister Close Valve, Purge Control Solenoid Valve
SENSOR 310A Electronic Thermostat, Rear Junction Block (Fuel Pump Relay)
SENSOR 410A G8BE : Camshaft Position Sensor #1/#2/#3/#4
IGN COIL15A G6DN : Ignition Coil #1/#2/#3/#4/#5/#6
G8BE : Ignition Coil #1/#2/#3/#4/#5/#6/#7/#8
G6DP : Ignition Coil #1/#2/#3/#4/#5/#6
ECU 420A ECM
H/LAMP
HI SOL10A H/LAMP HI SOL Relay
Page 472 of 516

7-71
7
Maintenance
Fuse NameFuse ratingCircuit Protected
DEICER20A Metal Core Block (PCB #2 - Front Deicer Relay)
H/LAMP
WASHER25A Head Lamp Washer Relay
A/CON 210A A/C Control Module
BLOWER40A Blower Relay
IG140A IG1 Relay
START30A E/R Junction Block (RLY. 2 - Start Relay)
ECU 115A ECM
TCU 120A TCM
ESC 310A ESC Module
MODULE 310A Smart Cruise Control Radar, Active Air Flap, 4WD ECM
MDPS 210A MDPS Unit, Steering Angle Sensor
SENSOR 510A G6DP : Brake Boost Vacuum Pressure Sensor Switch
HORN20A Horn Relay
ECU 210A ECM
TCU 215A TCM, Transmission Range Switch, P/N Relay, B/UP Lamp Relay
EPB 215A Electronic Parking Brake Module
EPB 115A Electronic Parking Brake Module
B/UP LAMP10A B/UP Lamp Relay
ACC40A ACC Relay
Page 473 of 516

7-72
Maintenance
Trunk fuse panel
(Rear fuse box panel)
Inside the fuse/relay box covers, you
can find the fuse/relay label describ-
ing fuse/relay name and capacity.
✽ ✽
NOTICE
Not all fuse panel descriptions in
this manual may be applicable to
your vehicle. It is accurate at the
time of printing. When you inspect
the fuse box on your vehicle, refer to
the fuse box label.ODH077052N
ODH077036
Page 474 of 516

7-73
7
Maintenance
Fuse NameFuse ratingCircuit Protected
P/TRUNK30A Power Trunk Lid Control Module
P/DOOR 15A Rear Door Latch RH RR RH
DOOR LOCK 215A Passenger Door Module
P/DOOR RR LH15A Rear Door Latch LH
AIR BAG15A Air Bag Relay
SPARE 110A Spare Fuse
P/SEAT PASS 225A Passenger Power Seat Relay Box
F/LID10A Fuel Lid Open Relay, Crash Pad Switch
ECS15A ECS Unit
DOOR LOCK 110A Driver Door Module
SPARE 615A Spare Fuse
TRUNK10A Trunk Lid Relay, Power Trunk Module Buzzer
S/HEATER
RR RH20A Rear Seat Warmer Control Module RH
FOG LAMP
RR10A Not Used
AMP25A AMP
S/HEATER
RR LH20A Rear Seat Warmer Control Module LH
P/WDW RH30A Passenger Power Window Module, Rear Power Window Module RH
F/PUMP20A Fuel Pump Relay
RR HTD40A Rear Defogger Relay
Trunk fuse panel
Page 475 of 516

7-74
Maintenance
Trunk fuse panel
(Battery box fuse panel)
Inside the fuse/relay box covers, you
can find the fuse/relay label describ-
ing fuse/relay name and capacity.
✽ ✽
NOTICE
Not all fuse panel descriptions in
this manual may be applicable to
your vehicle. It is accurate at the
time of printing. When you inspect
the fuse box on your vehicle, refer to
the fuse box label.
ODH077037
ODH077080
• Battery box fuse panel
Page 476 of 516

7-75
7
Maintenance
Fuse NameFuse ratingCircuit Protected
B+9100A
Rear Junction Block (Fuse - RR HTD/ P/TRUNK/ ECS/ F/LID/
P/DOOR RR RH/ DR LOCK 2/ P/DOOR RR LH/ AMP/
P/SEAT PASS 2/ DR LOCK 1/ TRUNK/ S/HEATER RR RH/
S/HEATER RR LH/ P/WDW RH/ F/PUMP/ AIR BAG)
B+880AMetal Core Block (PCB #2 Fuse - TCU/ ECU 1/ START/ IG 1)
AMS10ABattery Sensor
Trunk fuse panel
Page 477 of 516

7-76
Maintenance
L LI
IG
GH
HT
T
B
BU
UL
LB
BS
S
Consult an authorized retailer of
Genesis Branded products to
replace most vehicle light bulbs. It is
difficult to replace vehicle light bulbs
because other parts of the vehicle
must be removed before you can get
to the bulb. This is especially true for
removing the headlamp assembly to
get to the bulb(s).
Removing/installing the headlamp
assembly can result in damage to
the vehicle.
✽ ✽
NOTICE
After heavy driving, rain or wash-
ing, headlamp and trunk lenses
could appear frosty. This condition
is caused by the temperature differ-
ence between the lamp inside and
the outside temperature. This is sim-
ilar to the condensation on your win-
dows inside your vehicle during the
rain and doesn’t indicate a problem
with your vehicle. If the water leaks
into the lamp bulb circuitry, have
your vehicle checked by an author-
ized retailer of Genesis Branded
products.
Headlamp, position lamp, turn
signal lamp, side marker and
front fog lamp bulb replace-
ment
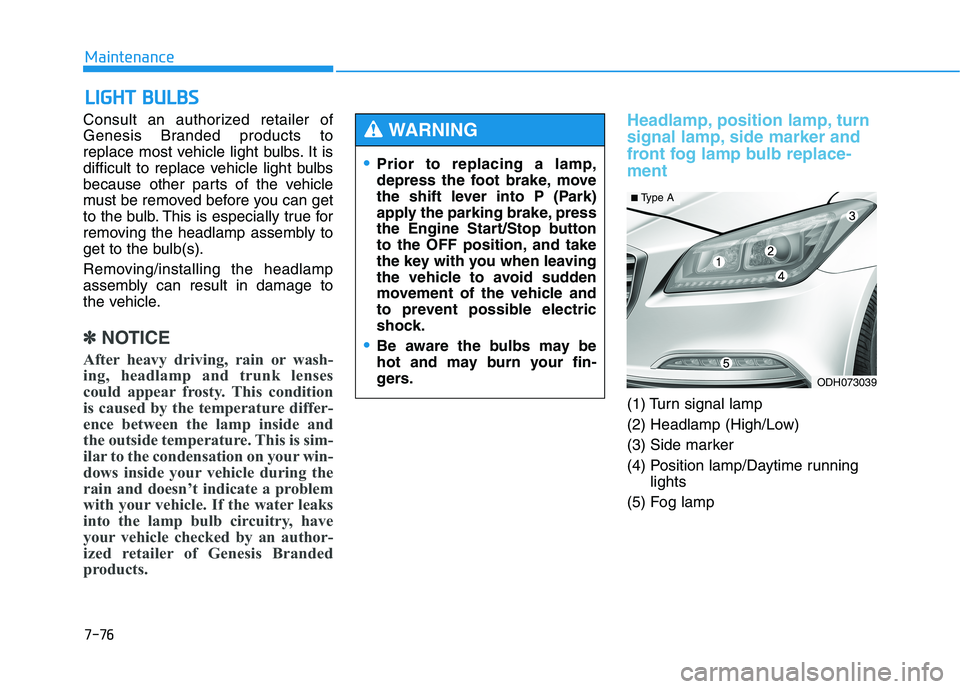
(1) Turn signal lamp
(2) Headlamp (High/Low)
(3) Side marker
(4) Position lamp/Daytime running
lights
(5) Fog lamp
Prior to replacing a lamp,
depress the foot brake, move
the shift lever into P (Park)
apply the parking brake, press
the Engine Start/Stop button
to the OFF position, and take
the key with you when leaving
the vehicle to avoid sudden
movement of the vehicle and
to prevent possible electric
shock.
Be aware the bulbs may be
hot and may burn your fin-
gers.
WARNING
ODH073039
■ Type A
Page 478 of 516

7-77
7
Maintenance
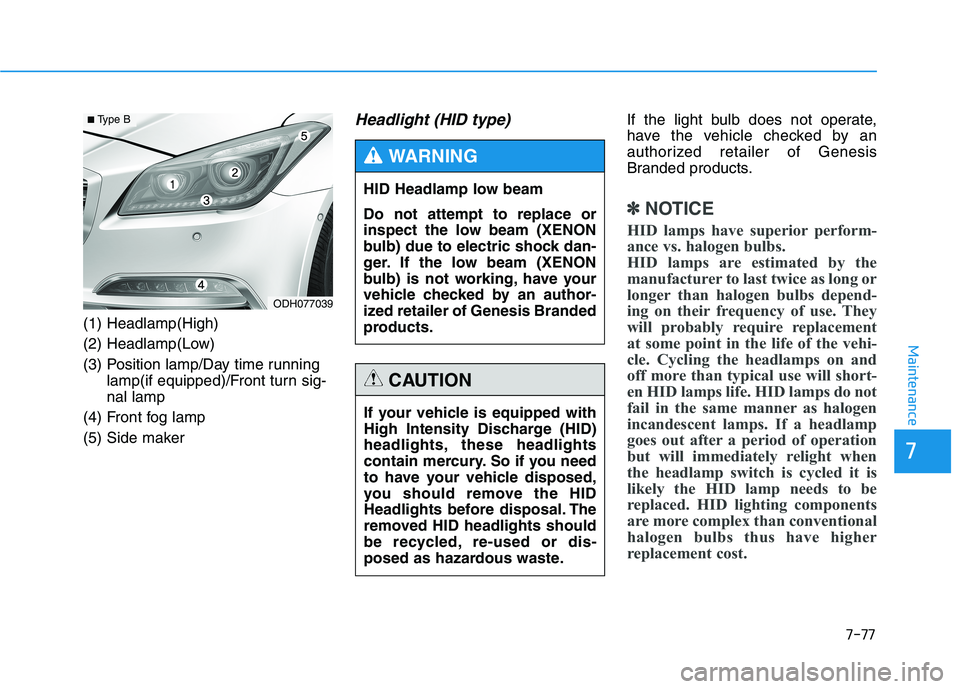
(1) Headlamp(High)
(2) Headlamp(Low)
(3) Position lamp/Day time running
lamp(if equipped)/Front turn sig-
nal lamp
(4) Front fog lamp
(5) Side maker
Headlight (HID type) If the light bulb does not operate,
have the vehicle checked by an
authorized retailer of Genesis
Branded products.
✽ ✽
NOTICE
HID lamps have superior perform-
ance vs. halogen bulbs.
HID lamps are estimated by the
manufacturer to last twice as long or
longer than halogen bulbs depend-
ing on their frequency of use. They
will probably require replacement
at some point in the life of the vehi-
cle. Cycling the headlamps on and
off more than typical use will short-
en HID lamps life. HID lamps do not
fail in the same manner as halogen
incandescent lamps. If a headlamp
goes out after a period of operation
but will immediately relight when
the headlamp switch is cycled it is
likely the HID lamp needs to be
replaced. HID lighting components
are more complex than conventional
halogen bulbs thus have higher
replacement cost.
HID Headlamp low beam
Do not attempt to replace or
inspect the low beam (XENON
bulb) due to electric shock dan-
ger. If the low beam (XENON
bulb) is not working, have your
vehicle checked by an author-
ized retailer of Genesis Branded
products.
WARNING
If your vehicle is equipped with
High Intensity Discharge (HID)
headlights, these headlights
contain mercury. So if you need
to have your vehicle disposed,
you should remove the HID
Headlights before disposal. The
removed HID headlights should
be recycled, re-used or dis-
posed as hazardous waste.
CAUTION
ODH077039
■ Type B
Page 479 of 516

7-78
Maintenance
✽ ✽
NOTICE
We recommend that the headlamp
aiming be adjusted after an accident
or after the headlamp assembly is
reinstalled at an authorized retailer
of Genesis Branded products.
Headlamp
1. Turn off the engine.
2. Open the hood.
3. Remove the socket from the
assembly by turning the socket
counterclockwise until the tabs on
the socket align with the slots on
the assembly.
4. Remove the connector (A) and
pull the BI-FUNCTION lamp.
5. Connect the BI-FUNCTION lamp
to the cable and install the con-
nector (A).
6. Install the socket in the assembly
by aligning the tabs on the socket
with the slots in the assembly.Push the socket into the assembly
and turn the socket clockwise.
If the headlamp (LED) does nut oper-
ate, have the vehicle checked by an
autorized retailer of Genesis
Branded products.
ODH073064L
A
A
Page 480 of 516

7-79
7
Maintenance
Turn signal light
1. Turn off the engine.
2. Open the hood.
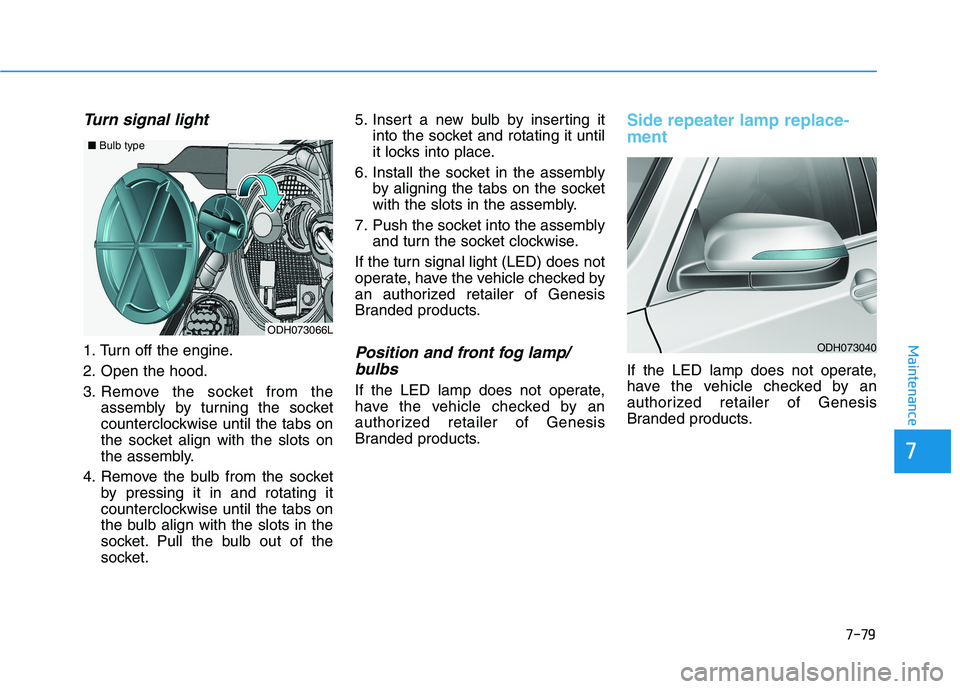
3. Remove the socket from the
assembly by turning the socket
counterclockwise until the tabs on
the socket align with the slots on
the assembly.
4. Remove the bulb from the socket
by pressing it in and rotating it
counterclockwise until the tabs on
the bulb align with the slots in the
socket. Pull the bulb out of the
socket.5. Insert a new bulb by inserting it
into the socket and rotating it until
it locks into place.
6. Install the socket in the assembly
by aligning the tabs on the socket
with the slots in the assembly.
7. Push the socket into the assembly
and turn the socket clockwise.
If the turn signal light (LED) does not
operate, have the vehicle checked by
an authorized retailer of Genesis
Branded products.Position and front fog lamp/
bulbs
If the LED lamp does not operate,
have the vehicle checked by an
authorized retailer of Genesis
Branded products.
Side repeater lamp replace-
ment
If the LED lamp does not operate,
have the vehicle checked by an
authorized retailer of Genesis
Branded products.
ODH073066L ■Bulb type
ODH073040