display GENESIS G80 2019 Quick Reference Guide
[x] Cancel search | Manufacturer: GENESIS, Model Year: 2019, Model line: G80, Model: GENESIS G80 2019Pages: 15, PDF Size: 5.21 MB
Page 3 of 15
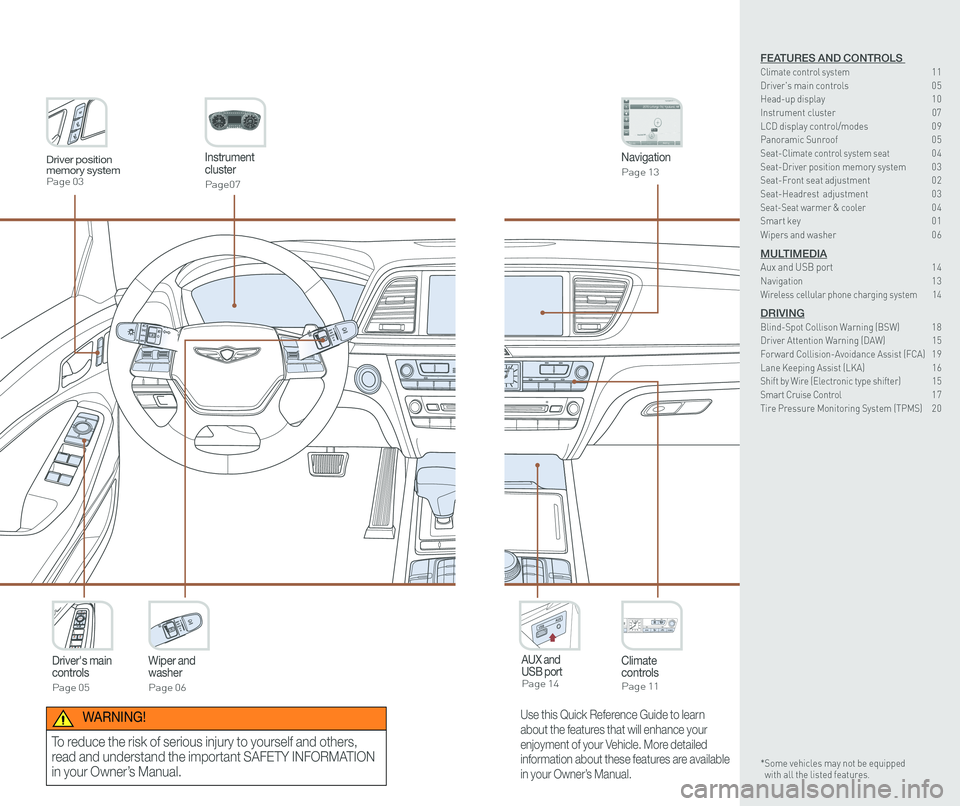
Instrument cluster
Page07
Navigation
Page 13
Climate controlsPage 11
Driver's main controls
Page 05
Wiper and washer
Page 06
AUX and USB port Page 14
Driver position memory systemPage 03
Use this Quick Reference Guide to learn
about the features that will enhance your
enjoyment of your Vehicle. More detailed
information about these features are available
in your Owner’s Manual.
WARNING!
To reduce the risk of serious injury to yourself and others,
read and understand the important SAFETY INFORMATION
in your Owner’s Manual.
FEATURES AND CONTROLS Climate control system 11Driver's main controls 0 5Head-up display 1 0
Instrument cluster 07LCD display control/modes 0 9 Panoramic Sunroof 0 5 Seat-Climate control system seat 04Seat-Driver position memory system 0 3Seat-Front seat adjustment 0 2Seat-Headrest adjustment 0 3 Seat-Seat warmer & cooler 04Smart key 0 1
Wipers and washer 0 6
MULTIMEDIAAux and USB port 14Navigation 1 3Wireless cellular phone charging system 14
DRIVINGBlind-Spot Collison Warning (BSW) 1 8Driver Attention Warning (DAW) 15Forward Collision-Avoidance Assist (FCA) 1 9Lane Keeping Assist (LKA) 16Shift by Wire (Electronic type shifter) 15Smart Cruise Control 1 7Tire Pressure Monitoring System (TPMS) 2 0
* Some vehicles may not be equipped with all the listed features.
Page 5 of 15
Quick Reference Guide I 0403 I Quick Reference Guide
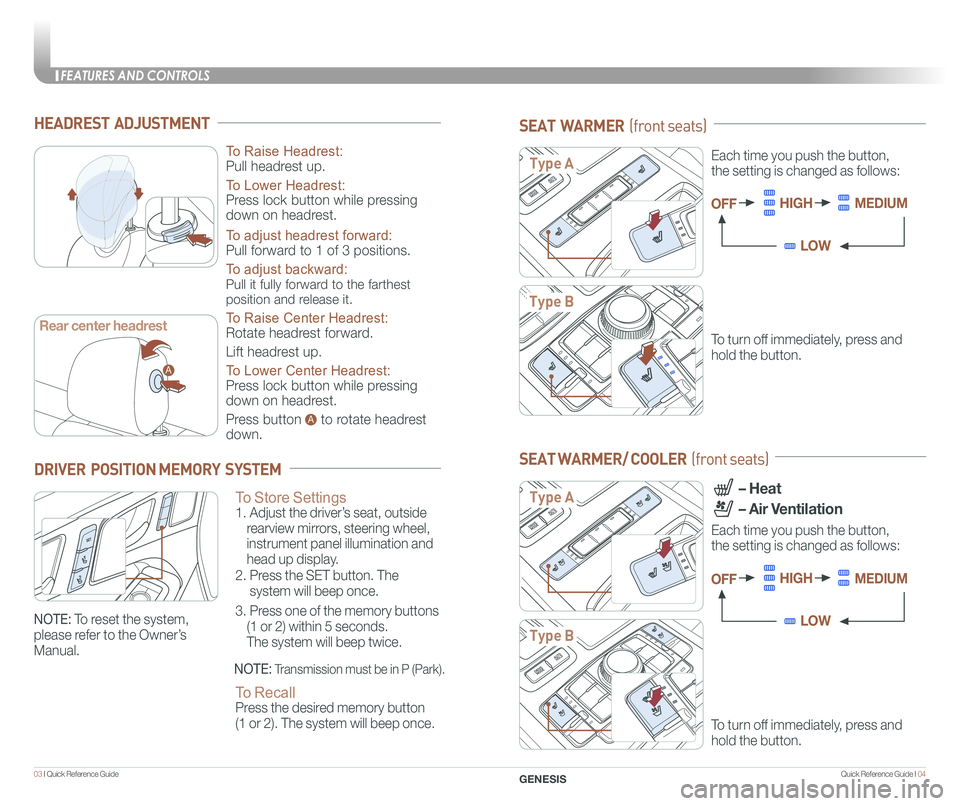
HEADREST ADJUSTMENT
To Raise Headrest:
Pull headrest up.
To Lower Headrest:
Press lock button while pressing
down on headrest.
To adjust headrest forward:
Pull forward to 1 of 3 positions.
To adjust backward:
Pull it fully forward to the farthest
position and release it.
To Raise Center Headrest:
Rotate headrest forward.
Lift headrest up.
To Lower Center Headrest:
Press lock button while pressing
down on headrest.
Press button to rotate headrest
down.
A
A
Rear center headrest
To Store Settings 1. Adjust the driver’s seat, outside
rearview mirrors, steering wheel,
instrument panel illumination and
head up display.
2. Press the SET button. The
system will beep once.
3. Press one of the memory buttons
(1 or 2) within 5 seconds.
The system will beep twice.
To Recall Press the desired memory button
(1 or 2). The system will beep once.
DRIVER POSITION MEMORY SYSTEM
NOTE: Transmission must be in P (Park).
NOTE: To reset the system,
please refer to the Owner’s
Manual.
SEAT WARMER (front seats)
To turn off immediately, press and
hold the button.
SEAT WARMER/ COOLER (front seats)
To turn off immediately, press and
hold the button.
Each time you push the button,
the setting is changed as follows:
– Heat
– Air Ventilation
Each time you push the button,
the setting is changed as follows:
OFF
OFF
HIGH
HIGH
MEDIUM
MEDIUM
LOW
LOW
Type A
Type B
Type A
Type B
FEATURES AND CONTROLS
GENESIS
Page 7 of 15
Quick Reference Guide I 0807 I Quick Reference Guide
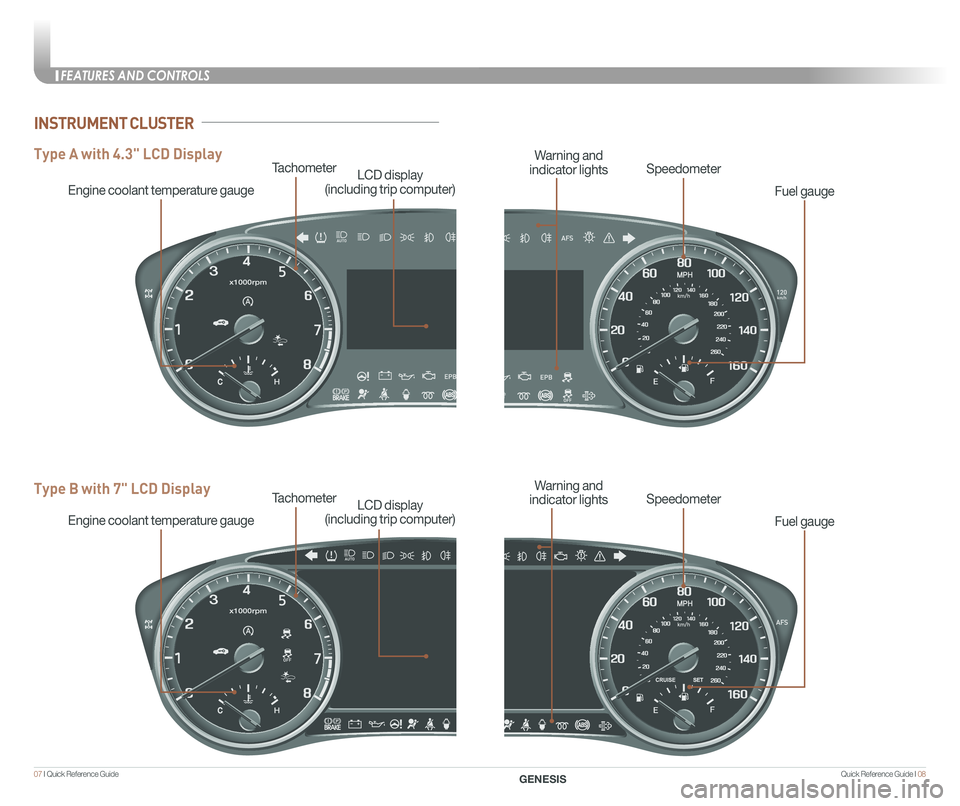
Tachometer
Engine coolant temperature gauge
LCD display
(including trip computer)
Type A with 4.3" LCD Display
Type B with 7" LCD DisplayTachometer
Engine coolant temperature gauge
LCD display
(including trip computer)
Fuel gauge
SpeedometerWarning and
indicator lights
Fuel gauge
SpeedometerWarning and
indicator lights
INSTRUMENT CLUSTER
FEATURES AND CONTROLS
GENESIS
Page 8 of 15
Quick Reference Guide I 1009 I Quick Reference Guide
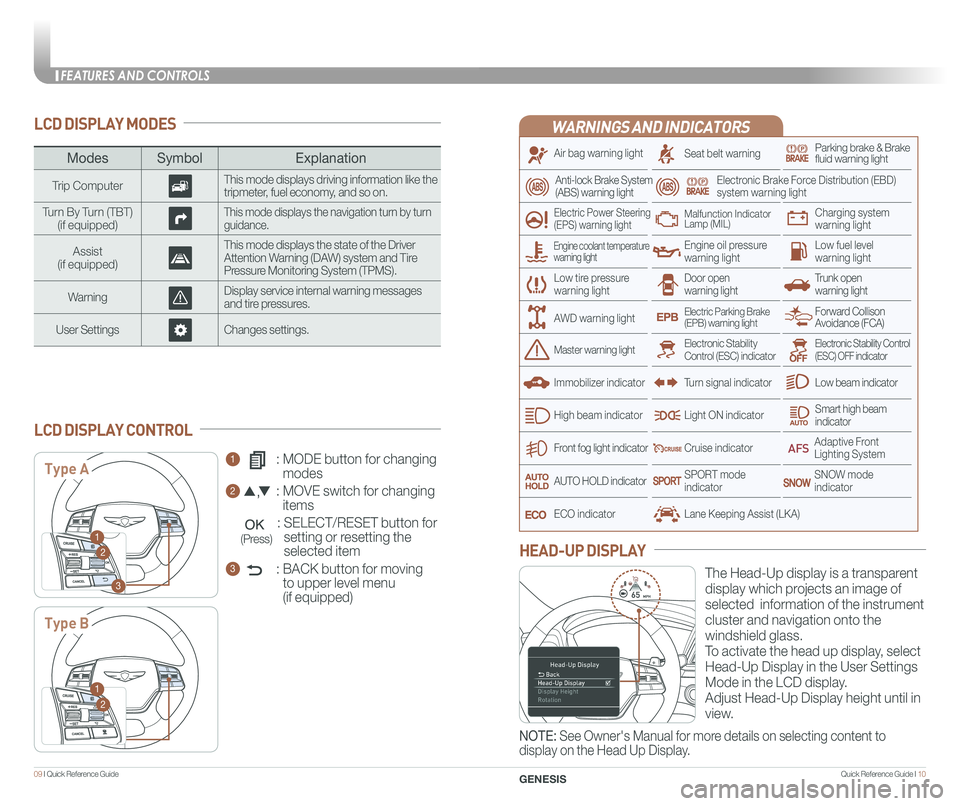
LCD DISPLAY MODES
ModesSymbol Explanation
Trip ComputerThis mode displays driving information like the tripmeter, fuel economy, and so on.
Turn By Turn (TBT)(if equipped)This mode displays the navigation turn by turn guidance.
Assist(if equipped)
This mode displays the state of the Driver Attention Warning (DAW) system and Tire Pressure Monitoring System (TPMS).
WarningDisplay service internal warning messages and tire pressures.
User SettingsChanges settings.
1 : MODE button for changing
modes
2 : MOVE switch for changing
items
: SELECT/RESET button for
setting or resetting the
selected item
3 : BACK button for moving
to upper level menu
(if equipped)
LCD DISPLAY CONTROL
Type A
Type B
1
2
3
1
2
(Press)
WARNINGS AND INDICATORS
Air bag warning light
Electric Power Steering (EPS) warning light
Seat belt warningParking brake & Brake fluid warning light
Electronic Brake Force Distribution (EBD) system warning light
Low tire pressurewarning lightTrunk open warning light
Low fuel level warning light
Front fog light indicator
Low beam indicator
Smart high beam indicator
SNOW modeindicator
Light ON indicator
ECO indicator
SPORT modeindicator
Anti-lock Brake System(ABS) warning light
High beam indicator
Door open warning light
Electronic Stability Control (ESC) indicatorMaster warning light
Forward Collison Avoidance (FCA)Electric Parking Brake(EPB) warning light
Engine oil pressure warning light
Charging system warning light
Immobilizer indicator
Malfunction IndicatorLamp (MIL)
Electronic Stability Control (ESC) OFF indicator
Cruise indicator
Lane Keeping Assist (LKA)
Adaptive Front Lighting System
AUTO HOLD indicator
Turn signal indicator
The Head-Up display is a transparent
display which projects an image of
selected information of the instrument
cluster and navigation onto the
windshield glass.
To activate the head up display, select
Head-Up Display in the User Settings
Mode in the LCD display.
Adjust Head-Up Display height until in
view.
HEAD-UP DISPLAY
Engine coolant temperature warning light
AWD warning light
NOTE: See Owner's Manual for more details on selecting content to
display on the Head Up Display.
FEATURES AND CONTROLS
GENESIS
Page 10 of 15
Quick Reference Guide I 1413 I Quick Reference Guide
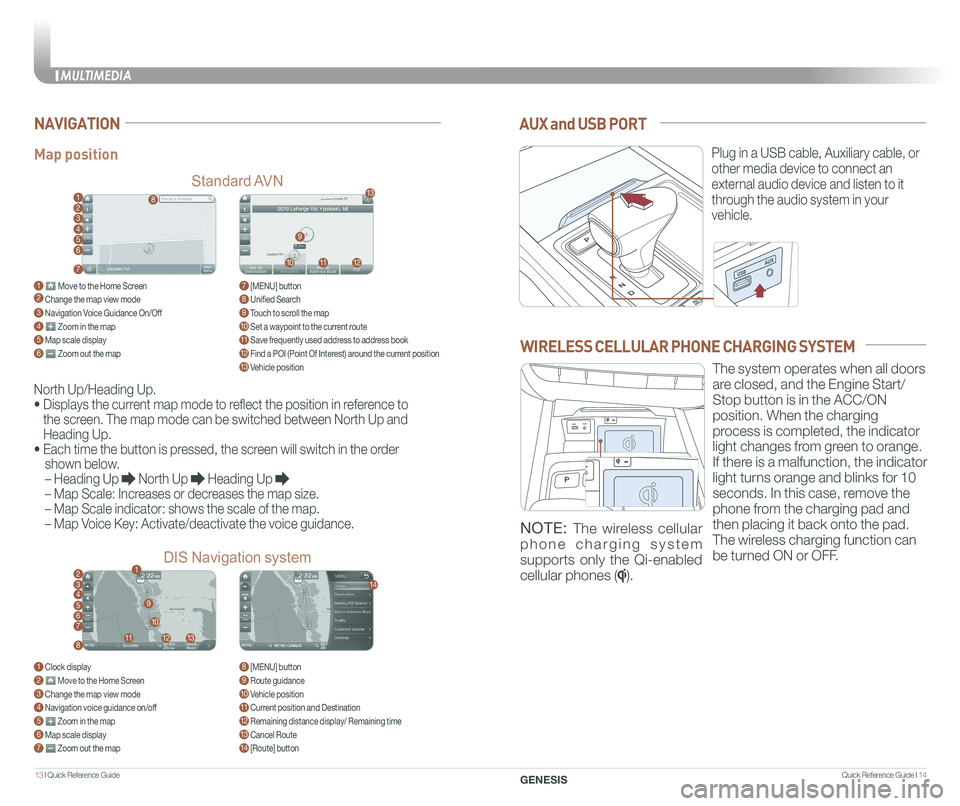
AUX and USB PORT
Plug in a USB cable, Auxiliary cable, or
other media device to connect an
external audio device and listen to it
through the audio system in your
vehicle.
Map position
Standard AVN
DIS Navigation system
NAVIGATION
North Up/Heading Up.
• Displays the current map mode to reflect the position in reference to
the screen. The map mode can be switched between North Up and
Heading Up.
• Each time the button is pressed, the screen will switch in the order
shown below.
– Heading Up North Up Heading Up
– Map Scale: Increases or decreases the map size.
– Map Scale indicator: shows the scale of the map.
– Map Voice Key: Activate/deactivate the voice guidance.
1 Move to the Home Screen2 Change the map view mode3 Navigation Voice Guidance On/Off4 Zoom in the map5 Map scale display6 Zoom out the map
1 Clock display2 Move to the Home Screen3 Change the map view mode4 Navigation voice guidance on/off5 Zoom in the map6 Map scale display7 Zoom out the map
7 [MENU] button 8 Unified Search9 Touch to scroll the map10 Set a waypoint to the current route11 Save frequently used address to address book12 Find a POI (Point Of Interest) around the current position13 Vehicle position
8 [MENU] button9 Route guidance10 Vehicle position11 Current position and Destination12 Remaining distance display/ Remaining time13 Cancel Route14 [Route] button
1
21
34567
81112
9
13
10
14
8
9
101112
13
23456
7
WIRELESS CELLULAR PHONE CHARGING SYSTEM
The system operates when all doors
are closed, and the Engine Start/
Stop button is in the ACC/ON
position. When the charging
process is completed, the indicator
light changes from green to orange.
If there is a malfunction, the indicator
light turns orange and blinks for 10
seconds. In this case, remove the
phone from the charging pad and
then placing it back onto the pad.
The wireless charging function can
be turned ON or OFF.
NOTE: The wireless cellular
phone charging system
supports only the Qi-enabled
cellular phones ().
MULTIMEDIA
GENESIS
Page 11 of 15
Quick Reference Guide I 1615 I Quick Reference Guide
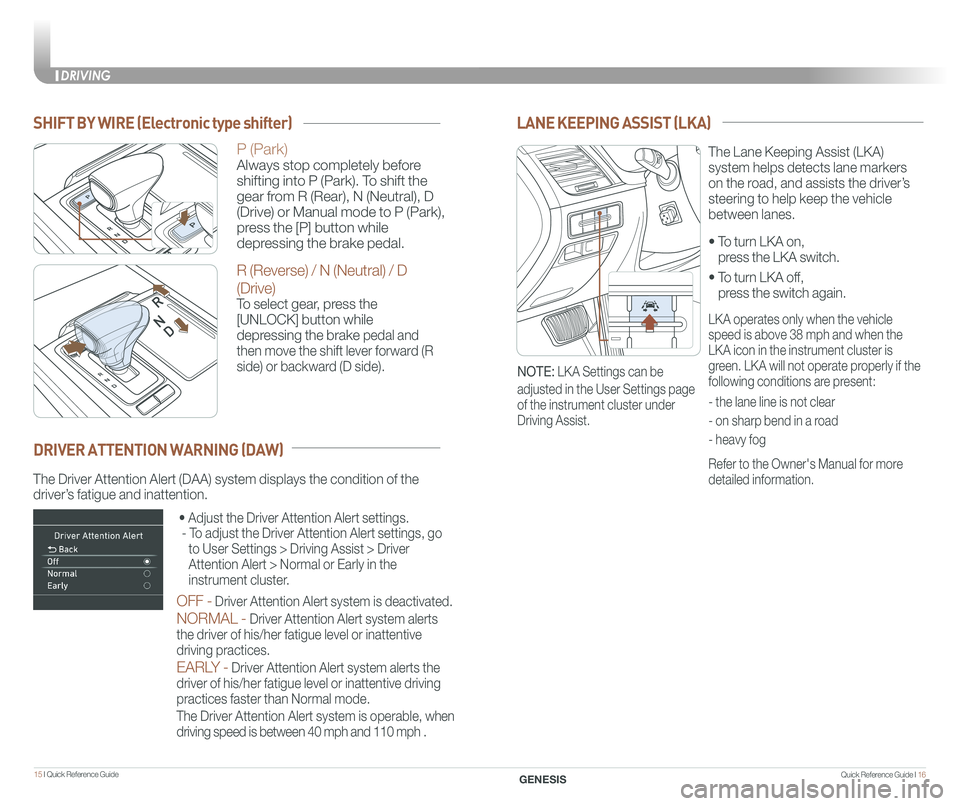
• To turn LKA on,
press the LKA switch.
• To turn LKA off,
press the switch again.
The Lane Keeping Assist (LKA)
system helps detects lane markers
on the road, and assists the driver’s
steering to help keep the vehicle
between lanes.
LANE KEEPING ASSIST (LKA)
LKA operates only when the vehicle
speed is above 38 mph and when the
LKA icon in the instrument cluster is
green. LKA will not operate properly if the
following conditions are present:
- the lane line is not clear
- on sharp bend in a road
- heavy fog
Refer to the Owner's Manual for more
detailed information.
NOTE: LKA Settings can be
adjusted in the User Settings page
of the instrument cluster under
Driving Assist.
The Driver Attention Alert (DAA) system displays the condition of the \
driver’s fatigue and inattention.
• Adjust the Driver Attention Alert settings.
- To adjust the Driver Attention Alert settings, go
to User Settings > Driving Assist > Driver
Attention Alert > Normal or Early in the
instrument cluster.
OFF - Driver Attention Alert system is deactivated.
NORMAL - Driver Attention Alert system alerts
the driver of his/her fatigue level or inattentive
driving practices.
EARLY - Driver Attention Alert system alerts the
driver of his/her fatigue level or inattentive driving
practices faster than Normal mode.
The Driver Attention Alert system is operable, when
driving speed is between 40 mph and 110 mph .
DRIVER ATTENTION WARNING (DAW)
SHIFT BY WIRE (Electronic type shifter)
P (Park)
Always stop completely before
shifting into P (Park). To shift the
gear from R (Rear), N (Neutral), D
(Drive) or Manual mode to P (Park),
press the [P] button while
depressing the brake pedal.
R (Reverse) / N (Neutral) / D
(Drive)
To select gear, press the
[UNLOCK] button while
depressing the brake pedal and
then move the shift lever forward (R
side) or backward (D side).
DRIVING
GENESIS
Page 13 of 15
Quick Reference Guide I 2019 I Quick Reference Guide
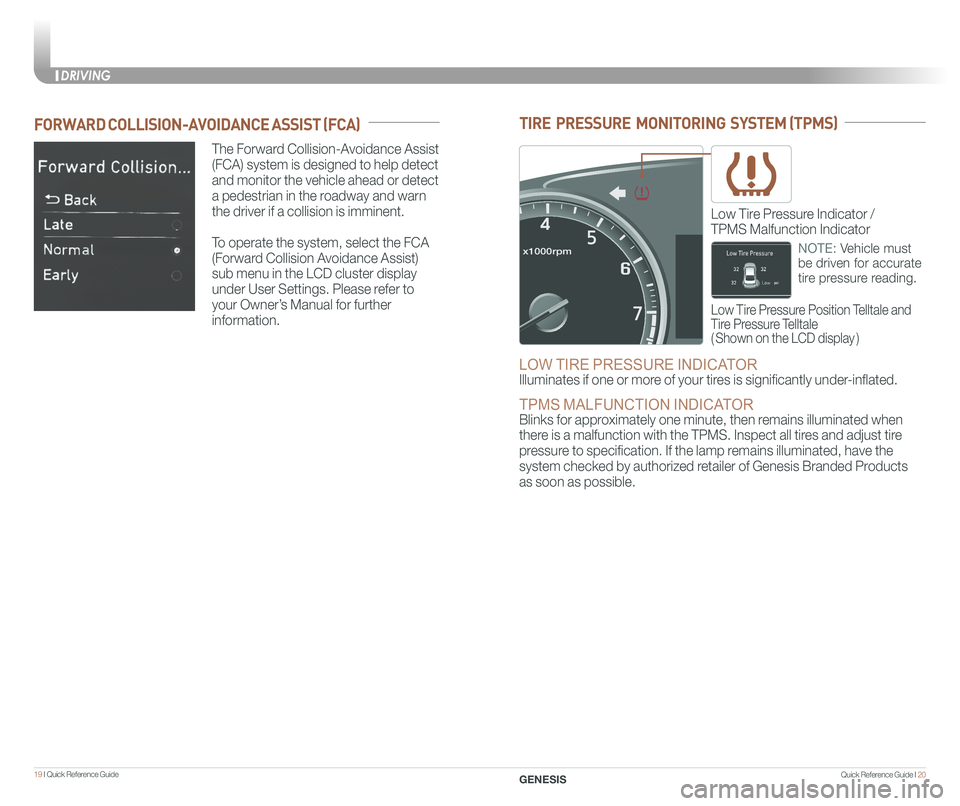
The Forward Collision-Avoidance Assist
(FCA) system is designed to help detect
and monitor the vehicle ahead or detect
a pedestrian in the roadway and warn
the driver if a collision is imminent.
To operate the system, select the FCA
(Forward Collision Avoidance Assist)
sub menu in the LCD cluster display
under User Settings. Please refer to
your Owner’s Manual for further
information.
FORWARD COLLISION-AVOIDANCE ASSIST (FCA)TIRE PRESSURE MONITORING SYSTEM (TPMS)
LOW TIRE PRESSURE INDICATOR
Illuminates if one or more of your tires is significantly under-inflated.
TPMS MALFUNCTION INDICATOR Blinks for approximately one minute, then remains illuminated when
there is a malfunction with the TPMS. Inspect all tires and adjust tire
pressure to specification. If the lamp remains illuminated, have the
system checked by authorized retailer of Genesis Branded Products
as soon as possible.
Low Tire Pressure Position Telltale and
Tire Pressure Telltale
( Shown on the LCD display )
Low Tire Pressure Indicator /
TPMS Malfunction Indicator
NOTE: Vehicle must
be driven for accurate
tire pressure reading.
DRIVING
GENESIS