check engine GENESIS G80 2021 Owner's Guide
[x] Cancel search | Manufacturer: GENESIS, Model Year: 2021, Model line: G80, Model: GENESIS G80 2021Pages: 604, PDF Size: 11.47 MB
Page 180 of 604

Convenient Features
5-42
Inside Rearview Mirror
Before driving your vehicle, check to
see that your inside rearview mirror is
properly positioned. Adjust the rearview
mirror so that the view through the rear
window is properly centered.
WARNING
Make sure your line of sight is not
obstructed. Do not place objects in the
rear seat, cargo area, or behind the rear
headrests which could interfere with
your vision through the rear window.
WARNING
To prevent serious injury during an
accident or deployment of the air bag,
do not modify the rearview mirror and
do not install a wide mirror.
WARNING
NEVER adjust the mirror while driving.
This may cause loss of vehicle control
resulting in an accident.
NOTICE
When cleaning the mirror, use a paper
towel or similar material dampened
with glass cleaner. Do not spray glass
cleaner directly on the mirror as this
may cause the liquid cleaner to enter
the mirror housing.
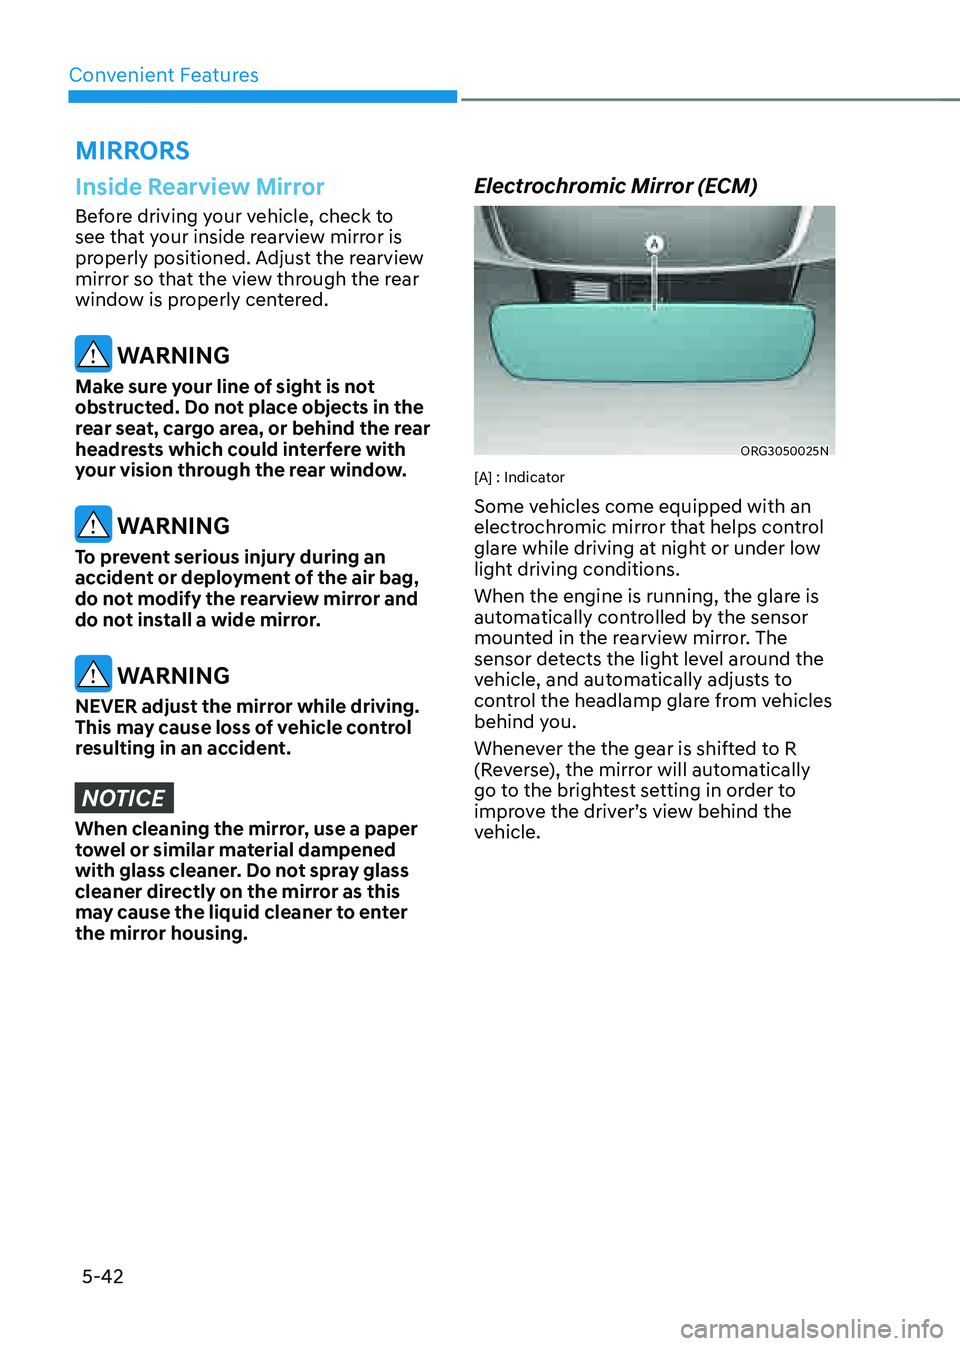
Electrochromic Mirror (ECM)
ORG3050025N
[A] : Indicator
Some vehicles come equipped with an
electrochromic mirror that helps control
glare while driving at night or under low
light driving conditions.
When the engine is running, the glare is
automatically controlled by the sensor
mounted in the rearview mirror. The
sensor detects the light level around the
vehicle, and automatically adjusts to
control the headlamp glare from vehicles
behind you.
Whenever the the gear is shifted to R
(Reverse), the mirror will automatically
go to the brightest setting in order to
improve the driver’s view behind the
vehicle.
MIRRORS
Page 198 of 604

Convenient Features
5-60
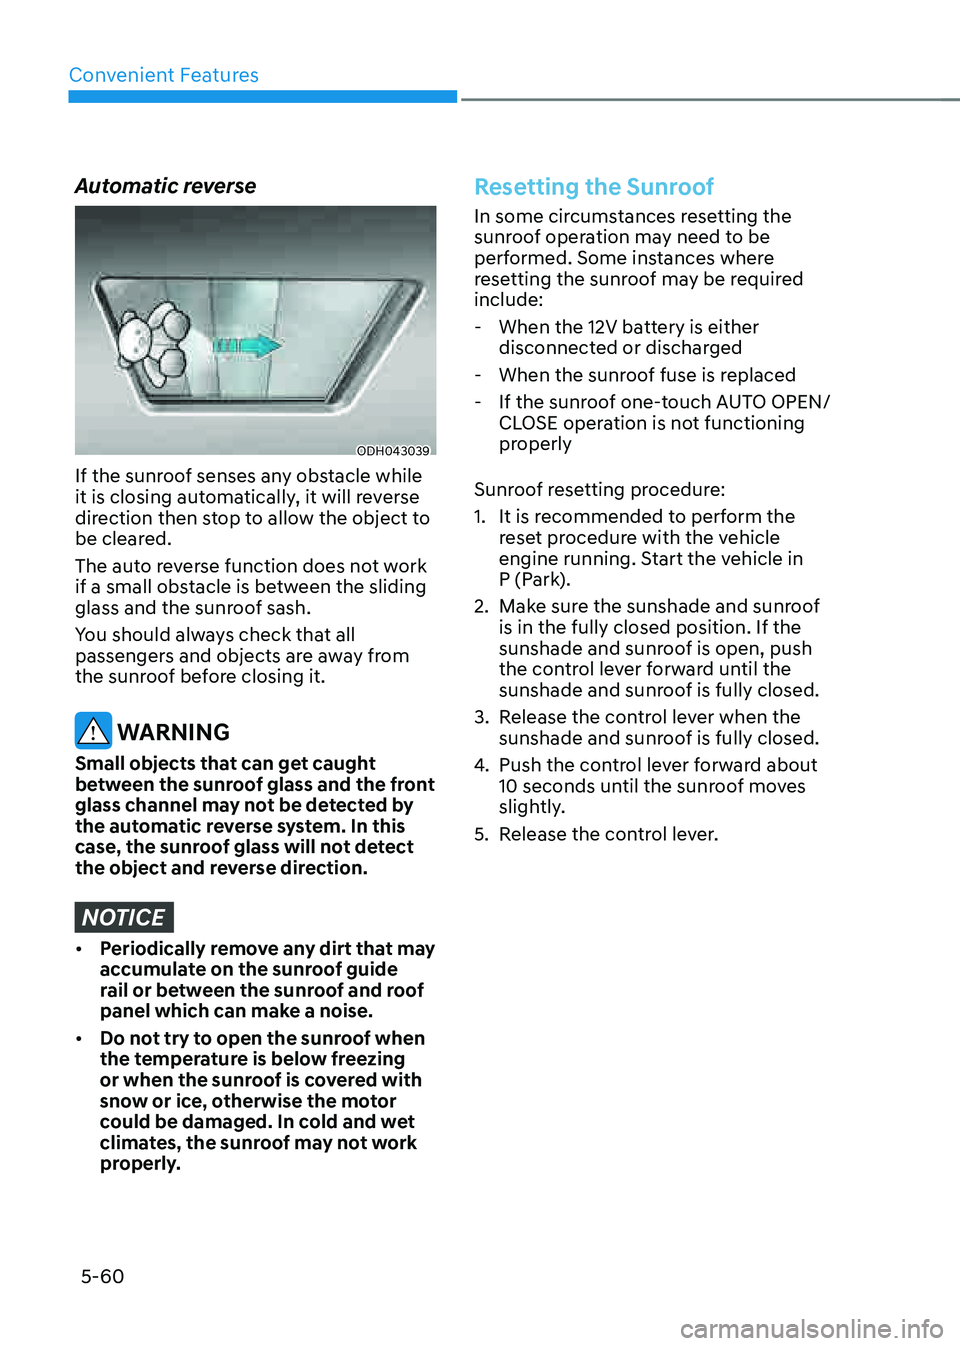
Automatic reverse
ODH043039
If the sunroof senses any obstacle while
it is closing automatically, it will reverse
direction then stop to allow the object to
be cleared.
The auto reverse function does not work
if a small obstacle is between the sliding
glass and the sunroof sash.
You should always check that all
passengers and objects are away from
the sunroof before closing it.
WARNING
Small objects that can get caught
between the sunroof glass and the front
glass channel may not be detected by
the automatic reverse system. In this
case, the sunroof glass will not detect
the object and reverse direction.
NOTICE
• Periodically remove any dirt that may
accumulate on the sunroof guide
rail or between the sunroof and roof
panel which can make a noise.
• Do not try to open the sunroof when
the temperature is below freezing
or when the sunroof is covered with
snow or ice, otherwise the motor
could be damaged. In cold and wet
climates, the sunroof may not work
properly.
Resetting the Sunroof
In some circumstances resetting the
sunroof operation may need to be
performed. Some instances where
resetting the sunroof may be required
include:
-When the 12V battery is either
disconnected or discharged
-When the sunroof fuse is replaced
-If the sunroof one-touch AUTO OPEN/
CLOSE operation is not functioning
properly
Sunroof resetting procedure:
1. It is recommended to perform the
reset procedure with the vehicle
engine running. Start the vehicle in
P (Park).
2. Make sure the sunshade and sunroof
is in the fully closed position. If the
sunshade and sunroof is open, push
the control lever forward until the
sunshade and sunroof is fully closed.
3. Release the control lever when the
sunshade and sunroof is fully closed.
4. Push the control lever forward about
10 seconds until the sunroof moves
slightly.
5. Release the control lever.
Page 200 of 604

Convenient Features
5-62
Hood
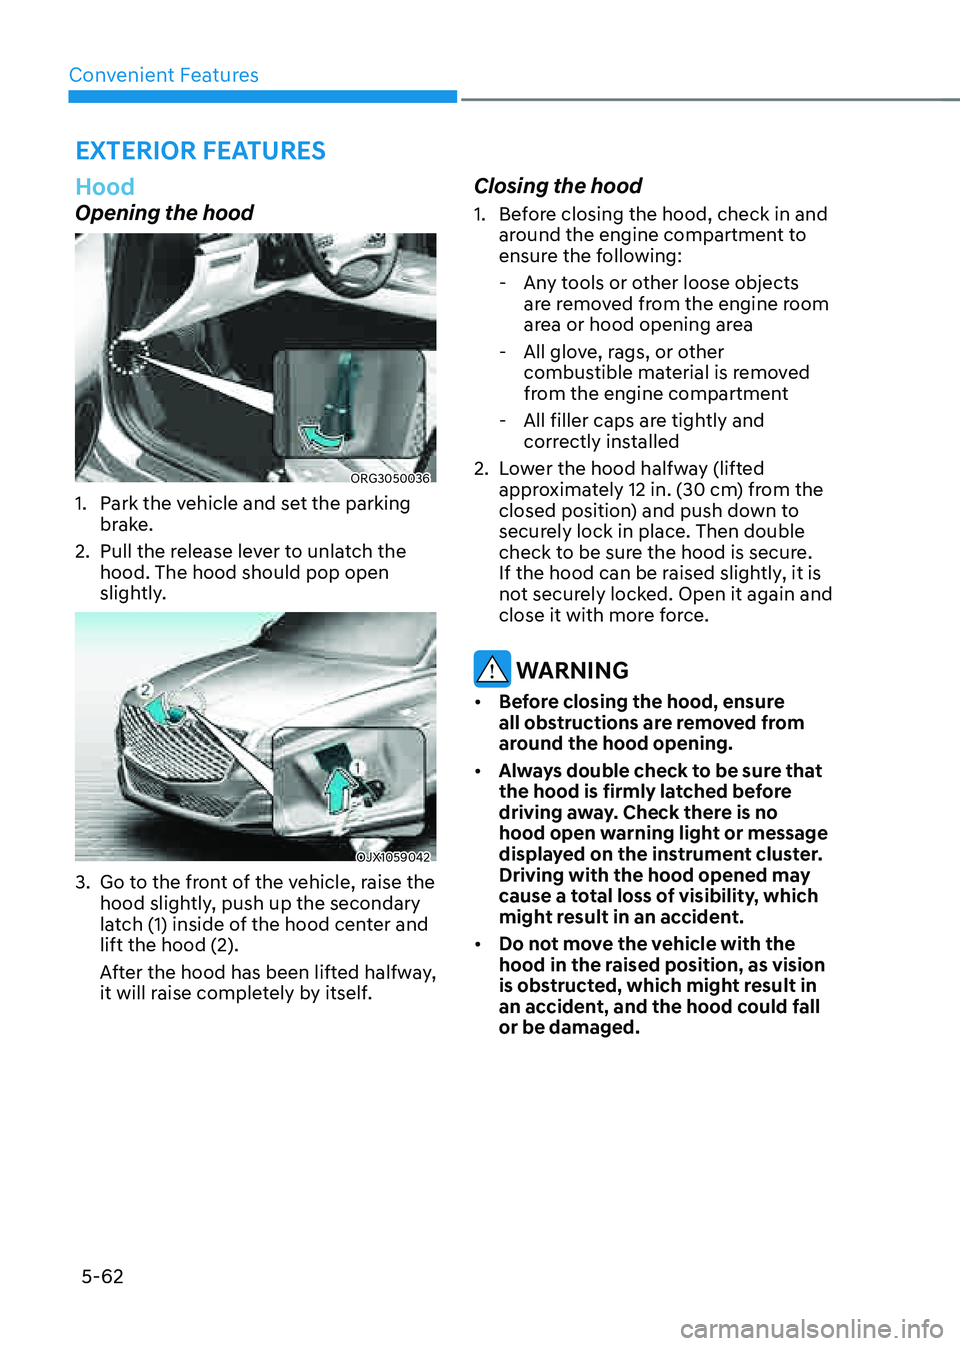
Opening the hood
ORG3050036
1. Park the vehicle and set the parking
brake.
2. Pull the release lever to unlatch the
hood. The hood should pop open
slightly.
OJX1059042
3. Go to the front of the vehicle, raise the
hood slightly, push up the secondary
latch (1) inside of the hood center and
lift the hood (2).
After the hood has been lifted halfway,
it will raise completely by itself.
Closing the hood
1. Before closing the hood, check in and
around the engine compartment to
ensure the following:
-Any tools or other loose objects
are removed from the engine room
area or hood opening area
-All glove, rags, or other
combustible material is removed
from the engine compartment
-All filler caps are tightly and
correctly installed
2. Lower the hood halfway (lifted
approximately 12 in. (30 cm) from the
closed position) and push down to
securely lock in place. Then double
check to be sure the hood is secure.
If the hood can be raised slightly, it is
not securely locked. Open it again and
close it with more force.
WARNING
• Before closing the hood, ensure
all obstructions are removed from
around the hood opening.
• Always double check to be sure that
the hood is firmly latched before
driving away. Check there is no
hood open warning light or message
displayed on the instrument cluster.
Driving with the hood opened may
cause a total loss of visibility, which
might result in an accident.
• Do not move the vehicle with the
hood in the raised position, as vision
is obstructed, which might result in
an accident, and the hood could fall
or be damaged.
EXTERIOR FEATURES
Page 212 of 604

Convenient Features
5 -74
WARNING
Gasoline is highly flammable and
explosive. Failure to follow these
guidelines may result in SERIOUS
INJURY or DEATH:
• Read and follow all warnings posted
at the gas station.
• Before refueling, note the location of
the Emergency Gasoline Shut-Off, if
available, at the gas station.
• Before touching the fuel nozzle, you
should eliminate the potential build-
up of static electricity by touching
a metal part of the vehicle, a safe
distance away from the fuel filler
neck, nozzle, or other gas source,
with your bare hand.
• Do not use mobile phones while
refueling. Electric current and/or
electronic interference from cellular
phones can potentially ignite fuel
vapors and cause a fire.
• Do not go back into the vehicle
once you have begun refueling.
You can generate a buildup of
static electricity by touching,
rubbing or sliding against any item
or fabric capable of producing
static electricity. Static electricity
discharge can ignite fuel vapors
causing a fire. If you must re-enter
the vehicle, you should once again
eliminate potentially dangerous
static electricity discharge by
touching a metal part of the vehicle,
away from the fuel filler neck, nozzle
or other Gasoline source, with your
bare hand.
• When using an approved portable
fuel container, be sure to place the
container on the ground prior to
refueling. Static electricity discharge
from the container can ignite fuel
vapors causing a fire.
Once refueling has begun, contact
between your bare hand and the
vehicle should be maintained until
the filling is complete.
• Use only approved portable plastic
fuel containers designed to carry and
store Gasoline.
• When refueling, always shift the
gear to the P (Park) position, set
the parking brake, and press the
Engine Start/Stop button to the
OFF position. Sparks produced by
electrical components related to the
engine can ignite fuel vapors causing
a fire.
• Do not use matches or a lighter and
do not smoke or leave a lit cigarette
in your vehicle while at a gas station,
especially during refueling.
• Do not over-fill or top-off your
vehicle tank, which can cause
Gasoline spillage.
• If a fire breaks out during refueling,
leave the vicinity of the vehicle, and
immediately contact the manager
of the gas station and then contact
the local fire department. Follow any
safety instructions they provide.
• If pressurized fuel sprays out, it can
cover your clothes or skin and thus
subject you to the risk of fire and
burns. Always remove the fuel cap
carefully and slowly. If the cap is
venting fuel or if you hear a hissing
sound, wait until the condition stops
before completely removing the cap.
• Always check that the fuel cap is
installed securely to prevent fuel
spillage in the event of an accident.
Page 229 of 604

05
5-91
AUTO (Automatic) control
ORG3050065
The rain sensor located on the upper
end of the windshield glass senses
the amount of rainfall and controls the
wiping cycle for the proper interval.
The wiper operation time will be
automatically controlled depends on
rainfall.
When the rain stops, the wiper stops.
To vary the sensitivity setting, turn the
sensitivity control knob.
If the wiper switch is set in AUTO mode
when the Engine Start/Stop button is in
the ON position, the wiper will operate
once to perform a self-check of the
system. Set the wiper to the OFF position
when the wiper is not in use.
WARNING
To avoid personal injury from the
windshield wipers, when the engine
is running and the windshield wiper
switch is placed in the AUTO mode:
• Do not touch the upper end of the
windshield glass facing the rain
sensor.
• Do not wipe the upper end of the
windshield glass with a damp or wet
cloth.
• Do not put pressure on the
windshield glass.
NOTICE
• When washing the vehicle, set the
wiper switch in the OFF position to
stop the auto wiper operation. The
wiper may operate and be damaged
if the switch is set in the AUTO mode
while washing the vehicle.
• Do not remove the sensor cover
located on the upper end of the
passenger side windshield glass.
Damage to system components
could occur and may not be covered
by your vehicle warranty.
• Because of using a photo sensor,
temporary malfunction could occur
according to sudden ambient light
change made by stone and dust
while driving.
Page 246 of 604

Convenient Features
5-108
WINDSHIELD DEFROSTING AND DEFOGGING
WARNING
Windshield heating
Do not use the
position during cooling operation in extremely humid
weather. The difference between the
temperature of the outside air and that
of the windshield could cause the outer
surface of the windshield to fog up,
causing loss of visibility could cause
an accident resulting in serious injury
or death. In this case, set the mode
selection button to the
position and fan speed control knob to a lower
speed.
• For maximum defrost performance,
set the temperature control to the
highest temperature setting and
the fan speed control to the highest
setting.
• If warm air to the floor is desired while
defrosting or defogging, set the mode
to the floor-defrost position.
• Before driving, clear all snow and ice
from the windshield, rear window,
side view mirrors, and all side
windows.
• Clear all snow and ice from the
hood and air inlet in the cowl grill
to improve heater and defroster
efficiency and to reduce the
probability of fogging up the inside of
the windshield.
NOTICE
If the engine temperature is still cold
after starting, then a brief engine warm
up period may be required for the
vented air flow to become warm or hot.
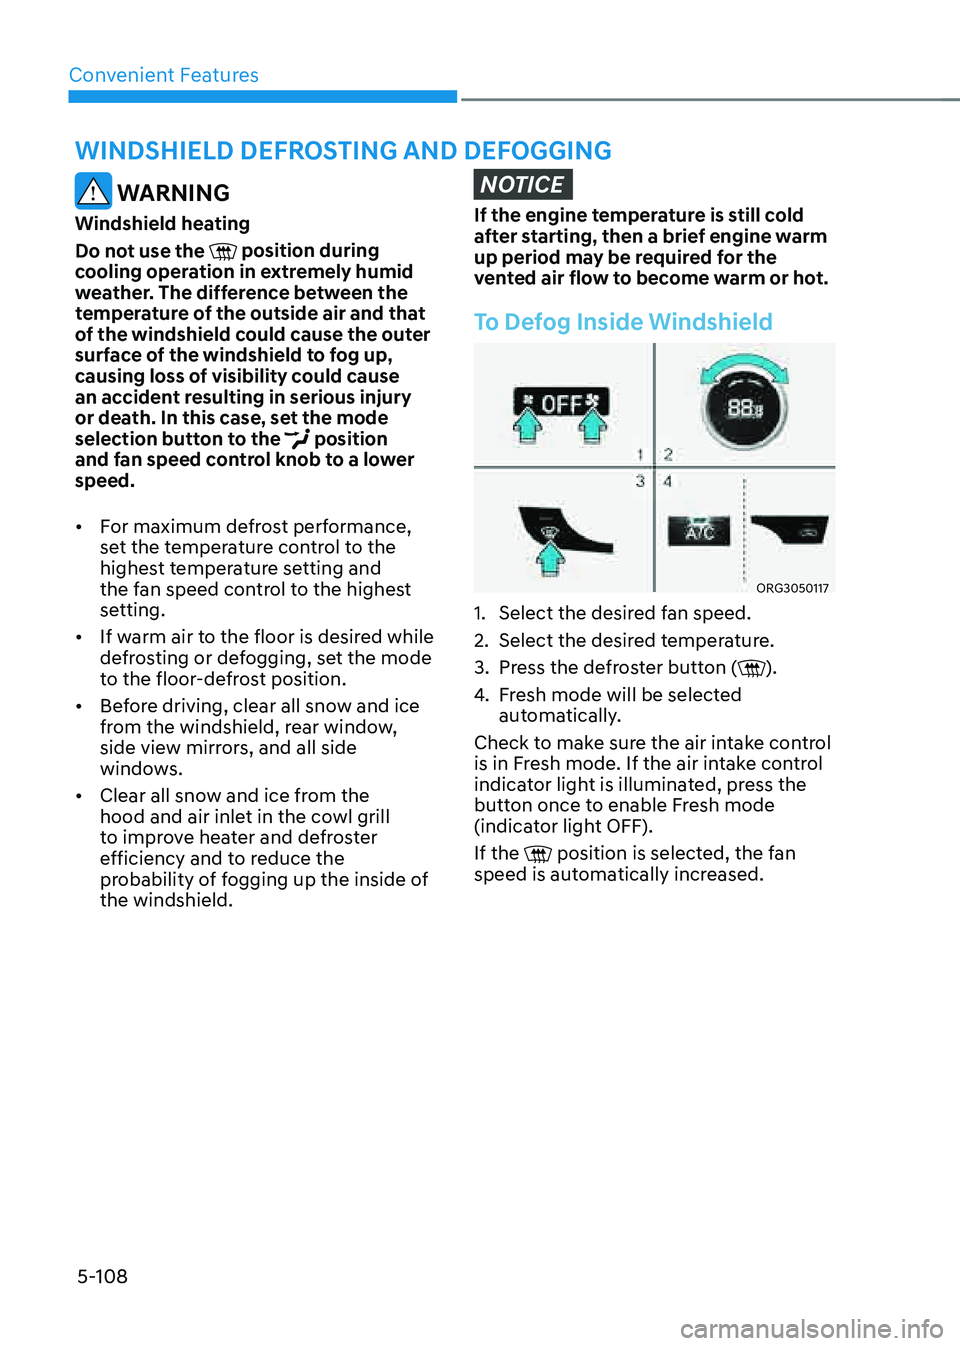
To Defog Inside Windshield
ORG3050117
1. Select the desired fan speed.
2. Select the desired temperature.
3. Press the defroster button ().
4. Fresh mode will be selected
automatically.
Check to make sure the air intake control
is in Fresh mode. If the air intake control
indicator light is illuminated, press the
button once to enable Fresh mode
(indicator light OFF).
If the
position is selected, the fan speed is automatically increased.
Page 247 of 604

05
5-109
To Defrost Inside Windshield
ORG3050118
1. Set the fan speed to the highest
(extreme right) position.
2. Set the temperature to the extreme
hot (HI) position.
3. Press the defroster button ().
4. Fresh mode will be selected
automatically.
Check to make sure the air intake control
is in Fresh mode. If the air intake control
indicator light is illuminated, press the
button once to enable Fresh mode
(indicator light OFF).
If the
position is selected, lower fan speed is adjusted to a higher fan speed.
Defogging Logic
To reduce the probability of fogging
up the inside of the windshield, the air
intake or air conditioning are controlled
automatically according to certain
conditions such as
positions. To cancel or reset the defogging logic, do
the following.
1. Press the Engine Start/Stop button to
the ON position.
2. Press the defroster button () or
().
3. While pressing the air conditioning
button (A/C), press the air intake
control button at least 5 times within
3 seconds.
The air intake control button indicator
will blink 3 times to indicate that the
defogging logic has been disabled.
Repeat the steps again to re-enable the
defogging logic.
If the battery has been discharged or
disconnected, it resets to the defog logic
status.
Page 257 of 604

05
5-119
USB Charger
ORG3050075
The USB charger is designed to recharge
batteries of small size electrical devices
using a USB cable.
The electrical devices can be recharged
when the Engine Start/Stop button is in
the ACC or ON (or START) position.
The battery charging state may be
monitored on the electrical device.
Disconnect the USB cable from the USB
port after use.
• A smart phone or a tablet PC may
get warmer during the re-charging
process. It does not indicate any
malfunction with the charging system.
• A smart phone or a tablet PC, which
adopts a different re-charging
method, may not be properly re-
charged. In this case, use an exclusive
charger of your device.
• The charging terminal is only to
recharge a device. Do not use the
charging terminal either to turn ON
an audio or to play media In the
infotainment system.
Wireless Smart Phone Charging
System (if equipped)
ORG3050076
[A] : Indicator light, [B] : Charging pad
On certain models, the vehicle comes
equipped with a wireless smart phone
charger.
The system is available when all doors
are closed, and when the Engine Start/
Stop button is in the ON (or START)
position.
Charging smart phone
The wireless smart phone charging
system charges only the Qi-enabled
smart phones (
). Read the label on
the smart phone accessory cover or
visit your smart phone manufacturer’s
website to check whether your smart
phone supports the Qi technology.
The wireless charging process starts
when you put a Qi-enabled smart phone
on the wireless charging unit.
1. Remove other items, including the
smart key, from the wireless charging
unit. If not, the wireless charging
process may be interrupted. Place
the smart phone on the center of the
charging pad.
Page 268 of 604

06
6-3
WARNING
Carbon monoxide (CO) gas is toxic. Breathing CO can cause unconsciousness and
death.
Engine exhaust contains carbon monoxide which cannot be seen or smelled.
Do not inhale engine exhaust.
If at any time you smell engine exhaust inside the vehicle, open the windows
immediately. Exposure to CO can cause unconsciousness and death by asphyxiation.
Be sure the exhaust system does not leak.
The exhaust system should be checked whenever the vehicle is raised to change the
oil or for any other purpose. If you hear a change in the sound of the exhaust or if you
drive over something that strikes the underneath side of the vehicle, have the exhaust
system checked as soon as possible by an authorized retailer of Genesis Branded
products.
Do not run the engine in an enclosed area.
Letting the engine idle in your garage, even with the garage door open, is a hazardous
practice. Run the engine only long enough to start the engine and to move the vehicle
out of the garage.
Avoid idling the engine for prolonged periods with people inside the vehicle.
If it is necessary to idle the engine for a prolonged period with people inside the
vehicle, be sure to do so only in an open area with the air intake set at “Fresh” and fan
control set to high so fresh air is drawn into the interior.
Keep the air intakes clear.
To assure proper operation of the ventilation system, keep the ventilation air intakes
located in front of the windshield clear of snow, ice, leaves, or other obstructions.
If you must drive with the trunk open:
Close all windows.
Open instrument panel air vents.
Set the air intake control at “Fresh”, the air flow control at “Floor” or “Face”, and the fan
control set to high.
WARNING
CALIFORNIA PROPOSITION 65 WARNING
Engine exhaust and a wide variety of automobile components including
components found in the interior furnishings in a vehicle, contain or emit harmful
chemicals known to the State of California to cause cancer and birth defects and
reproductive harm. In addition, certain fluids contained in vehicles and certain
products of components contain or emit chemicals known to the State of California
to cause cancer and birth defects or other reproductive harm.
Page 271 of 604

Driving Your Vehicle
6-6
Engine Stop/Start Button Positions
Button PositionAction Notes
OFF To turn off the engine, press the
Engine Start/Stop button with the
vehicle shifted to P (Park).
Note if the Engine Start/Stop
button is pressed with the vehicle
shifted to D (Drive) or R (Reverse),
the gear will automatically shift to
P (Park).
If the Engine Start/Stop button is
pressed with the gear shifted to
N (Neutral), the Engine Start/Stop
button will change to the ACC
position.
ACC Press the Engine Start/Stop button
when the button is in the OFF
position without depressing the
brake pedal.
Some of the electrical accessories
are usable. If you leave the Engine Start/Stop
button in the ACC position for
more than one hour, the battery
power will turn off automatically
to prevent the battery from
discharging.
ON Press the Engine Start/Stop button
while it is in the ACC position
without depressing the brake
pedal.
The warning lights can be checked
before the engine is started. Do not leave the Engine Start/Stop
button in the ON position when the
engine is not running to prevent
the battery from discharging.
START To start the engine, depress the
brake pedal and press the Engine
Start/ Stop button with the gear
shifted to the P (Park) or the N
(Neutral) position.
For your safety, start the engine
with the gear shifted to the P
(Park) position. If you press the Engine Start/Stop
button without depressing the
brake pedal, the engine does not
start and the Engine Start/Stop
button changes as follows:
OFF → ACC → ON → OFF or ACC
Ã
To prevent vehicle battery discharge, the Engine Start/Stop button changes to the
OFF position when the Engine Start/Stop button is in the ACC or ON position with
the gear in P (Park) for a certain period of time. When the function operates, the tail
lamps will turn off. To use the tail lamps again, turn the headlamp switch located on
the steering column to the OFF and ON position again.