air condition GENESIS G80 2021 Owner's Guide
[x] Cancel search | Manufacturer: GENESIS, Model Year: 2021, Model line: G80, Model: GENESIS G80 2021Pages: 604, PDF Size: 11.47 MB
Page 247 of 604

05
5-109
To Defrost Inside Windshield
ORG3050118
1. Set the fan speed to the highest
(extreme right) position.
2. Set the temperature to the extreme
hot (HI) position.
3. Press the defroster button ().
4. Fresh mode will be selected
automatically.
Check to make sure the air intake control
is in Fresh mode. If the air intake control
indicator light is illuminated, press the
button once to enable Fresh mode
(indicator light OFF).
If the
position is selected, lower fan speed is adjusted to a higher fan speed.
Defogging Logic
To reduce the probability of fogging
up the inside of the windshield, the air
intake or air conditioning are controlled
automatically according to certain
conditions such as
positions. To cancel or reset the defogging logic, do
the following.
1. Press the Engine Start/Stop button to
the ON position.
2. Press the defroster button () or
().
3. While pressing the air conditioning
button (A/C), press the air intake
control button at least 5 times within
3 seconds.
The air intake control button indicator
will blink 3 times to indicate that the
defogging logic has been disabled.
Repeat the steps again to re-enable the
defogging logic.
If the battery has been discharged or
disconnected, it resets to the defog logic
status.
Page 249 of 604

05
5-111
Auto Defogging System
ORG3050065
Auto defogging helps reduce the
possibility of fogging up the inside of the
windshield by automatically sensing the
moisture on inside the windshield.
The auto defogging system operates
when the heater or air conditioning is on.
Information
The auto defogging system may not
operate normally, when the outside
temperature is below 14 °F (-10 °C).
When the Auto Defogging System operates, the indicator
will illuminate.
If a high amount of humidity is detected
in the vehicle, the Auto Defogging
System will be enabled. The following
steps will be performed automatically:
Step 1) Air conditioning will turn ON.
Step 2) Air intake control will change to
Fresh mode.
Step 3) Fan speed will be set to MAX.
Step 4) Mode will change to defrost to
direct airflow to the windshield.
If the air conditioning is off or
recirculation mode is manually selected
while Auto Defogging System is ON, the
Auto Defogging System indicator will
blink 3 times to signal that the manual
operation has been canceled.
CLIMATE CONTROL ADDITIONAL FEATURES
Page 250 of 604

Convenient Features
5-112
Turning the Auto Defogging System
ON or OFF
Climate control system
Press the front windshield defroster
button for 3 seconds when the Engine
Start/Stop button is in the ON position.
When the Auto Defogging System is
turned off, the ADS OFF symbol will blink
3 times and ADS OFF will be displayed on
the climate control information screen.
When the Auto Defogging System is
turned on, the ADS OFF symbol will blink
6 times without a signal.
Infotainment system
Auto Defogging System can be turned
on and off by selecting ‘Setup →
Vehicle Settings → Climate → Defog/
Defrost Options → Auto Defog’ from the
infotainment system screen.
For detailed information, refer to the
separately supplied manual.
Information
• When the air conditioning is turned
on by Auto Defogging System, if you
try to turn off the air conditioning, the
indicator will blink 3 times and the air
conditioning will not be turned off.
• To maintain the effectiveness and
efficiency of the Auto Defogging
System, do not select Recirculation
mode while the system is operating.
• When Auto Defogging System is
operating, fan speed adjustment,
temperature adjustment, and air intake
control selection are all disabled.
NOTICE
Do not remove the sensor cover located
on the upper end of the windshield
glass.
Damage to system parts could occur
and may not be covered by your vehicle
warranty.
Auto Dehumidify (if equipped)
To increase cabin air quality and reduce
windshield misting, recirculation mode
switches off automatically after about 5
to 30 minutes, depending on the outside
temperature, and the air intake will
change to fresh mode.
Turning Auto Dehumidify ON or OFF
Climate control system
To turn the Auto Dehumidify feature
on or off, select Face level (
) mode
and press the air intake control ()
button at least five times within three
seconds. When Auto Dehumidify is
turned on, the air intake control button
indicator will blink 6 times. When turned
off, the indicator will blink 3 times.
Infotainment system
Auto Dehumidify can be turned on and
off by selecting ‘Setup → Vehicle Settings
→ Climate → Automatic Ventilation →
Auto Dehumidify’ from the infotainment
system screen.
For detailed information, refer to the
separately supplied manual.
Page 256 of 604

Convenient Features
5-118
Power Outlet
ORG3050074
The power outlet is designed to provide
power for mobile telephones or other
devices designed to operate with vehicle
electrical systems. The devices should
draw less than 180 watts with the engine
running.
WARNING
Avoid electrical shocks. Do not place
your fingers or foreign objects (pin, etc.)
into a power outlet or touch the power
outlet with a wet hand.
NOTICE
To prevent damage to the Power
Outlets:
• Use the power outlet only when the
engine is running and remove the
accessory plug after use. Using the
accessory plug for prolonged periods
of time with the engine off could
cause the battery to discharge.
• Only use 12 volts electric accessories
which are less than 180 watts in
electric capacity.
• Adjust the air-conditioner or heater
to the lowest operating level when
using the power outlet.
• Close the cover when not in use.
• Some electronic devices can
cause electronic interference
when plugged into a vehicle’s
power outlet. These devices may
cause excessive audio static and
malfunctions in other electronic
systems or devices used in your
vehicle.
• Push the plug in as far as it will go. If
good contact is not made, the plug
may overheat and the fuse may open.
• Plug in battery equipped electrical/
electronic devices with reverse
current protection. The current
from the battery may flow into the
vehicle’s electrical/electronic system
and cause system malfunction.
Page 286 of 604

06
6-21
Power-Assist brakes
Your vehicle has power-assisted brakes
that adjust automatically through normal
usage.
If the engine is not running or is turned
off while driving, the power assist for
the brakes will not work. You can still
stop your vehicle by applying greater
force to the brake pedal than typical.
The stopping distance, however, will be
longer than with power brakes.
When the engine is not running, the
reserve brake power is partially depleted
each time the brake pedal is applied.
Do not pump the brake pedal when the
power assist has been interrupted.
WARNING
Take the following precautions:
• Do not drive with your foot resting
on the brake pedal. This will create
abnormal high brake temperatures,
excessive brake lining and pad wear,
and increased stopping distances.
• When descending down a long or
steep hill, use the paddle shifter
and manually downshift to a
lower gear in order to control your
speed without using the brake
pedal excessively. Applying the
brakes continuously will cause
the brakes to overheat and could
result in a temporary loss of braking
performance.
• Wet brakes may impair the vehicle's
ability to safely slow down; the
vehicle may also pull to one side
when the brakes are applied.
Applying the brakes lightly will
indicate whether they have been
affected in this way. Always test your
brakes in this fashion after driving
through deep water. To dry the
brakes, lightly tap the brake pedal to
heat up the brakes while maintaining
a safe forward speed until brake
performance returns to normal.
Avoid driving at high speeds until the
brakes function correctly.
Disc Brakes Wear Indicator
When your brake pads are worn and new
pads are required, you will hear a high
pitched warning sound from your front
or rear brakes. You may hear this sound
come and go or it may occur whenever
you depress the brake pedal.
Note that some driving conditions or
climates may cause a brake squeal
when you first apply (or lightly apply)
the brakes. This is normal and does not
indicate a problem with your brakes.
NOTICE
To avoid costly brake repairs, do not
continue to drive with worn brake pads.
Information
Always replace brake pads as complete
front or rear axle sets.
BRAKING SYSTEM
Page 311 of 604

Driving Your Vehicle
6-46
Forced to Restart Engine
The engine is automatically restarted in
the following situations.
• The engine has stopped for about 5
minutes
• The air conditioning is ON with the
fan speed set to higher positon than
7 step
• The front defroster is ON
• The battery is weak
• The cooling and heating performance
of the climate control system is
unsatisfactory
• The vehicle is shifted to P (Park) when
Auto Hold is activated
• The door is opened or the seatbelt
is unfastened when Auto Hold is
activated
• The EPB switch is pressed when Auto
Hold is activated
The Auto Stop (
) indicator blinks in
green for 5 seconds on the instrument
cluster when the engine is restarted.
WARNING
When the engine is in Idle Stop mode,
the engine may restart without the
driver taking any action. Before leaving
the vehicle or working on the engine
compartment, turn off the engine by
pressing the ENGINE START/STOP
button to the OFF position.
ISG Malfunction
ISG system may not operate when there
is a malfunction with the ISG sensors or
ISG system.
The following will occur, when there is a
malfunction with the ISG system:
• The Auto Stop () indicator will blink
in yellow on the instrument cluster.
• The light on the ISG OFF button will
illuminate.
Contact an authorized retailer of Genesis
Branded products.
NOTICE
ORG3060023L[A] : Battery sensor
When a battery is disconnected then
reconnected or replaced, the ISG
system cannot operate until after 4
hours due to required battery sensor
calibration that has to occur.
After calibration, turn the engine on and
off 2 or 3 times.
Page 314 of 604

06
6-49
ORG3060024
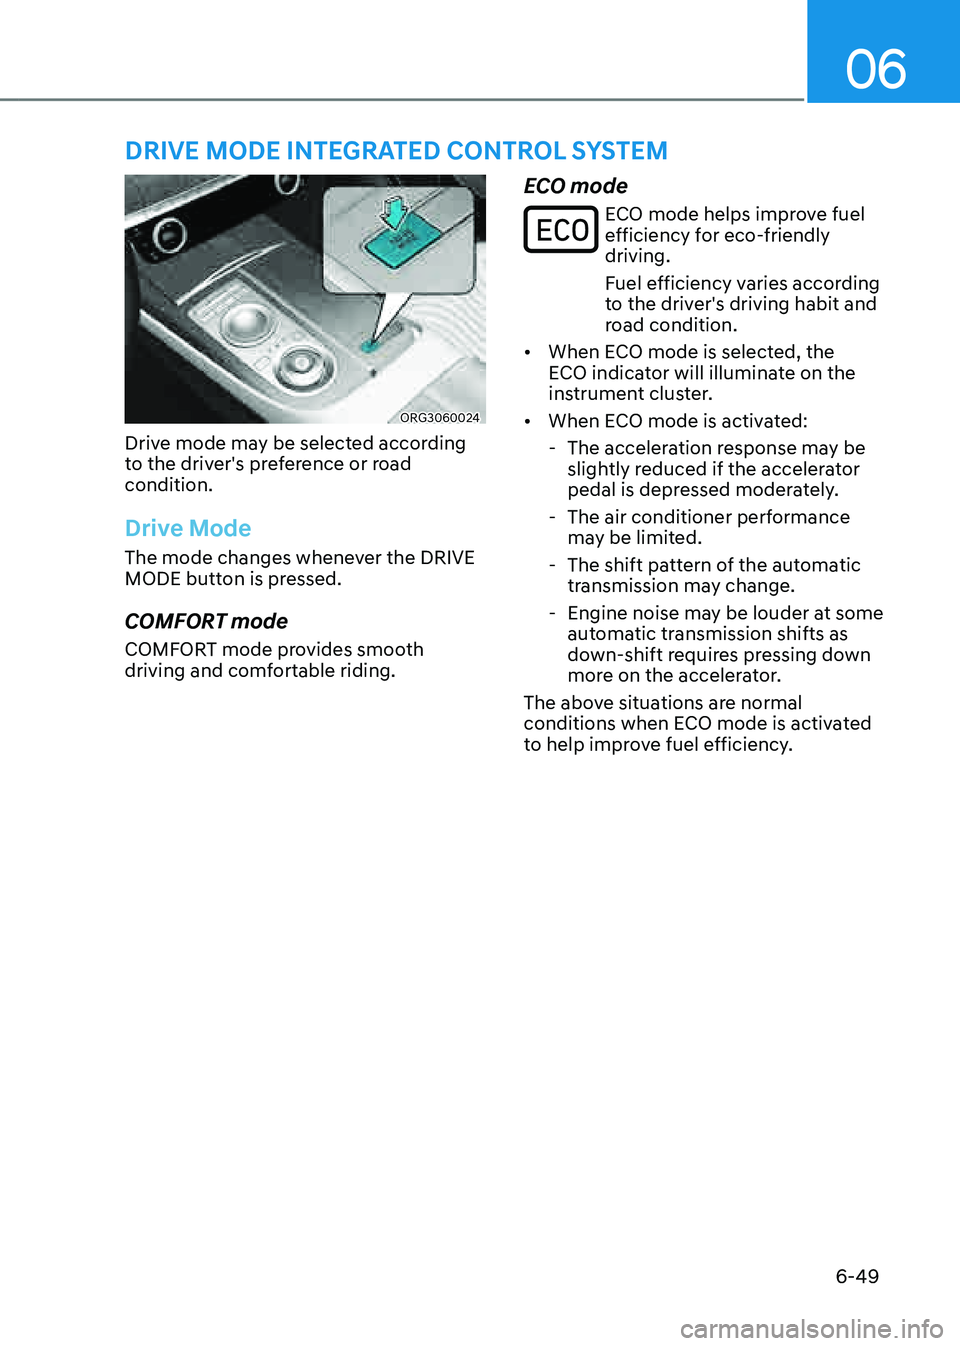
Drive mode may be selected according
to the driver's preference or road
condition.
Drive Mode
The mode changes whenever the DRIVE
MODE button is pressed.
COMFORT mode
COMFORT mode provides smooth
driving and comfortable riding.
ECO mode
ECO mode helps improve fuel efficiency for eco-friendly
driving.
Fuel efficiency varies according
to the driver's driving habit and
road condition.
• When ECO mode is selected, the
ECO indicator will illuminate on the
instrument cluster.
• When ECO mode is activated:
-The acceleration response may be
slightly reduced if the accelerator
pedal is depressed moderately.
-The air conditioner performance
may be limited.
-The shift pattern of the automatic
transmission may change.
-Engine noise may be louder at some
automatic transmission shifts as
down-shift requires pressing down
more on the accelerator.
The above situations are normal
conditions when ECO mode is activated
to help improve fuel efficiency.
DRIVE MODE INTEGRATED CONTROL SYSTEM
Page 348 of 604

Driver Assistance system
7-20
• The pedestrian or cyclist is not
fully detected, for example, if the
pedestrian is leaning over or is not
fully walking upright
• The pedestrian or cyclist is wearing
clothing or equipment that makes it
difficult to detect as a pedestrian or
cyclist
• The pedestrian or cyclist in front is
moving very quickly
• The pedestrian or cyclist in front is
short or is posing a low posture
• The pedestrian or cyclist in front has
impaired mobility
• The pedestrian or cyclist in front is
moving intersected with the driving
direction
• There is a group of pedestrians,
cyclists or a large crowd in front
• The pedestrian or cyclist is wearing
clothing that easily blends into the
background, making it difficult to
detect
• The pedestrian or cyclist is difficult to
distinguish from the similar shaped
structure in the surroundings
• You are driving by a pedestrian,
cyclist, traffic signs, structures, etc.
near the intersection
• Driving in a parking lot
• Driving through a tollgate,
construction area, unpaved road,
partial paved road, uneven road,
speed bumps, etc.
• Driving on an incline road, curved
road, etc.
• Driving through a roadside with trees
or streetlights
• The adverse road conditions cause
excessive vehicle vibrations while
driving
• Your vehicle height is low or high
due to heavy loads, abnormal tire
pressure, etc.
• Driving through a narrow road where
trees or grass or overgrown
• There is interference by
electromagnetic waves, such as
driving in an area with strong radio
waves or electrical noise
Junction Crossing, Lane-Change
Oncoming, Lane-Change Side, Evasive
Steering Assist function (if equipped)
• The temperature around the front
corner radar or rear corner radar is
high or low
• A trailer or carrier is installed around
the rear corner radar
• The front corner radar or rear corner
radar is covered with snow, rain, dirt,
etc.
• The bumper around the front corner
radar or rear corner radar is covered
with objects, such as a bumper
sticker, bumper guard, bike rack, etc.
Page 394 of 604

Driver Assistance system
7-66
Information
Two red lights may appear on the camera
in the following conditions when:
-The outside brightness is dim or
driving at night
-The vehicle drives inside a building,
such as a basement parking lot, garage
or tunnel
-The camera case of the instrument
cluster is partially broken
WARNING
Do not look toward the camera within
8 in. (20 cm) for longer than a minute.
Limitations of the system
The system may be limited or may
not operate properly in the following
circumstances:
• The driver is wearing sunglasses,
special glasses, infrared cutoff
glasses, refracting glasses or thick
glasses
• The driver has heavy eye makeup
(eyeliner, mascara, color makeup,
false eyelash) or eye piercing
• The driver’s view is blocked by his/her
hair, hat, etc.
• The driver is winking or wearing an
eye patch on one eye
• The driver’s face is covered partially
by a mask, muffler, etc.
• The driver’s view is blocked by
incoming light from outside of the
vehicle
• Light from outside, sunlight or infrared
LED light of the camera is reflected by
glasses or sunglasses
• The driver turns or lowers his/her
head so that the face or an eye is
hidden from the camera
• The camera is out of the range to
monitor or close within 8 in. (20 cm)
• The driver shakes his/her head up
and down, or adverse road conditions
cause excessive vehicle vibrations
while driving
• The driver is improperly positioned in
the driver's seat so that the driver’s
face is not detected
• The driver is too tall or short
• The camera is blocked by the adjusted
steering wheel height or the turned
steering wheel
• More than two people are looking at
the instrument cluster simultaneously
from the driver’s seat
• The driver’s eyes are narrowed due to
laughing or sun glare
• Misrecognize a picture or mannequin
that has a similar size of the driver’s
face
• There are other devices using infrared
light in the vehicle
Page 497 of 604

08
8-5
Jump starting procedure
Information
Your vehicle has a battery in the luggage
compartment, but when you jump start
your vehicle, use the jumper terminal in
the engine compartment.
1. Position the vehicles close enough
that the jumper cables will reach, but
do not allow the vehicles to touch.
2. Avoid fans or any moving parts in the
engine compartment at all times, even
when the vehicles are turned off.
3. Turn off all electrical devices such as
radios, lights, air conditioning, etc.
Put the vehicles in P (Park) and set the
parking brake. Turn both vehicles OFF.
4. Open the engine hood.
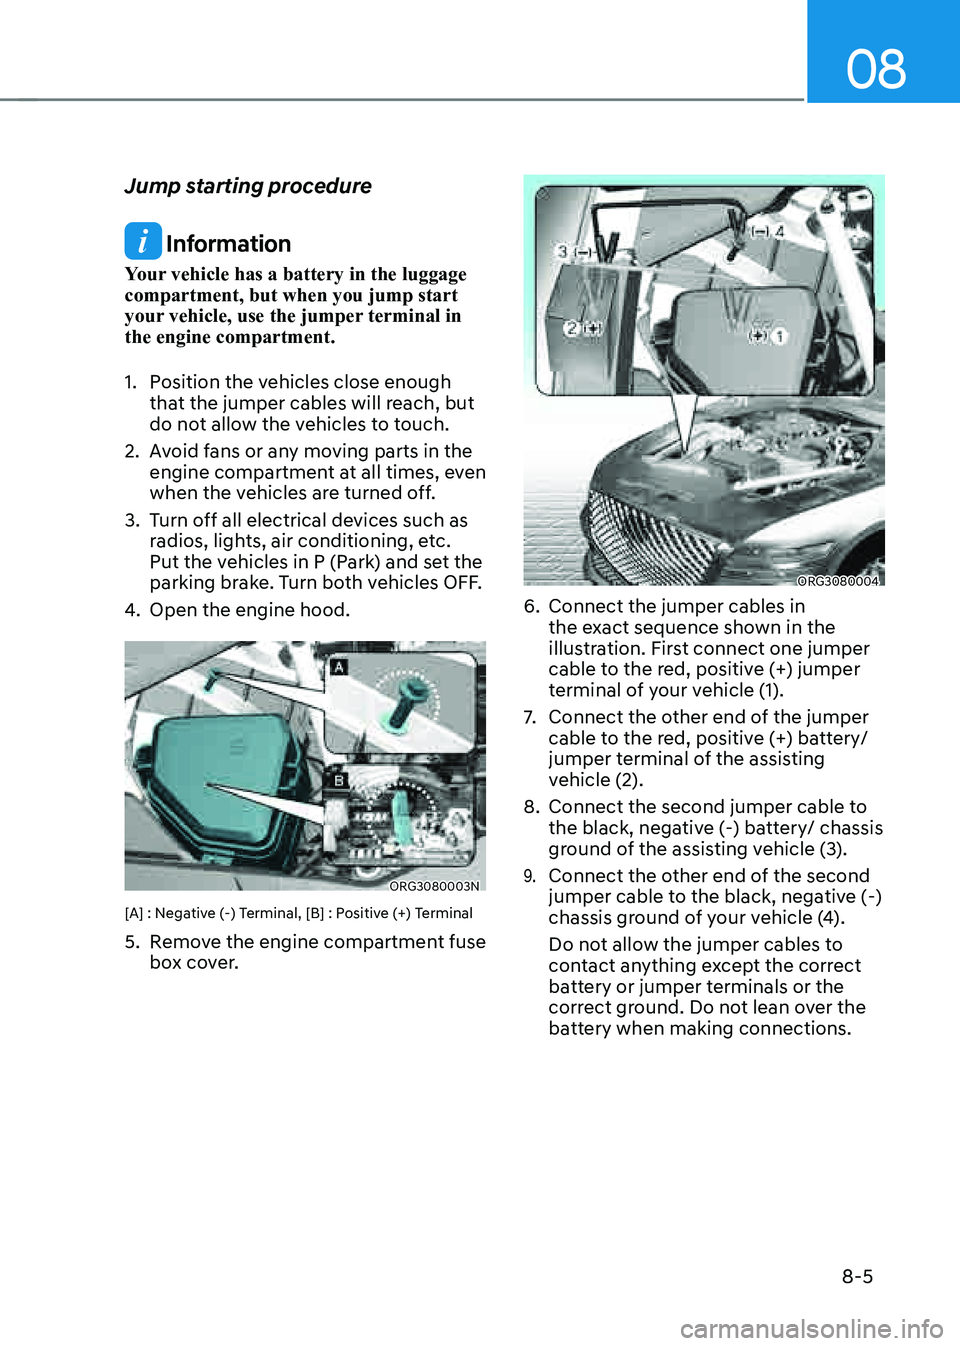
ORG3080003N
[A] : Negative (-) Terminal, [B] : Positive (+) Terminal
5. Remove the engine compartment fuse
box cover.
ORG3080004
6. Connect the jumper cables in
the exact sequence shown in the
illustration. First connect one jumper
cable to the red, positive (+) jumper
terminal of your vehicle (1).
7. Connect the other end of the jumper
cable to the red, positive (+) battery/
jumper terminal of the assisting
vehicle (2).
8. Connect the second jumper cable to
the black, negative (-) battery/ chassis
ground of the assisting vehicle (3).
9. Connect the other end of the second
jumper cable to the black, negative (-)
chassis ground of your vehicle (4).
Do not allow the jumper cables to
contact anything except the correct
battery or jumper terminals or the
correct ground. Do not lean over the
battery when making connections.