GENESIS G80 2021 Owner's Manual
Manufacturer: GENESIS, Model Year: 2021, Model line: G80, Model: GENESIS G80 2021Pages: 604, PDF Size: 11.47 MB
Page 541 of 604

Maintenance
9-26
OHI078075
3. Lift up the wiper blade clip (1). Then
lift up the wiper blade (2).
OHI078076
4. While pushing the lock (3), pull down
the wiper blade (4).
OHI078077
5. Remove the wiper blade from the
wiper arm (5).
6. Install a new wiper blade assembly in
the reverse order of removal.
7. Gently put the wipers back down onto
the windshield.
8. With the Engine Start/Stop button in
the ON position, turn the wiper switch
to Mist/Low/High position to return
the wipers to the bottom resting
position.
Page 542 of 604

09
9-27
WARNING
To prevent SERIOUS INJURY or DEATH
to you or bystanders, always follow
these precautions when working near
or handling the battery:
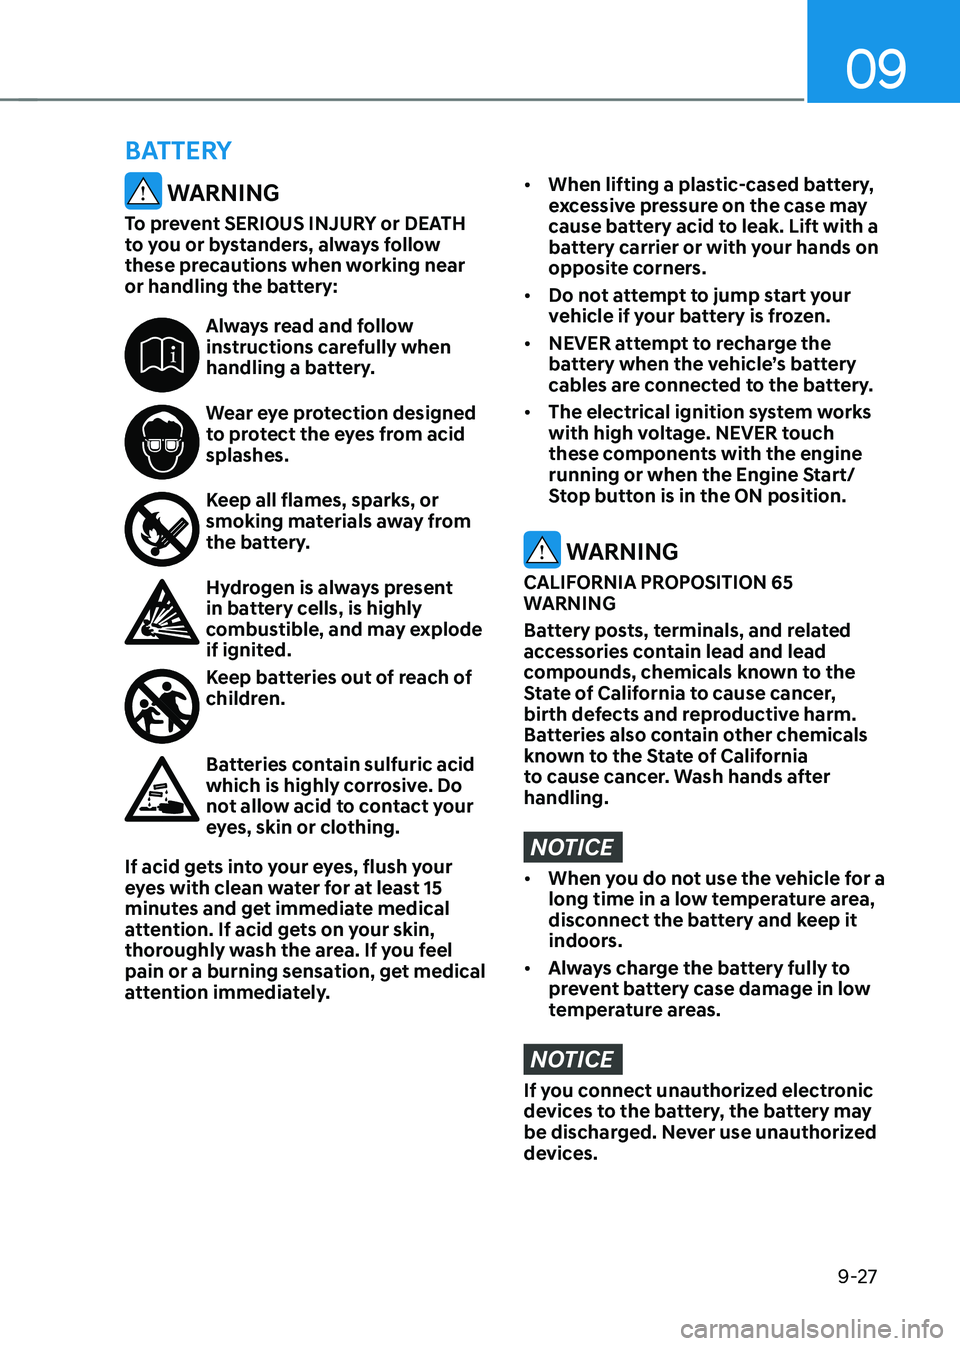
Always read and follow instructions carefully when
handling a battery.
Wear eye protection designed to protect the eyes from acid
splashes.
Keep all flames, sparks, or smoking materials away from
the battery.
Hydrogen is always present in battery cells, is highly
combustible, and may explode
if ignited.
Keep batteries out of reach of children.
Batteries contain sulfuric acid which is highly corrosive. Do
not allow acid to contact your
eyes, skin or clothing.
If acid gets into your eyes, flush your
eyes with clean water for at least 15
minutes and get immediate medical
attention. If acid gets on your skin,
thoroughly wash the area. If you feel
pain or a burning sensation, get medical
attention immediately.
• When lifting a plastic-cased battery,
excessive pressure on the case may
cause battery acid to leak. Lift with a
battery carrier or with your hands on
opposite corners.
• Do not attempt to jump start your
vehicle if your battery is frozen.
• NEVER attempt to recharge the
battery when the vehicle’s battery
cables are connected to the battery.
• The electrical ignition system works
with high voltage. NEVER touch
these components with the engine
running or when the Engine Start/
Stop button is in the ON position.
WARNING
CALIFORNIA PROPOSITION 65
WARNING
Battery posts, terminals, and related
accessories contain lead and lead
compounds, chemicals known to the
State of California to cause cancer,
birth defects and reproductive harm.
Batteries also contain other chemicals
known to the State of California
to cause cancer. Wash hands after
handling.
NOTICE
• When you do not use the vehicle for a
long time in a low temperature area,
disconnect the battery and keep it
indoors.
• Always charge the battery fully to
prevent battery case damage in low
temperature areas.
NOTICE
If you connect unauthorized electronic
devices to the battery, the battery may
be discharged. Never use unauthorized
devices.
BATTERY
Page 543 of 604

Maintenance
9-28
Battery Usage
Recommendations
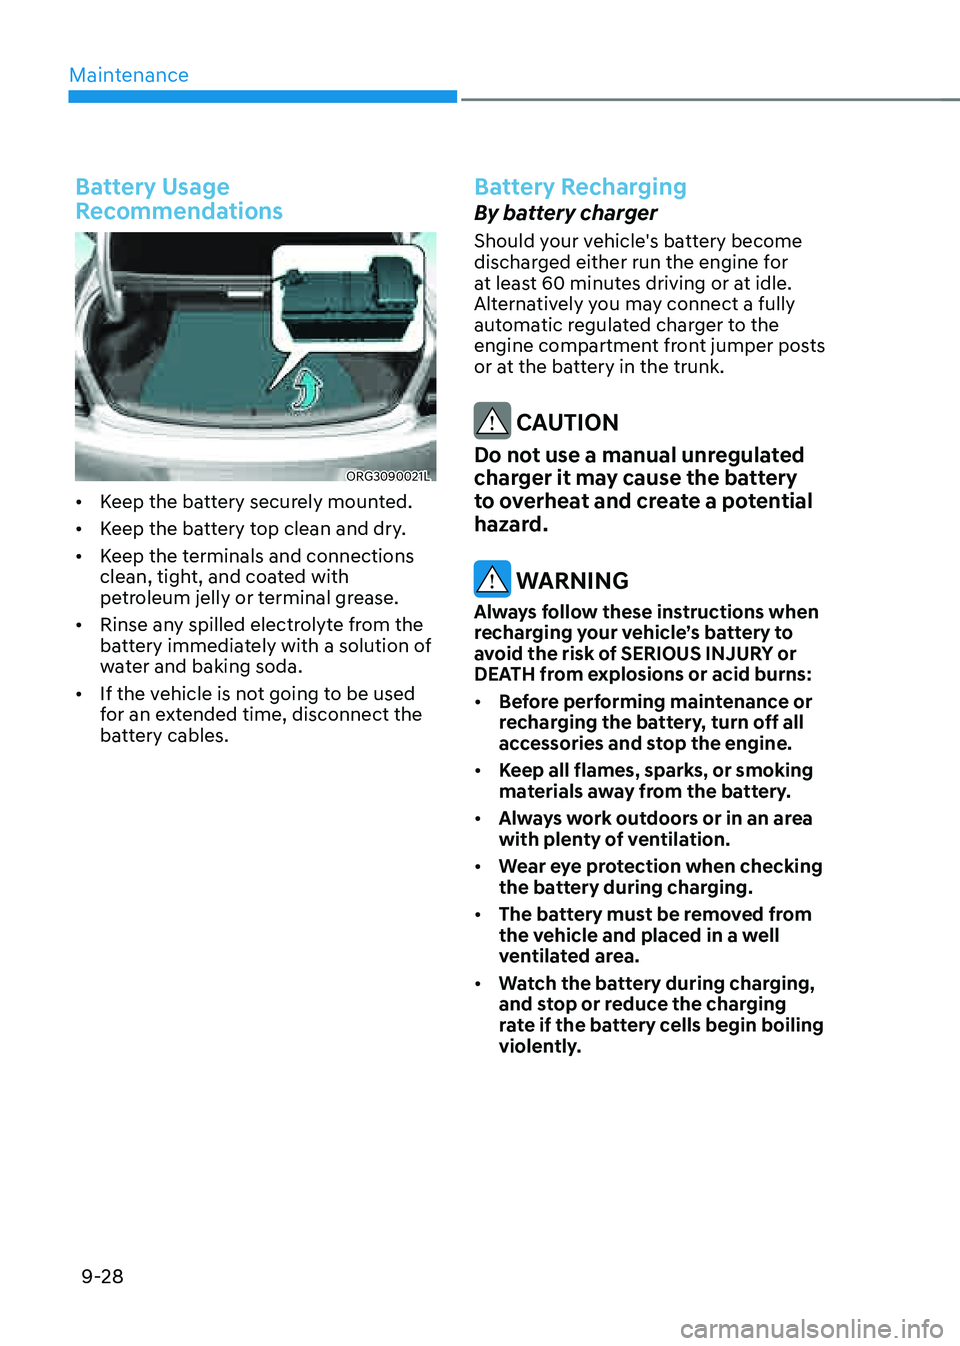
ORG3090021L
• Keep the battery securely mounted.
• Keep the battery top clean and dry.
• Keep the terminals and connections
clean, tight, and coated with
petroleum jelly or terminal grease.
• Rinse any spilled electrolyte from the
battery immediately with a solution of
water and baking soda.
• If the vehicle is not going to be used
for an extended time, disconnect the
battery cables.
Battery Recharging
By battery charger
Should your vehicle's battery become
discharged either run the engine for
at least 60 minutes driving or at idle.
Alternatively you may connect a fully
automatic regulated charger to the
engine compartment front jumper posts
or at the battery in the trunk.
CAUTION
Do not use a manual unregulated
charger it may cause the battery
to overheat and create a potential
hazard.
WARNING
Always follow these instructions when
recharging your vehicle’s battery to
avoid the risk of SERIOUS INJURY or
DEATH from explosions or acid burns:
• Before performing maintenance or
recharging the battery, turn off all
accessories and stop the engine.
• Keep all flames, sparks, or smoking
materials away from the battery.
• Always work outdoors or in an area
with plenty of ventilation.
• Wear eye protection when checking
the battery during charging.
• The battery must be removed from
the vehicle and placed in a well
ventilated area.
• Watch the battery during charging,
and stop or reduce the charging
rate if the battery cells begin boiling
violently.
Page 544 of 604

09
9-29
• The negative battery cable must
be removed first and installed last
when the battery is disconnected.
Disconnect the battery charger in the
following order:
1. Turn off the battery charger main
switch.
2. Unhook the negative clamp from
the negative battery terminal.
3. Unhook the positive clamp from
the positive battery terminal.
• Always use a Genuine Genesis Part
approved battery when you replace
the battery.
NOTICE
AGM battery
• Absorbent Glass Matt (AGM)
batteries are maintenance-free and
we recommend that the AGM battery
be serviced by an authorized retailer
of Genesis Branded products. For
charging your AGM battery, use only
fully automatic battery chargers that
are specially developed for AGM
batteries.
• When replacing the AGM battery,
we recommend that you use parts
for replacement from an authorized
retailer of Genesis Branded products.
• Do not open or remove the cap on
top of the battery. This may cause
leaks of internal electrolyte that
could result in severe injury.
By jump starting
After a jump start from a good battery,
drive the vehicle for 20-30 minutes
before it is shutoff. The vehicle may
not restart if you shut it off before the
battery had a chance to adequately
recharge. See “Jump Starting” in chapter
6 for more information on jump starting
procedures.
Information
An inappropriately disposed battery can be harmful to the
environment and human health.
Dispose of the battery according
to your local law(s) or regulation.
Reset Items
The following items may need to be reset
after the battery has been discharged or
the battery has been disconnected.
• Fuel economy/Driving info/Since
refueling/Accumulated info (items in
Utility view) (see chapter 4)
• Integrated memory system (see
chapter 5)
• Power window (see chapter 5)
• Sunroof (see chapter 5)
• Power trunk (see chapter 5)
• Climate control system (see chapter 5)
• Rear door window shade (see chapter
5)
• Clock (see Infotainment system
manual)
• Infotainment system (see
Infotainment system manual)
Page 545 of 604

Maintenance
9-30
WARNING
Tire failure may cause loss of
vehicle control resulting in an
accident. To reduce risk of SERIOUS
INJURY or DEATH, take the
following precautions:
• Inspect your tires monthly for
proper inflation as well as wear
and damage.
• The recommended cold tire
pressure for your vehicle can be
found in this manual and on the
tire label located on the driver’s
side center pillar. Always use a
tire pressure gauge to measure
tire pressure. Tires with too
much or too little pressure wear
unevenly causing poor handling.
• Check the pressure of the
spare every time you check the
pressure of the other tires on
your vehicle.
• Replace tires that are worn, show
uneven wear, or are damaged.
Worn tires can cause loss of
braking effectiveness, steering
control, or traction.
• ALWAYS replace tires with the
same size, type, construction and
tread pattern as each tire that
was originally supplied with this
vehicle. Using tires and wheels
other than the recommended
sizes could cause unusual
handling characteristics, poor
vehicle control, or negatively
affect your vehicle’s Anti-Lock
Brake System (ABS) resulting in a
serious accident.
Tire Care
For proper maintenance, safety, and
maximum fuel economy, you must
always maintain recommended
tire inflation pressures and stay
within the load limits and weight
distribution recommended for your
vehicle.
ORG3010025L
All specifications (sizes and
pressures) can be found on a label
attached to the driver’s side center
pillar.
Recommended Cold Tire
Inflation Pressures
All tire pressures (including the
spare) should be checked when the
tires are cold. “Cold tires” means the
vehicle has not been driven for at
least three hours or driven less than
one mile (1.6 km).
Warm tires normally exceed
recommended cold tire pressures
by 4 to 6 psi (28 to 41 kPa). Do not
release air from warm tires to adjust
the pressure or the tires will be
under-inflated. For recommended
inflation pressure, refer to “Tire and
Wheels” section in chapter 2.
TIRES AND WHEELS
Page 546 of 604

09
9-31
WARNING
Recommended pressures must be
maintained for the best ride, vehicle
handling, and minimum tire wear.
Over-inflation or under-inflation
can reduce tire life, adversely
affect vehicle handling, and lead to
sudden tire failure that could result
in loss of vehicle control resulting in
an accident.
Severe under-inflation can lead
to severe heat build-up, causing
blowouts, tread separation and
other tire failures that can result in
the loss of vehicle control resulting
in an accident. This risk is much
higher on hot days and when
driving for long periods at high
speeds.
CAUTION
• Under-inflation results in
excessive wear, poor handling
and reduced fuel economy.
Wheel deformation is also
possible. Keep your tire pressures
at the proper levels. If a tire
frequently needs refilling, have it
checked by an authorized retailer
of Genesis Branded products.
• Over-inflation produces a harsh
ride, excessive wear at the center
of the tire tread, and a greater
possibility of damage from road
hazards.
Check tire Inflation Pressure
Check your tires, including the spare
tire, once a month or more.
How to check
Use a good quality tire pressure
gauge to check tire pressure. You
can not tell if your tires are properly
inflated simply by looking at them.
Radial tires may look properly
inflated when they are under-
inflated.
Remove the valve cap from the tire
valve stem. Press the tire gauge
firmly onto the valve to get a
pressure measurement. If the cold
tire inflation pressure matches the
recommended pressure on the tire
and loading information label, no
further adjustment is necessary. If
the pressure is low, add air until you
reach the recommended pressure.
Make sure to put the valve caps
back on the valve stems. Without
the valve cap, dirt or moisture could
get into the valve core and cause
air leakage. If a valve cap is missing,
install a new one as soon as possible.
If you overfill the tire, release air by
pushing on the metal stem in the
center of the tire valve. Recheck the
tire pressure with the tire gauge. Be
sure to put the valve caps back on
the valve stems. Without the valve
cap, dirt or moisture could get into
the valve core and cause air leakage.
If a valve cap is missing, install a new
one as soon as possible.
Page 547 of 604

Maintenance
9-32
Tire Rotation
To equalize tread wear, Genesis
Branded Vehicle recommends that
the tires be rotated according to the
maintenance schedule or sooner if
irregular wear develops.
During rotation, check the tires for
correct balance.
When rotating tires, check for uneven
wear and damage. Abnormal wear
is usually caused by incorrect tire
pressure, improper wheel alignment,
out-of-balance wheels, severe braking
or severe cornering. Look for bumps or
bulges in the tread or side of the tire.
Replace the tire if you find any of these
conditions. Replace the tire if fabric or
cord is visible. After rotation, be sure to
bring the front and rear tire pressures
to specification and check wheel bolt
tightness (proper torque is 79~94 lbf·ft
[11~13 kgf·m].
„„18 inch tire
OHI078078
„„19, 20 inch tire
OHI078079
Disc brake pads should be inspected
for wear whenever tires are rotated.
Information
The outside and inside of the
unsymmetrical tire is distinguishable.
When installing an unsymmetrical
tire, be sure to install the side marked
“outside” face the outside. If the side
marked “inside” is installed on the
outside, it will have a negative effect
on vehicle performance.
WARNING
• Do not use the compact spare
tire for tire rotation.
• Do not mix bias ply and radial ply
tires under any circumstances.
This may cause unusual handling
characteristics that may cause
loss of vehicle control resulting in
an accident.
Page 548 of 604

09
9-33
Wheel Alignment and Tire
Balance
The wheels on your vehicle were
aligned and balanced carefully at the
factory to give you the longest tire
life and best overall performance.
In most cases, you will not need to
have your wheels aligned again.
However, if you notice unusual tire
wear or your vehicle pulling one way
or the other, the alignment may need
to be reset.
If you notice your vehicle vibrating
when driving on a smooth road, your
wheels may need to be rebalanced.
NOTICE
Incorrect wheel weights can
damage your vehicle’s aluminum
wheels. Use only approved wheel
weights.
Tire Replacement
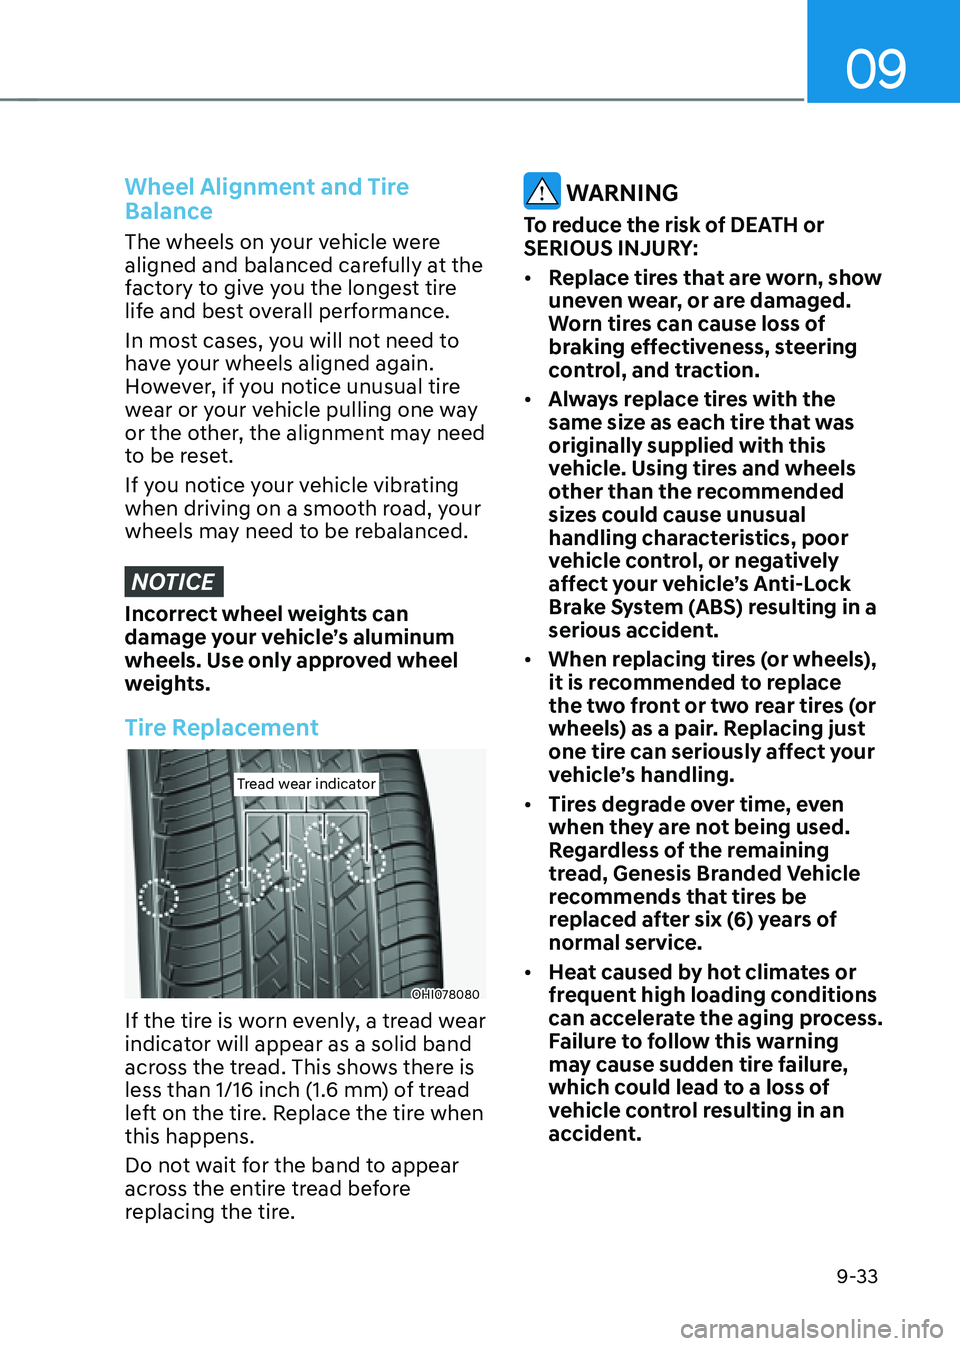
Tread wear indicatorTread wear indicator
OHI078080
If the tire is worn evenly, a tread wear
indicator will appear as a solid band
across the tread. This shows there is
less than 1/16 inch (1.6 mm) of tread
left on the tire. Replace the tire when
this happens.
Do not wait for the band to appear
across the entire tread before
replacing the tire.
WARNING
To reduce the risk of DEATH or
SERIOUS INJURY:
• Replace tires that are worn, show
uneven wear, or are damaged.
Worn tires can cause loss of
braking effectiveness, steering
control, and traction.
• Always replace tires with the
same size as each tire that was
originally supplied with this
vehicle. Using tires and wheels
other than the recommended
sizes could cause unusual
handling characteristics, poor
vehicle control, or negatively
affect your vehicle’s Anti-Lock
Brake System (ABS) resulting in a
serious accident.
• When replacing tires (or wheels),
it is recommended to replace
the two front or two rear tires (or
wheels) as a pair. Replacing just
one tire can seriously affect your
vehicle’s handling.
• Tires degrade over time, even
when they are not being used.
Regardless of the remaining
tread, Genesis Branded Vehicle
recommends that tires be
replaced after six (6) years of
normal service.
• Heat caused by hot climates or
frequent high loading conditions
can accelerate the aging process.
Failure to follow this warning
may cause sudden tire failure,
which could lead to a loss of
vehicle control resulting in an
accident.
Page 549 of 604

Maintenance
9-34
Compact spare tire replacement
A compact spare tire has a shorter
tread life than a regular size tire.
Replace it when you can see the
tread wear indicator bars on the tire.
The replacement compact spare tire
should be the same size and design
tire as the one provided with your
new vehicle and should be mounted
on the same compact spare tire
wheel. The compact spare tire is
not designed to be mounted on a
regular size wheel, and the compact
spare tire wheel is not designed for
mounting a regular size tire.
WARNING
The original tire should be repaired
or replaced as soon as possible to
avoid failure of the compact spare
tire and loss of vehicle control
resulting in an accident. The
compact spare tire is for emergency
use only. Do not operate your
vehicle over 50 mph (80 km/h)
when using the compact spare tire.
Wheel Replacement
When replacing the metal wheels
for any reason, make sure the new
wheels are equivalent to the original
factory units in diameter, rim width
and offset.
Tire Traction
Tire traction can be reduced if you
drive on worn tires, tires that are
improperly inflated or on slippery
road surfaces. Tires should be
replaced when tread wear indicators
appear. To reduce the possibility of
losing control, slow down whenever
there is rain, snow or ice on the road.
Tire Maintenance
In addition to proper inflation,
correct wheel alignment helps to
decrease tire wear. If you find a tire
is worn unevenly, have your dealer
check the wheel alignment.
When you have new tires installed,
make sure they are balanced. This
will increase vehicle ride comfort
and tire life. Additionally, a tire
should always be rebalanced if it is
removed from the wheel.
Page 550 of 604

09
9-35
Tire Sidewall Labeling
This information identifies and
describes the fundamental
characteristics of the tire and also
provides the tire identification
number (TIN) for safety standard
certification. The TIN can be used to
identify the tire in case of a recall.
OJX1099053
1. Manufacturer or brand name
Manufacturer or brand name is
shown.
2. Tire size designation
A tire’s sidewall is marked with a
tire size designation. You will need
this information when selecting
replacement tires for your car.
The following explains what the
letters and numbers in the tire size
designation mean. Example tire size designation:
(These numbers are provided as
an example only; your tire size
designator could vary depending on
your vehicle.)
245/45R19 98W
245
Tire width in millimeters.
45 Aspect ratio. The tire’s section
height as a percentage of its
width.
R - Tire construction code (Radial).
19 Rim diameter in inches.
98 Load Index, a numerical code
associated with the maximum
load the tire can carry.
W Speed Rating Symbol. See the
speed rating chart in this section
for additional information.
Wheel size designation
Wheels are also marked with
important information that you need
if you ever have to replace one. The
following explains what the letters
and numbers in the wheel size
designation mean.
Example wheel size designation:
8.5J X 19
8.5 - Rim width in inches.
J - Rim contour designation.
19 - Rim diameter in inches.