battery replacement GENESIS G80 2021 Owner's Manual
[x] Cancel search | Manufacturer: GENESIS, Model Year: 2021, Model line: G80, Model: GENESIS G80 2021Pages: 604, PDF Size: 11.47 MB
Page 148 of 604

Convenient Features
5-10
Information
This device complies with Part 15 of the
FCC rules.
Operation is subject to the following three
conditions:
1. This device may not cause harmful
interference, and
2. This device must accept any
interference received, including
interference that may cause undesired
operation.
3. Changes or modifications not expressly
approved by the party responsible
for compliance could void the user’s
authority to operate the device.
NOTICE
• Keep the smart key away from
electromagnetic materials that
blocks electromagnetic waves to the
key surface.
• Always have the smart key with
you when leaving the vehicle. If the
smart key is left near the vehicle, the
vehicle battery may be discharged.
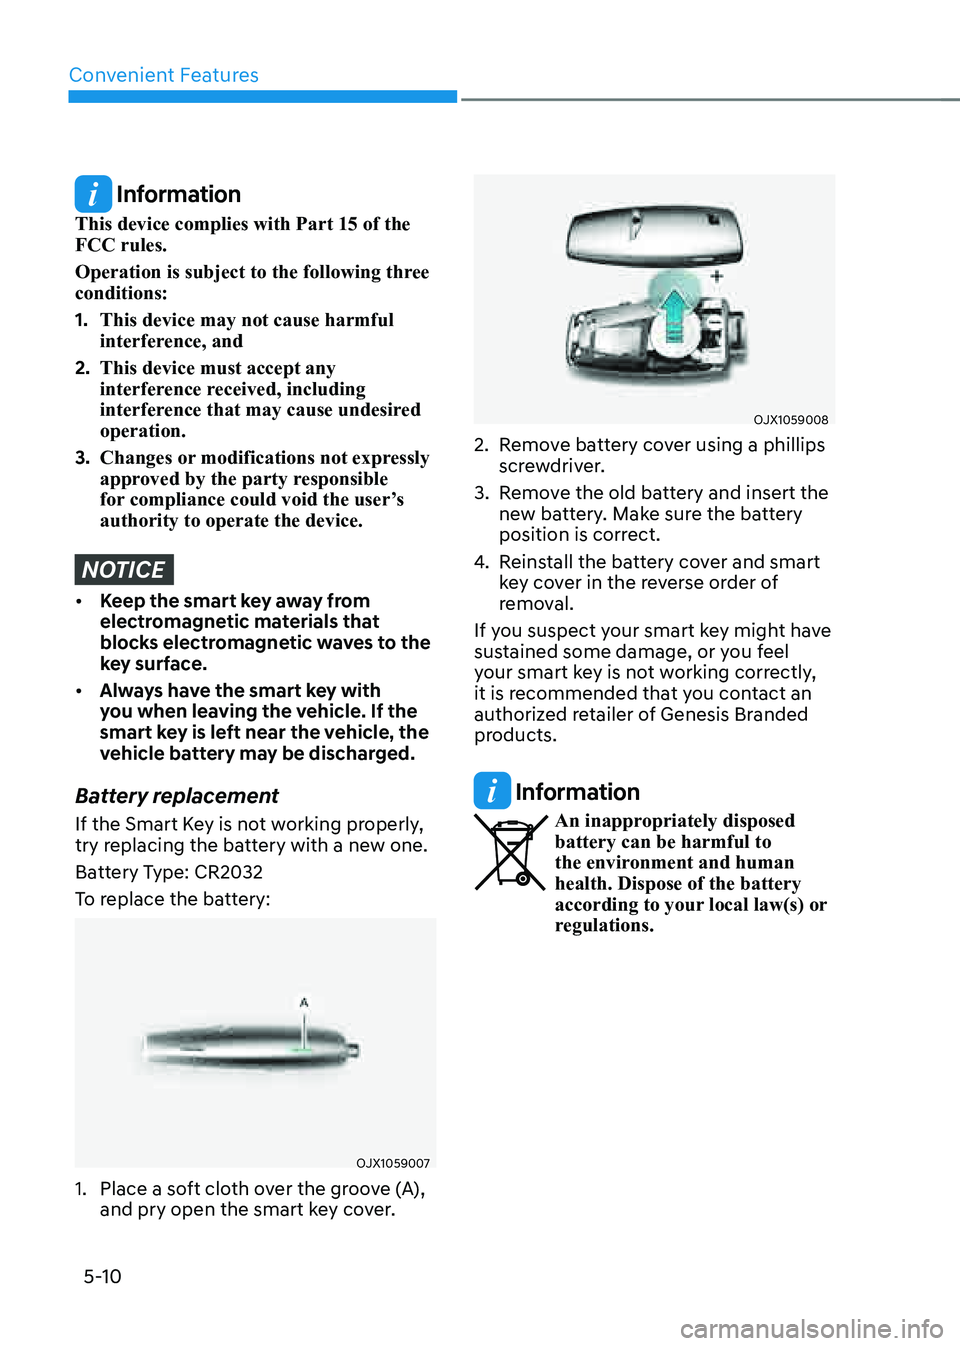
Battery replacement
If the Smart Key is not working properly,
try replacing the battery with a new one.
Battery Type: CR2032
To replace the battery:
OJX1059007
1. Place a soft cloth over the groove (A),
and pry open the smart key cover.
OJX1059008
2. Remove battery cover using a phillips
screwdriver.
3. Remove the old battery and insert the
new battery. Make sure the battery
position is correct.
4. Reinstall the battery cover and smart
key cover in the reverse order of
removal.
If you suspect your smart key might have
sustained some damage, or you feel
your smart key is not working correctly,
it is recommended that you contact an
authorized retailer of Genesis Branded
products.
Information
An inappropriately disposed battery can be harmful to
the environment and human
health. Dispose of the battery
according to your local law(s) or
regulations.
Page 489 of 604

07
7-161
OJX1079199L
System standby
When ‘Parking Assist Conditions Not
Met’ message appears, when Parking/
View (
) button has been pressed and
held, Remote Smart Parking Assist is in
standby. After a while, press and hold the
Parking/View (
) button again to see if
the system works.
The message appears even when the
smart key's battery is low. Check the
smart key battery level.
Limitations of the system
In the following circumstances, system
performance to park or exit the vehicle
may be limited, there may be a risk of
collision, or Remote Smart Parking Assist
may turn off. Park or exit the vehicle
manually if necessary.
• The parking space is curved or
diagonal
• There is an obstacle such as a trash
can, bicycle, motorcycle, shopping
cart, narrow pillar etc. near the
parking space
• There is a circular pillar or narrow
pillar, or a pillar surrounded by objects
such as fire extinguisher, etc. near the
parking space
• There is heavy snow, rain or wind
• The vehicle is installed with a snow
chain, spare tire or different size
wheel
• Tire pressure is lower or higher than
the standard tire pressure
• The road is bumpy
• The road is slippery
• The parking space is near a vehicle
with higher ground clearance or big,
such as a truck, etc.
• Your vehicle is loaded with cargo
longer or wider than your vehicle or a
trailer is connected to your vehicle
• The sensor is mounted or positioned
incorrectly by an impact to the
bumper
• The parking space is Inclined
• There is a problem with the wheel
alignment
• Your vehicle is leaned severely to one
side
• Front or rear ultrasonic sensors are
not working properly or does not work
(Refer to “Parking Distance Warning”
section in this chapter.)
• The smart key requires battery
replacement due to low battery level
• Your vehicle is equipped with a trailer
hitch
• A pedestrian or animal passes by your
vehicle
Page 516 of 604

Maintenance
9
9. Maintenance
Engine Compartment ........................................................................\
...............9-3
Maintenance Services
........................................................................\
..............9-5Owner’s Responsibility ........................................................................\
........................9-5
Owner Maintenance Precautions ........................................................................\
........9-5
Owner Maintenance ........................................................................\
.................9-6Owner Maintenance Schedule ........................................................................\
............9 -7
Scheduled Maintenance Services ...................................................................9-8Normal Maintenance Schedule ........................................................................\
..........9-9
Maintenance Under Severe Usage Conditions ........................................................9-12
Explanation of Scheduled Maintenance Items ..............................................9-14
Engine Oil
........................................................................\
.................................9-16Checking the Engine Oil Level ........................................................................\
...........9-16
Checking the Engine oil and Filter ........................................................................\
.....9-17
Engine Coolant/LIQUID-Cooled Intercooler Coolant ...................................9-18Checking the Coolant Level ........................................................................\
............... 9-18
Changing Coolant ........................................................................\
.............................9-20
Brake Fluid ........................................................................\
................................9-21Checking the Brake Fluid Level ........................................................................\
.........9-21
Washer Fluid ........................................................................\
............................9-22Checking the Washer Fluid Level ........................................................................\
......9-22
Air Cleaner ........................................................................\
...............................9-23Filter Replacement ........................................................................\
.............................9-23
Cabin Air Filter ........................................................................\
.........................9-24Filter Inspection ........................................................................\
.................................. 9-24
Filter Replacement ........................................................................\
.............................9-24
Wiper Blades ........................................................................\
...........................9-25Blade Inspection ........................................................................\
................................9-25
Blade Replacement ........................................................................\
............................9-25
Battery ........................................................................\
......................................9-27
Battery Usage Recommendations ........................................................................\
....9-28
Battery Recharging ........................................................................\
............................9-28
Reset Items ........................................................................\
.........................................9-29
Page 544 of 604

09
9-29
• The negative battery cable must
be removed first and installed last
when the battery is disconnected.
Disconnect the battery charger in the
following order:
1. Turn off the battery charger main
switch.
2. Unhook the negative clamp from
the negative battery terminal.
3. Unhook the positive clamp from
the positive battery terminal.
• Always use a Genuine Genesis Part
approved battery when you replace
the battery.
NOTICE
AGM battery
• Absorbent Glass Matt (AGM)
batteries are maintenance-free and
we recommend that the AGM battery
be serviced by an authorized retailer
of Genesis Branded products. For
charging your AGM battery, use only
fully automatic battery chargers that
are specially developed for AGM
batteries.
• When replacing the AGM battery,
we recommend that you use parts
for replacement from an authorized
retailer of Genesis Branded products.
• Do not open or remove the cap on
top of the battery. This may cause
leaks of internal electrolyte that
could result in severe injury.
By jump starting
After a jump start from a good battery,
drive the vehicle for 20-30 minutes
before it is shutoff. The vehicle may
not restart if you shut it off before the
battery had a chance to adequately
recharge. See “Jump Starting” in chapter
6 for more information on jump starting
procedures.
Information
An inappropriately disposed battery can be harmful to the
environment and human health.
Dispose of the battery according
to your local law(s) or regulation.
Reset Items
The following items may need to be reset
after the battery has been discharged or
the battery has been disconnected.
• Fuel economy/Driving info/Since
refueling/Accumulated info (items in
Utility view) (see chapter 4)
• Integrated memory system (see
chapter 5)
• Power window (see chapter 5)
• Sunroof (see chapter 5)
• Power trunk (see chapter 5)
• Climate control system (see chapter 5)
• Rear door window shade (see chapter
5)
• Clock (see Infotainment system
manual)
• Infotainment system (see
Infotainment system manual)
Page 558 of 604

09
9-43
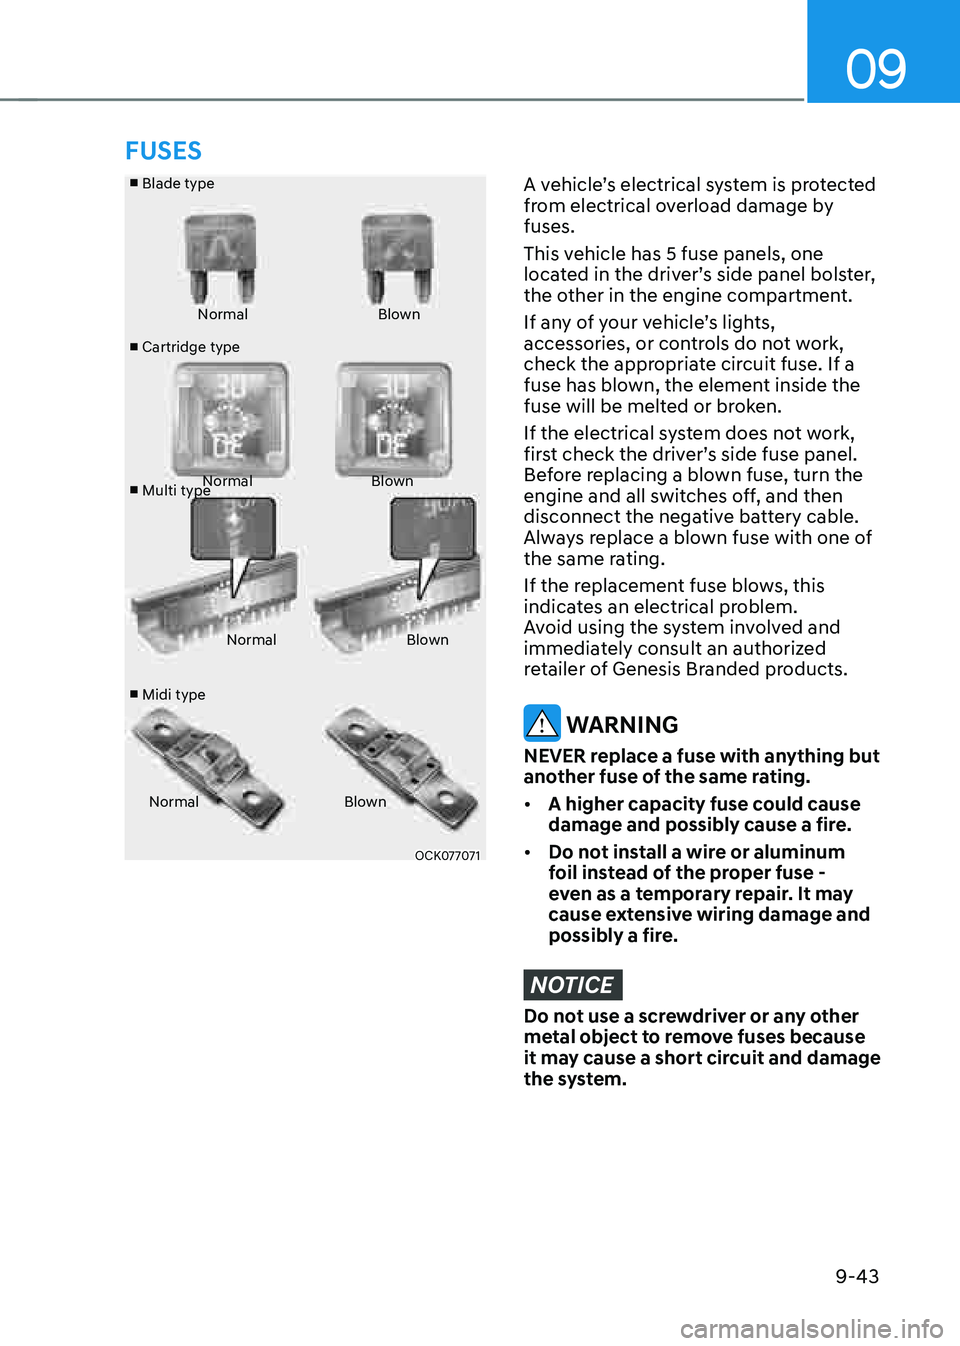
■ Blade type
■ Cartridge type
■ Multi type
■ Midi type Normal
Blown
Normal Blown
Normal Blown
Normal Blown
OCK077071
A vehicle’s electrical system is protected
from electrical overload damage by
fuses.
This vehicle has 5 fuse panels, one
located in the driver’s side panel bolster,
the other in the engine compartment.
If any of your vehicle’s lights,
accessories, or controls do not work,
check the appropriate circuit fuse. If a
fuse has blown, the element inside the
fuse will be melted or broken.
If the electrical system does not work,
first check the driver’s side fuse panel.
Before replacing a blown fuse, turn the
engine and all switches off, and then
disconnect the negative battery cable.
Always replace a blown fuse with one of
the same rating.
If the replacement fuse blows, this
indicates an electrical problem.
Avoid using the system involved and
immediately consult an authorized
retailer of Genesis Branded products.
WARNING
NEVER replace a fuse with anything but
another fuse of the same rating.
• A higher capacity fuse could cause
damage and possibly cause a fire.
• Do not install a wire or aluminum
foil instead of the proper fuse -
even as a temporary repair. It may
cause extensive wiring damage and
possibly a fire.
NOTICE
Do not use a screwdriver or any other
metal object to remove fuses because
it may cause a short circuit and damage
the system.
FUSES