GENESIS G90 2017 Owner's Manual
Manufacturer: GENESIS, Model Year: 2017, Model line: G90, Model: GENESIS G90 2017Pages: 524, PDF Size: 19.3 MB
Page 461 of 524

7-59
07
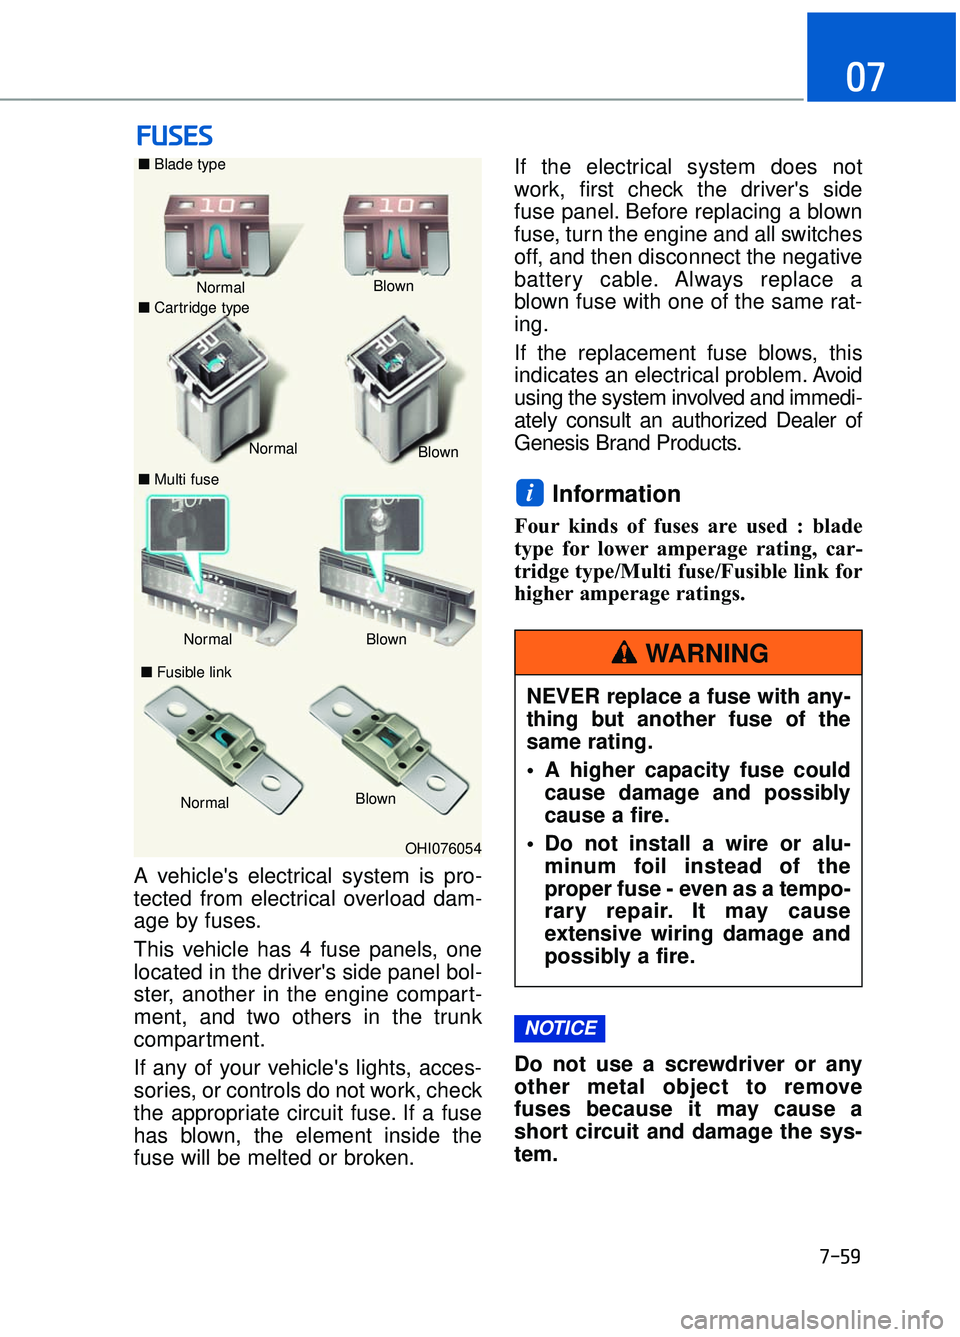
A vehicle's electrical system is pro-
tected from electrical overload dam-
age by fuses.
This vehicle has 4 fuse panels, one
located in the driver's side panel bol-
ster, another in the engine compart-
ment, and two others in the trunk
compartment.
If any of your vehicle's lights, acces-
sories, or controls do not work, check
the appropriate circuit fuse. If a fuse
has blown, the element inside the
fuse will be melted or broken.If the electrical system does not
work, first check the driver's side
fuse panel. Before replacing a blown
fuse, turn the engine and all switches
off, and then disconnect the negative
battery cable. Always replace a
blown fuse with one of the same rat-
ing.
If the replacement fuse blows, this
indicates an electrical problem. Avoid
using the system involved and immedi-
ately consult an authorized Dealer of
Genesis Brand Products.
Information
Four kinds of fuses are used : blade
type for lower amperage rating, car-
tridge type/Multi fuse/Fusible link for
higher amperage ratings.
Do not use a screwdriver or any
other metal object to remove
fuses because it may cause a
short circuit and damage the sys-
tem.
NOTICE
i
F F
U
U S
SE
E S
S
Normal
Normal
■
Blade type
■ Cartridge type
■ Multi fuse Blown
Blown
Normal Blown
■ Fusible link
Normal Blown
OHI076054
NEVER replace a fuse with any-
thing but another fuse of the
same rating.
A higher capacity fuse couldcause damage and possibly
cause a fire.
Do not install a wire or alu- minum foil instead of the
proper fuse - even as a tempo-
rary repair. It may cause
extensive wiring damage and
possibly a fire.
WARNING
Page 462 of 524

7-60
Maintenance
Instrument Panel Fuse
Replacement
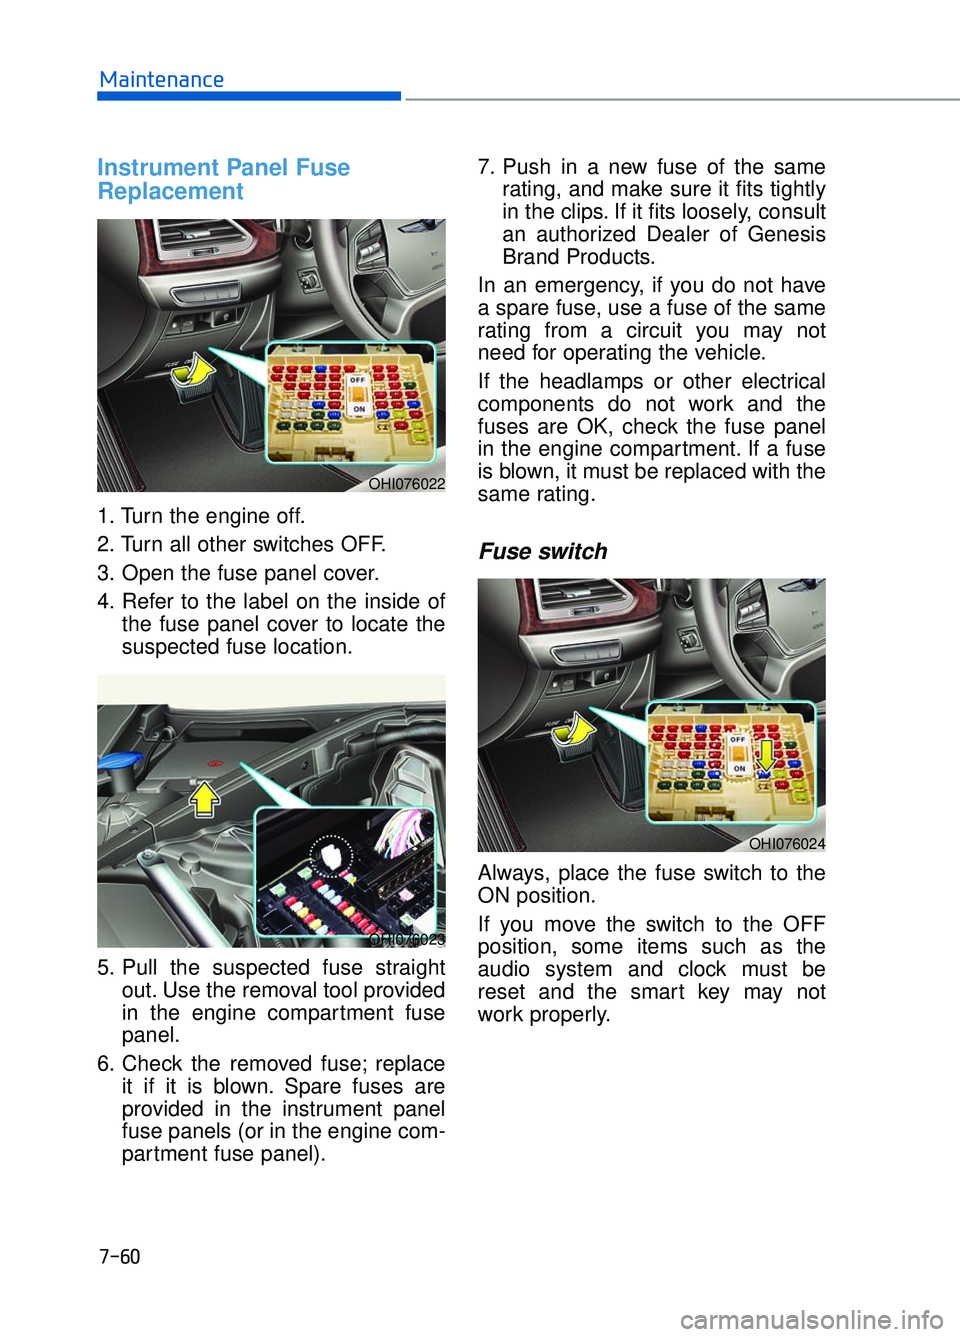
1. Turn the engine off.
2. Turn all other switches OFF.
3. Open the fuse panel cover.
4. Refer to the label on the inside ofthe fuse panel cover to locate the
suspected fuse location.
5. Pull the suspected fuse straight out. Use the removal tool provided
in the engine compartment fuse
panel.
6. Check the removed fuse; replace it if it is blown. Spare fuses are
provided in the instrument panel
fuse panels (or in the engine com-
partment fuse panel). 7. Push in a new fuse of the same
rating, and make sure it fits tightly
in the clips. If it fits loosely, consult
an authorized Dealer of Genesis
Brand Products.
In an emergency, if you do not have
a spare fuse, use a fuse of the same
rating from a circuit you may not
need for operating the vehicle.
If the headlamps or other electrical
components do not work and the
fuses are OK, check the fuse panel
in the engine compartment. If a fuse
is blown, it must be replaced with the
same rating.
Fuse switch
Always, place the fuse switch to the
ON position.
If you move the switch to the OFF
position, some items such as the
audio system and clock must be
reset and the smart key may not
work properly.
OHI076022
OHI076023
OHI076024
Page 463 of 524

7-61
07
Information
If the fuse switch is OFF, the above
message will appear.
Always place the fuse switch inthe ON position while driving the
vehicle.
Do not move the fuse switch repeatedly. The fuse switch may
be damaged.
Engine Compartment Panel
Fuse Replacement
1. Turn the engine off.
2. Turn all other switches OFF.
3. Remove the fuse panel cover by pressing the tap and pulling up.
4. Check the removed fuse; replace it if it is blown. To remove or insert
the fuse, use the fuse puller in the
engine compartment fuse panel.
5. Push in a new fuse of the same rating, and make sure it fits tightly
in the clips. If it fits loosely, consult
an authorized Dealer of Genesis
Brand Products.
NOTICE
i
OHI046130LOHI076025
OHI076023
Page 464 of 524

7-62
MaintenanceAfter checking the fuse box in the
engine compartment securely
close the fuse box cover inside
the engine compartment, until it
clicks.
If the fuse box is not closed prop-
erly, water may leak in side, possi-
bly causing a malfunction with the
electrical system.
Main fuse
If the main fuse is blown, it must be
removed as follows:
1. Turn off the engine.
2. Disconnect the negative battery cable.
3. Remove the fuse panel cover by pressing the tab and pulling it up.
4. Remove the nuts shown in the pic- ture above.
5. Replace the fuse with a new one of the same rating.
6. Reinstall in the reverse order of removal.
Information
If the main fuse is blown, consult an
authorized Dealer of Genesis Brand
Products.
Multi fuse
If the multi fuse is blown, it must be
removed as follows:
1. Turn off the engine.
2. Disconnect the negative batterycable.
3. Remove the fuse panel cover by pressing the tab and pulling it up.
4. Remove the nuts shown in the pic- ture above.
5. Replace the fuse with a new one of the same rating.
6. Reinstall in the reverse order of removal.
Information
If the multi fuse is blown, consult an
authorized Dealer of Genesis Brand
Products.
i
iNOTICE
OHI076026
OHI076027
Page 465 of 524

7-63
07
Blade type fuse
Before inspecting a fuse, you should
turn OFF the engine as well as the
other electric system switches.
If a fuse is blown out, remove the
blown-out fuse and install a new fuse
of the same capacity by using the
fuse puller, which is prepared inside
the fuse box in the engine compart-
ment. A new fuse may be prepared
along with the fuse puller. However, if
not, you may temporarily select/use
a fuse of the other systems, which do
not affect the vehicle operation, such
as the audio system.
Cartridge type fuse
Before inspecting a fuse, you should
turn OFF the engine as well as the
other electric system switches.
If a fuse is blown out, remove the
blown-out fuse and install a new fuse
of the same capacity. Pay extreme
caution not to damage the blown-out
fuse while removing it.
OHI076028OHI076029
Page 466 of 524

7-64
Maintenance
Fuse/Relay Panel Description
Instrument panel fuse panel
Inside the fuse/relay box cover, you
can find the fuse/relay label describ-
ing fuse/relay name and capacity.
Information
Not all fuse panel descriptions in this
manual may be applicable to your
vehicle; the information is accurate at
the time of printing. When you inspect
the fuse box on your vehicle, refer to
the fuse box label.
i
OHI076032
OHI076033N
Page 467 of 524

7-65
07
Instrument panel fuse panel
Fuse name Fuse rating Circuit protected
MODULE5 10AStop Lamp Switch, Driver/Passenger Door Module
MODULE7 10A
Electro Chromic Mirror, A/V & Navigation Head Unit, AMP,
A/C Control Module, Front A/C Controller, Air Quality
Sensor, Rear Seat Warmer Control Module LH/RH Head
Lamp LH/RH Driver/Passenger CCS Module
Rear CCS Module LH/RH, Driver/Passenger IMS Control
Module, Rear IMS Control Module LH/RH, Rear Seat
Console Switch
IBU3 10AIBU Control Module
E-SHIFTER2 10AElectronic ATM Shift Lever
MEMORY1 10A
Security Indicator, A/C Control Module, Front A/C Controller,
Instrument Cluster, Driver/Passenger IMS Control Module,
Rear IMS Control Module LH/RH, Head-Up Display, Analog
Clock
Driver/Passenger Seat Control Switch, Power Trunk Module,
Rear Seat Control Switch LH/RHM Driver/Passenger Smart
Key, Outside Handle Rear Smart Key Outside Handle
LH/RH
RR LH2P/SEAT25ARear IMS Control Module LH
DRIVER
P/SEAT225ADriver IMS Control Module
P/WINDOW RH30APassenger Power Window Module
Rear Power Window Module RH
MODULE 610A
Crash Pad Switch, Blind Spot Detection Radar LH/RH ECS
Unit, Electric Parking Brake Module, Lane Keeping Assist
Module, Front Console Switch, Steering Tilt & Telescopic
Module
MODULE 10 10ACooling Fan Controller (BLDC), Rear Seat Console Switch,
Around View Unit, Parking Guide Unit
MODULE3 10AGATEWAY (B+ (MCU)), Data Link Connector, Hazard
Switch
SUNROOF 25ASunroof Motor
PASSENGER P/SEAT2 25APassenger IMS Control Module
Page 468 of 524

7-66
Maintenance
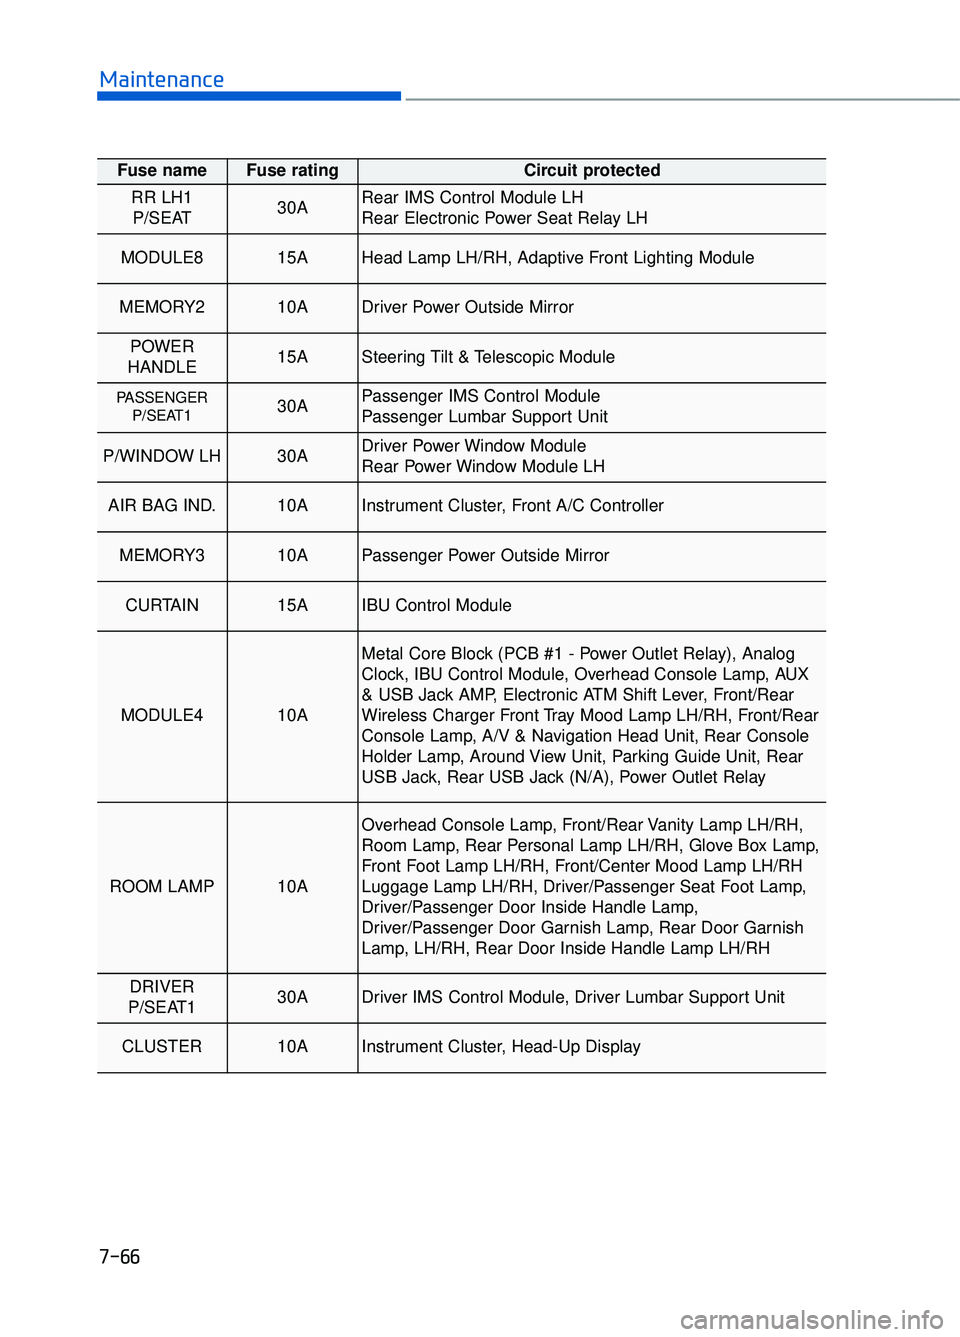
Fuse name Fuse rating Circuit protected
RR LH1P/SEAT 30ARear IMS Control Module LH
Rear Electronic Power Seat Relay LH
MODULE8 15AHead Lamp LH/RH, Adaptive Front Lighting Module
MEMORY2 10ADriver Power Outside Mirror
POWER
HANDLE 15ASteering Tilt & Telescopic Module
PASSENGER P/SEAT1 30APassenger IMS Control Module
Passenger Lumbar Support Unit
P/WINDOW LH30ADriver Power Window Module
Rear Power Window Module LH
AIR BAG IND.10AInstrument Cluster, Front A/C Controller
MEMORY3 10APassenger Power Outside Mirror
CURTAIN 15AIBU Control Module
MODULE4 10A
Metal Core Block (PCB #1 - Power Outlet Relay), Analog
Clock, IBU Control Module, Overhead Console Lamp, AUX
& USB Jack AMP, Electronic ATM Shift Lever, Front/Rear
Wireless Charger Front Tray Mood Lamp LH/RH, Front/Rear
Console Lamp, A/V & Navigation Head Unit, Rear Console
Holder Lamp, Around View Unit, Parking Guide Unit, Rear
USB Jack, Rear USB Jack (N/A), Power Outlet Relay
ROOM LAMP 10A
Overhead Console Lamp, Front/Rear Vanity Lamp LH/RH,
Room Lamp, Rear Personal Lamp LH/RH, Glove Box Lamp,
Front Foot Lamp LH/RH, Front/Center Mood Lamp LH/RH
Luggage Lamp LH/RH, Driver/Passenger Seat Foot Lamp,
Driver/Passenger Door Inside Handle Lamp,
Driver/Passenger Door Garnish Lamp, Rear Door Garnish
Lamp, LH/RH, Rear Door Inside Handle Lamp LH/RH
DRIVER
P/SEAT1 30ADriver IMS Control Module, Driver Lumbar Support Unit
CLUSTER 10AInstrument Cluster, Head-Up Display
Page 469 of 524

7-67
07
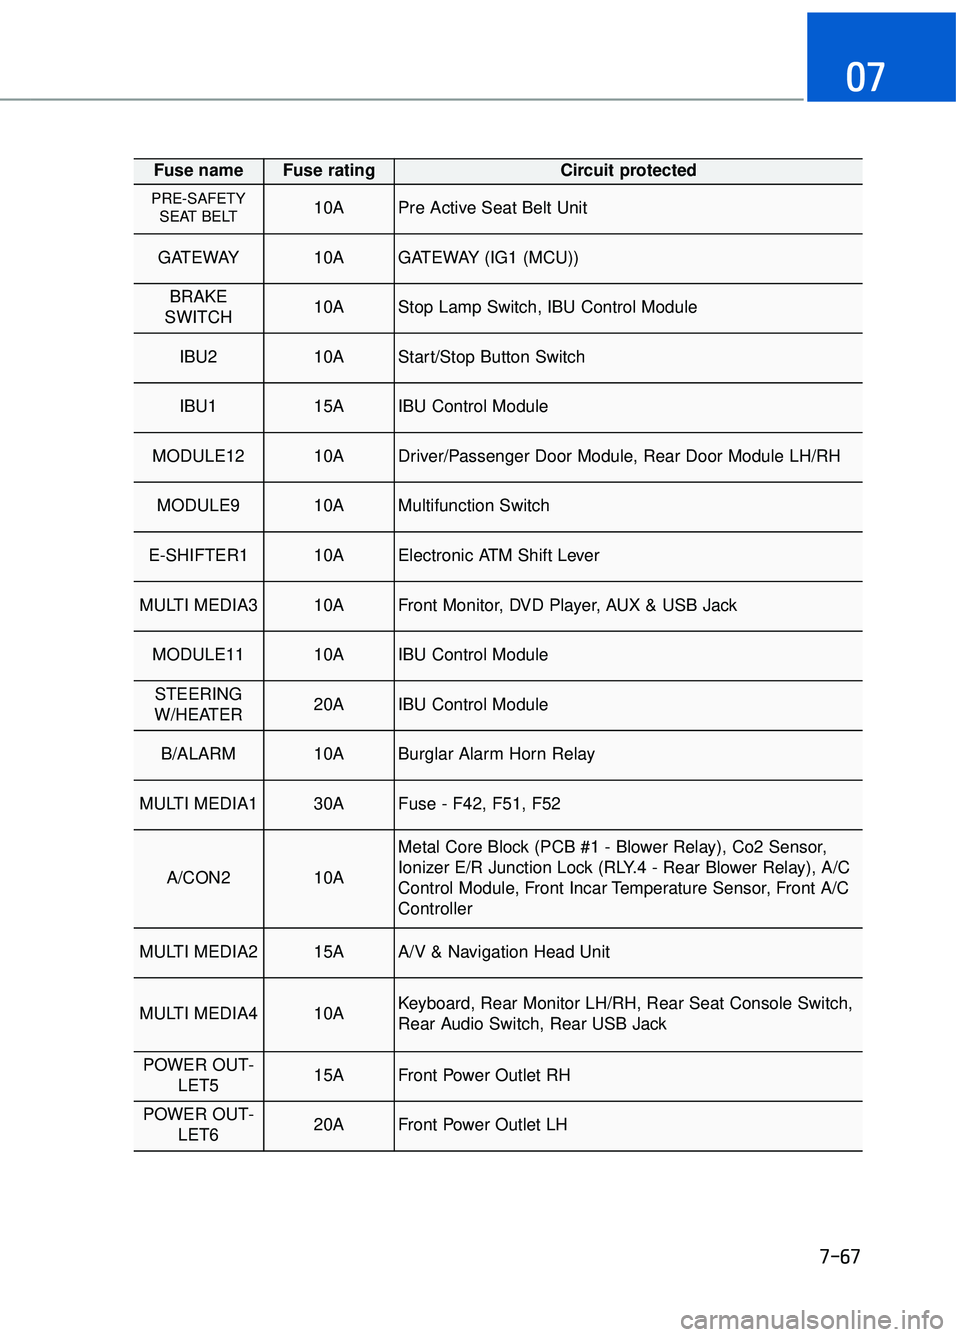
Fuse name Fuse rating Circuit protected
PRE-SAFETYSEAT BELT 10APre Active Seat Belt Unit
GATEWAY 10AGATEWAY (IG1 (MCU))
BRAKE
SWITCH 10AStop Lamp Switch, IBU Control Module
IBU2 10AStart/Stop Button Switch
IBU1 15AIBU Control Module
MODULE12 10ADriver/Passenger Door Module, Rear Door Module LH/RH
MODULE9 10AMultifunction Switch
E-SHIFTER1 10AElectronic ATM Shift Lever
MULTI MEDIA3 10AFront Monitor, DVD Player, AUX & USB Jack
MODULE11 10AIBU Control Module
STEERING
W/HEATER 20AIBU Control Module
B/ALARM 10ABurglar Alarm Horn Relay
MULTI MEDIA1 30AFuse - F42, F51, F52
A/CON2 10A
Metal Core Block (PCB #1 - Blower Relay), Co2 Sensor,
Ionizer E/R Junction Lock (RLY.4 - Rear Blower Relay), A/C
Control Module, Front Incar Temperature Sensor, Front A/C
Controller
MULTI MEDIA2 15AA/V & Navigation Head Unit
MULTI MEDIA4 10AKeyboard, Rear Monitor LH/RH, Rear Seat Console Switch,
Rear Audio Switch, Rear USB Jack
POWER OUT- LET5 15AFront Power Outlet RH
POWER OUT-LET6 20AFront Power Outlet LH
Page 470 of 524

7-68
Maintenance
Engine compartment fuse panel
Inside the fuse/relay box cover, you
can find the fuse/relay label describ-
ing fuse/relay name and capacity.
Information
Not all fuse panel descriptions in this
manual may be applicable to your
vehicle; the information is accurate at
the time of printing. When you inspect
the fuse panel in your vehicle, refer to
the fuse panel label.
i
OHI076030
OHI076031N