battery GENESIS G90 2021 Owner's Guide
[x] Cancel search | Manufacturer: GENESIS, Model Year: 2021, Model line: G90, Model: GENESIS G90 2021Pages: 538, PDF Size: 13.02 MB
Page 214 of 538

3-113
03
The selected function will be con-
trolled manually while other functions
operate automatically.
For your convenience and to improve
the effectiveness of the climate con-
trol, use the AUTO button and set the
temperature to 72°F (22°C).
Information
Never place anything near or covering
the sensor (both inside and outside the
vehicle) to ensure better control of the
heating and cooling system.
Manual Heating and Air
Conditioning
The heating and cooling system can
be controlled manually by pushing
buttons other than the AUTO button.
In this case, the system works
sequentially according to the order of
buttons selected.
When pressing any button except the
AUTO button while using automatic
operation, the functions not selected
will be controlled automatically.
1. Start the engine.
2. Set the mode to the desired posi-
tion.To improve the effectiveness of
heating and cooling, select the
mode according to the following:
- Heating:
- Cooling:
3. Set the temperature control to the
desired position.
4. Set the air intake control to Fresh
mode.
5. Set the fan speed control to the
desired speed.
6. If air conditioning is desired, turn
the air conditioning system on.
7. Press the AUTO button in order to
convert to full automatic control of
the system.
When starting the vehicle in cold
weather using manual temperature
control, operate the system in the fol-
lowing method to improve heating.
- Turn off or lower the blower, right
after starting the engine.
- Allow the engine to warm up during
this time since the air flow from the
heater is still cold.
- After a few minutes of engine warm
up, turn on or set the fan to a high-
er level and adjust the temperature
setting to hot.
The climate control system settings
will be maintained, even when the
engine is turned OFF. However, the
climate control system settings will
be initialized when the battery has
been discharged, or when the cables
have been disconnected. In this
case, adjust the climate control sys-
tem settings again.
i
OHI048309
Page 218 of 538

3-117
03
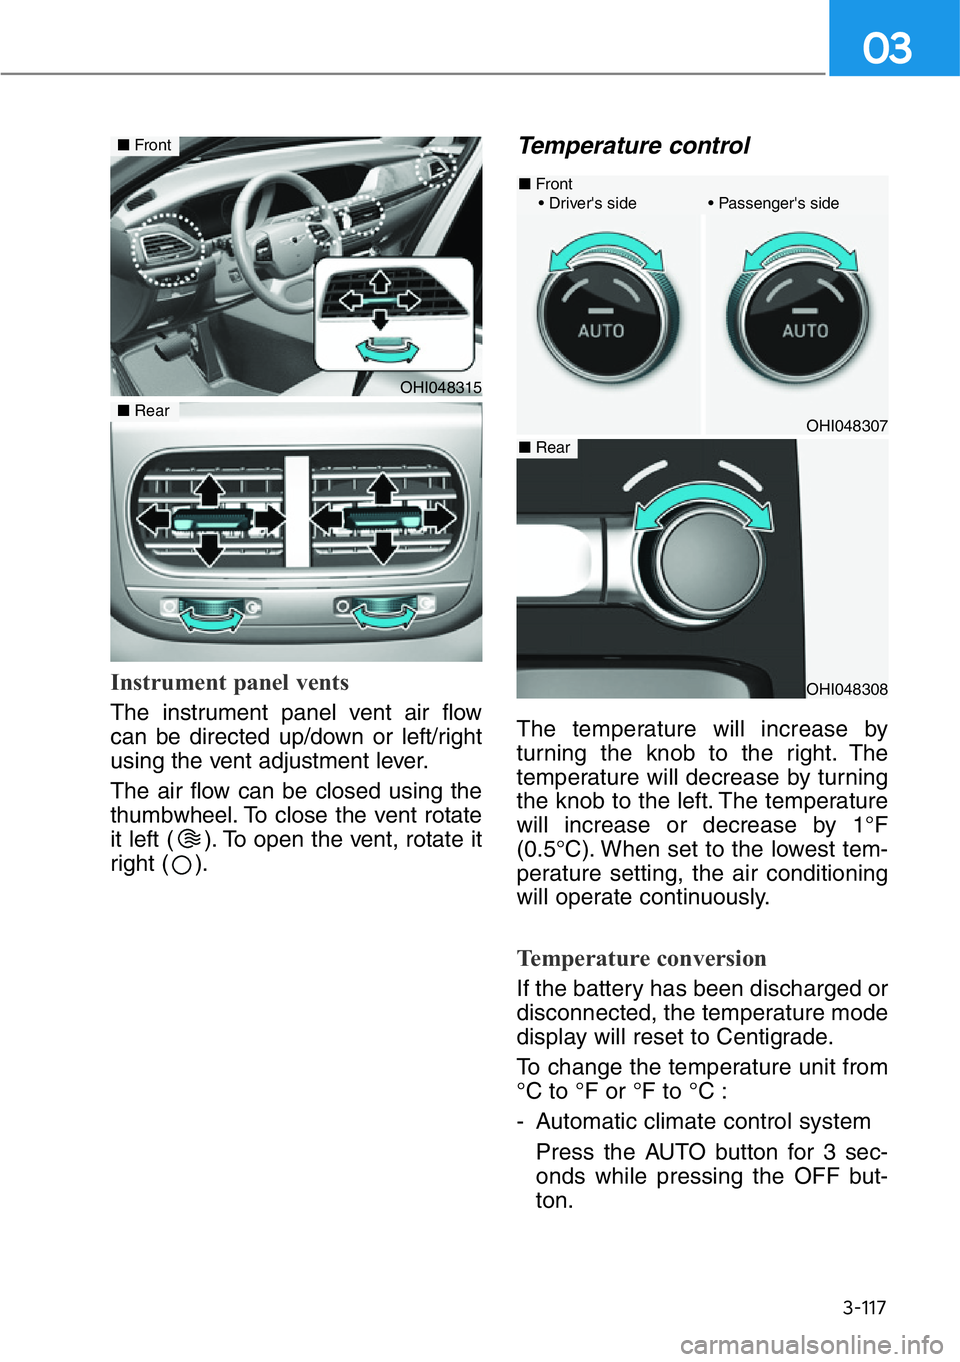
Instrument panel vents
The instrument panel vent air flow
can be directed up/down or left/right
using the vent adjustment lever.
The air flow can be closed using the
thumbwheel. To close the vent rotate
it left ( ). To open the vent, rotate it
right ( ).
Temperature control
The temperature will increase by
turning the knob to the right. The
temperature will decrease by turning
the knob to the left. The temperature
will increase or decrease by 1°F
(0.5°C). When set to the lowest tem-
perature setting, the air conditioning
will operate continuously.
Temperature conversion
If the battery has been discharged or
disconnected, the temperature mode
display will reset to Centigrade.
To change the temperature unit from
°C to °F or °F to °C :
- Automatic climate control system
Press the AUTO button for 3 sec-
onds while pressing the OFF but-
ton.
OHI048315
■Front
■Rear
OHI048308
OHI048307
■Front
• Driver's side • Passenger's side
■Rear
Page 229 of 538

3-128
Convenient features of your vehicle
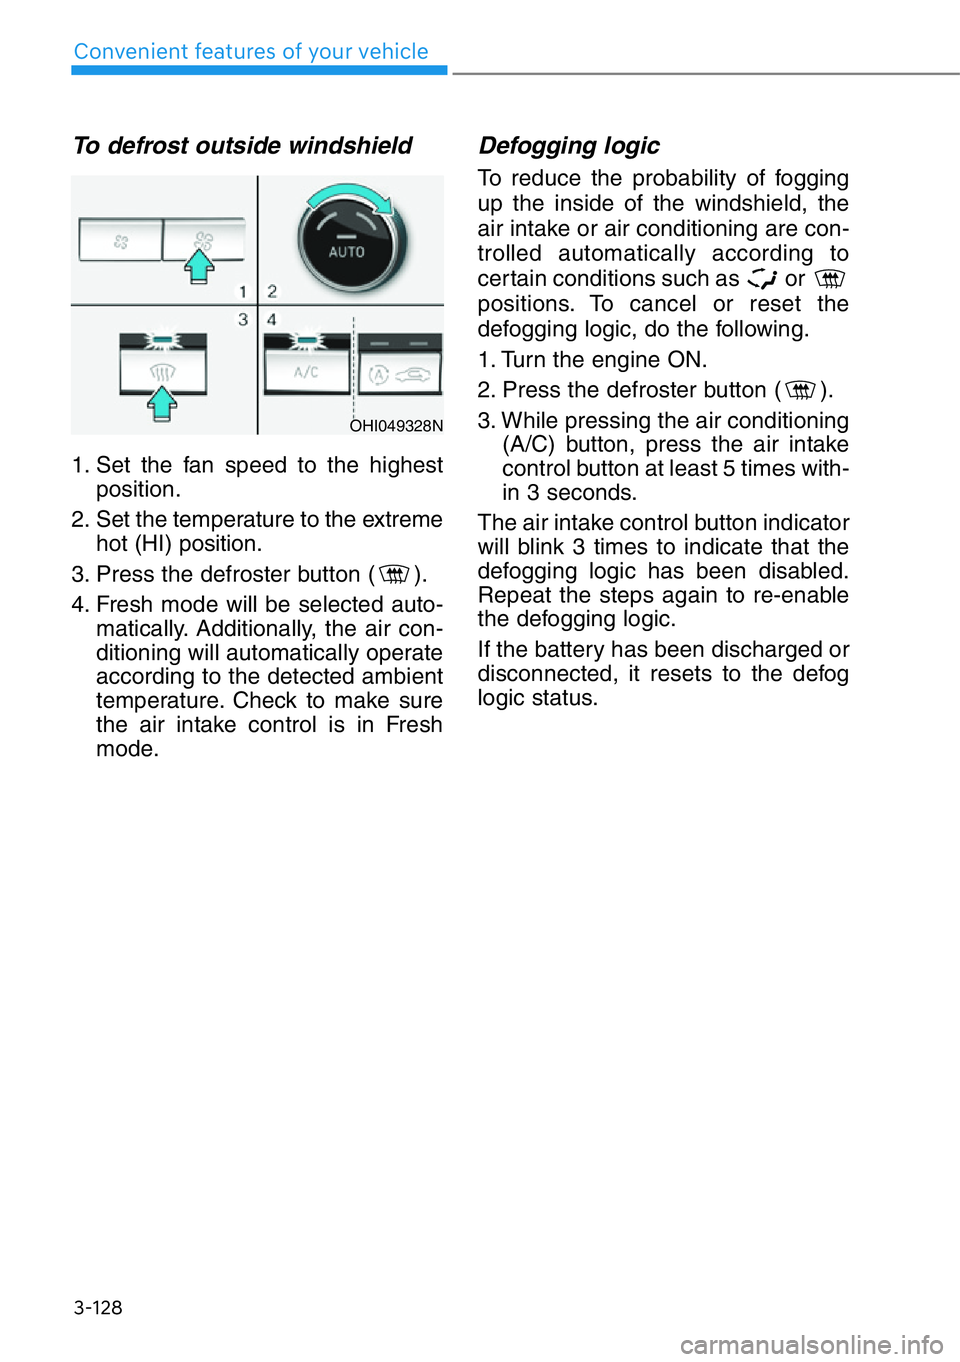
To defrost outside windshield
1. Set the fan speed to the highest
position.
2. Set the temperature to the extreme
hot (HI) position.
3. Press the defroster button ( ).
4. Fresh mode will be selected auto-
matically. Additionally, the air con-
ditioning will automatically operate
according to the detected ambient
temperature. Check to make sure
the air intake control is in Fresh
mode.
Defogging logic
To reduce the probability of fogging
up the inside of the windshield, the
air intake or air conditioning are con-
trolled automatically according to
certain conditions such as or
positions. To cancel or reset the
defogging logic, do the following.
1. Turn the engine ON.
2. Press the defroster button ( ).
3. While pressing the air conditioning
(A/C) button, press the air intake
control button at least 5 times with-
in 3 seconds.
The air intake control button indicator
will blink 3 times to indicate that the
defogging logic has been disabled.
Repeat the steps again to re-enable
the defogging logic.
If the battery has been discharged or
disconnected, it resets to the defog
logic status.
OHI049328N
Page 237 of 538

3-136
Convenient features of your vehicle
Sunvisor
To use the sunvisor, pull it downward.
To use the sunvisor to block the sun
from the side window, pull it down-
ward, release it from the bracket (1)
and swing it to the side towards the
window (2).
To use the vanity mirror, pull down
the sunvisor and slide the mirror
cover (3).
Adjust the sunvisor forward or back-
ward (4) as needed. Use the ticket
holder (5) to hold tickets.
Close the vanity mirror cover secure-
ly and return the sunvisor to its origi-
nal position after use.
Do not put several tickets in the
ticket holder at one time. This
could cause damage to the ticket
holder.
Rear Mirror (if equipped)
To open:
Press the cover and it will slowly
open and the mirror lamp will turn
ON.
To close:
Push back into position.
Make sure to close the rear mirror
cover after use. If not, the rear mir-
ror lamp remains ON, possibly
draining the battery or damaging
the rear mirror.
NOTICE
NOTICE
OHI048444OHI048562
For your safety, do not block your
view when using the sunvisor.
WARNING
Page 238 of 538

3-137
03
Power Outlet (if equipped)
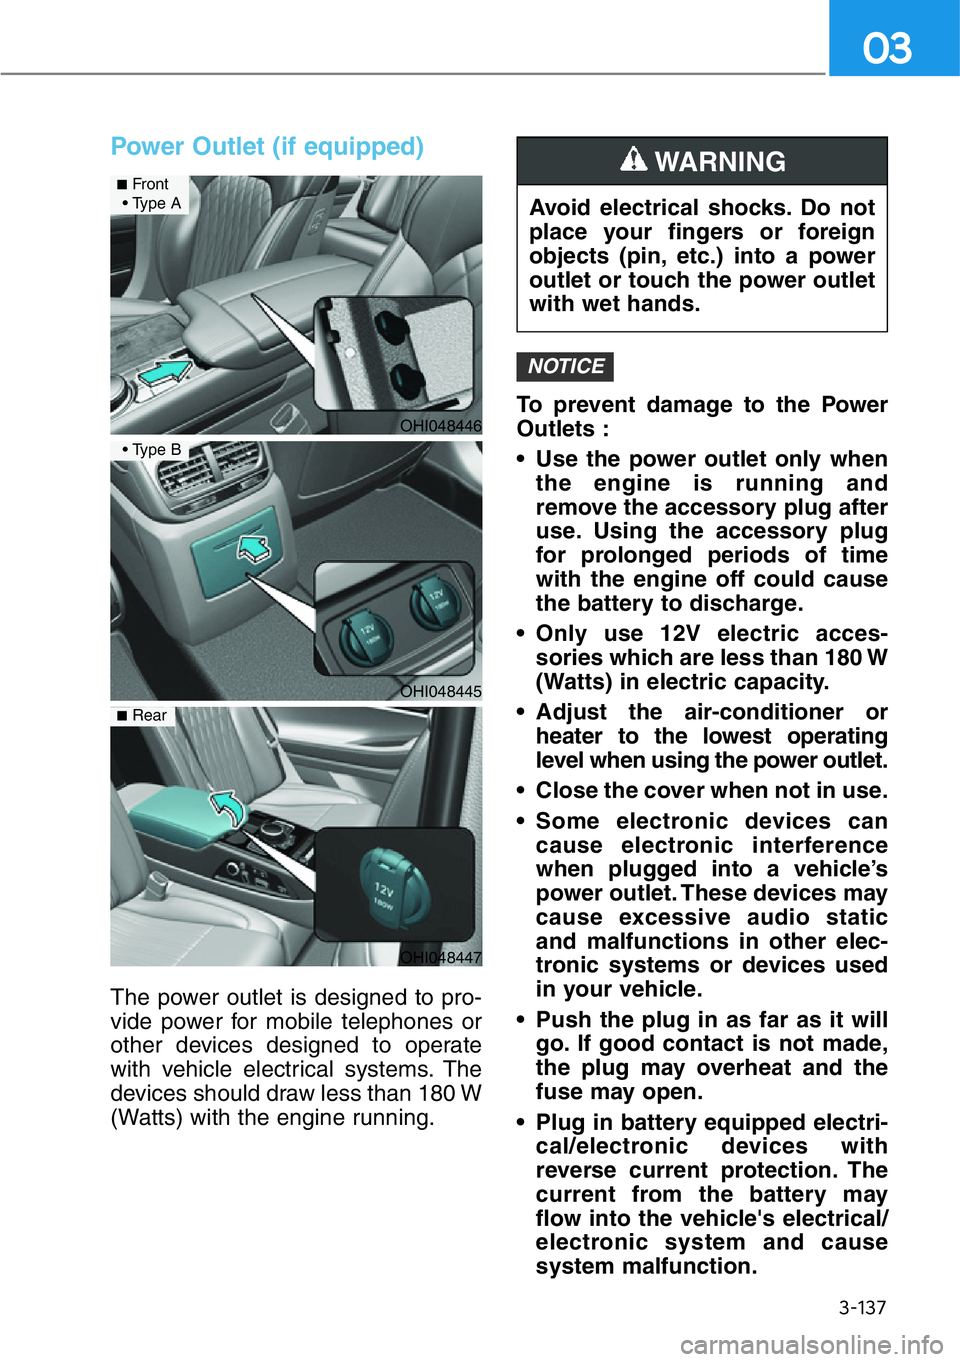
The power outlet is designed to pro-
vide power for mobile telephones or
other devices designed to operate
with vehicle electrical systems. The
devices should draw less than 180 W
(Watts) with the engine running.To prevent damage to the Power
Outlets :
• Use the power outlet only when
the engine is running and
remove the accessory plug after
use. Using the accessory plug
for prolonged periods of time
with the engine off could cause
the battery to discharge.
• Only use 12V electric acces-
sories which are less than 180 W
(Watts) in electric capacity.
• Adjust the air-conditioner or
heater to the lowest operating
level when using the power outlet.
• Close the cover when not in use.
• Some electronic devices can
cause electronic interference
when plugged into a vehicle’s
power outlet. These devices may
cause excessive audio static
and malfunctions in other elec-
tronic systems or devices used
in your vehicle.
• Push the plug in as far as it will
go. If good contact is not made,
the plug may overheat and the
fuse may open.
• Plug in battery equipped electri-
cal/electronic devices with
reverse current protection. The
current from the battery may
flow into the vehicle's electrical/
electronic system and cause
system malfunction.
NOTICE
Avoid electrical shocks. Do not
place your fingers or foreign
objects (pin, etc.) into a power
outlet or touch the power outlet
with wet hands.
WARNING
OHI048446
■Front
• Type A
OHI048445
• Type B
OHI048447
■Rear
Page 239 of 538

3-138
Convenient features of your vehicle
USB Charger (if equipped)
The USB charger is designed to
recharge batteries of small size elec-
trical devices using a USB cable.
The electrical devices can be
recharged when the Engine Start/
Stop button is in the ACC, ON or
START position.
Insert the USB charger into the USB
port, and re-charge a smart phone or
a tablet PC.
The battery charging state may be
monitored on the electrical device.
Disconnect the USB cable from the
USB port after use.
• A smart phone or a tablet PC may
get warmer during the re-charging
process. It does not indicate any
malfunction with the charging sys-
tem.• A smart phone or a tablet PC,
which adopts a different re-charg-
ing method, may not be properly
re-charged. In this case, use an
exclusive charger of your device.
OHI048438L
■Front
OHI048450
■Rear
Page 253 of 538

5
Before Driving ..............................5-4
Before Entering the Vehicle ............5-4
Before Starting ................................5-4
Engine Start/Stop Button ............5-6
Engine Stop/Start Button
Positions ..........................................5-7
Starting the Engine ........................5-8
Turning Off the Engine ....................5-9
Automatic Transmission..............5-10
Automatic Transmission
Operation ......................................5-10
Shift-lock System ............................5-14
When the Battery is Discharged ....5-14
Parking ............................................5-15
Paddle Shifter
(Manual Shift Mode) ......................5-15
LCD Display Messages ..................5-16
Good Driving Practices ..................5-19
Braking System ............................5-21
Power Brakes ..................................5-21
Disc Brakes Wear Indicator ..........5-22
Electronic Parking Brake (EPB) ......5-22
Auto Hold ........................................5-27
Anti-lock Brake System (ABS) ........5-31
Electronic Stability Control (ESC) ....33
Vehicle Stability Management
(VSM)..............................................5-36
Hill-Start Assist Control (HAC) ......5-37
Good Braking Practices ................5-38
All Wheel Drive (AWD) ..............5-39
Using All Wheel Drive (AWD) ........5-39
Emergency Precautions ................5-42
Genesis adaptive control
suspension ................................5-44
Electronic Control Suspension
(ECS) ..............................................5-44
Dynamic Stability Damping Control
(DSDC) ..........................................5-44
Drive Mode Integrated Control
System ........................................5-45
Drive Mode ....................................5-45
Coasting ......................................5-49
Coasting Setting ............................5-49
Coasting Operating Conditions ....5-49
Coasting Release Conditions ........5-50
Forward Collision-avoidance Assist
(FCA) System - Sensor Fusion Type
(Front Radar + Front Camera) ....5-51
System Setting and Operation ......5-51
FCA Warning Message and Brake
Control ..........................................5-53
FCA Sensor (Front Radar/Front
Camera) ........................................5-56
System Malfunction ......................5-58
Limitations of the System..............5-59
Forward Collision-avoidance
Assist - Lane-Change Oncoming
Function ......................................5-66
System Setting and Operation ......5-66
Limitations of the System ..............5-67
Blind-spot Collision Warning
(BCW)/Blind-spot Collision-
avoidance Assist (BCA) ..............5-68
System Description ........................5-68
System Setting and Operation ......5-69
Warning and System Control ........5-72
Detecting Sensor
(Camera and Radar) ......................5-75
System Malfunction ........................5-77
Limitations of the System ..............5-78
Rear Cross-traffic Collision Warning
(RCCW)/Rear Cross-Traffic
Collision-avoidance Assist
(RCCA) ........................................5-82
System Description ........................5-82
System Setting and Operation ......5-83
Warning and System Control ........5-85
5
5. Driving Your Vehicle
Page 259 of 538

5-7
05
Engine Stop/Start Button
Positions
OFF
To turn off the engine, press the
Engine Start/Stop button with the
vehicle shifted to P (Park).
Note if the Engine Start/Stop button
is pressed with the vehicle shifted to
D (Drive) or R (Reverse), the vehicle
will automatically shift to P (Park).
If the Engine Start/Stop button is
pressed with the vehicle shifted to N
(Neutral), the Engine Start/Stop but-
ton will go to the ACC position.
ACC
Press the Engine Start/Stop button
when the button is in the OFF posi-
tion without depressing the brake
pedal.
Some of the electrical accessories
are usable. The steering wheel
unlocks.
Information
If you leave the Engine Start/Stop but-
ton in the ACC position for more than
one hour, the battery power will turn
off automatically to prevent the bat-
tery from discharging.
ON
Press the Engine Start/Stop button
while it is in the ACC position without
depressing the brake pedal.
The warning lights can be checked
before the engine is started.
Information
Do not leave the Engine Start/Stop
button in the ON position when the
engine is not running to prevent the
battery from discharging.
START
To start the engine, depress the
brake pedal and press the Engine
Start/Stop button with the vehicle
shifted to the P (Park) or the N
(Neutral) position.
For your safety, start the engine with
the vehicle shifted to the P (Park)
position.
Information
If you press the Engine Start/Stop but-
ton without depressing the brake
pedal, the engine does not start and
the Engine Start/Stop button changes
as follows:
OFF
→ACC →ON →OFF
However, the engine may start if you
depress the brake pedal within 0.5 sec-
ond after pressing the Engine Start/
Stop button from the OFF position.
i
i
i• NEVER reach through the
steering wheel for the Engine
Start/Stop button or any other
control while the vehicle is in
motion. The presence of your
hand or arm in this area may
cause a loss of vehicle control
resulting in an accident.
Page 261 of 538

5-9
05
To prevent damage to the vehicle:
• If the engine stalls while you are
in motion, do not attempt to shift
the gear to the P (Park) position.
If traffic and road conditions
permit, you may put the shift
lever in the N (Neutral) position
while the vehicle is still moving
and press the Engine Start/Stop
button in an attempt to restart
the engine.
• Do not push or tow your vehicle
to start the engine.
To prevent damage to the vehicle:
When the stop lamp fuse is blown,
you can't start the engine normal-
ly. Replace the fuse with a new
one. If you are not able to replace
the fuse, you can start the engine
by pressing and holding the
Engine Start/Stop button for 10
seconds with the Engine Start/
Stop button in the ACC position.
Do not press the Engine Start/
Stop button for more than 10 sec-
onds except when the stop lamp
fuse is blown.
For your safety always depress
the brake pedal before starting the
engine.
Information
If the smart key battery is weak or the
smart key does not work correctly,
you can start the engine by pressing
the Engine Start/Stop button with the
smart key in the direction of the pic-
ture above.
Turning Off the Engine
1. Stop the vehicle and depress the
brake pedal fully.
2. Press the P button to shift to P
(Park).
3. Press the Engine Start/Stop but-
ton to the OFF position and apply
the parking brake.
i
NOTICE
NOTICE
OHI058006
Page 266 of 538

5-14
Driving your vehicle
Shift-lock System
For your safety, the automatic trans-
mission has a shift-lock system
which prevents shifting the transmis-
sion from P (Park) into R (Reverse)
or D (Drive) unless the UNLOCK but-
ton is pressed while depressing the
brake pedal.
To shift from P (Park) into R
(Reverse) or D (Drive):
1. Depress and hold the brake pedal.
2. Start the engine or place the
Engine Start/Stop button in the
ON position.
3. Move the shift lever to R (Reverse)
or D (Drive) while pressing the
UNLOCK button.
When the Battery is
Discharged
You cannot move the shift lever,
when the battery is discharged.
In emergencies, do the following to
move the shift lever to N (Neutral) on
a level ground.
1. Connect the battery cables from
another vehicle or from a another
battery to the jump-starting termi-
nals inside the engine compart-
ment.
For more details, refer to "Jump
Starting" in chapter 6.
2. Release the parking brake with
the Engine Start/Stop button in the
ON position.
3. Press the Engine Start/Stop but-
ton to the OFF position.
4. Remove the cap-cover (1) and
press the P release button (2)
while depressing the brake pedal.
Then, the gear will change to the N
(Neutral) position. The button (2)
operates only for 20 seconds to
change the gear between P (Park)
and N (Neutral) from the time when
the button (2) is first pressed.
OHI058017L