maintenance GENESIS G90 2021 Owner's Guide
[x] Cancel search | Manufacturer: GENESIS, Model Year: 2021, Model line: G90, Model: GENESIS G90 2021Pages: 538, PDF Size: 13.02 MB
Page 462 of 538

7-22
Maintenance
Checking the Engine Oil Level
1. Follow all of the oil manufacturer’s
precautions.
2. Be sure the vehicle is on the level
ground in P (Park) with the parking
brake set. If possible, block the
wheels.
3. Turn the engine on and allow the
engine to reach normal operating
temperature.
4. Turn the engine off and wait about
five minutes for the oil to return to
the oil pan.
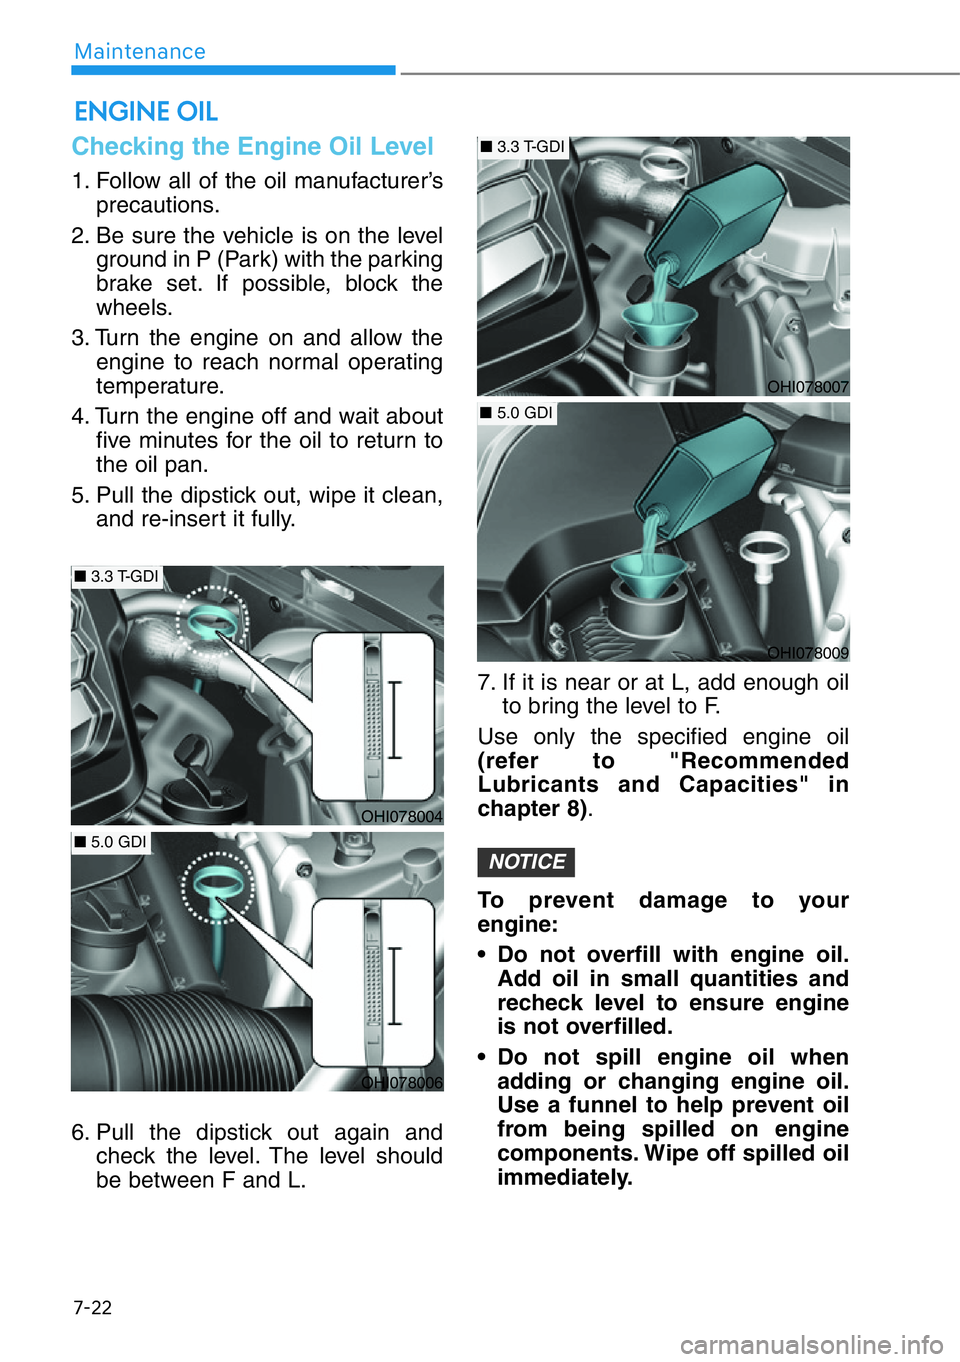
5. Pull the dipstick out, wipe it clean,
and re-insert it fully.
6. Pull the dipstick out again and
check the level. The level should
be between F and L.7. If it is near or at L, add enough oil
to bring the level to F.
Use only the specified engine oil
(refer to "Recommended
Lubricants and Capacities" in
chapter 8).
To prevent damage to your
engine:
• Do not overfill with engine oil.
Add oil in small quantities and
recheck level to ensure engine
is not overfilled.
• Do not spill engine oil when
adding or changing engine oil.
Use a funnel to help prevent oil
from being spilled on engine
components. Wipe off spilled oil
immediately.
NOTICE
ENGINE OIL
OHI078004
■3.3 T-GDI
OHI078006
■5.0 GDI
OHI078007
■3.3 T-GDI
OHI078009
■5.0 GDI
Page 463 of 538

7-23
07
CALIFORNIA PROPOSITION 65 WARNING
Engine oil contains chemicals known to the State of California to
cause cancer, birth defects and reproductive harm. Used engine oil
may cause irritation or cancer of the skin if left in contact with the skin
for prolonged periods of time. Always protect your skin by washing
your hands thoroughly with soap and warm water as soon as possi-
ble after handling used oil.
WARNING
Checking the Engine Oil and Filter
Have engine oil and filter changed by an authorized retailer of Genesis
Branded products according to the Maintenance Schedule at the beginning of
this chapter.
Page 464 of 538

7-24
Maintenance
The high-pressure cooling system
has a reservoir filled with year-round
antifreeze coolant. The reservoir is
filled at the factory.
Check the antifreeze protection and
coolant level at least once a year, at
the beginning of the winter season
and before traveling to a colder cli-
mate.
Checking the Engine Coolant
Level
Check the condition and connections
of all cooling system hoses and
heater hoses. Replace any swollen
or deteriorated hoses.
The coolant level should be filled
between the F and the L marks on
the side of the coolant reservoir
when the engine is cool.
If the coolant level is low, add enough
distilled (deionized) water to bring
the level to the F mark, but do not
overfill. If frequent additions are
required, we recommend that you
see an authorized retailer of Genesis
Branded products for a cooling sys-
tem inspection.
ENGINE COOLANT
OHI078010
■3.3 T-GDI
OHI078012
■5.0 GDI
Page 466 of 538

7-26
Maintenance
Changing Engine Coolant
Have coolant changed by an author-
ized retailer of Genesis Branded
products according to the
Maintenance Schedule at the begin-
ning of this chapter.
To prevent damage to engine
parts, put a thick towel around the
radiator cap before refilling the
coolant to prevent the coolant
from overflowing into engine
parts, such as the alternator.
NOTICE
Do not use engine coolant or
antifreeze in the washer fluid
reservoir.
Engine coolant can severely
obscure visibility when sprayed
on the windshield and may
cause loss of vehicle control
resulting in an accident.
Engine coolant may also cause
damage to paint and body trim.
WARNING
When you are sure all the pres-
sure has been released, press
down on the cap, using a thick
towel, and continue turning
counterclockwise to remove it.
The electric motor for
the cooling fan may
continue to operate
or start up when the
engine is not running
and can cause serious injury.
Keep hands, clothing and tools
away from the rotating fan
blades of the cooling fan.
Always turn off the engine
unless the vehicle has to be
inspected with the engine on.
Be cautious as the cooling fan
may operate if the negative (-)
battery terminal is not discon-
nected.
WARNING
Page 468 of 538

7-28
Maintenance
WASHER FLUID
Checking the Washer Fluid
Level
Check the fluid level in the washer
fluid reservoir and add fluid if neces-
sary. Plain water may be used if
washer fluid is not available.
However, use washer solvent with
antifreeze characteristics in cold cli-
mates to prevent freezing.To prevent serious injury or
death, take the following safety
precautions when using washer
fluid:
• Do not use engine coolant or
antifreeze in the washer fluid
reservoir. Engine coolant can
severely obscure visibility
when sprayed on the wind-
shield and may cause loss of
vehicle control resulting in an
accident or damage to paint
and body trim.
• Do not allow sparks or flame
to contact the washer fluid or
the washer fluid reservoir.
Washer fluid may contain
alcohol and can be flamma-
ble.
• Do not drink washer fluid and
avoid contact with skin.
Washer fluid is harmful to
humans and animals.
• Keep washer fluid away from
children and animals.
WARNING
OHI078017
Page 469 of 538

7-29
07
Filter Replacement
Do not attempt to wash or to rinse it,
as water will damage the filter.
If soiled, the air cleaner filter must be
replaced.
Visit an authorized retailer of
Genesis Branded products to
replace the air cleaner filter.
Replace the filter according to the
Maintenance Schedule
Information
If the vehicle is operated in extremely
dusty or sandy areas, replace the air
cleaner filter more often than the
usual recommended intervals (refer to
"Maintenance Under Severe Usage
Conditions" in this chapter).• Do not drive with the air cleaner
filter removed. This will result in
excessive engine wear.
• When removing the air cleaner
filter, be careful that dust or dirt
does not enter the air intake, or
damage may result.
• Use Genuine Genesis Part, use
of non-Genuine Genesis Part
could damage the engine.
NOTICE
i
AIR CLEANER
OHI078018
Page 470 of 538

7-30
Maintenance
Filter Inspection
The cabin air filter should be
replaced according to the
Maintenance Schedule. If the vehicle
is operated in severely air-polluted
cities or on dusty rough roads for a
long period, it should be inspected
more frequently and replaced soon-
er. Replace the cabin air filter by fol-
lowing the procedure below and be
careful to avoid damaging other com-
ponents.
1. With the glove box open, remove
the stoppers on both sides to
allow the glove box to hang freely
on the hinges.
2. Remove the support rod (1).3. Press and hold the lock on the left
side of the cover.
4. Pull out the cover.
5. Replace the cabin air filter.
6. Reassemble in the reverse order
of disassembly.
Install a new cabin air filter in the
correct direction with the arrow
symbol (
↓) facing downwards to
prevent noise and reduced effec-
tiveness.
NOTICE
CABIN AIR FILTER
OHI078051
OHI078052
OHI078050
OHI078055
Page 472 of 538

7-32
Maintenance
Front windshield wiper blade
replacement
1. Put the front windshield wipers
into the service position.
2. Open the wiper blade clip (1) and
slightly rotate the wiper blade
assembly (2) to expose the plastic
locking clip.3. Press the locking clip (3) and pull
down the wiper blade assembly
(4).
4. Remove the wiper blade assem-
bly from the wiper arm (5).
5. Install a blade assembly in the
reverse order of removal.
6. Return the wiper arm on the wind-
shield.
7. Place the Engine Start/Stop but-
ton to the ON position. The wiper
arms will return to the normal
operating position.
OHI078075
OHI078076
OHI078077
Page 474 of 538

7-34
Maintenance
Battery Usage
Recommendations
• Keep the battery securely mount-
ed.
• Keep the battery top clean and dry.
• Keep the terminals and connec-
tions clean, tight, and coated with
petroleum jelly or terminal grease.
• Rinse any spilled acid from the bat-
tery immediately with a solution of
water and baking soda.
Battery Replacement
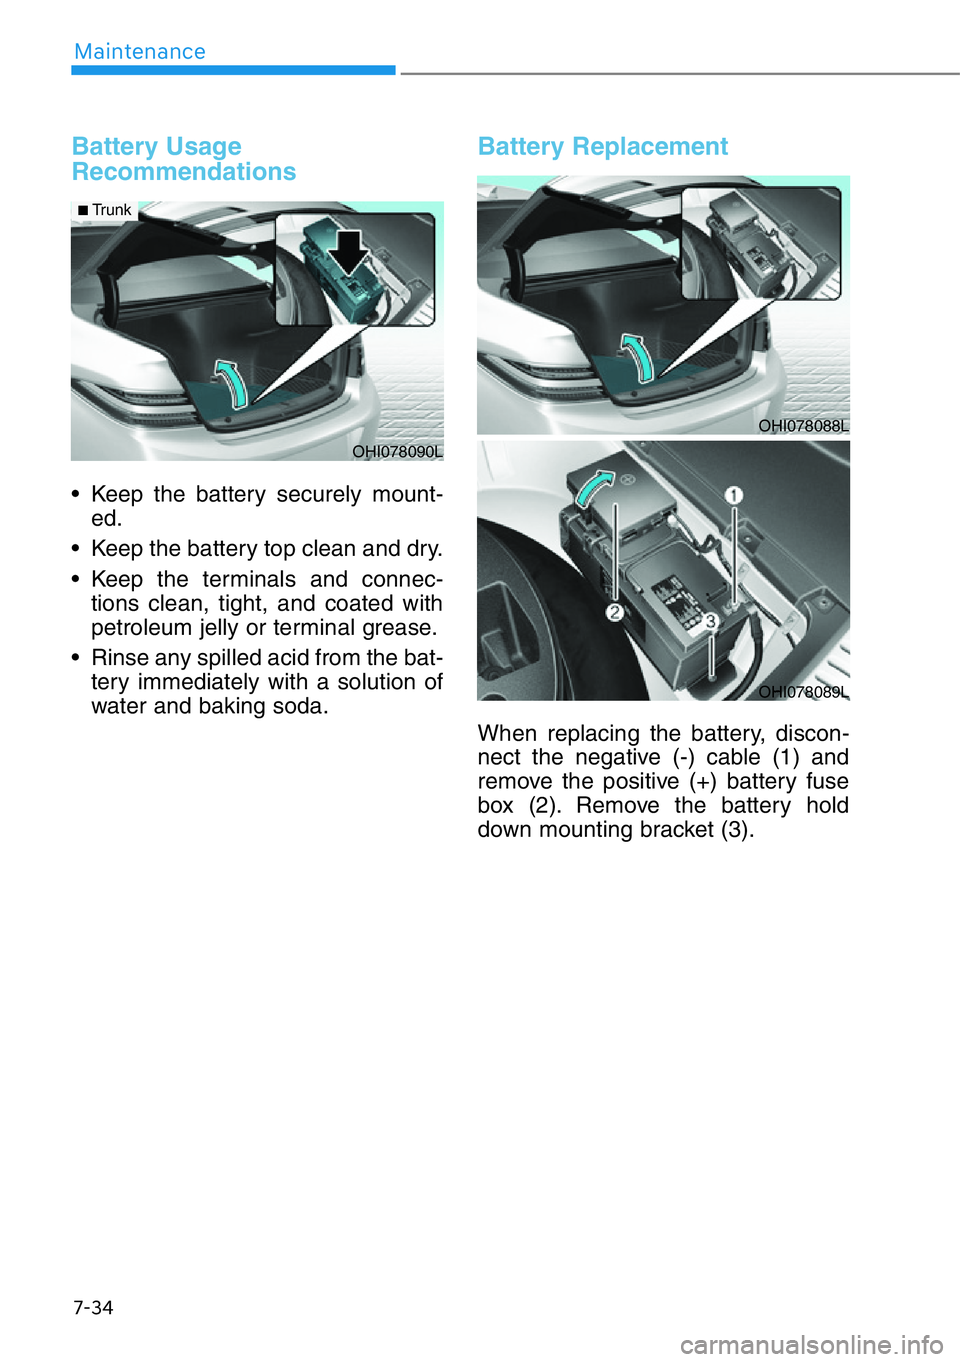
When replacing the battery, discon-
nect the negative (-) cable (1) and
remove the positive (+) battery fuse
box (2). Remove the battery hold
down mounting bracket (3).
OHI078090L
■Trunk
OHI078088L
OHI078089L
Page 475 of 538

7-35
07
Battery Recharging
By battery charger
Your vehicle has a maintenance-free,
calcium-based battery.
• If the battery becomes discharged
in a short time (because, for exam-
ple, the headlights or interior lights
were left on while the vehicle was
not in use), recharge it by slow
charging (trickle) for 10 hours.
• If the battery gradually discharges
because of high electric load while
the vehicle is being used, recharge
it at 20-30A for two hours.
AGM battery
• Absorbent Glass Matt (AGM)
batteries are maintenance-free
and we recommend that the
AGM battery be serviced by an
authorized retailer of Genesis
Branded products. For charging
your AGM battery, use only fully
automatic battery chargers that
are specially developed for AGM
batteries.
• When replacing the AGM bat-
tery, we recommend that you
use parts for replacement from
an authorized retailer of Genesis
Branded products.
• Do not open or remove the cap
on top of the battery. This may
cause leaks of internal elec-
trolyte that could result in
severe injury.
NOTICE
Always follow these instruc-
tions when recharging your
vehicle's battery to avoid the
risk of SERIOUS INJURY or
DEATH from explosions or acid
burns:
• Before performing mainte-
nance or recharging the bat-
tery, turn off all accessories
and press the Engine Start/
Stop button to the OFF posi-
tion.
• Keep all flames, sparks, or
smoking materials away from
the battery.
• Always work outdoors or in an
area with plenty of ventilation.
• Wear eye protection when
checking the battery during
charging.
• The battery must be removed
from the vehicle and placed in
a well ventilated area.
• Watch the battery during
charging, and stop or reduce
the charging rate if the battery
cells begin boiling violently.
WARNING