turn signal GENESIS G90 2021 Owner's Manual
[x] Cancel search | Manufacturer: GENESIS, Model Year: 2021, Model line: G90, Model: GENESIS G90 2021Pages: 538, PDF Size: 13.02 MB
Page 19 of 538

1-6
Your vehicle at a glance
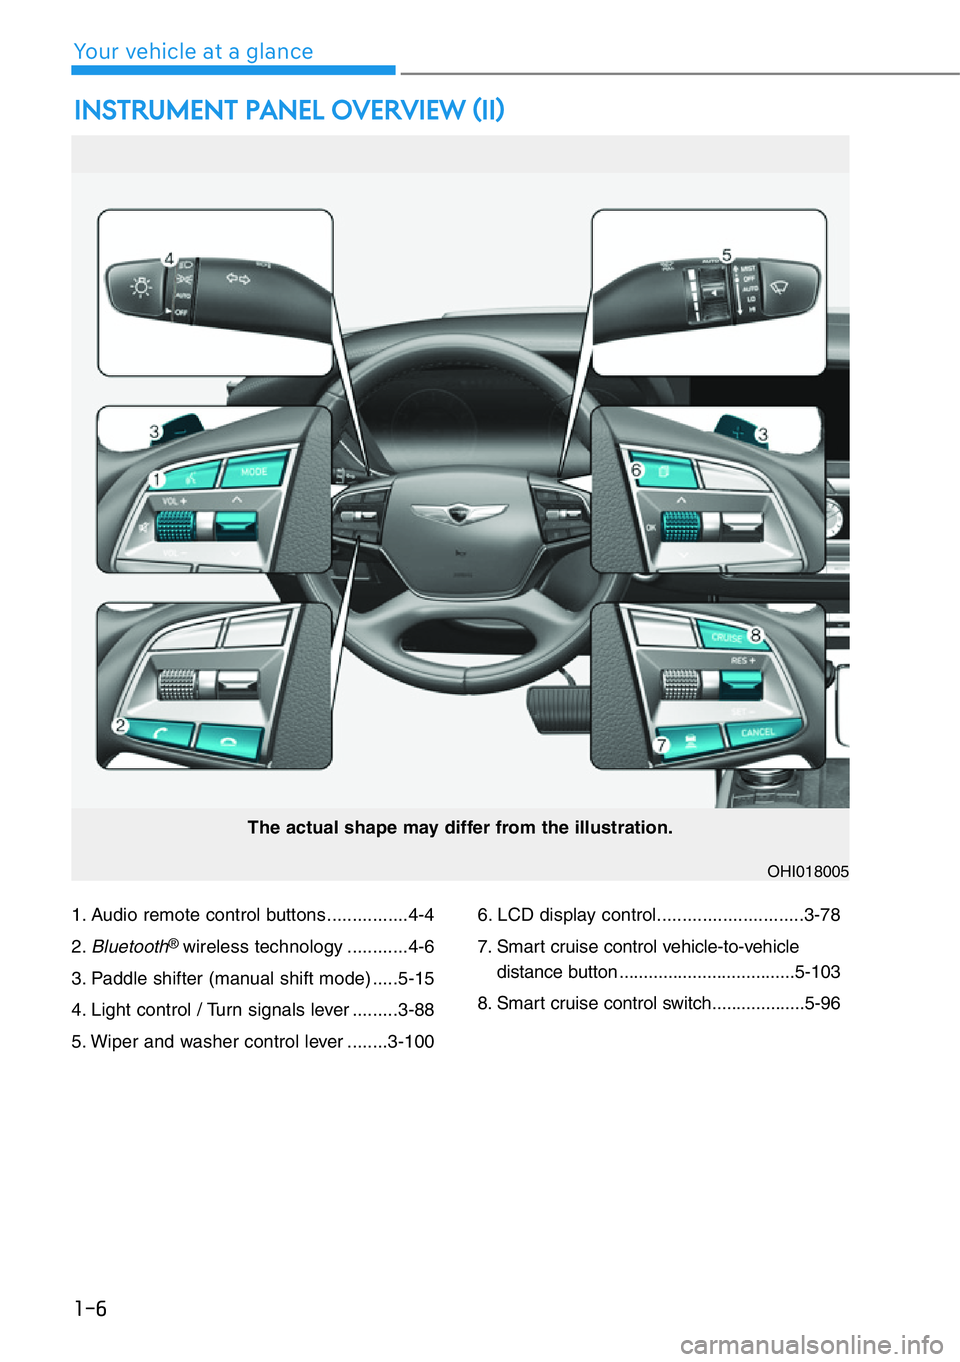
1. Audio remote control buttons ................4-4
2.
Bluetooth® wireless technology ............4-6
3. Paddle shifter (manual shift mode) .....5-15
4. Light control / Turn signals lever .........3-88
5. Wiper and washer control lever ........3-1006. LCD display control.............................3-78
7. Smart cruise control vehicle-to-vehicle
distance button ....................................5-103
8. Smart cruise control switch...................5-96
INSTRUMENT PANEL OVERVIEW (II)
The actual shape may differ from the illustration.
OHI018005
Page 126 of 538

3-25
03
Programming HomeLink®
Please note the following:
• When programming a garage door
opener, it is advised to park the
vehicle outside of the garage.
• It is recommended that a new bat-
tery be placed in the hand-held
transmitter of the device being pro-
grammed to HomeLink
®for quicker
training and accurate transmission
of the radio-frequency signal.
• Some vehicles may require the
Engine Start/Stop button to be in
the ACC (or "Accessories") posi-
tion for programming and/or opera-
tion of HomeLink
®.
• In the event that there are still pro-
gramming difficulties or questions
after following the programming
steps listed below, contact
HomeLink
®at: www.homelink.com,
www.youtube.com/HomeLinkGent
ex or by calling 1-800-355-3515.
Programming
To program most devices, follow
these instructions:
1. Press and release (1), (2) or (3)
button.
• If the indicator (4) is turned ON in
Orange, go to Step 3) since it is
a new programming.
• If the indicator (4) is continuous-
ly turned ON or flashes in Green
rapidly several times, go to Step
2) since it is a programmed but-
ton.
2. Press and hold the button you
wish to program for approximately
15-25 seconds until the LED flash-
es in Orange for several times.
3. Hold the Garage Door Opener
Original Transmitter near the
HomeLink Mirror.
OHI049595N
Page 128 of 538

3-27
03
Gate operator & Canadian program-
ming
During programming, your handheld
transmitter may automatically stop
transmitting. Continue to press the
Integrated HomeLink
®Wireless
Control System button while you press
and re-press ("cycle") your handheld
transmitter every two seconds until the
frequency signal has been learned.
The indicator light will flash slowly and
then rapidly after several seconds
upon successful training.
Operating HomeLink®
1. Press and release one of the
HomeLink buttons (1, 2 or 3) that
programed.
2. The HomeLink indicator (4) will
operate as below:
- Indicates Green and is continu-
ously ON (Fixed Code Garage
Door Opener)
- Flashes in Green rapidly (Rolling
Code Garage Door Opener)
Erasing HomeLink®buttons
1. Press and hold the button (1) and
(3) simultaneously.
2. The indicator (4) is turned continu-
ously ON in orange for about 10
seconds.
3. Then the indicator (4) color
changes to Green and flashes
rapidly.
Release the buttons once the
green indicator flashes.
4. Now HomeLink button (1), (2) and
(4) memories are all cleared.
NVS
®is a registered trademark and
Z-Nav™ is a trademark of the
Gentex Corporation, Zeeland,
Michigan. HomeLink
®is a registered
trademark owned by Johnson
Controls, Incorporated, Milwaukee,
Wisconsin.
FCC ID: NZLUAHL5A
IC: 4112A-UAHL5A
OHI049595N
OHI049597N
Page 171 of 538

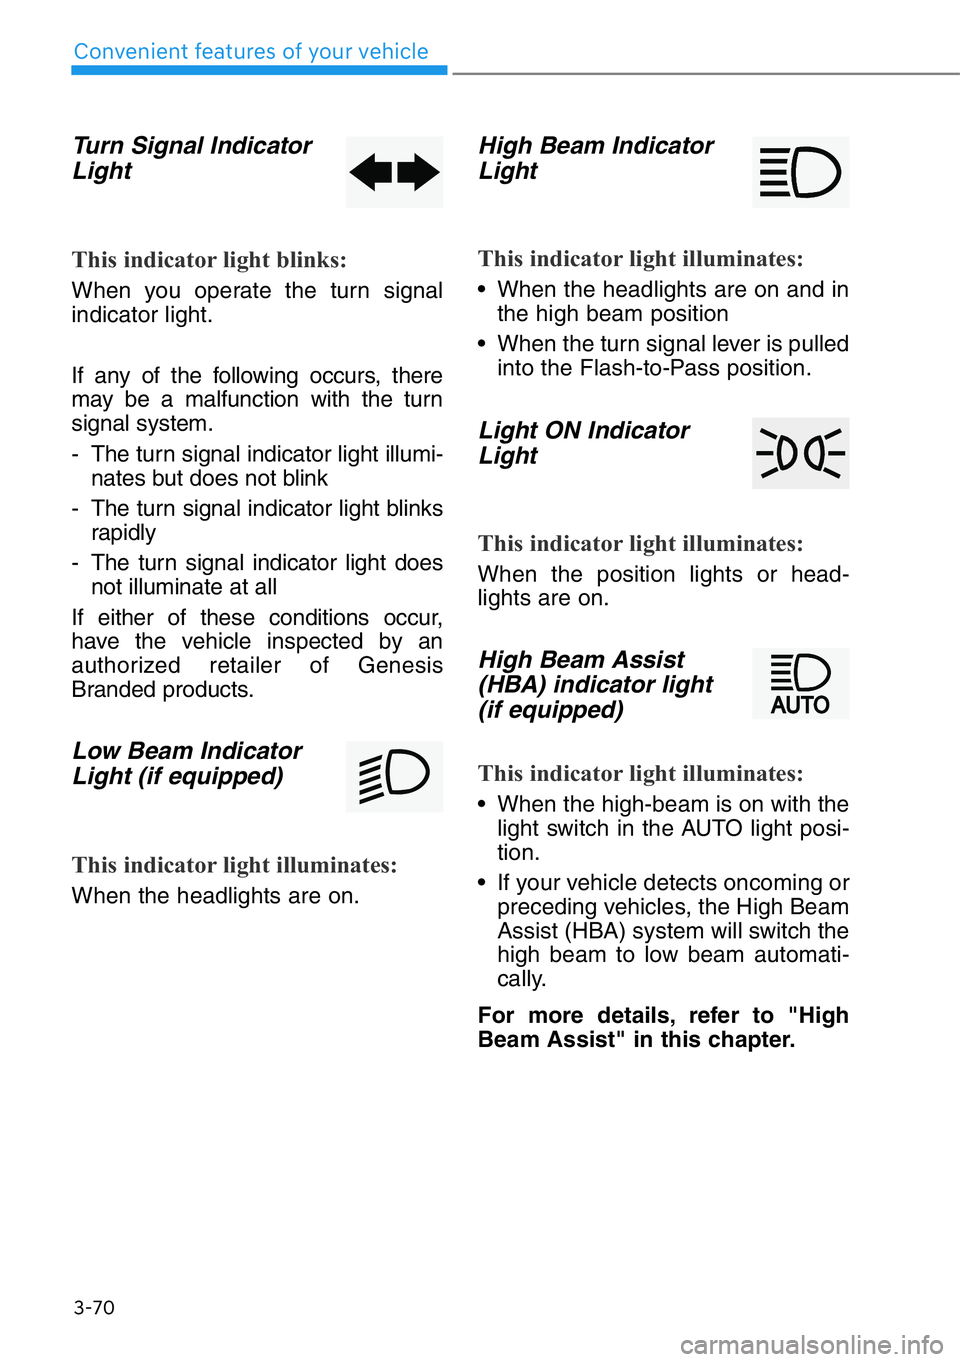
Turn Signal Indicator
Light
This indicator light blinks:
When you operate the turn signal
indicator light.
If any of the following occurs, there
may be a malfunction with the turn
signal system.
- The turn signal indicator light illumi-
nates but does not blink
- The turn signal indicator light blinks
rapidly
- The turn signal indicator light does
not illuminate at all
If either of these conditions occur,
have the vehicle inspected by an
authorized retailer of Genesis
Branded products.
Low Beam Indicator
Light (if equipped)
This indicator light illuminates:
When the headlights are on.
High Beam Indicator
Light
This indicator light illuminates:
• When the headlights are on and in
the high beam position
• When the turn signal lever is pulled
into the Flash-to-Pass position.
Light ON Indicator
Light
This indicator light illuminates:
When the position lights or head-
lights are on.
High Beam Assist
(HBA) indicator light
(if equipped)
This indicator light illuminates:
• When the high-beam is on with the
light switch in the AUTO light posi-
tion.
• If your vehicle detects oncoming or
preceding vehicles, the High Beam
Assist (HBA) system will switch the
high beam to low beam automati-
cally.
For more details, refer to "High
Beam Assist" in this chapter.
3-70
Convenient features of your vehicle
Page 177 of 538

3-76
Convenient features of your vehicle
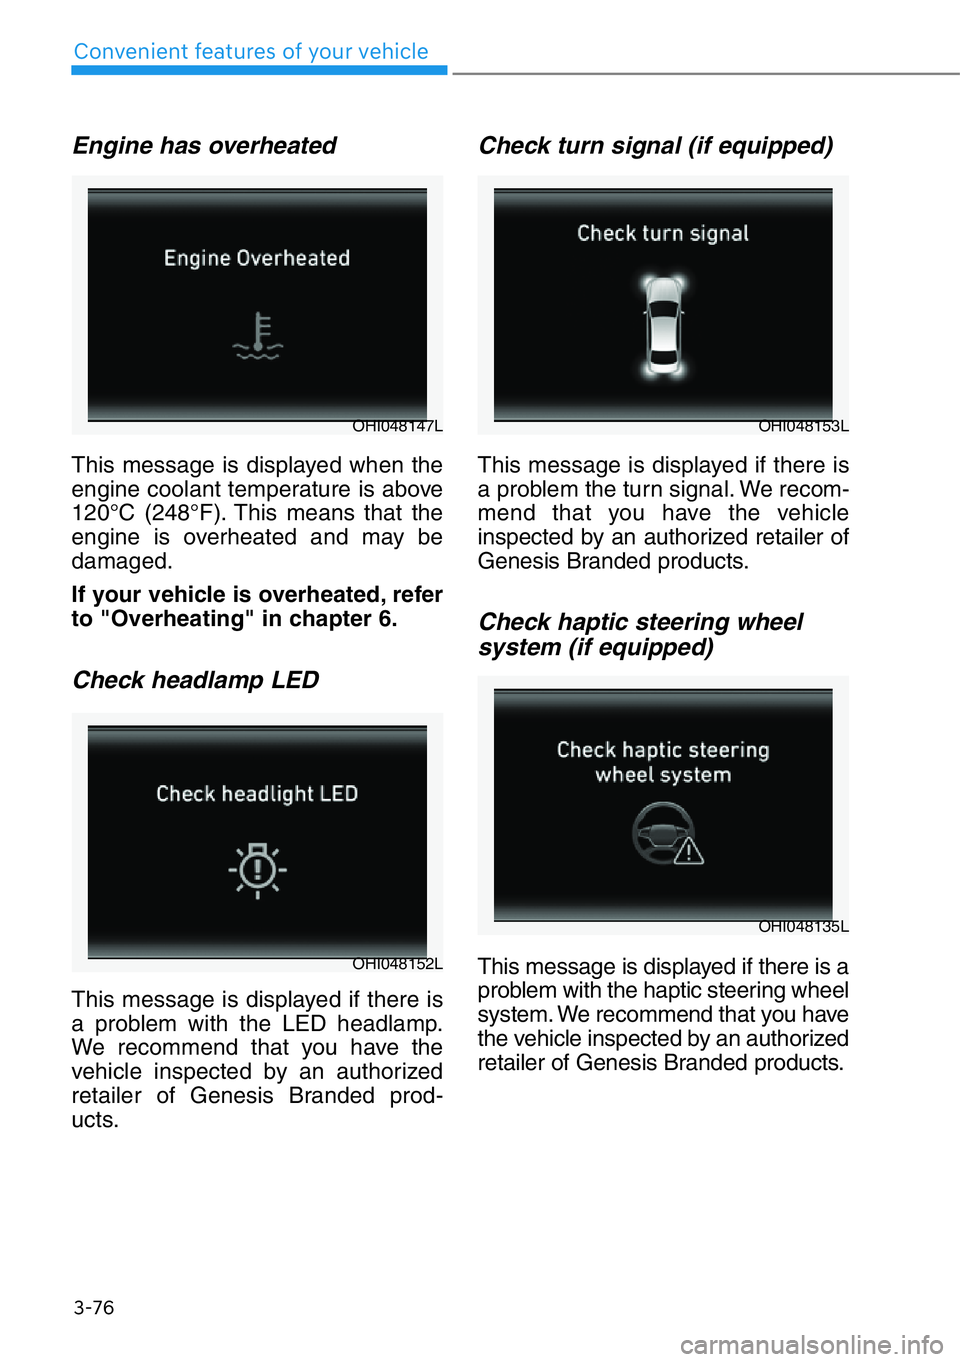
Engine has overheated
This message is displayed when the
engine coolant temperature is above
120°C (248°F). This means that the
engine is overheated and may be
damaged.
If your vehicle is overheated, refer
to "Overheating" in chapter 6.
Check headlamp LED
This message is displayed if there is
a problem with the LED headlamp.
We recommend that you have the
vehicle inspected by an authorized
retailer of Genesis Branded prod-
ucts.
Check turn signal (if equipped)
This message is displayed if there is
a problem the turn signal. We recom-
mend that you have the vehicle
inspected by an authorized retailer of
Genesis Branded products.
Check haptic steering wheel
system (if equipped)
This message is displayed if there is a
problem with the haptic steering wheel
system. We recommend that you have
the vehicle inspected by an authorized
retailer of Genesis Branded products.OHI048152L
OHI048147LOHI048153L
OHI048135L
Page 194 of 538

3-93
03
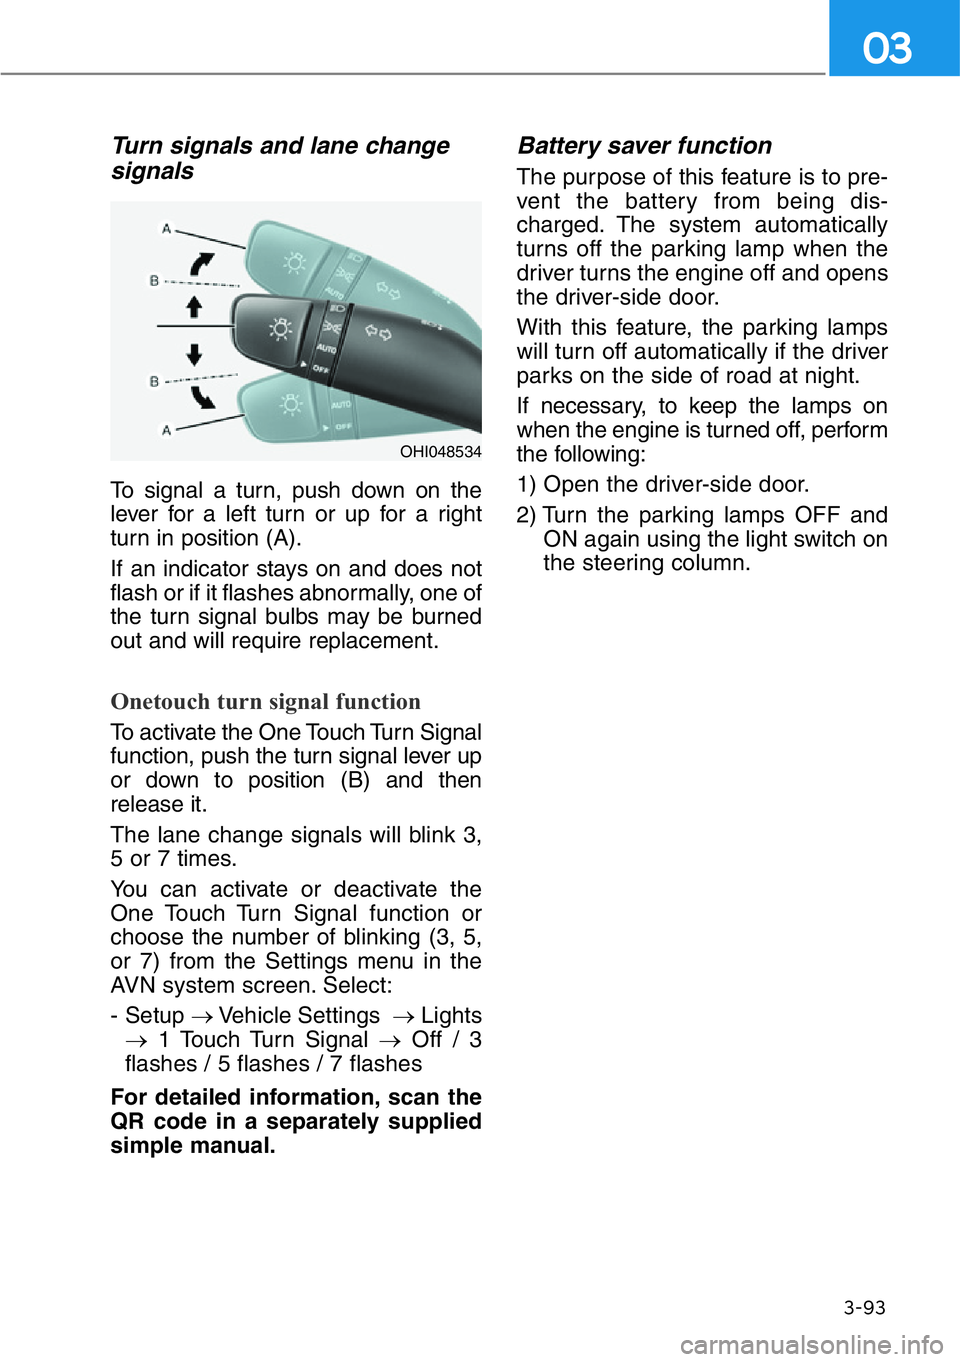
Turn signals and lane change
signals
To signal a turn, push down on the
lever for a left turn or up for a right
turn in position (A).
If an indicator stays on and does not
flash or if it flashes abnormally, one of
the turn signal bulbs may be burned
out and will require replacement.
Onetouch turn signal function
To activate the One Touch Turn Signal
function, push the turn signal lever up
or down to position (B) and then
release it.
The lane change signals will blink 3,
5 or 7 times.
You can activate or deactivate the
One Touch Turn Signal function or
choose the number of blinking (3, 5,
or 7) from the Settings menu in the
AVN system screen. Select:
- Setup →Vehicle Settings →Lights
→1 Touch Turn Signal →Off / 3
flashes / 5 flashes / 7 flashes
For detailed information, scan the
QR code in a separately supplied
simple manual.
Battery saver function
The purpose of this feature is to pre-
vent the battery from being dis-
charged. The system automatically
turns off the parking lamp when the
driver turns the engine off and opens
the driver-side door.
With this feature, the parking lamps
will turn off automatically if the driver
parks on the side of road at night.
If necessary, to keep the lamps on
when the engine is turned off, perform
the following:
1) Open the driver-side door.
2) Turn the parking lamps OFF and
ON again using the light switch on
the steering column.
OHI048534
Page 196 of 538

3-95
03
If the AFS malfunction indicator
comes on, the AFS is not working
properly.
Drive to the nearest safe location
and restart the engine. If the indica-
tor continuously remains on, we rec-
ommend that the system be checked
by an authorized retailer of Genesis
Branded products.
Daytime running light (DRL)
The Daytime Running Lights can
help others to see the front of your
vehicle during the day, especially
after dawn and before sunset.
The DRL system will turn OFF when:
• The light switch is in the parking or
headlamp lamp position, including
the operation that the parking lamp
or headlamp is turned on automat-
ically in the AUTO light position.
• The engine is turned off.
• The hazard warning flasher is on.
• The turn signal light is on.
If you turn on the turn signal light,
only the corresponding daytime
running lights will turn off.
• The parking brake is applied.
Headlamp leveling device
It automatically adjusts the headlamp
beam level according to the number
of passengers and loading weight in
the luggage area.
And it offers proper headlamp beam
under various conditions.
Headlamp moisture removal
function (if equipped)
When moisture fogs up inside of the
headlamp, if the headlamp is on for
certain period of time, the fan circu-
lates the air inside to remove mois-
ture. If the moisture is not removed,
have the vehicle checked by an
authorized retailer of Genesis
Branded products.
Reverse guide lamp
When the shift lever is in R
(Reverse), the back-up lamp turns on
and the reverse guide lamp at the
back of the vehicle lights the floor.
The lamp informs nearby drivers
that your vehicle is backing up.If the function does not work
properly, we recommend that
the system be inspected by an
authorized retailer of Genesis
Branded products. Do not
attempt to inspect or replace
the wiring yourself.
WARNING
Page 230 of 538

3-129
03
CLIMATE CONTROL ADDITIONAL FEATURES
Auto Defogging System
Auto defogging helps reduce the pos-
sibility of fogging up the inside of the
windshield by automatically sensing
the moisture on inside the windshield.
The auto defogging system operates
when the climate control system is on.
Information
The auto defogging system may not
operate normally, when the outside
temperature is below 14 °F (-10 °C).
When the Auto Defogging
System operates, the indi-
cator will illuminate.
If a high amount of humidity is
detected in the vehicle, the Auto
Defogging System will be enabled.
The following steps will be performed
automatically:
Step 1) The A/C button will turn ON.
Step 2) The air intake control will
change to Fresh mode under
low outside temperature.
Step 3) The mode will be changed to
defrost to direct airflow to the
windshield.
Step 4) The fan speed will be set to
MAX.If the air conditioning is off or recircu-
lation mode is manually selected
while Auto Defogging System is ON,
the Auto Defogging System Indicator
will blink 3 times to signal that the
manual operation has been can-
celed.
To cancel or activate the Auto
Defogging System
Climate control system
• To cancel the auto defogging
system
1. Press the Engine Start/Stop but-
ton to the ON or START position.
2. Press the front defroster button for
approximately 3 seconds.
3. The front defroster button LED will
blink 3 times and then ADS OFF
will illuminate on the climate control
information screen when the auto
defogging system is canceled.
• To reactivate the auto defogging
system
1. Press the Engine Start/Stop but-
ton to the ON or START position.
2. Press the front defroster button for
approximately 3 seconds.
3. The front defroster button LED will
blink 6 times and then ADS OFF
will turn off on the climate control
information screen when the auto
defogging system is reactivated.
i
OHI048309
Page 302 of 538

Coasting Release Conditions
The Coasting function will be auto-
matically released when the follow-
ing conditions are met.
• The driving mode is COMFORT or
SPORT mode.
• SMART is selected for Engine/
Transmission in CUSTOM mode
from the AVN system screen and
driver acceleration is SMART
COMFORT or SMART SPORT
• The Smart Cruise Control button is
ON (the cruise indicator is ON)
• The vehicle's speed exceeds
35–100 mph (55–160 km/h) range
• The road gradient is under -5% or
over +5%
• If the distance between the vehicle
ahead is too close or the relative
speed changes momentarily in
SMART mode.
• If lane change is predicated in
SMART mode (e.g. the turn signal
is turned ON or a LKA warning
appears due to steering wheel
control, etc.)
Information
It is recommended to turn off the
Coasting function if you are driving
under frequently stop-and-go condi-
tion. Change the Drive Mode to COM-
FORT or SPORT mode or deselect
Coasting from the AVN system screen.
i
5-50
Driving your vehicle
Page 320 of 538

5-68
Driving your vehicle
System Description
Blind-Spot Collision Warning
(BCW)
The Blind-Spot Collision Warning
system uses radar sensors in the
rear bumper to monitor and warn the
driver when it detects an approach-
ing vehicle in the driver's blind spot
area.
1) Blind-Spot Area
The blind spot detection range varies
relative to vehicle speed.
Note that if your vehicle is traveling
much faster than the vehicles around
you, the warning will not occur.2) Closing at high speed
The Lane Change Assist feature will
alert you when it detects a vehicle is
approaching in an adjacent lane at a
high rate of speed. If the driver acti-
vates the turn signal when the sys-
tem detects an oncoming vehicle, the
system sounds an audible alert.
Blind-Spot Collision-Avoidance
Assist (BCA)
The Blind-Spot Collision-Avoidance
Assist system helps detect the front
lane through the camera installed on
the upper front windshield and helps
detect the side/rear areas through
radar sensors.
BLIND-SPOT COLLISION WARNING (BCW)/BLIND-SPOT
COLLISION-AVOIDANCE ASSIST (BCA)
OHI058309L
OHI058311L
OHI058310L