warning light GMC ACADIA 2008 Get To Know Guide
[x] Cancel search | Manufacturer: GMC, Model Year: 2008, Model line: ACADIA, Model: GMC ACADIA 2008Pages: 24, PDF Size: 1.48 MB
Page 3 of 24

3
See Section 3 of your Owner Manual.
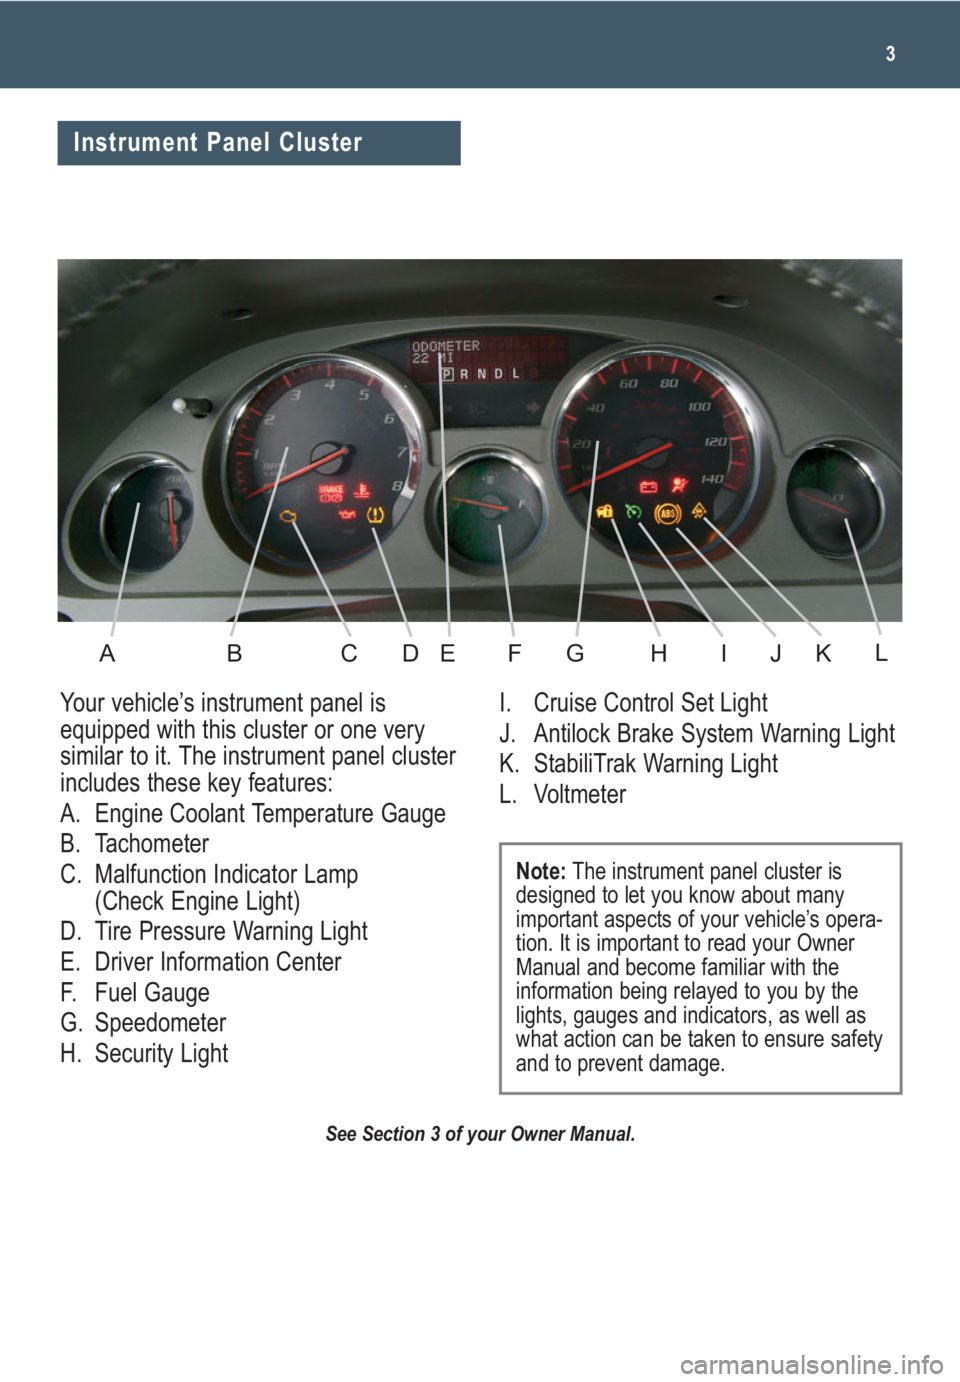
Your vehicle’s instrument panel is
equipped with this cluster or one very
similar to it. The instrument panel cluster
includes these key features:
A. Engine Coolant Temperature Gauge
B. Tachometer
C. Malfunction Indicator Lamp
(Check Engine Light)
D. Tire Pressure Warning Light
E. Driver Information Center
F. Fuel Gauge
G. Speedometer
H. Security LightI. Cruise Control Set Light
J. Antilock Brake System Warning Light
K. StabiliTrak Warning Light
L. Voltmeter
Note:The instrument panel cluster is
designed to let you know about many
important aspects of your vehicle’s opera-
tion. It is important to read your Owner
Manual and become familiar with the
information being relayed to you by the
lights, gauges and indicators, as well as
what action can be taken to ensure safety
and to prevent damage.
Instrument Panel Cluster
ABCDEFGHIKJL
Page 4 of 24

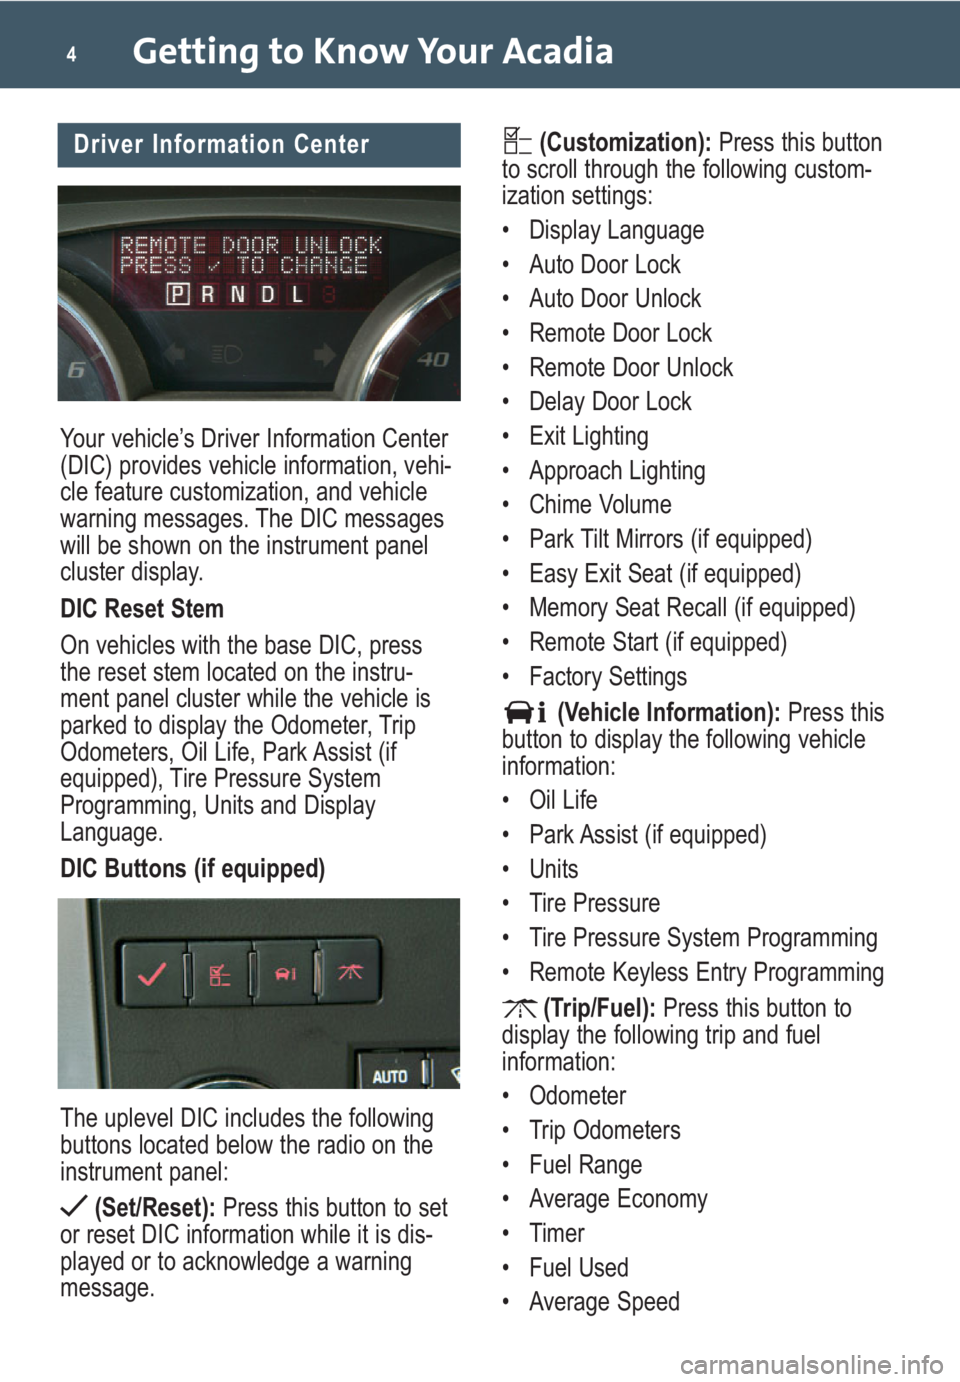
Your vehicle’s Driver Information Center
(DIC) provides vehicle information, vehi-
cle feature customization, and vehicle
warning messages. The DIC messages
will be shown on the instrument panel
cluster display.
DIC Reset Stem
On vehicles with the base DIC, press
the reset stem located on the instru-
ment panel cluster while the vehicle is
parked to display the Odometer, Trip
Odometers, Oil Life, Park Assist (if
equipped), Tire Pressure System
Programming, Units and Display
Language.
DIC Buttons (if equipped)
The uplevel DIC includes the following
buttons located below the radio on the
instrument panel:
(Set/Reset):Press this button to set
or reset DIC information while it is dis-
played or to acknowledge a warning
message.
Getting to Know Your Acadia4
(Customization):Press this button
to scroll through the following custom-
ization settings:
• Display Language
• Auto Door Lock
• Auto Door Unlock
• Remote Door Lock
• Remote Door Unlock
• Delay Door Lock
• Exit Lighting
• Approach Lighting
• Chime Volume
• Park Tilt Mirrors (if equipped)
• Easy Exit Seat (if equipped)
• Memory Seat Recall (if equipped)
• Remote Start (if equipped)
• Factory Settings
(Vehicle Information):Press this
button to display the following vehicle
information:
• Oil Life
• Park Assist (if equipped)
• Units
• Tire Pressure
• Tire Pressure System Programming
• Remote Keyless Entry Programming
(Trip/Fuel):Press this button to
display the following trip and fuel
information:
• Odometer
• Trip Odometers
• Fuel Range
• Average Economy
• Timer
• Fuel Used
• Average SpeedDriver Information Center
Page 22 of 24

Getting to Know Your Acadia22
PERFORMANCE & MAINTENANCE
Refueling the Vehicle
To open the fuel door, press the center
of the rear edge of the door and it will
pop open slightly. Pull the door to open
it fully.
When closing the fuel door, press the
center of the rear edge of the door until
it is flush with the side of the vehicle.
See Section 5 of your Owner Manual.
Automatic Transmission
Operation
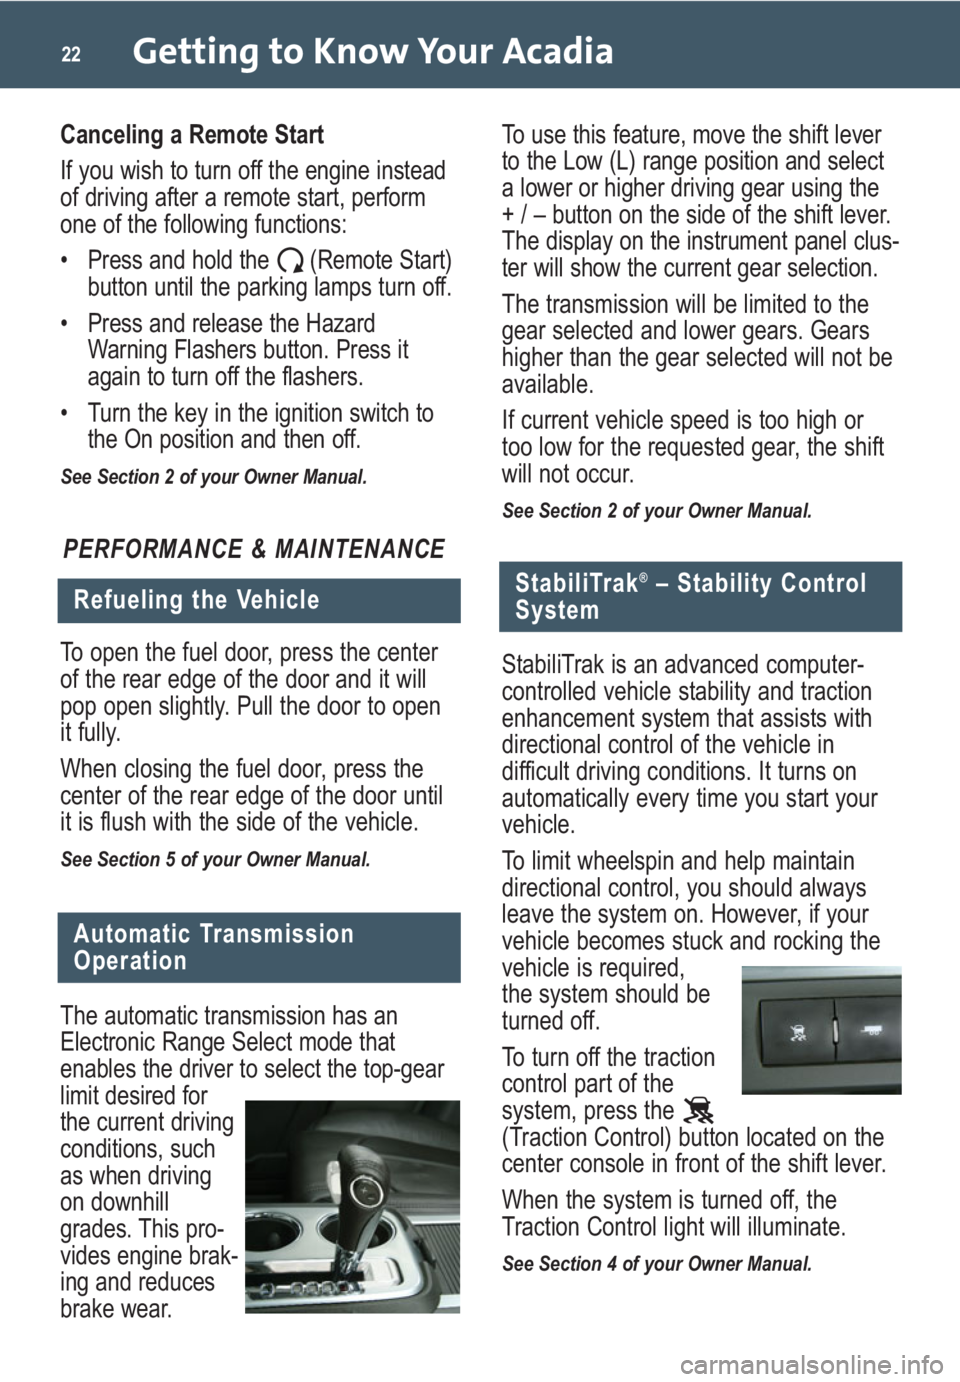
The automatic transmission has an
Electronic Range Select mode that
enables the driver to select the top-gear
limit desired for
the current driving
conditions, such
as when driving
on downhill
grades. This pro-
vides engine brak-
ing and reduces
brake wear.
StabiliTrak®– Stability Control
System
StabiliTrak is an advanced computer-
controlled vehicle stability and traction
enhancement system that assists with
directional control of the vehicle in
difficult driving conditions. It turns on
automatically every time you start your
vehicle.
To limit wheelspin and help maintain
directional control, you should always
leave the system on. However, if your
vehicle becomes stuck and rocking the
vehicle is required,
the system should be
turned off.
To turn off the traction
control part of the
system, press the
(Traction Control) button located on the
center console in front of the shift lever.
When the system is turned off, the
Traction Control light will illuminate.
See Section 4 of your Owner Manual.
To use this feature, move the shift lever
to the Low (L) range position and select
a lower or higher driving gear using the
+ / – button on the side of the shift lever.
The display on the instrument panel clus-
ter will show the current gear selection.
The transmission will be limited to the
gear selected and lower gears. Gears
higher than the gear selected will not be
available.
If current vehicle speed is too high or
too low for the requested gear, the shift
will not occur.
See Section 2 of your Owner Manual.
Canceling a Remote Start
If you wish to turn off the engine instead
of driving after a remote start, perform
one of the following functions:
• Press and hold the (Remote Start)
button until the parking lamps turn off.
• Press and release the Hazard
Warning Flashers button. Press it
again to turn off the flashers.
• Turn the key in the ignition switch to
the On position and then off.
See Section 2 of your Owner Manual.
Page 23 of 24

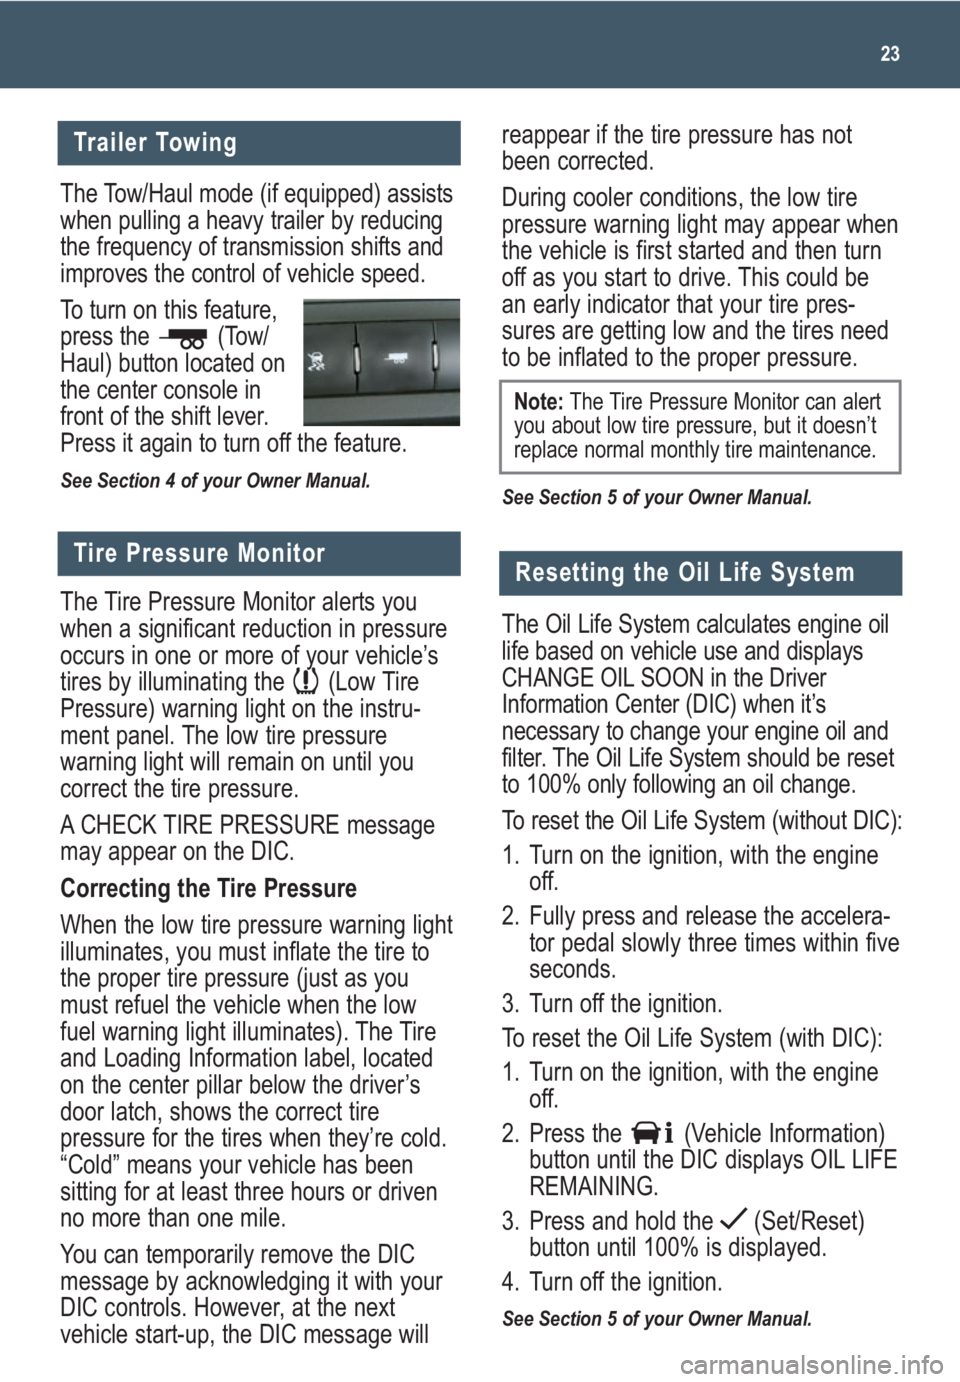
The Tow/Haul mode (if equipped) assists
when pulling a heavy trailer by reducing
the frequency of transmission shifts and
improves the control of vehicle speed.
To turn on this feature,
press the (Tow/
Haul) button located on
the center console in
front of the shift lever.
Press it again to turn off the feature.
See Section 4 of your Owner Manual.
reappear if the tire pressure has not
been corrected.
During cooler conditions, the low tire
pressure warning light may appear when
the vehicle is first started and then turn
off as you start to drive. This could be
an early indicator that your tire pres-
sures are getting low and the tires need
to be inflated to the proper pressure.
See Section 5 of your Owner Manual.
23
Trailer Towing
Tire Pressure Monitor
The Tire Pressure Monitor alerts you
when a significant reduction in pressure
occurs in one or more of your vehicle’s
tires by illuminating the (Low Tire
Pressure) warning light on the instru-
ment panel. The low tire pressure
warning light will remain on until you
correct the tire pressure.
A CHECK TIRE PRESSURE message
may appear on the DIC.
Correcting the Tire Pressure
When the low tire pressure warning light
illuminates, you must inflate the tire to
the proper tire pressure (just as you
must refuel the vehicle when the low
fuel warning light illuminates). The Tire
and Loading Information label, located
on the center pillar below the driver’s
door latch, shows the correct tire
pressure for the tires when they’re cold.
“Cold” means your vehicle has been
sitting for at least three hours or driven
no more than one mile.
You can temporarily remove the DIC
message by acknowledging it with your
DIC controls. However, at the next
vehicle start-up, the DIC message will
Note:The Tire Pressure Monitor can alert
you about low tire pressure, but it doesn’t
replace normal monthly tire maintenance.
Resetting the Oil Life System
The Oil Life System calculates engine oil
life based on vehicle use and displays
CHANGE OIL SOON in the Driver
Information Center (DIC) when it’s
necessary to change your engine oil and
filter. The Oil Life System should be reset
to 100% only following an oil change.
To reset the Oil Life System (without DIC):
1. Turn on the ignition, with the engine
off.
2. Fully press and release the accelera-
tor pedal slowly three times within five
seconds.
3. Turn off the ignition.
To reset the Oil Life System (with DIC):
1. Turn on the ignition, with the engine
off.
2. Press the (Vehicle Information)
button until the DIC displays OIL LIFE
REMAINING.
3. Press and hold the (Set/Reset)
button until 100% is displayed.
4. Turn off the ignition.
See Section 5 of your Owner Manual.