personalization GMC ACADIA 2021 User Guide
[x] Cancel search | Manufacturer: GMC, Model Year: 2021, Model line: ACADIA, Model: GMC ACADIA 2021Pages: 396, PDF Size: 7.87 MB
Page 42 of 396
GMC Acadia/Acadia Denali Owner Manual (GMNA-Localizing-U.S./Canada/
Mexico-14608671) - 2021 - CRC - 10/26/20
Seats and Restraints 41
Seat Entry Memory
The vehicle identifies the number of the
current driver’s RKE transmitter (1–8). See
Remote Keyless Entry (RKE) System
Operation07. If the RKE transmitter is 1 or
2, and Seat Entry Memory is enabled in
vehicle personalization, the positions saved
to the same memory button number 1 or 2
are automatically recalled when the vehicle
is turned on, or turned from off to ACC/
ACCESSORY. RKE transmitters 3–8 will not
provide automatic memory recalls.
To turn Seat Entry Memory on or off, see
“Vehicle Personalization Settings” previously
in this section and Vehicle Personalization
0 123.
The transmission must be in P (Park) to start
Seat Entry Memory. Seat Entry Memory
recall will complete if the vehicle is shifted
out of P (Park) prior to reaching the saved
memory position.
To stop Seat Entry Memory recall
movement, turn the vehicle off or press any
of the following controls:
.Power seat
.Memory SET, 1, 2, orB
.Power mirror, with the driver or
passenger side mirror selected
.Power steering wheel, if equipped
If the saved memory seat position does not
automatically recall or recalls to the wrong
positions, the driver’s RKE transmitter
number (1 or 2) may not match the memory
button number that positions were saved to.
Try storing the position to the other
memory button or try the other RKE
transmitter.
Seat Exit Memory
Seat Exit Memory is not linked to an RKE
transmitter. The position saved to
Bis
used for all drivers. To turn Seat Exit
Memory on or off, see "Vehicle
Personalization Settings" previously in this
section and Vehicle Personalization 0123.
If turned on, the position saved to
Bis
automatically recalled when one of the
following occurs:
.The vehicle is turned off and the driver
door is opened within a short time.
.The vehicle is turned off with the driver
door open.
To stop Seat Exit Memory movement, press
any of the following memory controls:
.Power seat
.Memory SET, 1, 2, orB
.Power mirror, with the driver or
passenger side mirror selected
.Power steering wheel, if equipped
Obstructions
If something has blocked the driver seat
and/or power steering wheel while recalling
a memory position, the recall may stop.
Remove the obstruction and try the recall
again. If the memory position still does not
recall, see your dealer.
Heated and Ventilated Front
Seats
{Warning
If temperature change or pain to the skin
cannot be felt, the seat heater may cause
burns. To reduce the risk of burns, use
care when using the seat heater,
especially for long periods of time. Do
not place anything on the seat that
insulates against heat, such as a blanket,
cushion, cover, or similar item. This may
cause the seat heater to overheat. An
overheated seat heater may cause a burn
or may damage the seat.
Page 43 of 396
GMC Acadia/Acadia Denali Owner Manual (GMNA-Localizing-U.S./Canada/
Mexico-14608671) - 2021 - CRC - 10/26/20
42 Seats and Restraints
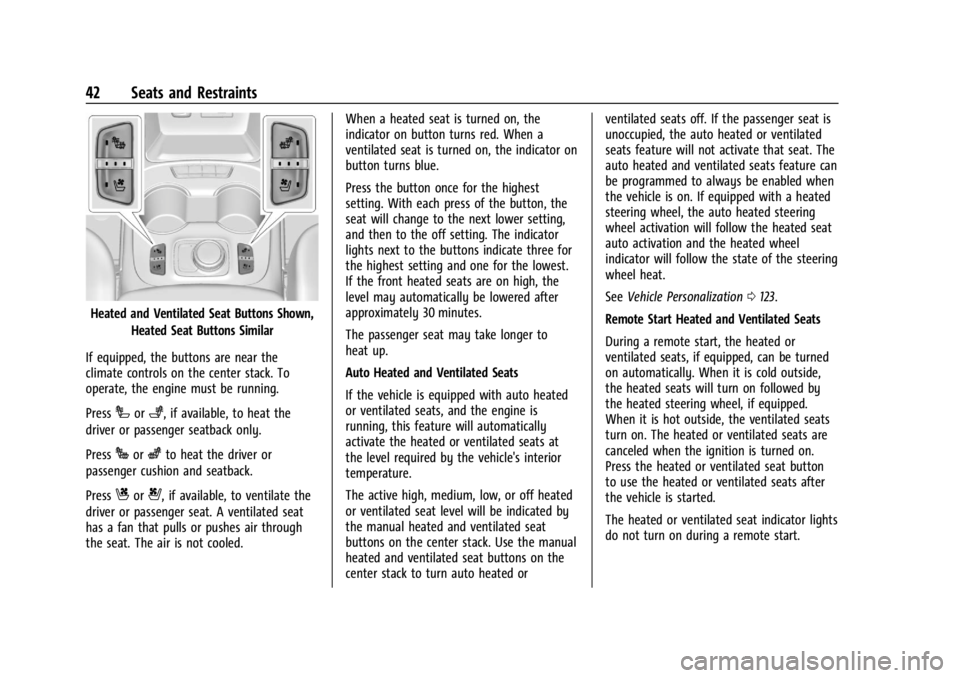
Heated and Ventilated Seat Buttons Shown,Heated Seat Buttons Similar
If equipped, the buttons are near the
climate controls on the center stack. To
operate, the engine must be running.
Press
Ior+, if available, to heat the
driver or passenger seatback only.
Press
Jorzto heat the driver or
passenger cushion and seatback.
Press
Cor{, if available, to ventilate the
driver or passenger seat. A ventilated seat
has a fan that pulls or pushes air through
the seat. The air is not cooled. When a heated seat is turned on, the
indicator on button turns red. When a
ventilated seat is turned on, the indicator on
button turns blue.
Press the button once for the highest
setting. With each press of the button, the
seat will change to the next lower setting,
and then to the off setting. The indicator
lights next to the buttons indicate three for
the highest setting and one for the lowest.
If the front heated seats are on high, the
level may automatically be lowered after
approximately 30 minutes.
The passenger seat may take longer to
heat up.
Auto Heated and Ventilated Seats
If the vehicle is equipped with auto heated
or ventilated seats, and the engine is
running, this feature will automatically
activate the heated or ventilated seats at
the level required by the vehicle's interior
temperature.
The active high, medium, low, or off heated
or ventilated seat level will be indicated by
the manual heated and ventilated seat
buttons on the center stack. Use the manual
heated and ventilated seat buttons on the
center stack to turn auto heated orventilated seats off. If the passenger seat is
unoccupied, the auto heated or ventilated
seats feature will not activate that seat. The
auto heated and ventilated seats feature can
be programmed to always be enabled when
the vehicle is on. If equipped with a heated
steering wheel, the auto heated steering
wheel activation will follow the heated seat
auto activation and the heated wheel
indicator will follow the state of the steering
wheel heat.
See
Vehicle Personalization 0123.
Remote Start Heated and Ventilated Seats
During a remote start, the heated or
ventilated seats, if equipped, can be turned
on automatically. When it is cold outside,
the heated seats will turn on followed by
the heated steering wheel, if equipped.
When it is hot outside, the ventilated seats
turn on. The heated or ventilated seats are
canceled when the ignition is turned on.
Press the heated or ventilated seat button
to use the heated or ventilated seats after
the vehicle is started.
The heated or ventilated seat indicator lights
do not turn on during a remote start.
Page 44 of 396
GMC Acadia/Acadia Denali Owner Manual (GMNA-Localizing-U.S./Canada/
Mexico-14608671) - 2021 - CRC - 10/26/20
Seats and Restraints 43
The temperature performance of an
unoccupied seat may be reduced. This is
normal.
The remote start heated or ventilated seats
may be enabled or disabled in the vehicle
personalization menu. SeeRemote Vehicle
Start 013 and
Vehicle Personalization 0123.
Rear Seats
Rear Seat Reminder
If equipped, the message REAR SEAT
REMINDER LOOK IN REAR SEAT displays
under certain conditions indicating there
may be an item or passenger in the rear
seat. Check before exiting the vehicle.
This feature will activate when a second row
door is opened while the vehicle is on or up
to 10 minutes before the vehicle is turned
on. There will be an alert when the vehicle
is turned off. The alert does not directly
detect objects in the rear seat; instead,
under certain conditions, it detects when a
rear door is opened and closed, indicating
that there may be something in the
rear seat. The feature is active only once each time
the vehicle is turned on and off, and will
require reactivation by opening and closing
the second row doors. There may be an
alert even when there is nothing in the rear
seat; for example, if a child entered the
vehicle through the rear door and left the
vehicle without the vehicle being shut off.
The feature can be turned on or off. See
Vehicle Personalization
0123.
Rear Seat Adjustment
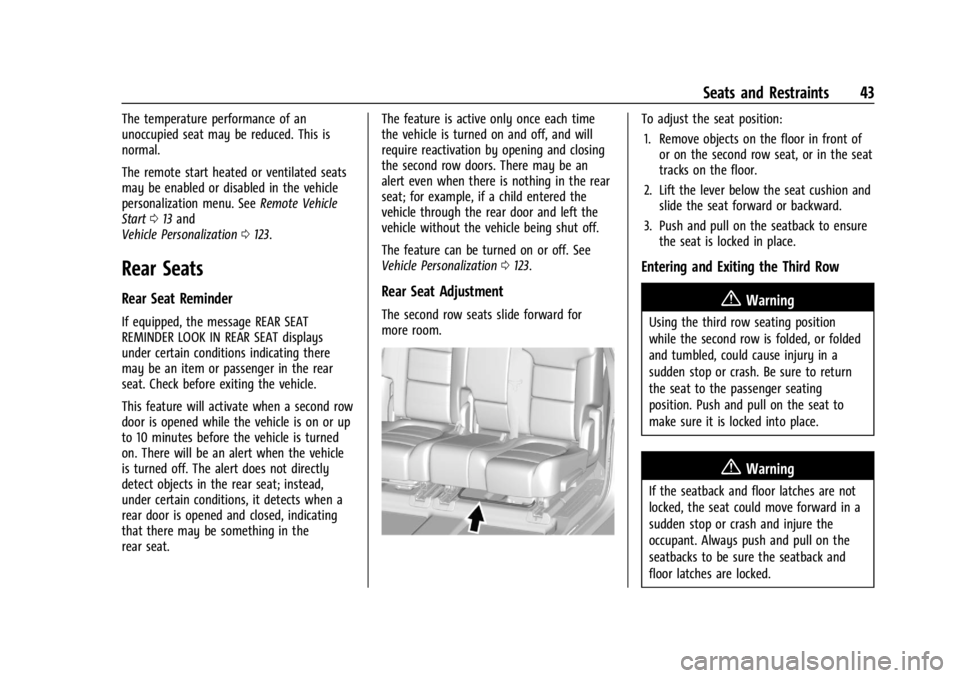
The second row seats slide forward for
more room.
To adjust the seat position:
1. Remove objects on the floor in front of or on the second row seat, or in the seat
tracks on the floor.
2. Lift the lever below the seat cushion and slide the seat forward or backward.
3. Push and pull on the seatback to ensure the seat is locked in place.
Entering and Exiting the Third Row
{Warning
Using the third row seating position
while the second row is folded, or folded
and tumbled, could cause injury in a
sudden stop or crash. Be sure to return
the seat to the passenger seating
position. Push and pull on the seat to
make sure it is locked into place.
{Warning
If the seatback and floor latches are not
locked, the seat could move forward in a
sudden stop or crash and injure the
occupant. Always push and pull on the
seatbacks to be sure the seatback and
floor latches are locked.
Page 90 of 396
GMC Acadia/Acadia Denali Owner Manual (GMNA-Localizing-U.S./Canada/
Mexico-14608671) - 2021 - CRC - 10/26/20
Instruments and Controls 89
Instruments and Controls
Controls
Steering Wheel Adjustment . . . . . . . . . . . . 90
Steering Wheel Controls . . . . . . . . . . . . . . . 90
Heated Steering Wheel . . . . . . . . . . . . . . . . 90
Horn . . . . . . . . . . . . . . . . . . . . . . . . . . . . . . . . . . . . 91
Windshield Wiper/Washer . . . . . . . . . . . . . . 91
Rear Window Wiper/Washer . . . . . . . . . . . 92
Compass . . . . . . . . . . . . . . . . . . . . . . . . . . . . . . . 92
Clock . . . . . . . . . . . . . . . . . . . . . . . . . . . . . . . . . . . 93
Power Outlets . . . . . . . . . . . . . . . . . . . . . . . . . . 93
Wireless Charging . . . . . . . . . . . . . . . . . . . . . . 94
Warning Lights, Gauges, and Indicators
Warning Lights, Gauges, andIndicators . . . . . . . . . . . . . . . . . . . . . . . . . . . . 96
Instrument Cluster (Base and Midlevel) . . . . . . . . . . . . . . . . . . . . . . . . . . . . . 97
Instrument Cluster (Uplevel) . . . . . . . . . . . 100
Speedometer . . . . . . . . . . . . . . . . . . . . . . . . . . 102
Odometer . . . . . . . . . . . . . . . . . . . . . . . . . . . . . 102
Trip Odometer . . . . . . . . . . . . . . . . . . . . . . . . . 102
Tachometer . . . . . . . . . . . . . . . . . . . . . . . . . . . . 102
Fuel Gauge . . . . . . . . . . . . . . . . . . . . . . . . . . . . 102
Engine Oil Temperature Gauge . . . . . . . . 103
Engine Coolant Temperature Gauge . . . 104
Voltmeter Gauge . . . . . . . . . . . . . . . . . . . . . . 104
Seat Belt Reminders . . . . . . . . . . . . . . . . . . . 105
Airbag Readiness Light . . . . . . . . . . . . . . . . 105 Passenger Airbag Status Indicator . . . . . 106
Charging System Light . . . . . . . . . . . . . . . . . 107
Malfunction Indicator Lamp (Check
Engine Light) . . . . . . . . . . . . . . . . . . . . . . . . 107
Brake System Warning Light . . . . . . . . . . 108
Electric Parking Brake Light . . . . . . . . . . . . 109
Service Electric Parking Brake Light
(Uplevel and Midlevel
Cluster Only) . . . . . . . . . . . . . . . . . . . . . . . . 109
Antilock Brake System (ABS) Warning Light . . . . . . . . . . . . . . . . . . . . . . . . . . . . . . . . . 110
Gear Shifting Light . . . . . . . . . . . . . . . . . . . . . 110
Tow/Haul Mode Light . . . . . . . . . . . . . . . . . 110
Hill Descent Control Light . . . . . . . . . . . . . . 110
Lane Keep Assist (LKA) Light . . . . . . . . . . . 110
Vehicle Ahead Indicator . . . . . . . . . . . . . . . . 111
Pedestrian Ahead Indicator . . . . . . . . . . . . . 111
Traction Off Light . . . . . . . . . . . . . . . . . . . . . . 111
StabiliTrak OFF Light . . . . . . . . . . . . . . . . . . . 112
Traction Control System (TCS)/ StabiliTrak Light . . . . . . . . . . . . . . . . . . . . . . 112
Engine Coolant Temperature Warning Light . . . . . . . . . . . . . . . . . . . . . . . . . . . . . . . . . 112
Tire Pressure Light . . . . . . . . . . . . . . . . . . . . . 113
Engine Oil Pressure Light . . . . . . . . . . . . . . . 113
Low Fuel Warning Light . . . . . . . . . . . . . . . . 114
Security Light . . . . . . . . . . . . . . . . . . . . . . . . . . 114
High-Beam On Light . . . . . . . . . . . . . . . . . . . 114
Front Fog Lamp Light . . . . . . . . . . . . . . . . . . 114
Lamps On Reminder . . . . . . . . . . . . . . . . . . . 114 Cruise Control Light . . . . . . . . . . . . . . . . . . . . 115
Door Ajar Light . . . . . . . . . . . . . . . . . . . . . . . . . 115
Information Displays
Driver Information Center
(DIC) (Base) . . . . . . . . . . . . . . . . . . . . . . . . . . 115
Driver Information Center (DIC) (Midlevel and Uplevel) . . . . . . . . . . . . . . . 117
Head-Up Display (HUD) . . . . . . . . . . . . . . . . 119
Vehicle Messages
Vehicle Messages . . . . . . . . . . . . . . . . . . . . . . 122
Engine Power Messages . . . . . . . . . . . . . . . 123
Vehicle Speed Messages . . . . . . . . . . . . . . . 123
Vehicle Personalization
Vehicle Personalization . . . . . . . . . . . . . . . . . 123
Universal Remote System
Universal Remote System . . . . . . . . . . . . . . 127
Universal Remote System Programming . . . . . . . . . . . . . . . . . . . . . . . . 127
Universal Remote System Operation . . . 129
Page 92 of 396
GMC Acadia/Acadia Denali Owner Manual (GMNA-Localizing-U.S./Canada/
Mexico-14608671) - 2021 - CRC - 10/26/20
Instruments and Controls 91
If equipped with auto heated seats, the
heated steering wheel will turn on when the
auto heated seat is activated. The heated
steering wheel indicator will display the
state of the steering wheel heat.
SeeHeated and Ventilated Front Seats 041
and
Vehicle Personalization 0123.
Horn
Pressaon the steering wheel pad to
sound the horn.
Windshield Wiper/Washer
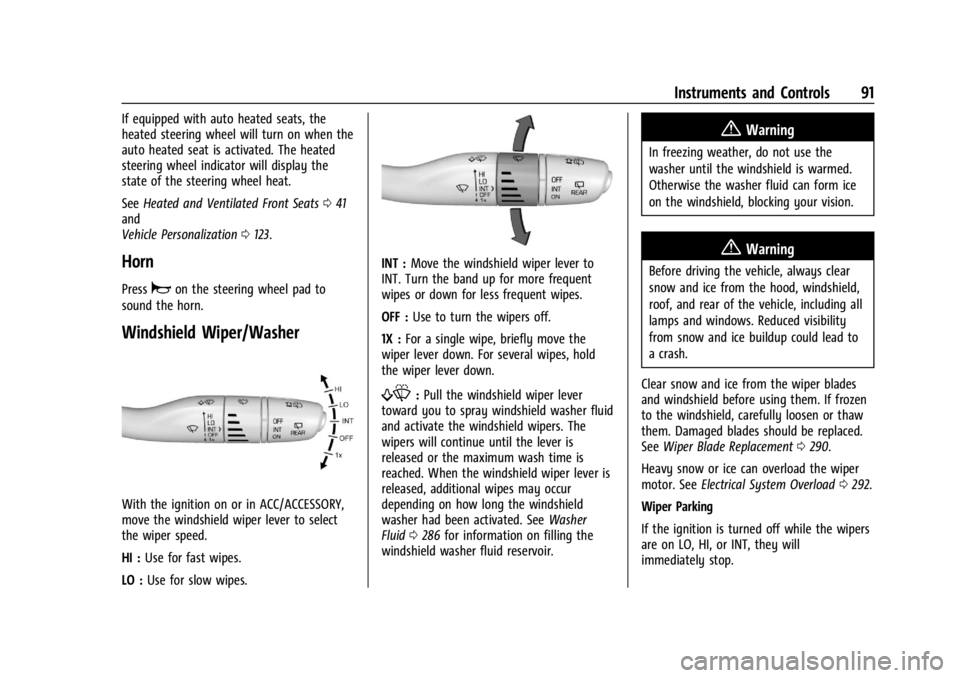
With the ignition on or in ACC/ACCESSORY,
move the windshield wiper lever to select
the wiper speed.
HI : Use for fast wipes.
LO : Use for slow wipes.
INT : Move the windshield wiper lever to
INT. Turn the band up for more frequent
wipes or down for less frequent wipes.
OFF : Use to turn the wipers off.
1X : For a single wipe, briefly move the
wiper lever down. For several wipes, hold
the wiper lever down.
f: Pull the windshield wiper lever
toward you to spray windshield washer fluid
and activate the windshield wipers. The
wipers will continue until the lever is
released or the maximum wash time is
reached. When the windshield wiper lever is
released, additional wipes may occur
depending on how long the windshield
washer had been activated. See Washer
Fluid 0286 for information on filling the
windshield washer fluid reservoir.
{Warning
In freezing weather, do not use the
washer until the windshield is warmed.
Otherwise the washer fluid can form ice
on the windshield, blocking your vision.
{Warning
Before driving the vehicle, always clear
snow and ice from the hood, windshield,
roof, and rear of the vehicle, including all
lamps and windows. Reduced visibility
from snow and ice buildup could lead to
a crash.
Clear snow and ice from the wiper blades
and windshield before using them. If frozen
to the windshield, carefully loosen or thaw
them. Damaged blades should be replaced.
See Wiper Blade Replacement 0290.
Heavy snow or ice can overload the wiper
motor. See Electrical System Overload 0292.
Wiper Parking
If the ignition is turned off while the wipers
are on LO, HI, or INT, they will
immediately stop.
Page 93 of 396
GMC Acadia/Acadia Denali Owner Manual (GMNA-Localizing-U.S./Canada/
Mexico-14608671) - 2021 - CRC - 10/26/20
92 Instruments and Controls
If the windshield wiper lever is then moved
to OFF before the driver door is opened or
within 10 minutes, the wipers will restart
and move to the base of the windshield.
If the ignition is turned off while the wipers
are performing wipes due to windshield
washing, the wipers continue to run until
they reach the base of the windshield.
Rear Window Wiper/Washer
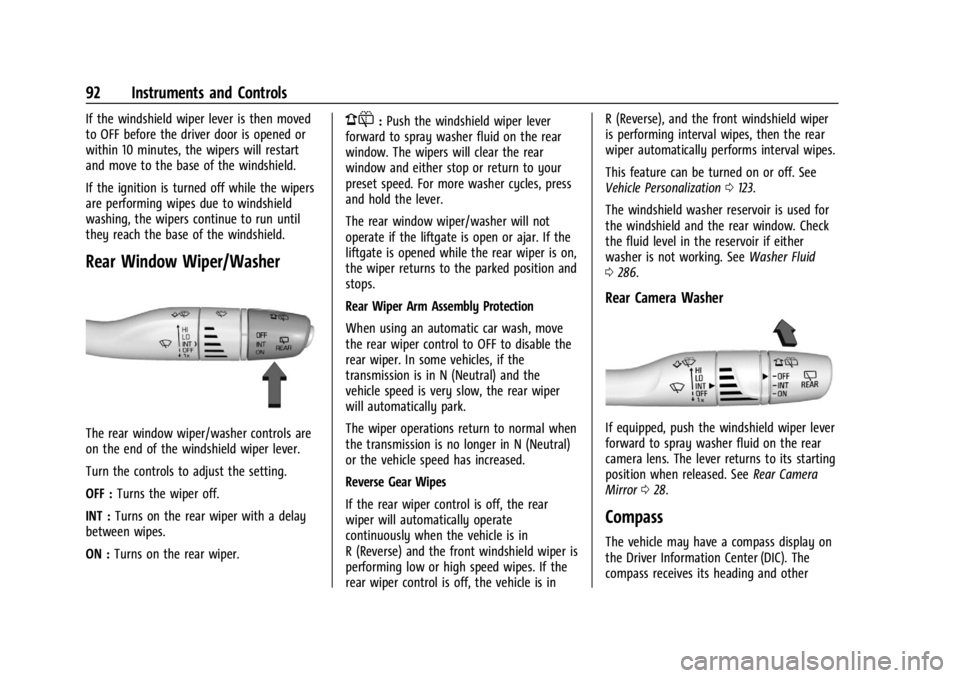
The rear window wiper/washer controls are
on the end of the windshield wiper lever.
Turn the controls to adjust the setting.
OFF :Turns the wiper off.
INT : Turns on the rear wiper with a delay
between wipes.
ON : Turns on the rear wiper.
1:Push the windshield wiper lever
forward to spray washer fluid on the rear
window. The wipers will clear the rear
window and either stop or return to your
preset speed. For more washer cycles, press
and hold the lever.
The rear window wiper/washer will not
operate if the liftgate is open or ajar. If the
liftgate is opened while the rear wiper is on,
the wiper returns to the parked position and
stops.
Rear Wiper Arm Assembly Protection
When using an automatic car wash, move
the rear wiper control to OFF to disable the
rear wiper. In some vehicles, if the
transmission is in N (Neutral) and the
vehicle speed is very slow, the rear wiper
will automatically park.
The wiper operations return to normal when
the transmission is no longer in N (Neutral)
or the vehicle speed has increased.
Reverse Gear Wipes
If the rear wiper control is off, the rear
wiper will automatically operate
continuously when the vehicle is in
R (Reverse) and the front windshield wiper is
performing low or high speed wipes. If the
rear wiper control is off, the vehicle is in R (Reverse), and the front windshield wiper
is performing interval wipes, then the rear
wiper automatically performs interval wipes.
This feature can be turned on or off. See
Vehicle Personalization
0123.
The windshield washer reservoir is used for
the windshield and the rear window. Check
the fluid level in the reservoir if either
washer is not working. See Washer Fluid
0 286.
Rear Camera Washer
If equipped, push the windshield wiper lever
forward to spray washer fluid on the rear
camera lens. The lever returns to its starting
position when released. See Rear Camera
Mirror 028.
Compass
The vehicle may have a compass display on
the Driver Information Center (DIC). The
compass receives its heading and other
Page 121 of 396
GMC Acadia/Acadia Denali Owner Manual (GMNA-Localizing-U.S./Canada/
Mexico-14608671) - 2021 - CRC - 10/26/20
120 Instruments and Controls
If equipped with HUD, some information
concerning the operation of the vehicle is
projected onto the windshield. The
information is projected through the HUD
lens on the driver side of the instrument
panel and focused out toward the front of
the vehicle.
Caution
If you try to use the HUD image as a
parking aid, you may misjudge the
distance and damage your vehicle. Do not
use the HUD image as a parking aid.
The HUD information can be displayed in
various languages. The speedometer reading
and other numerical values can be displayed
in either English or metric units.
The language selection is changed through
the radio and the units of measurement is
changed through the instrument cluster. See
Vehicle Personalization 0123 and "Options"
under Instrument Cluster (Base and Midlevel)
0 97 or
Instrument Cluster (Uplevel) 0100.
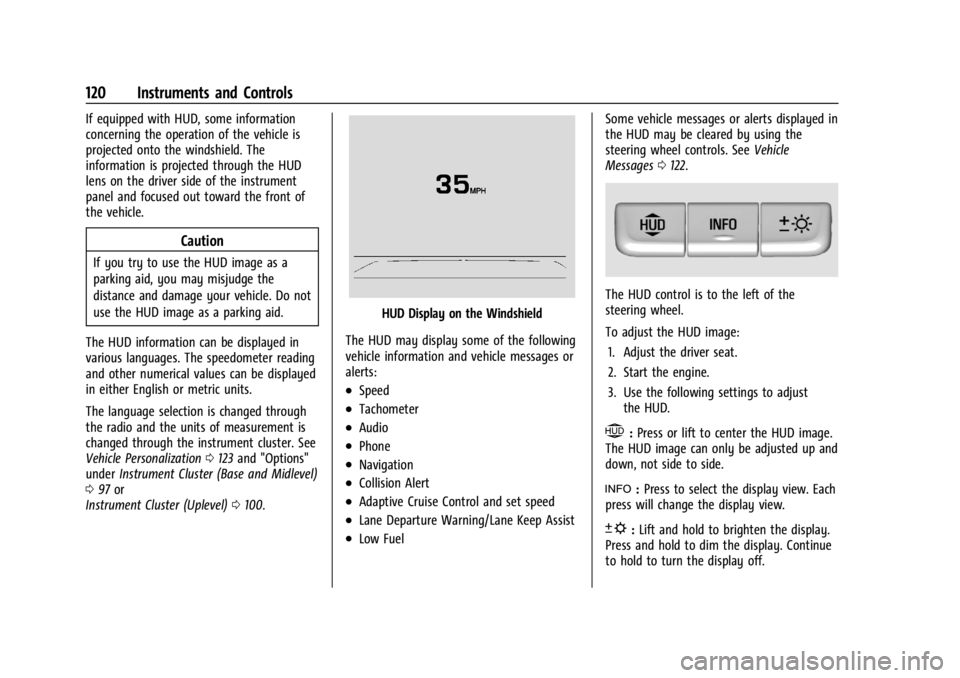
HUD Display on the Windshield
The HUD may display some of the following
vehicle information and vehicle messages or
alerts:
.Speed
.Tachometer
.Audio
.Phone
.Navigation
.Collision Alert
.Adaptive Cruise Control and set speed
.Lane Departure Warning/Lane Keep Assist
.Low Fuel Some vehicle messages or alerts displayed in
the HUD may be cleared by using the
steering wheel controls. See
Vehicle
Messages 0122.
The HUD control is to the left of the
steering wheel.
To adjust the HUD image:
1. Adjust the driver seat.
2. Start the engine.
3. Use the following settings to adjust the HUD.
$:Press or lift to center the HUD image.
The HUD image can only be adjusted up and
down, not side to side.
!: Press to select the display view. Each
press will change the display view.
D: Lift and hold to brighten the display.
Press and hold to dim the display. Continue
to hold to turn the display off.
Page 124 of 396
GMC Acadia/Acadia Denali Owner Manual (GMNA-Localizing-U.S./Canada/
Mexico-14608671) - 2021 - CRC - 10/26/20
Instruments and Controls 123
.Engine and Transmission
.Tire Pressure
.Battery
Engine Power Messages
ENGINE POWER IS REDUCED
This message displays when the vehicle's
propulsion power is reduced. A reduction in
propulsion power can affect the vehicle's
ability to accelerate. If this message is on,
but there is no observed reduction in
performance, proceed to your destination.
Under certain conditions the performance
may be reduced the next time the vehicle is
driven. The vehicle may be driven while this
message is on, but maximum acceleration
and speed may be reduced. Anytime this
message stays on, or displays repeatedly,
the vehicle should be taken to your dealer
for service as soon as possible.
Under certain operating conditions,
propulsion will be disabled. Try restarting
after the ignition has been off for
30 seconds.
Vehicle Speed Messages
SPEED LIMITED TO XXX KM/H (MPH)
This message shows that the vehicle speed
has been limited to the speed displayed. The
limited speed is a protection for various
propulsion and vehicle systems, such as
lubrication, thermal, brakes, suspension,
Teen Driver if equipped, or tires.
Vehicle Personalization
The following are all possible vehicle
personalization features. Depending on the
vehicle, some may not be available.
For System, Apps, and Personal features and
functions, seeSettings0174.
To access the vehicle personalization menu: 1. Touch the Settings icon on the Home Page of the infotainment display.
2. Touch Vehicle to display a list of available options.
3. Touch to select the desired feature setting.
4. Touch
9orRto turn a feature off or on.
5. Touch
zto go to the top level of the
Settings menu. The menu may contain the following:
Rear Seat Reminder
This allows for a chime and a message when
the rear door has been opened before or
during operation of the vehicle.
Touch Off or On.
Climate and Air Quality
Touch and the following may display:
.Auto Fan Speed
.Auto Cooled Seats
.Auto Heated Seats
.Auto Defog
.Auto Rear Defog
Auto Fan Speed
This setting specifies the amount of airflow
when the climate control fan setting is
Auto Fan.
Touch Low, Medium, or High.
Auto Cooled Seats
When enabled, this feature will
automatically activate ventilated seats at
the level required by the interior
temperature. See Heated and Ventilated
Front Seats 041.
Page 137 of 396
GMC Acadia/Acadia Denali Owner Manual (GMNA-Localizing-U.S./Canada/
Mexico-14608671) - 2021 - CRC - 10/26/20
136 Lighting
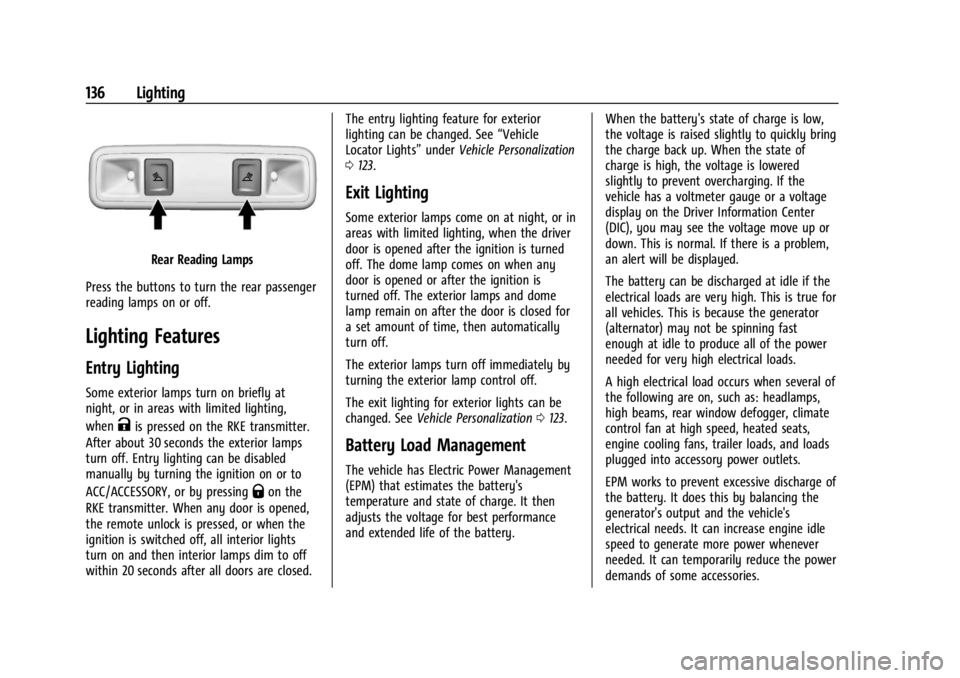
Rear Reading Lamps
Press the buttons to turn the rear passenger
reading lamps on or off.
Lighting Features
Entry Lighting
Some exterior lamps turn on briefly at
night, or in areas with limited lighting,
when
Kis pressed on the RKE transmitter.
After about 30 seconds the exterior lamps
turn off. Entry lighting can be disabled
manually by turning the ignition on or to
ACC/ACCESSORY, or by pressing
Qon the
RKE transmitter. When any door is opened,
the remote unlock is pressed, or when the
ignition is switched off, all interior lights
turn on and then interior lamps dim to off
within 20 seconds after all doors are closed. The entry lighting feature for exterior
lighting can be changed. See
“Vehicle
Locator Lights” underVehicle Personalization
0 123.
Exit Lighting
Some exterior lamps come on at night, or in
areas with limited lighting, when the driver
door is opened after the ignition is turned
off. The dome lamp comes on when any
door is opened or after the ignition is
turned off. The exterior lamps and dome
lamp remain on after the door is closed for
a set amount of time, then automatically
turn off.
The exterior lamps turn off immediately by
turning the exterior lamp control off.
The exit lighting for exterior lights can be
changed. See Vehicle Personalization 0123.
Battery Load Management
The vehicle has Electric Power Management
(EPM) that estimates the battery's
temperature and state of charge. It then
adjusts the voltage for best performance
and extended life of the battery. When the battery's state of charge is low,
the voltage is raised slightly to quickly bring
the charge back up. When the state of
charge is high, the voltage is lowered
slightly to prevent overcharging. If the
vehicle has a voltmeter gauge or a voltage
display on the Driver Information Center
(DIC), you may see the voltage move up or
down. This is normal. If there is a problem,
an alert will be displayed.
The battery can be discharged at idle if the
electrical loads are very high. This is true for
all vehicles. This is because the generator
(alternator) may not be spinning fast
enough at idle to produce all of the power
needed for very high electrical loads.
A high electrical load occurs when several of
the following are on, such as: headlamps,
high beams, rear window defogger, climate
control fan at high speed, heated seats,
engine cooling fans, trailer loads, and loads
plugged into accessory power outlets.
EPM works to prevent excessive discharge of
the battery. It does this by balancing the
generator's output and the vehicle's
electrical needs. It can increase engine idle
speed to generate more power whenever
needed. It can temporarily reduce the power
demands of some accessories.
Page 175 of 396

GMC Acadia/Acadia Denali Owner Manual (GMNA-Localizing-U.S./Canada/
Mexico-14608671) - 2021 - CRC - 10/26/20
174 Infotainment System
To disconnect the phones wireless
projection:1. Select Settings from the Home Page.
2. Select Phones
3. Touch
4next to the phone to be
disconnected.
4. Turn off Apple CarPlay or Android Auto.
Press
{on the center stack to return to the
Home Page.
Features are subject to change. For further
information on how to set up Android Auto
and Apple CarPlay in the vehicle, see
my.gmc.com.
Android Auto is provided by Google and is
subject to Google’s terms and privacy policy.
Apple CarPlay is provided by Apple and is
subject to Apple’s terms and privacy policy.
Data plan rates apply. For Android Auto
support and to see if your phone is
compatible, see https://support.google.com/
androidauto. For Apple CarPlay support and
to see if your phone is compatible, see
www.apple.com/ios/carplay/. Apple or
Google may change or suspend availability
at any time. Android Auto, Android, Google, Google Play, and other marks are
trademarks of Google Inc.; Apple CarPlay is a
trademark of Apple Inc.
Press
{on the center stack to exit Android
Auto or Apple CarPlay. To enter back into
Android Auto or Apple CarPlay, press and
hold
{on the center stack.
Apple CarPlay and Android Auto can be
disabled from the infotainment system. To
do this, touch Home, Settings, and then
touch the Apps tab along the top of the
display. Use the On/Off toggled to turn off
Apple CarPlay or Android Auto.
Settings
Certain settings can be managed in the
Owner Center sites when an account is
established, and may be modified if other
users have accessed the vehicle or created
accounts. This may result in changes to the
security or functionality of the infotainment
system. Some settings may also be
transferred to a new vehicle, if equipped. For
instructions, in the U.S. see my.gmc.com or
in Canada see mygmc.ca or mongmc.ca. Refer to the User Terms and Privacy
Statement for important details. To view,
touch the Settings icon on the Home Page
of the infotainment display.
The settings menu may be organized into
four categories. Select the desired category
by touching System, Apps, Vehicle,
or Personal.
To access the personalization menus:
1. Touch Settings on the Home Page on the infotainment display.
2. Touch the desired category to display a list of available options.
3. Touch to select the desired feature setting.
4. Touch the options on the infotainment display to disable or enable a feature.
5. Touch
zto go to the top level of the
Settings menu.