remote start GMC ACADIA 2021 User Guide
[x] Cancel search | Manufacturer: GMC, Model Year: 2021, Model line: ACADIA, Model: GMC ACADIA 2021Pages: 396, PDF Size: 7.87 MB
Page 29 of 396

GMC Acadia/Acadia Denali Owner Manual (GMNA-Localizing-U.S./Canada/
Mexico-14608671) - 2021 - CRC - 10/26/20
28 Keys, Doors, and Windows
during the resetting of the power folding
mirrors. This sound is normal after a manual
folding operation.
Remote Mirror Folding
If equipped, press and hold
Qon the RKE
transmitter for approximately one second to
automatically fold the exterior mirrors. Press
and hold
Kon the RKE transmitter for
approximately one second to unfold. See
Remote Keyless Entry (RKE) System
Operation 07.
This feature is turned on or off through
vehicle personalization. See Vehicle
Personalization 0123.
Heated Mirrors
K:Press to heat the mirrors.
See “Rear Window Defogger” underDual
Automatic Climate Control System 0192.
Automatic Dimming Mirror
If the vehicle has the automatic dimming
mirror, the driver outside mirror
automatically adjusts for the glare of
headlamps behind you.
Reverse Tilt Mirrors
If equipped with reverse tilt mirrors and
memory seats, the passenger and/or driver
mirror tilts to a preselected position when
the vehicle is in R (Reverse). This allows the
curb to be seen when parallel parking.
The mirror(s) may move from their tilted
position when:
.The vehicle is shifted out of R (Reverse),
or remains in R (Reverse) for about
30 seconds.
.The vehicle is turned off.
.The vehicle is driven in R (Reverse) above
a set speed.
To turn this feature on or off, see Vehicle
Personalization 0123.
Interior Mirrors
Interior Rearview Mirrors
Adjust the rearview mirror for a clear view
of the area behind the vehicle.
Do not spray glass cleaner directly on the
mirror. Use a soft towel dampened with
water.
Manual Rearview Mirror
If equipped, push the tab forward for
daytime use and pull it rearward for
nighttime use to avoid glare of the
headlamps from behind.
Automatic Dimming Rearview
Mirror
If equipped, automatic dimming reduces the
glare of headlamps from behind. The
dimming feature comes on when the vehicle
is started.
Rear Camera Mirror
If equipped, this automatic dimming mirror
provides a wide angle camera view of the
area behind the vehicle.
Page 40 of 396
GMC Acadia/Acadia Denali Owner Manual (GMNA-Localizing-U.S./Canada/
Mexico-14608671) - 2021 - CRC - 10/26/20
Seats and Restraints 39
2. Move the seatback to the desiredposition, and then release the lever to
lock the seatback in place.
3. Push and pull on the seatback to make sure it is locked.
To return the seatback to the upright
position: 1. Lift the lever fully without applying pressure to the seatback, and the
seatback will return to the upright
position.
2. Push and pull on the seatback to make sure it is locked.
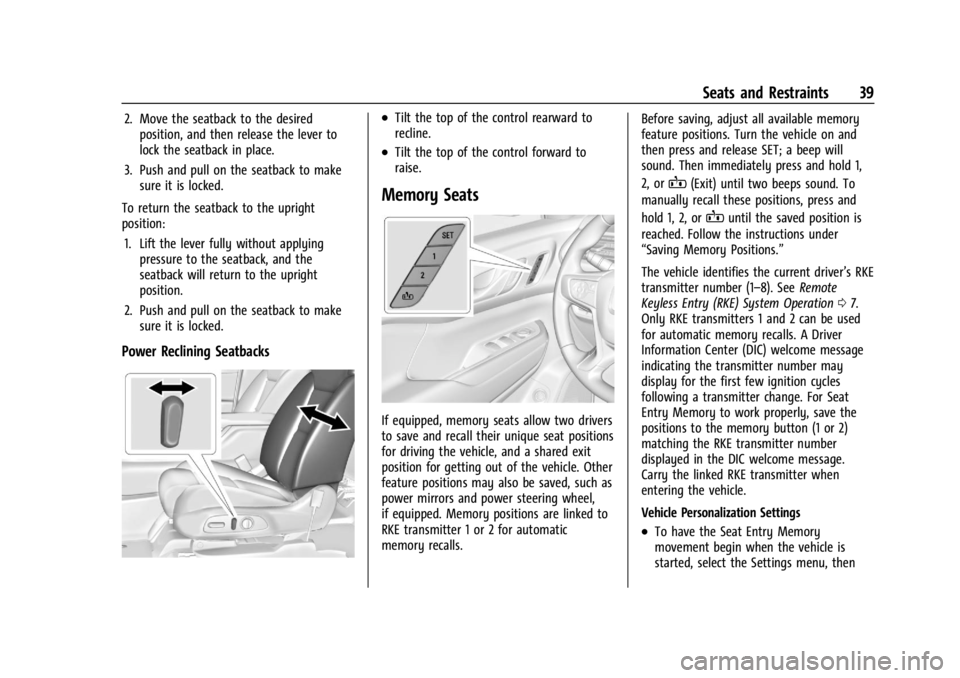
Power Reclining Seatbacks
.Tilt the top of the control rearward to
recline.
.Tilt the top of the control forward to
raise.
Memory Seats
If equipped, memory seats allow two drivers
to save and recall their unique seat positions
for driving the vehicle, and a shared exit
position for getting out of the vehicle. Other
feature positions may also be saved, such as
power mirrors and power steering wheel,
if equipped. Memory positions are linked to
RKE transmitter 1 or 2 for automatic
memory recalls. Before saving, adjust all available memory
feature positions. Turn the vehicle on and
then press and release SET; a beep will
sound. Then immediately press and hold 1,
2, or
B(Exit) until two beeps sound. To
manually recall these positions, press and
hold 1, 2, or
Buntil the saved position is
reached. Follow the instructions under
“Saving Memory Positions.”
The vehicle identifies the current driver’s RKE
transmitter number (1–8). See Remote
Keyless Entry (RKE) System Operation 07.
Only RKE transmitters 1 and 2 can be used
for automatic memory recalls. A Driver
Information Center (DIC) welcome message
indicating the transmitter number may
display for the first few ignition cycles
following a transmitter change. For Seat
Entry Memory to work properly, save the
positions to the memory button (1 or 2)
matching the RKE transmitter number
displayed in the DIC welcome message.
Carry the linked RKE transmitter when
entering the vehicle.
Vehicle Personalization Settings
.To have the Seat Entry Memory
movement begin when the vehicle is
started, select the Settings menu, then
Page 42 of 396
GMC Acadia/Acadia Denali Owner Manual (GMNA-Localizing-U.S./Canada/
Mexico-14608671) - 2021 - CRC - 10/26/20
Seats and Restraints 41
Seat Entry Memory
The vehicle identifies the number of the
current driver’s RKE transmitter (1–8). See
Remote Keyless Entry (RKE) System
Operation07. If the RKE transmitter is 1 or
2, and Seat Entry Memory is enabled in
vehicle personalization, the positions saved
to the same memory button number 1 or 2
are automatically recalled when the vehicle
is turned on, or turned from off to ACC/
ACCESSORY. RKE transmitters 3–8 will not
provide automatic memory recalls.
To turn Seat Entry Memory on or off, see
“Vehicle Personalization Settings” previously
in this section and Vehicle Personalization
0 123.
The transmission must be in P (Park) to start
Seat Entry Memory. Seat Entry Memory
recall will complete if the vehicle is shifted
out of P (Park) prior to reaching the saved
memory position.
To stop Seat Entry Memory recall
movement, turn the vehicle off or press any
of the following controls:
.Power seat
.Memory SET, 1, 2, orB
.Power mirror, with the driver or
passenger side mirror selected
.Power steering wheel, if equipped
If the saved memory seat position does not
automatically recall or recalls to the wrong
positions, the driver’s RKE transmitter
number (1 or 2) may not match the memory
button number that positions were saved to.
Try storing the position to the other
memory button or try the other RKE
transmitter.
Seat Exit Memory
Seat Exit Memory is not linked to an RKE
transmitter. The position saved to
Bis
used for all drivers. To turn Seat Exit
Memory on or off, see "Vehicle
Personalization Settings" previously in this
section and Vehicle Personalization 0123.
If turned on, the position saved to
Bis
automatically recalled when one of the
following occurs:
.The vehicle is turned off and the driver
door is opened within a short time.
.The vehicle is turned off with the driver
door open.
To stop Seat Exit Memory movement, press
any of the following memory controls:
.Power seat
.Memory SET, 1, 2, orB
.Power mirror, with the driver or
passenger side mirror selected
.Power steering wheel, if equipped
Obstructions
If something has blocked the driver seat
and/or power steering wheel while recalling
a memory position, the recall may stop.
Remove the obstruction and try the recall
again. If the memory position still does not
recall, see your dealer.
Heated and Ventilated Front
Seats
{Warning
If temperature change or pain to the skin
cannot be felt, the seat heater may cause
burns. To reduce the risk of burns, use
care when using the seat heater,
especially for long periods of time. Do
not place anything on the seat that
insulates against heat, such as a blanket,
cushion, cover, or similar item. This may
cause the seat heater to overheat. An
overheated seat heater may cause a burn
or may damage the seat.
Page 43 of 396
GMC Acadia/Acadia Denali Owner Manual (GMNA-Localizing-U.S./Canada/
Mexico-14608671) - 2021 - CRC - 10/26/20
42 Seats and Restraints
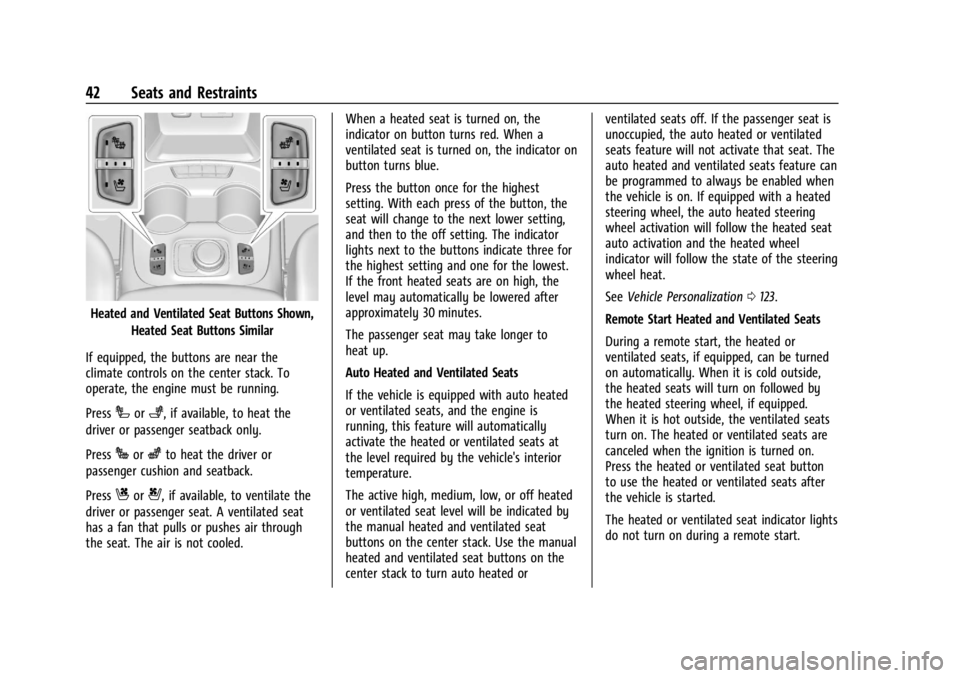
Heated and Ventilated Seat Buttons Shown,Heated Seat Buttons Similar
If equipped, the buttons are near the
climate controls on the center stack. To
operate, the engine must be running.
Press
Ior+, if available, to heat the
driver or passenger seatback only.
Press
Jorzto heat the driver or
passenger cushion and seatback.
Press
Cor{, if available, to ventilate the
driver or passenger seat. A ventilated seat
has a fan that pulls or pushes air through
the seat. The air is not cooled. When a heated seat is turned on, the
indicator on button turns red. When a
ventilated seat is turned on, the indicator on
button turns blue.
Press the button once for the highest
setting. With each press of the button, the
seat will change to the next lower setting,
and then to the off setting. The indicator
lights next to the buttons indicate three for
the highest setting and one for the lowest.
If the front heated seats are on high, the
level may automatically be lowered after
approximately 30 minutes.
The passenger seat may take longer to
heat up.
Auto Heated and Ventilated Seats
If the vehicle is equipped with auto heated
or ventilated seats, and the engine is
running, this feature will automatically
activate the heated or ventilated seats at
the level required by the vehicle's interior
temperature.
The active high, medium, low, or off heated
or ventilated seat level will be indicated by
the manual heated and ventilated seat
buttons on the center stack. Use the manual
heated and ventilated seat buttons on the
center stack to turn auto heated orventilated seats off. If the passenger seat is
unoccupied, the auto heated or ventilated
seats feature will not activate that seat. The
auto heated and ventilated seats feature can
be programmed to always be enabled when
the vehicle is on. If equipped with a heated
steering wheel, the auto heated steering
wheel activation will follow the heated seat
auto activation and the heated wheel
indicator will follow the state of the steering
wheel heat.
See
Vehicle Personalization 0123.
Remote Start Heated and Ventilated Seats
During a remote start, the heated or
ventilated seats, if equipped, can be turned
on automatically. When it is cold outside,
the heated seats will turn on followed by
the heated steering wheel, if equipped.
When it is hot outside, the ventilated seats
turn on. The heated or ventilated seats are
canceled when the ignition is turned on.
Press the heated or ventilated seat button
to use the heated or ventilated seats after
the vehicle is started.
The heated or ventilated seat indicator lights
do not turn on during a remote start.
Page 44 of 396
GMC Acadia/Acadia Denali Owner Manual (GMNA-Localizing-U.S./Canada/
Mexico-14608671) - 2021 - CRC - 10/26/20
Seats and Restraints 43
The temperature performance of an
unoccupied seat may be reduced. This is
normal.
The remote start heated or ventilated seats
may be enabled or disabled in the vehicle
personalization menu. SeeRemote Vehicle
Start 013 and
Vehicle Personalization 0123.
Rear Seats
Rear Seat Reminder
If equipped, the message REAR SEAT
REMINDER LOOK IN REAR SEAT displays
under certain conditions indicating there
may be an item or passenger in the rear
seat. Check before exiting the vehicle.
This feature will activate when a second row
door is opened while the vehicle is on or up
to 10 minutes before the vehicle is turned
on. There will be an alert when the vehicle
is turned off. The alert does not directly
detect objects in the rear seat; instead,
under certain conditions, it detects when a
rear door is opened and closed, indicating
that there may be something in the
rear seat. The feature is active only once each time
the vehicle is turned on and off, and will
require reactivation by opening and closing
the second row doors. There may be an
alert even when there is nothing in the rear
seat; for example, if a child entered the
vehicle through the rear door and left the
vehicle without the vehicle being shut off.
The feature can be turned on or off. See
Vehicle Personalization
0123.
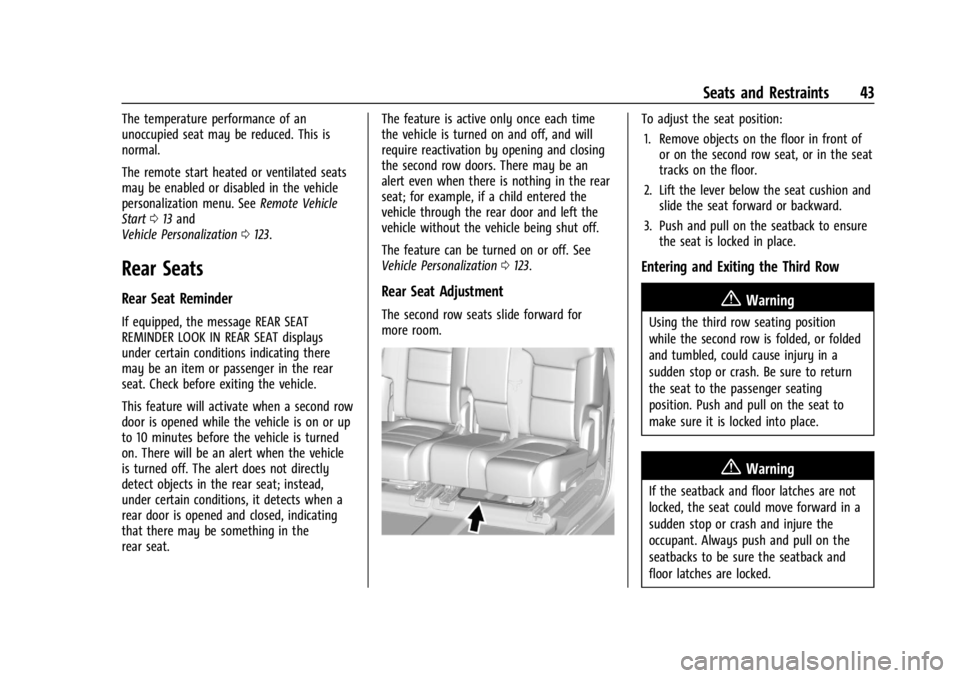
Rear Seat Adjustment
The second row seats slide forward for
more room.
To adjust the seat position:
1. Remove objects on the floor in front of or on the second row seat, or in the seat
tracks on the floor.
2. Lift the lever below the seat cushion and slide the seat forward or backward.
3. Push and pull on the seatback to ensure the seat is locked in place.
Entering and Exiting the Third Row
{Warning
Using the third row seating position
while the second row is folded, or folded
and tumbled, could cause injury in a
sudden stop or crash. Be sure to return
the seat to the passenger seating
position. Push and pull on the seat to
make sure it is locked into place.
{Warning
If the seatback and floor latches are not
locked, the seat could move forward in a
sudden stop or crash and injure the
occupant. Always push and pull on the
seatbacks to be sure the seatback and
floor latches are locked.
Page 91 of 396
GMC Acadia/Acadia Denali Owner Manual (GMNA-Localizing-U.S./Canada/
Mexico-14608671) - 2021 - CRC - 10/26/20
90 Instruments and Controls
Controls
Steering Wheel Adjustment
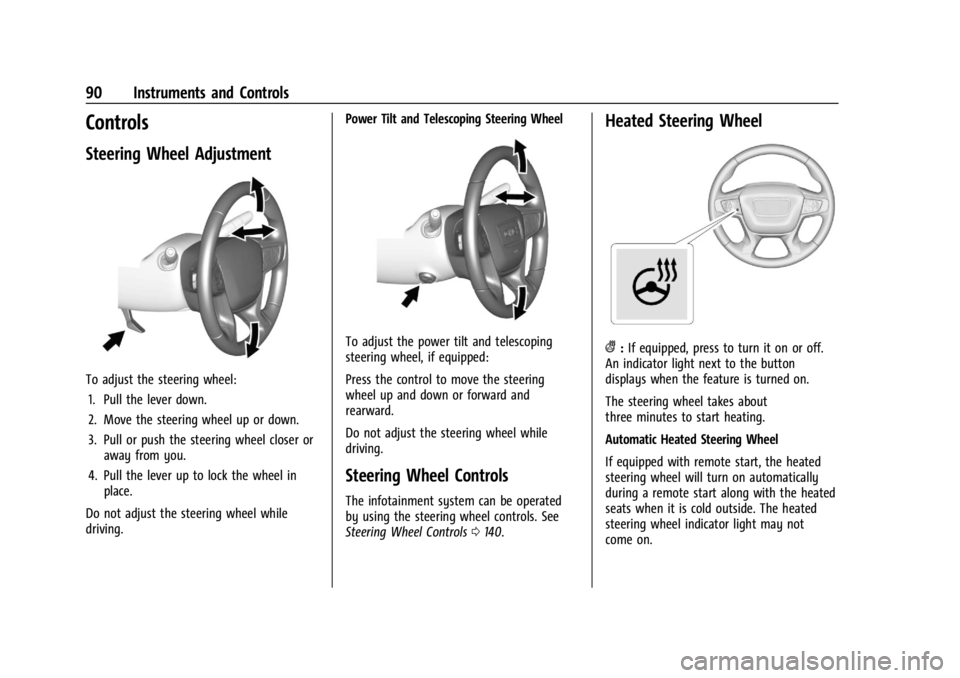
To adjust the steering wheel:1. Pull the lever down.
2. Move the steering wheel up or down.
3. Pull or push the steering wheel closer or away from you.
4. Pull the lever up to lock the wheel in place.
Do not adjust the steering wheel while
driving. Power Tilt and Telescoping Steering Wheel
To adjust the power tilt and telescoping
steering wheel, if equipped:
Press the control to move the steering
wheel up and down or forward and
rearward.
Do not adjust the steering wheel while
driving.
Steering Wheel Controls
The infotainment system can be operated
by using the steering wheel controls. See
Steering Wheel Controls
0140.
Heated Steering Wheel
(:If equipped, press to turn it on or off.
An indicator light next to the button
displays when the feature is turned on.
The steering wheel takes about
three minutes to start heating.
Automatic Heated Steering Wheel
If equipped with remote start, the heated
steering wheel will turn on automatically
during a remote start along with the heated
seats when it is cold outside. The heated
steering wheel indicator light may not
come on.
Page 125 of 396

GMC Acadia/Acadia Denali Owner Manual (GMNA-Localizing-U.S./Canada/
Mexico-14608671) - 2021 - CRC - 10/26/20
124 Instruments and Controls
Touch Off or On.
Auto Heated Seats
When enabled, this feature will
automatically activate the heated seats at
the level required by the interior
temperature. The auto heated seats can be
turned off by using the heated seat buttons
on the center console. SeeHeated and
Ventilated Front Seats 041.
Touch Off or On.
Auto Defog
This setting automatically turns the front
defogger on when the engine is started.
Touch Off or On.
Auto Rear Defog
This setting automatically turns the rear
defogger on when the engine is started.
Touch Off or On.
Collision/Detection Systems
Touch and the following may display:
.Alert Type
.Forward Collision System
.Front Pedestrian Detection
.Adaptive Cruise Go Notifier
.Lane Change Alert
.Rear Cross Traffic Alert
Alert Type
This feature will set the type of alert
received from the driver assistance systems
to help avoid crashes, either Beeps or Safety
Alert Seat vibration pulses.
Touch Beeps or Safety Alert Seat.
Forward Collision System
This setting can alert of a potential crash
with a detected vehicle ahead and can apply
brakes to help reduce a collision’s severity.
Touch Off, Alert, or Alert and Brake.
Front Pedestrian Detection
This feature may help avoid or reduce the
harm caused by front-end crashes with
nearby pedestrians.
See Front Pedestrian Braking (FPB) System
0 248.
Touch Off, Alert, or Alert and Brake.
Adaptive Cruise Go Notifier
This setting determines if an alert will
appear when Adaptive Cruise Control brings
the vehicle to a complete stop and the vehicle ahead of you starts moving again.
See
Adaptive Cruise Control (Advanced)
0 232.
Touch Off or On.
Lane Change Alert
The LCA system is a lane-changing aid that
assists drivers with avoiding lane change
crashes. See Lane Change Alert (LCA) 0250.
When Lane Change Alert is disabled, Side
Blind Zone Alert is also disabled.
Touch Off or On.
Rear Cross Traffic Alert
This allows the Rear Cross Traffic Alert
feature to be turned on or off. See
Assistance Systems for Parking or Backing
0 241.
Touch Off or On.
Comfort and Convenience
Touch and the following may display:
.Chime Volume
.Hands Free Liftgate/Trunk Control
.Reverse Tilt Mirror
.Remote Mirror Folding
.Auto Wipe in Reverse Gear
.Extended Hill Start Assist
Page 126 of 396
GMC Acadia/Acadia Denali Owner Manual (GMNA-Localizing-U.S./Canada/
Mexico-14608671) - 2021 - CRC - 10/26/20
Instruments and Controls 125
Chime Volume
This determines the chime volume level.
Touch the controls on the infotainment
display to adjust the volume.
Hands Free Liftgate/Trunk Control
The liftgate may be operated with a kicking
motion under the rear bumper between the
left exhaust pipe and the license plate. See
Liftgate018.
Touch Off, On-Open and Close,
or On-Open Only.
Reverse Tilt Mirror
When on, the driver, passenger, or both
driver and passenger outside mirrors will tilt
downward when the vehicle is shifted into
R (Reverse) to improve visibility of the
ground near the rear wheels. They may
move from their tilted position when the
vehicle is shifted out of R (Reverse) or
turned off. See Reverse Tilt Mirrors 028.
Touch Off, On - Driver and Passenger, On -
Driver, or On - Passenger. Remote Mirror Folding
When on, the outside mirrors will
automatically fold or unfold when the
Remote Keyless Entry (RKE) transmitter
Q
orKis pressed and held on.
Touch Off or On.
Auto Wipe in Reverse Gear
When on and the front wiper is on, the rear
wiper will automatically activate when the
vehicle is shifted to R (Reverse).
Touch Off or On.
Extended Hill Start Assist
This allows the duration of the Hill Start
Assist to be changed.
Touch Extended Hold or Standard Hold.
Lighting
Touch and the following may display:
.Vehicle Locator Lights
.Exit Lighting Vehicle Locator Lights
This feature will flash the exterior lamps and
allows some of the exterior lamps and most
of the interior lamps to turn on briefly
when
Kon the Remote Keyless Entry (RKE)
transmitter is pressed to locate the vehicle.
Touch Off or On.
Exit Lighting
This allows the selection of how long the
exterior lamps stay on when leaving the
vehicle when it is dark outside.
Touch Off, 30 Seconds, 60 Seconds,
or 120 Seconds.
Power Door Locks
Touch and the following may display:
.Open Door Anti Lockout
.Auto Door Unlock
.Delayed Door Lock
Open Door Anti Lock Out
This setting prevents the driver door from
locking when the door is open. If this
setting is on, the Delayed Door Lock menu
will not be available.
Touch Off or On.
Page 127 of 396
GMC Acadia/Acadia Denali Owner Manual (GMNA-Localizing-U.S./Canada/
Mexico-14608671) - 2021 - CRC - 10/26/20
126 Instruments and Controls
Auto Door Unlock
This allows selection of which of the doors
will automatically unlock when the vehicle is
shifted into P (Park).
Touch Off, All Doors, or Driver Door.
Delayed Door Lock
This setting delays the locking of the
vehicle’s doors.
Touch Off or On.
Remote Lock, Unlock, and Start
Touch and the following may display:
.Remote Unlock Light Feedback
.Remote Lock Feedback
.Remote Door Unlock
.Remote Start Auto Cool Seats
.Remote Start Auto Heat Seats
.Remote Window Operation
.Passive Door Unlock
.Passive Door Lock
.Remote Left in Vehicle Alert
Remote Unlock Light Feedback
This setting flashes the exterior lamps when
the vehicle is unlocked with the RKE
transmitter. Touch Off or Flash Lights.
Remote Lock Feedback
This setting specifies how the vehicle
responds when the vehicle is locked with
the RKE transmitter.
Touch Off, Lights and Horn, Lights Only,
or Horn Only.
Remote Door Unlock
This setting specifies whether all doors,
or just the driver door, unlock when pressing
Kon the RKE transmitter.
Touch All Doors or Driver Door.
Remote Start Auto Cool Seats
If equipped and turned on, this feature will
turn on the ventilated seats when using
remote start on warm days. See Heated and
Ventilated Front Seats 041 and
Remote Vehicle Start 013.
Touch Off or On.
Remote Start Auto Heat Seats
If equipped and turned on, this feature will
turn on the heated seats when using remote
start on cold days. See Heated and
Ventilated Front Seats 041 and
Remote Vehicle Start 013. Touch Off or On.
Remote Window Operation
This allows the windows to be opened when
pressing and holding
Kon the RKE
transmitter. See Remote Keyless Entry (RKE)
System Operation 07.
Touch Off or On.
Passive Door Unlock
This setting specifies which doors unlock
when using the button on the driver door
handle to unlock the vehicle.
Touch All Doors or Driver Door Only.
Passive Door Lock
This setting specifies if the vehicle will
automatically lock, or lock and provide an
alert after all the doors are closed, and you
walk away from the vehicle with the remote
key. See Remote Keyless Entry (RKE) System
Operation 07.
Touch Off, On with Horn Chirp, or On.
Remote Left in Vehicle Alert
This feature sounds an alert when the RKE
transmitter is left in the vehicle. This menu
also enables the Remote No Longer In
Vehicle Alert.
Page 181 of 396
GMC Acadia/Acadia Denali Owner Manual (GMNA-Localizing-U.S./Canada/
Mexico-14608671) - 2021 - CRC - 10/26/20
180 Infotainment System
.Active Call View: Shows active call display
when answering a call.
Touch the controls on the infotainment
display to disable or enable.
.Privacy: Only show call alerts in the
instrument cluster.
Touch Off or On.
.Sort Contacts: Touch to sort by first or
last name.
.Re-sync Device Contacts:
This allows the device contacts to re-sync
if you are having difficulty accessing all of
the contacts on your cell phone.
.Delete All Vehicle Contacts: Touch to
delete all vehicle stored contacts.
.OnStar Phone TTY Mode: This enables
OnStar cell phone TTY mode.
Touch Disable or Enable.
Vehicle
This menu allows adjustment of different
vehicle features. SeeVehicle Personalization
0 123.
Personal
If equipped, this menu allows adjustment of
different user profile settings. See “Users”in
Using the System 0141 for information on
setting up user profiles.
The menu may contain the following:
Name
Touch to edit your user name that will be
displayed in the vehicle.
Vehicle Account Information
Touch to view the vehicle account
information and to change the account
password.
An “unverified user account” pop-up will
display until the account information
verification process has been completed on
the Internet. Check your registered e-mail
account for an activation e-mail to complete
the verification process.
Profile Picture
Touch to choose or change your profile
picture.
Profile Identifiers
Touch to have the vehicle recognize the
identifier you choose. Touch Vehicle Key 1 and/or Vehicle Key 2.
If the Remote Key is lost or stolen, see your
dealer.
Security
Touch to have your profile secured with a
Personal Identification Number (PIN).
Touch No or Yes.
Vehicle Name
Touch to edit your vehicle name.
Vehicle Account
Touch to view the vehicle account
information and to change the account
password.
Delete Profile
Touch to remove the profile from the
vehicle.
Touch Remove or Cancel.
Teen Driver
If equipped, this allows multiple keys to be
registered for beginner drivers to encourage
safe driving habits. When the vehicle is
started with a Teen Driver key, it will
automatically activate certain safety
systems, allow setting of some features, and