headlamp GMC CANYON 2020 User Guide
[x] Cancel search | Manufacturer: GMC, Model Year: 2020, Model line: CANYON, Model: GMC CANYON 2020Pages: 364, PDF Size: 5.59 MB
Page 133 of 364
GMC Canyon/Canyon Denali Owner Manual (GMNA-Localizing-U.S./Canada-
13566643) - 2020 - CRC - 10/4/19
132 Lighting
moving up or down. This is normal.
If there is a problem, an alert will be
displayed.
The battery can be discharged at
idle if the electrical loads are very
high. This is true for all vehicles.
This is because the generator
(alternator) may not be spinning fast
enough at idle to produce all the
power that is needed for very high
electrical loads.
A high electrical load occurs when
several of the following are on, such
as: headlamps, high beams, fog
lamps, rear window defogger,
climate control fan at high speed,
heated seats, engine cooling fans,
trailer loads, and loads plugged into
accessory power outlets.
EPM works to prevent excessive
discharge of the battery. It does this
by balancing the generator's output
and the vehicle's electrical needs.
It can increase engine idle speed to
generate more power, whenever
needed. It can temporarily reduce
the power demands of some
accessories.Normally, these actions occur in
steps or levels, without being
noticeable. In rare cases at the
highest levels of corrective action,
this action may be noticeable to the
driver. If so, a DIC message might
be displayed and it is recommended
that the driver reduce the electrical
loads as much as possible.
Battery Power Protection
This feature shuts off the dome and
reading lamps, if they are left on for
more than 10 minutes after the
ignition is turned off. The cargo
lamp shuts off after 20 minutes. This
prevents the battery from
running down.
Exterior Lighting Battery
Saver
The exterior lamps turn off about
10 minutes after the ignition is
turned off, if the parking lamps or
headlamps have been manually left
on. This protects against draining
the battery. To restart the 10-minute
timer, turn the exterior lamp control
to the
Oposition and then back to
the
;or2position.
To keep the lamps on for more than
10 minutes, the ignition must be on
or in ACC/ACCESSORY.
Page 149 of 364
GMC Canyon/Canyon Denali Owner Manual (GMNA-Localizing-U.S./Canada-
13566643) - 2020 - CRC - 10/4/19
148 Driving and Operating
When driving on hills:
.Use a low gear and keep a firm
grip on the steering wheel.
. Maintain a slow speed.
. When possible, drive straight up
or down the hill.
. Slow down when approaching
the top of the hill.
. Use headlamps even during the
day to make the vehicle more
visible.
{Warning
Driving to the top of a hill at high
speed can cause a crash. There
could be a drop-off, embankment,
cliff, or even another vehicle. You
could be seriously injured or
killed. As you near the top of a
hill, slow down and stay alert.
. Never go downhill forward or
backward with either the
transmission or transfer case in N (Neutral). The brakes could
overheat and you could lose
control.
{Warning
If the vehicle has the two-speed
automatic or electronic transfer
case, shifting the transfer case to
N (Neutral) can cause your
vehicle to roll even if the
transmission is in P (Park). This is
because the N (Neutral) position
on the transfer case overrides the
transmission. You or someone
else could be injured. If leaving
the vehicle, set the parking brake
and shift the transmission to
P (Park). Shift the transfer case to
any position but N (Neutral).
. When driving down a hill, keep
the vehicle headed straight
down. Use a low gear because
the engine will work with the
brakes to slow the vehicle and
help keep the vehicle under
control.
{Warning
Heavy braking when going down
a hill can cause your brakes to
overheat and fade. This could
cause loss of control and you or
others could be injured or killed.
Apply the brakes lightly when
descending a hill and use a low
gear to keep vehicle speed under
control.
If the vehicle stalls on a hill: 1. Apply the brakes to stop the vehicle, and then apply the
parking brake.
2. Shift into P (Park) and then restart the engine.
.If driving uphill when the
vehicle stalls, shift to
R (Reverse), release the
parking brake, and back
straight down.
Page 154 of 364
GMC Canyon/Canyon Denali Owner Manual (GMNA-Localizing-U.S./Canada-
13566643) - 2020 - CRC - 10/4/19
Driving and Operating 153
{Warning
Snow can trap engine exhaust
under the vehicle. This may
cause exhaust gases to get
inside. Engine exhaust contains
carbon monoxide (CO), which
cannot be seen or smelled. It can
cause unconsciousness and even
death.
If the vehicle is stuck in snow:. Clear snow from the base of
the vehicle, especially any
blocking the exhaust pipe.
. Open a window about 5 cm
(2 in) on the vehicle side
that is away from the wind,
to bring in fresh air.
. Fully open the air outlets on
or under the instrument
panel.
. Adjust the climate control
system to circulate the air
inside the vehicle and set
(Continued)
Warning (Continued)
the fan speed to the highest
setting. See“Climate
Control Systems.”
For more information about CO,
see Engine Exhaust 0168.
To save fuel, run the engine for
short periods to warm the vehicle
and then shut the engine off and
partially close the window. Moving
about to keep warm also helps.
If it takes time for help to arrive,
when running the engine, push the
accelerator pedal slightly so the
engine runs faster than the idle
speed. This keeps the battery
charged to restart the vehicle and to
signal for help with the headlamps.
Do this as little as possible, to
save fuel.
If the Vehicle Is Stuck
Slowly and cautiously spin the
wheels to free the vehicle when
stuck in sand, mud, ice, or snow.
See “Rocking the Vehicle to Get It
Out” later in this section.
The Traction Control System (TCS)
can often help to free a stuck
vehicle. See Traction Control/
Electronic Stability Control 0183.
If TCS cannot free the vehicle, see
“Rocking the Vehicle to Get it Out”
following.
{Warning
If the vehicle's tires spin at high
speed, they can explode, and you
or others could be injured. The
vehicle can overheat, causing an
engine compartment fire or other
damage. Spin the wheels as little
as possible and avoid going
above 56 km/h (35 mph).
For information about using tire
chains on the vehicle, see Tire
Chains 0277.
Page 190 of 364
GMC Canyon/Canyon Denali Owner Manual (GMNA-Localizing-U.S./Canada-
13566643) - 2020 - CRC - 10/4/19
Driving and Operating 189
Warning (Continued)
Complete attention is always
required while driving, and you
should be ready to take action
and apply the brakes and/or steer
the vehicle to avoid crashes.
Audible Alert
Some driver assistance features
alert the driver of obstacles by
beeping. To change the volume of
the warning chime, see “Comfort
and Convenience” underVehicle
Personalization 0122.
Cleaning
Depending on vehicle options, keep
these areas of the vehicle clean to
ensure the best driver assistance
feature performance. Driver
Information Center (DIC) messages
may display when the systems are
unavailable or blocked.
. Front and rear bumpers and the
area below the bumpers
. Front grille and headlamps .
Front camera lens in the front
grille or near the front emblem
. Front side and rear side panels
. Outside of the windshield in front
of the rearview mirror
. Side camera lens on the bottom
of the outside mirrors
. Rear side corner bumpers
. Rear Vision Camera above the
license plate
Radio Frequency
This vehicle may be equipped with
driver assistance systems that
operate using radio frequency. See
Radio Frequency Statement 0339.
Assistance Systems for
Parking or Backing
If equipped, the Rear Vision Camera
(RVC) and Rear Park Assist (RPA)
may help the driver park or avoid
objects. Always check around the
vehicle when parking or backing.
Page 194 of 364
GMC Canyon/Canyon Denali Owner Manual (GMNA-Localizing-U.S./Canada-
13566643) - 2020 - CRC - 10/4/19
Driving and Operating 193
display green. Vehicles may not be
detected on curves, highway exit
ramps, or hills, due to poor visibility;
or if a vehicle ahead is partially
blocked by pedestrians or other
objects. FCA will not detect another
vehicle ahead until it is completely
in the driving lane.
{Warning
FCA does not provide a warning
to help avoid a crash, unless it
detects a vehicle. FCA may not
detect a vehicle ahead if the FCA
sensor is blocked by dirt, snow,
or ice, or if the windshield is
damaged. It may also not detect a
vehicle on winding or hilly roads,
or in conditions that can limit
visibility such as fog, rain,
or snow, or if the headlamps or
windshield are not cleaned or in
proper condition. Keep the
windshield, headlamps, and FCA
sensors clean and in good repair.Collision Alert
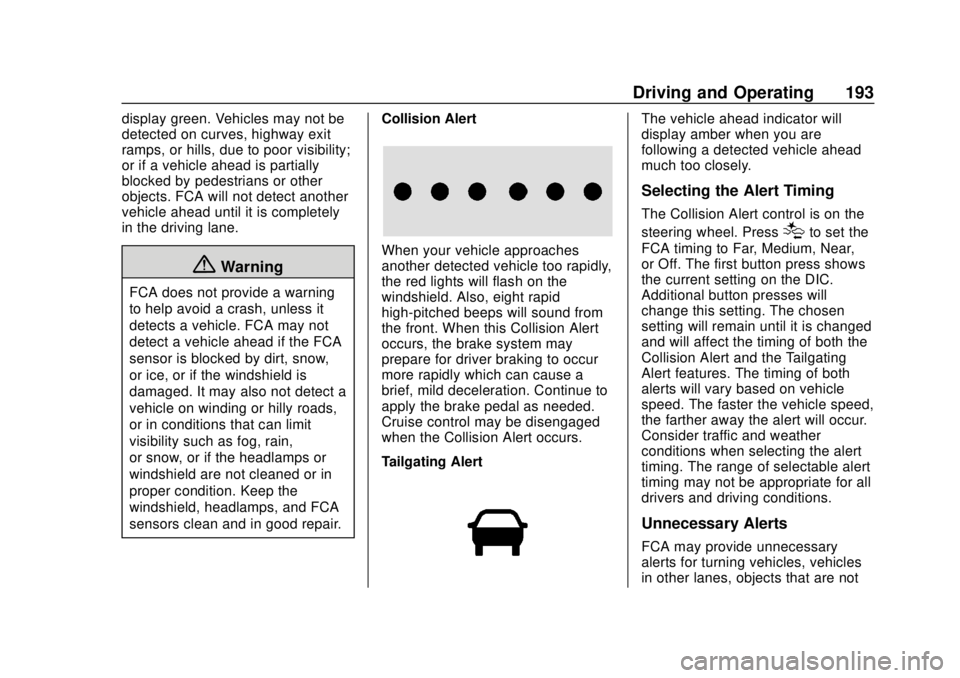
When your vehicle approaches
another detected vehicle too rapidly,
the red lights will flash on the
windshield. Also, eight rapid
high-pitched beeps will sound from
the front. When this Collision Alert
occurs, the brake system may
prepare for driver braking to occur
more rapidly which can cause a
brief, mild deceleration. Continue to
apply the brake pedal as needed.
Cruise control may be disengaged
when the Collision Alert occurs.
Tailgating Alert
The vehicle ahead indicator will
display amber when you are
following a detected vehicle ahead
much too closely.
Selecting the Alert Timing
The Collision Alert control is on the
steering wheel. Press
[to set the
FCA timing to Far, Medium, Near,
or Off. The first button press shows
the current setting on the DIC.
Additional button presses will
change this setting. The chosen
setting will remain until it is changed
and will affect the timing of both the
Collision Alert and the Tailgating
Alert features. The timing of both
alerts will vary based on vehicle
speed. The faster the vehicle speed,
the farther away the alert will occur.
Consider traffic and weather
conditions when selecting the alert
timing. The range of selectable alert
timing may not be appropriate for all
drivers and driving conditions.
Unnecessary Alerts
FCA may provide unnecessary
alerts for turning vehicles, vehicles
in other lanes, objects that are not
Page 195 of 364
GMC Canyon/Canyon Denali Owner Manual (GMNA-Localizing-U.S./Canada-
13566643) - 2020 - CRC - 10/4/19
194 Driving and Operating
vehicles, or shadows. These alerts
are normal operation and the
vehicle does not need service.
Cleaning the System
If the FCA system does not seem to
operate properly, this may correct
the issue:
.Clean the outside of the
windshield in front of the
rearview mirror.
. Clean the entire front of the
vehicle.
. Clean the headlamps.
Lane Departure
Warning (LDW)
If equipped, LDW may help avoid
crashes due to unintentional lane
departures. It may provide an alert if
the vehicle is crossing a lane
marking without using a turn signal
in that direction. LDW uses a
camera sensor to detect the lane
markings at speeds of 56 km/h
(35 mph) or greater.
{Warning
The LDW system does not steer
the vehicle. The LDW system
may not:
. Provide enough time to
avoid a crash.
. Detect lane markings under
poor weather or visibility
conditions. This can occur if
the windshield or
headlamps are blocked by
dirt, snow, or ice; if they are
not in proper condition; or if
the sun shines directly into
the camera.
. Detect road edges.
. Detect lanes on winding or
hilly roads.
If LDW only detects lane
markings on one side of the road,
it will only warn you when
departing the lane on the side
where it has detected a lane
marking. Always keep your (Continued)
Warning (Continued)
attention on the road and
maintain proper vehicle position
within the lane, or vehicle
damage, injury, or death could
occur. Always keep the
windshield, headlamps, and
camera sensors clean and in
good repair. Do not use LDW in
bad weather conditions.
How the System Works
The LDW camera sensor is on the
windshield ahead of the rearview
mirror.
To turn LDW on and off, press
@on
the center stack. The control
indicator will light when LDW is on.
Page 211 of 364
GMC Canyon/Canyon Denali Owner Manual (GMNA-Localizing-U.S./Canada-
13566643) - 2020 - CRC - 10/4/19
210 Driving and Operating
Tires
.Do not tow a trailer while using a
compact spare tire on the
vehicle.
. Tires must be properly inflated to
support loads while towing a
trailer. See Tires0257 for
instructions on proper tire
inflation.
Safety Chains
Always attach chains between the
vehicle and the trailer, and attach
the chains to the holes on the trailer
hitch platform. Instructions about
safety chains may be provided by
the hitch manufacturer or by the
trailer manufacturer.
Cross the safety chains under the
tongue of the trailer to help prevent
the tongue from contacting the road
if it becomes separated from the
hitch. Always leave just enough
slack so the combination can turn.
Never allow safety chains to drag on
the ground.
Trailer Brakes
Loaded trailers over 900 kg
(2,000 lb) must be equipped with
brake systems and with brakes for
each axle. Trailer braking equipment
conforming to Canadian Standards
Association (CSA) requirement
CAN3-D313, or its equivalent, is
recommended.
State or local regulations may
require trailers to have their own
braking system if the loaded weight
of the trailer exceeds certain
minimums that can vary from state
to state. Read and follow the
instructions for the trailer brakes so
they are installed, adjusted, and
maintained properly. Never attempt
to tap into your vehicle's hydraulic
brake system. If you do, both the
vehicle anti-lock brakes and the
trailer brakes may not function,
which could result in a crash.
Trailer Wiring Harness
For vehicles not equipped with
heavy-duty trailering, a harness is
secured underneath the left side of
the vehicle, next to the spare tire. The harness requires the installation
of a trailer connector, which is
available through your dealer. The
seven-wire harness contains the
following trailer circuits:
.
Yellow: Left stop/turn signal
. Green: Right stop/turn signal
. Brown: Taillamps/parking lamps
. Black: Ground
. Gray: Back-up lamps
. Orange: Battery feed
. Blue: Trailer brake
To help charge a remote
(non-vehicle) battery, press the Tow/
Haul Mode button on the center
stack. If the trailer is too light for
Tow/Haul Mode, turn on the
headlamps to help charge the
battery.
Page 220 of 364
GMC Canyon/Canyon Denali Owner Manual (GMNA-Localizing-U.S./Canada-
13566643) - 2020 - CRC - 10/4/19
Vehicle Care 219
Vehicle Care
General Information
General Information . . . . . . . . . . 220
California Proposition65 Warning . . . . . . . . . . . . . . . . . 220
California Perchlorate Materials Requirements . . . . . 221
Accessories and Modifications . . . . . . . . . . . . . . . . 221
Vehicle Checks
Doing Your OwnService Work . . . . . . . . . . . . . . . 221
Hood . . . . . . . . . . . . . . . . . . . . . . . . . 222
Engine Compartment Overview . . . . . . . . . . . . . . . . . . . . 224
Engine Oil . . . . . . . . . . . . . . . . . . . . 227
Engine Oil Life System . . . . . . . 229
Automatic Transmission Fluid . . . . . . . . . . . . . . . . . . . . . . . . 231
Engine Air Cleaner/Filter . . . . . . 231
Cooling System . . . . . . . . . . . . . . 233
Engine Overheating . . . . . . . . . . 236
Engine Fan . . . . . . . . . . . . . . . . . . . 237
Washer Fluid . . . . . . . . . . . . . . . . . 238
Brakes . . . . . . . . . . . . . . . . . . . . . . . 239
Brake Fluid . . . . . . . . . . . . . . . . . . . 239
Battery - North America . . . . . . 240 Four-Wheel Drive . . . . . . . . . . . . . 241
Front Axle . . . . . . . . . . . . . . . . . . . . 242
Rear Axle . . . . . . . . . . . . . . . . . . . . 242
Starter Switch Check . . . . . . . . . 242
Automatic Transmission Shift
Lock Control Function
Check . . . . . . . . . . . . . . . . . . . . . . . 242
Ignition Transmission Lock Check . . . . . . . . . . . . . . . . . . . . . . . 243
Park Brake and P (Park) Mechanism Check . . . . . . . . . . 243
Wiper Blade Replacement . . . . 243
Windshield Replacement . . . . . 244
Gas Strut(s) . . . . . . . . . . . . . . . . . . 244
Headlamp Aiming
Front Headlamp Aiming . . . . . . 246
Bulb Replacement
Bulb Replacement . . . . . . . . . . . . 246
Halogen Bulbs . . . . . . . . . . . . . . . . 246
Headlamps, Front Turn Signal, Sidemarker, and Parking
Lamps . . . . . . . . . . . . . . . . . . . . . . 246
Taillamps, Turn Signal, Stoplamps, and Back-Up
Lamps . . . . . . . . . . . . . . . . . . . . . . 247
Center High-Mounted Stoplamp (CHMSL) and
Cargo Lamp . . . . . . . . . . . . . . . . . 248
Electrical System
Electrical System Overload . . . 249
Fuses and Circuit Breakers . . . 249
Engine Compartment Fuse
Block . . . . . . . . . . . . . . . . . . . . . . . . 250
Instrument Panel Fuse
Block . . . . . . . . . . . . . . . . . . . . . . . . 254
Wheels and Tires
Tires . . . . . . . . . . . . . . . . . . . . . . . . . . 257
All-Season Tires . . . . . . . . . . . . . . 258
Winter Tires . . . . . . . . . . . . . . . . . . 258
All-Terrain Tires . . . . . . . . . . . . . . . 259
Tire Sidewall Labeling . . . . . . . . 259
Tire Designations . . . . . . . . . . . . . 261
Tire Terminology andDefinitions . . . . . . . . . . . . . . . . . . 262
Tire Pressure . . . . . . . . . . . . . . . . . 264
Tire Pressure Monitor
System . . . . . . . . . . . . . . . . . . . . . . 265
Tire Pressure Monitor Operation . . . . . . . . . . . . . . . . . . . 266
Tire Inspection . . . . . . . . . . . . . . . . 271
Tire Rotation . . . . . . . . . . . . . . . . . 271
When It Is Time for New Tires . . . . . . . . . . . . . . . . . . . . . . . . 272
Buying New Tires . . . . . . . . . . . . . 273
Different Size Tires and Wheels . . . . . . . . . . . . . . . . . . . . . . 274
Page 247 of 364
GMC Canyon/Canyon Denali Owner Manual (GMNA-Localizing-U.S./Canada-
13566643) - 2020 - CRC - 10/4/19
246 Vehicle Care
Headlamp Aiming
Front Headlamp Aiming
Headlamp aim has been preset and
should need no further adjustment.
If the vehicle is damaged in a crash,
the headlamp aim may be affected.
If adjustment to the headlamps is
necessary, see your dealer.
Bulb Replacement
For the proper type of replacement
bulbs, or any bulb changing
procedure not listed in this section,
contact your dealer.
Caution
Do not replace incandescent
bulbs with aftermarket LED
replacement bulbs. This can
cause damage to the vehicle
electrical system.
Halogen Bulbs
{Warning
Halogen bulbs have pressurized
gas inside and can burst if you
drop or scratch the bulb. You or
others could be injured. Be sure
to read and follow the instructions
on the bulb package.
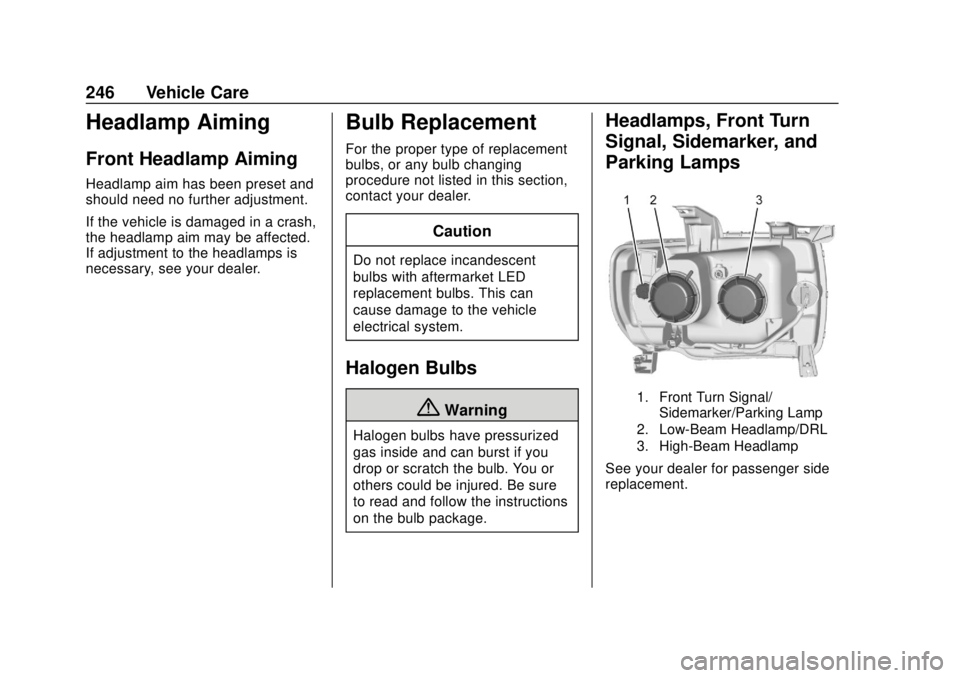
Headlamps, Front Turn
Signal, Sidemarker, and
Parking Lamps
1. Front Turn Signal/Sidemarker/Parking Lamp
2. Low-Beam Headlamp/DRL
3. High-Beam Headlamp
See your dealer for passenger side
replacement.
Page 248 of 364
GMC Canyon/Canyon Denali Owner Manual (GMNA-Localizing-U.S./Canada-
13566643) - 2020 - CRC - 10/4/19
Vehicle Care 247
Headlamp
1. Open the hood.
2. Remove the headlamp bulbcover by turning it
counterclockwise.
3. Turn the bulb socket counterclockwise to remove it
from the headlamp assembly
and pull it straight out.
4. Unplug the electrical connector from the old bulb by releasing
the clip on the bulb socket.
5. Replace the bulb and reverse Steps 1–4 to reinstall.
Turn Signal/Sidemarker/
Parking Lamp
1. Open the hood.
2. Turn the bulb socketcounterclockwise to remove it
from the headlamp assembly
and pull it straight out.
3. Remove the bulb by pulling it straight out of the bulb socket.
4. Replace the bulb and reverse Steps 1–3 to reinstall.
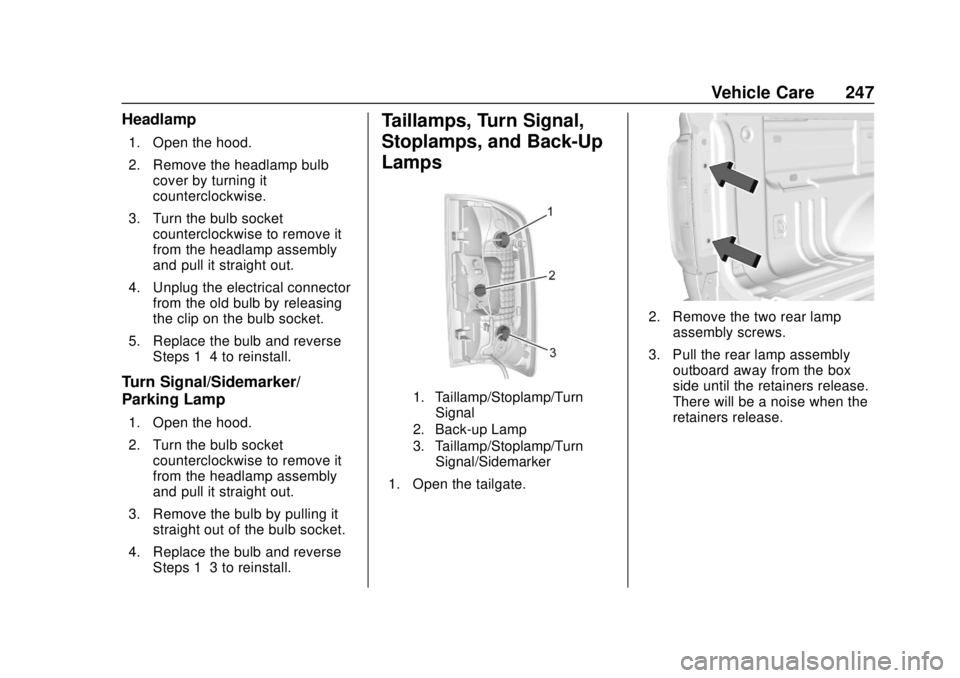
Taillamps, Turn Signal,
Stoplamps, and Back-Up
Lamps
1. Taillamp/Stoplamp/TurnSignal
2. Back-up Lamp
3. Taillamp/Stoplamp/Turn Signal/Sidemarker
1. Open the tailgate.
2. Remove the two rear lamp assembly screws.
3. Pull the rear lamp assembly outboard away from the box
side until the retainers release.
There will be a noise when the
retainers release.