jack point GMC CANYON 2021 Owner's Manual
[x] Cancel search | Manufacturer: GMC, Model Year: 2021, Model line: CANYON, Model: GMC CANYON 2021Pages: 359, PDF Size: 7.37 MB
Page 286 of 359
GMC Canyon/Canyon Denali Owner Manual (GMNA-Localizing-U.S./Canada-
14430430) - 2021 - CRC - 9/9/20
Vehicle Care 285
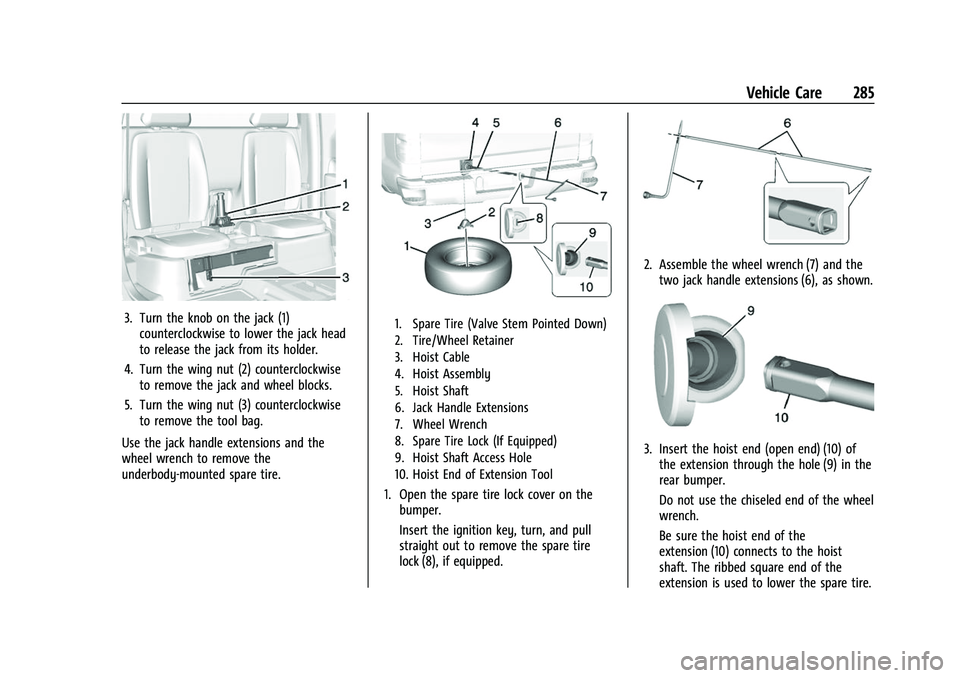
3. Turn the knob on the jack (1)counterclockwise to lower the jack head
to release the jack from its holder.
4. Turn the wing nut (2) counterclockwise to remove the jack and wheel blocks.
5. Turn the wing nut (3) counterclockwise to remove the tool bag.
Use the jack handle extensions and the
wheel wrench to remove the
underbody-mounted spare tire.1. Spare Tire (Valve Stem Pointed Down)
2. Tire/Wheel Retainer
3. Hoist Cable
4. Hoist Assembly
5. Hoist Shaft
6. Jack Handle Extensions
7. Wheel Wrench
8. Spare Tire Lock (If Equipped)
9. Hoist Shaft Access Hole
10. Hoist End of Extension Tool
1. Open the spare tire lock cover on the bumper.
Insert the ignition key, turn, and pull
straight out to remove the spare tire
lock (8), if equipped.
2. Assemble the wheel wrench (7) and thetwo jack handle extensions (6), as shown.
3. Insert the hoist end (open end) (10) ofthe extension through the hole (9) in the
rear bumper.
Do not use the chiseled end of the wheel
wrench.
Be sure the hoist end of the
extension (10) connects to the hoist
shaft. The ribbed square end of the
extension is used to lower the spare tire.
Page 290 of 359
GMC Canyon/Canyon Denali Owner Manual (GMNA-Localizing-U.S./Canada-
14430430) - 2021 - CRC - 9/9/20
Vehicle Care 289
{Warning
Wheel nuts that are improperly or
incorrectly tightened can cause the
wheels to become loose or come off. The
wheel nuts should be tightened with a
torque wrench to the proper torque
specification after replacing. Follow the
torque specification supplied by the
aftermarket manufacturer when using
accessory locking wheel nuts. See
Capacities and Specifications0324 for
original equipment wheel nut torque
specifications.
Caution
Improperly tightened wheel nuts can lead
to brake pulsation and rotor damage. To
avoid expensive brake repairs, evenly
tighten the wheel nuts in the proper
sequence and to the proper torque
specification. See Capacities and
Specifications 0324 for the wheel nut
torque specification.
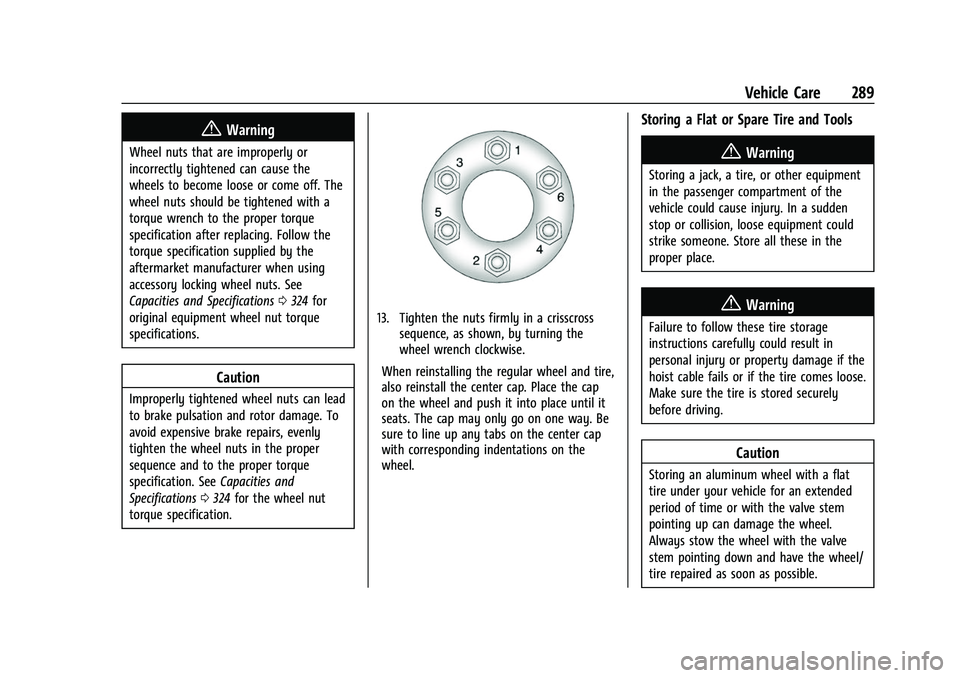
13. Tighten the nuts firmly in a crisscross sequence, as shown, by turning the
wheel wrench clockwise.
When reinstalling the regular wheel and tire,
also reinstall the center cap. Place the cap
on the wheel and push it into place until it
seats. The cap may only go on one way. Be
sure to line up any tabs on the center cap
with corresponding indentations on the
wheel.
Storing a Flat or Spare Tire and Tools
{Warning
Storing a jack, a tire, or other equipment
in the passenger compartment of the
vehicle could cause injury. In a sudden
stop or collision, loose equipment could
strike someone. Store all these in the
proper place.
{Warning
Failure to follow these tire storage
instructions carefully could result in
personal injury or property damage if the
hoist cable fails or if the tire comes loose.
Make sure the tire is stored securely
before driving.
Caution
Storing an aluminum wheel with a flat
tire under your vehicle for an extended
period of time or with the valve stem
pointing up can damage the wheel.
Always stow the wheel with the valve
stem pointing down and have the wheel/
tire repaired as soon as possible.
Page 291 of 359
GMC Canyon/Canyon Denali Owner Manual (GMNA-Localizing-U.S./Canada-
14430430) - 2021 - CRC - 9/9/20
290 Vehicle Care
Caution
The tire hoist can be damaged if there is
no tension on the cable when using it. To
have the necessary tension, the spare or
road tire and wheel assembly must be
installed on the tire hoist to use it.
{Warning
An improperly stored spare tire could
come loose and cause a crash. To avoid
personal injury or property damage,
always store the spare tire when the
vehicle is parked on a level surface.
Store the tire under the rear of the vehicle
in the spare tire carrier.
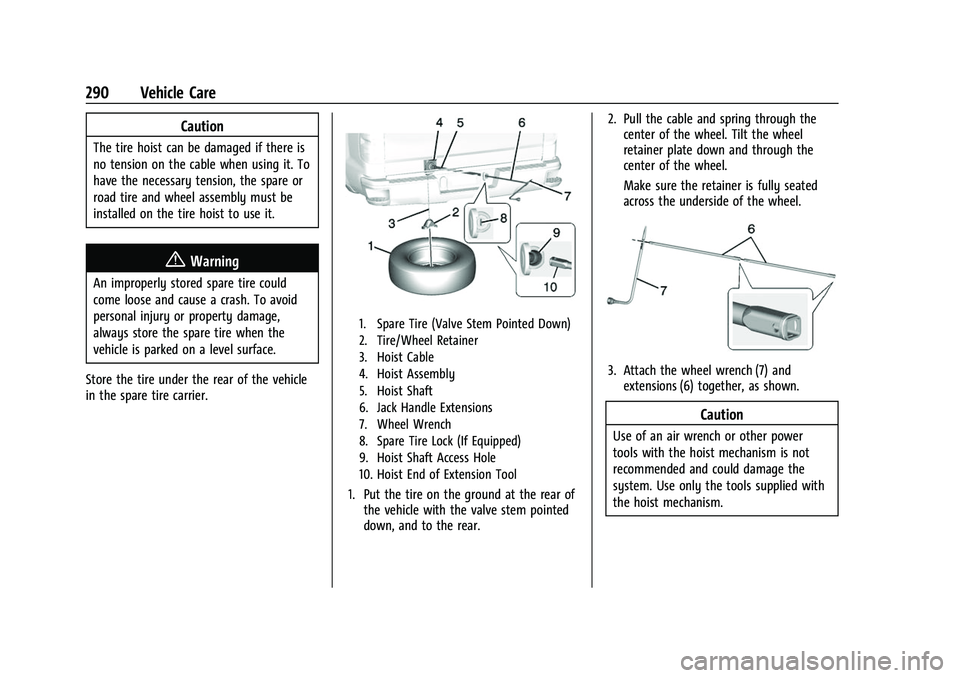
1. Spare Tire (Valve Stem Pointed Down)
2. Tire/Wheel Retainer
3. Hoist Cable
4. Hoist Assembly
5. Hoist Shaft
6. Jack Handle Extensions
7. Wheel Wrench
8. Spare Tire Lock (If Equipped)
9. Hoist Shaft Access Hole
10. Hoist End of Extension Tool
1. Put the tire on the ground at the rear of the vehicle with the valve stem pointed
down, and to the rear. 2. Pull the cable and spring through the
center of the wheel. Tilt the wheel
retainer plate down and through the
center of the wheel.
Make sure the retainer is fully seated
across the underside of the wheel.
3. Attach the wheel wrench (7) andextensions (6) together, as shown.
Caution
Use of an air wrench or other power
tools with the hoist mechanism is not
recommended and could damage the
system. Use only the tools supplied with
the hoist mechanism.