Driver side GMC ENVOY 2003 User Guide
[x] Cancel search | Manufacturer: GMC, Model Year: 2003, Model line: ENVOY, Model: GMC ENVOY 2003Pages: 442, PDF Size: 3.1 MB
Page 75 of 442

Battery Replacement
Under normal use, the battery in your remote keyless
entry transmitter should last about two years.
You can tell the battery is weak if the transmitter won't
work at the normal range in any location. If you have
to get close to your vehicle before the transmitter works,
it's probably time to change the battery.
The Driver Information Center (DIC) will display a
RFA # BATTERY LOW message when the transmitter
battery is low.
Notice:When replacing the battery, use care not to
touch any of the circuitry. Static from your body
transferred to these surfaces may damage the
transmitter.To replace the battery in the remote keyless entry
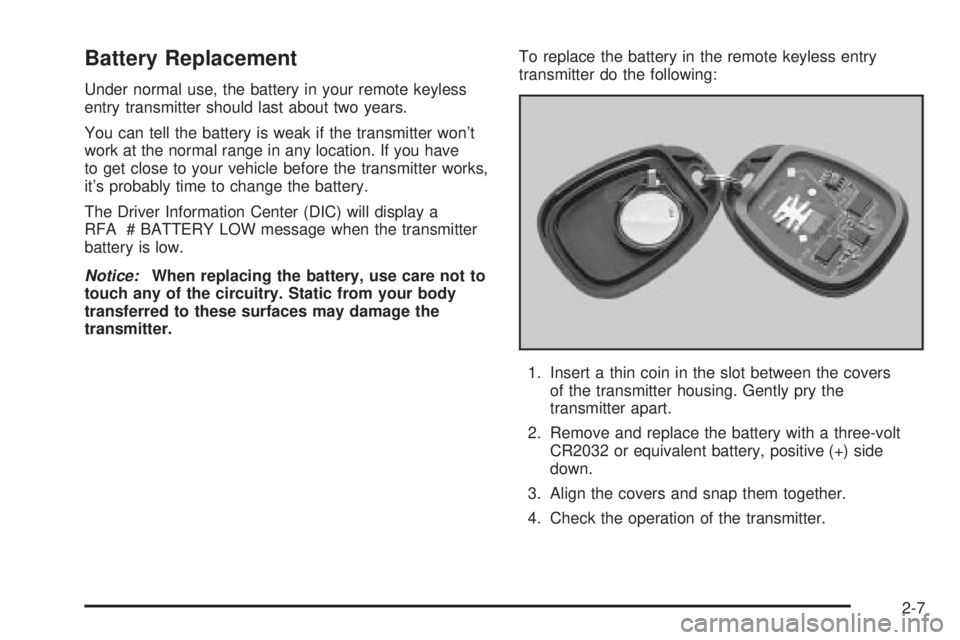
transmitter do the following:
1. Insert a thin coin in the slot between the covers
of the transmitter housing. Gently pry the
transmitter apart.
2. Remove and replace the battery with a three-volt
CR2032 or equivalent battery, positive (+) side
down.
3. Align the covers and snap them together.
4. Check the operation of the transmitter.
2-7
Page 77 of 442

Power Door Locks
The power door lock
switches are located on
the driver's and front
passenger's armrests.
Remove the ignition key and press the lock symbol to
lock all of the doors at once. To unlock the doors, press
the other side of the switch.
Delayed Locking
This feature makes it easier to use the power door locks
to lock all the doors and the liftgate when leaving your
vehicle.
The ®rst time you attempt to lock the doors using the
power lock switch or the remote keyless entry
transmitter, with a door or the liftgate open, three
chimes will signal that delayed locking is being used. All
doors and the liftgate can be reopened for up to ®ve
seconds from the time the last door is closed.Five seconds after the last door is closed, all the doors
will lock. You can lock the doors immediately by
using the power door lock switch or by pressing the lock
button on the optional remote keyless entry transmitter
a second time.
If the key is inserted in the ignition, this feature will not
lock the doors. The lockout prevention feature will
operate instead.
You can enable or disable the delayed locking feature.
If the feature is disabled, the doors will lock immediately
when a power door lock switch or remote keyless
entry transmitter lock button is pressed.
Programming Delayed Locking
When your vehicle was shipped from the factory, the
delayed locking feature was programmed on, or
enabled. The mode may have been changed since it
left the factory. To turn the delayed locking feature on or
off, do the following:
1. Press and hold the power door lock switch on the
driver's door in the lock position.
2. Press the remote keyless entry transmitter unlock
button twice.
If the delayed locking feature was on, it will now be off.
If the feature was off, it will now be on.
2-9
Page 78 of 442

Programmable Automatic
Door Locks
Your vehicle is equipped with an automatic lock/unlock
feature which enables you to program your vehicle's
power door locks. You can program this feature through
the Driver Information Center (DIC), or by the following
method.
Programmable Locking Feature
The following is the list of available programming
options:
Mode 1:All doors lock when the transmission is shifted
into gear.
Mode 2:All doors lock when the vehicle speed is
greater than 8 mph (13 km/h).
Mode 3:No automatic door locking.
The automatic door locks were pre-programmed at the
factory to lock all the doors when the transmission
is shifted into gear. The following instructions detail how
to program your door locks differently than the factory
setting. Choose one of the three programming
options listed above before entering the program mode.To enter the program mode, do the following:
1. Begin with the ignition off. Then pull the turn
signal/multifunction lever toward you and hold
it there while you perform the next step.
2. Turn the key to RUN and LOCK twice. Then, with
the key in LOCK, release the turn signal/multifunction
lever. Once you do this, you will hear the lock switch
lock and unlock, the horn will chirp twice, and a
30 second program timer will begin.
3. You are now ready to program the automatic door
locks. Select one of the three programming options
listed above, and press the lock side of the power
door lock switch to cycle through the lock options.
You will have 30 seconds to begin programming. If
you exceed the 30 second limit, the locks will
automatically lock and unlock and the horn will chirp
twice to indicate that you have left the program
mode. If this occurs, repeat the procedure beginning
with Step 1 to re-enter the programming mode.
You can exit the program mode any time by turning the
ignition to RUN. The locks will automatically lock and
unlock and the horn will chirp twice to indicate that you
are leaving the program mode. If the lock/unlock
switches are not pressed while in the programming
mode, the current auto lock/unlock setting will not be
modi®ed.
See your dealer for more information.
2-10
Page 79 of 442

Programmable Unlocking Feature
The following is the list of available programming
options:
Mode 1:Driver's door unlocks when the transmission is
shifted into PARK (P).
Mode 2:All doors unlock when the transmission is
shifted into PARK (P).
Mode 3:All doors unlock when the key is removed
from the ignition.
Mode 4:No automatic door unlock.
The automatic door locks were pre-programmed at the
factory to unlock the driver's door once the transmission
is shifted to PARK (P). The following instructions detail
how to program your door locks differently than the
factory setting. Choose one of the four programming
options listed above before entering the program mode.
To enter the program mode you need to do the
following:
1. Begin with the ignition off. Then pull the turn
signal/multifunction lever toward you and hold
it there while you perform the next step.2. Turn the key to RUN and LOCK twice. Then, with the
key in LOCK, release the turn signal/multifunction
lever. Once you do this, you will hear the lock switch
lock and unlock, the horn will chirp twice, and a
30 second program timer will begin.
3. You are now ready to program the automatic door
locks. Select one of the four programming
options listed above, and press the unlock side of
the power door lock switch to cycle through
the unlocking options. You will have 30 seconds to
begin programming. If you exceed the
30 second limit, the locks will automatically lock
and unlock and the horn will chirp twice to
indicate that you have left the program mode. If
this occurs, repeat the procedure beginning
with Step 1 to re-enter the programming mode.
You can exit the program mode any time by turning the
ignition to RUN. The locks will automatically lock and
unlock and the horn will chirp twice to indicate that you
are leaving the program mode. If the lock/unlock
switches are not pressed while in the programming
mode, the current auto lock/unlock setting will not be
modi®ed.
See your dealer for more information.
2-11
Page 80 of 442

Rear Door Security Locks
Your vehicle may have this feature. You can lock the
rear doors so they can't be opened from the inside
by passengers. To use one of these locks do the
following:
1. Open one of the rear doors. You will ®nd a
security lock lever located on the inside edge
of each rear door.
2. Move the lever down to
engage the safety lock.
Move the lever up to
disengage the
safety lock.
3. Close the door.
4. Do the same thing to the other rear door.The rear doors of your vehicle cannot be opened from
the inside while this feature is in use. If you want to open
the rear door while the security lock is on, unlock the
door and open the door from the outside.
Lockout Protection
This feature stops the power door locks from locking
when the key is in the ignition and a door is open
to protect you from locking your key in the vehicle.
If the power lock switch is pressed when a door is open
and the key is in the ignition, all the doors will lock
and then the driver's door will unlock.
Leaving Your Vehicle
If you are leaving the vehicle, take your key, open your
door and set the lock from inside. Then get out and
close the door.
2-12
Page 83 of 442

Power WindowsThe controls for the power windows are located on the
armrest on each of the side doors. With power
windows, the switches operate the windows when the
ignition is in RUN, ACCESSORY or when Retained
Accessory Power (RAP) is active. The driver's door
has a switch for each of the passenger's windows
as well.
Press the bottom of the switch to lower the window.
Press the top of the switch to raise the window.
2-15
Page 84 of 442

Express±Down Window
The driver's and front passenger's window switches
have an express-down feature that allows you to lower
the window without holding the switch down. Press
down brie¯y on the bottom of the driver's window switch
labeled AUTO to activate the express-down feature.
Lightly tap the switch to open the window slightly. The
express-down feature can be interrupted at any time
by pressing the top of the switch.
Window Lockout
Your vehicle has a lockout feature to prevent
passengers from operating the power windows. The
lockout switch is located in front of the window switches.
A small light in the lockout switch will come on to
show that the switch has been activated. Press the
lockout switch again to return to normal operation.
Sun Visors
To block out glare, you can pull the visor down. You
can also slide the visor along the rod from side-to-side
to cover the driver or passenger front window.
Visor Vanity Mirror
Pull the sun visor down to expose the vanity mirror
Lighted Visor Vanity Mirror
Your vehicle may have this feature. Pull the sun visor
down and lift the mirror cover to turn on the lamps. The
lamps will turn off when the cover is closed.
2-16
Page 86 of 442

Testing the Alarm
The alarm can be tested by following these steps:
1. From inside the vehicle, lower the driver's window
and open the driver's door.
2. Activate the system by locking the doors with the
power door lock switch while the door is open, or
with the remote keyless entry transmitter.
3. Get out of the vehicle, close the door and wait for
the SECURITY light to go out.
4. Then reach in through the window, unlock the door
with the manual door lock and open the door. This
should set off the alarm.
When the alarm is set the power door unlock switch is
not operational.
If the alarm does not sound when it should but the
headlamps ¯ash, check to see if the horn works. The
horn fuse may be blown. To replace the fuse, see
Fuses
and Circuit Breakers on page 5-90.
If the alarm does not sound or the headlamps do not
¯ash, the vehicle should be serviced by your dealer.
Passlockž
Your vehicle is equipped with the
Passlockžtheft-deterrent system.
Passlockžis a passive theft-deterrent system.
Passlockženables fuel if the ignition lock cylinder is
turned with a valid key. If a correct key is not used or the
ignition lock cylinder is tampered with, the fuel system
is disabled and the vehicle will not start.
During normal operation, the security light will turn off
approximately ®ve seconds after the key is turned
to RUN.
If the engine stalls and the security light ¯ashes, wait
about 10 minutes until the light stops ¯ashing before
trying to restart the engine. Remember to release
the key from START as soon as the engine starts.
If the engine does not start after three tries, the vehicle
needs service.
If the engine is running and the security light comes on,
you will be able to restart the engine if you turn the
engine off. However, your Passlock
žsystem is
not working properly and must be serviced by your
dealer. Your vehicle is not protected by Passlock
žat this
time. You may also want to check the fuse. See
Fuses and Circuit Breakers on page 5-90. See your
dealer for service.
In an emergency, call the GM Roadside Assistance
Center. See
Roadside Assistance Program on page 7-5.
2-18
Page 90 of 442

Engine Coolant Heater
Your vehicle may have this feature. In very cold
weather, 0ÉF (-18ÉC) or colder, the engine coolant
heater can help. You'll get easier starting and better fuel
economy during engine warm-up. Usually, the coolant
heater should be plugged in a minimum of four
hours prior to starting your vehicle. At temperatures
above 32ÉF (0ÉC), use of the coolant heater is not
required.
To Use the Engine Coolant Heater
1. Turn off the engine.
2. Open the hood and unwrap the electrical cord. The
cord is located on the driver's side of the engine
compartment, behind the battery.
3. Plug it into a normal, grounded 110-Volt AC outlet.
{CAUTION:
Plugging the cord into an ungrounded outlet
could cause an electrical shock. Also, the
wrong kind of extension cord could overheat
and cause a ®re. You could be seriously
injured. Plug the cord into a properly grounded
three-prong 110-volt AC outlet. If the cord
won't reach, use a heavy-duty three-prong
extension cord rated for at least 15 amps.
4. Before starting the engine, be sure to unplug and
store the cord as it was before to keep it away
from moving engine parts. If you don't, it could be
damaged.
How long should you keep the coolant heater plugged
in? The answer depends on the outside temperature, the
kind of oil you have, and some other things. Instead
of trying to list everything here, we ask that you contact
your dealer in the area where you'll be parking your
vehicle. The dealer can give you the best advice for that
particular area.
2-22
Page 105 of 442

Outside Manual Mirrors
Adjust your outside mirrors so you can see a little of the
side of your vehicle.
Fold the mirrors in before entering a car wash. To do
this, pull the mirrors in toward the vehicle. Push the
mirrors back out when ®nished.
Outside Power Mirrors
Your vehicle may have this feature.The control is located on the driver's door.
1. Twist the knob toward the mirror you desire to
adjust.
2. Move the knob in the direction you want the mirror
to go.
3. Adjust the mirror in all four directions.
4. After you are satis®ed with the position of the
mirror, twist the knob to the center position or twist it
to the other mirror to adjust that mirror.
If you reach the mirror's end of the travel position in any
direction, the mirror will enter a ratcheting mode. This
action is harmless. It is a warning that the mirror can go
no further. To stop this action, back the mirror up by
moving the knob in the opposite direction.
When the knob is twisted to the center position, the
mirrors can not be moved with the control knob.
2-37