ECU GMC ENVOY 2004 Service Manual
[x] Cancel search | Manufacturer: GMC, Model Year: 2004, Model line: ENVOY, Model: GMC ENVOY 2004Pages: 474, PDF Size: 4.83 MB
Page 289 of 474
Dolly Towing
Two-Wheel-Drive Vehicles
Two-wheel-drive vehicles should not be dolly towed.
Two-wheel-drive transmissions have no provisions
for internal lubrication while being towed. To properly
tow these vehicles, they should be placed on a platform
trailer with all four wheels off the ground.
Four-Wheel-Drive Vehicles
Four-wheel-drive vehicles can be dolly towed with the
rear wheels on the ground.
Use the following procedure to tow your vehicle:
1. Drive the vehicle onto the tow dolly.
2. Shift the transmission to PARK (P).
3. Turn the engine off, but leave the ignition on.
4. Firmly set the parking brake.
5. Securely attach the vehicle being towed
to the dolly.
{CAUTION:
Shifting a four-wheel-drive vehicle’s transfer
case into NEUTRAL can cause your vehicle to
roll even if the transmission is in Park (P). You
or others could be injured. Make sure the
parking brake is �rmly set before you shift the
transfer case to NEUTRAL.
6. Shift the transfer case to NEUTRAL. See
Four-Wheel Drive on page 2-26for the proper
procedure to select the NEUTRAL position for your
vehicle.
7. Release the parking brake only after the vehicle
being towed is �rmly attached to the towing
vehicle.
8. Turn the ignition off and lock the steering column.
4-47
Page 295 of 474
{CAUTION:
Things you put inside your vehicle can strike
and injure people in a sudden stop or turn, or
in a crash.
Put things in the cargo area of your
vehicle. Try to spread the weight evenly.
Never stack heavier things, like suitcases,
inside the vehicle so that some of them
are above the tops of the seats.
Do not leave an unsecured child restraint
in your vehicle.
When you carry something inside the
vehicle, secure it whenever you can.
Do not leave a seat folded down unless
you need to.
There’s also important loading information for off-road
driving in this manual.
Electronically Controlled Air
Suspension System
Your vehicle may be equipped with an electronically
controlled air suspension system that automatically
keeps your vehicle level as you load and unload. The
system includes a compressor, two height sensors
and two air springs supporting the rear axle.
The system also has an internal clock to prevent
overheating. If the system overheats, all leveling function
stops until the system cools down. During this time,
the indicator light on the air in�ator system will be
�ashing.
The ignition has to be on for the system to in�ate, in
order to raise the vehicle to the standard ride height after
loading. The system can lower the vehicle to the
standard ride height after unloading with the ignition on
and also for up to 30 minutes after the ignition has
been turned off.
4-53
Page 303 of 474

Driving with a Trailer
{CAUTION:
If you have a rear-most window open and you
pull a trailer with your vehicle, carbon
monoxide (CO) could come into your vehicle.
You can not see or smell CO. It can cause
unconsciousness or death. SeeEngine
Exhaust on page 2-34. To maximize your safety
when towing a trailer:
Have your exhaust system inspected for
leaks, and make necessary repairs before
starting on your trip.
Keep the rear-most windows closed.
If exhaust does come into your vehicle
through a window in the rear or another
opening, drive with your front, main
heating or cooling system on and with the
fan on any speed. This will bring fresh,
outside air into your vehicle. Do not use
the climate control setting for maximum air
because it only recirculates the air inside
your vehicle. See Climate Control System
in the Index.Towing a trailer requires a certain amount of experience.
Before setting out for the open road, you’ll want to get
to know your rig. Acquaint yourself with the feel of
handling and braking with the added weight of the trailer.
And always keep in mind that the vehicle you are
driving is now a good deal longer and not nearly as
responsive as your vehicle is by itself.
Before you start, check all trailer hitch parts and and
attachments, safety chains, electrical connection, lamps,
tires and mirror adjustment. If the trailer has electric
brakes, start your vehicle and trailer moving and then
apply the trailer brake controller by hand to be sure
the brakes are working. This lets you check your
electrical connection at the same time.
During your trip, check occasionally to be sure that the
load is secure, and that the lamps and any trailer
brakes are still working.
4-61
Page 335 of 474
Adding Coolant
If you need more coolant, add the proper DEX-COOL®
coolant mixtureat the coolant recovery tank.
{CAUTION:
Turning the radiator pressure cap when the
engine and radiator are hot can allow steam
and scalding liquids to blow out and burn you
badly. With the coolant recovery tank, you will
almost never have to add coolant at the
radiator. Never turn the radiator pressure
cap — even a little — when the engine and
radiator are hot.
Add coolant mixture at the recovery tank, but be careful
not to spill it.
{CAUTION:
You can be burned if you spill coolant on hot
engine parts. Coolant contains ethylene glycol,
and it will burn if the engine parts are hot
enough. Do not spill coolant on a hot engine.
Occasionally check the coolant level in the radiator. For
information on how to add coolant to the radiator,
seeCooling System on page 5-30.
Radiator Pressure Cap
Notice:If the pressure cap is not tightly installed,
coolant loss and possible engine damage may
occur. Be sure the cap is properly and tightly
secured.
SeeEngine Compartment Overview on page 5-12for
information on location.
5-27
Page 374 of 474
When to Check
Check your tires once a month or more.
Also, check the tire pressure of the spare tire.
How to Check
Use a good quality pocket-type gage to check tire
pressure. You can’t tell if your tires are properly in�ated
simply by looking at them. Radial tires may look
properly in�ated even when they’re underin�ated. Check
the tire’s in�ation pressure when the tires are cold.
cold means your vehicle has been sitting for at least
three hours or driven no more than 1 mile (1.6 km).
Remove the valve cap from the tire valve stem. Press
the tire gage �rmly onto the valve to get a pressure
measurement. If the cold tire in�ation pressure matches
the recommended pressure on the tire and loading
information label, no further adjustment is necessary.
If the pressure is low, add air until you reach the
recommended amount.
If you over�ll the tire, release air by pushing on the
metal stem in the center of the tire valve. Recheck the
tire pressure with the tire gage.
Be sure to put the valve caps back on the valve stems.
They help prevent leaks by keeping out dirt and
moisture.
Tire Inspection and Rotation
Tires should be rotated every 5,000 to 8,000 miles
(8 000 to 13 000 km).
Any time you notice unusual wear, rotate your tires as
soon as possible and check wheel alignment. Also
check for damaged tires or wheels. SeeWhen It Is Time
for New Tires on page 5-68andWheel Replacement
on page 5-71for more information.
Make sure the spare tire is stored securely. Push, pull,
and then try to rotate or turn the tire. If it moves,
use the wheel wrench to tighten the cable. For
information on storing or removing the spare tire, see
Changing a Flat Tire on page 5-76.
The purpose of regular rotation is to achieve more
uniform wear for all tires on the vehicle. The �rst rotation
is the most important. SeeScheduled Maintenance
on page 6-4.
5-66
Page 397 of 474
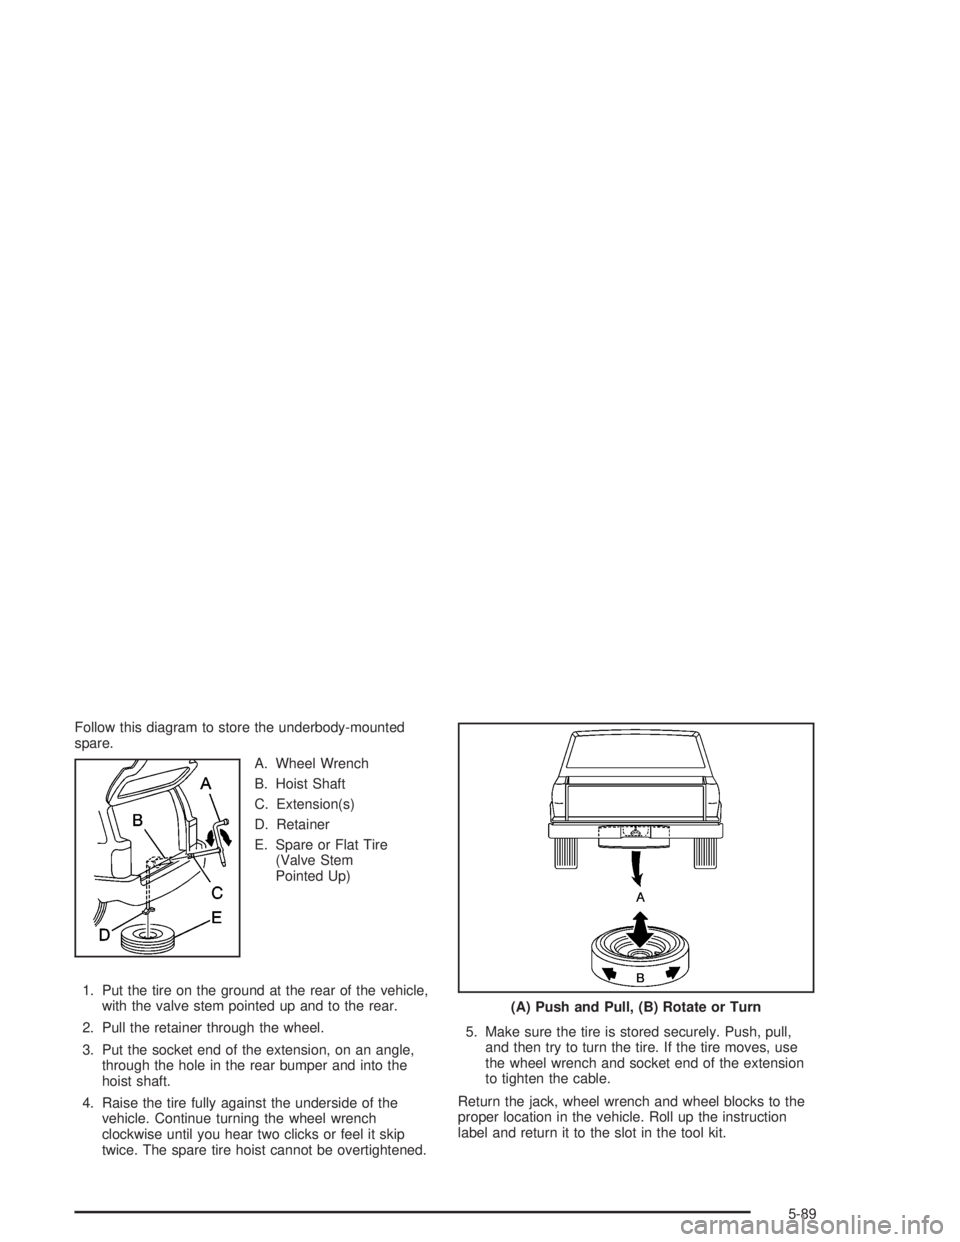
Follow this diagram to store the underbody-mounted
spare.
A. Wheel Wrench
B. Hoist Shaft
C. Extension(s)
D. Retainer
E. Spare or Flat Tire
(Valve Stem
Pointed Up)
1. Put the tire on the ground at the rear of the vehicle,
with the valve stem pointed up and to the rear.
2. Pull the retainer through the wheel.
3. Put the socket end of the extension, on an angle,
through the hole in the rear bumper and into the
hoist shaft.
4. Raise the tire fully against the underside of the
vehicle. Continue turning the wheel wrench
clockwise until you hear two clicks or feel it skip
twice. The spare tire hoist cannot be overtightened.5. Make sure the tire is stored securely. Push, pull,
and then try to turn the tire. If the tire moves, use
the wheel wrench and socket end of the extension
to tighten the cable.
Return the jack, wheel wrench and wheel blocks to the
proper location in the vehicle. Roll up the instruction
label and return it to the slot in the tool kit.
(A) Push and Pull, (B) Rotate or Turn
5-89
Page 433 of 474
Owner Checks and Services
These owner checks and services should be performed
at the intervals speci�ed to help ensure the safety,
dependability and emission control performance of your
vehicle. Your GM Goodwrench dealer can assist you
with these checks and services.
Be sure any necessary repairs are completed at once.
Whenever any �uids or lubricants are added to your
vehicle, make sure they are the proper ones, as shown
inRecommended Fluids and Lubricants on page 6-12.
At Each Fuel Fill
It is important to perform these underhood checks at
each fuel �ll.
Engine Oil Level Check
Check the engine oil level and add the proper oil if
necessary. SeeEngine Oil on page 5-16for further
details.
Notice:It is important to check your oil regularly
and keep it at the proper level. Failure to keep your
engine oil at the proper level can cause damage
to your engine not covered by your warranty.
Engine Coolant Level Check
Check the engine coolant level and add
DEX-COOL®coolant mixture if necessary. SeeEngine
Coolant on page 5-25for further details.
Windshield Washer Fluid Level Check
Check the windshield washer �uid level in the windshield
washer tank and add the proper �uid if necessary.
At Least Once a Month
Tire In�ation Check
Visually inspect your tires and make sure tires are
in�ated to the correct pressures. Do not forget to check
your spare tire. SeeTires on page 5-57for further
details. Check to make sure the spare tire is stored
securely. Push, pull and then try to rotate or turn
the spare tire. If it moves, tighten it. SeeChanging a
Flat Tire on page 5-76.
6-9
Page 448 of 474
Roadside Assistance Program
Security While You Travel
1-800-GMC-8782 (1-800-462-8782, Roadside
Assistance prompt)
As the proud owner of a new GMC vehicle, you are
automatically enrolled in the GMC Roadside Assistance
program. This value-added service is intended to
provide you with peace of mind as you drive in the city
or travel the open road. GMC’s Roadside Assistance
toll-free number is staffed by courteous and capable
Roadside Assistance Representatives who are available
24 hours a day, 365 days a year.
We will provide the following services during the
Bumper-to-Bumper warranty period, at no expense to
you:
Fuel Delivery:Delivery of enough fuel ($5
maximum) for the customer to get to the nearest
service station.
Lock-out Service (identi�cation required):
Replacement keys or locksmith service will
be covered at no charge if you are unable to gain
entry into your vehicle. Delivery of the replacement
key will be covered within 10 miles.
Emergency Tow:Tow to the nearest dealership for
warranty service or in the event of a
vehicle-disabling accident. Assistance when the
vehicle is mired in sand, mud or snow.
Flat Tire Change:Installation of a spare tire will be
covered at no charge. (The customer is responsible
for the repair or replacement of the tire if not
covered by a warrantable failure.)
Jump Start:No-start occurrences which require a
battery jump start will be covered at no charge.
Dealer Locator Service
Trip Routing:Your Roadside Assistance
Representative can provide you with speci�c
information regarding this feature.
Trip Interruption Expense Bene�ts:Your
Roadside Assistance Representative can provide
you with speci�c information regarding this feature.
In many instances, mechanical failures are covered
under GMC’s Bumper-to-Bumper warranty. However,
when other services are utilized, our Roadside
Assistance Representatives will explain any payment
obligations you might incur.
7-6
Page 449 of 474

For prompt and efficient assistance when calling, please
provide the following to the Roadside Assistance
Representative:
Your name, home address, and home telephone
number
Telephone number of your location
Location of the vehicle
Model, year, color, and license plate number
Mileage, Vehicle Identi�cation Number, and delivery
date of the vehicle
Description of the problem
While we hope you never have the occasion to use our
service, it is added security while traveling for you
and your family. Remember, we are only a phone call
away. GMC Roadside Assistance: 1-800-462-8782, text
telephone (TTY) users, call 1-888-889-2438.
GMC reserves the right to limit services or
reimbursement to an owner or driver when, in GMC’s
judgement, the claims become excessive in frequency or
type of occurrence.
Roadside Assistance is not part of or included in the
coverage provided by the New Vehicle Limited Warranty.
GMC reserves the right to make any changes or
discontinue the Roadside Assistance program at any
time without noti�cation.
Canadian Roadside Assistance
Vehicles purchased in Canada have an extensive
roadside assistance program accessible from anywhere
in Canada or the United States. Please refer to the
Warranty and Owner Assistance Information book.
Courtesy Transportation
GMC has always exempli�ed quality and value in its
offering of motor vehicles. To enhance your ownership
experience, we and our participating dealers are
proud to offer Courtesy Transportation, a customer
support program for new vehicles.
The Courtesy Transportation program is offered to retail
purchase/lease customers in conjunction with the
Bumper-to-Bumper coverage provided by the New
Vehicle Limited Warranty. Several transportation options
are available when warranty repairs are required.
This will reduce your inconvenience during warranty
repairs.
7-7
Page 459 of 474
Care of (cont.)
Cargo Cover..................................................2-50
Cargo Tie Downs............................................2-51
Cassette Tape Messages.................................3-86
CD Adapter Kits.............................................3-86
CD Messages...............................3-75, 3-89, 3-102
Chains, Tires..................................................5-72
Charging System Light....................................3-36
Check
Engine Light...............................................3-40
Gages Warning Light...................................3-47
CHECK WASHER FLUID.................................3-61
Checking Brake Fluid......................................5-40
Checking Coolant............................................5-26
Checking Engine Oil........................................5-16
Checking Things Under the Hood......................5-10
Checking Your Restraint Systems......................1-61
Chemical Paint Spotting...................................5-98
Child Restraints
Child Restraint Systems...............................1-35
Infants and Young Children...........................1-31
Lower Anchorages and Top Tethers
for Children (LATCH System).....................1-42
Older Children.............................................1-29
Securing a Child Restraint Designed
for the LATCH System..............................1-44
Securing a Child Restraint in a
Rear Outside Seat Position........................1-44Child Restraints (cont.)
Securing a Child Restraint in the
Center Seat Position.................................1-48
Securing a Child Restraint in the
Right Front Seat Position..........................1-48
Top Strap...................................................1-39
Top Strap Anchor Location............................1-41
Where to Put the Restraint...........................1-39
Chime Level Adjustment.................................3-120
Cigarette Lighter.............................................3-20
Cleaning
Inside of Your Vehicle..................................5-92
Outside of Your Vehicle................................5-95
Underbody Maintenance...............................5-98
Video Screen............................................3-119
Weatherstrips..............................................5-94
Cleaning Aluminum Wheels..............................5-97
Cleaning Exterior Lamps/Lenses.......................5-95
Cleaning Fabric/Carpet....................................5-92
Cleaning Glass Surfaces..................................5-94
Cleaning Interior Plastic Components.................5-94
Cleaning Leather............................................5-93
Cleaning the Top of the Instrument Panel...........5-94
Cleaning the Windshield, Backglass
and Wiper Blades........................................5-96
Cleaning Tires................................................5-97
Cleaning Vinyl................................................5-93
3