battery GMC SIERRA 2004 Owner's Manual
[x] Cancel search | Manufacturer: GMC, Model Year: 2004, Model line: SIERRA, Model: GMC SIERRA 2004Pages: 588, PDF Size: 3.74 MB
Page 92 of 588
Servicing Your Air Bag-Equipped
Vehicle
Air bags affect how your vehicle should be serviced.
There are parts of the air bag system in several places
around your vehicle. You don't want the system to
in¯ate while someone is working on your vehicle. Your
dealer and the service manual have information
about servicing your vehicle and the air bag system. To
purchase a service manual, see
Service Publications
Ordering Information on page 7-12.
{CAUTION:
For up to 10 seconds after the ignition key is
turned off and the battery is disconnected, an
air bag can still in¯ate during improper
service. You can be injured if you are close to
an air bag when it in¯ates. Avoid yellow
connectors. They are probably part of the air
bag system. Be sure to follow proper service
procedures, and make sure the person
performing work for you is quali®ed to do so.
The air bag system does not need regular maintenance.
Adding Equipment to Your Air
Bag-Equipped Vehicle
Q:Is there anything I might add to the front of the
vehicle that could keep the air bags from
working properly?
A:Yes. If you add things that change your vehicle's
frame, bumper system, front end sheet metal or
height, they may keep the air bag system
from working properly. Also, the air bag system
may not work properly if you relocate any of the air
bag sensors. If you have any questions about
this, you should contact Customer Assistance
before you modify your vehicle. The phone
numbers and addresses for Customer Assistance
are in Step Two of the Customer Satisfaction
Procedure in this manual. See²Customer
Satisfaction Procedure²in the Index.
1-86
Page 99 of 588
At times you may notice a decrease in range. This is
normal for any remote keyless entry system. If the
transmitter does not work or if you have to stand closer
to your vehicle for the transmitter to work, try this:
·Check the distance. You may be too far from your
vehicle. You may need to stand closer during
rainy or snowy weather.
·Check the location. Other vehicles or objects may
be blocking the signal. Take a few steps to the
left or right, hold the transmitter higher, and
try again.
·Check to determine if battery replacement or
resynchronization is necessary. See ªBattery
Replacementº and ªResynchronizationº under
ªRemote Keyless Entry System Operationº following
this section.
·If you are still having trouble, see your dealer or a
quali®ed technician for service.
Remote Keyless Entry System
Operation
If your vehicle has this feature, you can lock and unlock
your doors from about 3 feet (1 m) up to 30 feet
(9 m) away using the remote keyless entry transmitter
supplied with your vehicle.
UNLOCK:Pressing this button once will unlock the
driver's door. The parking lamps will ¯ash and the
interior lights will come on. The ground illumination
lamps will come on. Pressing UNLOCK again within
three seconds will cause the remaining doors to unlock.
The parking lamps will ¯ash and the interior lights will
come on.
LOCK:Pressing this button once will lock all of the
doors. Wait one second, then press LOCK again and the
horn will chirp.
Operating the keyless entry transmitter may interact with
the theft-deterrent system. See
Content Theft-Deterrent
on page 2-19.
2-5
Page 100 of 588
Remote Alarm
When the panic button with the horn symbol on the
keyless entry transmitter is pressed, the horn will sound
and the headlamps and taillamps will ¯ash for up to
30 seconds. This can be turned off by pressing the panic
button again, waiting for 30 seconds, or starting the
vehicle.
Matching Transmitter(s) to Your
Vehicle
Each remote keyless entry transmitter is coded to prevent
another transmitter from unlocking your vehicle. If a
transmitter is lost or stolen, a replacement can be
purchased through your dealer. Remember to bring any
remaining transmitters with you when you go to your
dealer. When the dealer matches the replacement
transmitter to your vehicle, any remaining transmitters
must also be matched. Once your dealer has coded the
new transmitter, the lost transmitter will not unlock your
vehicle. Each vehicle can have a maximum of four
transmitters matched to it.
Battery Replacement
Under normal use, the battery in your remote keyless
entry transmitter should last about two years.
You can tell the battery is weak if the transmitter won't
work at the normal range in any location. If you have
to get close to your vehicle before the transmitter works,
it's probably time to change the battery.
Notice:When replacing the battery, use care not to
touch any of the circuitry. Static from your body
transferred to these surfaces may damage the
transmitter.
2-6
Page 101 of 588
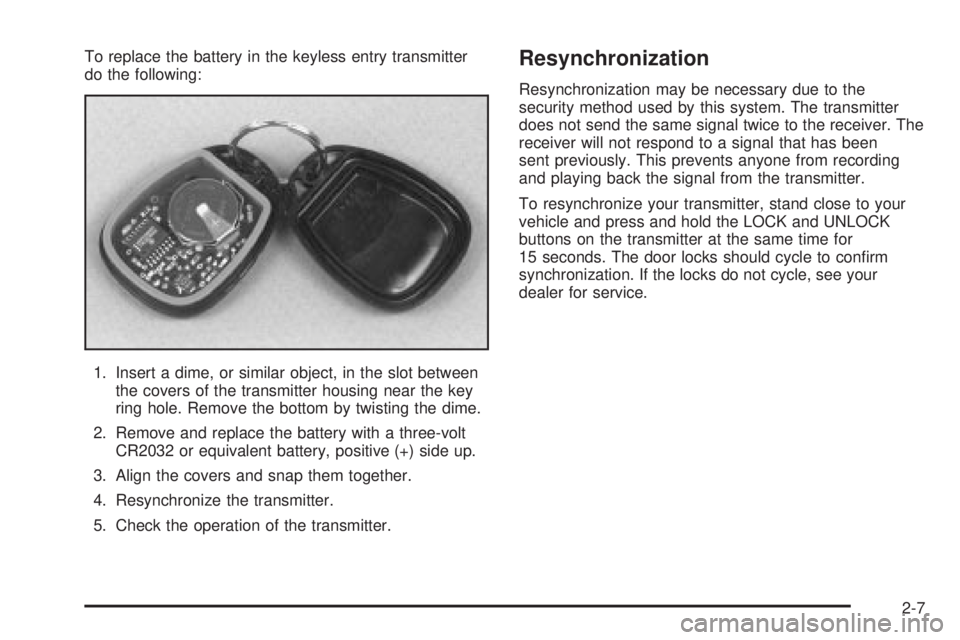
To replace the battery in the keyless entry transmitter
do the following:
1. Insert a dime, or similar object, in the slot between
the covers of the transmitter housing near the key
ring hole. Remove the bottom by twisting the dime.
2. Remove and replace the battery with a three-volt
CR2032 or equivalent battery, positive (+) side up.
3. Align the covers and snap them together.
4. Resynchronize the transmitter.
5. Check the operation of the transmitter.Resynchronization
Resynchronization may be necessary due to the
security method used by this system. The transmitter
does not send the same signal twice to the receiver. The
receiver will not respond to a signal that has been
sent previously. This prevents anyone from recording
and playing back the signal from the transmitter.
To resynchronize your transmitter, stand close to your
vehicle and press and hold the LOCK and UNLOCK
buttons on the transmitter at the same time for
15 seconds. The door locks should cycle to con®rm
synchronization. If the locks do not cycle, see your
dealer for service.
2-7
Page 114 of 588
If a door is opened without the key or the remote
keyless entry transmitter, the alarm will go off. Your
vehicle's headlamps will ¯ash and the horn will sound for
about two minutes, then will turn off to save the
battery power.
Remember, the theft-deterrent system won't activate if
you lock the doors with a key or use the manual
door lock. It activates only if you use a power door lock
switch with the door open, or with the remote keyless
entry transmitter. You should also remember that
you can start your vehicle with the correct ignition key if
the alarm has been set off.
Here's how to avoid setting off the alarm by accident:
·If you don't want to activate the theft-deterrent
system, the vehicle should be locked with the door
key
afterthe doors are closed.
·Always unlock a door with a key, or use the remote
keyless entry transmitter. Unlocking a door any
other way will set off the alarm if the system
has been armed.
If you set off the alarm by accident, unlock any door with
the key. You can also turn off the alarm by pressing
UNLOCK on the remote keyless entry transmitter or by
placing the key in the ignition and turning it to START.
Testing the Alarm
The alarm can be tested by following these steps:
1. From inside the vehicle, lower the driver's window
and open the driver's door.
2. Activate the system by locking the doors with the
power door lock switch while the door is open, or
with the remote keyless entry transmitter.
3. Get out of the vehicle, close the door and wait for
the security light to go out.
4. Then reach in through the window, unlock the door
with the manual door lock and open the door. This
should set off the alarm.
If the alarm does not sound when it should but the
vehicle's headlamps ¯ash, check to see if the horn works.
The horn fuse may be blown. To replace the fuse, see
Fuses and Circuit Breakers on page 5-126.
If the alarm does not sound or the vehicle's headlamps do
not ¯ash, the vehicle should be serviced by an authorized
service center.
2-20
Page 118 of 588
Manual Transmission
The gear selector should be in neutral and the parking
brake engaged. Hold the clutch pedal to the ¯oor
and start the engine. Your vehicle won't start if the clutch
pedal is not all the way down ± that's a safety feature.
Starting Your V8 Engine
1. With your foot off the accelerator pedal, turn the
ignition key to START. When the engine starts,
let go of the key. The idle speed will go down as
your engine gets warm.
Notice:Holding your key in START for longer than
15 seconds at a time will cause your battery to
be drained much sooner. And the excessive heat
can damage your starter motor. Wait about
15 seconds between each try to help avoid draining
your battery or damaging your starter.
2. If it doesn't start within 10 seconds, push the
accelerator pedal all the way to the ¯oor, while you
hold the ignition key in START. When the engine
starts, let go of the key and let up on the accelerator
pedal. Wait about 15 seconds between each try.When starting your engine in very cold weather
(below 0ÉF or-18ÉC), do this:
1. With your foot off the accelerator pedal, turn the
ignition key to START and hold it there up to
15 seconds. When the engine starts, let go of
the key.
2. If your engine still won't start (or starts but then
stops), it could be ¯ooded with too much gasoline.
Try pushing your accelerator pedal all the way to the
¯oor and holding it there as you hold the key in
START for about three seconds. When the engine
starts, let go of the key and accelerator. If the
vehicle starts brie¯y but then stops again, do the
same thing, but this time keep the pedal down
for ®ve or six seconds. This clears the extra
gasoline from the engine.
Notice:Your engine is designed to work with the
electronics in your vehicle. If you add electrical
parts or accessories, you could change the way the
engine operates. Before adding electrical equipment,
check with your dealer. If you do not, your engine
might not perform properly.
2-24
Page 165 of 588
Instrument Panel Overview...............................3-4
Hazard Warning Flashers................................3-6
Other Warning Devices...................................3-6
Horn.............................................................3-7
Tilt Wheel.....................................................3-7
Turn Signal/Multifunction Lever.........................3-7
Exterior Lamps.............................................3-14
Interior Lamps..............................................3-19
Accessory Power Outlets...............................3-20
Ashtrays and Cigarette Lighter........................3-21
Climate Controls............................................3-21
Climate Control System.................................3-21
Dual Climate Control System..........................3-22
Dual Automatic Climate Control System...........3-26
Warning Lights, Gages and Indicators.............3-33
Warning Lights, Gages, and Indicators.............3-33
Instrument Panel Cluster................................3-34
Speedometer and Odometer...........................3-35
Tachometer.................................................3-35
Safety Belt Reminder Light.............................3-36
Air Bag Readiness Light................................3-36Air Bag Off Light..........................................3-37
Passenger Air Bag Status Indicator.................3-40
Battery Warning Light....................................3-42
Voltmeter Gage............................................3-42
Up-Shift Light...............................................3-43
Brake System Warning Light..........................3-43
Anti-Lock Brake System Warning Light.............3-45
Traction Off Light..........................................3-45
Engine Coolant Temperature Gage..................3-46
Transmission Temperature Gage.....................3-47
Malfunction Indicator Lamp.............................3-49
Oil Pressure Gage........................................3-52
Cruise Control Light......................................3-53
Four-Wheel-Drive Light..................................3-53
Tow/Haul Mode Light....................................3-53
Overdrive Disable.........................................3-53
Fuel Gage...................................................3-54
Low Fuel Warning Light.................................3-54
Driver Information Center (DIC).......................3-55
DIC Operation and Displays...........................3-55
DIC Warnings and Messages.........................3-66
Section 3 Instrument Panel
3-1
Page 184 of 588
Dome Lamps
The dome lamps will come on when you open a door.
You can also turn the dome lamps on by turning the
thumbwheel, located next to the exterior lamps control, all
the way up. In this position, the dome lamps will remain
on whether the doors are opened or closed.
E:You can use the dome override button, located
below the exterior lamps control, to set the dome lamps
to come on automatically, or remain off, when the
doors are opened. To turn the lamps off, press the
button to the in position. With the button in this position,
the dome lamps will remain off when the doors are
open. To return the lamps to automatic operation, press
the button again and return it to the out position.
Battery Run-Down Protection
This feature shuts off the dome, and reading lamps.
if they are left on for more than 10 minutes when the
ignition is off. The cargo lamp will shut off after
20 minutes. This will keep your battery from
running down.
Accessory Power Outlets
With accessory power outlets you can plug in auxiliary
electrical equipment such as a cellular telephone or
CB radio.
Your vehicle may have two accessory power outlets, or
may have one accessory power outlet located near
the cigarette lighter, if equipped. The cigarette lighter is
designed to ®t only in the receptacle to the right of
the accessory power outlet.
To use the outlet, lift the cover. When not using it,
always close the cover.
Certain power accessory plugs may not be compatible
to the accessory power outlet and could result in
blown vehicle or adapter fuses. If you experience a
problem, see your dealer for additional information on
the accessory power plugs.
Notice:Adding any electrical equipment to your
vehicle may damage it or keep other components
from working as they should. The repairs would not
be covered by your warranty. Check with your
dealer before adding electrical equipment.
When adding electrical equipment, be sure to follow the
proper installation instructions included with the
equipment.
3-20
Page 206 of 588
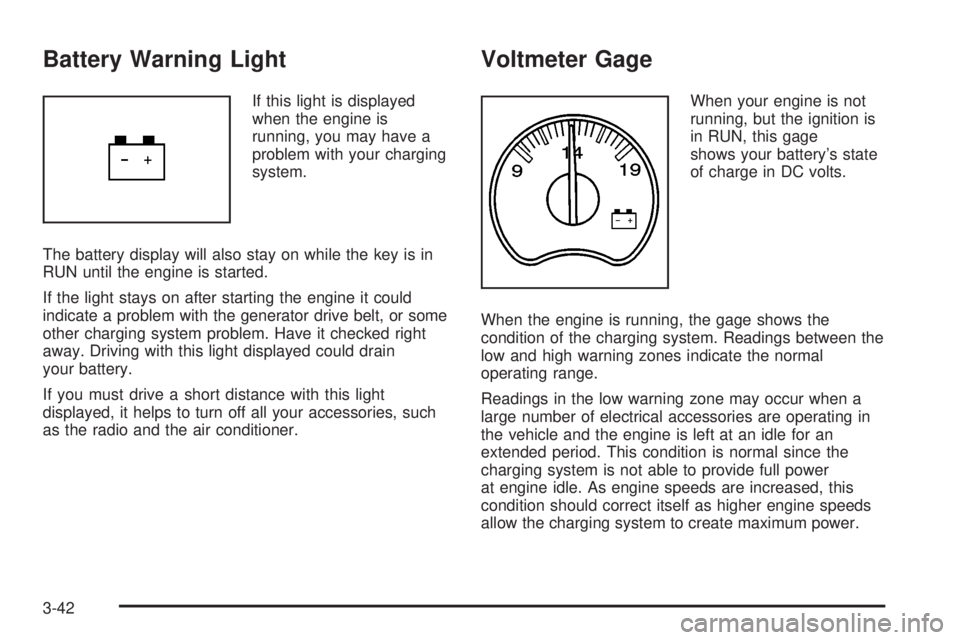
Battery Warning Light
If this light is displayed
when the engine is
running, you may have a
problem with your charging
system.
The battery display will also stay on while the key is in
RUN until the engine is started.
If the light stays on after starting the engine it could
indicate a problem with the generator drive belt, or some
other charging system problem. Have it checked right
away. Driving with this light displayed could drain
your battery.
If you must drive a short distance with this light
displayed, it helps to turn off all your accessories, such
as the radio and the air conditioner.
Voltmeter Gage
When your engine is not
running, but the ignition is
in RUN, this gage
shows your battery's state
of charge in DC volts.
When the engine is running, the gage shows the
condition of the charging system. Readings between the
low and high warning zones indicate the normal
operating range.
Readings in the low warning zone may occur when a
large number of electrical accessories are operating in
the vehicle and the engine is left at an idle for an
extended period. This condition is normal since the
charging system is not able to provide full power
at engine idle. As engine speeds are increased, this
condition should correct itself as higher engine speeds
allow the charging system to create maximum power.
3-42
Page 215 of 588

Have you recently changed brands of fuel?
If so, be sure to fuel your vehicle with quality fuel. See
Gasoline Octane on page 5-4. Poor fuel quality will
cause your engine not to run as efficiently as designed.
You may notice this as stalling after start-up, stalling
when you put the vehicle into gear, mis®ring, hesitation
on acceleration or stumbling on acceleration. (These
conditions may go away once the engine is warmed up.)
This will be detected by the system and cause the
light to turn on.
If you experience one or more of these conditions,
change the fuel brand you use. It will require at least
one full tank of the proper fuel to turn the light off.
If none of the above steps have made the light turn off,
your dealer can check the vehicle. Your dealer has
the proper test equipment and diagnostic tools to ®x any
mechanical or electrical problems that may have
developed.
Emissions Inspection and Maintenance
Programs
Some state/provincial and local governments have or
may begin programs to inspect the emission control
equipment on your vehicle. Failure to pass this inspection
could prevent you from getting a vehicle registration.
Here are some things you need to know to help your
vehicle pass an inspection:
Your vehicle will not pass this inspection if the Check
Engine light is on or not working properly.
Your vehicle will not pass this inspection if the OBD
(on-board diagnostic) system determines that critical
emission control systems have not been completely
diagnosed by the system. The vehicle would be
considered not ready for inspection. This can happen if
you have recently replaced your battery or if your
battery has run down. The diagnostic system is
designed to evaluate critical emission control systems
during normal driving. This may take several days
of routine driving. If you have done this and your vehicle
still does not pass the inspection for lack of OBD
system readiness, your GM dealer can prepare the
vehicle for inspection.
3-51