GMC SIERRA 2009 Get To Know Guide
Manufacturer: GMC, Model Year: 2009, Model line: SIERRA, Model: GMC SIERRA 2009Pages: 24, PDF Size: 1.4 MB
Page 11 of 24
11
FAV (Favorite)(if equipped): Press this
button to go through up to six pages of
any combination (AM, FM, or XM,
if equipped) of preset favorite radio
stations. On each page, up to six
stations are available by using the six
pushbuttons below the radio display.
EQ (Equalization)(if equipped): Press
this button to select preset equalization
settings.
CAT (Category) (if equipped): Press this
button to find XM stations (if equipped)
within a desired category.
Auxiliary Input Jack (if equipped):
A portable audio player, such as an MP3
player or a cassette player, can be con-
nected to the auxiliary input jack located
on the radio. Press the CD/AUX button
to begin playing audio from the player
over the vehicle speakers. To optimize
speaker volume, fully increase the
volume on the portable audio player.
Setting Preset/Favorite Stations
Before setting your preset or favorite
stations, shift the vehicle into Park.
Note: Engaging in extended searching
for specific audio stations or songs by
using buttons and knobs — or giving
extended attention to entertainment
tasks — can lead you to look away
from the road frequently or longer than
usual. Looking away from the road for
prolonged periods may cause you to
miss seeing things on the road that you
need to see. Be sure to keep your eyes
on the road and mind on the drive —
and avoid engaging in extended
searching for specific items while driving.
Setting Preset Stations (Base Radio)
To set up to 18 preset stations:
1. Turn on the radio.
2. Press BAND to select FM1, FM2
or AM.
3. Tune in the desired radio station.
4. Press and hold one of the six push-
buttons until a beep sounds.
5. Repeat steps 2–4 for each
pushbutton.
Setting Favorite Stations (Uplevel
Radio, if equipped)
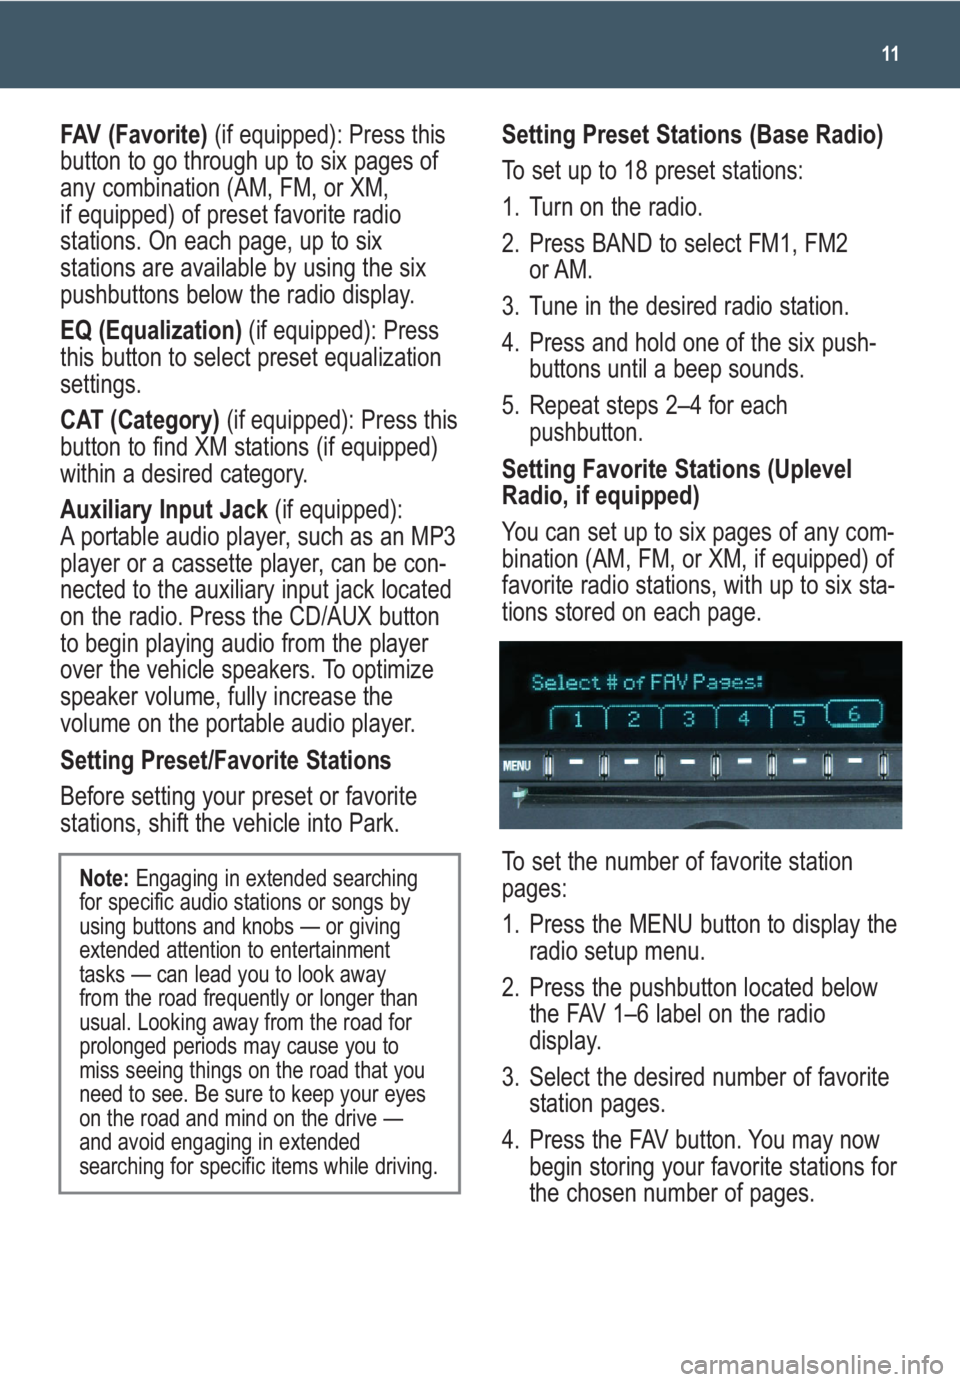
You can set up to six pages of any com-
bination (AM, FM, or XM, if equipped) of
favorite radio stations, with up to six sta-
tions stored on each page.
To set the number of favorite station
pages:
1. Press the MENU button to display the
radio setup menu.
2. Press the pushbutton located below
the FAV 1–6 label on the radio
display.
3. Select the desired number of favorite
station pages.
4. Press the FAV button. You may now
begin storing your favorite stations for
the chosen number of pages.
Page 12 of 24
Getting to Know Your Sierra12
To store favorite stations:
1. Press the BAND button to select the
band (AM, FM, or XM, if equipped).
2. Tune in the desired radio station.
3. Press the FAV button to display the
page where the station is to be
stored.
4. Press and hold one of the six push-
buttons until a beep sounds.
5. Repeat the steps for each pushbutton
on each page.
Setting the Time
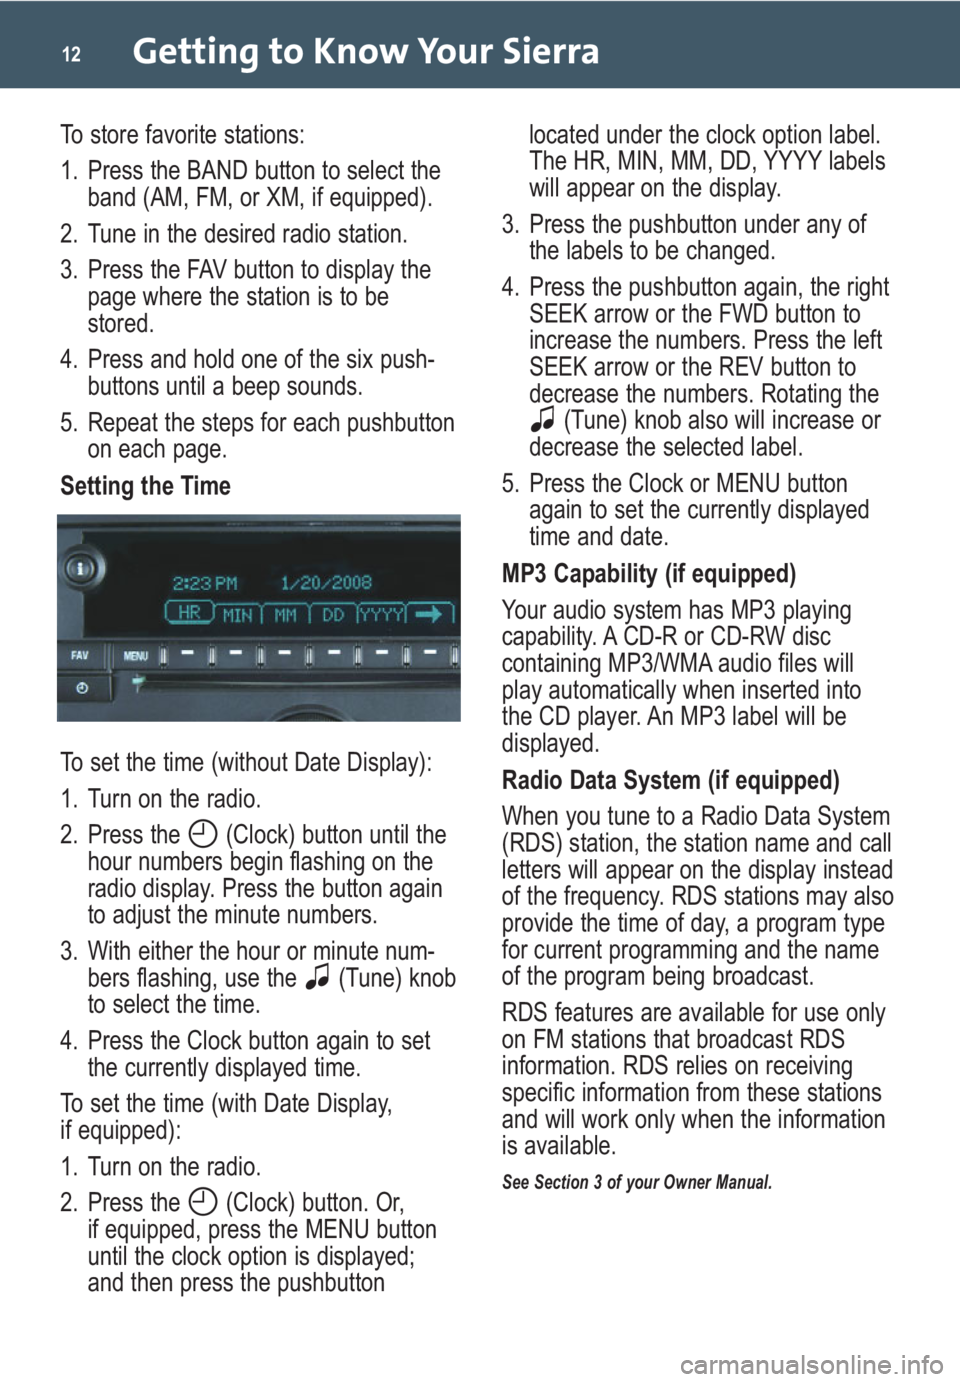
To set the time (without Date Display):
1. Turn on the radio.
2. Press the (Clock) button until the
hour numbers begin flashing on the
radio display. Press the button again
to adjust the minute numbers.
3. With either the hour or minute num-
bers flashing, use the (Tune) knob
to select the time.
4. Press the Clock button again to set
the currently displayed time.
To set the time (with Date Display,
if equipped):
1. Turn on the radio.
2. Press the (Clock) button. Or,
if equipped, press the MENU button
until the clock option is displayed;
and then press the pushbuttonlocated under the clock option label.
The HR, MIN, MM, DD, YYYY labels
will appear on the display.
3. Press the pushbutton under any of
the labels to be changed.
4. Press the pushbutton again, the right
SEEK arrow or the FWD button to
increase the numbers. Press the left
SEEK arrow or the REV button to
decrease the numbers. Rotating the
(Tune) knob also will increase or
decrease the selected label.
5. Press the Clock or MENU button
again to set the currently displayed
time and date.
MP3 Capability (if equipped)
Your audio system has MP3 playing
capability. A CD-R or CD-RW disc
containing MP3/WMA audio files will
play automatically when inserted into
the CD player. An MP3 label will be
displayed.
Radio Data System (if equipped)
When you tune to a Radio Data System
(RDS) station, the station name and call
letters will appear on the display instead
of the frequency. RDS stations may also
provide the time of day, a program type
for current programming and the name
of the program being broadcast.
RDS features are available for use only
on FM stations that broadcast RDS
information. RDS relies on receiving
specific information from these stations
and will work only when the information
is available.
See Section 3 of your Owner Manual.
Page 13 of 24
13
Multiple-Disc CD Player
(if equipped)
With the in-dash 6-disc CD player, you
cannot directly load a CD as in single-
play systems.
To load a CD(s):
• Press and release the LOAD
button. To load multiple CDs, press
and hold the LOAD button for
two seconds. Follow the display
prompts to load each CD.
To play a CD:
• Press the pushbutton below the
arrow label on the display to select
the desired CD number.
To eject a CD(s):
• Press the EJECT button once to
eject the CD that is currently playing.
To eject all CDs, press and hold the
EJECT button for two seconds.
If a CD is not removed after several sec-
onds, it will be pulled back into the play-
er automatically.
See Section 3 of your Owner Manual.
Note: CDs with any affixed labels may
jam in the CD player. Label a CD using a
permanent marker. If more than one CD
is inserted into the slot at a time, or if
scratched or damaged CDs are played,
the CD player could be damaged. When
using the CD player, use only CDs in
good condition without labels; load one
CD at a time; and keep the CD player
and the loading slot free of foreign
materials, liquids or debris.
Touch Screen Navigation
Entertainment System
(if equipped)
Your vehicle’s Navigation Entertainment
System provides you with detailed
maps of all major highways and roads
throughout the continental United States
and Canada. The system provides turn-
by-turn driving instructions for each
destination you enter and can help you
locate a variety of points of interest,
such as banks, airports and restaurants.
Additional navigation assistance is avail-
able with Destination Download from
OnStar and real-time XM NavTraffic
(if equipped).
Refer to your Navigation Entertainment
System Owner Manual for operating
instructions.
See Section 3 of your Owner Manual.
XM®Radio (if equipped)
XM Radio offers more than 170 chan-
nels of digital-quality sound that goes
wherever you go — coast to coast —
and real-time XM NavTraffic on the navi-
gation system (if equipped) of many
vehicles. After a free three-month trial
period, service subscription fees apply.
Service is based in the continental U.S.
and Canada. For more information, visit
XM online at www.XMradio.comor call
1-800-929-2100.
See Section 3 of your Owner Manual.
Page 14 of 24
Getting to Know Your Sierra14
Rear Seat Audio and DVD Rear
Seat Entertainment Systems
(if equipped)
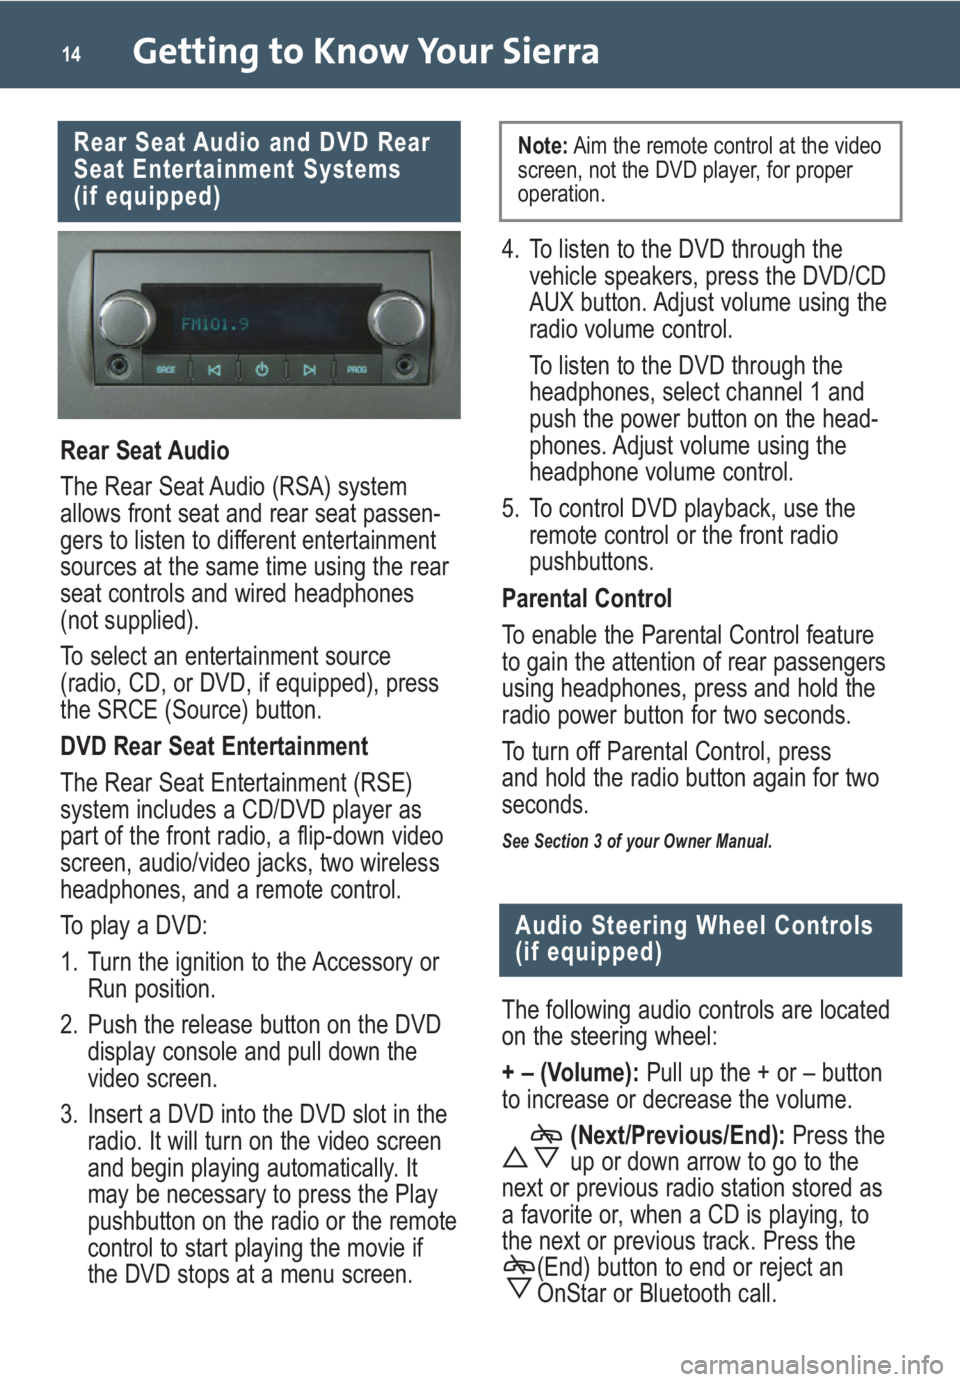
Rear Seat Audio
The Rear Seat Audio (RSA) system
allows front seat and rear seat passen-
gers to listen to different entertainment
sources at the same time using the rear
seat controls and wired headphones
(not supplied).
To select an entertainment source
(radio, CD, or DVD, if equipped), press
the SRCE (Source) button.
DVD Rear Seat Entertainment
The Rear Seat Entertainment (RSE)
system includes a CD/DVD player as
part of the front radio, a flip-down video
screen, audio/video jacks, two wireless
headphones, and a remote control.
To play a DVD:
1. Turn the ignition to the Accessory or
Run position.
2. Push the release button on the DVD
display console and pull down the
video screen.
3. Insert a DVD into the DVD slot in the
radio. It will turn on the video screen
and begin playing automatically. It
may be necessary to press the Play
pushbutton on the radio or the remote
control to start playing the movie if
the DVD stops at a menu screen.
Audio Steering Wheel Controls
(if equipped)
The following audio controls are located
on the steering wheel:
+ – (Volume): Pull up the + or – button
to increase or decrease the volume.
(Next/Previous/End):Press the
up or down arrow to go to the
next or previous radio station stored as
a favorite or, when a CD is playing, to
the next or previous track. Press the
(End) button to end or reject an
OnStar or Bluetooth call.
4. To listen to the DVD through the
vehicle speakers, press the DVD/CD
AUX button. Adjust volume using the
radio volume control.
To listen to the DVD through the
headphones, select channel 1 and
push the power button on the head-
phones. Adjust volume using the
headphone volume control.
5. To control DVD playback, use the
remote control or the front radio
pushbuttons.
Parental Control
To enable the Parental Control feature
to gain the attention of rear passengers
using headphones, press and hold the
radio power button for two seconds.
To turn off Parental Control, press
and hold the radio button again for two
seconds.
See Section 3 of your Owner Manual.
Note:Aim the remote control at the video
screen, not the DVD player, for proper
operation.
Page 15 of 24
This feature allows you to start the
engine from outside the vehicle by
using the Remote Keyless Entry (RKE)
transmitter. The remote start capability
must be turned on using the Driver
Information Center.
The automatic climate control system
(if equipped) will default to a heating
or cooling mode based on outside tem-
perature, or the manual climate control
system will turn on at the same setting
as when the vehicle was last turned off.
Heated/cooled seats (if equipped)
will also turn on based on outside
temperature.
Starting the Vehicle
To remote-start the vehicle:
1. Aim the RKE transmitter at the vehi-
cle. (Remote Vehicle Start transmitter
range is within approximately 200 feet
of the vehicle.)
2. Press and release the (Lock)
button on the transmitter.
3. Immediately press and hold the
(Remote Vehicle Start) button for
about four seconds. When the park-
ing lights flash, release the button.
The engine will start and the parking
lamps will remain on. The engine will
continue running for 10 minutes.
4. Repeat these steps for a 10-minute
time extension. Only two consecutive
remote starts are allowed.
When you enter the vehicle after a
remote start, the key must be inserted in
the ignition and turned to the Run posi-
tion before driving.
15
Remote Vehicle Start
(if equipped)
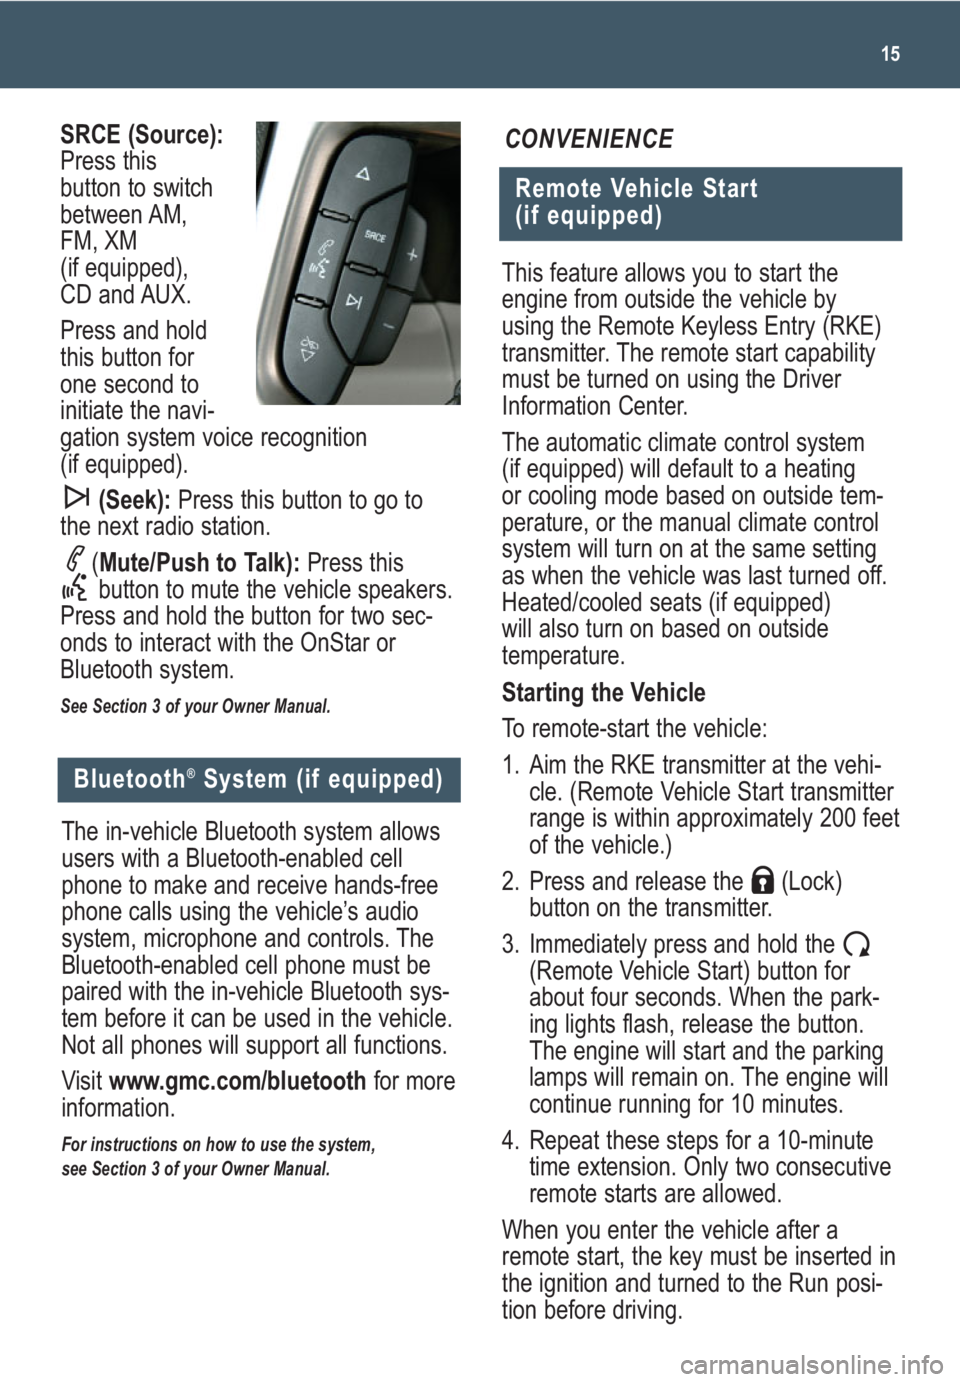
CONVENIENCESRCE (Source):
Press this
button to switch
between AM,
FM, XM
(if equipped),
CD and AUX.
Press and hold
this button for
one second to
initiate the navi-
gation system voice recognition
(if equipped).
(Seek):Press this button to go to
the next radio station.
(Mute/Push to Talk): Press this
button to mute the vehicle speakers.
Press and hold the button for two sec-
onds to interact with the OnStar or
Bluetooth system.
See Section 3 of your Owner Manual.
Bluetooth®System (if equipped)
The in-vehicle Bluetooth system allows
users with a Bluetooth-enabled cell
phone to make and receive hands-free
phone calls using the vehicle’s audio
system, microphone and controls. The
Bluetooth-enabled cell phone must be
paired with the in-vehicle Bluetooth sys-
tem before it can be used in the vehicle.
Not all phones will support all functions.
Visit www.gmc.com/bluetoothfor more
information.
For instructions on how to use the system,
see Section 3 of your Owner Manual.
Page 16 of 24
Getting to Know Your Sierra16
Cruise Control (if equipped)
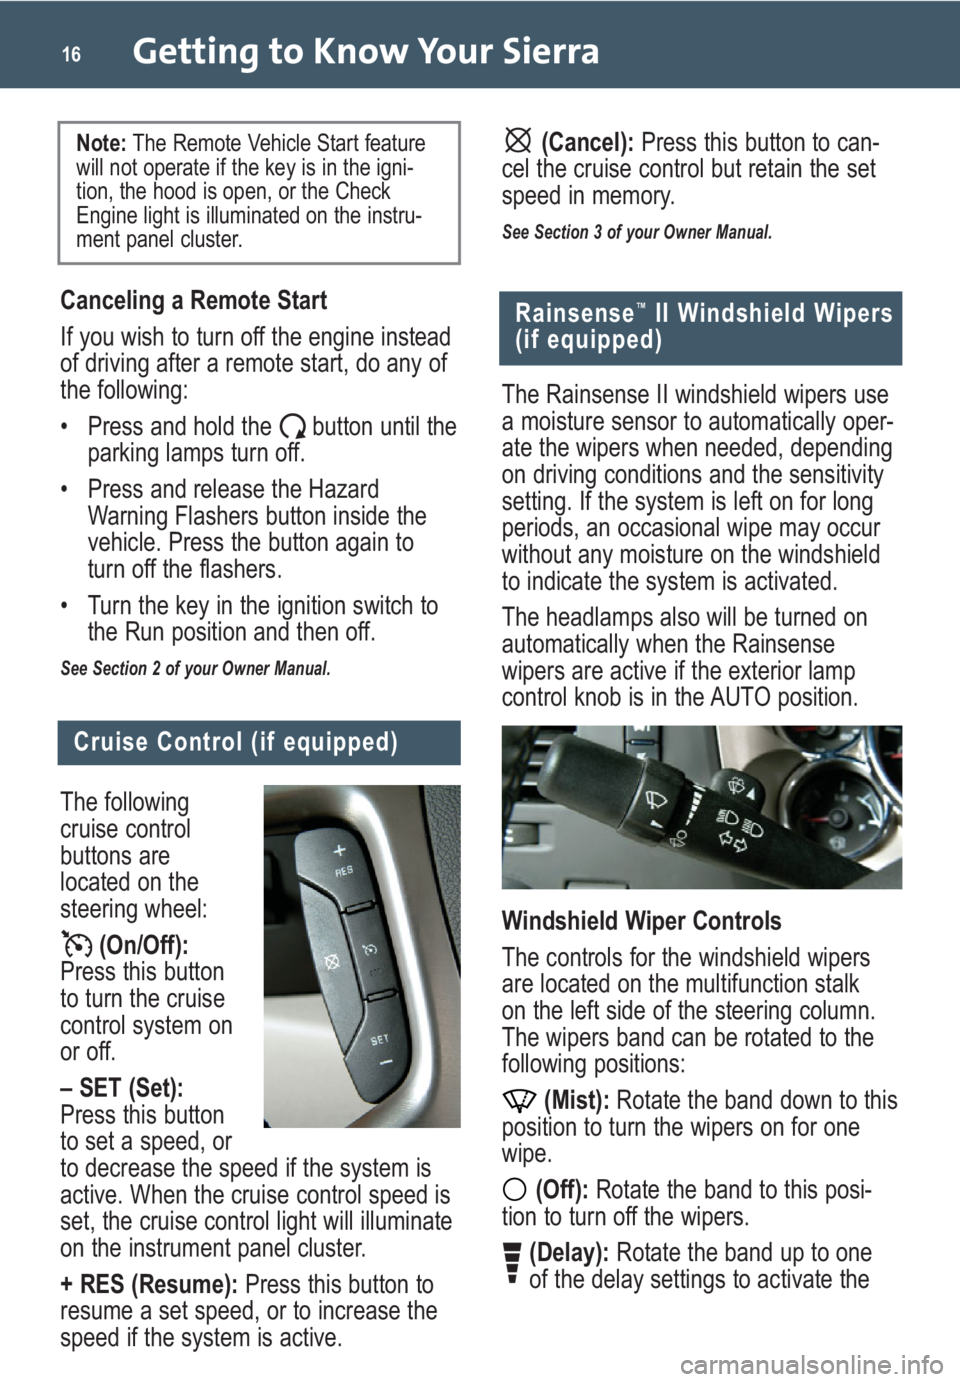
The following
cruise control
buttons are
located on the
steering wheel:
(On/Off):
Press this button
to turn the cruise
control system on
or off.
– SET (Set):
Press this button
to set a speed, or
to decrease the speed if the system is
active. When the cruise control speed is
set, the cruise control light will illuminate
on the instrument panel cluster.
+ RES (Resume):Press this button to
resume a set speed, or to increase the
speed if the system is active.
Rainsense™II Windshield Wipers
(if equipped)
The Rainsense II windshield wipers use
a moisture sensor to automatically oper-
ate the wipers when needed, depending
on driving conditions and the sensitivity
setting. If the system is left on for long
periods, an occasional wipe may occur
without any moisture on the windshield
to indicate the system is activated.
The headlamps also will be turned on
automatically when the Rainsense
wipers are active if the exterior lamp
control knob is in the AUTO position.
Windshield Wiper Controls
The controls for the windshield wipers
are located on the multifunction stalk
on the left side of the steering column.
The wipers band can be rotated to the
following positions:
(Mist):Rotate the band down to this
position to turn the wipers on for one
wipe.
(Off):Rotate the band to this posi-
tion to turn off the wipers.
(Delay):Rotate the band up to one
of the delay settings to activate the
Canceling a Remote Start
If you wish to turn off the engine instead
of driving after a remote start, do any of
the following:
• Press and hold the button until the
parking lamps turn off.
• Press and release the Hazard
Warning Flashers button inside the
vehicle. Press the button again to
turn off the flashers.
• Turn the key in the ignition switch to
the Run position and then off.
See Section 2 of your Owner Manual.
Note: The Remote Vehicle Start feature
will not operate if the key is in the igni-
tion, the hood is open, or the Check
Engine light is illuminated on the instru-
ment panel cluster.(Cancel):Press this button to can-
cel the cruise control but retain the set
speed in memory.
See Section 3 of your Owner Manual.
Page 17 of 24
operation, avoid placing any objects on
or near the sensor.
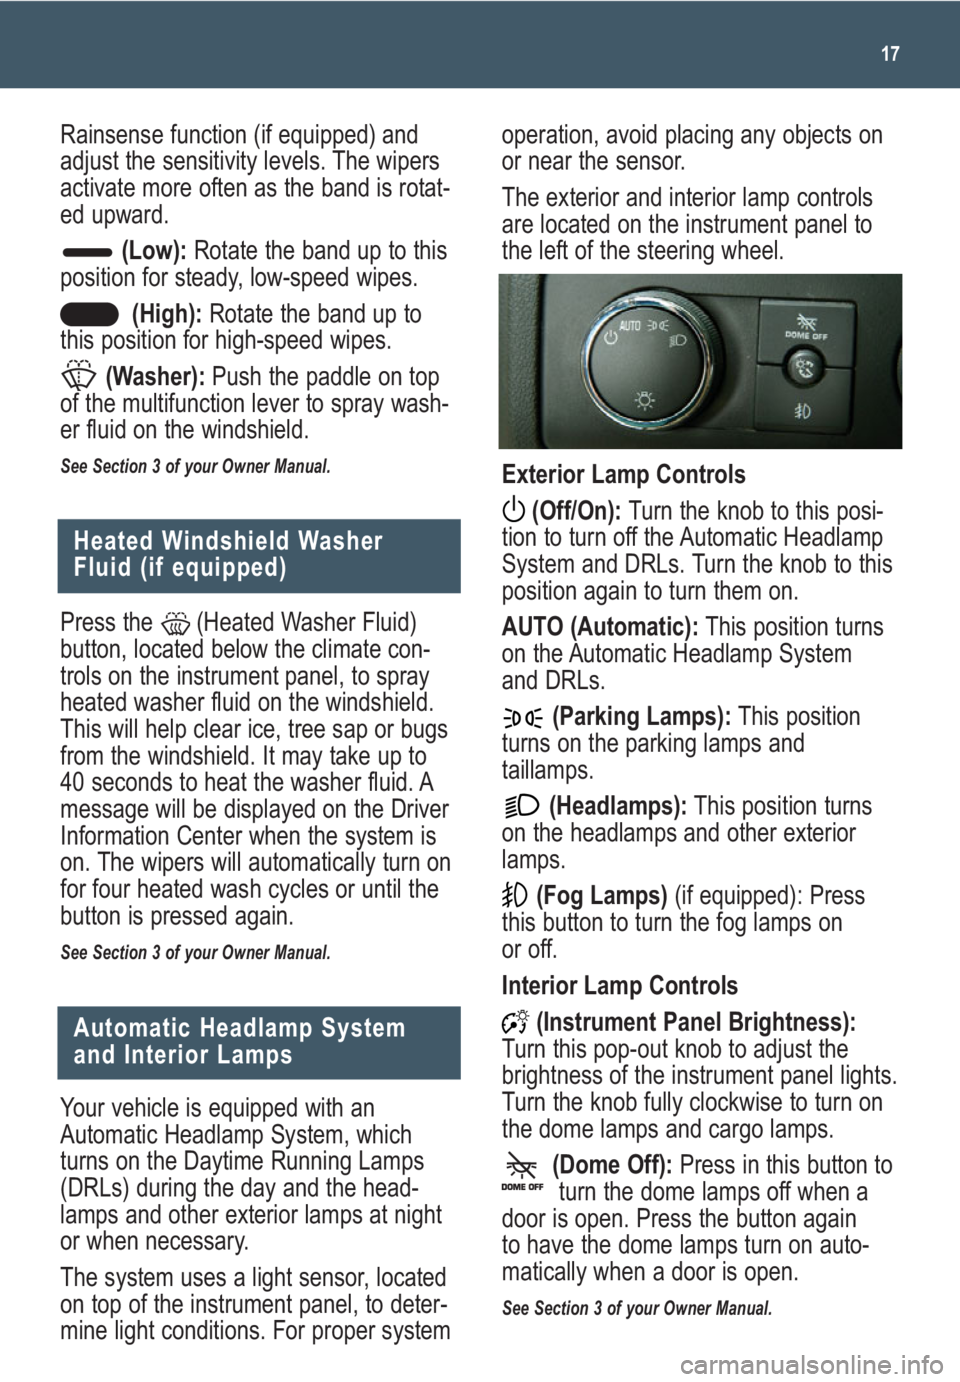
The exterior and interior lamp controls
are located on the instrument panel to
the left of the steering wheel.
Exterior Lamp Controls
(Off/On): Turn the knob to this posi-
tion to turn off the Automatic Headlamp
System and DRLs. Turn the knob to this
position again to turn them on.
AUTO (Automatic):This position turns
on the Automatic Headlamp System
and DRLs.
(Parking Lamps):This position
turns on the parking lamps and
taillamps.
(Headlamps):This position turns
on the headlamps and other exterior
lamps.
(Fog Lamps)(if equipped): Press
this button to turn the fog lamps on
or off.
Interior Lamp Controls
(Instrument Panel Brightness):
Turn this pop-out knob to adjust the
brightness of the instrument panel lights.
Turn the knob fully clockwise to turn on
the dome lamps and cargo lamps.
(Dome Off):Press in this button to
turn the dome lamps off when a
door is open. Press the button again
to have the dome lamps turn on auto-
matically when a door is open.
See Section 3 of your Owner Manual.
17
Heated Windshield Washer
Fluid (if equipped)
Press the (Heated Washer Fluid)
button, located below the climate con-
trols on the instrument panel, to spray
heated washer fluid on the windshield.
This will help clear ice, tree sap or bugs
from the windshield. It may take up to
40 seconds to heat the washer fluid. A
message will be displayed on the Driver
Information Center when the system is
on. The wipers will automatically turn on
for four heated wash cycles or until the
button is pressed again.
See Section 3 of your Owner Manual.
Your vehicle is equipped with an
Automatic Headlamp System, which
turns on the Daytime Running Lamps
(DRLs) during the day and the head-
lamps and other exterior lamps at night
or when necessary.
The system uses a light sensor, located
on top of the instrument panel, to deter-
mine light conditions. For proper system
Automatic Headlamp System
and Interior Lamps
Rainsense function (if equipped) and
adjust the sensitivity levels. The wipers
activate more often as the band is rotat-
ed upward.
(Low):Rotate the band up to this
position for steady, low-speed wipes.
(High):Rotate the band up to
this position for high-speed wipes.
(Washer):Push the paddle on top
of the multifunction lever to spray wash-
er fluid on the windshield.
See Section 3 of your Owner Manual.
Page 18 of 24
Getting to Know Your Sierra18
Power Sliding Rear Window
(if equipped)
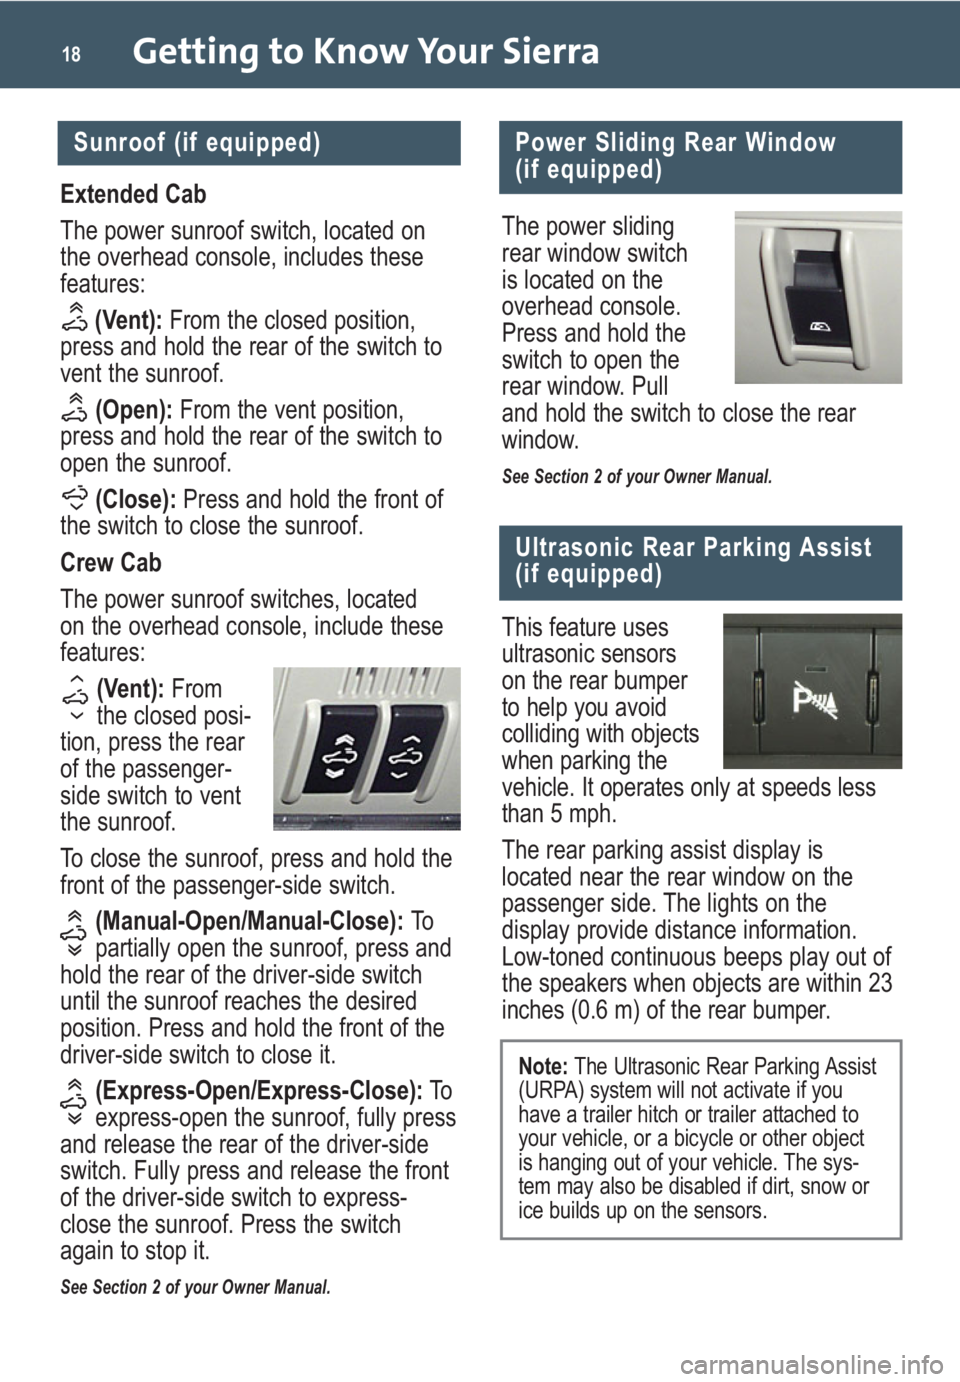
The power sliding
rear window switch
is located on the
overhead console.
Press and hold the
switch to open the
rear window. Pull
and hold the switch to close the rear
window.
See Section 2 of your Owner Manual.
This feature uses
ultrasonic sensors
on the rear bumper
to help you avoid
colliding with objects
when parking the
vehicle. It operates only at speeds less
than 5 mph.
The rear parking assist display is
located near the rear window on the
passenger side. The lights on the
display provide distance information.
Low-toned continuous beeps play out of
the speakers when objects are within 23
inches (0.6 m) of the rear bumper.
Ultrasonic Rear Parking Assist
(if equipped)
Extended Cab
The power sunroof switch, located on
the overhead console, includes these
features:
(Vent):From the closed position,
press and hold the rear of the switch to
vent the sunroof.
(Open):From the vent position,
press and hold the rear of the switch to
open the sunroof.
(Close):Press and hold the front of
the switch to close the sunroof.
Crew Cab
The power sunroof switches, located
on the overhead console, include these
features:
(Vent): From
the closed posi-
tion, press the rear
of the passenger-
side switch to vent
the sunroof.
To close the sunroof, press and hold the
front of the passenger-side switch.
(Manual-Open/Manual-Close): To
partially open the sunroof, press and
hold the rear of the driver-side switch
until the sunroof reaches the desired
position. Press and hold the front of the
driver-side switch to close it.
(Express-Open/Express-Close):To
express-open the sunroof, fully press
and release the rear of the driver-side
switch. Fully press and release the front
of the driver-side switch to express-
close the sunroof. Press the switch
again to stop it.
See Section 2 of your Owner Manual.
Sunroof (if equipped)
Note: The Ultrasonic Rear Parking Assist
(URPA) system will not activate if you
have a trailer hitch or trailer attached to
your vehicle, or a bicycle or other object
is hanging out of your vehicle. The sys-
tem may also be disabled if dirt, snow or
ice builds up on the sensors.
Page 19 of 24
19
Universal Home Remote
(if equipped)
Automatic Dimming
The automatic dimming feature is turned
on each time the vehicle is started. To
Automatic Dimming Rearview
Mirror (if equipped)
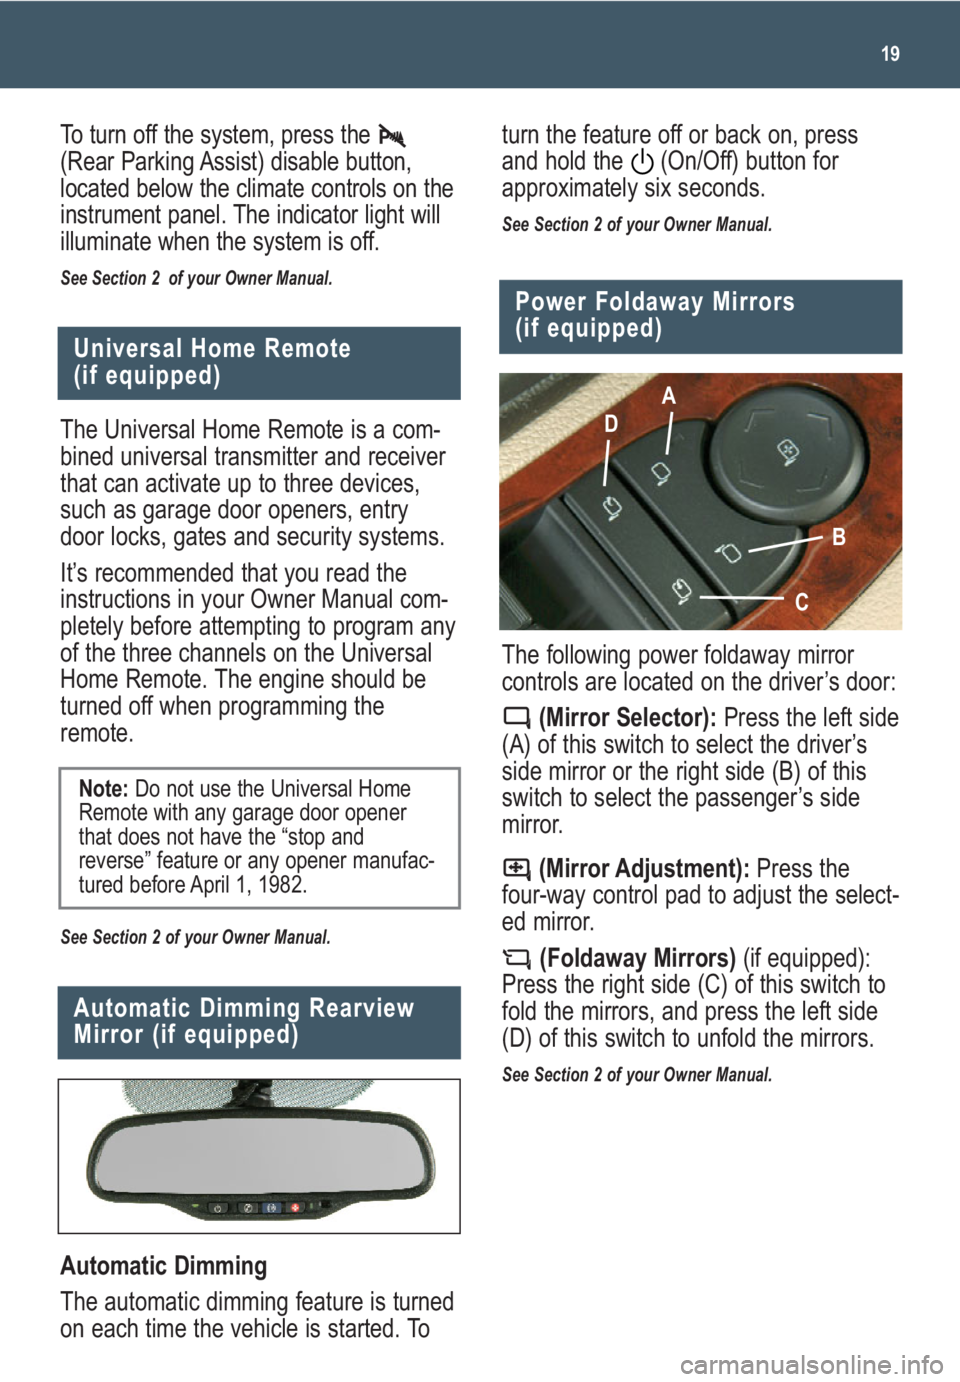
The following power foldaway mirror
controls are located on the driver’s door:
(Mirror Selector):Press the left side
(A) of this switch to select the driver’s
side mirror or the right side (B) of this
switch to select the passenger’s side
mirror.
(Mirror Adjustment):Press the
four-way control pad to adjust the select-
ed mirror.
(Foldaway Mirrors)(if equipped):
Press the right side (C) of this switch to
fold the mirrors, and press the left side
(D) of this switch to unfold the mirrors.
See Section 2 of your Owner Manual.
Power Foldaway Mirrors
(if equipped)
A
D
B
C
The Universal Home Remote is a com-
bined universal transmitter and receiver
that can activate up to three devices,
such as garage door openers, entry
door locks, gates and security systems.
It’s recommended that you read the
instructions in your Owner Manual com-
pletely before attempting to program any
of the three channels on the Universal
Home Remote. The engine should be
turned off when programming the
remote.
See Section 2 of your Owner Manual.
Note:Do not use the Universal Home
Remote with any garage door opener
that does not have the “stop and
reverse” feature or any opener manufac-
tured before April 1, 1982.
To turn off the system, press the
(Rear Parking Assist) disable button,
located below the climate controls on the
instrument panel. The indicator light will
illuminate when the system is off.
See Section 2 of your Owner Manual.
turn the feature off or back on, press
and hold the (On/Off) button for
approximately six seconds.
See Section 2 of your Owner Manual.
Page 20 of 24

Getting to Know Your Sierra20
Folding the Rear Seat
(if equipped)
60/40 Split-Bench Seat
To fold either side of the split-bench
seat, pull up the seat cushion.
To unfold the seat, pull down the seat
cushion.
Cargo Management System
(if equipped)
The cargo management system is com-
posed of three rails located on the front
and sides of the truck bed. It includes
four adjustable cargo tie-downs that can
be placed on the upper and lower slides
of the rail.
To adjust a tie-down, pull out the locator
pin and move the tie-down to another
location. Make sure the locator pin lines
up with a locator hole on the rail. Once
the pin is inside the hole, the tie-down
will not move side to side.
The rails are notched at each end to
allow the tie-downs to be removed and
placed on another rail. To remove, pull
out the locator pin and slide the tie-down
to the end of the rail and pull back.
Trailer-Tow Mirrors (if equipped)
The trailer-tow mirrors can be extended
manually to provide better visibility when
towing a trailer. The lower portion of the
mirror has a convex (spotter) mirror that
also can be adjusted manually to pro-
vide a better viewing angle.
See Section 2 of your Owner Manual.
Rear Vision Camera (if equipped)
When the vehicle is shifted into
Reverse, a view of the area behind the
vehicle is displayed on the inside
rearview mirror or the navigation system
screen (if equipped).
The camera is located near the tailgate
handle. Clean the camera lens with
water and a soft cloth.
See Section 2 of your Owner Manual.
Full-Bench Seat
To fold up the full-bench seat, push
down on the front of the seat cushion
while pulling down on the release strap
located under the seat cushion. Pull up
the seat cushion until it latches with the
seatback.
To fold down the full bench seat, push
on the seat cushion and pull the release
strap. Pull down the seat cushion until it
latches in place.
See Section 1 of your Owner Manual.