wheel GMC SIERRA 2016 Get To Know Guide
[x] Cancel search | Manufacturer: GMC, Model Year: 2016, Model line: SIERRA, Model: GMC SIERRA 2016Pages: 20, PDF Size: 3.12 MB
Page 2 of 20
2
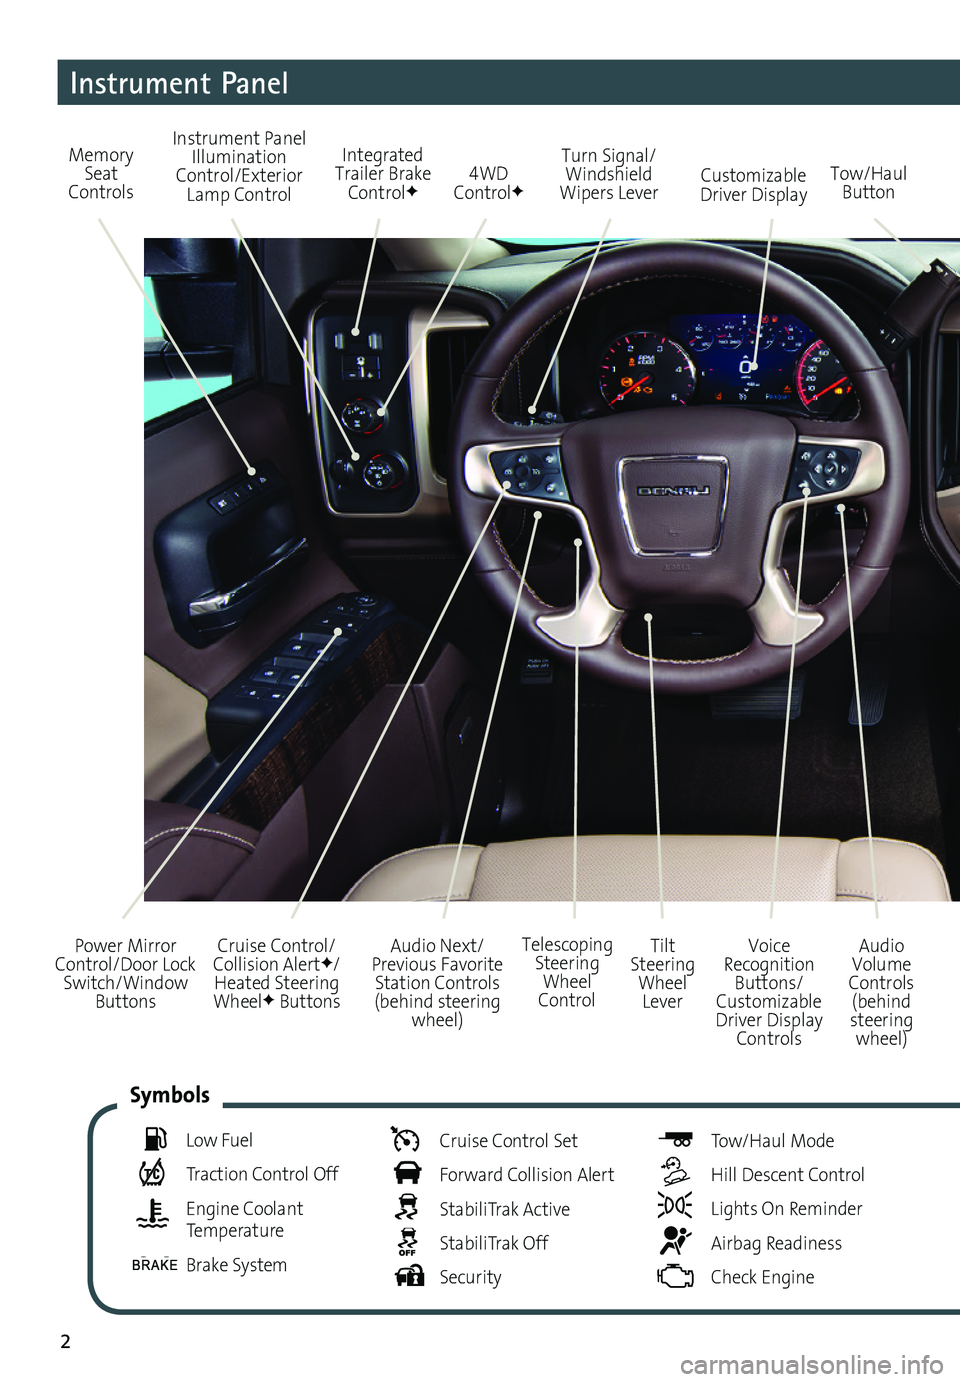
Audio Next/Previous Favorite Station Controls (behind steering wheel)
Cruise Control/ Collision AlertF/Heated Steering WheelF Buttons
Power Mirror Control/Door Lock Switch/Window Buttons
Audio Volume Controls (behind steering wheel)
Voice Recognition Buttons/ Customizable Driver Display Controls
Tilt Steering Wheel Lever
Telescoping Steering Wheel Control
Memory Seat Controls
Instrument Panel Illumination Control/Exterior Lamp Control4WD ControlFTow/Haul ButtonCustomizable Driver Display
Turn Signal/Windshield Wipers Lever
Integrated Trailer Brake ControlF
Instrument Panel
Low Fuel
Traction Control Off
Engine Coolant Temperature
Brake System
Cruise Control Set
Forward Collision Alert
StabiliTrak Active
StabiliTrak Off
Security
Tow/Haul Mode
Hill Descent Control
Lights On Reminder
Airbag Readiness
Check Engine
Symbols
Page 3 of 20
3
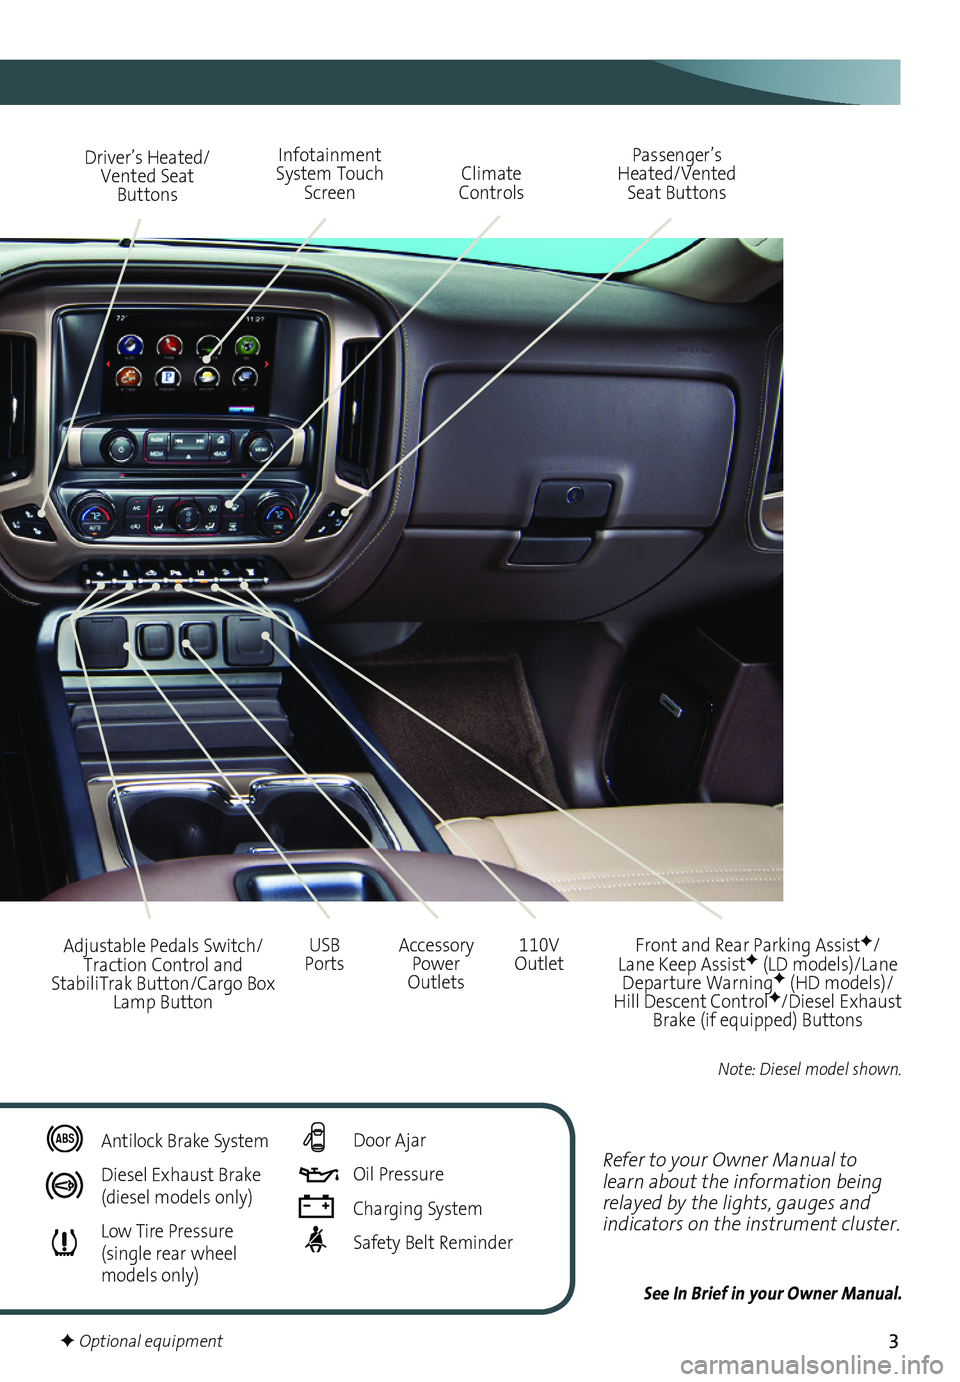
Refer to your Owner Manual to learn about the information being relayed by the lights, gauges and indicators on the instrument cluster.
See In Brief in your Owner Manual.
Driver’s Heated/Vented Seat Buttons
Infotainment System Touch Screen
Passenger’s Heated/Vented Seat ButtonsClimate Controls
Accessory Power Outlets
Adjustable Pedals Switch/Traction Control and StabiliTrak Button/Cargo Box Lamp Button
110V OutletUSB Ports
Antilock Brake System
Diesel Exhaust Brake (diesel models only)
Low Tire Pressure (single rear wheel models only)
Door Ajar
Oil Pressure
Charging System
Safety Belt Reminder
F Optional equipment
Front and Rear Parking AssistF/Lane Keep AssistF (LD models)/Lane Departure WarningF (HD models)/Hill Descent ControlF/Diesel Exhaust Brake (if equipped) Buttons
Note: Diesel model shown.
Page 6 of 20
6
Lighting
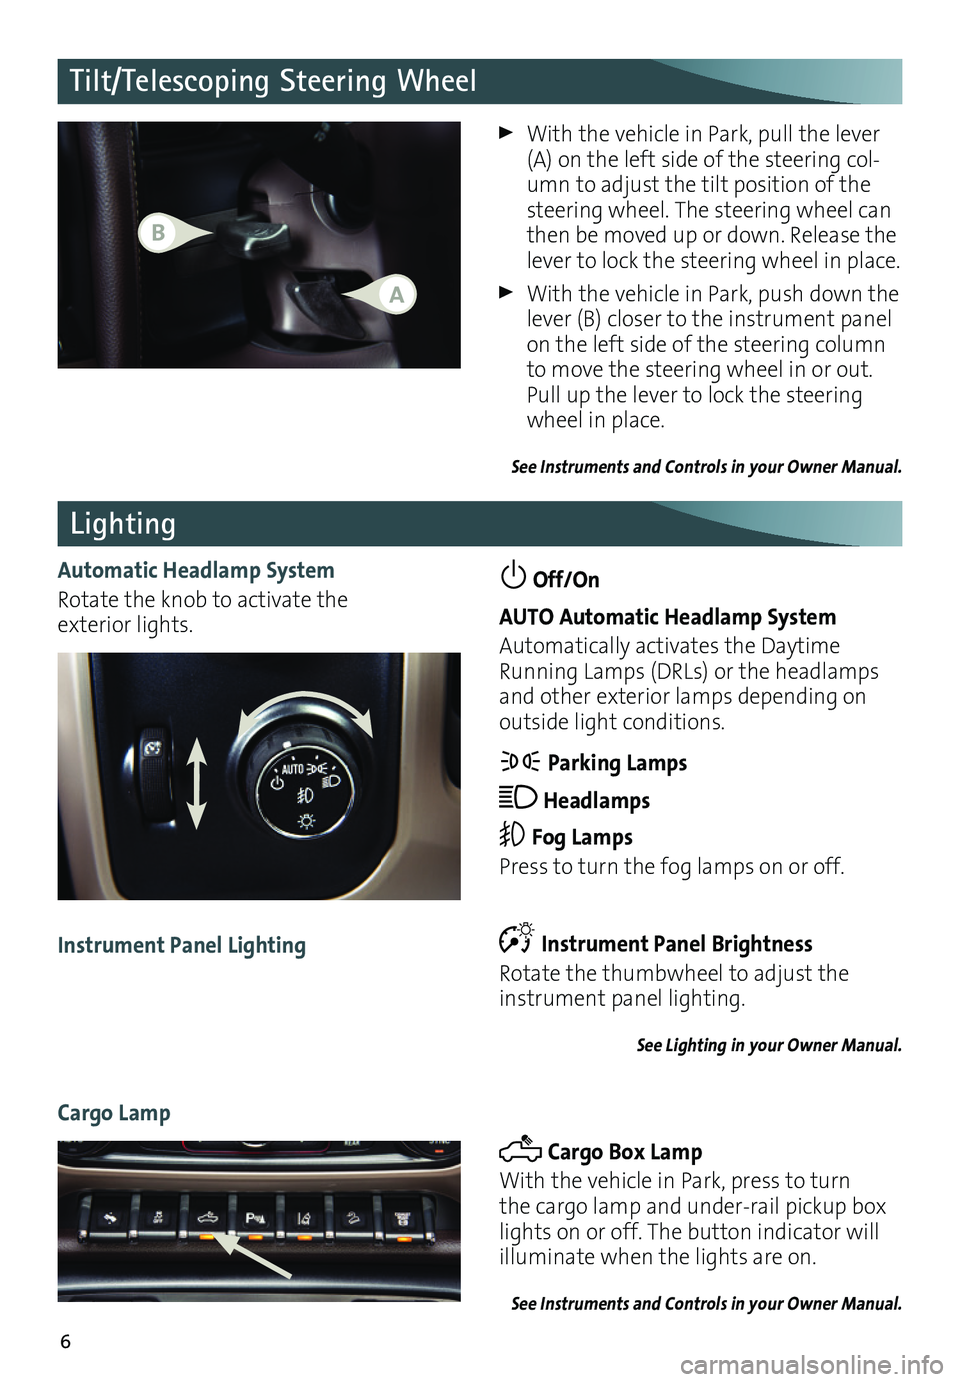
Automatic Headlamp System
Rotate the knob to activate the exterior lights.
Off/On
AUTO Automatic Headlamp System
Automatically activates the Daytime Running Lamps (DRLs) or the headlamps and other exterior lamps depending on
outside light conditions.
Parking Lamps
Headlamps
Fog Lamps
Press to turn the fog lamps on or off.
Instrument Panel Brightness
Rotate the thumbwheel to adjust the
instrument panel lighting.
See Lighting in your Owner Manual.
Instrument Panel Lighting
Cargo Lamp
Cargo Box Lamp
With the vehicle in Park, press to turn the cargo lamp and under-rail pickup box lights on or off. The button indicator will illuminate when the lights are on.
See Instruments and Controls in your Owner Manual.
With the vehicle in Park, pull the lever (A) on the left side of the steering col-umn to adjust the tilt position of the steering wheel. The steering wheel can then be moved up or down. Release the lever to lock the steering wheel in place.
With the vehicle in Park, push down the lever (B) closer to the instrument panel on the left side of the steering column to move the steering wheel in or out. Pull up the lever to lock the steering wheel in place.
See Instruments and Controls in your Owner Manual.
Tilt/Telescoping Steering Wheel
B
A
Page 7 of 20
7
Customizable Driver Display
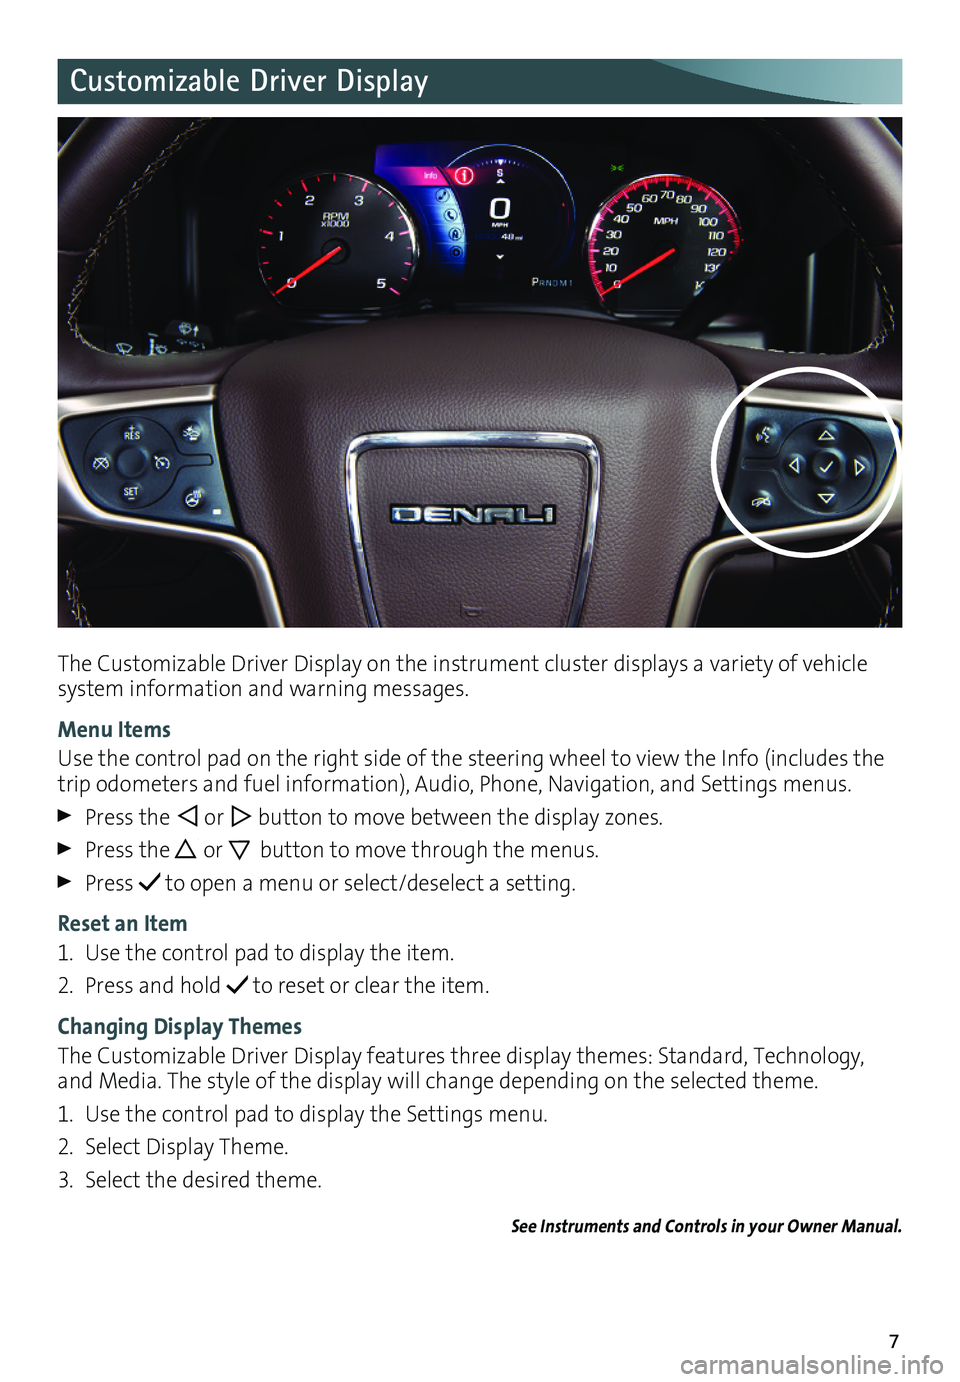
The Customizable Driver Display on the instrument cluster displays a variety of vehicle system information and warning messages.
Menu Items
Use the control pad on the right side of the steering wheel to view the Info (includes the trip odometers and fuel information), Audio, Phone, Navigation, and Settings menus.
Press the or button to move between the display zones.
Press the or button to move through the menus.
Press to open a menu or select/deselect a setting.
Reset an Item
1. Use the control pad to display the item.
2. Press and hold to reset or clear the item.
Changing Display Themes
The Customizable Driver Display features three display themes: Standard, Technology, and Media. The style of the display will change depending on the selected theme.
1. Use the control pad to display the Settings menu.
2. Select Display Theme.
3. Select the desired theme.
See Instruments and Controls in your Owner Manual.
Page 9 of 20
9
Windshield Wipers
Audio Steering Wheel Controls
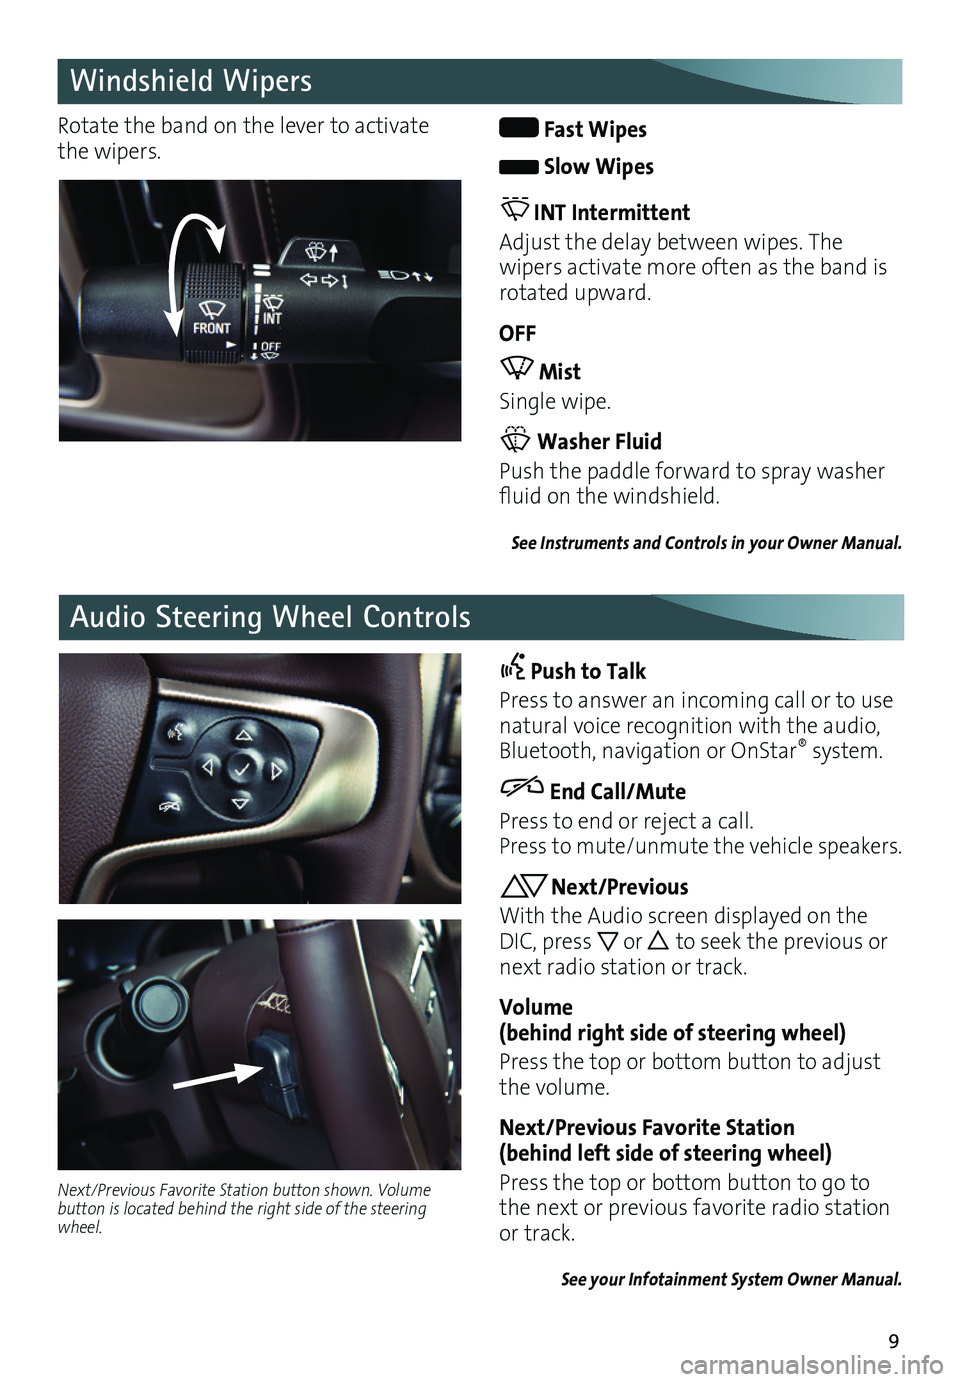
Rotate the band on the lever to activate the wipers. Fast Wipes
Slow Wipes
INT Intermittent
Adjust the delay between wipes. The
wipers activate more often as the band is rotated upward.
OFF
Mist
Single wipe.
Washer Fluid
Push the paddle forward to spray washer fluid on the windshield.
See Instruments and Controls in your Owner Manual.
Push to Talk
Press to answer an incoming call or to use natural voice recognition with the audio, Bluetooth, navigation or OnStar® system.
End Call/Mute
Press to end or reject a call. Press to mute/unmute the vehicle speakers.
Next/Previous
With the Audio screen displayed on the DIC, press or to seek the previous or next radio station or track.
Volume (behind right side of steering wheel)
Press the top or bottom button to adjust the volume.
Next/Previous Favorite Station (behind left side of steering wheel)
Press the top or bottom button to go to the next or previous favorite radio station or track.
See your Infotainment System Owner Manual.
Next/Previous Favorite Station button shown. Volume button is located behind the right side of the steering wheel.
Page 10 of 20
10
GMC IntelliLink
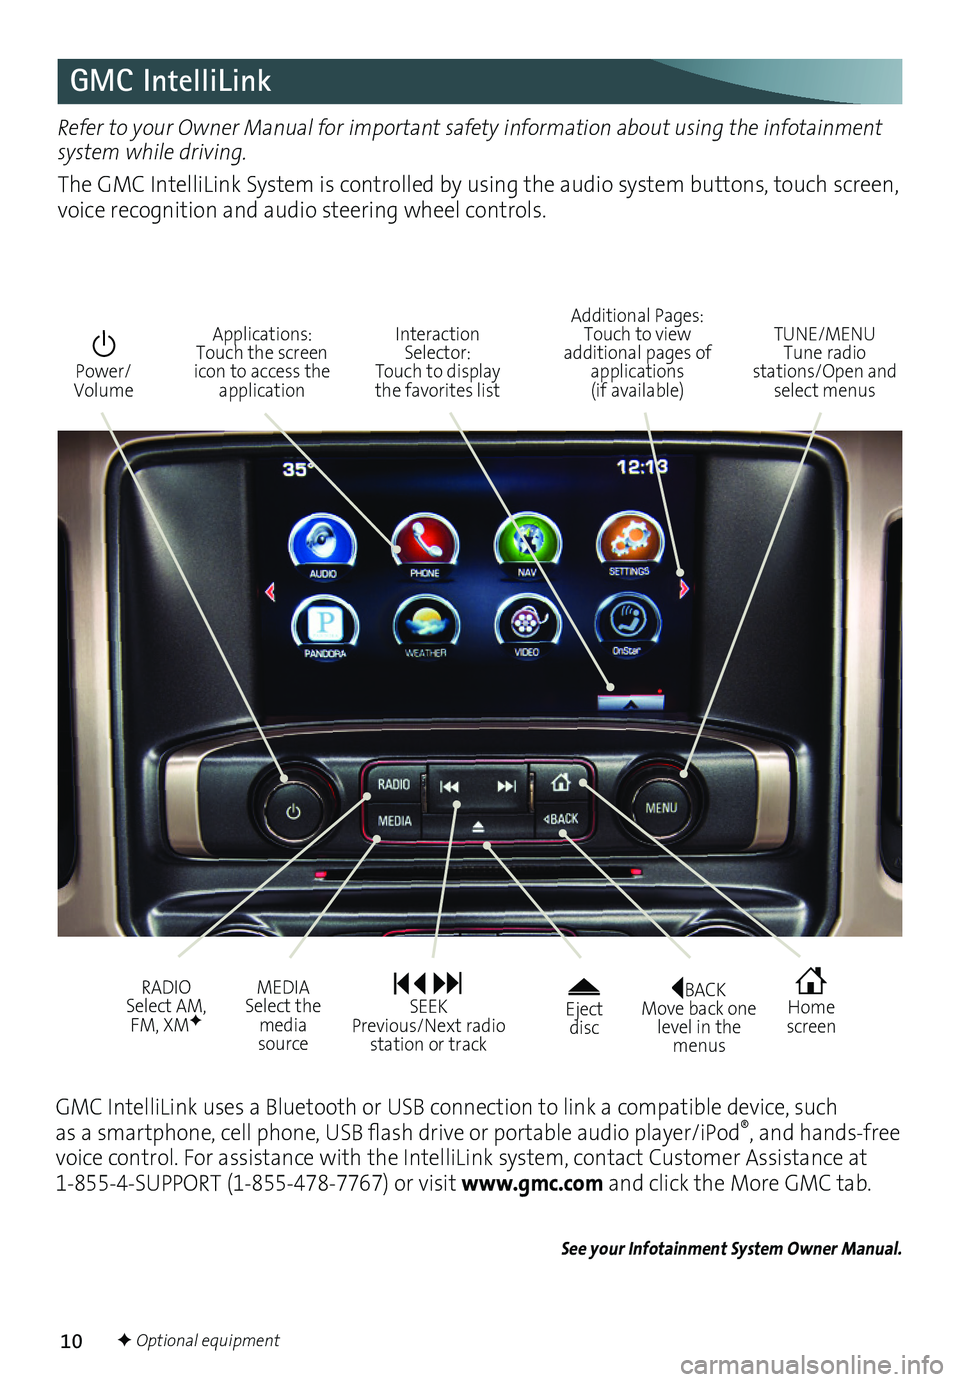
BACK Move back one level in the menus
Home screen
Eject disc
Power/ Volume
Additional Pages: Touch to view additional pages of applications (if available)
TUNE/MENU Tune radio stations/Open and select menus
Interaction Selector: Touch to display the favorites list
Applications: Touch the screen icon to access the application
RADIO Select AM, FM, XMF
MEDIA Select the media source
SEEK Previous/Next radio station or track
Refer to your Owner Manual for important safety information about using the infotainment system while driving.
The GMC IntelliLink System is controlled by using the audio system buttons, touch screen, voice recognition and audio steering wheel controls.
F Optional equipment
GMC IntelliLink uses a Bluetooth or USB connection to link a compatible device, such as a smartphone, cell phone, USB flash drive or portable audio player/iPod®, and hands-free voice control. For assistance with the IntelliLink system, contact Customer Assistance at 1-855-4-SUPPORT (1-855-478-7767) or visit www.gmc.com and click the More GMC tab.
See your Infotainment System Owner Manual.
Page 11 of 20
11
GMC IntelliLink
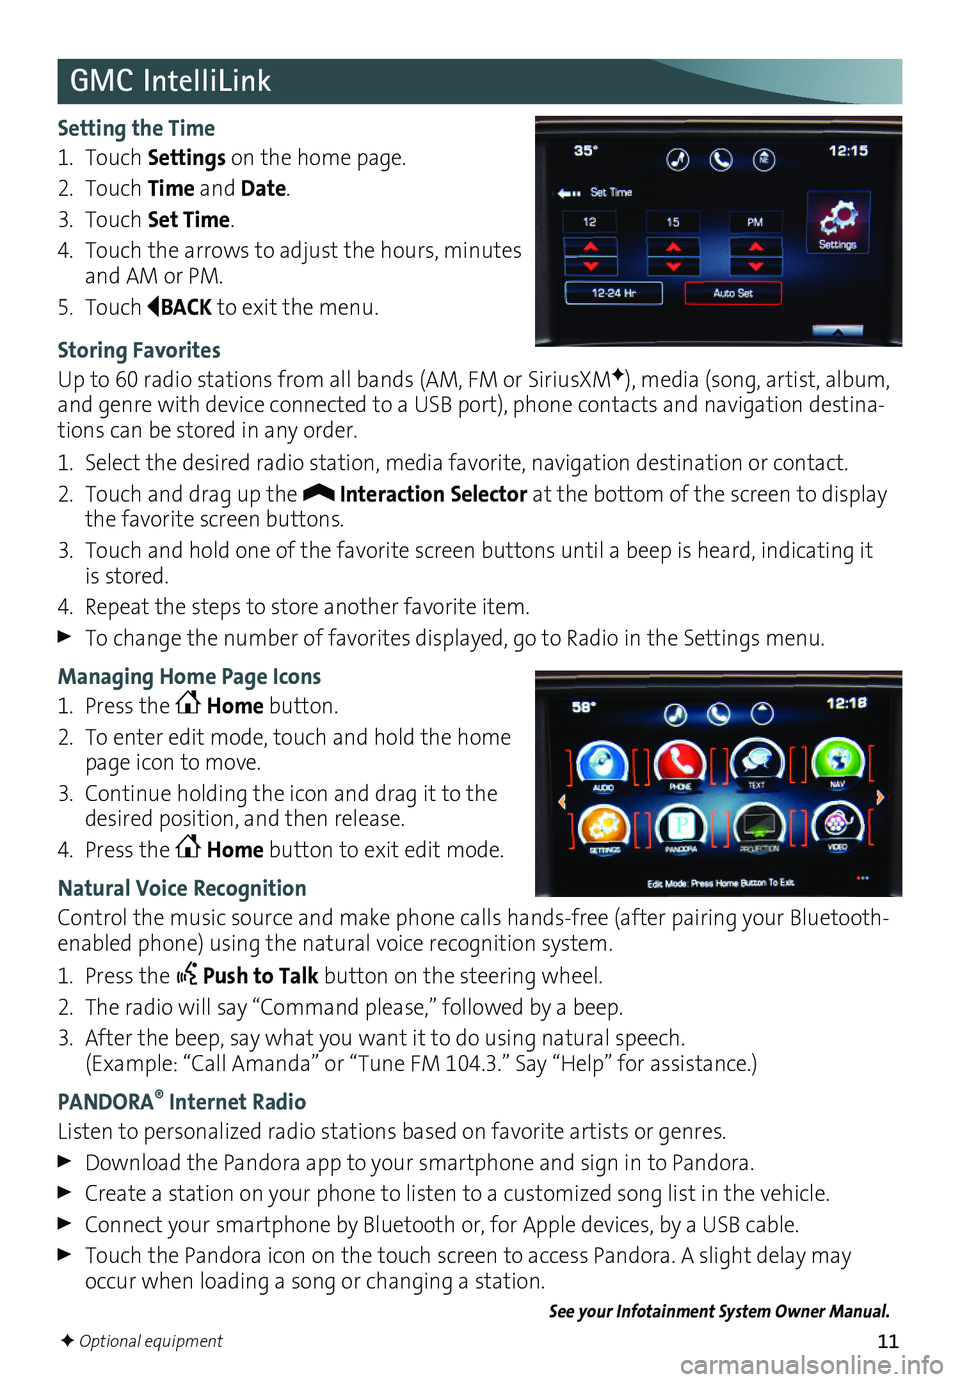
Setting the Time
1. Touch Settings on the home page.
2. Touch Time and Date.
3. Touch Set Time.
4. Touch the arrows to adjust the hours, minutes and AM or PM.
5. Touch BACK to exit the menu.
Storing Favorites
Up to 60 radio stations from all bands (AM, FM or SiriusXMF), media (song, artist, album, and genre with device connected to a USB port), phone contacts and navigation destina-tions can be stored in any order.
1. Select the desired radio station, media favorite, navigation destination or contact.
2. Touch and drag up the Interaction Selector at the bottom of the screen to display the favorite screen buttons.
3. Touch and hold one of the favorite screen buttons until a beep is heard, indicating it is stored.
4. Repeat the steps to store another favorite item.
To change the number of favorites displayed, go to Radio in the Settings menu.
Managing Home Page Icons
1. Press the Home button.
2. To enter edit mode, touch and hold the home page icon to move.
3. Continue holding the icon and drag it to the desired position, and then release.
4. Press the Home button to exit edit mode.
Natural Voice Recognition
Control the music source and make phone calls hands-free (after pairing your Bluetooth-enabled phone) using the natural voice recognition system.
1. Press the Push to Talk button on the steering wheel.
2. The radio will say “Command please,” followed by a beep.
3. After the beep, say what you want it to do using natural speech. (Example: “Call Amanda” or “Tune FM 104.3.” Say “Help” for assistance.)
PANDORA® Internet Radio
Listen to personalized radio stations based on favorite artists or genres.
Download the Pandora app to your smartphone and sign in to Pandora.
Create a station on your phone to listen to a customized song list in the vehicle.
Connect your smartphone by Bluetooth or, for Apple devices, by a USB cable.
Touch the Pandora icon on the touch screen to access Pandora. A slight delay may occur when loading a song or changing a station.
See your Infotainment System Owner Manual.
F Optional equipment
Page 16 of 20
16
Driver Assistance Systems
The driver assistance systems use advanced technologies to help avoid collisions by
providing visual and audible alerts under some imminent collision conditions.
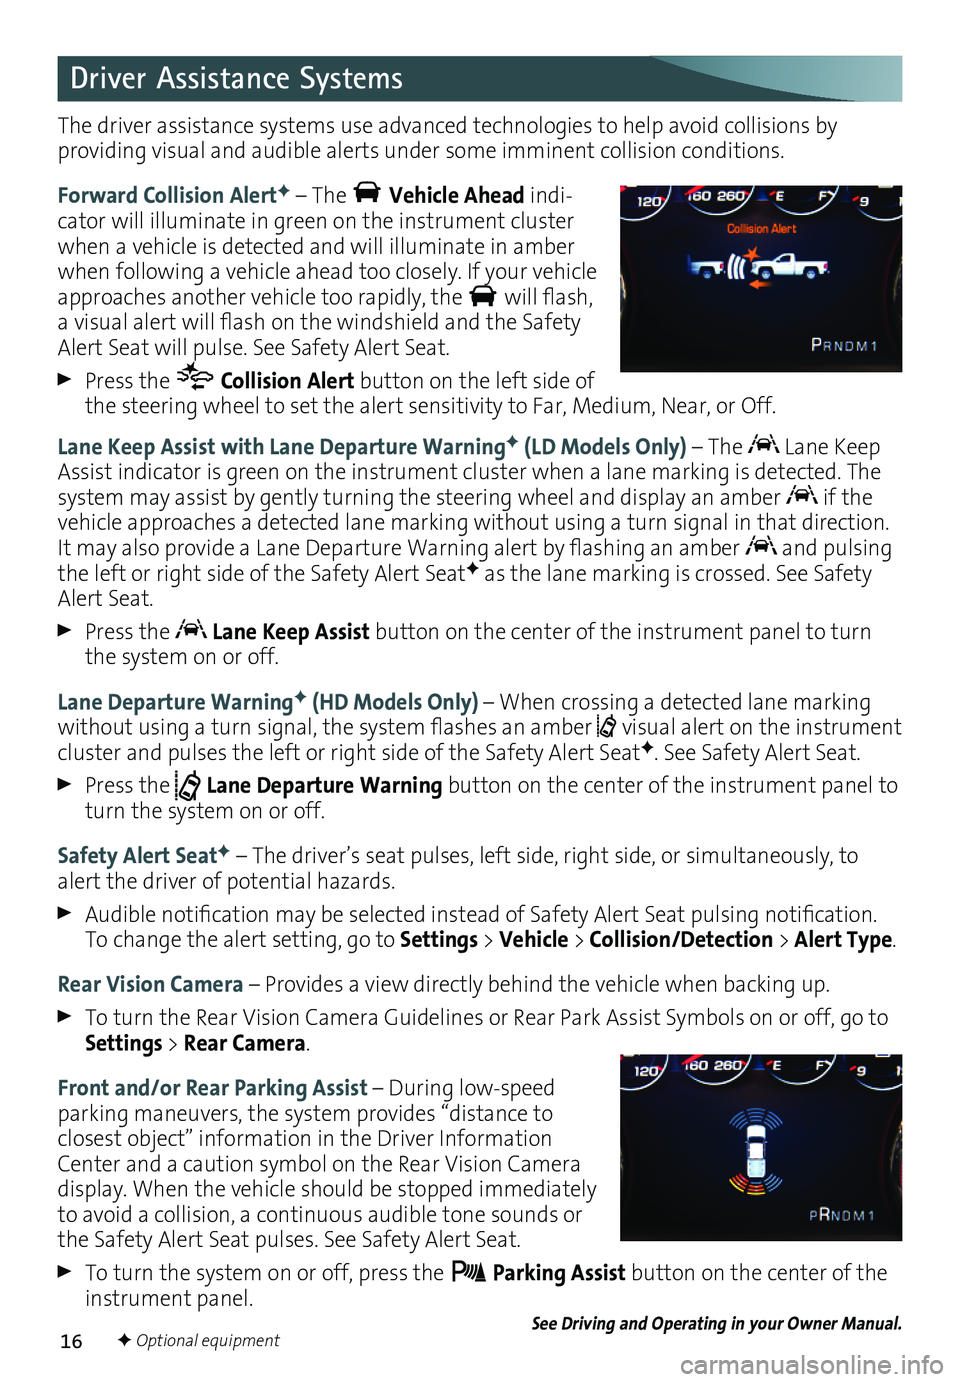
Forward Collision AlertF – The Vehicle Ahead indi-cator will illuminate in green on the instrument cluster when a vehicle is detected and will illuminate in amber when following a vehicle ahead too closely. If your vehicle approaches another vehicle too rapidly, the will flash, a visual alert will flash on the windshield and the Safety Alert Seat will pulse. See Safety Alert Seat.
Press the Collision Alert button on the left side of the steering wheel to set the alert sensitivity to Far, Medium, Near, or Off.
Lane Keep Assist with Lane Departure WarningF (LD Models Only) – The Lane Keep Assist indicator is green on the instrument cluster when a lane marking is detected. The system may assist by gently turning the steering wheel and display an amber if the vehicle approaches a detected lane marking without using a turn signal in that direction. It may also provide a Lane Departure Warning alert by flashing an amber and pulsing the left or right side of the Safety Alert SeatF as the lane marking is crossed. See Safety Alert Seat.
Press the Lane Keep Assist button on the center of the instrument panel to turn the system on or off.
Lane Departure WarningF (HD Models Only) – When crossing a detected lane marking without using a turn signal, the system flashes an amber visual alert on the instrument cluster and pulses the left or right side of the Safety Alert SeatF. See Safety Alert Seat.
Press the Lane Departure Warning button on the center of the instrument panel to turn the system on or off.
Safety Alert SeatF – The driver’s seat pulses, left side, right side, or simultaneously, to alert the driver of potential hazards.
Audible notification may be selected instead of Safety Alert Seat pulsing notification. To change the alert setting, go to Settings > Vehicle > Collision/Detection > Alert Type.
Rear Vision Camera – Provides a view directly behind the vehicle when backing up.
To turn the Rear Vision Camera Guidelines or Rear Park Assist Symbols on or off, go to Settings > Rear Camera.
Front and/or Rear Parking Assist – During low-speed parking maneuvers, the system provides “distance to
closest object” information in the Driver Information Center and a caution symbol on the Rear Vision Camera display. When the vehicle should be stopped immediately to avoid a collision, a continuous audible tone sounds or the Safety Alert Seat pulses. See Safety Alert Seat.
To turn the system on or off, press the Parking Assist button on the center of the instrument panel.See Driving and Operating in your Owner Manual.F Optional equipment
Page 18 of 20
18
Tire Pressure Monitor (Single Rear Wheel Models Only)
Hill Descent Control sets and maintains vehicle speed from 2–14 mph while descending a steep incline in a forward or reverse gear.
1. Press the Hill Descent Control button on the center of the instrument panel. Vehicle speed must be below 31 mph to enable the system. The Hill Descent Control symbol will illuminate on the instrument cluster.
2. Increase or decrease speed by applying the accelerator or brake pedal or use the Cruise Control +/– buttons on the steering wheel. The adjusted speed becomes the new set speed. The symbol flashes when the system is actively applying the brakes to main-tain vehicle speed.
See Driving and Operating in your Owner Manual.
Hill Descent ControlF (Z71)
The traction control system limits wheelspin and the StabiliTrak® stability control system assists with directional control of the vehicle in difficult
driving conditions. Both systems turn on automatically every time the vehicle is started.
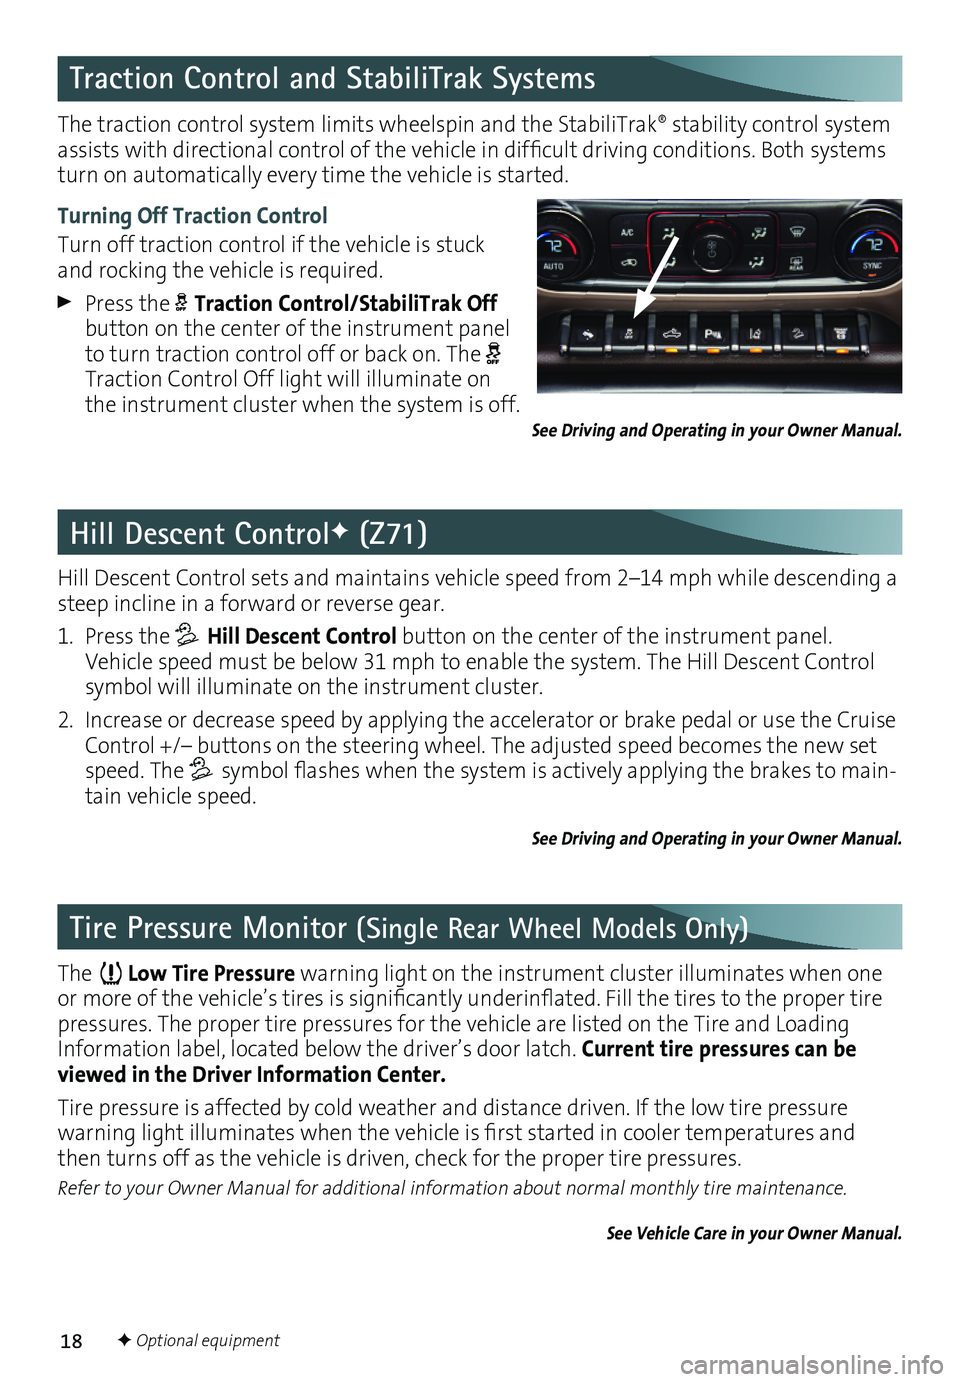
Turning Off Traction Control
Turn off traction control if the vehicle is stuck and rocking the vehicle is required.
Press the Traction Control/StabiliTrak Off button on the center of the instrument panel to turn traction control off or back on. The Traction Control Off light will illuminate on the instrument cluster when the system is off.
Traction Control and StabiliTrak Systems
The Low Tire Pressure warning light on the instrument cluster illuminates when one or more of the vehicle’s tires is significantly underinflated. Fill the tires to the proper tire pressures. The proper tire pressures for the vehicle are listed on the Tire and Loading Information label, located below the driver’s door latch. Current tire pressures can be viewed in the Driver Information Center.
Tire pressure is affected by cold weather and distance driven. If the low tire pressure
warning light illuminates when the vehicle is first started in cooler temperatures and then turns off as the vehicle is driven, check for the proper tire pressures.
Refer to your Owner Manual for additional information about normal monthly tire maintenance.
See Vehicle Care in your Owner Manual.
See Driving and Operating in your Owner Manual.
F Optional equipment