automat GMC SIERRA 2019 Owners Manual
[x] Cancel search | Manufacturer: GMC, Model Year: 2019, Model line: SIERRA, Model: GMC SIERRA 2019Pages: 477, PDF Size: 8.7 MB
Page 335 of 477
GMC Sierra/Sierra Denali Owner Manual (GMNA-Localizing-U.S./Canada/
Mexico-1500-11698638) - 2019 - CRC - 5/14/19
334 Vehicle Care
.Helps keep the proper engine
temperature.
Caution
Do not use anything other than a
mix of DEX-COOL coolant that
meets GM Standard
GMW3420 and clean, drinkable
water. Anything else can cause
damage to the engine cooling
system and the vehicle, which
would not be covered by the
vehicle warranty.
Never dispose of engine coolant by
putting it in the trash, or by pouring
it on the ground, or into sewers,
streams, or bodies of water. Have
the coolant changed by an
authorized service center, familiar
with legal requirements regarding
used coolant disposal. This will help
protect the environment and your
health.
Checking Coolant
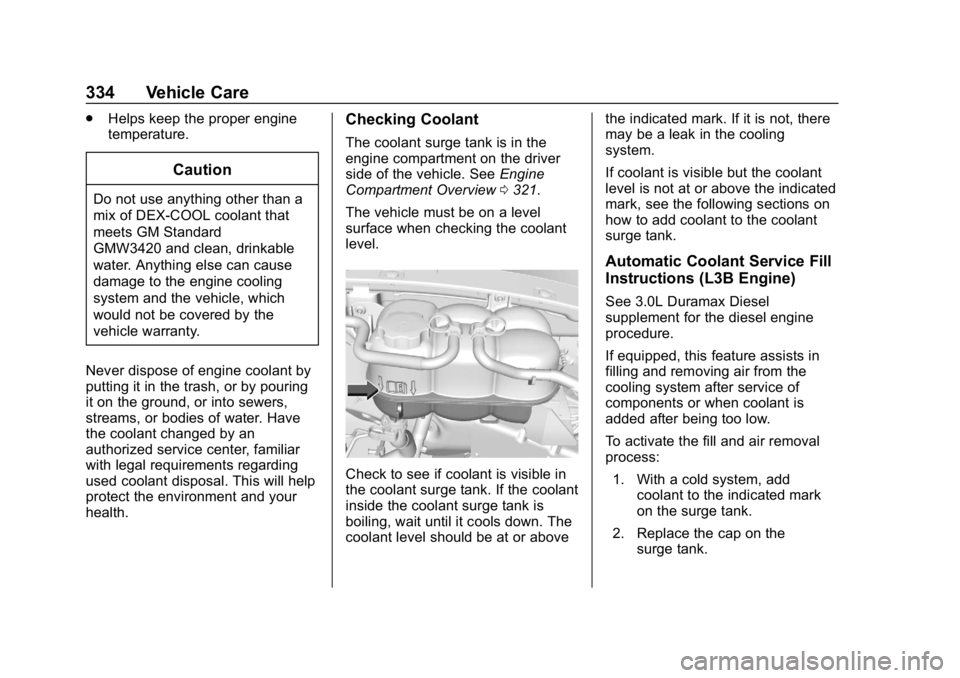
The coolant surge tank is in the
engine compartment on the driver
side of the vehicle. See Engine
Compartment Overview 0321.
The vehicle must be on a level
surface when checking the coolant
level.
Check to see if coolant is visible in
the coolant surge tank. If the coolant
inside the coolant surge tank is
boiling, wait until it cools down. The
coolant level should be at or above the indicated mark. If it is not, there
may be a leak in the cooling
system.
If coolant is visible but the coolant
level is not at or above the indicated
mark, see the following sections on
how to add coolant to the coolant
surge tank.
Automatic Coolant Service Fill
Instructions (L3B Engine)
See 3.0L Duramax Diesel
supplement for the diesel engine
procedure.
If equipped, this feature assists in
filling and removing air from the
cooling system after service of
components or when coolant is
added after being too low.
To activate the fill and air removal
process:
1. With a cold system, add coolant to the indicated mark
on the surge tank.
2. Replace the cap on the surge tank.
Page 336 of 477
GMC Sierra/Sierra Denali Owner Manual (GMNA-Localizing-U.S./Canada/
Mexico-1500-11698638) - 2019 - CRC - 5/14/19
Vehicle Care 335
3. Connect the vehicle to abattery charger.
4. Turn the ignition on for Key Access vehicles or to Service
Only for Keyless Access
vehicles. See Ignition Positions
(Key Access) 0220 or
Ignition Positions (Keyless
Access) 0222.
5. Turn off the air conditioning.
6. Set the parking brake.
7. At the same time, press the accelerator and the brake for
automatic transmission
vehicles for two seconds, then
release.
At the end of the cycle, check the
coolant level in the surge tank and
add coolant if it is low. Turn off the
vehicle, allow the Electronic Control
Module (ECM) to go to sleep, about
2 minutes, and repeat Steps 3-7.
Listen for pump activation and
movement of the control valves
while watching the level of the
coolant in the surge tank. If the tank
empties, turn the ignition off, carefully remove the surge tank cap,
refill to the indicated mark, and
repeat Steps 3-6. The fill and air
removal process will run for
approximately 10 minutes.
How to Add Coolant to the
Coolant Surge Tank for
Gasoline Engines Except L3B
If the vehicle has a diesel engine,
see
“Cooling System” in the
Duramax diesel supplement for the
proper coolant fill procedure.
{Warning
Spilling coolant on hot engine
parts can burn you. Coolant
contains ethylene glycol and it will
burn if the engine parts are hot
enough.
{Warning
Plain water, or other liquids such
as alcohol, can boil before the
proper coolant mixture will. With
plain water or the wrong mixture,
the engine could get too hot but
there would not be an overheat
warning. The engine could catch
fire and you or others could be
burned.
{Warning
Steam and scalding liquids from a
hot cooling system are under
pressure. Turning the pressure
cap, even a little, can cause them
to come out at high speed and
you could be burned. Never turn
the cap when the cooling system,
including the pressure cap, is hot.
Wait for the cooling system and
pressure cap to cool.
Page 338 of 477
GMC Sierra/Sierra Denali Owner Manual (GMNA-Localizing-U.S./Canada/
Mexico-1500-11698638) - 2019 - CRC - 5/14/19
Vehicle Care 337
The vehicle has several indicators
to warn of engine overheating.
There is a coolant temperature
gauge in the vehicle's instrument
cluster. SeeEngine Coolant
Temperature Gauge 0147.
In addition, there are ENGINE
OVERHEATED STOP ENGINE,
ENGINE OVERHEATED IDLE
ENGINE, and ENGINE POWER IS
REDUCED messages in the Driver
Information Center (DIC).
If the decision is made not to lift the
hood when this warning appears,
get service help right away. See
Roadside Assistance Program
0 442.
If the decision is made to lift the
hood, make sure the vehicle is
parked on a level surface.
2.7L L4, 4.3L V6, 5.3L V8, and 6.2L
V8 Engines
Check to see if the engine cooling
fans are running. If the engine is
overheating, the fans should be running. If they are not, do not
continue to run the engine. Have the
vehicle serviced.
If Steam is Coming from the
Engine Compartment
{Warning
Steam and scalding liquids from a
hot cooling system are under
pressure. Turning the pressure
cap, even a little, can cause them
to come out at high speed and
you could be burned. Never turn
the cap when the cooling system,
including the pressure cap, is hot.
Wait for the cooling system and
pressure cap to cool.
If No Steam is Coming from
the Engine Compartment
The ENGINE OVERHEATED STOP
ENGINE or the ENGINE
OVERHEATED IDLE ENGINE
message, along with a low coolant
condition, can indicate a serious
problem.The 2.7L engine will shut down
automatically if the ENGINE
OVERHEATED STOP ENGINE
message displays.
If there is an engine overheat
warning, but no steam is seen or
heard, the problem may not be too
serious. Sometimes the engine can
get a little too hot when the vehicle:
.
Climbs a long hill on a hot day.
. Stops after high-speed driving.
. Idles for long periods in traffic.
. Tows a trailer; see Trailer Towing
0 286.
If the ENGINE OVERHEATED
STOP ENGINE or the ENGINE
OVERHEATED IDLE ENGINE
message appears with no sign of
steam, try this for a minute or so: 1. Turn the air conditioning off.
2. Turn the heater on to the highest temperature and to the
highest fan speed. Open the
windows as necessary.
Page 341 of 477
GMC Sierra/Sierra Denali Owner Manual (GMNA-Localizing-U.S./Canada/
Mexico-1500-11698638) - 2019 - CRC - 5/14/19
340 Vehicle Care
Brakes
Disc brake pads have built-in wear
indicators that make a high-pitched
warning sound when the brake pads
are worn and new pads are needed.
The sound can come and go or be
heard all the time the vehicle is
moving, except when applying the
brake pedal firmly.
{Warning
The brake wear warning sound
means that soon the brakes will
not work well. That could lead to
a crash. When the brake wear
warning sound is heard, have the
vehicle serviced.
Caution
Continuing to drive with worn-out
brake pads could result in costly
brake repair.Some driving conditions or climates
can cause a brake squeal when the
brakes are first applied or lightly
applied. This does not mean
something is wrong with the brakes.
Properly torqued wheel nuts are
necessary to help prevent brake
pulsation. When tires are rotated,
inspect brake pads for wear and
evenly tighten wheel nuts in the
proper sequence to torque
specifications in
Capacities and
Specifications 0435.
Brake linings should always be
replaced as complete axle sets.
Brake Pedal Travel
See your dealer if the brake pedal
does not return to normal height,
or if there is a rapid increase in
pedal travel. This could be a sign
that brake service may be required.
Replacing Brake System Parts
Always replace brake system parts
with new, approved replacement
parts. If this is not done, the brakes
may not work properly. The braking
performance expected can change in many other ways if the wrong
replacement brake parts are
installed or parts are improperly
installed.
Brake Pad Life System
When to Change Brake Pads
This vehicle has a system that
estimates the remaining life of the
front and rear brake pads. Brake
pad life is displayed in the Driver
Information Center (DIC), along with
a percentage for each axle. The
system must be reset every time the
brake pads are changed.
When the system has determined
that the brake pads need to be
replaced, a message will display,
which may include mileage
remaining.
Brake pads should always be
replaced as complete axle sets.
How to Reset the Brake Pad
Life System
The system will automatically detect
when significantly worn brake pads
are replaced. When the ignition is
Page 370 of 477
GMC Sierra/Sierra Denali Owner Manual (GMNA-Localizing-U.S./Canada/
Mexico-1500-11698638) - 2019 - CRC - 5/14/19
Vehicle Care 369
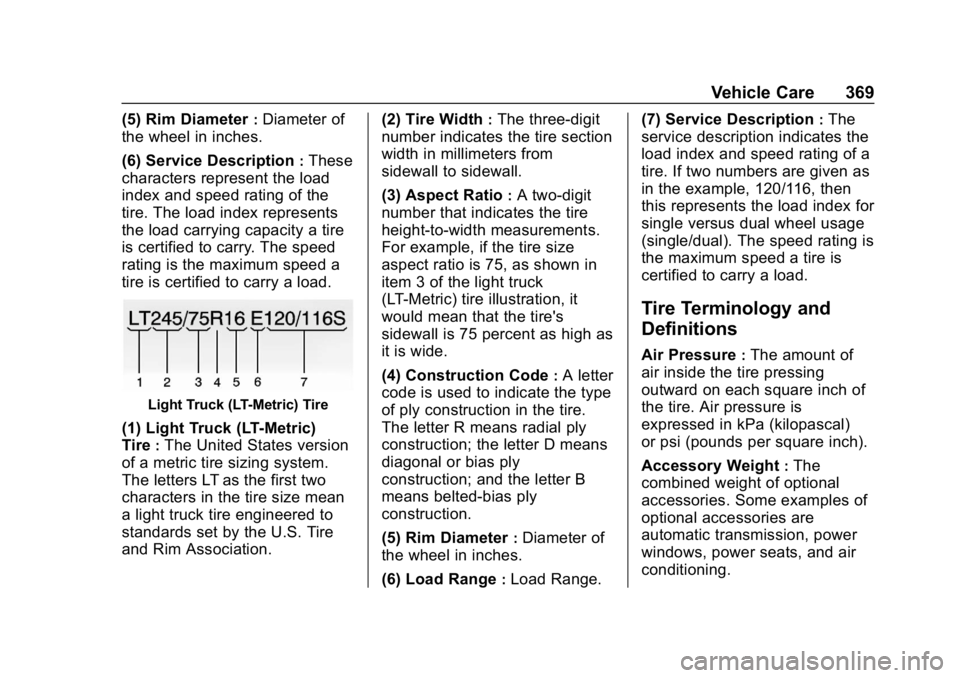
(5) Rim Diameter:Diameter of
the wheel in inches.
(6) Service Description
:These
characters represent the load
index and speed rating of the
tire. The load index represents
the load carrying capacity a tire
is certified to carry. The speed
rating is the maximum speed a
tire is certified to carry a load.
Light Truck (LT-Metric) Tire
(1) Light Truck (LT-Metric)
Tire
:The United States version
of a metric tire sizing system.
The letters LT as the first two
characters in the tire size mean
a light truck tire engineered to
standards set by the U.S. Tire
and Rim Association. (2) Tire Width
:The three-digit
number indicates the tire section
width in millimeters from
sidewall to sidewall.
(3) Aspect Ratio
:A two-digit
number that indicates the tire
height-to-width measurements.
For example, if the tire size
aspect ratio is 75, as shown in
item 3 of the light truck
(LT-Metric) tire illustration, it
would mean that the tire's
sidewall is 75 percent as high as
it is wide.
(4) Construction Code
:A letter
code is used to indicate the type
of ply construction in the tire.
The letter R means radial ply
construction; the letter D means
diagonal or bias ply
construction; and the letter B
means belted-bias ply
construction.
(5) Rim Diameter
:Diameter of
the wheel in inches.
(6) Load Range
:Load Range. (7) Service Description
:The
service description indicates the
load index and speed rating of a
tire. If two numbers are given as
in the example, 120/116, then
this represents the load index for
single versus dual wheel usage
(single/dual). The speed rating is
the maximum speed a tire is
certified to carry a load.
Tire Terminology and
Definitions
Air Pressure:The amount of
air inside the tire pressing
outward on each square inch of
the tire. Air pressure is
expressed in kPa (kilopascal)
or psi (pounds per square inch).
Accessory Weight
:The
combined weight of optional
accessories. Some examples of
optional accessories are
automatic transmission, power
windows, power seats, and air
conditioning.
Page 402 of 477
GMC Sierra/Sierra Denali Owner Manual (GMNA-Localizing-U.S./Canada/
Mexico-1500-11698638) - 2019 - CRC - 5/14/19
Vehicle Care 401
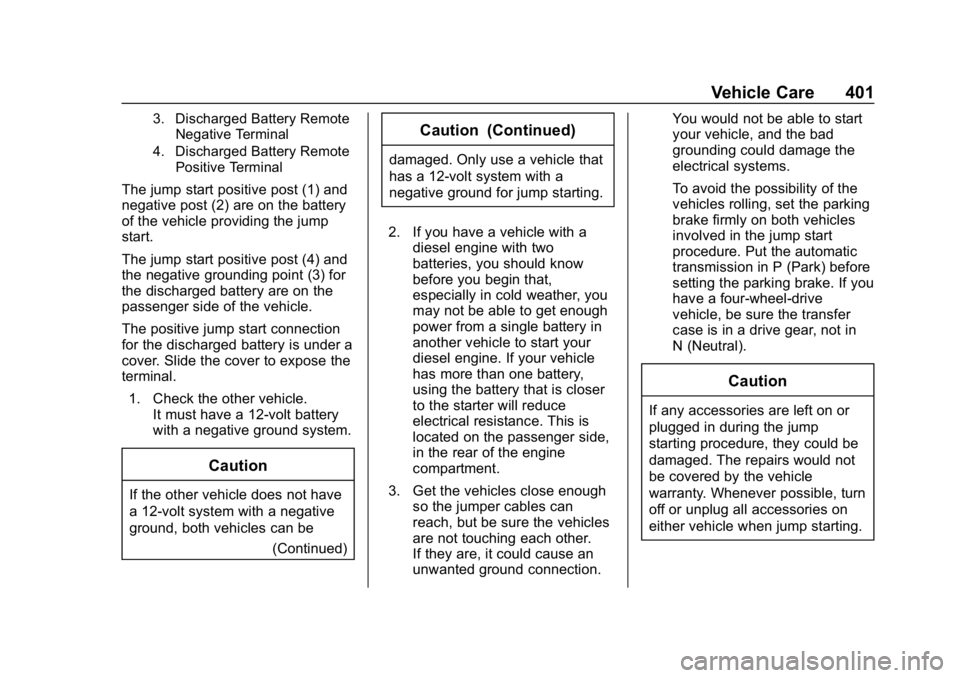
3. Discharged Battery RemoteNegative Terminal
4. Discharged Battery Remote Positive Terminal
The jump start positive post (1) and
negative post (2) are on the battery
of the vehicle providing the jump
start.
The jump start positive post (4) and
the negative grounding point (3) for
the discharged battery are on the
passenger side of the vehicle.
The positive jump start connection
for the discharged battery is under a
cover. Slide the cover to expose the
terminal.
1. Check the other vehicle. It must have a 12-volt battery
with a negative ground system.
Caution
If the other vehicle does not have
a 12-volt system with a negative
ground, both vehicles can be
(Continued)
Caution (Continued)
damaged. Only use a vehicle that
has a 12-volt system with a
negative ground for jump starting.
2. If you have a vehicle with a diesel engine with two
batteries, you should know
before you begin that,
especially in cold weather, you
may not be able to get enough
power from a single battery in
another vehicle to start your
diesel engine. If your vehicle
has more than one battery,
using the battery that is closer
to the starter will reduce
electrical resistance. This is
located on the passenger side,
in the rear of the engine
compartment.
3. Get the vehicles close enough so the jumper cables can
reach, but be sure the vehicles
are not touching each other.
If they are, it could cause an
unwanted ground connection. You would not be able to start
your vehicle, and the bad
grounding could damage the
electrical systems.
To avoid the possibility of the
vehicles rolling, set the parking
brake firmly on both vehicles
involved in the jump start
procedure. Put the automatic
transmission in P (Park) before
setting the parking brake. If you
have a four-wheel-drive
vehicle, be sure the transfer
case is in a drive gear, not in
N (Neutral).
Caution
If any accessories are left on or
plugged in during the jump
starting procedure, they could be
damaged. The repairs would not
be covered by the vehicle
warranty. Whenever possible, turn
off or unplug all accessories on
either vehicle when jump starting.
Page 410 of 477
GMC Sierra/Sierra Denali Owner Manual (GMNA-Localizing-U.S./Canada/
Mexico-1500-11698638) - 2019 - CRC - 5/14/19
Vehicle Care 409
Caution
Do not power wash any
component under the hood that
has this
esymbol.
This could cause damage that
would not be covered by the
vehicle warranty.
If using an automatic car wash,
follow with the car wash
instructions. The windshield wiper
and rear window wiper, if equipped,
must be turned off. Remove any
accessories that may be damaged
or interfere with the car wash
equipment.
See Power Assist Steps 054 for
cleaning information.
Rinse the vehicle well, before
washing and after, to remove all
cleaning agents completely. If they
are allowed to dry on the surface,
they could stain. Dry the finish with a soft, clean
chamois or an all-cotton towel to
avoid surface scratches and water
spotting.Finish Care
Application of aftermarket clearcoat
sealant/wax materials is not
recommended. If painted surfaces
are damaged, see your dealer to
have the damage assessed and
repaired. Foreign materials such as
calcium chloride and other salts, ice
melting agents, road oil and tar, tree
sap, bird droppings, chemicals from
industrial chimneys, etc., can
damage the vehicle's finish if they
remain on painted surfaces. Wash
the vehicle as soon as possible.
If necessary, use non-abrasive
cleaners that are marked safe for
painted surfaces to remove foreign
matter.
Occasional hand waxing or mild
polishing should be done to remove
residue from the paint finish. See
your dealer for approved cleaning
products.Do not apply waxes or polishes to
uncoated plastic, vinyl, rubber,
decals, simulated wood, or flat paint
as damage can occur.Caution
Machine compounding or
aggressive polishing on a
basecoat/clearcoat paint finish
may damage it. Use only
non-abrasive waxes and polishes
that are made for a basecoat/
clearcoat paint finish on the
vehicle.
To keep the paint finish looking new,
keep the vehicle garaged or
covered whenever possible.
Page 413 of 477
GMC Sierra/Sierra Denali Owner Manual (GMNA-Localizing-U.S./Canada/
Mexico-1500-11698638) - 2019 - CRC - 5/14/19
412 Vehicle Care
rubbing with a clean cloth. See
Recommended Fluids and
Lubricants0430.
Tires
Use a stiff brush with tire cleaner to
clean the tires.
Caution
Using petroleum-based tire
dressing products on the vehicle
may damage the paint finish and/
or tires. When applying a tire
dressing, always wipe off any
overspray from all painted
surfaces on the vehicle.
Wheels and Wheel Trim
Use a soft, clean cloth with mild
soap and water to clean the wheels.
After rinsing thoroughly with clean
water, dry with a soft, clean towel.
A wax may then be applied.
Caution
Chrome wheels and chrome
wheel trim may be damaged if the
vehicle is not washed after driving
on roads that have been sprayed
with magnesium chloride or
calcium chloride. These are used
on roads for conditions such as
dust and ice. Always wash the
chrome with soap and water after
exposure.
Caution
To avoid surface damage on
wheels and wheel trim, do not
use strong soaps, chemicals,
abrasive polishes, cleaners,
or brushes. Use only GM
approved cleaners. Do not drive
the vehicle through an automatic
car wash that uses silicon carbide
tire/wheel cleaning brushes.
(Continued)
Caution (Continued)
Damage could occur and the
repairs would not be covered by
the vehicle warranty.
Brake System
Visually inspect brake lines and
hoses for proper hook-up, binding,
leaks, cracks, chafing, etc. Inspect
disc brake pads for wear and rotors
for surface condition. Inspect drum
brake linings/shoes for wear or
cracks. Inspect all other brake parts.
Steering, Suspension, and
Chassis Components
Visually inspect steering,
suspension, and chassis
components for damaged, loose,
or missing parts or signs of wear at
least once a year.
Inspect power steering for proper
attachment, connections, binding,
cracks, chafing, etc.
Visually check constant velocity joint
boots and axle seals for leaks.
Page 423 of 477

GMC Sierra/Sierra Denali Owner Manual (GMNA-Localizing-U.S./Canada/
Mexico-1500-11698638) - 2019 - CRC - 5/13/19
422 Service and Maintenance
.Check ignition transmission lock.
See Ignition Transmission Lock
Check 0348.
. Check parking brake and
automatic transmission park
mechanism. See Park Brake and
P (Park) Mechanism Check
0 348.
. Check accelerator pedal for
damage, high effort, or binding.
Replace if needed.
. Visually inspect gas strut for
signs of wear, cracks, or other
damage. Check the hold open
ability of the strut. If the hold
open is low, service the gas
strut. See Gas Strut(s) 0350.
. Inspect sunroof track and seal,
if equipped. See Sunroof066.
. Verify spare tire key lock
operation and lubricate as
needed. See Tire Changing
0 390. .
Verify the spare tire is tightly
stowed under the vehicle.
Tighten as needed. See "Storing
a Flat or Spare Tire and Tools" in
Tire Changing 0390.
. Visually inspect the spare tire to
ensure that it is tightly stowed
under the vehicle. Push, pull,
and try to turn the tire. If the
spare tire moves, tighten as
necessary. SeeTire Changing
0390.
Page 426 of 477
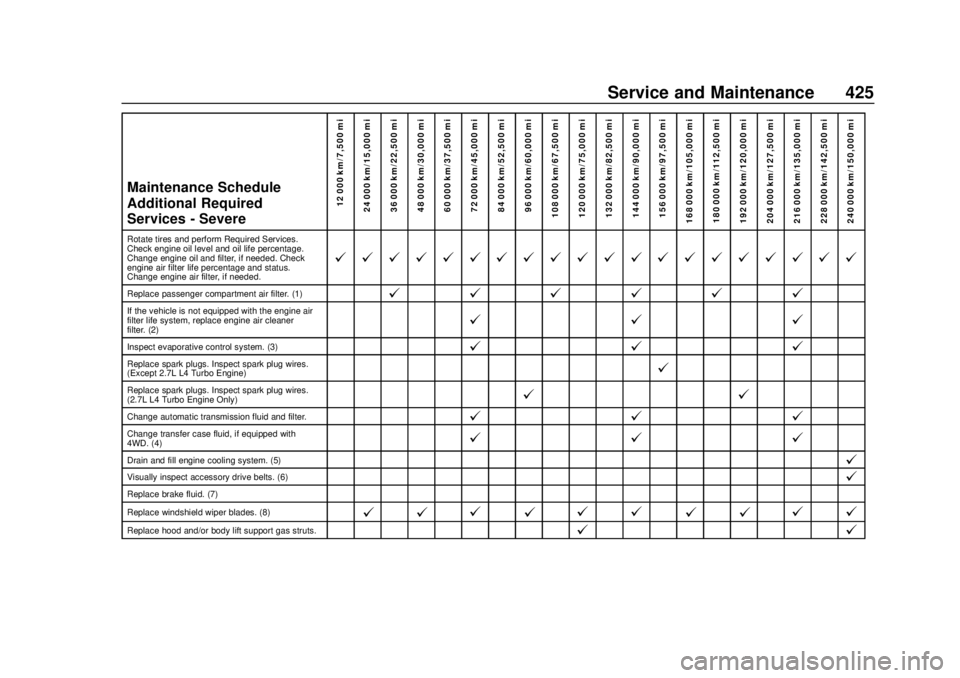
GMC Sierra/Sierra Denali Owner Manual (GMNA-Localizing-U.S./Canada/
Mexico-1500-11698638) - 2019 - CRC - 5/13/19
Service and Maintenance 425
Maintenance Schedule
Additional Required
Services - Severe12 000 km/7,500 mi
24 000 km/15,000 mi
36 000 km/22,500 mi
48 000 km/30,000 mi
60 000 km/37,500 mi
72 000 km/45,000 mi
84 000 km/52,500 mi
96 000 km/60,000 mi
108 000 km/67,500 mi
120 000 km/75,000 mi
132 000 km/82,500 mi
144 000 km/90,000 mi
156 000 km/97,500 mi
168 000 km/105,000 mi 180 000 km/112,500 mi
192 000 km/120,000 mi
204 000 km/127,500 mi
216 000 km/135,000 mi
228 000 km/142,500 mi
240 000 km/150,000 mi
Rotate tires and perform Required Services.
Check engine oil level and oil life percentage.
Change engine oil and filter, if needed. Check
engine air filter life percentage and status.
Change engine air filter, if needed.
@ @ @ @ @ @ @ @ @ @ @ @ @ @ @ @ @ @ @ @
Replace passenger compartment air filter. (1)@ @@@@@
If the vehicle is not equipped with the engine air
filter life system, replace engine air cleaner
filter. (2)@ @@
Inspect evaporative control system. (3)@@@
Replace spark plugs. Inspect spark plug wires.
(Except 2.7L L4 Turbo Engine)@
Replace spark plugs. Inspect spark plug wires.
(2.7L L4 Turbo Engine Only)@ @
Change automatic transmission fluid and filter.@@@
Change transfer case fluid, if equipped with
4WD. (4)@@@
Drain and fill engine cooling system. (5)@
Visually inspect accessory drive belts. (6)@
Replace brake fluid. (7)
Replace windshield wiper blades. (8)
@ @@
@@ @
@ @@ @
Replace hood and/or body lift support gas struts.@
@