display GMC SIERRA 2020 User Guide
[x] Cancel search | Manufacturer: GMC, Model Year: 2020, Model line: SIERRA, Model: GMC SIERRA 2020Pages: 502, PDF Size: 8.04 MB
Page 49 of 502
GMC Sierra/Sierra Denali Owner Manual (GMNA-Localizing-U.S./Canada/
Mexico-13337776) - 2020 - CRC - 4/4/19
48 Keys, Doors, and Windows
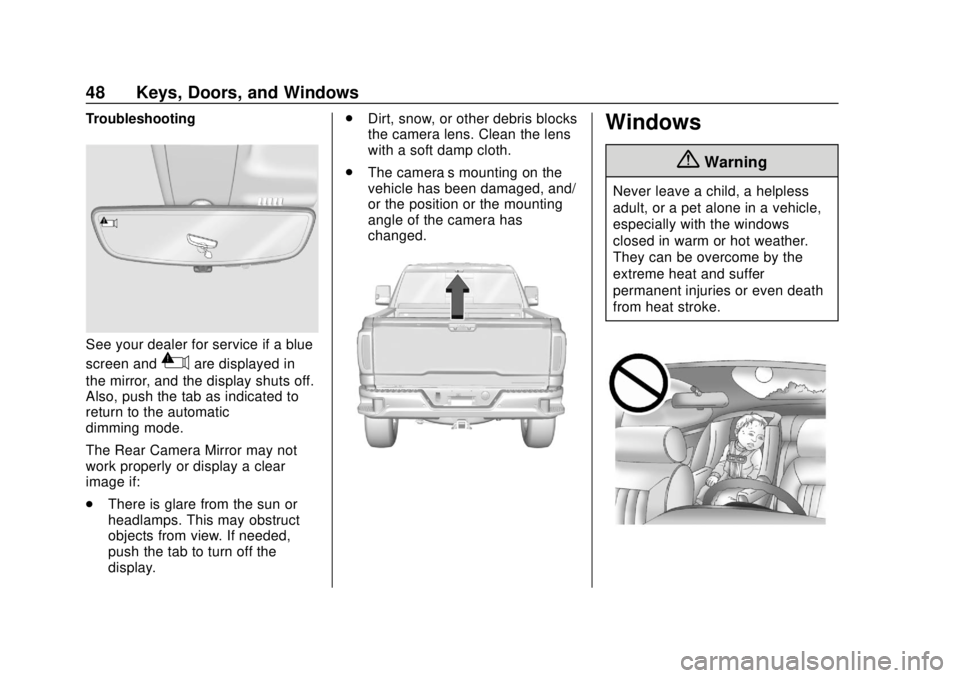
Troubleshooting
See your dealer for service if a blue
screen and
3are displayed in
the mirror, and the display shuts off.
Also, push the tab as indicated to
return to the automatic
dimming mode.
The Rear Camera Mirror may not
work properly or display a clear
image if:
. There is glare from the sun or
headlamps. This may obstruct
objects from view. If needed,
push the tab to turn off the
display. .
Dirt, snow, or other debris blocks
the camera lens. Clean the lens
with a soft damp cloth.
. The camera’s mounting on the
vehicle has been damaged, and/
or the position or the mounting
angle of the camera has
changed.
Windows
{Warning
Never leave a child, a helpless
adult, or a pet alone in a vehicle,
especially with the windows
closed in warm or hot weather.
They can be overcome by the
extreme heat and suffer
permanent injuries or even death
from heat stroke.
Page 60 of 502
GMC Sierra/Sierra Denali Owner Manual (GMNA-Localizing-U.S./Canada/
Mexico-13337776) - 2020 - CRC - 4/4/19
Seats and Restraints 59
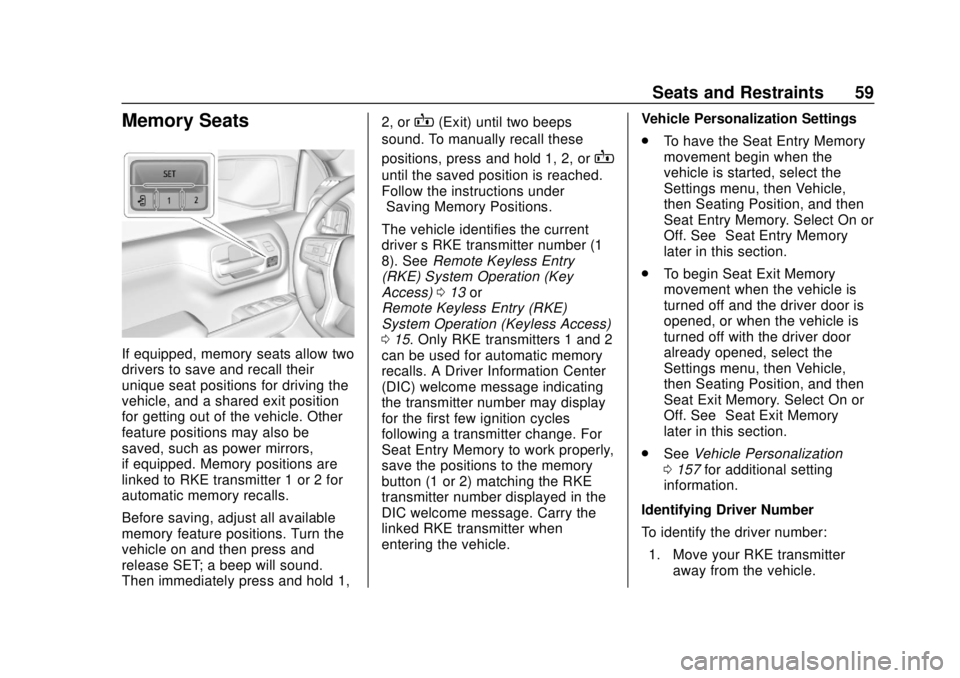
Memory Seats
If equipped, memory seats allow two
drivers to save and recall their
unique seat positions for driving the
vehicle, and a shared exit position
for getting out of the vehicle. Other
feature positions may also be
saved, such as power mirrors,
if equipped. Memory positions are
linked to RKE transmitter 1 or 2 for
automatic memory recalls.
Before saving, adjust all available
memory feature positions. Turn the
vehicle on and then press and
release SET; a beep will sound.
Then immediately press and hold 1,2, or
B(Exit) until two beeps
sound. To manually recall these
positions, press and hold 1, 2, or
B
until the saved position is reached.
Follow the instructions under
“Saving Memory Positions.”
The vehicle identifies the current
driver ’s RKE transmitter number (1–
8). See Remote Keyless Entry
(RKE) System Operation (Key
Access) 013 or
Remote Keyless Entry (RKE)
System Operation (Keyless Access)
0 15. Only RKE transmitters 1 and 2
can be used for automatic memory
recalls. A Driver Information Center
(DIC) welcome message indicating
the transmitter number may display
for the first few ignition cycles
following a transmitter change. For
Seat Entry Memory to work properly,
save the positions to the memory
button (1 or 2) matching the RKE
transmitter number displayed in the
DIC welcome message. Carry the
linked RKE transmitter when
entering the vehicle. Vehicle Personalization Settings
.
To have the Seat Entry Memory
movement begin when the
vehicle is started, select the
Settings menu, then Vehicle,
then Seating Position, and then
Seat Entry Memory. Select On or
Off. See “Seat Entry Memory”
later in this section.
. To begin Seat Exit Memory
movement when the vehicle is
turned off and the driver door is
opened, or when the vehicle is
turned off with the driver door
already opened, select the
Settings menu, then Vehicle,
then Seating Position, and then
Seat Exit Memory. Select On or
Off. See “Seat Exit Memory”
later in this section.
. See Vehicle Personalization
0 157 for additional setting
information.
Identifying Driver Number
To identify the driver number: 1. Move your RKE transmitter away from the vehicle.
Page 61 of 502
GMC Sierra/Sierra Denali Owner Manual (GMNA-Localizing-U.S./Canada/
Mexico-13337776) - 2020 - CRC - 4/4/19
60 Seats and Restraints
2. Start the vehicle with anotherkey or RKE transmitter. The
DIC should display the driver
number for the other RKE
transmitter. Turn the vehicle off
and remove the key or RKE
transmitter from the vehicle.
3. Start the vehicle with the initial key or RKE transmitter. The
DIC should display the driver
number of your RKE
transmitter.
Saving Memory Positions
Read these instructions completely
before saving memory positions.
To save preferred driving positions
1 and 2: 1. Turn the vehicle on or to ACC/ ACCESSORY.
A DIC welcome message may
indicate driver number 1 or 2.
2. Adjust all available memory features to the desired driving
position.
3. Press and release SET; a beep will sound. 4. Immediately press and hold the
1 or 2 memory button matching
the above DIC welcome
message until two beeps
sound.
If too much time passes
between releasing SET and
pressing 1, the memory
position will not be saved and
two beeps will not sound.
Repeat Steps 3 and 4.
1 or 2 corresponds to the driver
number. See “Identifying Driver
Number” previously in this
section.
5. Repeat Steps 1–4 for a second driver using 1 or 2. RKE
transmitters 3–8 will not save
memory positions.
To save the position for
Band
Seat Exit Memory features, repeat
Steps 1–4 using
B. This saves the
position for getting out of the
vehicle.
Save preferred memory feature
positions to both 1 and 2 if you are
the only driver. Manually Recalling Memory
Positions
Press and hold 1, 2, or
Bto recall
the previously saved memory
positions if you are driver 1 or 2
identified in the DIC welcome
message.
To stop Manual Memory recall
movement, release 1, 2, or
Bor
press any of the following controls:
. Power seat
. Memory SET
. Power mirror, with the driver or
passenger side mirror selected
Seat Entry Memory
The vehicle identifies the number of
the current driver ’s RKE transmitter
(1–8). See Remote Keyless Entry
(RKE) System Operation (Key
Access) 013 or
Remote Keyless Entry (RKE)
System Operation (Keyless Access)
0 15. If the RKE transmitter is 1 or
2, and Seat Entry Memory is
enabled in vehicle personalization,
the positions saved to the same
Page 64 of 502

GMC Sierra/Sierra Denali Owner Manual (GMNA-Localizing-U.S./Canada/
Mexico-13337776) - 2020 - CRC - 4/4/19
Seats and Restraints 63
The temperature performance of an
unoccupied seat may be reduced.
This is normal.
The heated or ventilated seats will
not turn on during a remote start
unless they are enabled in vehicle
personalization. SeeRemote
Vehicle Start 024 and
Vehicle Personalization 0157.Rear Seats
Rear Seat Reminder
If equipped, the message REAR
SEAT REMINDER LOOK IN REAR
SEAT displays under certain
conditions indicating there may be
an item or passenger in the rear
seat. Check before exiting the
vehicle.
This feature will activate when a
second row door is opened while
the vehicle is on or up to 10 minutes
before the vehicle is turned on.
There will be an alert when the
vehicle is turned off. The alert does
not directly detect objects in the rear
seat; instead, under certain
conditions, it detects when a rear
door is opened and closed,
indicating that there may be
something in the rear seat.
The feature is active only once each
time the vehicle is turned on and off,
and will require reactivation by
opening and closing the second row
doors. There may be an alert even
when there is nothing in the rear
seat; for example, if a child entered the vehicle through the rear door
and left the vehicle without the
vehicle being shut off.
The feature can be turned on or off.
See
Vehicle Personalization 0157.
Folding the Rear Seat Cushion
Either side of the rear seat cushion
can be folded up for added cargo
space.
Caution
Folding a rear seat with the seat
belts still fastened may cause
damage to the seat or the seat
belts. Always unbuckle the seat
belts and return them to their
normal stowed position before
folding a rear seat.
Make sure that nothing is on the
seat cushion.
Page 65 of 502

GMC Sierra/Sierra Denali Owner Manual (GMNA-Localizing-U.S./Canada/
Mexico-13337776) - 2020 - CRC - 4/4/19
64 Seats and Restraints
To fold the seat, slowly pull the seat
cushion up.
To return the seat to the normal
seating position, slowly pull the seat
cushion down.
{Warning
A seat belt that is improperly
routed, not properly attached,
or twisted will not provide the
protection needed in a crash. The
person wearing the belt could be
seriously injured. After raising the
rear seatback, always check to be(Continued)
Warning (Continued)
sure that the seat belts are
properly routed and attached, and
are not twisted.
Heated Rear Seats
{Warning
If you cannot feel temperature
change or pain to the skin, the
seat heater may cause burns.
See the Warning under Heated
and Ventilated Front Seats 061.If available, the buttons are on the
rear of the center console. To
operate, the engine must be
running.
Press
MorLto heat the left or
right outboard seat cushion. An
indicator on the climate control
display appears when this feature
is on.
This feature turns on at the highest
setting. With each press of the
button, the heated seat changes to
the next lower setting, and then the
off setting. Three lights indicate the
highest setting, and one light
indicates the lowest. If the heated
Page 119 of 502
GMC Sierra/Sierra Denali Owner Manual (GMNA-Localizing-U.S./Canada/
Mexico-13337776) - 2020 - CRC - 4/4/19
118 Instruments and Controls
Instruments and
Controls
Controls
Steering Wheel Adjustment . . . 119
Steering Wheel Controls . . . . . . 120
Heated Steering Wheel . . . . . . . 120
Horn . . . . . . . . . . . . . . . . . . . . . . . . . . 120
Windshield Wiper/Washer . . . . 120
Compass . . . . . . . . . . . . . . . . . . . . . 121
Clock . . . . . . . . . . . . . . . . . . . . . . . . . 121
Power Outlets . . . . . . . . . . . . . . . . 122
Wireless Charging . . . . . . . . . . . . 124
Warning Lights, Gauges, and
Indicators
Warning Lights, Gauges, andIndicators . . . . . . . . . . . . . . . . . . . 126
Instrument Cluster . . . . . . . . . . . . 127
Speedometer . . . . . . . . . . . . . . . . . 131
Odometer . . . . . . . . . . . . . . . . . . . . . 132
Trip Odometer . . . . . . . . . . . . . . . . 132
Tachometer . . . . . . . . . . . . . . . . . . . 132
Fuel Gauge . . . . . . . . . . . . . . . . . . . 132
Engine Oil Pressure Gauge . . . . . . . . . . . . . . . . . . . . . . 133
Engine Coolant Temperature Gauge . . . . . . . . . . . . . . . . . . . . . . 134 Voltmeter Gauge . . . . . . . . . . . . . 135
Seat Belt Reminders . . . . . . . . . 136
Airbag Readiness Light . . . . . . . 136
Passenger Airbag Status
Indicator . . . . . . . . . . . . . . . . . . . . 137
Charging System Light . . . . . . . 138
Malfunction Indicator Lamp (Check Engine Light) . . . . . . . . 138
Brake System Warning Light . . . . . . . . . . . . . . . . . . . . . . . . 140
Electric Parking Brake Light . . . . . . . . . . . . . . . . . . . . . . . . 141
Service Electric Parking Brake Light . . . . . . . . . . . . . . . . . . . . . . . . 141
Antilock Brake System (ABS) Warning Light . . . . . . . . . . . . . . . 141
Four-Wheel-Drive Light . . . . . . . 142
Tow/Haul Mode Light . . . . . . . . . 142
Hill Descent Control Light . . . . 142
Lane Departure Warning (LDW) Light (2500/3500
Series) . . . . . . . . . . . . . . . . . . . . . . 142
Lane Keep Assist (LKA) Light (1500 Series) . . . . . . . . . . . . . . . 143
Vehicle Ahead Indicator . . . . . . 143
Pedestrian Ahead Indicator . . . 143
Traction Off Light . . . . . . . . . . . . . 143
Traction Control System (TCS)/ Electronic Stability Control
Light . . . . . . . . . . . . . . . . . . . . . . . . 144 Electronic Stability Control
(ESC) Off Light . . . . . . . . . . . . . . 144
Engine Coolant Temperature Warning Light . . . . . . . . . . . . . . . 145
Driver Mode Control Light . . . . 145
Tire Pressure Light . . . . . . . . . . . 145
Engine Oil Pressure Light
(Uplevel Cluster) . . . . . . . . . . . . 146
Low Fuel Warning Light . . . . . . 146
Security Light . . . . . . . . . . . . . . . . . 147
High-Beam On Light . . . . . . . . . . 147
Front Fog Lamp Light . . . . . . . . . 147
Lamps On Reminder . . . . . . . . . 147
Cruise Control Light . . . . . . . . . . 147
Door Ajar Light . . . . . . . . . . . . . . . 148
Information Displays
Driver Information Center (DIC) (Base Level) . . . . . . . . . . . . . . . . 148
Driver Information Center (DIC) (Midlevel and Uplevel) . . . . . . 149
Head-Up Display (HUD) . . . . . . 152
Vehicle Messages
Vehicle Messages . . . . . . . . . . . . 156
Engine Power Messages . . . . . 156
Vehicle Speed Messages . . . . . 156
Vehicle Personalization
Vehicle Personalization . . . . . . . 157
Page 121 of 502
GMC Sierra/Sierra Denali Owner Manual (GMNA-Localizing-U.S./Canada/
Mexico-13337776) - 2020 - CRC - 4/4/19
120 Instruments and Controls
Steering Wheel Controls
The infotainment system can be
operated by using the steering
wheel controls. See“Steering Wheel
Controls” in the infotainment
manual.
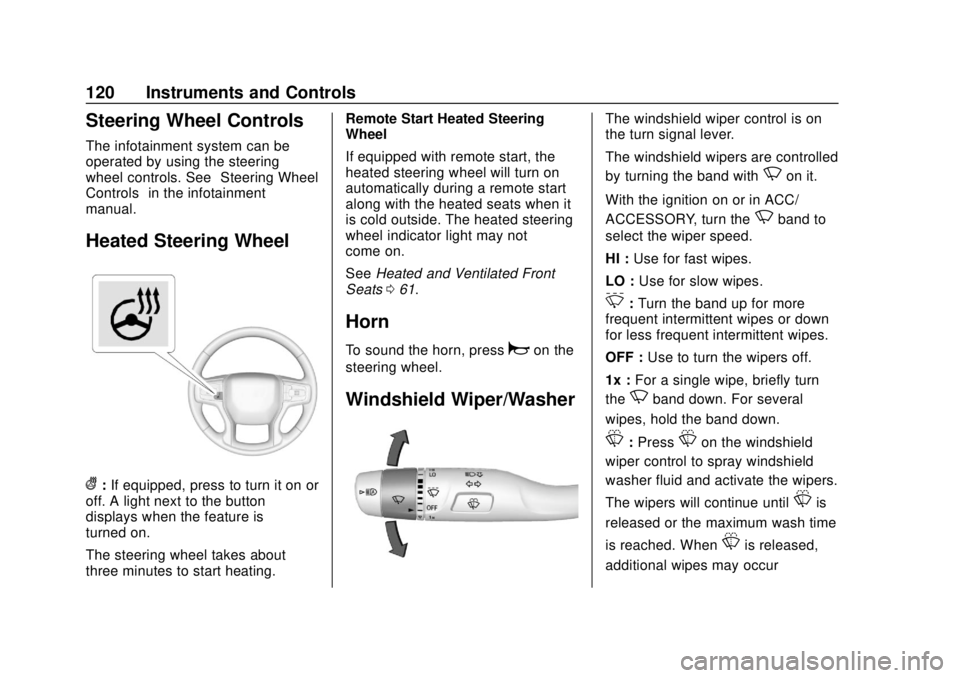
Heated Steering Wheel
(: If equipped, press to turn it on or
off. A light next to the button
displays when the feature is
turned on.
The steering wheel takes about
three minutes to start heating. Remote Start Heated Steering
Wheel
If equipped with remote start, the
heated steering wheel will turn on
automatically during a remote start
along with the heated seats when it
is cold outside. The heated steering
wheel indicator light may not
come on.
See
Heated and Ventilated Front
Seats 061.
Horn
To sound the horn, pressaon the
steering wheel.
Windshield Wiper/Washer
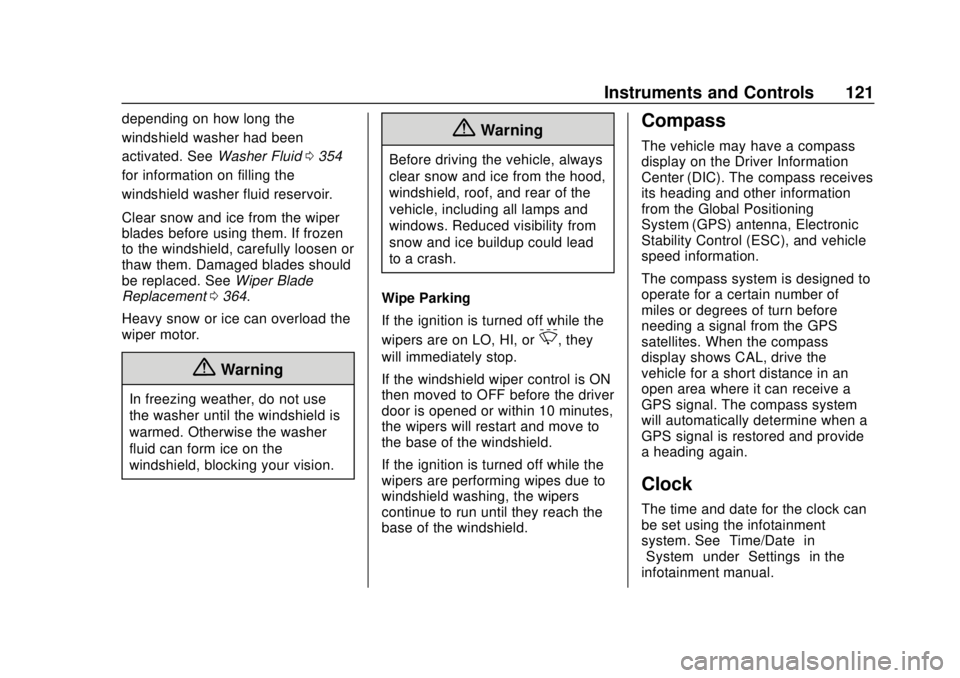
The windshield wiper control is on
the turn signal lever.
The windshield wipers are controlled
by turning the band with
Non it.
With the ignition on or in ACC/
ACCESSORY, turn the
Nband to
select the wiper speed.
HI : Use for fast wipes.
LO : Use for slow wipes.
3:Turn the band up for more
frequent intermittent wipes or down
for less frequent intermittent wipes.
OFF : Use to turn the wipers off.
1x : For a single wipe, briefly turn
the
Nband down. For several
wipes, hold the band down.
L: PressLon the windshield
wiper control to spray windshield
washer fluid and activate the wipers.
The wipers will continue until
Lis
released or the maximum wash time
is reached. When
Lis released,
additional wipes may occur
Page 122 of 502
GMC Sierra/Sierra Denali Owner Manual (GMNA-Localizing-U.S./Canada/
Mexico-13337776) - 2020 - CRC - 4/4/19
Instruments and Controls 121
depending on how long the
windshield washer had been
activated. SeeWasher Fluid0354
for information on filling the
windshield washer fluid reservoir.
Clear snow and ice from the wiper
blades before using them. If frozen
to the windshield, carefully loosen or
thaw them. Damaged blades should
be replaced. See Wiper Blade
Replacement 0364.
Heavy snow or ice can overload the
wiper motor.
{Warning
In freezing weather, do not use
the washer until the windshield is
warmed. Otherwise the washer
fluid can form ice on the
windshield, blocking your vision.
{Warning
Before driving the vehicle, always
clear snow and ice from the hood,
windshield, roof, and rear of the
vehicle, including all lamps and
windows. Reduced visibility from
snow and ice buildup could lead
to a crash.
Wipe Parking
If the ignition is turned off while the
wipers are on LO, HI, or
3, they
will immediately stop.
If the windshield wiper control is ON
then moved to OFF before the driver
door is opened or within 10 minutes,
the wipers will restart and move to
the base of the windshield.
If the ignition is turned off while the
wipers are performing wipes due to
windshield washing, the wipers
continue to run until they reach the
base of the windshield.
Compass
The vehicle may have a compass
display on the Driver Information
Center (DIC). The compass receives
its heading and other information
from the Global Positioning
System (GPS) antenna, Electronic
Stability Control (ESC), and vehicle
speed information.
The compass system is designed to
operate for a certain number of
miles or degrees of turn before
needing a signal from the GPS
satellites. When the compass
display shows CAL, drive the
vehicle for a short distance in an
open area where it can receive a
GPS signal. The compass system
will automatically determine when a
GPS signal is restored and provide
a heading again.
Clock
The time and date for the clock can
be set using the infotainment
system. See “Time/Date”in
“System” under“Settings” in the
infotainment manual.
Page 126 of 502

GMC Sierra/Sierra Denali Owner Manual (GMNA-Localizing-U.S./Canada/
Mexico-13337776) - 2020 - CRC - 4/4/19
Instruments and Controls 125
1. Remove all objects from thecharging pad. The system may
not charge if there are any
objects between the
smartphone and charging pad.
2. Place the smartphone face up on the
@symbol on the
charging pad.
To maximize the charge rate,
ensure the smartphone is fully
seated and centered in the
holder with nothing under it.
A thick smartphone case may
prevent the wireless charger
from working, or may reduce
the charging performance. See
your dealer for additional
information.
3. A green
}will appear on the
Von the infotainment display.
This indicates that the
smartphone is properly
positioned and charging. If a
smartphone is placed on the
charging pad and
}does not
display, remove the
smartphone from the pad, turn
it 180 degrees, and wait three seconds before placing/
aligning the smartphone on the
pad again.
4. If
}turns yellow, ensure that
the charging pad is clear of any
objects and that the
smartphone is capable of
wireless charging before
re-positioning it. If
}does not
illuminate, the smartphone may
need to re-positioned.
The smartphone may become
warm during charging. This is
normal. In warmer
temperatures, the speed of
charging may be reduced.
Software Acknowledgements
Certain Wireless Charging Module
product from LG Electronics, Inc.
("LGE") contains the open source
software detailed below. Refer to
the indicated open source licenses
(as are included following this
notice) for the terms and conditions
of their use. OSS Notice Information
To obtain the source code that is
contained in this product, please
visit http://opensource.lge.com. In
addition to the source code, all
referred license terms, warranty
disclaimers and copyright notices
are available for download. LG
Electronics will also provide open
source code to you on CD-ROM for
a charge covering the cost of
performing such distribution (such
as the cost of media, shipping, and
handling) upon email request to
[email protected]. This offer is
valid for three (3) years from the
date on which you purchased the
product.
Freescale-WCT library
Copyright (c) 2012-2014 Freescale
Semiconductor, Inc.. All rights
reserved.
1. Redistributions of source code must retain the above copyright
notice, this list of conditions
and the following disclaimer.
Page 131 of 502

GMC Sierra/Sierra Denali Owner Manual (GMNA-Localizing-U.S./Canada/
Mexico-13337776) - 2020 - CRC - 4/4/19
130 Instruments and Controls
Cluster Menu (Midlevel and
Uplevel)
There is an interactive display area
in the center of the instrument
cluster.
Use the right steering wheel control
to open and scroll through the
different items and displays.
Press
SorTto access the cluster
applications. Use the thumbwheel to
scroll through the list of available
features. Press the thumbwheel to
select. Not all applications will be
available on all vehicles. .
Home
. Info App. This is where the
selected Driver Information
Center (DIC) displays can be
viewed. See “Driver Information
Center (DIC) (Uplevel)” in the
Index.
. Audio
. Navigation
. Phone
. Options
Home
Information displayed here can be
customized from the Options menu.
Speedometer : Displays how fast
the vehicle is moving in either
kilometers per hour (km/h) or miles
per hour (mph).
Speed Sign : Shows sign
information, which comes from a
roadway database in the onboard
navigation, if equipped.
Time : Displays the current time. Fuel Range :
Displays the
approximate distance the vehicle
can be driven without refueling. The
fuel range estimate is based on an
average of the vehicle’s fuel
economy over recent driving history
and the amount of fuel remaining in
the fuel tank. Fuel range cannot be
reset.
Audio
In the Audio menu, use the
thumbwheel to scroll through
options, browse for music, select
from favorites, or change the audio
source. In the main view, scroll to
change the station or go to the next
or previous track.
Navigation
In the Navigation menu, if there is
no active route, a compass will be
displayed. If there is an active route,
press the thumbwheel to cancel or
resume route guidance, mute or
unmute voice guidance, or access
Recents or Favorites.