display GMC SIERRA 2020 Owner's Manual
[x] Cancel search | Manufacturer: GMC, Model Year: 2020, Model line: SIERRA, Model: GMC SIERRA 2020Pages: 502, PDF Size: 8.04 MB
Page 7 of 502
GMC Sierra/Sierra Denali Owner Manual (GMNA-Localizing-U.S./Canada/
Mexico-13337776) - 2020 - CRC - 4/10/19
6 Introduction
1. Tow/Haul Mode (On SomeModels). See Driver Mode
Control 0238
Automatic Transfer Case
Control (If Equipped).
See Four-Wheel Drive 0227
Driver Mode Control 0238 (If
Equipped).
2. Air Vents 0182.
3. Head-Up Display (HUD) 0152
(If Equipped).
4. Turn Signal Lever. See Turn
and Lane-Change Signals
0 170.
Windshield Wiper/Washer
0 120.
5. Instrument Cluster 0127.
6. Shift Lever. See Automatic
Transmission 0221.
Range Selection Mode. See
Manual Mode 0224.
7. Light Sensor. See Automatic
Headlamp System 0168.
8. Infotainment 0176.
9. Climate Control Systems 0177
(If Equipped). Dual Automatic Climate Control
System
0179 (If Equipped).
10. Heated and Ventilated Front
Seats 061 (If Equipped).
11.
XPark Assist Switch (If
Equipped). See Assistance
Systems for Parking or Backing
0 257.
gTraction Control/Electronic
Stability Control 0235.
|Hazard Warning Flashers
0 169.
ALane Keep Assist (LKA)
(1500 Series) 0278 (If
Equipped).
@Lane Departure Warning
(LDW) (2500/3500 Series)
0 276 (If Equipped).
5Hill Descent Control Switch
(If Equipped). See Hill Descent
Control (HDC) 0237.
jPower Assist Steps 036 (If
Equipped).
5Power Release Tailgate
(If Equipped). See Tailgate
0 28.
DC/AC Switch. See Power
Outlets 0122.
hAuto Stop Disable Switch
(If Equipped). See Stop/Start
System 0213.
LExpress Window Down
Button (If Equipped). See
Power Windows 049.
Tow/Haul Mode 0226 (On
Some Models).
12. Power Outlet (Alternating Current) (If Equipped). See
Power Outlets 0122.
13. Power Outlets 0122.
14. USB Port. See the infotainment manual.
15. Wireless Charging 0124 (If
Equipped).
Page 15 of 502
GMC Sierra/Sierra Denali Owner Manual (GMNA-Localizing-U.S./Canada/
Mexico-13337776) - 2020 - CRC - 4/4/19
14 Keys, Doors, and Windows
least four seconds. The engine may
be started from outside the vehicle
using the RKE transmitter. See
Remote Vehicle Start024.
Q:Press to lock all doors.
If enabled, the turn signal lamps
may flash and/or the horn may
sound on the second press to
indicate locking has occurred.
If enabled, the horn chirps when
Q
is pressed again within
three seconds. See Vehicle
Personalization 0157.
Pressing
Qarms the alarm system.
See Vehicle Alarm System 037.
If equipped with remote mirror
folding, pressing and holding
Qfor
one second will fold the mirrors,
if enabled. See Vehicle
Personalization 0157.
K:Press once to unlock only the
driver door. If
Kis pressed again
within three seconds, all remaining
doors unlock. The interior lamps may come on and stay on for
20 seconds or until the ignition is
turned on.
If enabled, the turn signal lamps
flash twice to indicate unlocking has
occurred. If enabled, the exterior
lamps may turn on. See
Vehicle
Personalization 0157.
Pressing
Kon the RKE transmitter
disarms the alarm system. See
Vehicle Alarm System 037.
If equipped with remote mirror
folding, pressing and holding
Kfor
one second will unfold the mirrors,
if enabled. See Vehicle
Personalization 0157.
Press and hold
Kto remotely open
the windows, if enabled. See
Vehicle Personalization 0157.
x:Press twice quickly to release
the tailgate, if equipped.
7: Press and release to initiate the
vehicle locator. The turn signal
lamps flash and the horn sounds
three times. Press and hold
7for more than
three seconds to activate the panic
alarm. The turn signal lamps flash
and the horn sounds repeatedly for
30 seconds. The alarm turns off
when the ignition is turned on or
7
is pressed again. The ignition must
be off for the panic alarm to work.
Programming Transmitters to
the Vehicle
Only RKE transmitters programmed
to this vehicle will work. If a
transmitter is lost or stolen, a
replacement can be purchased and
programmed through your dealer.
Each vehicle can have up to
eight transmitters programmed to it.
See your dealer for transmitter
programming.
Battery Replacement
Replace the battery in the
transmitter soon if the REPLACE
BATTERY IN REMOTE KEY
displays in the Driver Information
Center (DIC).
Page 20 of 502
GMC Sierra/Sierra Denali Owner Manual (GMNA-Localizing-U.S./Canada/
Mexico-13337776) - 2020 - CRC - 4/4/19
Keys, Doors, and Windows 19
transmitter inside the vehicle. Do
not leave the RKE transmitter in an
unattended vehicle.
To customize the doors to
automatically lock when exiting the
vehicle, see“Remote Lock, Unlock,
Start” under Vehicle Personalization
0 157.
Temporary Disable of Passive
Locking
Temporarily disable passive locking
by pressing and holding
Kon the
interior door switch with a door open
for at least four seconds, or until
three chimes are heard. Passive
locking will then remain disabled
until
Qon the interior door is
pressed, or until the vehicle is
turned on.
Remote Left in Vehicle Alert
When the vehicle is turned off and
an RKE transmitter is left in the
vehicle, the horn will chirp three
times after all doors are closed. To
turn on or off see Vehicle
Personalization 0157. Remote No Longer in Vehicle Alert
If the vehicle is on with a door open
and then all doors are closed, the
vehicle will check for RKE
transmitters inside. If an RKE
transmitter is not detected, the
Driver Information Center (DIC) will
display NO REMOTE DETECTED
and the horn will chirp three times.
This occurs only once each time the
vehicle is driven. To turn on or off
see
Vehicle Personalization 0157.
Key Access
To access a vehicle with a dead
transmitter battery, see Door Locks
0 25.Programming Transmitters to
the Vehicle
Only RKE transmitters programmed
to the vehicle will work. If a
transmitter is lost or stolen, a
replacement can be purchased and
programmed through your dealer.
The vehicle can be reprogrammed
so that lost or stolen transmitters no longer work. Each vehicle can have
up to eight transmitters matched
to it.
Programming with Recognized
Transmitters
A new transmitter can be
programmed to the vehicle when
there are two recognized
transmitters.
To program, the vehicle must be off
and all transmitters, both currently
recognized and new, must be
with you.
1. Remove the key from a recognized transmitter.
2. Place the two recognized transmitters in the cupholder or
on the passenger seat.
3. Insert the vehicle key into the key lock cylinder on the driver
door handle. Then turn the key
counterclockwise, to the unlock
position, five times within
10 seconds.
The DIC displays READY FOR
REMOTE#3, 4, 5 ETC.
Page 21 of 502
GMC Sierra/Sierra Denali Owner Manual (GMNA-Localizing-U.S./Canada/
Mexico-13337776) - 2020 - CRC - 4/4/19
20 Keys, Doors, and Windows
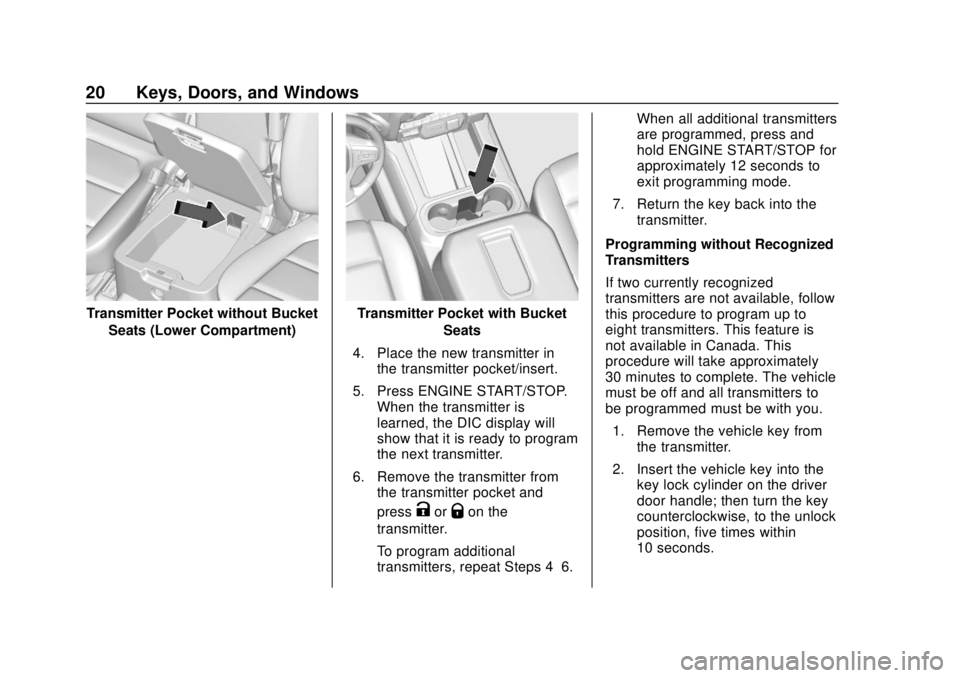
Transmitter Pocket without BucketSeats (Lower Compartment)Transmitter Pocket with Bucket Seats
4. Place the new transmitter in the transmitter pocket/insert.
5. Press ENGINE START/STOP. When the transmitter is
learned, the DIC display will
show that it is ready to program
the next transmitter.
6. Remove the transmitter from the transmitter pocket and
press
KorQon the
transmitter.
To program additional
transmitters, repeat Steps 4–6. When all additional transmitters
are programmed, press and
hold ENGINE START/STOP for
approximately 12 seconds to
exit programming mode.
7. Return the key back into the transmitter.
Programming without Recognized
Transmitters
If two currently recognized
transmitters are not available, follow
this procedure to program up to
eight transmitters. This feature is
not available in Canada. This
procedure will take approximately
30 minutes to complete. The vehicle
must be off and all transmitters to
be programmed must be with you. 1. Remove the vehicle key from the transmitter.
2. Insert the vehicle key into the key lock cylinder on the driver
door handle; then turn the key
counterclockwise, to the unlock
position, five times within
10 seconds.
Page 22 of 502

GMC Sierra/Sierra Denali Owner Manual (GMNA-Localizing-U.S./Canada/
Mexico-13337776) - 2020 - CRC - 4/4/19
Keys, Doors, and Windows 21
The DIC displays REMOTE
LEARN PENDING,
PLEASE WAIT.
3. Wait for 10 minutes until the DIC displays PRESS ENGINE
START BUTTON TO LEARN,
then press ENGINE
START/STOP.
The DIC will again display
REMOTE LEARN PENDING,
PLEASE WAIT.
4. Repeat Step 3 two additional times. After the third time all
previously known transmitters
will no longer work with the
vehicle. Remaining transmitters
can be relearned during the
next steps.
The DIC should now display
READY FOR REMOTE # 1.
Transmitter Pocket without Bucket
Seats (Lower Compartment)Transmitter Pocket with Bucket Seats
5. Place the new transmitter in the transmitter pocket/insert.
6. Press ENGINE START/STOP. When the transmitter is
learned, the DIC display will
show that it is ready to program
the next transmitter.
7. Remove the transmitter from the transmitter pocket/insert
and press
KorQon the
transmitter.
To program additional
transmitters, repeat Steps 5–7.
Page 23 of 502

GMC Sierra/Sierra Denali Owner Manual (GMNA-Localizing-U.S./Canada/
Mexico-13337776) - 2020 - CRC - 4/4/19
22 Keys, Doors, and Windows
When all additional transmitters
are programmed, press and
hold ENGINE START/STOP for
approximately 12 seconds to
exit programming mode.
8. Return the key back into the transmitter.
Starting the Vehicle with a Low
Transmitter Battery
If the transmitter battery is weak or if
there is interference with the signal,
the DIC may display NO REMOTE
DETECTED or NO REMOTE KEY
WAS DETECTED PLACE KEY IN
TRANSMITTER POCKET THEN
START YOUR VEHICLE when
starting the vehicle.
To start the vehicle:
Transmitter Pocket without Bucket
Seats (Lower Compartment)Transmitter Pocket with Bucket Seats
1. Place the transmitter in the transmitter pocket/insert.
2. With the vehicle in P (Park) or N (Neutral) press the brake
pedal and ENGINE
START/STOP.
Replace the transmitter battery
as soon as possible.
Battery Replacement
Replace the battery in the
transmitter soon if the DIC displays
REPLACE BATTERY IN
REMOTE KEY.
Page 37 of 502
GMC Sierra/Sierra Denali Owner Manual (GMNA-Localizing-U.S./Canada/
Mexico-13337776) - 2020 - CRC - 4/4/19
36 Keys, Doors, and Windows
Power Assist Steps
{Warning
To avoid personal injury or
property damage, before entering
or exiting the vehicle, be sure the
power assist step is fully
extended. Do not step on the
power assist step while it is
moving. Never place hands or
other body parts between the
extended power assist step and
the vehicle.
If equipped, the power assist steps,
when enabled, will extend when the
door is opened. They will retract
three seconds after the door is
closed or immediately if the vehicle
starts moving.
Keep hands, children, pets, objects,
and clothing clear of the power
assist steps when in motion.
The steps will reverse direction if
there is an obstruction. If possible,
carefully remove the obstruction,
then open and close the door on the same side to complete the motion.
If the obstruction is not cleared, the
assist steps remain extended.
Slight movement of the steps while
extended is normal.
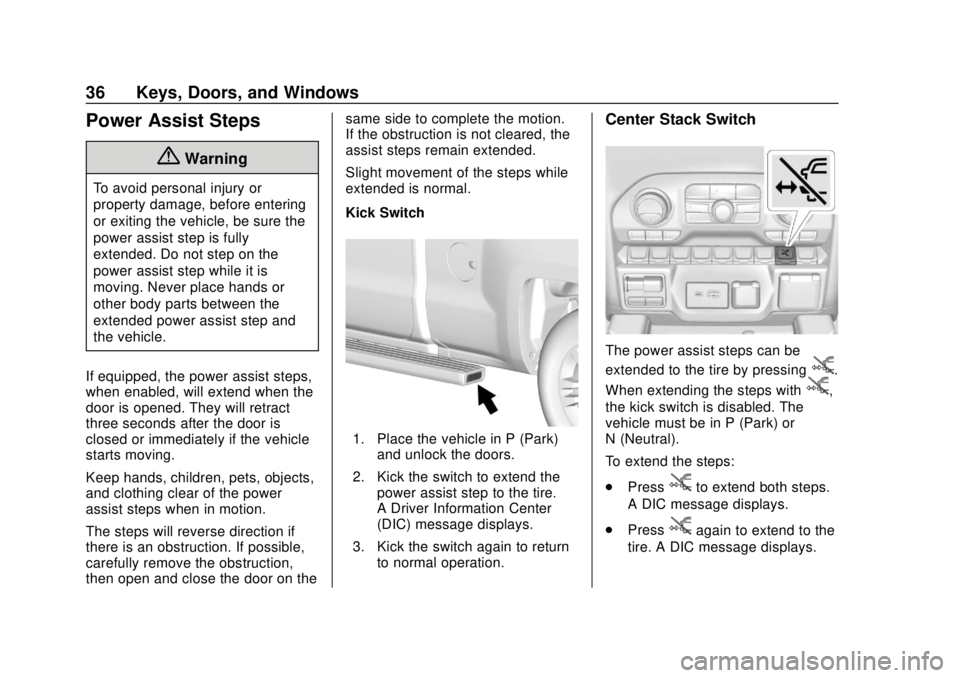
Kick Switch
1. Place the vehicle in P (Park)
and unlock the doors.
2. Kick the switch to extend the power assist step to the tire.
A Driver Information Center
(DIC) message displays.
3. Kick the switch again to return to normal operation.
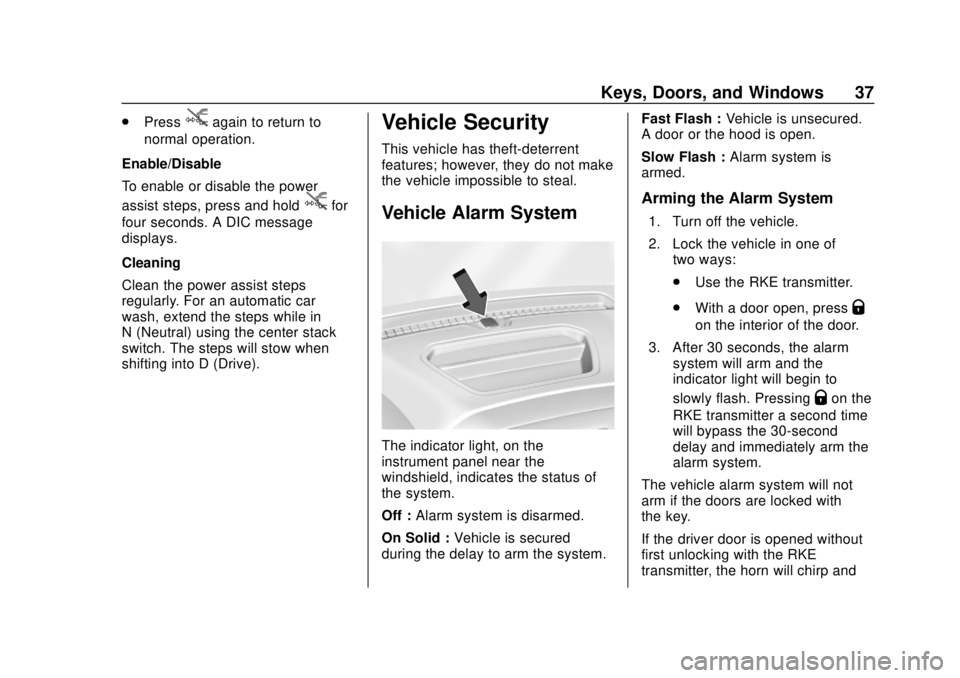
Center Stack Switch
The power assist steps can be
extended to the tire by pressing
j.
When extending the steps with
j,
the kick switch is disabled. The
vehicle must be in P (Park) or
N (Neutral).
To extend the steps:
. Press
jto extend both steps.
A DIC message displays.
. Press
jagain to extend to the
tire. A DIC message displays.
Page 38 of 502
GMC Sierra/Sierra Denali Owner Manual (GMNA-Localizing-U.S./Canada/
Mexico-13337776) - 2020 - CRC - 4/4/19
Keys, Doors, and Windows 37
.Pressjagain to return to
normal operation.
Enable/Disable
To enable or disable the power
assist steps, press and hold
jfor
four seconds. A DIC message
displays.
Cleaning
Clean the power assist steps
regularly. For an automatic car
wash, extend the steps while in
N (Neutral) using the center stack
switch. The steps will stow when
shifting into D (Drive).
Vehicle Security
This vehicle has theft-deterrent
features; however, they do not make
the vehicle impossible to steal.
Vehicle Alarm System
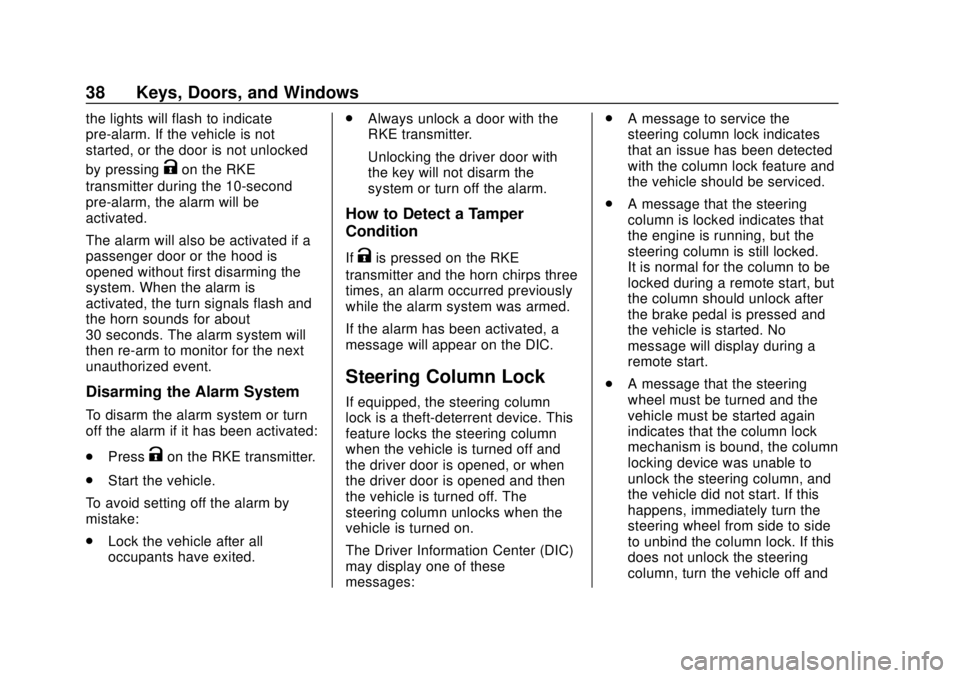
The indicator light, on the
instrument panel near the
windshield, indicates the status of
the system.
Off : Alarm system is disarmed.
On Solid : Vehicle is secured
during the delay to arm the system. Fast Flash :
Vehicle is unsecured.
A door or the hood is open.
Slow Flash : Alarm system is
armed.
Arming the Alarm System
1. Turn off the vehicle.
2. Lock the vehicle in one of two ways:
.Use the RKE transmitter.
. With a door open, press
Q
on the interior of the door.
3. After 30 seconds, the alarm system will arm and the
indicator light will begin to
slowly flash. Pressing
Qon the
RKE transmitter a second time
will bypass the 30-second
delay and immediately arm the
alarm system.
The vehicle alarm system will not
arm if the doors are locked with
the key.
If the driver door is opened without
first unlocking with the RKE
transmitter, the horn will chirp and
Page 39 of 502
GMC Sierra/Sierra Denali Owner Manual (GMNA-Localizing-U.S./Canada/
Mexico-13337776) - 2020 - CRC - 4/4/19
38 Keys, Doors, and Windows
the lights will flash to indicate
pre-alarm. If the vehicle is not
started, or the door is not unlocked
by pressing
Kon the RKE
transmitter during the 10-second
pre-alarm, the alarm will be
activated.
The alarm will also be activated if a
passenger door or the hood is
opened without first disarming the
system. When the alarm is
activated, the turn signals flash and
the horn sounds for about
30 seconds. The alarm system will
then re-arm to monitor for the next
unauthorized event.
Disarming the Alarm System
To disarm the alarm system or turn
off the alarm if it has been activated:
. Press
Kon the RKE transmitter.
. Start the vehicle.
To avoid setting off the alarm by
mistake:
. Lock the vehicle after all
occupants have exited. .
Always unlock a door with the
RKE transmitter.
Unlocking the driver door with
the key will not disarm the
system or turn off the alarm.
How to Detect a Tamper
Condition
IfKis pressed on the RKE
transmitter and the horn chirps three
times, an alarm occurred previously
while the alarm system was armed.
If the alarm has been activated, a
message will appear on the DIC.
Steering Column Lock
If equipped, the steering column
lock is a theft-deterrent device. This
feature locks the steering column
when the vehicle is turned off and
the driver door is opened, or when
the driver door is opened and then
the vehicle is turned off. The
steering column unlocks when the
vehicle is turned on.
The Driver Information Center (DIC)
may display one of these
messages: .
A message to service the
steering column lock indicates
that an issue has been detected
with the column lock feature and
the vehicle should be serviced.
. A message that the steering
column is locked indicates that
the engine is running, but the
steering column is still locked.
It is normal for the column to be
locked during a remote start, but
the column should unlock after
the brake pedal is pressed and
the vehicle is started. No
message will display during a
remote start.
. A message that the steering
wheel must be turned and the
vehicle must be started again
indicates that the column lock
mechanism is bound, the column
locking device was unable to
unlock the steering column, and
the vehicle did not start. If this
happens, immediately turn the
steering wheel from side to side
to unbind the column lock. If this
does not unlock the steering
column, turn the vehicle off and
Page 47 of 502

GMC Sierra/Sierra Denali Owner Manual (GMNA-Localizing-U.S./Canada/
Mexico-13337776) - 2020 - CRC - 4/4/19
46 Keys, Doors, and Windows
Interior Mirrors
Interior Rearview Mirrors
Adjust the rearview mirror for a clear
view of the area behind your
vehicle.
Do not spray glass cleaner directly
on the mirror. Use a soft towel
dampened with water.
Manual Rearview Mirror
If equipped, push the tab forward for
daytime use and pull it rearward for
nighttime use to avoid glare from
the headlamps from behind.
Automatic Dimming
Rearview Mirror
If equipped, the mirror will
automatically reduce the glare of the
headlamps from behind. The
dimming feature comes on each
time the vehicle is started.
Rear Camera Mirror
If equipped, this automatic dimming
mirror provides a wide angle camera
view of the area behind the vehicle.
Pull the tab to turn on the display.
Push the tab to turn it off. When off
the mirror is automatic dimming.
Adjust the mirror for a clear view of
the area behind the vehicle while
the display is off.
PressVto scroll through the
adjustment options.
Press
tanduto adjust the
settings using the indicators on the
mirror. The indicators will remain
visible for five seconds after the last
button activation, and the settings
will remain saved.
The adjustment options are: