key GMC SIERRA 2021 Get To Know Guide
[x] Cancel search | Manufacturer: GMC, Model Year: 2021, Model line: SIERRA, Model: GMC SIERRA 2021Pages: 20, PDF Size: 2.48 MB
Page 4 of 20
4F Optional equipment
KEYLESS ACCESS SYSTEMF
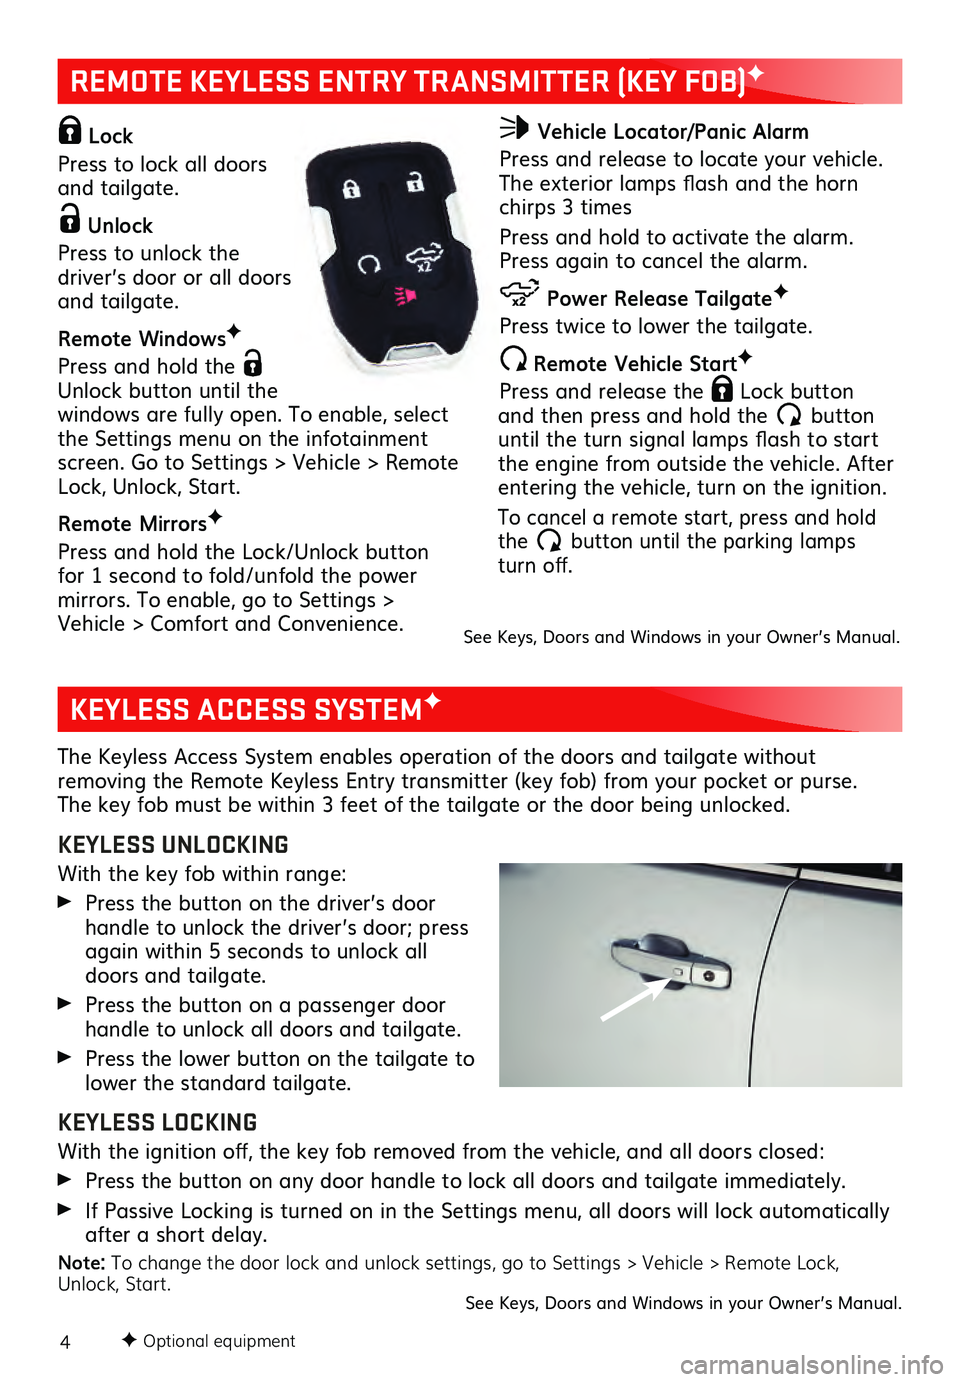
REMOTE KEYLESS ENTRY TRANSMITTER (KEY FOB)F
The Keyless Access System enables operation of the doors and tailgate without removing the Remote Keyless Entry transmitter (key fob) from your pocket or purse.
The key fob must be within 3 feet of the tailgate or the door being unlocked.
KEYLESS UNLOCKING
With the key fob within range:
Press the button on the driver’s door
handle to unlock the driver’s door; press
again within 5 seconds to unlock all
doors and tailgate.
Press the button on a passenger door handle to unlock all doors and tailgate.
Press the lower button on the tailgate to lower the standard tailgate.
KEYLESS LOCKING
With the ignition off, the key fob removed from the vehicle, and all doors closed:
Press the button on any door handle to lock all doors and tailgate immediately.
If Passive Locking is turned on in the Settings menu, all doors will lock automatically after a short delay.
Note: To change the door lock and unlock settings, go to Settings > Vehicle > Remote Lock,
Unlock, Start.
See Keys, Doors and Windows in your Owner’s Manual.
Lock
Press to lock all doors
and tailgate.
Unlock
Press to unlock the
driver’s door or all doors
and tailgate.
Remote Windows F
Press and hold the
Unlock button until the
windows are fully open. To enable, select
the Settings menu on the infotainment
screen. Go to Settings > Vehicle > Remote
Lock, Unlock, Start.
Remote Mirrors F
Press and hold the Lock/Unlock button
for 1 second to fold/unfold the power
mirrors. To enable, go to Settings > Vehicle > Comfort and Convenience.
Vehicle Locator/Panic Alarm
Press and release to locate your vehicle.
The exterior lamps flash and the horn
chirps 3 times
Press and hold to activate the alarm.
Press again to cancel the alarm.
Power Release Tailgate F
Press twice to lower the tailgate.
Remote Vehicle StartF
Press and release the
Lock button and then press and hold the button until the turn signal lamps flash to start
the engine from outside the vehicle. After
entering the vehicle, turn on the ignition.
To cancel a remote start, press and hold
the button until the parking lamps turn off.
See Keys, Doors and Windows in your Owner’s Manual.
Page 5 of 20
5
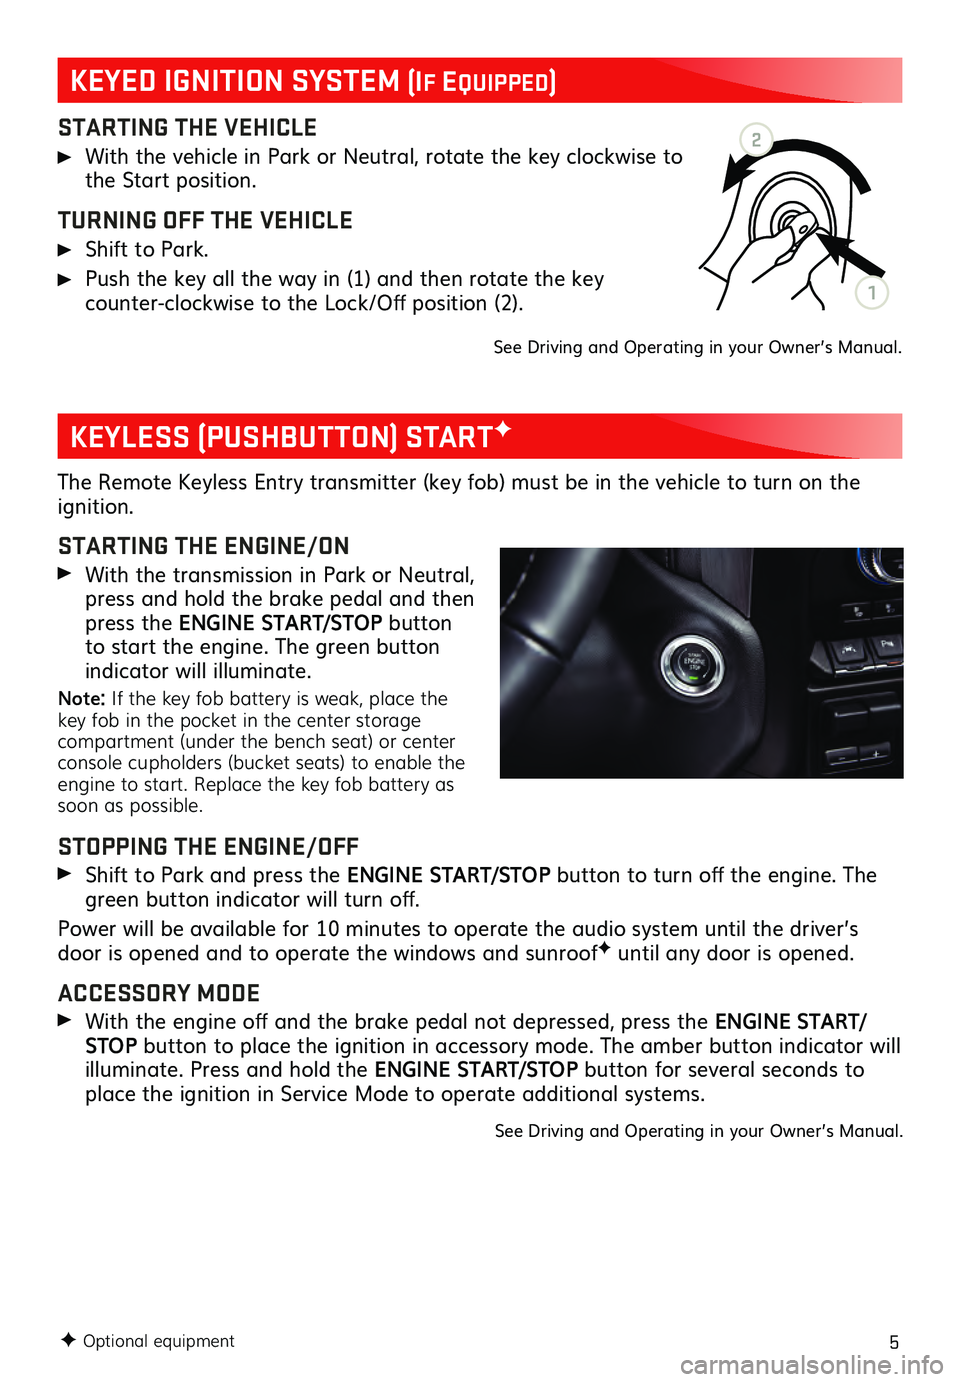
STARTING THE VEHICLE
With the vehicle in Park or Neutral, rotate the key clockwise to the Start position.
TURNING OFF THE VEHICLE
Shift to Park.
Push the key all the way in (1) and then rotate the key counter-clockwise to the Lock/Off position (2).
See Driving and Operating in your Owner’s Manual.
The Remote Keyless Entry transmitter (key fob) must be in the vehicle to turn on the ignition.
STARTING THE ENGINE/ON
With the transmission in Park or Neutral, press and hold the brake pedal and then
press the ENGINE START/STOP button
to start the engine. The green button
indicator will illuminate.
Note: If the key fob battery is weak, place the
key fob in the pocket in the center storage
compartment (under the bench seat) or center
console cupholders (bucket seats) to enable the
engine to start. Replace the key fob battery as
soon as possible.
STOPPING THE ENGINE/OFF
Shift to Pa rk and press the ENGINE START/STOP button to turn off the engine. The
green button indicator will turn off.
Power will be available for 10 minutes to operate the audio system until the driver’s
door is opened and to operate the windows and sunroof
F until any door is opened.
ACCESSORY MODE
With the engine off and the brake pedal not depressed, press the ENGINE START/
STOP button to place the ignition in accessory mode. The amber button indicator will
illuminate. Press and hold the ENGINE START/STOP button for several seconds to
place the ignition in Service Mode to operate additional systems.
See Driving and Operating in your Owner’s Manual.
F Optional equipment
KEYLESS (PUSHBUTTON) STARTF
KEYED IGNITION SYSTEM (If EquIppEd)
2
1
Page 6 of 20
6
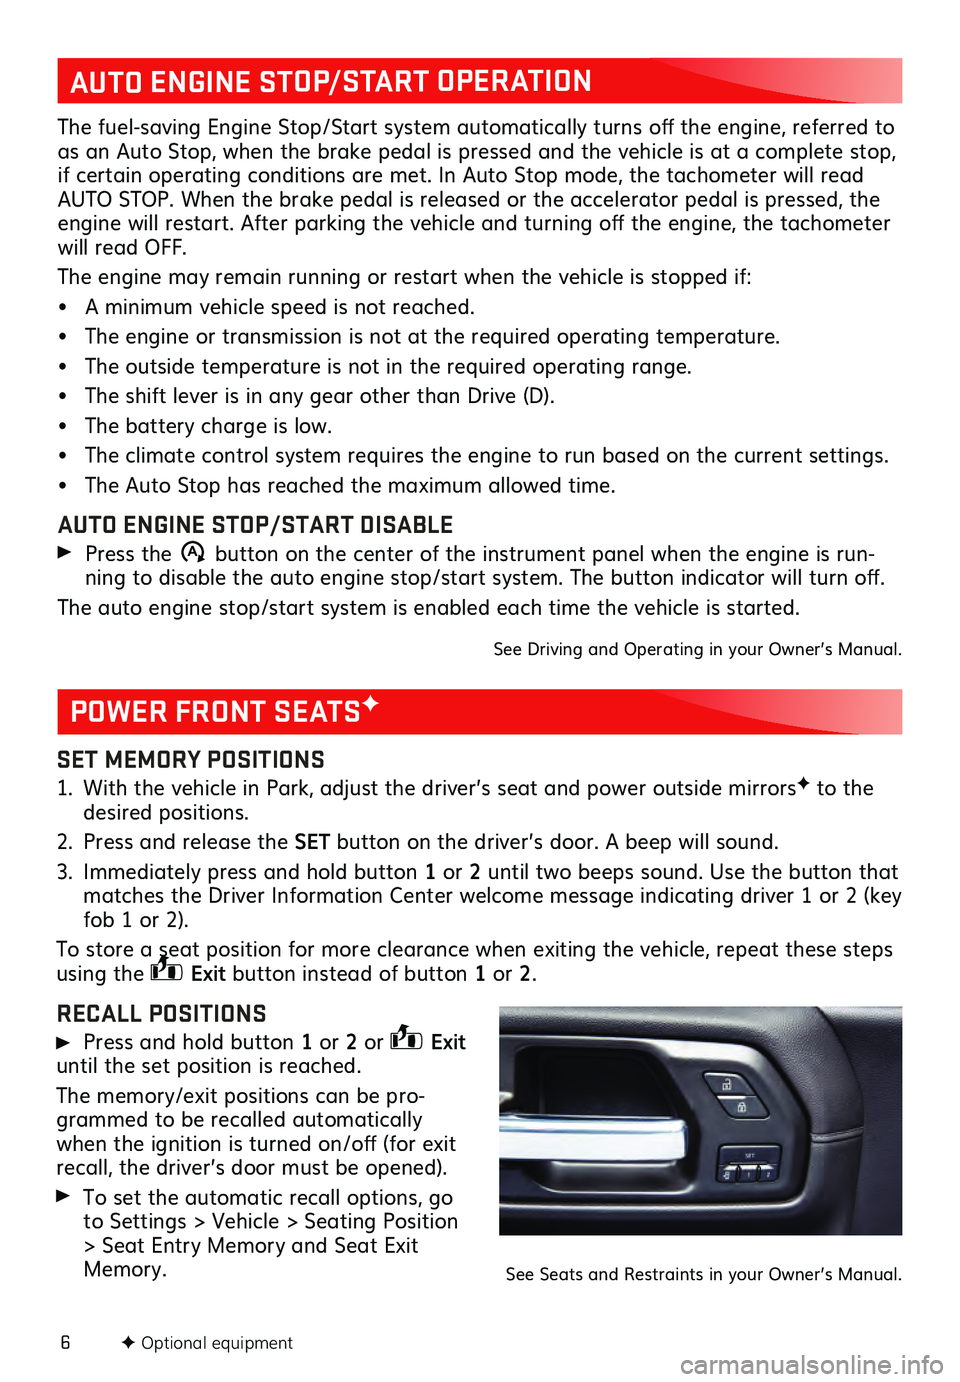
SET MEMORY POSITIONS
1. With the vehicle in Park, adjust the driver’s seat and power outside mirrorsF to the desired positions.
2. Press and release the SET button on the driver’s door. A beep will sound.
3. Immediately pres s and hold button 1 or 2 until two beeps sound. Use the button that
matches the Driver Information Center welcome message indicating driver 1 or 2 (key
fob 1 or 2).
To store a seat position for more clearance when exiting the vehicle, repeat these steps
using the
Exit button instead of button 1 or 2.
RECALL POSITIONS
Press and hold button 1 or 2 or Exit
until the set position is reached.
The memory/exit positions can be pro -
grammed to be recalled automatically
when the ignition is turned on/off (for exit
recall, the driver’s door must be opened).
To set the automatic recall options, go
to Settings > Vehicle > Seating Position
> Seat Entry Memory and Seat Exit
Memory.
POWER FRONT SEATSF
F Optional equipment
AUTO ENGINE STOP/START OPERATION
The fuel-saving Engine Stop/Start system automatically turns off the engine, referred to
as an Auto Stop, when the brake pedal is pressed and the vehicle is at a complete stop,
if certain operating conditions are met. In Auto Stop mode, the tachometer will read
AUTO STOP. When the brake pedal is released or the accelerator pedal is pressed, the
engine will restart. After parking the vehicle and turning off the engine, the tachometer
will read OFF.
The engine may remain running or restart when the vehicle is stopped if:
• A minimu m vehicle speed is not reached.
• The engine or transmiss ion is not at the required operating temperature.
• The outside temperature is not in the required operating range.
• The shift lever is in any gear other than Drive (D).
• The battery charge is low.
• The climate control system requires the engine to run based on the current settings.
• The Auto Stop has reach ed the maximum allowed time.
AUTO ENGINE STOP/START DISABLE
Press the �$ button on the center of the instrument panel when the engine is run -
ning to disable the auto engine stop/start system. The button indicator will turn off.
The auto engine stop/start system is enabled each time the vehicle is started.
See Driving and Operating in your Owner’s Manual.
See Seats and Restraints in your Owner’s Manual.
Page 15 of 20
15F Optional equipment
DRIVER ASSISTANCE SYSTEMSF
LANE KEEP ASSIST WITH LANE DEPARTURE WARNING – The system may help you
avoid collisions due to unintentional lane departures. The
Lane Keep Assist indicator
is green if the system is available to assist. If the vehicle approaches a detected lane
marking without using a turn signal in that direction, the system may assist by gently
turning the steering wheel and displaying an amber
.
If active driver steering is not detected, the amber may flash and the Safety Alert
Seat may pulse or beeps may sound (if selected) on the side of the departure direction
as the lane marking is crossed. In order to use this system safely, the driver needs to
steer and be in complete control of the vehicle.
To turn on or off, press the Lane Keep Assist button on the instrument panel.
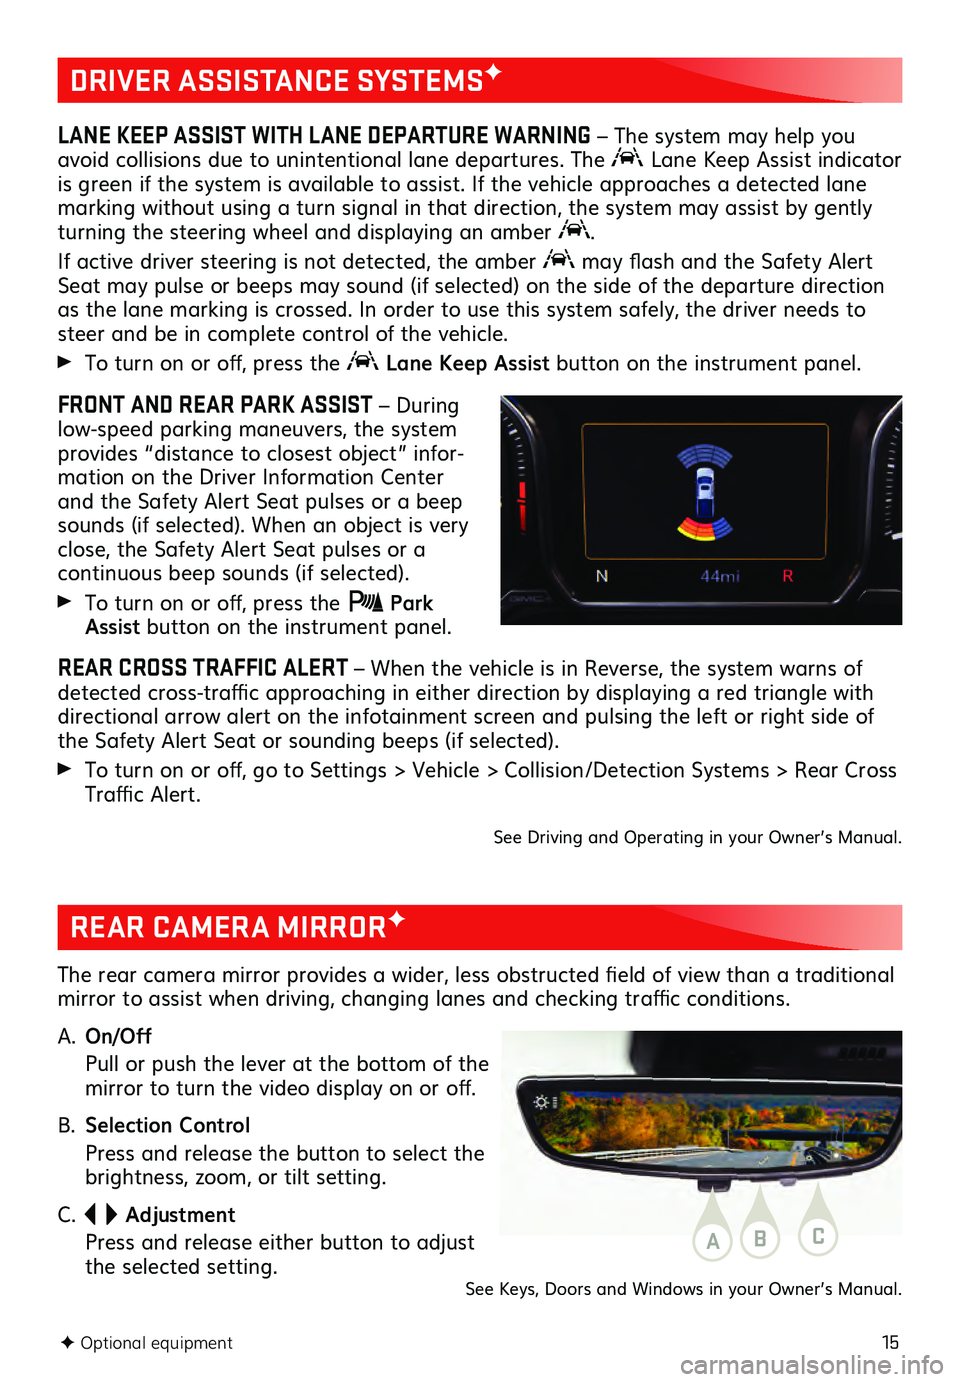
FRONT AND REAR PARK ASSIST – During
low-speed parking maneuvers, the system
provides “distance to closest object” infor -
mation on the Driver Information Center
and the Safety Alert Seat pulses or a beep
sounds (if selected). When an object is very
close, the Safety Alert Seat pulses or a
continuous beep sounds (if selected).
To turn on or off, press the Park Assist button on the instrument panel.
REAR CROSS TRAFFIC ALERT – When the vehicle is in Reverse, the system warns of
detected cross-traffic approaching in either direction by displaying a red triangle with
directional arrow alert on the infotainment screen and pulsing the left or right side of
the Safety Alert Seat or sounding beeps (if selected).
To turn on or off, go to Settings > Vehicle > Collision/Detection Systems > Rear Cross
Traffic Alert.
See Driving and Operating in your Owner’s Manual.
REAR CAMERA MIRRORF
The rear camera mirror provides a wider, less obstructed field of view than a traditional
mirror to assist when driving, changing lanes and checking traffic conditions.
A.
On/Off
Pull or pu sh the lever at the bottom of the mirror to turn the video display on or off.
B. Selection Control
Press and release the button to select the brightness, zoom, or tilt setting.
C.
Adjustment
Press and release either button to adjust the selected setting.ABC
See Keys, Doors and Windows in your Owner’s Manual.
Page 17 of 20
17F Optional equipment
POWER MIRRORSF/TRAILERING MIRRORSF
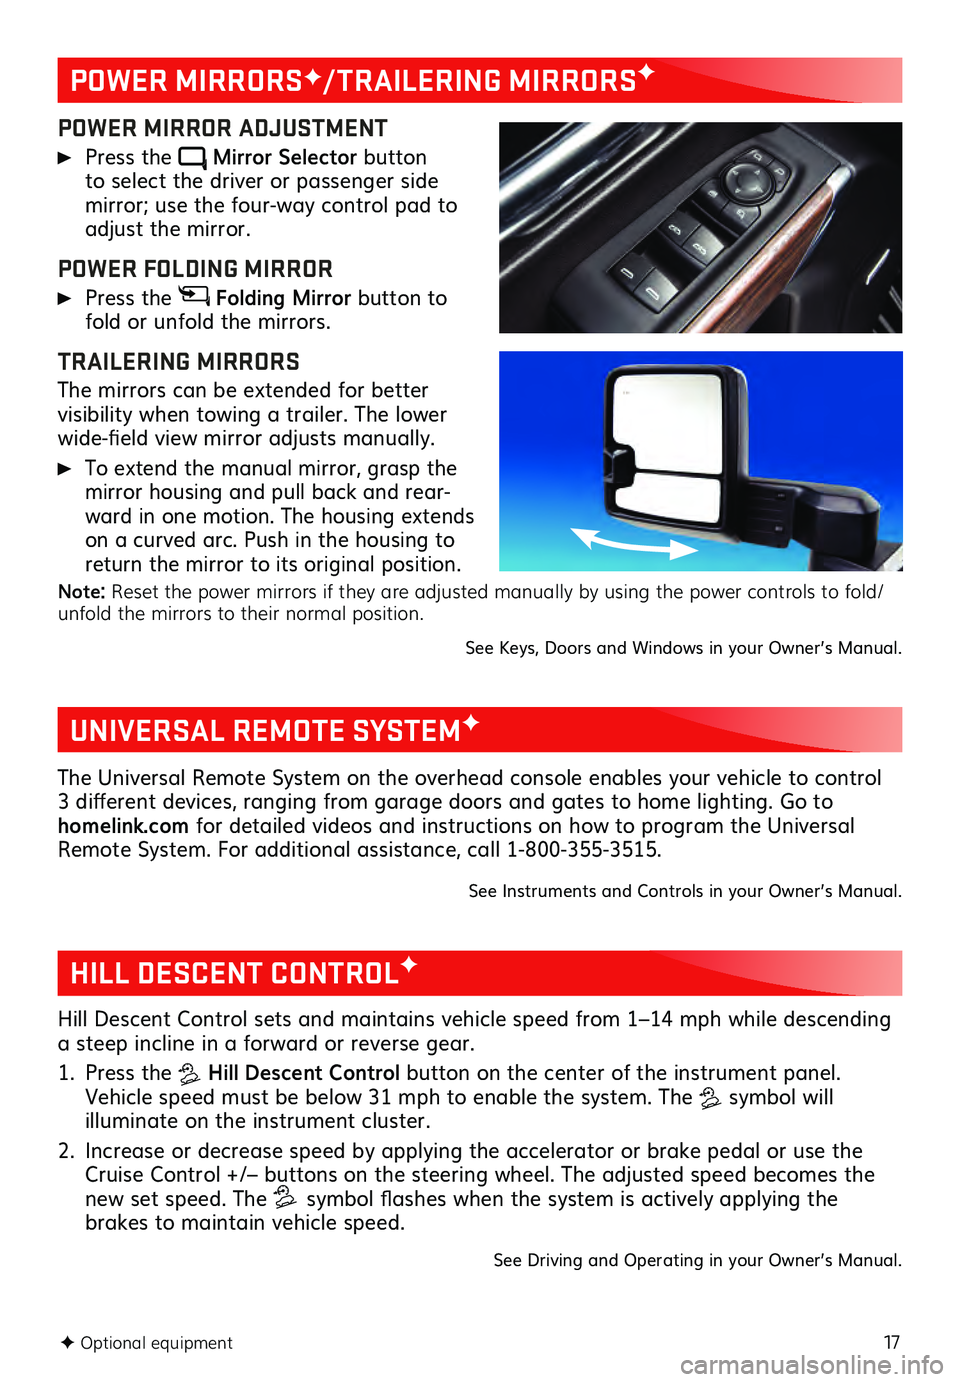
POWER MIRROR ADJUSTMENT
Press the Mirror Selector button to select the driver or passenger side mirror; use the four-way control pad to adjust the mirror.
POWER FOLDING MIRROR
Press the Folding Mirror button to
fold or unfold the mirrors.
TRAILERING MIRRORS
The mirrors can be extended for better visibility when towing a trailer. The lower
wide-field view mirror adjusts manually.
To extend the manual mirror, grasp the
mirror housing and pull back and rear -
ward in one motion. The housing extends
on a curved arc. Push in the housing to
return the mirror to its original position.
Note: Reset the power mirrors if they are adjusted manually by using the power controls to fold/
unfold the mirrors to their normal position.
See Keys, Doors and Windows in your Owner’s Manual.
UNIVERSAL REMOTE SYSTEMF
The Universal Remote System on the overhead console enables your vehicle to control
3 different devices, ranging from garage doors and gates to home lighting. Go to
homelink.com for detailed videos and instructions on how to program the Universal
Remote System. For additional assistance, call 1-800-355-3515.
See Instruments and Controls in your Owner’s Manual.
HILL DESCENT CONTROLF
Hill Descent Control sets and maintains vehicle speed from 1–14 mph while descending
a steep incline in a forward or reverse gear.
1. Press the Hill Descent Control button on the center of the instrument panel.
Vehicle speed must be below 31 mph to enable the system. The
symbol will illuminate on the instrument cluster.
2. Increase or decrease speed by applying the accelerator or brake pedal or use the Cruise Control +/– buttons on the steering wheel. The adjusted speed becomes the
new set speed. The symbol flashes when the system is actively applying the
brakes to maintain vehicle speed.
See Driving and Operating in your Owner’s Manual.
Page 19 of 20
19
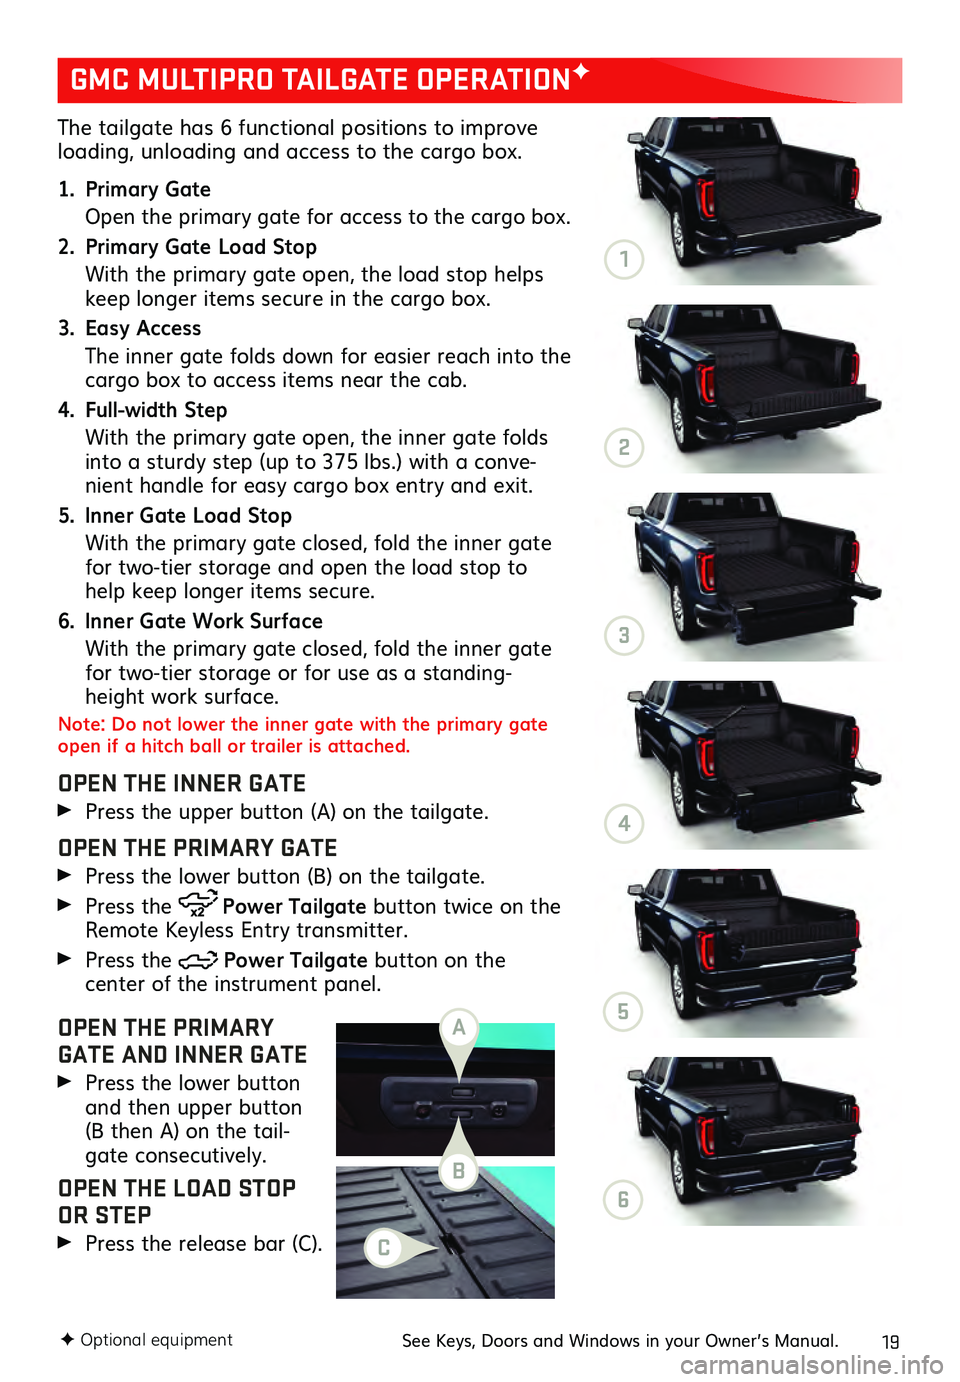
The tailgate has 6 functional positions to improve loading, unloading and access to the cargo box.
1. Primary Gate
Open the primary gate for ac cess to the cargo box.
2. Primary Gate Load Stop
With the primary gate open, the load stop helps keep longer items secure in the cargo box.
3. Easy Access
The inner ga te folds down for easier reach into the cargo box to access items near the cab.
4. Full-width Step
With the primary gate open, the inner gate folds into a sturdy step (up to 375 lbs.) with a conve-
nient handle for easy cargo box entry and exit.
5. Inner Gate Load Stop
With the primary gate closed, fold the inner gate for two-tier storage and open the load stop to
help keep longer items secure.
6. Inner Gate Work Surface
With the primary gate closed, fold the inner gate for two-tier storage or for use as a standing-
height work surface.
Note: Do not lower the inner gate with the primary gate
open if a hitch ball or trailer is attached.
OPEN THE INNER GATE
Press the upper button (A) on the tailgate.
OPEN THE PRIMARY GATE
Press the lower button (B) on the tailgate.
Press the Power Tailgate button twice on the
Remote Keyless Entry transmitter.
Press the Power Tailgate button on the center of the instrument panel.
OPEN THE PRIMARY
GATE AND INNER GATE
Press the lower button and then upper button
(B then A) on the tail -
gate consecutively.
OPEN THE LOAD STOP
OR STEP
Press the release bar (C).
GMC MULTIPRO TAILGATE OPERATIONF
F Optional equipmentSee Keys, Doors and Windows in your Owner’s Manual.
A
B
C
1
2
3
4
5
6
Page 20 of 20
20
Download the myGMC app to your compatible smartphone (or device) and, if your vehicle is properly equipped, you can start or turn off your engine, lock or unlock your doors, view key diagnostic information, set parking information and more.
The app is available on select Apple and Android devices. Service availability, features and functionality vary by vehicle, device and data plan. Device data connection
required. Visit onstar.com for more details. Download the mobile app from your
compatible mobile device’s app store.
ROADSIDE ASSISTANCE
1-888-881-3302 TTY Users: 1-888-889-2438
As the owner of a new GMC, you are automatically enrolled in the GMC Roadside
Assistance program for up to 5 years/60,000 miles, whichever occurs first, at no
expense to you. GMC’s Roadside Assistance toll-free number is staffed by a team of
trained advisors who are available 24 hours a day, 365 days a year, to contact a service
provider for light services (fuel delivery, jump-starts, flat tire and lock-outs) or make
arrangements to tow your vehicle to the nearest GMC dealer for any repairs.
ONSTAR® ROADSIDE ASSISTANCE
If you have a current OnStar Safety & Security plan, push the blue OnStar button or red
Emergency button to get the help you need. An OnStar advisor will use GPS technology
to pinpoint your vehicle location and contact the nearest service provider.
To learn more about OnStar services, push the blue OnStar button, visit onstar.com, call
1-888-4-ONSTAR (1-888-466-7827), or refer to your Owner’s Manual.
GMC OWNER CENTER
Get to know your vehicle inside and out with the GMC Owner Center. Check out person -
alized information, including an online Owner’s Manual and helpful how-to videos, track
your service history and warranty status, manage your OnStar and Connected Services
vehicle plans, review your current Vehicle Diagnostics report (active service required)
and more. Create an account today at my.gmc.com.
MYGMC MOBILE APP
!84550395=A!84550395 A
We recommend always using ACDelco or GM Genuine Parts
Certain restrictions, precautions and safety procedures apply to your vehicle. Please read your Owner’s Manual
for complete instructions. All information contained in this guide is based on the latest information available at
the time of printing and is subject to change without notice. Copyright 2020 General Motors. All rights reserved.