engine GMC TERRAIN 2010 Owner's Manual
[x] Cancel search | Manufacturer: GMC, Model Year: 2010, Model line: TERRAIN, Model: GMC TERRAIN 2010Pages: 410, PDF Size: 2.55 MB
Page 1 of 410
2010 GMC Terrain Owner ManualM
Keys, Doors and Windows. . . 1-1
Keys and Locks . . . . . . . . . . . . . . . 1-2
Doors . . . . . . . . . . . . . . . . . . . . . . . . . . 1-8
Vehicle Security . . . . . . . . . . . . . . 1-13
Exterior Mirrors . . . . . . . . . . . . . . . 1-14
Interior Mirrors . . . . . . . . . . . . . . . . 1-16
Windows . . . . . . . . . . . . . . . . . . . . . 1-16
Roof . . . . . . . . . . . . . . . . . . . . . . . . . . 1-19
Seats and Restraints . . . . . . . . . 2-1
Head Restraints . . . . . . . . . . . . . . . 2-2
Front Seats . . . . . . . . . . . . . . . . . . . . 2-3
Rear Seats . . . . . . . . . . . . . . . . . . . . 2-8
Safety Belts . . . . . . . . . . . . . . . . . . . . 2-9
Airbag System . . . . . . . . . . . . . . . . 2-25
Child Restraints . . . . . . . . . . . . . . 2-41
Storage . . . . . . . . . . . . . . . . . . . . . . . 3-1
Storage Compartments . . . . . . . . 3-1
Additional Storage Features . . . 3-2
Roof Rack System . . . . . . . . . . . . . 3-2 Instruments and Controls
. . . . 4-1
Instrument Panel Overview . . . . 4-4
Controls . . . . . . . . . . . . . . . . . . . . . . . 4-6
Warning Lights, Gauges, and
Indicators . . . . . . . . . . . . . . . . . . . 4-11
Information Displays . . . . . . . . . . 4-25
Vehicle Messages . . . . . . . . . . . . 4-29
Vehicle Personalization . . . . . . . 4-36
OnStar
®System . . . . . . . . . . . . . . 4-41
Lighting . . . . . . . . . . . . . . . . . . . . . . . 5-1
Exterior Lighting . . . . . . . . . . . . . . . 5-1
Interior Lighting . . . . . . . . . . . . . . . . 5-4
Lighting Features . . . . . . . . . . . . . . 5-4
Infotainment System . . . . . . . . . 6-1
Introduction . . . . . . . . . . . . . . . . . . . . 6-1
Radio . . . . . . . . . . . . . . . . . . . . . . . . . 6-11
Audio Players . . . . . . . . . . . . . . . . 6-18
Rear Seat Infotainment . . . . . . . 6-33
Phone . . . . . . . . . . . . . . . . . . . . . . . . 6-41 Climate Controls
. . . . . . . . . . . . . 7-1
Climate Control Systems . . . . . . 7-1
Air Vents . . . . . . . . . . . . . . . . . . . . . . . 7-6
Driving and Operating . . . . . . . . 8-1
Driving Information . . . . . . . . . . . . . 8-2
Starting and Operating . . . . . . . 8-27
Engine Exhaust . . . . . . . . . . . . . . 8-34
Automatic Transmission . . . . . . 8-35
Drive Systems . . . . . . . . . . . . . . . . 8-38
Brakes . . . . . . . . . . . . . . . . . . . . . . . 8-39
Ride Control Systems . . . . . . . . 8-41
Cruise Control . . . . . . . . . . . . . . . . 8-44
Object Detection Systems . . . . 8-47
Fuel . . . . . . . . . . . . . . . . . . . . . . . . . . 8-54
Towing . . . . . . . . . . . . . . . . . . . . . . . 8-58
Conversions and Add-Ons . . . 8-66
Page 5 of 410
Introduction v
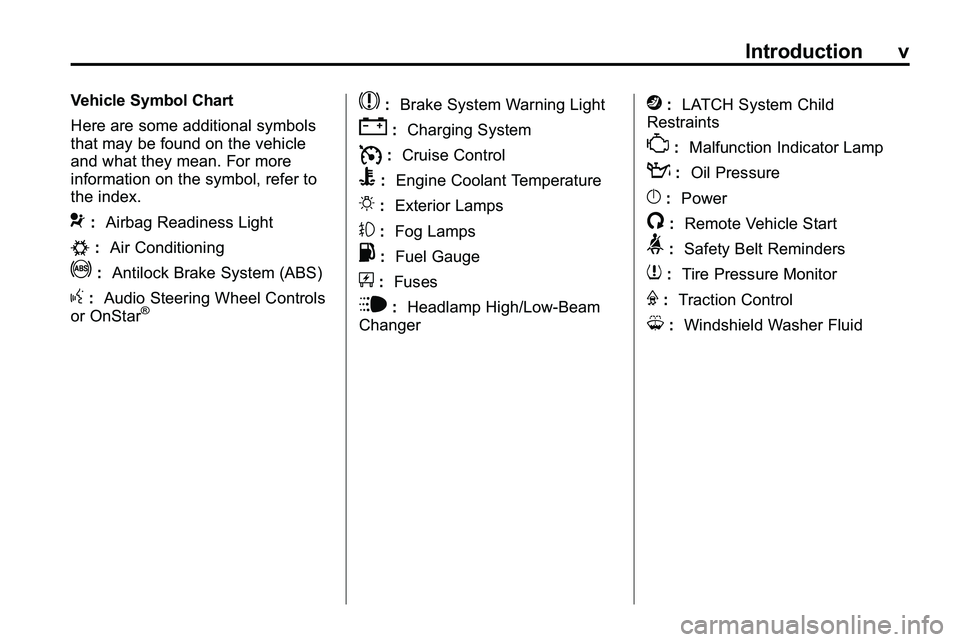
Vehicle Symbol Chart
Here are some additional symbols
that may be found on the vehicle
and what they mean. For more
information on the symbol, refer to
the index.
9:Airbag Readiness Light
#:Air Conditioning
!:Antilock Brake System (ABS)
g:Audio Steering Wheel Controls
or OnStar®
$: Brake System Warning Light
":Charging System
I:Cruise Control
B: Engine Coolant Temperature
O:Exterior Lamps
#:Fog Lamps
.: Fuel Gauge
+:Fuses
i: Headlamp High/Low-Beam
Changer
j: LATCH System Child
Restraints
*: Malfunction Indicator Lamp
::Oil Pressure
}:Power
/:Remote Vehicle Start
>:Safety Belt Reminders
7:Tire Pressure Monitor
F:Traction Control
M:Windshield Washer Fluid
Page 10 of 410
1-4 Keys, Doors and Windows
See“Unlocked Door Anti Lock Out”
under Vehicle Personalizationon
page 4‑36.
Pressing
Qmay also arm the
theft-deterrent system. See
Anti-Theft Alarm System
on
page 1‑13.
K(Unlock): Press to unlock
the driver door or all doors, see
“Remote Door Unlock” under
Vehicle Personalization
on
page 4‑36. The turn signal
indicators flash to indicate unlocking
has occurred. For more information
see “Remote Unlock Light
Feedback” underVehicle
Personalization
on page 4‑36.
Pressing
Kmay also disarm the
theft-deterrent system. See
Anti-Theft Alarm System
on
page 1‑13.
V(Remote Liftgate Release):
First press
K, then press and hold
Vto unlock the liftgate. For
vehicles with the power liftgate,
press and hold
Vuntil the liftgate
begins to move to open the liftgate.
7(Vehicle Locator/Panic
Alarm): Press and release one
time to locate the vehicle. The
exterior lamps flash and the horn
chirps. Press and hold
7for at least
two seconds to sound the panic
alarm. The horn sounds and the
turn signals flash until
7is pressed
again or the key is placed in the
ignition and turned to ON/RUN.
/(Remote Vehicle Start): For
vehicles with this feature, first press
Qthen press and hold/to start
the engine from outside the vehicle
using the RKE transmitter. See
Remote Vehicle Start
on page 1‑5for additional information.
Programming Transmitters
to the Vehicle
Only RKE transmitters programmed
to this vehicle will work. If a
transmitter is lost or stolen, a
replacement can be purchased and
programmed through your dealer/
retailer. When the replacement
transmitter is programmed to this
vehicle, all remaining transmitters
must also be reprogrammed. Any
lost or stolen transmitters will no
longer work once the new
transmitter is programmed.
Battery Replacement
Replace the battery if the “Replace
Battery in Remote Key” message
displays in the DIC. See “Replace
Battery in Remote Key” underKey
and Lock Messages on page 4‑33.
The battery is not rechargeable.
See your dealer/retailer to replace
the battery.
Page 11 of 410
Keys, Doors and Windows 1-5
Remote Vehicle Start
The vehicle may have this feature
that allows you to start the engine
from outside the vehicle.
/(Remote Vehicle Start):
This button will be on the RKE
transmitter if the vehicle has remote
start. To enable and disable remote
start, see “Remote Vehicle Start”
under Vehicle Personalization
on
page 4‑36.
Vehicles with an automatic climate
control system will default to a
heating or cooling mode depending
on the outside temperature during a
remote start. Once the key is turned
to ON/RUN, the system will turn on
at the setting the vehicle was last
set to.
Laws in some local communities
may restrict the use of remote
starters. For example, some laws
require a person using remote start
to have the vehicle in view. Check
local regulations for any
requirements. There are other conditions which
can affect the performance of the
transmitter, see
Remote Keyless
Entry (RKE) System
on page 1‑3for additional information.
Starting the Engine Using
Remote Start
To start the engine using the remote
start feature:
1. Press
Qon the RKE transmitter.
2. Press and hold /for about
two seconds. The turn signal
lamps will briefly flash to confirm
the vehicle has been started.
The parking lamps will turn on
and remain on as long as the
engine is running. The vehicle's
doors will be locked.
3. The key must be inserted and turned to ON/RUN before
driving.
The engine will shut off after
10 minutes unless a time
extension is done or the key is
inserted and turned to ON/RUN. Extending Engine Run Time
For a 10-minute extension, repeat
Steps 1 and 2 while the engine is
still running. The remote start can
be extended once.
When the remote start is extended,
the second 10 minutes will start
immediately.
For example, if the engine has been
running for five minutes, and
10 minutes are added, the engine
will run for a total of 15 minutes.
A maximum of two remote starts or
remote start attempts are allowed
between ignition cycles.
The vehicle's ignition switch must
be turned to ON/RUN and then back
to LOCK/OFF using the key, before
the remote start procedure can be
used again.
Page 12 of 410
1-6 Keys, Doors and Windows
Shutting the Engine Off After a
Remote Start
To shut off the engine:
.Press/until the parking lamps
turn off.
.Turn on the hazard warning
flashers.
.Insert the key and turn it to
ON/RUN and then back to
LOCK/OFF. Conditions in Which Remote Start
Will Not Work
The remote vehicle start feature will
not operate if:
.The key is in the ignition.
.The hood or doors are not
closed.
.The hazard warning flashers
are on.
.There is an emission control
system malfunction.
.The engine coolant temperature
is too high.
.The oil pressure is low.
.Two remote vehicle starts have
already been used.
.The vehicle is not in P (Park).
Door Locks
{WARNING
Unlocked doors can be
dangerous.
.Passengers, especially
children, can easily open the
doors and fall out of a moving
vehicle. The chance of being
thrown out of the vehicle in a
crash is increased if the
doors are not locked. So, all
passengers should wear
safety belts properly and the
doors should be locked
whenever the vehicle is
driven.
(Continued)
Page 14 of 410
1-8 Keys, Doors and Windows
Safety Locks
Rear door security locks prevent
passengers from opening the rear
doors from the inside.
Press (C) to activate the safety
locks. Once activated, the LED light,
changes to amber.
Pressing the button again
deactivates the safety locks.
SeePower Door Locks
on
page 1‑7.
Doors
Liftgate (Manual)
{WARNING
Exhaust gases can enter the
vehicle if it is driven with the
liftgate, trunk/hatch open, or with
any objects that pass through the
seal between the body and the
trunk/hatch or liftgate. Engine
exhaust contains Carbon
Monoxide (CO) which cannot be
seen or smelled. It can cause
unconsciousness and even death.
If the vehicle must be driven with
the liftgate, or trunk/hatch open:
.Close all of the windows.
.Fully open the air outlets on
or under the instrument
panel.
(Continued)
WARNING (Continued)
.Adjust the Climate Control
system to a setting that
brings in only outside air and
set the fan speed to the
highest setting. See Climate
Control System in the Index.
For more information about
carbon monoxide, see Engine
Exhaust on page 8‑34.
Notice: If you open the liftgate
without checking for overhead
obstructions such as a garage
door, you could damage the
liftgate or the liftgate glass.
Always check to make sure the
area above and behind the liftgate
is clear before opening it.
Press the touchpad located in the
handle of the liftgate, above the
license plate, and lift up to open.
Page 15 of 410
Keys, Doors and Windows 1-9
Do not press the touchpad while
closing the liftgate. This will cause
the liftgate to be unlatched.
Always close the liftgate before
driving.
Liftgate (Power)
Power Liftgate Operation
{WARNING
Exhaust gases can enter the
vehicle if it is driven with the
liftgate, trunk/hatch open, or with
any objects that pass through the
seal between the body and the
trunk/hatch or liftgate. Engine
exhaust contains Carbon
Monoxide (CO) which cannot be
seen or smelled. It can cause
unconsciousness and even death.(Continued)
WARNING (Continued)
If the vehicle must be driven with
the liftgate, or trunk/hatch open:
.Close all of the windows.
.Fully open the air outlets on
or under the instrument
panel.
.Adjust the Climate Control
system to a setting that
brings in only outside air and
set the fan speed to the
highest setting. See Climate
Control System in the Index.
.If the vehicle is equipped with
a power liftgate, disable the
power liftgate function.
For more information about
carbon monoxide, see Engine
Exhaust on page 8‑34. On vehicles with a power liftgate,
the switch is located on the
overhead console. The vehicle
must be in P (Park) to use the
power feature. The taillamps flash
when the power liftgate moves.
{WARNING
You or others could be injured if
caught in the path of the power
liftgate. Make sure there is no one
in the way of the liftgate as it is
opening and closing.
Notice: If you open the liftgate
without checking for overhead
obstructions such as a garage
door, you could damage the
liftgate or the liftgate glass.
Always check to make sure the
area above and behind the liftgate
is clear before opening it.
Page 20 of 410
1-14 Keys, Doors and Windows
The system is automatically
disarmed when the vehicle is
started with the correct key. The key
uses a transponder that matches
an immobilizer control unit in the
vehicle and automatically disarms
the system. Only the correct key
starts the vehicle. The vehicle may
not start if the key is damaged.
The security light, located in the
instrument panel cluster, comes on
if there is a problem with arming or
disarming the theft-deterrent
system.
When trying to start the vehicle, the
security light comes on briefly when
the ignition is turned on.If the engine does not start and the
security light stays on there is a
problem with the system. Turn the
ignition off and try again.
If the engine still does not start, and
the key appears to be undamaged
or the light continues to stay on, try
another ignition key. If the engine
does not start with the other key, the
vehicle needs service. If the vehicle
does start, the first key may be
damaged. See your dealer/retailer
who can service the theft-deterrent
system and have a new key made.
Do not leave the key or device that
disarms or deactivates the theft
deterrent system in the vehicle.
Exterior Mirrors
Convex Mirrors
{WARNING
A convex mirror can make things,
like other vehicles, look farther
away than they really are. If you
cut too sharply into the right lane,
you could hit a vehicle on the
right. Check the inside mirror or
glance over your shoulder before
changing lanes.
The passenger side mirror is convex
shaped. A convex mirror's surface is
curved so more can be seen from
the driver seat.
Page 58 of 410
2-32 Seats and Restraints
What Will You See After
an Airbag Inflates?
After the frontal airbags and
seat-mounted side impact airbags
inflate, they quickly deflate, so
quickly that some people may not
even realize an airbag inflated.
Roof-rail airbags may still be at least
partially inflated for some time after
they deploy. Some components of
the airbag module may be hot for
several minutes. For location of the
airbag modules, seeWhat Makes
an Airbag Inflate? on page 2‑31.
The parts of the airbag that come
into contact with you may be warm,
but not too hot to touch. There may
be some smoke and dust coming
from the vents in the deflated
airbags. Airbag inflation does not
prevent the driver from seeing out of
the windshield or being able to steer
the vehicle, nor does it prevent
people from leaving the vehicle.
{WARNING
When an airbag inflates, there
may be dust in the air. This dust
could cause breathing problems
for people with a history of
asthma or other breathing trouble.
To avoid this, everyone in the
vehicle should get out as soon as
it is safe to do so. If you have
breathing problems but cannot
get out of the vehicle after an
airbag inflates, then get fresh air
by opening a window or a door.
If you experience breathing
problems following an airbag
deployment, you should seek
medical attention.
The vehicle has a feature that may
automatically unlock the doors, turn
on the interior lamps and hazard
warning flashers, and shut off the
fuel system after the airbags inflate. You can lock the doors, turn off the
interior lamps and hazard warning
flashers by using the controls for
those features.
{WARNING
A crash severe enough to inflate
the airbags may have also
damaged important functions in
the vehicle, such as the fuel
system, brake and steering
systems, etc. Even if the vehicle
appears to be drivable after a
moderate crash, there may be
concealed damage that could
make it difficult to safely operate
the vehicle.
Use caution if you should attempt
to restart the engine after a crash
has occurred.
In many crashes severe enough to
inflate the airbag, windshields are
broken by vehicle deformation.
Page 93 of 410
Instruments and Controls 4-1
Instruments and
Controls
Instrument Panel Overview
Instrument Panel Overview . . . . 4-4
Controls
Steering Wheel Adjustment . . . 4-6
Steering Wheel Controls . . . . . . 4-6
Horn . . . . . . . . . . . . . . . . . . . . . . . . . . 4-7
Windshield Wiper/Washer . . . . . 4-7
Rear Window Wiper/Washer . . . . . . . . . . . . . . . . . . . . . . 4-8
Compass . . . . . . . . . . . . . . . . . . . . . 4-9
Clock (With Date Display) . . . . . 4-9
Clock (Without Date Display) . . . . . . . . . . . . . . . . . . . . 4-10
Power Outlets . . . . . . . . . . . . . . . 4-10
Warning Lights, Gauges, and
Indicators
Warning Lights, Gauges, and Indicators . . . . . . . . . . . . . . . . . . . 4-11
Instrument Cluster . . . . . . . . . . . 4-12
Speedometer . . . . . . . . . . . . . . . . 4-13
Odometer . . . . . . . . . . . . . . . . . . . . 4-13
Tachometer . . . . . . . . . . . . . . . . . . 4-13
Fuel Gauge . . . . . . . . . . . . . . . . . . 4-13
Engine Coolant Temperature Gauge . . . . . . . . 4-14
Safety Belt Reminders . . . . . . . 4-14
Airbag Readiness Light . . . . . . 4-15
Passenger Airbag Status Indicator . . . . . . . . . . . . . . . . . . . . 4-15
Charging System Light . . . . . . 4-16
Malfunction Indicator Lamp . . . . . . . . . . . . . 4-17
Brake System Warning Light . . . . . . . . . . . . . . . . . . . . . . . 4-19 Antilock Brake System (ABS)
Warning Light . . . . . . . . . . . . . . 4-20
Traction Off Light . . . . . . . . . . . . 4-21
StabiliTrak®OFF Light . . . . . . . 4-21
Traction Control System
(TCS)/StabiliTrak
®Light . . . . 4-21
Tire Pressure Light . . . . . . . . . . 4-22
Engine Oil Pressure Light . . . . 4-23
Fuel Economy Light . . . . . . . . . 4-23
Low Fuel Warning Light . . . . . . 4-24
Security Light . . . . . . . . . . . . . . . . 4-24
High-Beam on Light . . . . . . . . . 4-24
Fog Lamp Light . . . . . . . . . . . . . . 4-25
Lamps on Reminder . . . . . . . . . 4-25
Cruise Control Light . . . . . . . . . 4-25
Information Displays
Driver Information Center (DIC) . . . . . . . . . . . . . . . 4-25