buttons GMC TERRAIN 2010 Owner's Manual
[x] Cancel search | Manufacturer: GMC, Model Year: 2010, Model line: TERRAIN, Model: GMC TERRAIN 2010Pages: 410, PDF Size: 2.55 MB
Page 22 of 410
1-16 Keys, Doors and Windows
Interior Mirrors
Automatic Dimming
Rearview Mirror
The vehicle may have an automatic
dimming inside rearview mirror.
Vehicles with OnStar
®have three
additional control buttons located at
the bottom of the mirror. See your
dealer/retailer for more information
on the system and how to subscribe
to OnStar. See OnStar
®Systemon
page 4‑41for more information
about the services OnStar provides.
O: Press to turn automatic
dimming on or off.
If the vehicle has a rear vision
camera (RVC) the
Obutton for
turning the automatic dimming
feature on or off will not be
available. See Rear Vision Camera
(RVC)
on page 8‑50for more
information.
Automatic Dimming Mirror
Operation
Automatic dimming reduces the
glare from the headlamps of the
vehicle behind you. The dimming
feature comes on and the indicator
light comes on each time the vehicle
is started.
Cleaning the Mirror
Do not spray glass cleaner directly
on the mirror. Use a soft towel
dampened with water.
Windows
{WARNING
Leaving children, helpless adults,
or pets in a vehicle with the
windows closed is dangerous.
They can be overcome by
the extreme heat and suffer
permanent injuries or even death
from heat stroke. Never leave a
child, a helpless adult, or a pet
alone in a vehicle, especially with
the windows closed in warm or
hot weather.
Page 31 of 410
Seats and Restraints 2-5
To stop recall movement of the RKE
remote recall feature, press one of
the power seat controls, memory
buttons, or power mirror buttons.
Memory Seat recall may stop if the
seat is blocked. Remove the
obstruction and then press the
memory button again. If the memory
function does not work properly, see
your dealer/retailer for service.
Easy Exit Seat
If the easy exit seat feature is on in
the Driver Information Center (DIC),
automatic adjustment occurs when
the ignition is turned to LOCK/OFF
and the driver door is opened. The
driver seat moves back.
SeeVehicle Personalization
on
page 4‑36for more information.
Lumbar Adjustment
Power Lumbar
Seats with power lumbar have
controls located on the outboard
side of the seat. See Power Seat
Adjustment
on page 2‑3for more
information.
Adjust lumbar support by using the
rocker switch (D) on the outboard
side of the driver seat.
Release the switch when the
seatback reaches the desired level
of lumbar support.
Reclining Seatbacks
Manual Reclining Seatbacks
{WARNING
You can lose control of the
vehicle if you try to adjust a
manual driver's seat while the
vehicle is moving. The sudden
(Continued)
WARNING (Continued)
movement could startle and
confuse you, or make you push a
pedal when you do not want to.
Adjust the driver's seat only when
the vehicle is not moving.
{WARNING
If either seatback is not locked, it
could move forward in a sudden
stop or crash. That could cause
injury to the person sitting there.
Always push and pull on the
seatbacks to be sure they are
locked.
Vehicles with manual reclining
seatbacks have a lever on the
outboard side of the seat. Lift the
lever and move the seatback to the
desired position, then release the
lever. The seatback should not
move when pushed or pulled.
Page 97 of 410

Instruments and Controls 4-5
A.Air Vents on page 7‑6.
B. Turn and Lane-Change Signals
on page 5‑3.Exterior Lamp
Controlson page 5‑1. Fog
Lamps on page 5‑3.
C. Horn on page 4‑7.
D. Instrument Cluster
on
page 4‑12.
E. Windshield Wiper/Washer
on
page 4‑7. Rear Window
Wiper/Washer on page 4‑8.
F. Power Door Locks
on
page 1‑7.
G. Instrument Panel Storage
on
page 3‑1. H.
Safety Locks on page 1‑8.
I. AM-FM Radio on page 6‑11.
J. Cruise Control
on page 8‑44.
K. Instrument Panel Illumination
Control
on page 5‑4.
L. Steering Wheel Adjustment
on
page 4‑6.
M. Steering Wheel Controls
on
page 4‑6.
N. Ignition Positions on page 8‑28.
O. Climate Control Systems
on
page 7‑1or Automatic Climate
Control System on page 7‑3.
P. Shift Lever. See Automatic
Transmission on page 8‑35. Q.
StabiliTrak System
on
page 8‑42.
R. Cupholders on page 3‑1.
S. Power Outlets on page 4‑10.
T. CD/DVD Player Slot. See CD
Player
on page 6‑18or
CD/DVD Player on page 6‑21.
U. Driver Information Center (DIC) Buttons. See Driver Information
Center (DIC) on page 4‑25.
V. Hazard Warning Flashers
on
page 5‑3.
W. Glove Box on page 3‑1.
Page 118 of 410
4-26 Instruments and Controls
DIC Operation and Displays
Use the DIC buttons located in the
center of the instrument panel to
access different displays. The DIC
displays trip, fuel, vehicle system
information, and warning messages.
It also shows the shift lever position,
the odometer, and the direction the
vehicle is driving.
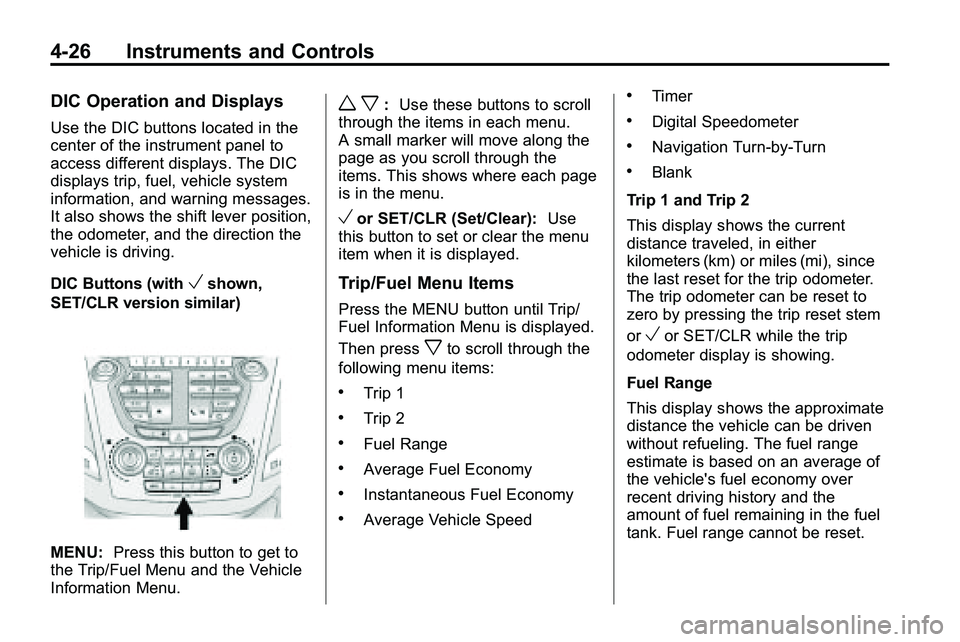
DIC Buttons (with
Vshown,
SET/CLR version similar)
MENU: Press this button to get to
the Trip/Fuel Menu and the Vehicle
Information Menu.
w x: Use these buttons to scroll
through the items in each menu.
A small marker will move along the
page as you scroll through the
items. This shows where each page
is in the menu.
Vor SET/CLR (Set/Clear): Use
this button to set or clear the menu
item when it is displayed.
Trip/Fuel Menu Items
Press the MENU button until Trip/
Fuel Information Menu is displayed.
Then press
xto scroll through the
following menu items:
.Trip 1
.Trip 2
.Fuel Range
.Average Fuel Economy
.Instantaneous Fuel Economy
.Average Vehicle Speed
.Timer
.Digital Speedometer
.Navigation Turn-by-Turn
.Blank
Trip 1 and Trip 2
This display shows the current
distance traveled, in either
kilometers (km) or miles (mi), since
the last reset for the trip odometer.
The trip odometer can be reset to
zero by pressing the trip reset stem
or
Vor SET/CLR while the trip
odometer display is showing.
Fuel Range
This display shows the approximate
distance the vehicle can be driven
without refueling. The fuel range
estimate is based on an average of
the vehicle's fuel economy over
recent driving history and the
amount of fuel remaining in the fuel
tank. Fuel range cannot be reset.
Page 134 of 410
![GMC TERRAIN 2010 Owners Manual 4-42 Instruments and Controls
The OnStar system can record and
transmit vehicle information. This
information is automatically sent to
an OnStar call center when
Qis
pressed,
]is pressed, or if the
ai GMC TERRAIN 2010 Owners Manual 4-42 Instruments and Controls
The OnStar system can record and
transmit vehicle information. This
information is automatically sent to
an OnStar call center when
Qis
pressed,
]is pressed, or if the
ai](/img/44/35523/w960_35523-133.png)
4-42 Instruments and Controls
The OnStar system can record and
transmit vehicle information. This
information is automatically sent to
an OnStar call center when
Qis
pressed,
]is pressed, or if the
airbags or ACR system deploy. This
information usually includes the
vehicle's GPS location and, in the
event of a crash, additional
information regarding the crash that
the vehicle was involved in (e.g. the
direction from which the vehicle was
hit). When the virtual advisor feature
of OnStar hands-free calling is
used, the vehicle also sends OnStar
the vehicle's GPS location so they
can provide services where it is
located.
Location information about the
vehicle is only available if the GPS
satellite signals are unobstructed
and available. The vehicle must have a working
electrical system, including
adequate battery power, for the
OnStar equipment to operate. There
are other problems OnStar cannot
control that may prevent OnStar
from providing OnStar service at
any particular time or place. Some
examples are damage to important
parts of the vehicle in a crash, hills,
tall buildings, tunnels, weather or
wireless phone network congestion.
OnStar Steering Wheel
Controls
This vehicle may have a Talk/Mute
button that can be used to interact
with OnStar hands-free calling. See
Steering Wheel Controls
on
page 4‑6for more information. On some vehicles, the mute button
can be used to dial numbers into
voice mail systems, or to dial phone
extensions. See the OnStar Owner's
Guide for more information.
Your Responsibility
Increase the volume of the radio if
the OnStar advisor cannot be heard.
If the light next to the OnStar
buttons is red, the system may
not be functioning properly.
Press
Qand request a vehicle
diagnostic. If the light appears clear
(no light is appearing), your OnStar
subscription has expired and all
services have been deactivated.
Press
Qto confirm that the OnStar
equipment is active.
Page 141 of 410

Infotainment System 6-3
Overview (Radio with CD)A. VOL/O
.Turns the system on or off
and adjusts the volume.
B.
gSEEK
.Radio: Seeks the previous
station.
.CD: Selects the previous
track or rewinds within a
track.
C. RADIO/BAND
.Changes the band while
listening to the radio.
.Selects the radio when
listening to a different audio
source.
D. AUX
.Selects a connected
external audio source.
E. Buttons 1 to 6
.Radio: Saves and selects
favorite stations.
Page 144 of 410
6-6 Infotainment System
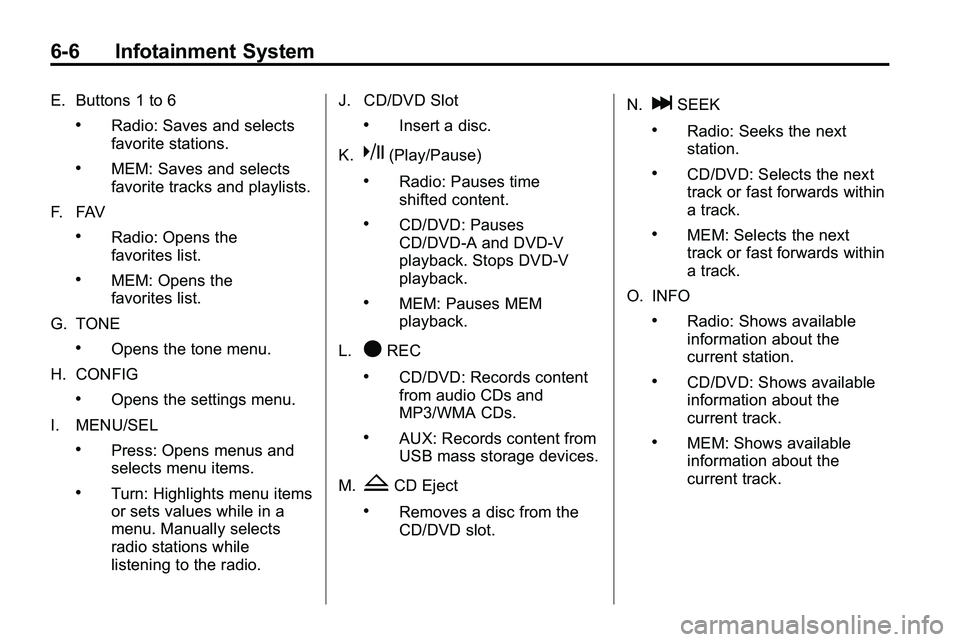
E. Buttons 1 to 6
.Radio: Saves and selects
favorite stations.
.MEM: Saves and selects
favorite tracks and playlists.
F. FAV
.Radio: Opens the
favorites list.
.MEM: Opens the
favorites list.
G. TONE
.Opens the tone menu.
H. CONFIG
.Opens the settings menu.
I. MENU/SEL
.Press: Opens menus and
selects menu items.
.Turn: Highlights menu items
or sets values while in a
menu. Manually selects
radio stations while
listening to the radio. J. CD/DVD Slot
.Insert a disc.
K.
k(Play/Pause)
.Radio: Pauses time
shifted content.
.CD/DVD: Pauses
CD/DVD‐A and DVD‐V
playback. Stops DVD‐V
playback.
.MEM: Pauses MEM
playback.
L.
OREC
.CD/DVD: Records content
from audio CDs and
MP3/WMA CDs.
.AUX: Records content from
USB mass storage devices.
M.
ZCD Eject
.Removes a disc from the
CD/DVD slot. N.
lSEEK
.Radio: Seeks the next
station.
.CD/DVD: Selects the next
track or fast forwards within
a track.
.MEM: Selects the next
track or fast forwards within
a track.
O. INFO
.Radio: Shows available
information about the
current station.
.CD/DVD: Shows available
information about the
current track.
.MEM: Shows available
information about the
current track.
Page 145 of 410
Infotainment System 6-7
P.5/0(Phone/Mute)
.Opens the phone
main menu.
.Mutes the audio system.
Q. DEL
.MEM: Deletes the current
track from MEM.
R.
0BACK
.Menu: Moves one
level back.
.Character Input: Deletes
the last character.
Operation
Controls
The infotainment system is operated
by using the pushbuttons,
multifunction knobs, menus that are
shown on the display, and steering
wheel controls, if equipped.
Turning the System On or Off
VOL/O(Volume/Power): Press
to turn the system on and off.
Automatic Switch‐Off
If the infotainment system has been
turned on after the ignition is turned
off, the system will turn off
automatically after ten minutes.
Volume Control
VOL/O(Volume/Power): Turn to
adjust the volume.
5/0(Mute): For vehicles with
OnStar®, press and hold5/0to
mute the infotainment system. Press
and hold
5/0again, or turn the
VOL/
Oknob to cancel mute.
For vehicles without OnStar
®, press5/0to mute the infotainment
system. Press
5/0again, or turn
the VOL/
Oknob to cancel mute.
Menu System
Controls
The MENU/SEL knob and the
0BACK button are used to
navigate the menu system.
MENU/SEL (Menu/Select):
Press to:
.Enter the menu system.
.Select or activate the highlighted
menu option.
.Confirm a set value.
.Turn a system setting on or off.
Page 149 of 410
Infotainment System 6-11
Radio
AM-FM Radio
Control Buttons
The buttons used to control the
radio are:
RADIO/BAND:Press to turn the
radio on and choose between AM,
FM, and XM™, if equipped.
MENU/SEL: Turn to manually
search for stations.
FAV: Press to open the
favorites list.
lSEEK orgSEEK: Press to
search for stations. Press and hold
to fast forward and rewind time
shifted data. See “Time Shifting
(Radio with CD/DVD and MEM)”
later in this section.
k: Press to pause and resume
time shifted data. See “Time Shifting
(Radio with CD/DVD and MEM)”
later in this section.
1 to 6: Press to select preset
stations.
RDS (Radio Data System)
The radio may have RDS. The RDS
feature is available for use only on
FM stations that broadcast RDS
information. This feature only works
when the information from the radio
station is available. In rare cases, a
radio station could broadcast
incorrect information that causes the
radio features to work improperly.
If this happens, contact the radio
station.
While the radio is tuned to an
FM-RDS station, the station name
or call letters display.
Radio Menus
Radio menus are available for AM
and FM.
Press the MENU/SEL knob to open
the main radio menu for that band.
Selecting a Band
Press the RADIO/BAND button
to choose AM, FM, or XM™,
if equipped. The last station that
was playing starts playing again.
Selecting a Station
Seek Tuning (Radio with CD)
If the radio station is not known:
Briefly press
gSEEK orlSEEK,
to automatically search for the next
available station. If a station is not
found, the radio switches to a more
sensitive search level. If a station
still is not found, the frequency that
was last active begins to play.
Page 151 of 410
Infotainment System 6-13
Storing a Station as a Favorite
Stations from all bands can be
stored in any order in the favorite
pages.
Up to six stations can be stored in
each favorite page and the number
of available favorite pages can
be set.
Storing a Station as a Favorite
To store the station to a position in
the list, press the corresponding
button 1 to 6 until a beep is heard.
Retrieving stations
Press the FAV button to open a
favorite page or to switch to another
favorite page. Briefly press one of
the 1 to 6 buttons to retrieve the
station.
Time Shifting (Radio with
CD/DVD and MEM)
The radio with MEM time shift
feature can rewind 20 minutes of
FM/AM content. While listening to
the radio, the content from the
current station is always being
buffered.
Press the
kbutton to pause the
radio. The radio displays the time
shift status bar. The status bar
shows the amount of content that is
stored in the buffer and the current
pause point.
To resume playback from the
current pause point, press
the
kbutton again. The radio is
no longer live, but played from the
time shift buffer. A status bar
displays below the station number.
Press and hold the
gSEEK
or
lSEEK buttons to fast forward
or rewind through the time shift buffer. Hold
lSEEK until the end
of the recorded buffer resumes live
playback.
Press and release the
gSEEK
or
lSEEK buttons to jump forward
or back 30 seconds in the time shift
buffer.
When the radio station is
changed, the buffer is cleared
and automatically restarted for the
current station. Content from a
previously tuned station is no longer
available.
The time shift feature is not
available while recording or with
other sources of playback.
Pausing AM/FM with the Vehicle
Turned Off
If AM/FM is paused when the
vehicle is turned off, the radio
continues to buffer the current radio
station for up to 20 minutes. If the
vehicle is turned back on within
20 minutes, the radio resumes
playback from the paused point.