Tow GMC TERRAIN 2011 User Guide
[x] Cancel search | Manufacturer: GMC, Model Year: 2011, Model line: TERRAIN, Model: GMC TERRAIN 2011Pages: 426, PDF Size: 5.58 MB
Page 107 of 426

Black plate (53,1)GMC Terrain Owner Manual - 2011
Seats and Restraints 3-53
Do not fold the empty rear seat
with a safety belt buckled. This
could damage the safety belt or
the seat. Unbuckle and return the
safety belt to its stowed position,
before folding the seat.
Make sure to attach the child
restraint at the proper anchor
location.
This system is designed to make
installation of child restraints easier.
When using lower anchors, do
not use the vehicle's safety belts.
Instead use the vehicle's anchors
and child restraint attachments
to secure the restraints. Some
restraints also use another vehicle
anchor to secure a top tether.
1. Attach and tighten the lowerattachments to the lower
anchors. If the child restraint
does not have lower
attachments or the desired
seating position does not have
lower anchors, secure the child restraint with the top tether and
the safety belts. Refer to the
child restraint manufacturer
instructions and the instructions
in this manual.
1.1. Find the lower anchors
for the desired seating
position.
1.2. Put the child restraint on the seat.
1.3. Attach and tighten the lower attachments on the child
restraint to the lower
anchors.
2. If the child restraint manufacturer recommends that the top tether
be attached, attach and tighten
the top tether to the top tether
anchor, if equipped. Refer to the
child restraint instructions and
the following steps:
2.1. Find the top tether anchor. 2.2. Route, attach and tighten
the top tether according
to your child restraint
instructions and the
following instructions:
.If the position being used
does not have a headrest
or head restraint and a
single tether is being used,
route the tether over the
seatback.
Page 110 of 426

Black plate (56,1)GMC Terrain Owner Manual - 2011
3-56 Seats and Restraints
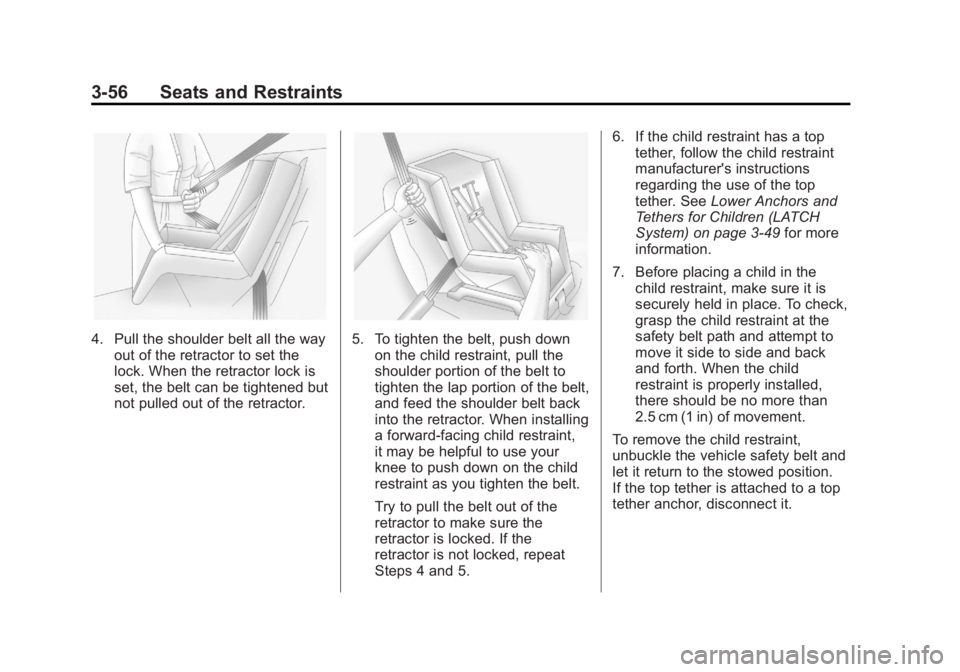
4. Pull the shoulder belt all the wayout of the retractor to set the
lock. When the retractor lock is
set, the belt can be tightened but
not pulled out of the retractor.5. To tighten the belt, push downon the child restraint, pull the
shoulder portion of the belt to
tighten the lap portion of the belt,
and feed the shoulder belt back
into the retractor. When installing
a forward-facing child restraint,
it may be helpful to use your
knee to push down on the child
restraint as you tighten the belt.
Try to pull the belt out of the
retractor to make sure the
retractor is locked. If the
retractor is not locked, repeat
Steps 4 and 5. 6. If the child restraint has a top
tether, follow the child restraint
manufacturer's instructions
regarding the use of the top
tether. See Lower Anchors and
Tethers for Children (LATCH
System) on page 3‑49 for more
information.
7. Before placing a child in the child restraint, make sure it is
securely held in place. To check,
grasp the child restraint at the
safety belt path and attempt to
move it side to side and back
and forth. When the child
restraint is properly installed,
there should be no more than
2.5 cm (1 in) of movement.
To remove the child restraint,
unbuckle the vehicle safety belt and
let it return to the stowed position.
If the top tether is attached to a top
tether anchor, disconnect it.
Page 111 of 426

Black plate (57,1)GMC Terrain Owner Manual - 2011
Seats and Restraints 3-57
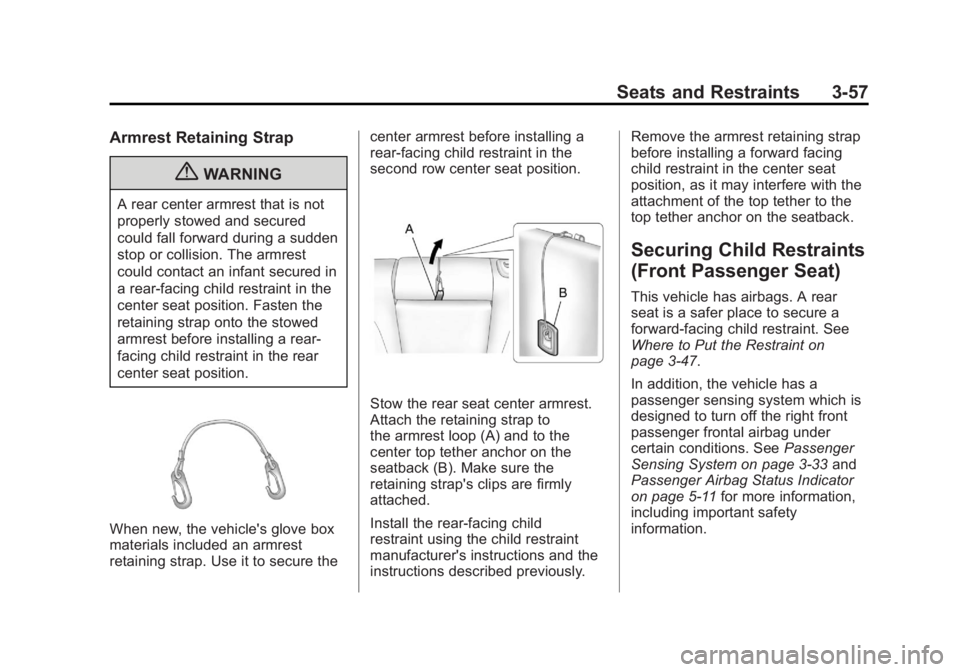
Armrest Retaining Strap
{WARNING
A rear center armrest that is not
properly stowed and secured
could fall forward during a sudden
stop or collision. The armrest
could contact an infant secured in
a rear‐facing child restraint in the
center seat position. Fasten the
retaining strap onto the stowed
armrest before installing a rear‐
facing child restraint in the rear
center seat position.
When new, the vehicle's glove box
materials included an armrest
retaining strap. Use it to secure thecenter armrest before installing a
rear‐facing child restraint in the
second row center seat position.
Stow the rear seat center armrest.
Attach the retaining strap to
the armrest loop (A) and to the
center top tether anchor on the
seatback (B). Make sure the
retaining strap's clips are firmly
attached.
Install the rear-facing child
restraint using the child restraint
manufacturer's instructions and the
instructions described previously.Remove the armrest retaining strap
before installing a forward facing
child restraint in the center seat
position, as it may interfere with the
attachment of the top tether to the
top tether anchor on the seatback.
Securing Child Restraints
(Front Passenger Seat)
This vehicle has airbags. A rear
seat is a safer place to secure a
forward-facing child restraint. See
Where to Put the Restraint on
page 3‑47.
In addition, the vehicle has a
passenger sensing system which is
designed to turn off the right front
passenger frontal airbag under
certain conditions. See
Passenger
Sensing System on page 3‑33 and
Passenger Airbag Status Indicator
on page 5‑11 for more information,
including important safety
information.
Page 114 of 426

Black plate (60,1)GMC Terrain Owner Manual - 2011
3-60 Seats and Restraints
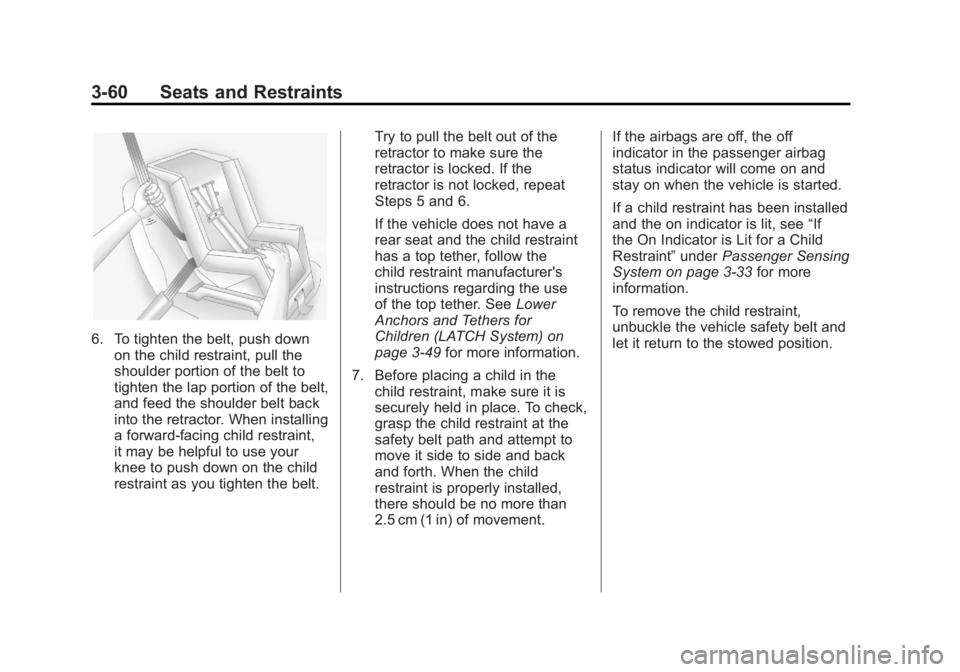
6. To tighten the belt, push downon the child restraint, pull the
shoulder portion of the belt to
tighten the lap portion of the belt,
and feed the shoulder belt back
into the retractor. When installing
a forward-facing child restraint,
it may be helpful to use your
knee to push down on the child
restraint as you tighten the belt. Try to pull the belt out of the
retractor to make sure the
retractor is locked. If the
retractor is not locked, repeat
Steps 5 and 6.
If the vehicle does not have a
rear seat and the child restraint
has a top tether, follow the
child restraint manufacturer's
instructions regarding the use
of the top tether. See
Lower
Anchors and Tethers for
Children (LATCH System) on
page 3‑49 for more information.
7. Before placing a child in the child restraint, make sure it is
securely held in place. To check,
grasp the child restraint at the
safety belt path and attempt to
move it side to side and back
and forth. When the child
restraint is properly installed,
there should be no more than
2.5 cm (1 in) of movement. If the airbags are off, the off
indicator in the passenger airbag
status indicator will come on and
stay on when the vehicle is started.
If a child restraint has been installed
and the on indicator is lit, see
“If
the On Indicator is Lit for a Child
Restraint” underPassenger Sensing
System on page 3‑33 for more
information.
To remove the child restraint,
unbuckle the vehicle safety belt and
let it return to the stowed position.
Page 116 of 426

Black plate (2,1)GMC Terrain Owner Manual - 2011
4-2 Storage
Additional Storage
Features
Cargo Cover
For vehicles with a cargo cover, use
it to cover items in the rear of the
vehicle.
To remove the cover from the
vehicle, pull both ends toward each
other. To reinstall, place each end of
the cover in the holes behind the
rear seat.
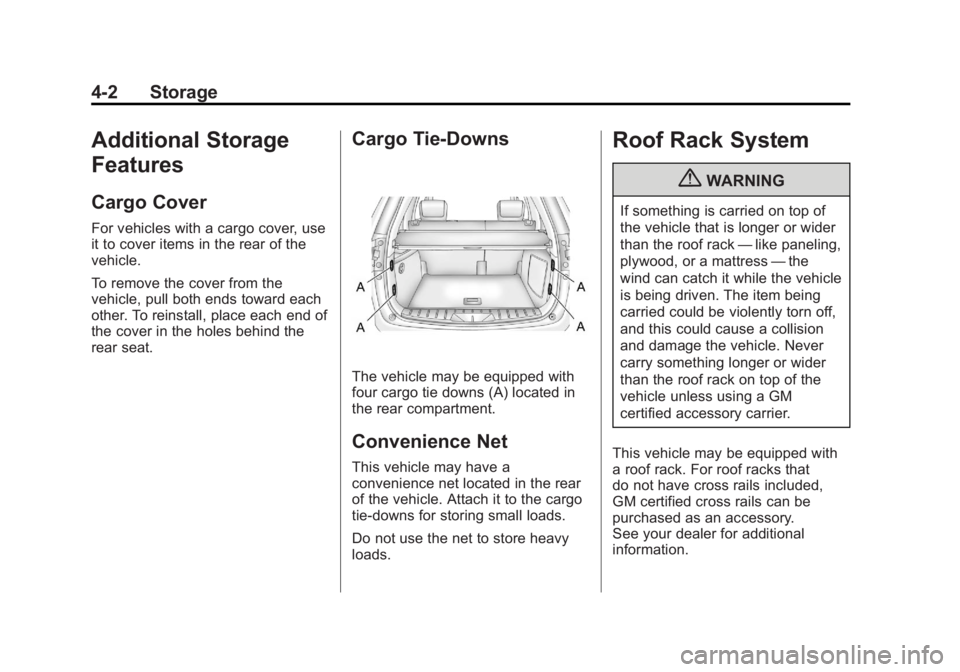
Cargo Tie-Downs
The vehicle may be equipped with
four cargo tie downs (A) located in
the rear compartment.
Convenience Net
This vehicle may have a
convenience net located in the rear
of the vehicle. Attach it to the cargo
tie‐downs for storing small loads.
Do not use the net to store heavy
loads.
Roof Rack System
{WARNING
If something is carried on top of
the vehicle that is longer or wider
than the roof rack—like paneling,
plywood, or a mattress —the
wind can catch it while the vehicle
is being driven. The item being
carried could be violently torn off,
and this could cause a collision
and damage the vehicle. Never
carry something longer or wider
than the roof rack on top of the
vehicle unless using a GM
certified accessory carrier.
This vehicle may be equipped with
a roof rack. For roof racks that
do not have cross rails included,
GM certified cross rails can be
purchased as an accessory.
See your dealer for additional
information.
Page 122 of 426

Black plate (4,1)GMC Terrain Owner Manual - 2011
5-4 Instruments and Controls
Windshield Washer
Pull the lever toward you to spray
washer fluid on the windshield.
The spray continues until the lever
is released. The wipers will run a
few times. SeeWasher Fluid on
page 10‑23 for information on filling
the windshield washer fluid
reservoir.
{WARNING
In freezing weather, do not use
the washer until the windshield is
warmed. Otherwise the washer
fluid can form ice on the
windshield, blocking your vision.
Rear Window
Wiper/Washer
The rear wiper controls are on the
end of the windshield wiper lever.
Press the upper or lower portion of
the button to control the rear wiper
and rear wiper delay.
The system turns off when the
button is returned to the middle
position.
Z(Rear Wiper): For continuous
rear window wipes.
5(Rear Wiper Delay): Sets a
delay between wipes.
=(Rear Washer): Push the
windshield wiper lever forward to
spray washer fluid on the rear
window. The lever returns to its
starting position when released.
The windshield washer reservoir
is used for the windshield and the
rear window. Check the fluid level
in the reservoir if either washer is
not working. See Washer Fluid on
page 10‑23.
Compass
The vehicle may have a compass
display on the Driver Information
Center (DIC). The compass receives
its heading and other information
from the Global Positioning
System (GPS) antenna, StabiliTrak,
and vehicle speed information.
Avoid covering the GPS antenna for
long periods of time with objects
that may interfere with the antenna's
ability to receive a satellite signal.
Page 128 of 426

Black plate (10,1)GMC Terrain Owner Manual - 2011
5-10 Instruments and Controls
Engine Coolant
Temperature Gauge
EnglishMetric
This gauge measures the
temperature of the vehicle's engine.
If the indicator needle moves to the
hot side of the gauge toward the
colored line, the engine is too hot.
If the vehicle has been operated
under normal driving conditions, pull
off the road, stop the vehicle, and
turn off the engine as soon as
possible.
Safety Belt Reminders
Driver Safety Belt Reminder
Light
There is a driver safety belt
reminder light on the instrument
panel cluster.
When the engine is started this
light and a chime come on and stay
on for several seconds to remind
drivers to fasten their safety belts.
The light also begins to flash.
This cycle repeats if the driver
remains unbuckled and the vehicle
is moving.
If the driver safety belt is already
buckled, neither the light nor chime
comes on.
Passenger Safety Belt
Reminder Light
The passenger safety belt reminder
light is by the passenger airbag
status indicator.
When the engine is started this light
and the chime come on and stay on
for several seconds to remind the
passenger to fasten their safety belt.
The light also begins to flash.
This cycle repeats if the passenger
remains unbuckled and the vehicle
is moving.
If the passenger safety belt is
buckled, neither the chime nor the
light comes on.
The front passenger safety belt
warning light and chime may turn on
if an object is put on the seat such
Page 131 of 426

Black plate (13,1)GMC Terrain Owner Manual - 2011
Instruments and Controls 5-13
Malfunction
Indicator Lamp
A computer system called OBD II
(On-Board Diagnostics-Second
Generation) monitors operation of
the fuel, ignition, and emission
control systems. It ensures that
emissions are at acceptable levels
for the life of the vehicle, helping to
produce a cleaner environment.
This light should come on when the
ignition is on, but the engine is not
running, as a check to show it is
working. If it does not, have the
vehicle serviced by your dealer.
If the Malfunction Indicator Lamp
comes on and stays on while the
engine is running, this indicates that
there is an OBD II problem and
service is required.Malfunctions often are indicated by
the system before any problem is
apparent. Being aware of the light
can prevent more serious damage
to the vehicle. This system assists
the service technician in correctly
diagnosing any malfunction.
Notice:
If the vehicle is
continually driven with this light
on the emission controls might
not work as well, the vehicle fuel
economy might not be as good,
and the engine might not run
as smoothly. This could lead to
costly repairs that might not be
covered by the vehicle warranty.
Notice: Modifications made
to the engine, transmission,
exhaust, intake, or fuel system
of the vehicle or the replacement
of the original tires with other
than those of the same Tire
Performance Criteria (TPC) can
affect the vehicle's emission
controls and can cause this light
to come on. Modifications to
these systems could lead to
costly repairs not covered by the vehicle warranty. This
could also result in a failure
to pass a required Emission
Inspection/Maintenance test. See
Accessories and Modifications on
page 10‑3.
This light comes on during a
malfunction in one of two ways:
Light Flashing:
A misfire condition
has been detected. A misfire
increases vehicle emissions and
could damage the emission control
system on the vehicle. Diagnosis
and service might be required.
To prevent more serious damage to
the vehicle:.Reduce vehicle speed.
.Avoid hard accelerations.
.Avoid steep uphill grades.
.If towing a trailer, reduce the
amount of cargo being hauled as
soon as it is possible.
Page 133 of 426

Black plate (15,1)GMC Terrain Owner Manual - 2011
Instruments and Controls 5-15
The vehicle may not pass
inspection if:
.The Malfunction Indicator Lamp
is on with the engine running,
or if the light does not come on
when the ignition is turned to
ON/RUN while the engine is off.
.The critical emission control
systems have not been
completely diagnosed by the
system. This can happen if
the battery has recently been
replaced or if the battery has run
down. The diagnostic system
evaluates critical emission
control systems during
normal driving. This can take
several days of routine driving.
If this has been done and the
vehicle still does not pass the
inspection, your dealer can
prepare the vehicle for
inspection.
Brake System Warning
Light
The vehicle brake system consists
of two hydraulic circuits. If one
circuit is not working, the remaining
circuit can still work to stop the
vehicle. For normal braking
performance, both circuits need to
be working
EnglishMetric
The brake indicator light should
come on briefly as the engine is
started. If it does not come on have
the vehicle serviced by your dealer.
When the ignition is on, the brake
system warning light comes on
when the parking brake is set. The
light stays on if the parking brake
does not fully release. If it stays on after the parking brake is fully
released, there is a brake problem.
Have the brake system inspected
immediately.
{WARNING
The brake system might not be
working properly if the brake
system warning light is on.
Driving with the brake system
warning light on can lead to a
crash. If the light is still on after
the vehicle has been pulled off
the road and carefully stopped,
have the vehicle towed for
service.
If the light comes on while driving, a
chime sounds. Pull off the road and
stop. The pedal might be harder
to push or go closer to the floor.
It might also take longer to stop.
If the light is still on, have the
vehicle towed for service. See
Towing the Vehicle on page 10‑79.
Page 150 of 426

Black plate (32,1)GMC Terrain Owner Manual - 2011
5-32 Instruments and Controls
They will return to their previous
driving position when the vehicle
is shifted out of R (Reverse), the
ignition is turned to OFF, or the
vehicle is left in reverse. SeePark
Tilt Mirrors on page 2‑15 for more
information.
This allows you to turn the park tilt
mirrors feature on or off.
Press the MENU/SEL knob when
“Reverse Tilt Mirror” is highlighted.
Turn the knob to select “On”or“Off.”
Press the knob to confirm and go
back to the last menu.
Collision/Detection Systems
Select the Collision/Detection
Systems menu and the following will
be displayed:
.Park Assist Park Assist
This allows the Ultrasonic Parking
Assist feature to be turned on
or off.
Press the MENU/SEL knob when
“Park Assist”
is highlighted. Turn the
knob to select “On,” “Off,”or“Tow
Bar.” Press the knob to confirm and
go back to the last menu.
See Ultrasonic Parking Assist on
page 9‑45 for more information
Languages
Select the Languages menu and the
following will be displayed:
.English
.French
.Spanish
Turn the MENU/SEL knob to select
the language. Press the knob to
confirm and go back to the
last menu.
Lighting
Select the Lighting menu and the
following will be displayed:
.Vehicle Locator Lights
.Exit Lighting
Vehicle Locator Lights
This allows the vehicle locator lights
to be turned on or off.
Press the MENU/SEL knob
when “Vehicle Locator Lights” is
highlighted to toggle between “On”
or “Off.” Press
}BACK to confirm
the selection and go back to the
last menu.
Exit Lighting
This allows the selection of how
long the exterior lamps stay on
when leaving the vehicle when it is
dark outside.