Tow GMC TERRAIN 2011 Owner's Manual
[x] Cancel search | Manufacturer: GMC, Model Year: 2011, Model line: TERRAIN, Model: GMC TERRAIN 2011Pages: 426, PDF Size: 5.58 MB
Page 1 of 426

Black plate (1,1)GMC Terrain Owner Manual - 2011
2011 GMC Terrain Owner ManualM
In Brief. . . . . . . . . . . . . . . . . . . . . . . . 1-1
Instrument Panel . . . . . . . . . . . . . . 1-2
Initial Drive Information . . . . . . . . 1-4
Vehicle Features . . . . . . . . . . . . . 1-18
Performance and Maintenance . . . . . . . . . . . . . . . . 1-23
Keys, Doors and Windows . . . 2-1
Keys and Locks . . . . . . . . . . . . . . . 2-2
Doors . . . . . . . . . . . . . . . . . . . . . . . . . . 2-8
Vehicle Security . . . . . . . . . . . . . . 2-12
Exterior Mirrors . . . . . . . . . . . . . . . 2-14
Interior Mirrors . . . . . . . . . . . . . . . . 2-15
Windows . . . . . . . . . . . . . . . . . . . . . 2-16
Roof . . . . . . . . . . . . . . . . . . . . . . . . . . 2-18
Seats and Restraints . . . . . . . . . 3-1
Head Restraints . . . . . . . . . . . . . . . 3-2
Front Seats . . . . . . . . . . . . . . . . . . . . 3-3
Rear Seats . . . . . . . . . . . . . . . . . . . . 3-9
Safety Belts . . . . . . . . . . . . . . . . . . 3-10
Airbag System . . . . . . . . . . . . . . . . 3-26
Child Restraints . . . . . . . . . . . . . . 3-40 Storage
. . . . . . . . . . . . . . . . . . . . . . . 4-1
Storage Compartments . . . . . . . . 4-1
Additional Storage Features . . . 4-2
Roof Rack System . . . . . . . . . . . . . 4-2
Instruments and Controls . . . . 5-1
Controls . . . . . . . . . . . . . . . . . . . . . . . 5-2
Warning Lights, Gauges, and
Indicators . . . . . . . . . . . . . . . . . . . . 5-7
Information Displays . . . . . . . . . . 5-20
Vehicle Messages . . . . . . . . . . . . 5-24
Vehicle Personalization . . . . . . . 5-30
Lighting . . . . . . . . . . . . . . . . . . . . . . . 6-1
Exterior Lighting . . . . . . . . . . . . . . . 6-1
Interior Lighting . . . . . . . . . . . . . . . . 6-4
Lighting Features . . . . . . . . . . . . . . 6-5
Infotainment System . . . . . . . . . 7-1
Introduction . . . . . . . . . . . . . . . . . . . . 7-1
Radio . . . . . . . . . . . . . . . . . . . . . . . . . 7-11
Audio Players . . . . . . . . . . . . . . . . 7-19
Rear Seat Infotainment . . . . . . . 7-33
Phone . . . . . . . . . . . . . . . . . . . . . . . . 7-45 Climate Controls
. . . . . . . . . . . . . 8-1
Climate Control Systems . . . . . . 8-1
Air Vents . . . . . . . . . . . . . . . . . . . . . . . 8-5
Maintenance . . . . . . . . . . . . . . . . . . . 8-6
Driving and Operating . . . . . . . . 9-1
Driving Information . . . . . . . . . . . . . 9-2
Starting and Operating . . . . . . . 9-26
Engine Exhaust . . . . . . . . . . . . . . 9-32
Automatic Transmission . . . . . . 9-34
Drive Systems . . . . . . . . . . . . . . . . 9-37
Brakes . . . . . . . . . . . . . . . . . . . . . . . 9-37
Ride Control Systems . . . . . . . . 9-39
Cruise Control . . . . . . . . . . . . . . . . 9-42
Object Detection Systems . . . . 9-45
Fuel . . . . . . . . . . . . . . . . . . . . . . . . . . 9-52
Towing . . . . . . . . . . . . . . . . . . . . . . . 9-57
Conversions and
Add-Ons . . . . . . . . . . . . . . . . . . . . 9-64
Page 2 of 426

Black plate (2,1)GMC Terrain Owner Manual - 2011
2011 GMC Terrain Owner ManualM
Vehicle Care. . . . . . . . . . . . . . . . . 10-1
General Information . . . . . . . . . . 10-2
Vehicle Checks . . . . . . . . . . . . . . . 10-4
Headlamp Aiming . . . . . . . . . . . 10-31
Bulb Replacement . . . . . . . . . . 10-33
Electrical System . . . . . . . . . . . . 10-39
Wheels and Tires . . . . . . . . . . . 10-45
Jump Starting . . . . . . . . . . . . . . . 10-75
Towing . . . . . . . . . . . . . . . . . . . . . . 10-79
Appearance Care . . . . . . . . . . . 10-82 Service and Maintenance
. . . 11-1
General Information . . . . . . . . . . 11-1
Scheduled Maintenance . . . . . . 11-2
Recommended Fluids,
Lubricants, and Parts . . . . . . . 11-6
Maintenance Records . . . . . . . . 11-9
Technical Data . . . . . . . . . . . . . . . 12-1
Vehicle Identification . . . . . . . . . 12-1
Vehicle Data . . . . . . . . . . . . . . . . . . 12-2 Customer Information
. . . . . . . 13-1
Customer Information . . . . . . . . 13-1
Reporting Safety Defects . . . . 13-15
Vehicle Data Recording and
Privacy . . . . . . . . . . . . . . . . . . . . 13-16
Index . . . . . . . . . . . . . . . . . . . . . i-1
Page 20 of 426

Black plate (14,1)GMC Terrain Owner Manual - 2011
1-14 In Brief
For more information, see:
.Exterior Lamp Controls on
page 6‑1.
.Daytime Running Lamps (DRL)
on page 6‑2.
.Fog Lamps on page 6‑4.
Windshield Wiper/Washer
The windshield wiper/washer lever
is located on the right side of the
steering column.Move the lever to one of the
following positions:
8:
Use for a single wipe, move
the lever to
8and then release.
The wipers stop after one wipe.
(: Use to turn the wipers off.
&:For adjustable interval wipes.
Turn the
&band up for more
frequent wipes or down for less
frequent wipes.
1: Use for slow wipes.
2: Use for fast wipes.
Windshield Washer
Pull the lever toward you to spray
washer fluid on the windshield. The
spray continues until the lever is
released. Rear Window Wiper/Washer
The rear wiper controls are on the
end of the windshield wiper lever.
Press the upper or lower portion of
the button to control the rear wiper
and rear wiper delay.
Page 23 of 426

Black plate (17,1)GMC Terrain Owner Manual - 2011
In Brief 1-17
To release the parking brake, hold
the regular brake pedal down, then
push down momentarily on the
parking brake pedal until you feel
the pedal release. Slowly pull your
foot up off the park brake pedal.
SeeParking Brake on page 9‑38.
Transmission
Electronic Range Select
(ERS) Mode
ERS or manual mode allows for
the selection of the range of gear
positions. Use this mode when
driving down hill or towing a trailer
to limit the top gear and vehicle
speed. To use this feature:
1. Move the shift lever to
M (Manual Mode).
2. Press the plus/minus button on the shift lever, to increase or
decrease the gear range
available.
See Manual Mode on page 9‑35 for
more information.
Fuel Economy Mode
Vehicles with a 2.4L engine have
a Fuel Economy Mode. When
engaged, fuel economy mode can
improve the vehicle's fuel economy.Press the “eco”(economy) button
by the shift lever to turn this feature
on or off. The “eco”light in the
instrument cluster will come on
when engaged, and a Driver
Information Center (DIC) message
“ECO MODE ON” displays. See
Fuel Economy Mode on page 9‑36.
Page 27 of 426

Black plate (21,1)GMC Terrain Owner Manual - 2011
In Brief 1-21
SET/−:Move the thumbwheel
down toward SET/- to set a speed
and activate cruise control, or to
make the vehicle decelerate.
See Cruise Control on page 9‑42.
Navigation System
If the vehicle has a navigation
system, there is a separate
Navigation System Manual that
includes information on the radio,
audio players, and navigation
system.
The navigation system provides
detailed maps of most major
freeways and roads. After a
destination has been set, the
system provides turn-by-turn
instructions for reaching the
destination. In addition, the system
can help locate a variety of points
of interest (POIs), such as banks,
airports, restaurants, and more.
See the navigation system manual
for more information.
Driver Information
Center (DIC)
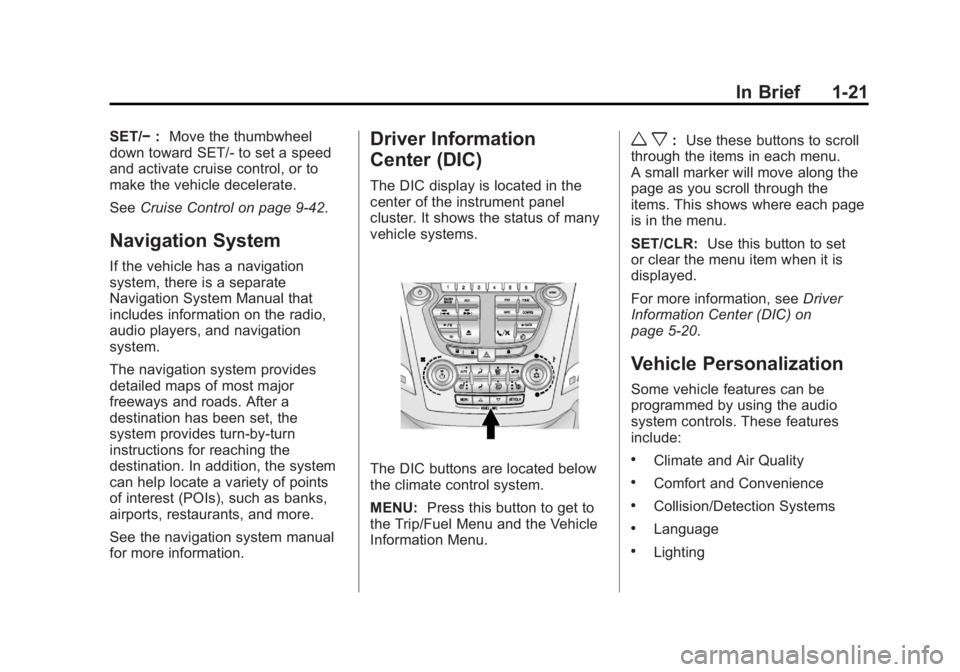
The DIC display is located in the
center of the instrument panel
cluster. It shows the status of many
vehicle systems.
The DIC buttons are located below
the climate control system.
MENU: Press this button to get to
the Trip/Fuel Menu and the Vehicle
Information Menu.
w x: Use these buttons to scroll
through the items in each menu.
A small marker will move along the
page as you scroll through the
items. This shows where each page
is in the menu.
SET/CLR: Use this button to set
or clear the menu item when it is
displayed.
For more information, see Driver
Information Center (DIC) on
page 5‑20.
Vehicle Personalization
Some vehicle features can be
programmed by using the audio
system controls. These features
include:
.Climate and Air Quality
.Comfort and Convenience
.Collision/Detection Systems
.Language
.Lighting
Page 38 of 426

Black plate (4,1)GMC Terrain Owner Manual - 2011
2-4 Keys, Doors and Windows
PressingKmay also disarm the
theft-deterrent system. See
Anti-Theft Alarm System on
page 2‑12.
V(Remote Liftgate Release):
First press
K, then press and
hold
Vto unlock the liftgate. For
vehicles with the power liftgate,
press and hold
Vuntil the liftgate
begins to move to open the liftgate.
7(Vehicle Locator/Panic
Alarm): Press and release one
time to locate the vehicle. The
exterior lamps flash and the horn
chirps. Press and hold
7for at least
two seconds to sound the panic
alarm. The horn sounds and the
turn signals flash until
7is pressed
again or the key is placed in the
ignition and turned to ON/RUN.
/(Remote Vehicle Start): For
vehicles with this feature, first
press
Qthen press and hold/to
start the engine from outside the
vehicle using the RKE transmitter.
See Remote Vehicle Start on
page 2‑5 for additional information.
Programming Transmitters to
the Vehicle
Only RKE transmitters programmed
to this vehicle will work. If a
transmitter is lost or stolen, a
replacement can be purchased and
programmed through your dealer.
When the replacement transmitter
is programmed to this vehicle, all
remaining transmitters must also be
reprogrammed. Any lost or stolen
transmitters will no longer work
once the new transmitter is
programmed.
Battery Replacement
Replace the battery if the REPLACE
BATTERY IN REMOTE KEY
message displays in the DIC. See
“Replace Battery in Remote Key”
underKey and Lock Messages on
page 5‑27.
The battery is not rechargeable. To
replace the battery:
1. Push the button on the transmitter to extend the key.
2. Remove the battery cover by prying with a finger.
3. Remove the battery by pushing on the battery and sliding it
toward the keyblade.
4. Insert the new battery, positive side facing up. Push the battery
down until it is held in place.
Replace with a CR2032 or
equivalent battery.
5. Snap the battery cover back on to the transmitter.
Page 50 of 426

Black plate (16,1)GMC Terrain Owner Manual - 2011
2-16 Keys, Doors and Windows
Vehicles with OnStar®have three
additional control buttons located at
the bottom of the mirror. See your
dealer for more information on the
system and how to subscribe to
OnStar. See the OnStar Owner's
Guide for more information about
the services OnStar provides.
Cleaning the Mirror
Do not spray glass cleaner directly
on the mirror. Use a soft towel
dampened with water.
Windows
{WARNING
Leaving children, helpless adults,
or pets in a vehicle with the
windows closed is dangerous.
They can be overcome by
the extreme heat and suffer
permanent injuries or even death
from heat stroke. Never leave a
child, a helpless adult, or a pet
alone in a vehicle, especially with
the windows closed in warm or
hot weather.
The vehicle aerodynamics are
designed to improve fuel economy
performance. This may result in a
pulsing sound when either rear
window is down and the front
windows are up. To reduce the
sound, open either a front window
or the sunroof (if equipped).
Page 63 of 426

Black plate (9,1)GMC Terrain Owner Manual - 2011
Seats and Restraints 3-9
The passenger seat may take
longer to heat up.
Remote Start Heated Seats
When it is cold outside, the heated
seats can be programmed to turn
on automatically during a remote
vehicle start. The heated seats will
be canceled when the ignition is
turned on. Press the heated seat
button to use the heated seats after
the vehicle is started.
The heated seat button lights will
not turn on during a remote start.
The temperature of an unoccupied
seat may be reduced.
To program the heated seat feature
to enabled, see“Remote Start
Auto Heat Seats” underVehicle
Personalization on page 5‑30 for
more information.Rear Seats
Split Folding Seatbacks
With this feature, either side of the
rear seatback can be folded down
for more cargo space.
{WARNING
If either seatback is not locked, it
could move forward in a sudden
stop or crash. That could cause
injury to the person sitting there.
Always push and pull on the
seatbacks to be sure they are
locked.
{WARNING
A safety belt that is improperly
routed, not properly attached,
or twisted will not provide the
protection needed in a crash. The
person wearing the belt could be
(Continued)
WARNING (Continued)
seriously injured. After raising the
rear seatback, always check to
be sure that the safety belts are
properly routed and attached, and
are not twisted.
To fold the seatback down:
Notice: Folding a rear seat with
the safety belts still fastened may
cause damage to the seat or the
safety belts. Always unbuckle the
safety belts and return them to
their normal stowed position
before folding a rear seat.
1. Unbuckle the rear safety belts and place the front seatbacks
in the upright position. See
Reclining Seatbacks on
page 3‑6.
Page 85 of 426

Black plate (31,1)GMC Terrain Owner Manual - 2011
Seats and Restraints 3-31
determined by the location and
severity of the side impact. In a
rollover event, roof-rail airbag
deployment is determined by the
direction of the roll.
What Makes an Airbag
Inflate?
In a deployment event, the sensing
system sends an electrical signal
triggering a release of gas from the
inflator. Gas from the inflator fills the
airbag causing the bag to break out
of the cover and deploy. The inflator,
the airbag, and related hardware are
all part of the airbag module.
Frontal airbag modules are located
inside the steering wheel and
instrument panel. For vehicles with
seat-mounted side impact airbags,
there are airbag modules in the side
of the front seatbacks closest to
the door. For vehicles with roof-rail
airbags, there are airbag modules in
the ceiling of the vehicle, near the
side windows that have occupant
seating positions.
How Does an Airbag
Restrain?
In moderate to severe frontal or
near frontal collisions, even belted
occupants can contact the steering
wheel or the instrument panel. In
moderate to severe side collisions,
even belted occupants can contact
the inside of the vehicle.
Airbags supplement the protection
provided by safety belts. Frontal
airbags distribute the force of
the impact more evenly over the
occupant's upper body, stopping
the occupant more gradually.
Seat‐mounted side impact and
roof-rail airbags distribute the force
of the impact more evenly over the
occupant's upper body.
Rollover capable roof-rail airbags
are designed to help contain the
head and chest of occupants in
the outboard seating positions in
the first and second rows. The
rollover capable roof-rail airbags are
designed to help reduce the risk offull or partial ejection in rollover
events, although no system can
prevent all such ejections.
But airbags would not help in
many types of collisions, primarily
because the occupant's motion
is not toward those airbags. See
When Should an Airbag Inflate? on
page 3‑29
for more information.
Airbags should never be regarded
as anything more than a supplement
to safety belts.
What Will You See After
an Airbag Inflates?
After the frontal airbags and
seat-mounted side impact airbags
inflate, they quickly deflate, so
quickly that some people may not
even realize an airbag inflated.
Roof-rail airbags may still be at least
partially inflated for some time after
they deploy. Some components of
the airbag module may be hot for
several minutes. For location of the
airbag modules, see What Makes
an Airbag Inflate? on page 3‑31.
Page 91 of 426

Black plate (37,1)GMC Terrain Owner Manual - 2011
Seats and Restraints 3-37
Additional Factors Affecting
System Operation
Safety belts help keep the
passenger in position on the
seat during vehicle maneuvers
and braking, which helps the
passenger sensing system
maintain the passenger airbag
status. See“Safety Belts” and
“Child Restraints” in the Index for
additional information about the
importance of proper restraint use.
A thick layer of additional material,
such as a blanket or cushion,
or aftermarket equipment such
as seat covers, seat heaters, and
seat massagers can affect how
well the passenger sensing system
operates. We recommend that
you not use seat covers or other
aftermarket equipment except when
approved by GM for your specific
vehicle. See Adding Equipment to
the Airbag-Equipped Vehicle on
page 3‑38 for more information
about modifications that can affect
how the system operates. A wet seat can affect the
performance of the passenger
sensing system. Here is how:.The passenger sensing system
may turn off the passenger
airbag when liquid is soaked
into the seat. If this happens, the
off indicator will be lit, and the
airbag readiness light on the
instrument panel will also be lit.
.Liquid pooled on the seat that
has not soaked in may make it
more likely that the passenger
sensing system will enable (turn
on) the passenger airbag while a
child restraint or child occupant
is on the seat. If the passenger
airbag is turned on, the on
indicator will be lit.
If the passenger seat gets wet, dry
the seat immediately. If the airbag
readiness light is lit, do not install a
child restraint or allow anyone to
occupy the seat. See Airbag
Readiness Light on page 5‑11 for
important safety information. The on indicator may be lit if
an object, such as a briefcase,
handbag, grocery bag, laptop or
other electronic device, is put on
an unoccupied seat. If this is not
desired remove the object from
the seat.
{WARNING
Stowing of articles under the
passenger seat or between the
passenger seat cushion and
seatback may interfere with the
proper operation of the passenger
sensing system.
Servicing the
Airbag-Equipped Vehicle
Airbags affect how the vehicle
should be serviced. There are parts
of the airbag system in several
places around the vehicle. Your
dealer and the service manual have
information about servicing the
vehicle and the airbag system.