cd controls GMC TERRAIN 2015 User Guide
[x] Cancel search | Manufacturer: GMC, Model Year: 2015, Model line: TERRAIN, Model: GMC TERRAIN 2015Pages: 357, PDF Size: 4.04 MB
Page 23 of 357
Black plate (16,1)GMC Terrain/Terrain Denali Owner Manual (GMNA-Localizing-U.S./Canada/
Mexico-7707484) - 2015 - crc - 10/1/14
1-16 In Brief
To release the parking brake, hold
the regular brake pedal down, then
push down momentarily on the
parking brake pedal until you feel
the pedal release. Slowly pull your
foot up off the parking brake pedal.
SeeParking Brake on page 9-31.
Transmission
Electronic Range Select
(ERS) Mode
ERS or manual mode allows for the
selection of the range of gear
positions. Use this mode when
driving downhill or towing a trailer to
limit the top gear and vehicle speed.
To use this feature:
1. Move the shift lever to
M (Manual Mode).
2. Press the plus/minus button on the shift lever to increase or
decrease the gear range
available.
See Manual Mode on page 9-28.
Fuel Economy Mode
Vehicles with a 2.4L engine have a
Fuel Economy Mode. When
engaged, Fuel Economy Mode can
improve the vehicle's fuel economy.
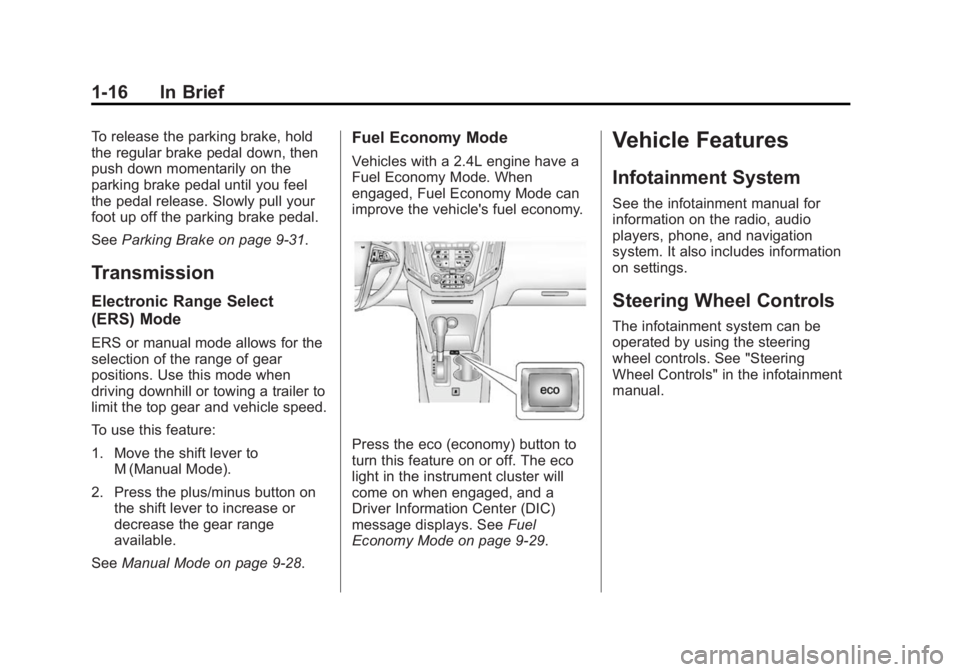
Press the eco (economy) button to
turn this feature on or off. The eco
light in the instrument cluster will
come on when engaged, and a
Driver Information Center (DIC)
message displays. See Fuel
Economy Mode on page 9-29.
Vehicle Features
Infotainment System
See the infotainment manual for
information on the radio, audio
players, phone, and navigation
system. It also includes information
on settings.
Steering Wheel Controls
The infotainment system can be
operated by using the steering
wheel controls. See "Steering
Wheel Controls" in the infotainment
manual.
Page 30 of 357
Black plate (1,1)GMC Terrain/Terrain Denali Owner Manual (GMNA-Localizing-U.S./Canada/
Mexico-7707484) - 2015 - crc - 10/1/14
Keys, Doors, and Windows 2-1
Keys, Doors, and
Windows
Keys and Locks
Keys . . . . . . . . . . . . . . . . . . . . . . . . . . 2-1
Remote Keyless Entry (RKE)System . . . . . . . . . . . . . . . . . . . . . . 2-2
Remote Keyless Entry (RKE) System Operation . . . . . . . . . . . 2-3
Remote Vehicle Start . . . . . . . . . 2-5
Door Locks . . . . . . . . . . . . . . . . . . . 2-7
Power Door Locks . . . . . . . . . . . . 2-7
Delayed Locking . . . . . . . . . . . . . . 2-8
Automatic Door Locks . . . . . . . . . 2-8
Lockout Protection . . . . . . . . . . . . 2-8
Safety Locks . . . . . . . . . . . . . . . . . . 2-9
Doors
Liftgate . . . . . . . . . . . . . . . . . . . . . . . . 2-9
Vehicle Security
Vehicle Security . . . . . . . . . . . . . . 2-13
Vehicle Alarm System . . . . . . . 2-13
Immobilizer . . . . . . . . . . . . . . . . . . 2-14
Immobilizer Operation . . . . . . . 2-14
Exterior Mirrors
Convex Mirrors . . . . . . . . . . . . . . 2-15
Power Mirrors . . . . . . . . . . . . . . . . 2-15
Heated Mirrors . . . . . . . . . . . . . . . 2-16
Reverse Tilt Mirrors . . . . . . . . . . 2-16
Interior Mirrors
Interior Rearview Mirrors . . . . . 2-16
Manual Rearview Mirror . . . . . . 2-17
Automatic Dimming Rearview Mirror . . . . . . . . . . . . . . . . . . . . . . . 2-17
Windows
Windows . . . . . . . . . . . . . . . . . . . . . 2-17
Power Windows . . . . . . . . . . . . . 2-17
Sun Visors . . . . . . . . . . . . . . . . . . . 2-18
Roof
Sunroof . . . . . . . . . . . . . . . . . . . . . . 2-19
Keys and Locks
Keys
{Warning
Leaving children in a vehicle with
the ignition key is dangerous and
children or others could be
seriously injured or killed. They
could operate the power windows
or other controls or make the
vehicle move. The windows will
function with the keys in the
ignition, and children or others
could be caught in the path of a
closing window. Do not leave
children in a vehicle with the
ignition key.
Page 56 of 357
Black plate (7,1)GMC Terrain/Terrain Denali Owner Manual (GMNA-Localizing-U.S./Canada/
Mexico-7707484) - 2015 - crc - 10/1/14
Seats and Restraints 3-7
turned off. These automatically
stored positions are referred to as
RKE Memory positions. See
Remote Keyless Entry (RKE)
System Operation on page 2-3.
Storing Button Memory Positions
To save positions into Button
Memory:
1. Adjust the driver seat, seatbackrecliner, and both outside mirrors
to the desired driving positions.
2. Press and hold MEM (Memory) and “1”at the same time until a
beep sounds.
3. Repeat Steps 1 and 2 for a second driver using “2.”
Recalling Button Memory
Positions
To recall the Button Memory
positions, press and hold “1”or“2.”
The driver seat and outside mirrors
move to the positions stored to
those buttons when pressed. Releasing
“1”or“2” before the
stored positions are reached stops
the recall.
If something has blocked the driver
seat while recalling a memory
position, the recall may stop.
Remove the obstruction; then press
and hold the appropriate manual
control for the memory item that is
not recalling for two seconds. Try
recalling the memory position again
by pressing the appropriate memory
button. If the memory position is still
not recalling, see your dealer for
service.
Recalling RKE Memory Positions
(Memory Remote Recall)
The Memory Remote Recall feature
can recall the driver seat and
outside mirrors to previously stored
RKE Memory positions when
entering the vehicle.
Every time the ignition is turned off,
the positions of the driver seat and
outside mirrors are automatically
stored to the RKE transmitter that
was used to start the vehicle. These positions are called RKE Memory
positions and may be different than
the previously mentioned Button
Memory positions saved to the
“1”
or“2” buttons. To recall RKE
Memory positions, unlock the driver
door with the RKE transmitter and
open the driver door. If the driver
door is already open, pressing the
RKE transmitter
Kbutton will also
activate the RKE Memory recall.
The driver seat and outside mirrors
will move to the previously saved
RKE Memory positions.
This feature is turned on or off using
the vehicle personalization menu.
See Vehicle Personalization on
page 5-31.
To stop recall movement, press any
of the memory, power mirror,
or power seat controls.
If something has blocked the driver
seat while recalling a memory
position, the recall may stop.
Remove the obstruction; then press
and hold the appropriate manual
control for the memory item that is
Page 57 of 357

Black plate (8,1)GMC Terrain/Terrain Denali Owner Manual (GMNA-Localizing-U.S./Canada/
Mexico-7707484) - 2015 - crc - 10/1/14
3-8 Seats and Restraints
not recalling for two seconds. Try
recalling the memory position again
by opening the driver door and
pressing the
Kon the RKE
transmitter.
RKE transmitters are not labeled
with a number. If your memory seat
position is stored to "1" or "2" but
this position is not automatically
recalling, then change the stored
position or switch RKE transmitters
with the other driver.
If the memory position is still not
recalling, see your dealer for
service.
Easy Exit Driver Seat
This feature moves the seat
rearward allowing the driver more
room to exit the vehicle.
To activate, turn the ignition off and
open the driver door. If the driver
door is already open, turning the
ignition off will activate the recall. This feature can be turned on or off
using the vehicle personalization
menu. See
Vehicle Personalization
on page 5-31.
To stop recall movement, press one
of the memory or power seat
controls.
If something has blocked the driver
seat while recalling the exit position,
the recall may stop. Remove the
obstruction; then press and hold the
power seat control rearward for
two seconds. Try recalling the exit
position again. If the exit position is
still not recalling, see your dealer for
service.
Heated Front Seats
{Warning
If you cannot feel temperature
change or pain to the skin, the
seat heater may cause burns. To
reduce the risk of burns, people
with such a condition should use
care when using the seat heater,
especially for long periods of
time. Do not place anything on
the seat that insulates against
heat, such as a blanket, cushion,
cover, or similar item. This may
cause the seat heater to
overheat. An overheated seat
heater may cause a burn or may
damage the seat.
Page 58 of 357

Black plate (9,1)GMC Terrain/Terrain Denali Owner Manual (GMNA-Localizing-U.S./Canada/
Mexico-7707484) - 2015 - crc - 10/1/14
Seats and Restraints 3-9
Uplevel Climate Control SystemShown, Base Similar
If available, the buttons are near the
climate controls. To operate, the
ignition must be in ON/RUN.
Press
zorJto heat the driver or
passenger seat cushion and
seatback.
Press the button once for the
highest setting. With each press of
the button, the heated seat will
change to the next lower setting,
and then the off setting. Three lights
indicate the highest setting, and one
light indicates the lowest. The passenger seat may take
longer to heat up.
Remote Start Heated Seats
When it is cold outside, the heated
seats can be programmed to turn on
automatically during a remote
vehicle start. The heated seats will
be canceled when the ignition is
turned on. Press the heated seat
button to use the heated seats after
the vehicle is started.
The heated seat button lights will
not turn on during a remote start.
The temperature of an unoccupied
seat may be reduced.
To program the heated seat feature
to enabled, see
Vehicle
Personalization on page 5-31.
Rear Seats
Split Folding Seatbacks
Either side of the rear seatback can
be folded down for more cargo
space.
Folding the Seatbacks
{Caution
Folding a rear seat with the safety
belts still fastened may cause
damage to the seat or the safety
belts. Always unbuckle the safety
belts and return them to their
normal stowed position before
folding a rear seat.
To fold the seatback down:
1. Unbuckle the rear safety belts and place the front seatbacks in
the upright position. See
Reclining Seatbacks on
page 3-5.
Page 74 of 357

Black plate (25,1)GMC Terrain/Terrain Denali Owner Manual (GMNA-Localizing-U.S./Canada/
Mexico-7707484) - 2015 - crc - 10/1/14
Seats and Restraints 3-25
several minutes. For location of the
airbags, seeWhere Are the
Airbags? on page 3-21.
The parts of the airbag that come
into contact with you may be warm,
but not too hot to touch. There may
be some smoke and dust coming
from the vents in the deflated
airbags. Airbag inflation does not
prevent the driver from seeing out of
the windshield or being able to steer
the vehicle, nor does it prevent
people from leaving the vehicle.
{Warning
When an airbag inflates, there
may be dust in the air. This dust
could cause breathing problems
for people with a history of
asthma or other breathing trouble.
To avoid this, everyone in the
vehicle should get out as soon as
it is safe to do so. If you have
breathing problems but cannot
get out of the vehicle after an
(Continued)
Warning (Continued)
airbag inflates, then get fresh air
by opening a window or a door.
If you experience breathing
problems following an airbag
deployment, you should seek
medical attention.
The vehicle has a feature that may
automatically unlock the doors, turn
on the interior lamps and hazard
warning flashers, and shut off the
fuel system after the airbags inflate.
The feature may also activate,
without airbag inflation, after an
event that exceeds a predetermined
threshold. You can lock the doors,
and turn off the interior lamps, and
turn off the hazard warning flashers
by using the controls for those
features.
{Warning
A crash severe enough to inflate
the airbags may have also
damaged important functions in
the vehicle, such as the fuel
system, brake and steering
systems, etc. Even if the vehicle
appears to be drivable after a
moderate crash, there may be
concealed damage that could
make it difficult to safely operate
the vehicle.
Use caution if you should attempt
to restart the engine after a crash
has occurred.
In many crashes severe enough to
inflate the airbag, windshields are
broken by vehicle deformation.
Additional windshield breakage may
also occur from the front outboard
passenger airbag.
.Airbags are designed to inflate
only once. After an airbag
inflates, you will need some new
Page 106 of 357
Black plate (1,1)GMC Terrain/Terrain Denali Owner Manual (GMNA-Localizing-U.S./Canada/
Mexico-7707484) - 2015 - crc - 10/1/14
Instruments and Controls 5-1
Instruments and
Controls
Controls
Steering Wheel Adjustment . . . 5-2
Steering Wheel Controls . . . . . . 5-2
Horn . . . . . . . . . . . . . . . . . . . . . . . . . . 5-2
Windshield Wiper/Washer . . . . . 5-2
Rear Window Wiper/Washer . . . . . . . . . . . . . . . . . . . . . . 5-3
Compass . . . . . . . . . . . . . . . . . . . . . 5-4
Clock . . . . . . . . . . . . . . . . . . . . . . . . . 5-4
Power Outlets . . . . . . . . . . . . . . . . . 5-5
Warning Lights, Gauges, and
Indicators
Warning Lights, Gauges, and Indicators . . . . . . . . . . . . . . . . . . . . 5-6
Instrument Cluster . . . . . . . . . . . . 5-7
Speedometer . . . . . . . . . . . . . . . . . 5-8
Odometer . . . . . . . . . . . . . . . . . . . . . 5-8
Tachometer . . . . . . . . . . . . . . . . . . . 5-8
Fuel Gauge . . . . . . . . . . . . . . . . . . . 5-8
Engine Coolant Temperature Gauge . . . . . . . . . . . . . . . . . . . . . . . 5-9
Safety Belt Reminders . . . . . . . . 5-9
Airbag Readiness Light . . . . . . 5-10 Passenger Airbag Status
Indicator . . . . . . . . . . . . . . . . . . . . 5-11
Charging System Light . . . . . . . 5-11
Malfunction Indicator Lamp . . . . . . . . . . . . . 5-12
Brake System Warning Light . . . . . . . . . . . . . . . . . . . . . . . 5-14
Antilock Brake System (ABS) Warning Light . . . . . . . . . . . . . . 5-15
Lane Departure Warning (LDW) Light . . . . . . . . . . . . . . . . 5-15
Forward Collision Alert (FCA) Warning Light . . . . . . . . . . . . . . 5-16
Vehicle Ahead Indicator . . . . . . 5-16
Traction Off Light . . . . . . . . . . . . 5-16
StabiliTrak
®OFF Light . . . . . . . 5-17
Traction Control System (TCS)/StabiliTrak
®Light . . . . 5-17
Tire Pressure Light . . . . . . . . . . 5-17
Engine Oil Pressure Light . . . . 5-18
Fuel Economy Light . . . . . . . . . 5-18
Low Fuel Warning Light . . . . . . 5-19
Security Light . . . . . . . . . . . . . . . . 5-19
High-Beam On Light . . . . . . . . . 5-19
Front Fog Lamp Light . . . . . . . . 5-19
Lamps On Reminder . . . . . . . . . 5-20
Cruise Control Light . . . . . . . . . 5-20
Information Displays
Driver Information Center (DIC) . . . . . . . . . . . . . . . 5-20
Vehicle Messages
Vehicle Messages . . . . . . . . . . . 5-24
Battery Voltage and ChargingMessages . . . . . . . . . . . . . . . . . . 5-24
Brake System Messages . . . . 5-24
Compass Messages . . . . . . . . . 5-24
Cruise Control Messages . . . . 5-25
Door Ajar Messages . . . . . . . . . 5-25
Engine Cooling System Messages . . . . . . . . . . . . . . . . . . 5-25
Engine Oil Messages . . . . . . . . 5-26
Engine Power Messages . . . . 5-26
Fuel System Messages . . . . . . 5-27
Key and Lock Messages . . . . . 5-27
Object Detection System Messages . . . . . . . . . . . . . . . . . . 5-27
Ride Control System Messages . . . . . . . . . . . . . . . . . . 5-28
Airbag System Messages . . . . 5-29
Security Messages . . . . . . . . . . 5-29
Service Vehicle Messages . . . 5-29
Tire Messages . . . . . . . . . . . . . . . 5-29
Transmission Messages . . . . . 5-30
Vehicle Reminder Messages . . . . . . . . . . . . . . . . . . 5-30
Page 107 of 357

Black plate (2,1)GMC Terrain/Terrain Denali Owner Manual (GMNA-Localizing-U.S./Canada/
Mexico-7707484) - 2015 - crc - 10/1/14
5-2 Instruments and Controls
Vehicle Personalization
Vehicle Personalization . . . . . . 5-31
Universal Remote System
Universal Remote System . . . 5-37
Universal Remote SystemProgramming . . . . . . . . . . . . . . . 5-37
Universal Remote System Operation . . . . . . . . . . . . . . . . . . 5-39
Controls
Steering Wheel
Adjustment
To adjust the steering wheel:
1. Pull the lever down.
2. Move the steering wheel up
or down.
3. Pull or push the steering wheel closer or away from you.
4. Pull the lever up to lock the steering wheel in place. Do not adjust the steering wheel
while driving.
Steering Wheel Controls
The infotainment system can be
operated by using the steering
wheel controls. See "Steering
Wheel Controls" in the infotainment
manual.
Horn
Pressaon the steering wheel pad
to sound the horn.
Windshield Wiper/Washer
The windshield wiper/washer lever
is located on the right side of the
steering column. With the ignition in
Page 108 of 357

Black plate (3,1)GMC Terrain/Terrain Denali Owner Manual (GMNA-Localizing-U.S./Canada/
Mexico-7707484) - 2015 - crc - 10/1/14
Instruments and Controls 5-3
ACC/ACCESSORY or ON/RUN/
START, move the windshield wiper
lever to select the wiper speed.
HI:Use for fast wipes.
LO: Use for slow wipes.
INT (Intermittent Wipes): Move
the lever up to INT for intermittent
wipes, then turn the
3INT band
up for more frequent wipes or down
for less frequent wipes.
OFF: Use to turn the wipers off.
1X (Mist): For a single wipe, briefly
move the wiper lever down. For
several wipes, hold the wiper
lever down.
n LFRONT (Windshield
Washer): Pull the windshield wiper
lever toward you to spray windshield
washer fluid and activate the wipers. The wipers will continue until the
lever is released or the maximum
wash time is reached. When the
windshield wiper lever is released,
additional wipes may occur
depending on how long the
windshield washer had been
activated. See
Washer Fluid on
page 10-20 for information on filling
the windshield washer fluid
reservoir.
{Warning
In freezing weather, do not use
the washer until the windshield is
warmed. Otherwise the washer
fluid can form ice on the
windshield, blocking your vision.
Clear snow and ice from the wiper
blades before using them. If frozen
to the windshield, carefully loosen or
thaw them. Damaged blades should
be replaced. See Wiper Blade
Replacement on page 10-25. Heavy snow or ice can overload the
wiper motor.
Wiper Parking
If the ignition is turned to LOCK/
OFF while the wipers are on LO, HI,
or INT, they will immediately stop.
If the windshield wiper lever is then
moved to OFF before the driver
door is opened or within 10 minutes,
the wipers will restart and move to
the base of the windshield.
If the ignition is turned to LOCK/
OFF while the wipers are performing
wipes due to windshield washing,
the wipers continue to run until they
reach the base of the windshield.
Rear Window Wiper/
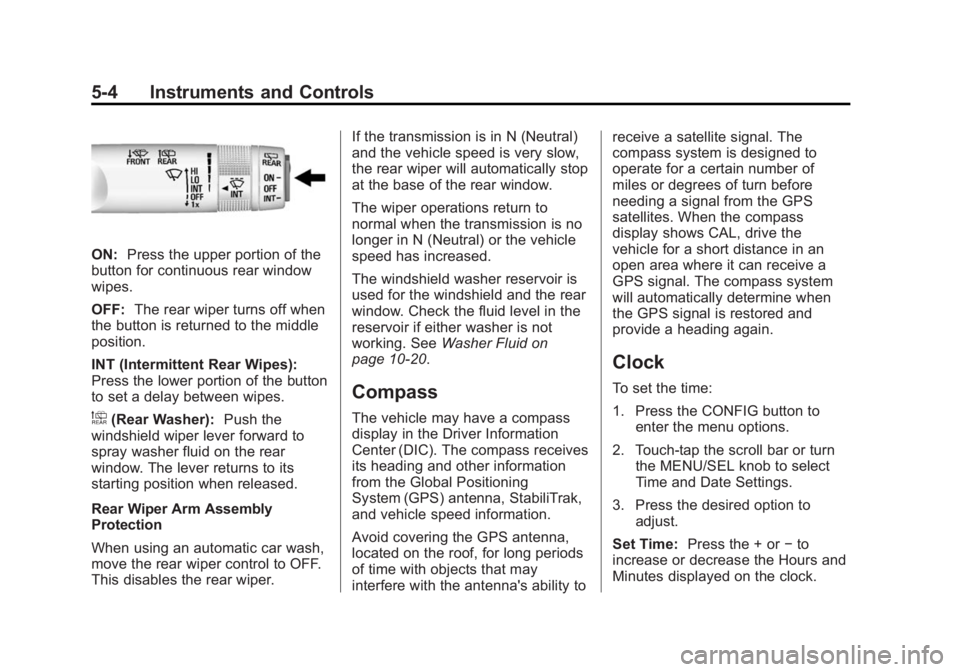
Washer
The rear wiper controls are on the
end of the windshield wiper lever.
Page 109 of 357
Black plate (4,1)GMC Terrain/Terrain Denali Owner Manual (GMNA-Localizing-U.S./Canada/
Mexico-7707484) - 2015 - crc - 10/1/14
5-4 Instruments and Controls
ON:Press the upper portion of the
button for continuous rear window
wipes.
OFF: The rear wiper turns off when
the button is returned to the middle
position.
INT (Intermittent Rear Wipes):
Press the lower portion of the button
to set a delay between wipes.
a(Rear Washer): Push the
windshield wiper lever forward to
spray washer fluid on the rear
window. The lever returns to its
starting position when released.
Rear Wiper Arm Assembly
Protection
When using an automatic car wash,
move the rear wiper control to OFF.
This disables the rear wiper. If the transmission is in N (Neutral)
and the vehicle speed is very slow,
the rear wiper will automatically stop
at the base of the rear window.
The wiper operations return to
normal when the transmission is no
longer in N (Neutral) or the vehicle
speed has increased.
The windshield washer reservoir is
used for the windshield and the rear
window. Check the fluid level in the
reservoir if either washer is not
working. See
Washer Fluid on
page 10-20.
Compass
The vehicle may have a compass
display in the Driver Information
Center (DIC). The compass receives
its heading and other information
from the Global Positioning
System (GPS) antenna, StabiliTrak,
and vehicle speed information.
Avoid covering the GPS antenna,
located on the roof, for long periods
of time with objects that may
interfere with the antenna's ability to receive a satellite signal. The
compass system is designed to
operate for a certain number of
miles or degrees of turn before
needing a signal from the GPS
satellites. When the compass
display shows CAL, drive the
vehicle for a short distance in an
open area where it can receive a
GPS signal. The compass system
will automatically determine when
the GPS signal is restored and
provide a heading again.
Clock
To set the time:
1. Press the CONFIG button to
enter the menu options.
2. Touch-tap the scroll bar or turn the MENU/SEL knob to select
Time and Date Settings.
3. Press the desired option to adjust.
Set Time: Press the + or −to
increase or decrease the Hours and
Minutes displayed on the clock.