seat adjustment GMC TERRAIN 2019 Owner's Manual
[x] Cancel search | Manufacturer: GMC, Model Year: 2019, Model line: TERRAIN, Model: GMC TERRAIN 2019Pages: 434, PDF Size: 6.38 MB
Page 6 of 434
GMC Terrain/Terrain Denali Owner Manual (GMNA-Localizing-U.S./Canada/
Mexico-12146071) - 2019 - crc - 7/27/18
In Brief 5
In Brief
Instrument Panel
Instrument Panel . . . . . . . . . . . . . . . . 6
Initial Drive Information
Initial Drive Information . . . . . . . . . . 8
Stop/Start System . . . . . . . . . . . . . . . 8
Remote Keyless Entry (RKE)System . . . . . . . . . . . . . . . . . . . . . . . . 8
Remote Vehicle Start . . . . . . . . . . . 8
Door Locks . . . . . . . . . . . . . . . . . . . . . 9
Liftgate . . . . . . . . . . . . . . . . . . . . . . . . . . 9
Windows . . . . . . . . . . . . . . . . . . . . . . . 10
Seat Adjustment . . . . . . . . . . . . . . . 11
Memory Features . . . . . . . . . . . . . . 12
Heated and Ventilated Seats . . . 13
Head Restraint Adjustment . . . . 13
Seat Belts . . . . . . . . . . . . . . . . . . . . . 14
Passenger Sensing System . . . 14
Mirror Adjustment . . . . . . . . . . . . . . 14
Steering Wheel Adjustment . . . . 15
Interior Lighting . . . . . . . . . . . . . . . . 15
Exterior Lighting . . . . . . . . . . . . . . . 16
Windshield Wiper/Washer . . . . . . 17
Climate Controls . . . . . . . . . . . . . . . 18
Transmission . . . . . . . . . . . . . . . . . . 19
Vehicle Features
Infotainment System . . . . . . . . . . . 20
Steering Wheel Controls . . . . . . . 20
Cruise Control . . . . . . . . . . . . . . . . . 20
Driver Information Center (DIC) . . . . . . . . . . . . . . . . . 20
Forward Collision Alert (FCA) System . . . . . . . . . . . . . . . . . . . . . . . 21
Forward Automatic Braking (FAB) . . . . . . . . . . . . . . . . 21
Front Pedestrian Braking (FPB) System . . . . . . . . . . . . . . . . . . . . . . . 21
Lane Keep Assist (LKA) . . . . . . . 21
Lane Change Alert (LCA) . . . . . . 22
Surround Vision . . . . . . . . . . . . . . . 22
Rear Vision Camera (RVC) . . . . 22
Rear Cross Traffic Alert (RCTA) System . . . . . . . . . . . . . . . . . . . . . . . 22
Park Assist . . . . . . . . . . . . . . . . . . . . 22
Automatic Parking Assist (APA) . . . . . . . . . . . . . . . . . . 23
Power Outlets . . . . . . . . . . . . . . . . . 23
Universal Remote System . . . . . 23
Sunroof . . . . . . . . . . . . . . . . . . . . . . . . 23
Performance and Maintenance
Traction Control/Electronic Stability Control . . . . . . . . . . . . . . 25
Tire Pressure Monitor . . . . . . . . . . 25 Fuel (LYX - 1.5L L4 Turbo
Engine) . . . . . . . . . . . . . . . . . . . . . . . 25
Fuel (LTG - 2.0L L4 Turbo Engine) . . . . . . . . . . . . . . . . . . . . . . . 26
Fuel (Diesel) . . . . . . . . . . . . . . . . . . . 26
E85 or FlexFuel . . . . . . . . . . . . . . . . 26
Engine Oil Life System . . . . . . . . 26
Driving for Better Fuel
Economy . . . . . . . . . . . . . . . . . . . . . 27
Diesel Particulate Filter . . . . . . . . 27
Diesel Exhaust Fluid . . . . . . . . . . . 28
Roadside Assistance Program . . . . . . . . . . . . . . . . . . . . . . 28
Page 8 of 434

GMC Terrain/Terrain Denali Owner Manual (GMNA-Localizing-U.S./Canada/
Mexico-12146071) - 2019 - crc - 7/27/18
In Brief 7
1.Air Vents 0175.
2. Turn Signal Lever. See Turn
and Lane-Change Signals
0 165.
IntelliBeam System Button (If
Equipped). See Exterior Lamp
Controls 0161.
3. Instrument Cluster (Base and
Midlevel) 0122 orInstrument
Cluster (Uplevel) 0125.
Driver Information Center (DIC)
Display.
See Driver Information Center
(DIC) (Base and Midlevel)
0 142 orDriver Information
Center (DIC) (Uplevel) 0147.
4. Windshield Wiper/Washer
0114.
5. Infotainment 0169.
6. Light Sensor. See Automatic
Headlamp System 0164.
7. Hazard Warning Flashers
0164.
8. Climate Control Systems 0170
(If Equipped). Dual Automatic Climate Control
System
0172 (If Equipped).
9. Shift Switches. See Automatic
Transmission 0213.
10. Power Outlets 0117.
11. Assistance Systems for
Parking or Backing 0243 (If
Equipped).
12. Heated and Ventilated Front
Seats 065 (If Equipped).
13. Wireless Charging 0118 (If
Equipped).
14. Driver Mode Control 0226 (If
Equipped).
15. Lane Keep Assist (LKA) 0258
(If Equipped).
Hill Descent Control (HDC)
0 225 (If Equipped).
16. USB Port. See the infotainment manual.
Auxiliary Jack. See the
infotainment manual.
17. ENGINE START/STOP Button. SeeIgnition Positions 0195. 18. Steering Wheel Controls. See
the infotainment manual.
19. Horn 0114.
20. Steering Wheel Adjustment
0114 (Out of View).
21. Hood Release. See Hood
0 287.
22. Cruise Control 0230.
Heated Steering Wheel 0114
(If Equipped).
Forward Collision Alert (FCA)
System 0250 (If Equipped).
23. Data Link Connector (DLC) (Out of View). See Malfunction
Indicator Lamp (Check Engine
Light) 0133.
24. Electric Parking Brake 0219.
25. Exterior Lamp Controls 0161.
Instrument Panel Illumination
Control 0166.
Fog Lamps 0165 (If
Equipped).
Page 12 of 434
GMC Terrain/Terrain Denali Owner Manual (GMNA-Localizing-U.S./Canada/
Mexico-12146071) - 2019 - crc - 7/27/18
In Brief 11
Seat Adjustment
Manual Front Seats
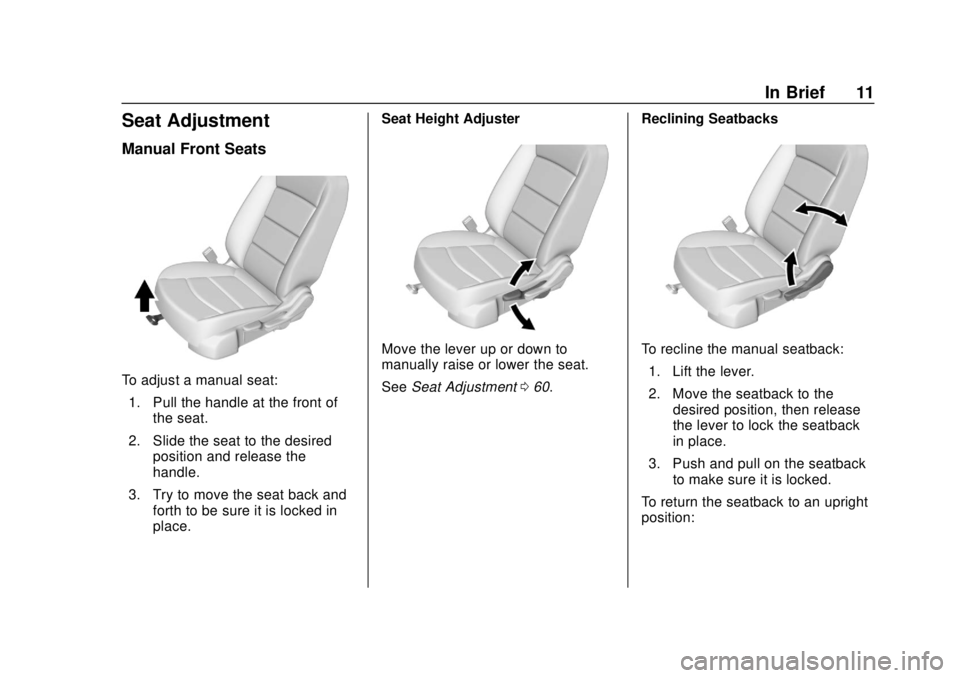
To adjust a manual seat:1. Pull the handle at the front of the seat.
2. Slide the seat to the desired position and release the
handle.
3. Try to move the seat back and forth to be sure it is locked in
place. Seat Height Adjuster
Move the lever up or down to
manually raise or lower the seat.
See
Seat Adjustment 060. Reclining SeatbacksTo recline the manual seatback:
1. Lift the lever.
2. Move the seatback to the desired position, then release
the lever to lock the seatback
in place.
3. Push and pull on the seatback to make sure it is locked.
To return the seatback to an upright
position:
Page 13 of 434
GMC Terrain/Terrain Denali Owner Manual (GMNA-Localizing-U.S./Canada/
Mexico-12146071) - 2019 - crc - 7/27/18
12 In Brief
1. Lift the lever fully withoutapplying pressure to the
seatback, and the seatback
returns to the upright position.
2. Push and pull on the seatback to make sure it is locked.
See Reclining Seatbacks 061.
Power Driver Seat
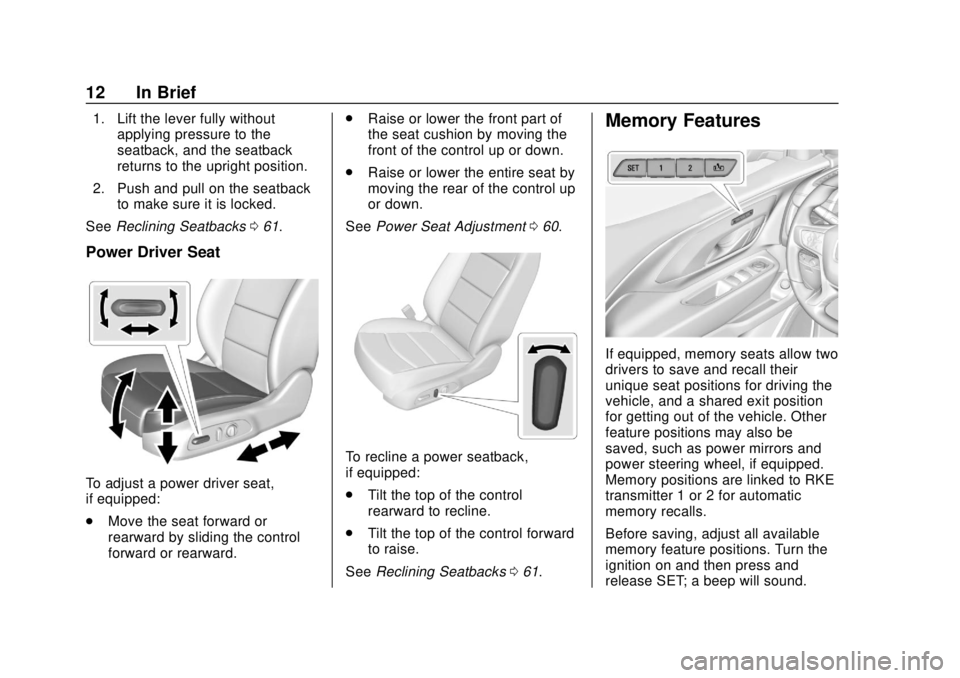
To adjust a power driver seat,
if equipped:
.
Move the seat forward or
rearward by sliding the control
forward or rearward. .
Raise or lower the front part of
the seat cushion by moving the
front of the control up or down.
. Raise or lower the entire seat by
moving the rear of the control up
or down.
See Power Seat Adjustment 060.
To recline a power seatback,
if equipped:
.
Tilt the top of the control
rearward to recline.
. Tilt the top of the control forward
to raise.
See Reclining Seatbacks 061.
Memory Features
If equipped, memory seats allow two
drivers to save and recall their
unique seat positions for driving the
vehicle, and a shared exit position
for getting out of the vehicle. Other
feature positions may also be
saved, such as power mirrors and
power steering wheel, if equipped.
Memory positions are linked to RKE
transmitter 1 or 2 for automatic
memory recalls.
Before saving, adjust all available
memory feature positions. Turn the
ignition on and then press and
release SET; a beep will sound.
Page 14 of 434
GMC Terrain/Terrain Denali Owner Manual (GMNA-Localizing-U.S./Canada/
Mexico-12146071) - 2019 - crc - 7/27/18
In Brief 13
Then immediately press and hold 1,
2, or
B(Exit) until two beeps
sound. To manually recall these
positions, press and hold 1, 2, or
B
until the saved position is reached.
When Seat Entry Memory is
enabled in vehicle personalization,
positions previously saved to
memory buttons 1 and 2 are
recalled when the ignition is
changed from off to on or ACC/
ACCESSORY.
When Seat Exit Memory is enabled
in vehicle personalization, the
feature automatically recalls the
previously saved exit position when
exiting the vehicle.
Memory adjustments may not be
available upon delivery or after
service until steps in “Saving
Memory Positions” section are
performed. See Memory Seats062.
Heated and Ventilated
Seats
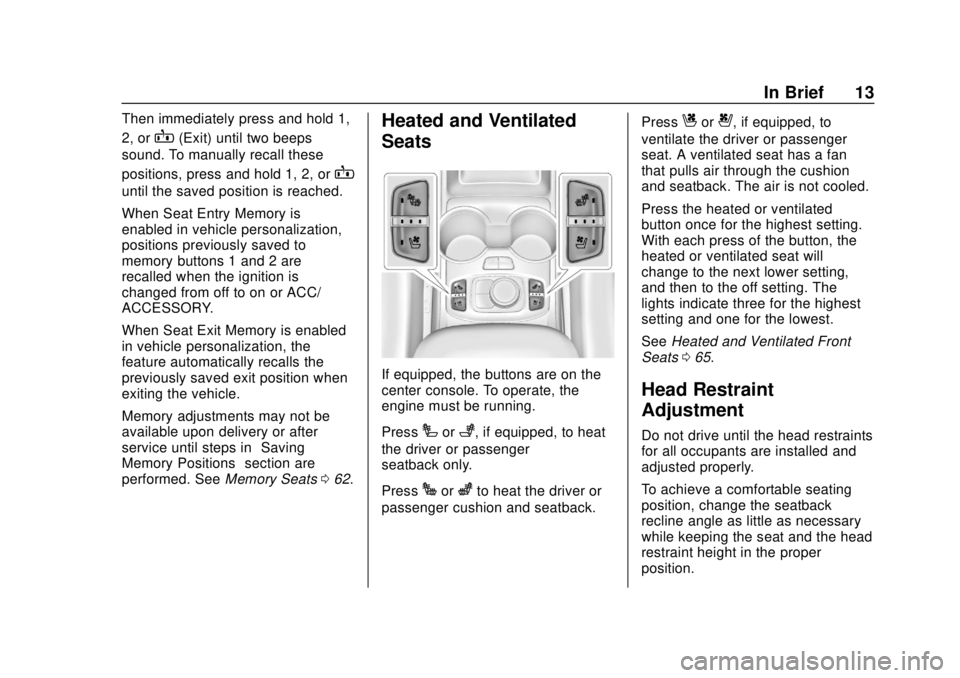
If equipped, the buttons are on the
center console. To operate, the
engine must be running.
Press
Ior+, if equipped, to heat
the driver or passenger
seatback only.
Press
Jorzto heat the driver or
passenger cushion and seatback. Press
Cor{, if equipped, to
ventilate the driver or passenger
seat. A ventilated seat has a fan
that pulls air through the cushion
and seatback. The air is not cooled.
Press the heated or ventilated
button once for the highest setting.
With each press of the button, the
heated or ventilated seat will
change to the next lower setting,
and then to the off setting. The
lights indicate three for the highest
setting and one for the lowest.
See Heated and Ventilated Front
Seats 065.
Head Restraint
Adjustment
Do not drive until the head restraints
for all occupants are installed and
adjusted properly.
To achieve a comfortable seating
position, change the seatback
recline angle as little as necessary
while keeping the seat and the head
restraint height in the proper
position.
Page 15 of 434
GMC Terrain/Terrain Denali Owner Manual (GMNA-Localizing-U.S./Canada/
Mexico-12146071) - 2019 - crc - 7/27/18
14 In Brief
SeeHead Restraints 058 and Seat
Adjustment 060.
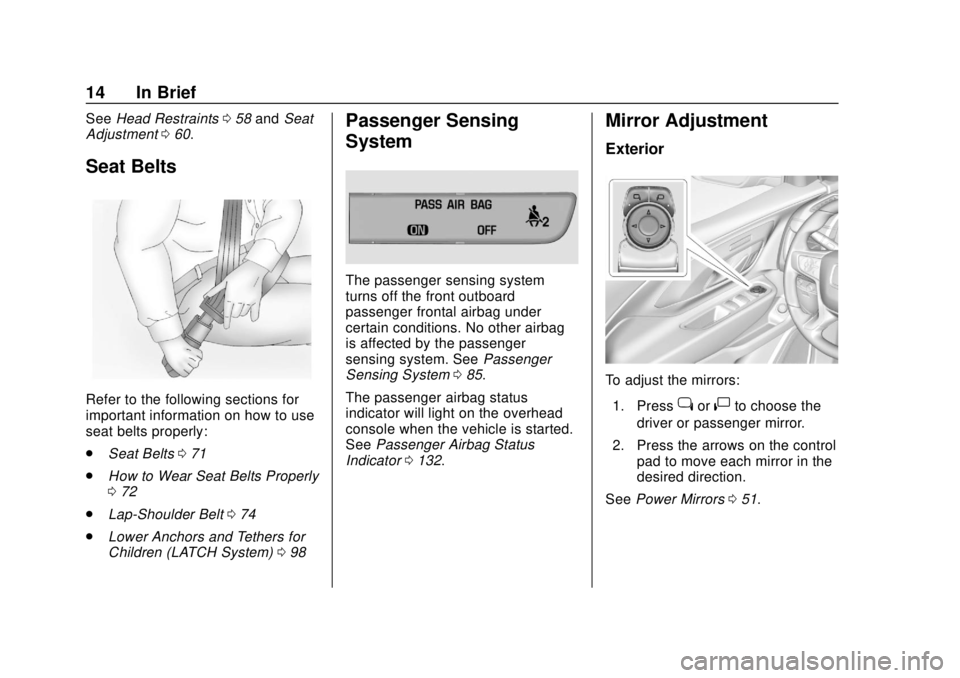
Seat Belts
Refer to the following sections for
important information on how to use
seat belts properly:
.
Seat Belts 071
. How to Wear Seat Belts Properly
072
. Lap-Shoulder Belt 074
. Lower Anchors and Tethers for
Children (LATCH System) 098
Passenger Sensing
System
The passenger sensing system
turns off the front outboard
passenger frontal airbag under
certain conditions. No other airbag
is affected by the passenger
sensing system. See Passenger
Sensing System 085.
The passenger airbag status
indicator will light on the overhead
console when the vehicle is started.
See Passenger Airbag Status
Indicator 0132.
Mirror Adjustment
Exterior
To adjust the mirrors:
1. Press
jor|to choose the
driver or passenger mirror.
2. Press the arrows on the control pad to move each mirror in the
desired direction.
See Power Mirrors 051.
Page 58 of 434
GMC Terrain/Terrain Denali Owner Manual (GMNA-Localizing-U.S./Canada/
Mexico-12146071) - 2019 - crc - 7/27/18
Seats and Restraints 57
Seats and
Restraints
Head Restraints
Head Restraints . . . . . . . . . . . . . . . 58
Front Seats
Seat Adjustment . . . . . . . . . . . . . . . 60
Power Seat Adjustment . . . . . . . . 60
Lumbar Adjustment . . . . . . . . . . . . 61
Reclining Seatbacks . . . . . . . . . . . 61
Memory Seats . . . . . . . . . . . . . . . . . 62
Heated and Ventilated FrontSeats . . . . . . . . . . . . . . . . . . . . . . . . . 65
Folding Seatback . . . . . . . . . . . . . . 66
Rear Seats
Rear Seats . . . . . . . . . . . . . . . . . . . . 67
Heated Rear Seats . . . . . . . . . . . . 70
Seat Belts
Seat Belts . . . . . . . . . . . . . . . . . . . . . 71
How to Wear Seat Belts Properly . . . . . . . . . . . . . . . . . . . . . . 72
Lap-Shoulder Belt . . . . . . . . . . . . . 74
Seat Belt Use During Pregnancy . . . . . . . . . . . . . . . . . . . . 77
Seat Belt Extender . . . . . . . . . . . . . 77
Safety System Check . . . . . . . . . . 78 Seat Belt Care . . . . . . . . . . . . . . . . . 78
Replacing Seat Belt System
Parts after a Crash . . . . . . . . . . . 78
Airbag System
Airbag System . . . . . . . . . . . . . . . . . 79
Where Are the Airbags? . . . . . . . 81
When Should an AirbagInflate? . . . . . . . . . . . . . . . . . . . . . . . 82
What Makes an Airbag Inflate? . . . . . . . . . . . . . . . . . . . . . . . 83
How Does an Airbag Restrain? . . . . . . . . . . . . . . . . . . . . . 83
What Will You See after an Airbag Inflates? . . . . . . . . . . . . . . 84
Passenger Sensing System . . . 85
Servicing the Airbag-Equipped Vehicle . . . . . . . . . . . . . . . . . . . . . . . 89
Adding Equipment to the Airbag-Equipped Vehicle . . . . . 89
Airbag System Check . . . . . . . . . . 90
Replacing Airbag System Parts after a Crash . . . . . . . . . . . . . . . . . 91
Child Restraints
Older Children . . . . . . . . . . . . . . . . . 91
Infants and Young Children . . . . 93
Child Restraint Systems . . . . . . . 95
Where to Put the Restraint . . . . . 97
Lower Anchors and Tethers forChildren (LATCH System) . . . . 98 Replacing LATCH System
Parts After a Crash . . . . . . . . . 103
Securing Child Restraints (With the Seat Belt in the
Rear Seat) . . . . . . . . . . . . . . . . . . 104
Securing Child Restraints (With the Seat Belt in the
Front Seat) . . . . . . . . . . . . . . . . . . 106
Page 61 of 434
GMC Terrain/Terrain Denali Owner Manual (GMNA-Localizing-U.S./Canada/
Mexico-12146071) - 2019 - crc - 7/27/18
60 Seats and Restraints
Front Seats
Seat Adjustment
{Warning
You can lose control of the
vehicle if you try to adjust a driver
seat while the vehicle is moving.
Adjust the driver seat only when
the vehicle is not moving.
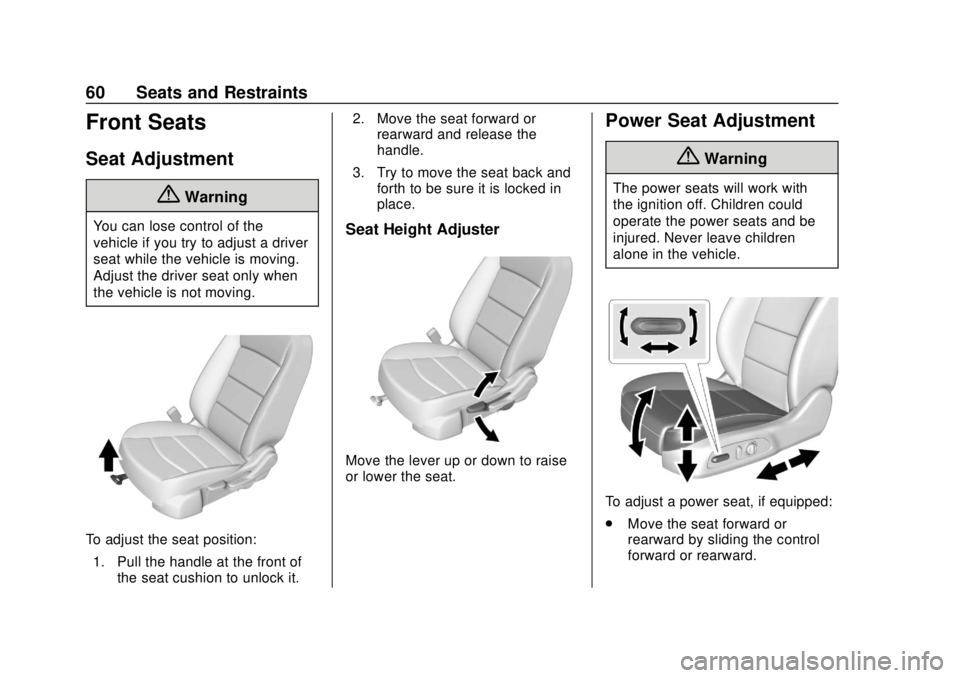
To adjust the seat position:1. Pull the handle at the front of the seat cushion to unlock it. 2. Move the seat forward or
rearward and release the
handle.
3. Try to move the seat back and forth to be sure it is locked in
place.
Seat Height Adjuster
Move the lever up or down to raise
or lower the seat.
Power Seat Adjustment
{Warning
The power seats will work with
the ignition off. Children could
operate the power seats and be
injured. Never leave children
alone in the vehicle.
To adjust a power seat, if equipped:
.Move the seat forward or
rearward by sliding the control
forward or rearward.
Page 62 of 434
GMC Terrain/Terrain Denali Owner Manual (GMNA-Localizing-U.S./Canada/
Mexico-12146071) - 2019 - crc - 7/27/18
Seats and Restraints 61
.Raise or lower the front part of
the seat cushion by moving the
front of the control up or down.
. Raise or lower the entire seat by
moving the rear of the control up
or down.
To adjust the seatback, see
Reclining Seatbacks 061.
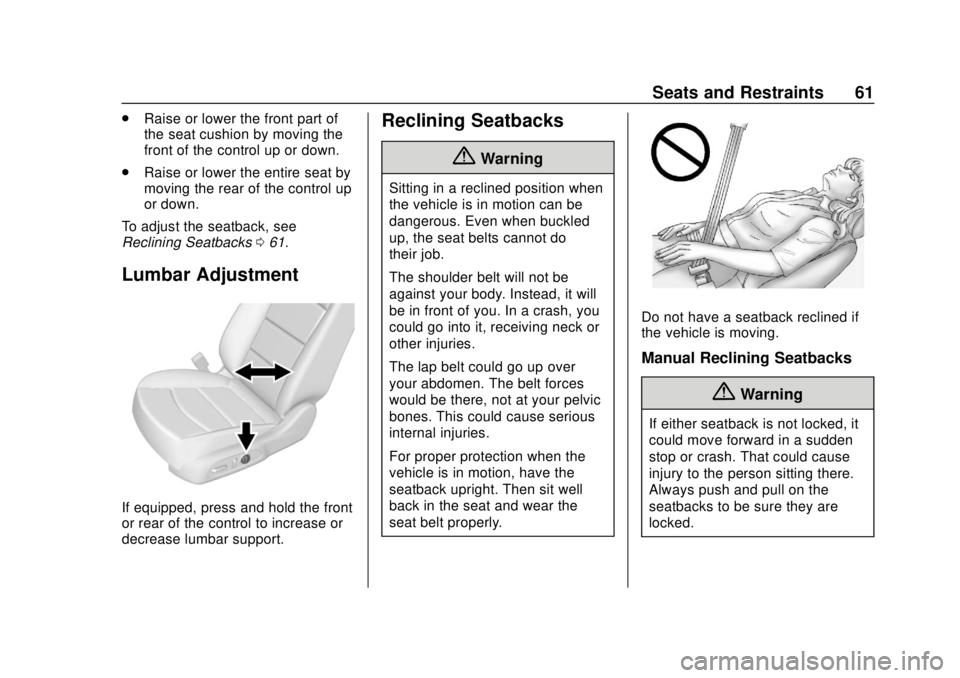
Lumbar Adjustment
If equipped, press and hold the front
or rear of the control to increase or
decrease lumbar support.
Reclining Seatbacks
{Warning
Sitting in a reclined position when
the vehicle is in motion can be
dangerous. Even when buckled
up, the seat belts cannot do
their job.
The shoulder belt will not be
against your body. Instead, it will
be in front of you. In a crash, you
could go into it, receiving neck or
other injuries.
The lap belt could go up over
your abdomen. The belt forces
would be there, not at your pelvic
bones. This could cause serious
internal injuries.
For proper protection when the
vehicle is in motion, have the
seatback upright. Then sit well
back in the seat and wear the
seat belt properly.
Do not have a seatback reclined if
the vehicle is moving.
Manual Reclining Seatbacks
{Warning
If either seatback is not locked, it
could move forward in a sudden
stop or crash. That could cause
injury to the person sitting there.
Always push and pull on the
seatbacks to be sure they are
locked.
Page 64 of 434
GMC Terrain/Terrain Denali Owner Manual (GMNA-Localizing-U.S./Canada/
Mexico-12146071) - 2019 - crc - 7/27/18
Seats and Restraints 63
Then immediately press and hold 1,
2, or
B(Exit) until two beeps
sound. To manually recall these
positions, press and hold 1, 2, or
B
until the saved position is reached.
Follow the instructions under
“Saving Memory Positions.”
The vehicle identifies the current
driver ’s RKE transmitter number (1–
8). See Remote Keyless Entry
(RKE) System Operation 030. Only
RKE transmitters 1 and 2 can be
used for automatic memory recalls.
A Driver Information Center (DIC)
welcome message indicating the
transmitter number may display for
the first few ignition cycles following
a transmitter change. For Seat Entry
Memory to work properly, save the
positions to the memory button (1 or
2) matching the RKE transmitter
number displayed in the DIC
welcome message. Carry the linked
RKE transmitter when entering the
vehicle. Memory adjustments may not be
available upon delivery or after
service until steps in
“Saving
Memory Positions” section are
performed.
Vehicle Personalization Settings
. To have the Seat Entry Memory
movement begin when the
vehicle is started, select the
Settings menu, then Vehicle,
then Seating Position, and then
Seat Entry Memory. Select On or
Off. See “Seat Entry Memory”
later in this section.
. Seat Exit Memory movement
begins when the ignition is
turned off and the driver door is
opened, or when the ignition is
turned off with the driver door
already opened, select the
Settings menu, then Vehicle,
then Seating Position, and then
Seat Exit Memory. Select On or
Off. See “Seat Exit Memory”
later in this section.
. See Vehicle Personalization
0 152 for additional setting
information. Identifying Driver Number
To identify the driver number:
1. Start the vehicle with a different key or RKE transmitter. The
DIC should display the driver
number; 1 or 2. Turn the
ignition off and remove the key
or RKE transmitter from the
vehicle.
2. Start the vehicle with the initial key or RKE transmitter. The
DIC should display the other
driver number not shown in
Step 1.
Saving Memory Positions
Read these instructions completely
before saving memory positions.
To save preferred driving positions
1 and 2: 1. Turn the ignition on or to ACC/ ACCESSORY.
A DIC welcome message may
indicate driver number 1 or 2.
2. Adjust all available memory features to the desired driving
position.