warning light GMC YUKON 2010 User Guide
[x] Cancel search | Manufacturer: GMC, Model Year: 2010, Model line: YUKON, Model: GMC YUKON 2010Pages: 614, PDF Size: 3.55 MB
Page 134 of 614
For some children, including children in child restraints,
and for very small adults, the passenger sensing
system may or may not turn off the right front passenger
frontal airbag, depending upon the person's seating
posture and body build. Everyone in your vehicle who
has outgrown child restraints should wear a safety belt
properly—whether or not there is an airbag for that
person.
{WARNING:
If the airbag readiness light ever comes on and
stays on, it means that something may be wrong
with the airbag system. To help avoid injury to
yourself or others, have the vehicle serviced right
away. See Airbag Readiness Light
on page 4‑32
for more information, including important safety
information.
If the On Indicator is Lit for a Child
Restraint
If a child restraint has been installed and the on
indicator is lit:
1. Turn the vehicle off.
2. Remove the child restraint from the vehicle.
3. Remove any additional items from the seat such as blankets, cushions, seat covers, seat heaters,
or seat massagers.
4. Reinstall the child restraint following the directions provided by the child restraint manufacturer and
refer to Securing a Child Restraint in the Right
Front Seat Position on page 2‑79.
2-96
Page 140 of 614
Airbags
The airbag system does not need regularly scheduled
maintenance or replacement. Make sure the airbag
readiness light is working. SeeAirbag Readiness Light
on page 4‑32for more information.
Notice: If an airbag covering is damaged, opened,
or broken, the airbag may not work properly. Do not
open or break the airbag coverings. If there are any
opened or broken airbag covers, have the airbag
covering and/or airbag module replaced. For the
location of the airbag modules, see What Makes an
Airbag Inflate?
on page 2‑91. See your dealer for
service.
Replacing Restraint System Parts
After a Crash
{WARNING:
A crash can damage the restraint systems in your
vehicle. A damaged restraint system may not
properly protect the person using it, resulting in
serious injury or even death in a crash. To help
make sure your restraint systems are working
properly after a crash, have them inspected and
any necessary replacements made as soon as
possible.
2-102
Page 151 of 614
/(Remote Start): This button will be on the RKE
transmitter if you have remote start.
To start the vehicle using the remote start feature:
1. Aim the transmitter at the vehicle.
2. Press and release the transmitter's lock button. The vehicle's doors will lock. Immediately press
and hold the transmitter's remote start button until
the turn signal lights flash. If you cannot see the
vehicle's lights, press and hold the remote start
button for two to four seconds. Pressing the remote
start button again after the vehicle has started will
turn the engine off.
When the vehicle starts, the parking lamps will turn
on and remain on while the vehicle is running.
If the vehicle is left running it will automatically shut
off after 10 minutes unless a time extension has
been done.
3. If it is the first remote start since the vehicle has been driven, repeat these steps, while the engine
is still running, to extend the engine running time
by 10 minutes. Remote start can be extended
one time.
After entering the vehicle during a remote start, insert
and turn the key to RUN to drive the vehicle. To manually shut off a remote start, do any of the
following:
.Aim the RKE transmitter at the vehicle and press
the remote start button until the parking lamps
turn off.
.Turn on the hazard warning flashers.
.Turn the ignition switch on and then off.
The vehicle can be remote started two separate times
between driving sequences. The engine will run for
10 minutes after each remote start.
Or, you can extend the engine run time by another
10 minutes within the first 10 minute remote start time
frame, and before the engine stops.
For example, if the lock button and then the remote start
buttons are pressed again after the vehicle has been
running for five minutes, 10 minutes are added, allowing
the engine to run for 15 minutes.
The additional ten minutes are considered a second
remote vehicle start.
Once two remote starts, or a single remote start with
one time extension has been done, the vehicle must be
started with the key. After the key is removed from the
ignition, the vehicle can be remote started again.
3-9
Page 152 of 614
The vehicle cannot be remote started if the key is
in the ignition, the hood is not closed, or if there is an
emission control system malfunction and the check
engine light comes on.
Also, the engine will turn off during a remote vehicle
start if the coolant temperature gets too high or if the
oil pressure gets low.
Vehicles that have the remote vehicle start feature are
shipped from the factory with the remote vehicle start
system enabled. The system may be enabled or
disabled through the DIC. See“REMOTE START”
under DIC Vehicle Customization (With DIC Buttons)
on
page 4‑72for additional information. If your vehicle
does not have DIC buttons, see your dealer to enable
or disable the remote vehicle start system.
Remote Start Ready
If your vehicle does not have the remote vehicle start
feature, it may have the remote start ready feature.
This feature allows your dealer to add the
manufacturer's remote vehicle start feature.
See your dealer if you would like to add the
manufacturer's remote vehicle start feature to
your vehicle.
Doors and Locks
Door Locks
{WARNING:
Unlocked doors can be dangerous.
.Passengers, especially children, can easily
open the doors and fall out of a moving
vehicle. When a door is locked, the handle
will not open it. The chance of being thrown
out of the vehicle in a crash is increased if
the doors are not locked. So, all passengers
should wear safety belts properly and the
doors should be locked whenever the vehicle
is driven.
.Young children who get into unlocked vehicles
may be unable to get out. A child can be
overcome by extreme heat and can suffer
permanent injuries or even death from heat
stroke. Always lock the vehicle whenever
leaving it.
(Continued)
3-10
Page 159 of 614
The power liftgate may be temporarily disabled under
extreme temperatures, or under low battery conditions.
If this occurs, the liftgate can still be operated manually.
If you shift the transmission out of P (Park) while the
power function is in progress, the liftgate power function
will continue to completion. If you shift the transmission
out of P (Park) and accelerate before the power liftgate
latches closed, the liftgate may reverse to the open
position. Cargo could fall out of the vehicle. Always
make sure the power liftgate is closed and latched
before you drive away.
If you power open the liftgate and the liftgate support
struts have lost pressure, the lights will flash and a
chime will sound. The liftgate will stay open temporarily,
then slowly close. See your dealer for service before
using the liftgate.Obstacle Detection Features
If the liftgate encounters an obstacle during a power
open or close cycle, a warning chime will sound and
the liftgate will automatically reverse direction to the full
closed or open position. After removing the obstruction,
the power liftgate operation can be used again. If the
liftgate encounters multiple obstacles on the same
power cycle, the power function will deactivate, and
you must manually open or close the liftgate. The
REAR ACCESS OPEN warning message in the Driver
Information Center (DIC) will indicate that the liftgate is
open. After removing the obstructions, manually open
the liftgate to the full open position or close the liftgate
to the fully closed and latched position. The liftgate will
now resume normal power operation.
Your vehicle has pinch sensors located on the side
edges of the liftgate. If an object is caught between
the liftgate and the body and presses against this
sensor, the liftgate will reverse direction and open fully.
The liftgate will remain open until it is activated again or
closed manually. Do not force the liftgate open or closed
during a power cycle.
3-17
Page 171 of 614
B (ACC/ACCESSORY):This position lets things like
the radio and the windshield wipers operate while the
engine is off. Use this position if the vehicle must be
pushed or towed.
C (ON/RUN): This position can be used to operate the
electrical accessories and to display some instrument
panel cluster warning and indicator lights. The switch
stays in this position when the engine is running.
The transmission is also unlocked in this position
on automatic transmission vehicles.
If you leave the key in the ACC/ACCESSORY or
ON/RUN position with the engine off, the battery could
be drained. You may not be able to start the vehicle if
the battery is allowed to drain for an extended period
of time.
D (START): This is the position that starts the engine.
When the engine starts, release the key. The ignition
switch returns to ON/RUN for driving.
A warning tone will sound when the driver door is
opened, the ignition is in ACC/ACCESSORY or
LOCK/OFF and the key is in the ignition.Retained Accessory Power (RAP)
The following vehicle accessories can be used for up to
10 minutes after the engine is turned off:
.Audio System
.Power Windows
.OnStar®System (if equipped)
.Sunroof (if equipped)
These features work when the key is in ON/RUN
or ACC/ACCESSORY. Once the key is turned from
ON/RUN to LOCK/OFF, the windows and sunroof
continue to work up to 10 minutes until any door
is opened. The radio continues to work for up to
10 minutes or until the driver door is opened.
Starting the Engine
If the vehicle is a Two-mode Hybrid, see the Two-mode
Hybrid manual for more information.
Move the shift lever to P (Park) or N (Neutral).
The engine will not start in any other position. To restart
the engine when the vehicle is are already moving,
use N (Neutral) only.
Notice: Do not try to shift to P (Park) if the
vehicle is moving. If you do, you could damage
the transmission. Shift to P (Park) only when the
vehicle is stopped.
3-29
Page 176 of 614

Heavy Duty 6-Speed Automatic Transmission Shown(Light Duty Similar)
See “Range Selection Mode” later in this section.
P (Park): This position locks the rear wheels. It is the
best position to use when starting the engine because
the vehicle cannot move easily. When parked on a hill,
especially when the vehicle has a heavy load, you
might notice an increase in the effort to shift out of
P (Park). See Torque Lock (Automatic Transmission)
under Shifting Into Park
on page 3‑49for more
information.
{WARNING:
It is dangerous to get out of the vehicle if the shift
lever is not fully in P (Park) with the parking brake
firmly set. The vehicle can roll.
Do not leave the vehicle when the engine is
running unless you have to. If you have left the
engine running, the vehicle can move suddenly.
You or others could be injured. To be sure the
vehicle will not move, even when you are on fairly
level ground, always set the parking brake and
move the shift lever to P (Park). See Shifting Into
Park
on page 3‑49. If you are pulling a trailer,
see Towing a Trailer on page 5‑49.
3-34
Page 184 of 614
2m(Two-Wheel Drive High):This setting is used for
driving in most street and highway situations. The front
axle is not engaged in two-wheel drive. This setting also
provides the best fuel economy.
AUTO (Automatic Four-Wheel Drive): This setting is
ideal for use when road surface traction conditions are
variable. When driving your vehicle in AUTO, the front
axle is engaged, but the vehicle's power is primarily
sent to the rear wheels. When the vehicle's software
determines a need for more traction, the system will
transfer more power to the front wheels. Driving in
this mode results in slightly lower fuel economy than
Two-Wheel Drive High.
4
m(Four-Wheel Drive High): Use the four-wheel
high position when you need extra traction, such as
on snowy or icy roads or in most off-road situations.
This setting also engages your front axle to help drive
the vehicle. This is the best setting to use when
plowing snow.
4
n(Four-Wheel Drive Low) : This setting also
engages the front axle and delivers extra torque.
You may never need this setting. It sends maximum
power to all four wheels. You might choose Four-Wheel
Drive Low if you are driving off-road in deep sand, deep
mud, deep snow, and while climbing or descending
steep hills. The vehicle has StabiliTrak
®. Shifting into
Four-Wheel-Drive Low will turn Traction Control and
StabiliTrak
®off. See StabiliTrak®System on page 5‑6.
{WARNING:
Shifting the transfer case to N (Neutral) can
cause the vehicle to roll even if the transmission
is in P (Park). You or someone else could be
seriously injured. Be sure to set the parking brake
before placing the transfer case in N (Neutral).
SeeParking Brake on page 3‑48.
N (Neutral): Shift the vehicle's transfer case
to N (Neutral) only when towing the vehicle.
See Recreational Vehicle Towing
on page 5‑41orTowing Your Vehicleon page 5‑41for more
information.
If the SERVICE 4 WHEEL DRIVE message stays on,
you should take the vehicle to your dealer for service.
See “SERVICE 4 WHEEL DRIVE message” underDIC
Warnings and Messages on page 4‑61.
3-42
Page 190 of 614
Service Four Wheel Drive
If the SERVICE 4 WHEEL DRIVE message stays on,
you should take the vehicle to your dealer for service.
See“SERVICE 4 WHEEL DRIVE message” underDIC
Warnings and Messages on page 4‑61.
Shifting Into Four-Wheel Drive High or
AUTO (Automatic Four-Wheel Drive)
Turn the knob to the Four-Wheel High or AUTO
position. This can be done at any speed. The indicator
light will flash while shifting. It will remain on when the
shift is completed.
Shifting Into Two-Wheel Drive High
Turn the knob to the Two-Wheel High position. This can
be done at any speed. The indicator light will flash while
shifting. It will remain on when the shift is completed.
Excessively shifting the transfer case into or out of the
different modes may cause the transfer case to enter
the shift protection mode. This will protect the transfer
case from possible damage and will only allow the
transfer case to respond to one shift per 10 seconds.
The transfer case may stay in this mode for up to
three minutes.
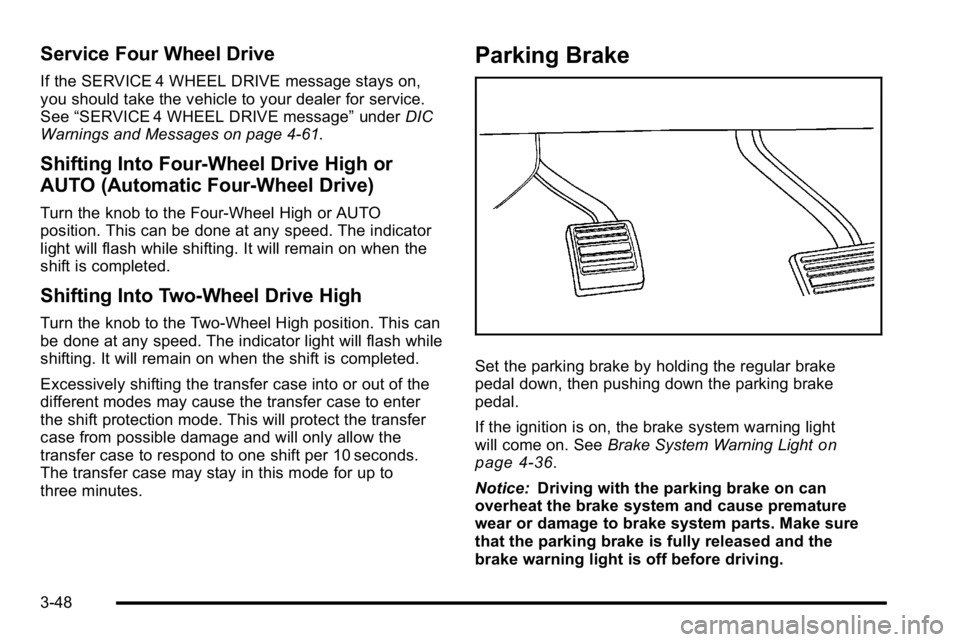
Parking Brake
Set the parking brake by holding the regular brake
pedal down, then pushing down the parking brake
pedal.
If the ignition is on, the brake system warning light
will come on. See Brake System Warning Light
on
page 4‑36.
Notice: Driving with the parking brake on can
overheat the brake system and cause premature
wear or damage to brake system parts. Make sure
that the parking brake is fully released and the
brake warning light is off before driving.
3-48
Page 191 of 614
To release the parking brake, hold the regular brake
pedal down, then push down momentarily on the
parking brake pedal until you feel the pedal release.
Slowly pull your foot up off the park brake pedal. If the
parking brake is not released when you begin to drive,
the brake system warning light will flash and a chime
will sound warning you that the parking brake is still on.
If you are towing a trailer and are parking on a hill, see
Towing a Trailer on page 5‑49.
Shifting Into Park
{WARNING:
It can be dangerous to get out of the vehicle if the
shift lever is not fully in P (Park) with the parking
brake firmly set. The vehicle can roll. If you have
left the engine running, the vehicle can move
suddenly. You or others could be injured. To be
sure the vehicle will not move, even when you are
on fairly level ground, use the steps that follow.
If you have a four-wheel drive transfer case with
a N (Neutral) position, and the transfer case is in(Continued)
WARNING: (Continued)
N (Neutral), the vehicle will be free to roll, even
if the shift lever is in P (Park). So, be sure the
transfer case is in a drive gear—not in
N (Neutral). If you are pulling a trailer, see Towing
a Trailer
on page 5‑49. Always set the parking
brake.
1. Hold the brake pedal down, then set the parking brake.
See Parking Brake
on page 3‑48for more
information.
2. Move the shift lever into the P (Park) position by pulling the shift lever toward you and moving it up
as far as it will go.
3. Be sure the transfer case is in a drive gear —not
in N (Neutral).
4. Turn the ignition key to LOCK/OFF.
5. Remove the key and take it with you. If you can leave the vehicle with the ignition key in your hand,
the vehicle is in P (Park).
3-49