engine GMC YUKON 2021 User Guide
[x] Cancel search | Manufacturer: GMC, Model Year: 2021, Model line: YUKON, Model: GMC YUKON 2021Pages: 433, PDF Size: 6.54 MB
Page 31 of 433
GMC Yukon/Yukon XL/Denali Owner Manual (GMNA-Localizing-U.S./
Canada/Mexico-13690468) - 2021 - crc - 8/14/20
28 Keys, Doors, and Windows
The immobilization system is disarmed
when the ignition is turned on or to ACC/
ACCESSORY and a valid remote key is
present in the vehicle.
The security light, in the instrument cluster,
comes on if there is a problem with arming
or disarming the theft-deterrent system.
The system has one or more remote keys
matched to an immobilizer control unit in
the vehicle. Only a correctly matched
remote key will start the vehicle. If the
remote key is ever damaged, you may not
be able to start your vehicle.
When trying to start the vehicle, the
security light may come on briefly.
If the engine does not start and the security
light stays on, there is a problem with the
system. Turn the ignition off and try again.
If the vehicle will not change ignition modes
(ACC/ACCESSORY, on, off), and the remote
key appears to be undamaged, try another
remote key. Or, you may try placing theremote key in the backup location. See
Remote Keyless Entry (RKE) System
Operation
08.
If the ignition modes will not change with
the other remote key or in the backup
location, the vehicle needs service. If the
ignition does change modes, the first
remote key may be faulty. See your dealer.
It is possible for the immobilizer system to
learn new or replacement remote keys. Up
to eight remote keys can be programmed
for the vehicle. To program additional
remote keys, see “Programming Remote
Keys to the Vehicle” underRemote Keyless
Entry (RKE) System Operation 08.
Do not leave the remote key or device that
disarms or deactivates the theft-deterrent
system in the vehicle.
Exterior Mirrors
Convex Mirrors
{Warning
A convex mirror can make things, like
other vehicles, look farther away than
they really are. If you cut too sharply (Continued)
Warning (Continued)
into the right lane, you could hit a
vehicle on the right. Check the inside
mirror or glance over your shoulder
before changing lanes.
The passenger side mirror is convex shaped.
A convex mirror's surface is curved so more
can be seen from the driver seat.
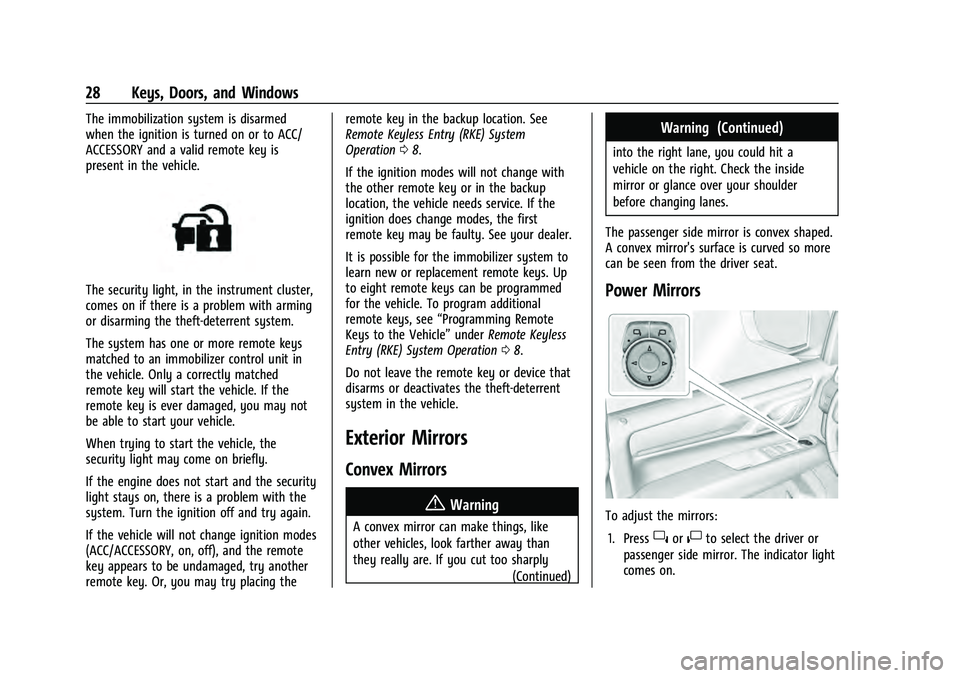
Power Mirrors
To adjust the mirrors: 1. Press
}or|to select the driver or
passenger side mirror. The indicator light
comes on.
Page 37 of 433
GMC Yukon/Yukon XL/Denali Owner Manual (GMNA-Localizing-U.S./
Canada/Mexico-13690468) - 2021 - crc - 8/14/20
34 Keys, Doors, and Windows
Window Lockout
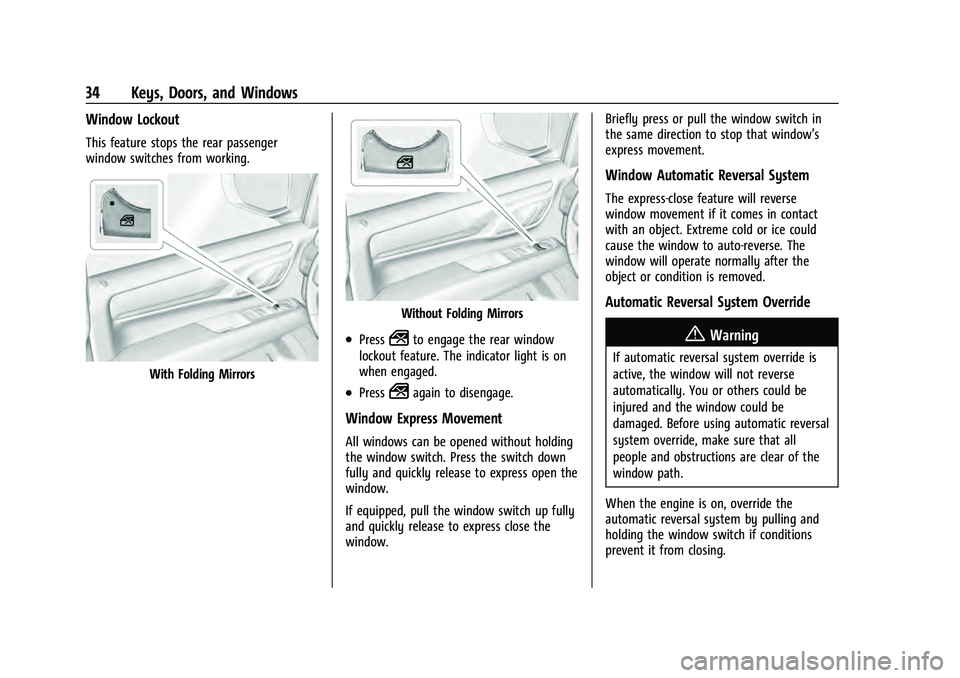
This feature stops the rear passenger
window switches from working.
With Folding Mirrors
Without Folding Mirrors
.Press2to engage the rear window
lockout feature. The indicator light is on
when engaged.
.Press2again to disengage.
Window Express Movement
All windows can be opened without holding
the window switch. Press the switch down
fully and quickly release to express open the
window.
If equipped, pull the window switch up fully
and quickly release to express close the
window. Briefly press or pull the window switch in
the same direction to stop that window’s
express movement.
Window Automatic Reversal System
The express-close feature will reverse
window movement if it comes in contact
with an object. Extreme cold or ice could
cause the window to auto-reverse. The
window will operate normally after the
object or condition is removed.
Automatic Reversal System Override
{Warning
If automatic reversal system override is
active, the window will not reverse
automatically. You or others could be
injured and the window could be
damaged. Before using automatic reversal
system override, make sure that all
people and obstructions are clear of the
window path.
When the engine is on, override the
automatic reversal system by pulling and
holding the window switch if conditions
prevent it from closing.
Page 47 of 433
GMC Yukon/Yukon XL/Denali Owner Manual (GMNA-Localizing-U.S./
Canada/Mexico-13690468) - 2021 - crc - 8/14/20
44 Seats and Restraints
Obstructions
If something has blocked the driver seat
while recalling a memory position, the recall
may stop. Remove the obstruction and try
the recall again. If the memory position still
does not recall, see your dealer.
Heated and Ventilated Front
Seats
{Warning
If temperature change or pain to the skin
cannot be felt, the seat heater may cause
burns. To reduce the risk of burns, use
care when using the seat heater,
especially for long periods of time. Do
not place anything on the seat that
insulates against heat, such as a blanket,
cushion, cover, or similar item. This may
cause the seat heater to overheat. An
overheated seat heater may cause a burn
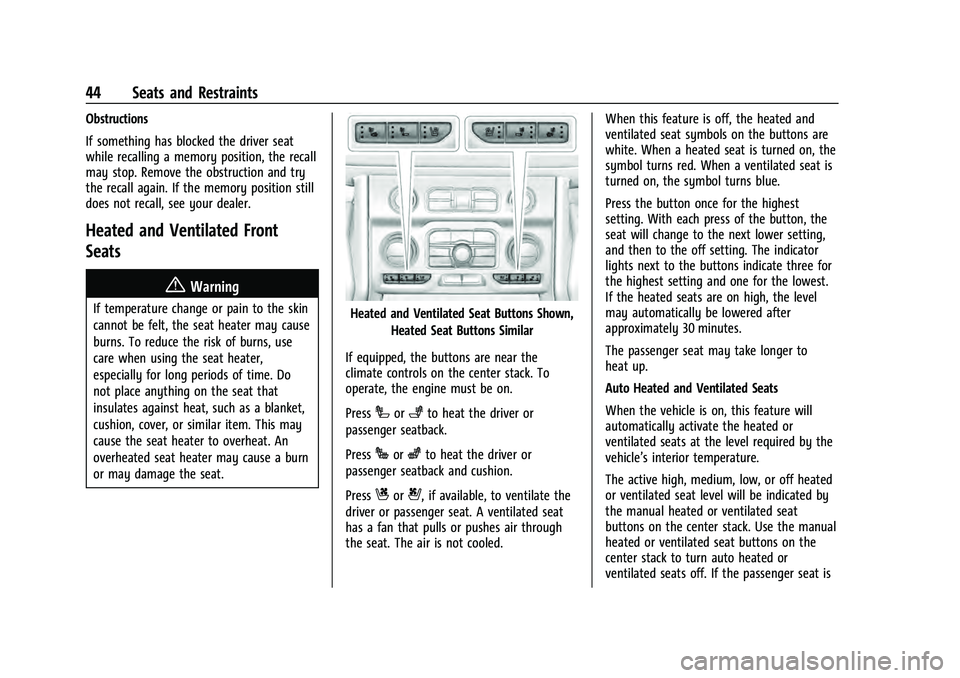
or may damage the seat.Heated and Ventilated Seat Buttons Shown,Heated Seat Buttons Similar
If equipped, the buttons are near the
climate controls on the center stack. To
operate, the engine must be on.
Press
Ior+to heat the driver or
passenger seatback.
Press
Jorzto heat the driver or
passenger seatback and cushion.
Press
Cor{, if available, to ventilate the
driver or passenger seat. A ventilated seat
has a fan that pulls or pushes air through
the seat. The air is not cooled. When this feature is off, the heated and
ventilated seat symbols on the buttons are
white. When a heated seat is turned on, the
symbol turns red. When a ventilated seat is
turned on, the symbol turns blue.
Press the button once for the highest
setting. With each press of the button, the
seat will change to the next lower setting,
and then to the off setting. The indicator
lights next to the buttons indicate three for
the highest setting and one for the lowest.
If the heated seats are on high, the level
may automatically be lowered after
approximately 30 minutes.
The passenger seat may take longer to
heat up.
Auto Heated and Ventilated Seats
When the vehicle is on, this feature will
automatically activate the heated or
ventilated seats at the level required by the
vehicle’s interior temperature.
The active high, medium, low, or off heated
or ventilated seat level will be indicated by
the manual heated or ventilated seat
buttons on the center stack. Use the manual
heated or ventilated seat buttons on the
center stack to turn auto heated or
ventilated seats off. If the passenger seat is
Page 49 of 433
GMC Yukon/Yukon XL/Denali Owner Manual (GMNA-Localizing-U.S./
Canada/Mexico-13690468) - 2021 - crc - 8/14/20
46 Seats and Restraints
With the engine running, pressMorLto
heat the left or right outboard seat cushion.
An indicator on the rear climate control
display appears when this feature is on.
Press the button once for the highest
setting. With each press of the button, the
seat will change to the next lower setting,
and then to the off setting. The indicator
lights next to the buttons indicate three for
the highest setting and one for the lowest.
If the heated seats are on high for an
extended time, their level may automatically
be lowered.Second Row Seats
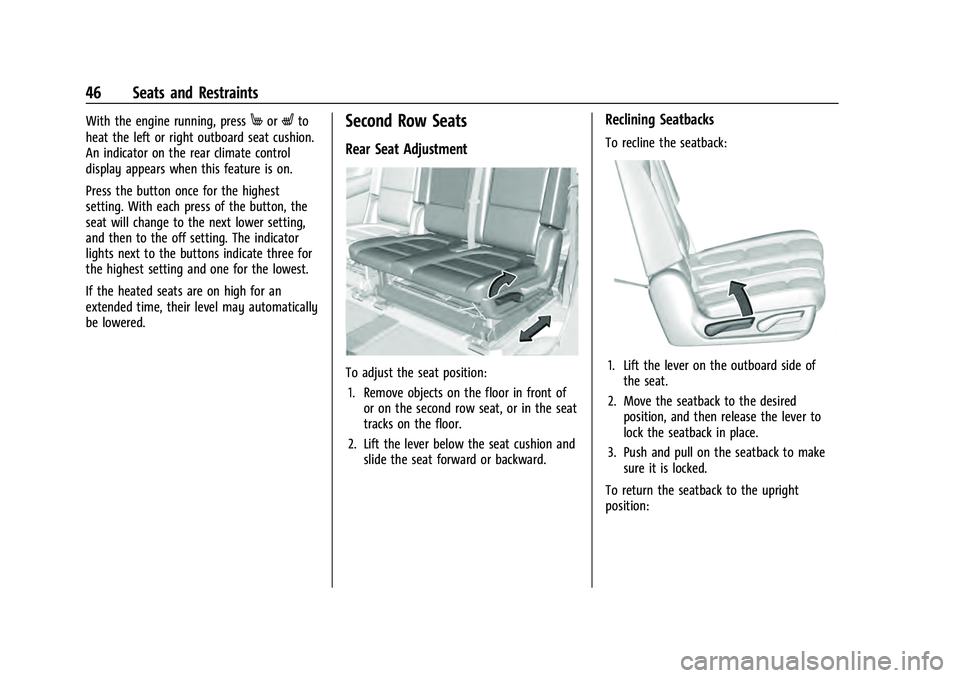
Rear Seat Adjustment
To adjust the seat position:
1. Remove objects on the floor in front of or on the second row seat, or in the seat
tracks on the floor.
2. Lift the lever below the seat cushion and slide the seat forward or backward.
Reclining Seatbacks
To recline the seatback:
1. Lift the lever on the outboard side ofthe seat.
2. Move the seatback to the desired position, and then release the lever to
lock the seatback in place.
3. Push and pull on the seatback to make sure it is locked.
To return the seatback to the upright
position:
Page 68 of 433
GMC Yukon/Yukon XL/Denali Owner Manual (GMNA-Localizing-U.S./
Canada/Mexico-13690468) - 2021 - crc - 8/14/20
Seats and Restraints 65
least partially inflated for some time after
they inflate. Some components of the airbag
module may be hot for several minutes. For
location of the airbags, seeWhere Are the
Airbags? 062.
The parts of the airbag that come into
contact with you may be warm, but not too
hot to touch. There may be some smoke
and dust coming from the vents in the
deflated airbags. Airbag inflation does not
prevent the driver from seeing out of the
windshield or being able to steer the
vehicle, nor does it prevent people from
leaving the vehicle.
{Warning
When an airbag inflates, there may be
dust in the air. This dust could cause
breathing problems for people with a
history of asthma or other breathing
trouble. To avoid this, everyone in the
vehicle should get out as soon as it is
safe to do so. If you have breathing
problems but cannot get out of the
vehicle after an airbag inflates, then get
fresh air by opening a window or a door. (Continued)
Warning (Continued)
If you experience breathing problems
following an airbag deployment, you
should seek medical attention.
The vehicle has a feature that may
automatically unlock the doors, turn on the
interior lamps and hazard warning flashers,
and shut off the fuel system after the
airbags inflate. The feature may also
activate, without airbag inflation, after an
event that exceeds a predetermined
threshold. After turning the ignition off and
then on again, the fuel system will return to
normal operation; the doors can be locked,
the interior lamps can be turned off, and
the hazard warning flashers can be turned
off using the controls for those features.
If any of these systems are damaged in the
crash they may not operate as normal.
{Warning
A crash severe enough to inflate the
airbags may have also damaged
important functions in the vehicle, such
as the fuel system, brake and steering
systems, etc. Even if the vehicle appears (Continued)
Warning (Continued)
to be drivable after a moderate crash,
there may be concealed damage that
could make it difficult to safely operate
the vehicle.
Use caution if you should attempt to
restart the engine after a crash has
occurred.
In many crashes severe enough to inflate
the airbag, windshields are broken by
vehicle deformation. Additional windshield
breakage may also occur from the front
outboard passenger airbag.
.Airbags are designed to inflate only once.
After an airbag inflates, you will need
some new parts for the airbag system.
If you do not get them, the airbag
system will not be there to help protect
you in another crash. A new system will
include airbag modules and possibly other
parts. The service manual for the vehicle
covers the need to replace other parts.
.The vehicle has a crash sensing and
diagnostic module which records
information after a crash. See Vehicle
Data Recording and Privacy 0408 and
Event Data Recorders 0409.
Page 98 of 433
GMC Yukon/Yukon XL/Denali Owner Manual (GMNA-Localizing-U.S./
Canada/Mexico-13690468) - 2021 - crc - 8/14/20
Instruments and Controls 95
Instruments and Controls
Controls
Steering Wheel Adjustment . . . . . . . . . . . . 96
Steering Wheel Controls . . . . . . . . . . . . . . . 96
Heated Steering Wheel . . . . . . . . . . . . . . . . . 96
Horn . . . . . . . . . . . . . . . . . . . . . . . . . . . . . . . . . . . 97
Windshield Wiper/Washer . . . . . . . . . . . . . . 97
Rear Window Wiper/Washer . . . . . . . . . . . 98
Compass . . . . . . . . . . . . . . . . . . . . . . . . . . . . . . . 99
Clock . . . . . . . . . . . . . . . . . . . . . . . . . . . . . . . . . . 100
Power Outlets . . . . . . . . . . . . . . . . . . . . . . . . . 100
Wireless Charging . . . . . . . . . . . . . . . . . . . . . 101
Warning Lights, Gauges, and Indicators
Warning Lights, Gauges, andIndicators . . . . . . . . . . . . . . . . . . . . . . . . . . . . 103
Instrument Cluster . . . . . . . . . . . . . . . . . . . . 104
Speedometer . . . . . . . . . . . . . . . . . . . . . . . . . . 106
Odometer . . . . . . . . . . . . . . . . . . . . . . . . . . . . . 106
Trip Odometer . . . . . . . . . . . . . . . . . . . . . . . . 106
Tachometer . . . . . . . . . . . . . . . . . . . . . . . . . . . 106
Fuel Gauge . . . . . . . . . . . . . . . . . . . . . . . . . . . . 106
Engine Oil Pressure Gauge . . . . . . . . . . . . . 107
Engine Coolant Temperature Gauge . . . 108
Voltmeter Gauge . . . . . . . . . . . . . . . . . . . . . . 108
Seat Belt Reminders . . . . . . . . . . . . . . . . . . . 109
Airbag Readiness Light . . . . . . . . . . . . . . . . 109
Passenger Airbag Status Indicator . . . . . . 110
Charging System Light . . . . . . . . . . . . . . . . . 111 Malfunction Indicator Lamp (Check
Engine Light) . . . . . . . . . . . . . . . . . . . . . . . . . 111
Brake System Warning Light . . . . . . . . . . . 112
Electric Parking Brake Light . . . . . . . . . . . . 113
Service Electric Parking Brake Light . . . . . 113
Antilock Brake System (ABS) Warning Light . . . . . . . . . . . . . . . . . . . . . . . . . . . . . . . . . 113
Four-Wheel-Drive Light . . . . . . . . . . . . . . . . . 114
Hill Descent Control Light . . . . . . . . . . . . . . 114
Lane Keep Assist (LKA) Light . . . . . . . . . . . 114
Vehicle Ahead Indicator . . . . . . . . . . . . . . . . 115
Pedestrian Ahead Indicator . . . . . . . . . . . . . 115
Traction Off Light . . . . . . . . . . . . . . . . . . . . . . 115
Traction Control System (TCS)/Electronic Stability Control Light . . . . . . . . . . . . . . . . 115
Electronic Stability Control (ESC) Off Light . . . . . . . . . . . . . . . . . . . . . . . . . . . . . . . . . 116
Engine Coolant Temperature Warning Light . . . . . . . . . . . . . . . . . . . . . . . . . . . . . . . . . 116
Driver Mode Control Light . . . . . . . . . . . . . 116
Four Corner Air Suspension Light . . . . . . . 117
Tire Pressure Light . . . . . . . . . . . . . . . . . . . . . 118
Engine Oil Pressure Light . . . . . . . . . . . . . . 118
Low Fuel Warning Light . . . . . . . . . . . . . . . . 118
Security Light . . . . . . . . . . . . . . . . . . . . . . . . . . 119
High-Beam On Light . . . . . . . . . . . . . . . . . . . 119
Front Fog Lamp Light . . . . . . . . . . . . . . . . . . 119
Lamps On Reminder . . . . . . . . . . . . . . . . . . . 119
Cruise Control Light . . . . . . . . . . . . . . . . . . . . 119
Door Ajar Light . . . . . . . . . . . . . . . . . . . . . . . . 120
Information Displays
Driver Information Center (DIC) . . . . . . . . 120
Head-Up Display (HUD) . . . . . . . . . . . . . . . . 122
Vehicle Messages
Vehicle Messages . . . . . . . . . . . . . . . . . . . . . . 125
Engine Power Messages . . . . . . . . . . . . . . . 125
Vehicle Speed Messages . . . . . . . . . . . . . . . 126
Vehicle Personalization
Vehicle Personalization . . . . . . . . . . . . . . . . 126
Universal Remote System
Universal Remote System . . . . . . . . . . . . . . 131
Universal Remote System Programming . . . . . . . . . . . . . . . . . . . . . . . . . 131
Universal Remote System Operation . . . 133
Page 104 of 433
GMC Yukon/Yukon XL/Denali Owner Manual (GMNA-Localizing-U.S./
Canada/Mexico-13690468) - 2021 - crc - 6/3/21
Instruments and Controls 101
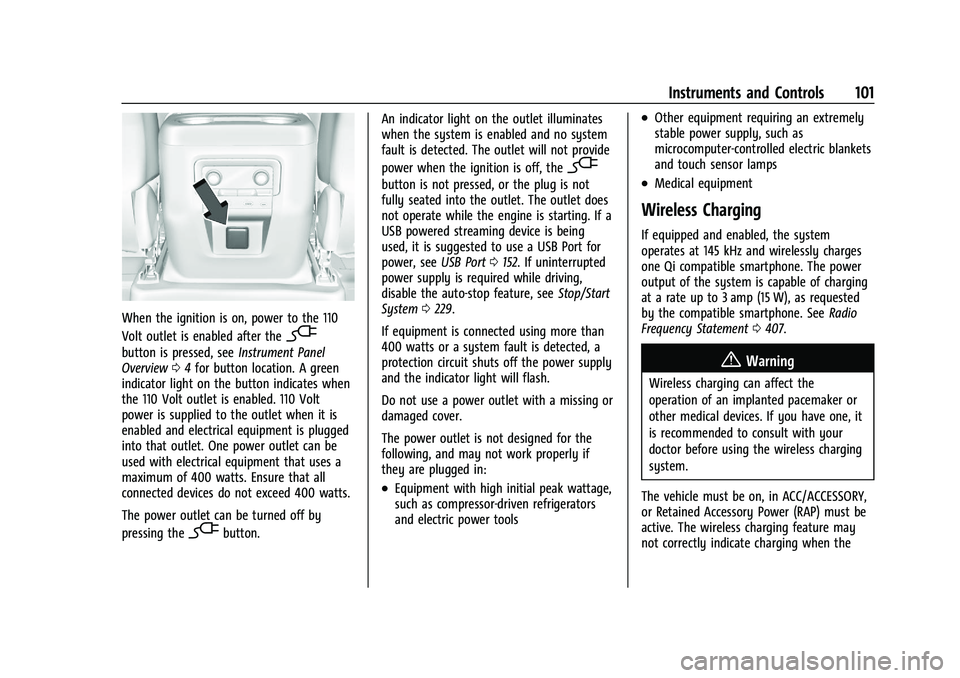
When the ignition is on, power to the 110
Volt outlet is enabled after the
-
button is pressed, seeInstrument Panel
Overview 04for button location. A green
indicator light on the button indicates when
the 110 Volt outlet is enabled. 110 Volt
power is supplied to the outlet when it is
enabled and electrical equipment is plugged
into that outlet. One power outlet can be
used with electrical equipment that uses a
maximum of 400 watts. Ensure that all
connected devices do not exceed 400 watts.
The power outlet can be turned off by
pressing the
-button. An indicator light on the outlet illuminates
when the system is enabled and no system
fault is detected. The outlet will not provide
power when the ignition is off, the
-
button is not pressed, or the plug is not
fully seated into the outlet. The outlet does
not operate while the engine is starting. If a
USB powered streaming device is being
used, it is suggested to use a USB Port for
power, see
USB Port0152. If uninterrupted
power supply is required while driving,
disable the auto-stop feature, see Stop/Start
System 0229.
If equipment is connected using more than
400 watts or a system fault is detected, a
protection circuit shuts off the power supply
and the indicator light will flash.
Do not use a power outlet with a missing or
damaged cover.
The power outlet is not designed for the
following, and may not work properly if
they are plugged in:
.Equipment with high initial peak wattage,
such as compressor-driven refrigerators
and electric power tools
.Other equipment requiring an extremely
stable power supply, such as
microcomputer-controlled electric blankets
and touch sensor lamps
.Medical equipment
Wireless Charging
If equipped and enabled, the system
operates at 145 kHz and wirelessly charges
one Qi compatible smartphone. The power
output of the system is capable of charging
at a rate up to 3 amp (15 W), as requested
by the compatible smartphone. See Radio
Frequency Statement 0407.
{Warning
Wireless charging can affect the
operation of an implanted pacemaker or
other medical devices. If you have one, it
is recommended to consult with your
doctor before using the wireless charging
system.
The vehicle must be on, in ACC/ACCESSORY,
or Retained Accessory Power (RAP) must be
active. The wireless charging feature may
not correctly indicate charging when the
Page 106 of 433
GMC Yukon/Yukon XL/Denali Owner Manual (GMNA-Localizing-U.S./
Canada/Mexico-13690468) - 2021 - crc - 8/14/20
Instruments and Controls 103
OSS Notice Information
To obtain the source code that is contained
in this product, please visit http://
opensource.lge.com. In addition to the
source code, all referred license terms,
warranty disclaimers and copyright notices
are available for download. LG Electronics
will also provide open source code to you
on CD-ROM for a charge covering the cost of
performing such distribution (such as the
cost of media, shipping, and handling) upon
email request to [email protected]. This
offer is valid for three (3) years from the
date on which you purchased the product.
Freescale-WCT library
Copyright (c) 2012-2014 Freescale
Semiconductor, Inc.. All rights reserved.1. Redistributions of source code must retain the above copyright notice, this
list of conditions and the following
disclaimer.
2. Redistributions in binary form must reproduce the above copyright notice,
this list of conditions and the following
disclaimer in the documentation and/or
other materials provided with the
distribution. 3. Neither the name of the copyright holder
nor the names of its contributors may be
used to endorse or promote products
derived from this software without
specific prior written permission.
THIS SOFTWARE IS PROVIDED BY THE
COPYRIGHT HOLDERS AND CONTRIBUTORS
"AS IS" AND ANY EXPRESS OR IMPLIED
WARRANTIES, INCLUDING, BUT NOT LIMITED
TO, THE IMPLIED WARRANTIES OF
MERCHANTABILITY AND FITNESS FOR A
PARTICULAR PURPOSE ARE DISCLAIMED. IN
NO EVENT SHALL THE COPYRIGHT HOLDER
OR CONTRIBUTORS BE LIABLE FOR ANY
DIRECT, INDIRECT, INCIDENTAL, SPECIAL,
EXEMPLARY, OR CONSEQUENTIAL DAMAGES
(INCLUDING, BUT NOT LIMITED TO,
PROCUREMENT OF SUBSTITUTE GOODS OR
SERVICES; LOSS OF USE, DATA, OR PROFITS;
OR BUSINESS INTERRUPTION) HOWEVER
CAUSED AND ON ANY THEORY OF LIABILITY,
WHETHER IN CONTRACT, STRICT LIABILITY, OR
TORT (INCLUDING NEGLIGENCE OR
OTHERWISE) ARISING IN ANY WAY OUT OF
THE USE OF THIS SOFTWARE, EVEN IF
ADVISED OF THE POSSIBILITY OF SUCH
DAMAGE.Warning Lights, Gauges, and
Indicators
Warning lights and gauges can signal that
something is wrong before it becomes
serious enough to cause an expensive repair
or replacement. Paying attention to the
warning lights and gauges could prevent
injury.
Some warning lights come on briefly when
the engine is started to indicate they are
working. When one of the warning lights
comes on and stays on while driving,
or when one of the gauges shows there
may be a problem, check the section that
explains what to do. Waiting to do repairs
can be costly and even dangerous.
Page 107 of 433
GMC Yukon/Yukon XL/Denali Owner Manual (GMNA-Localizing-U.S./
Canada/Mexico-13690468) - 2021 - crc - 8/14/20
104 Instruments and Controls
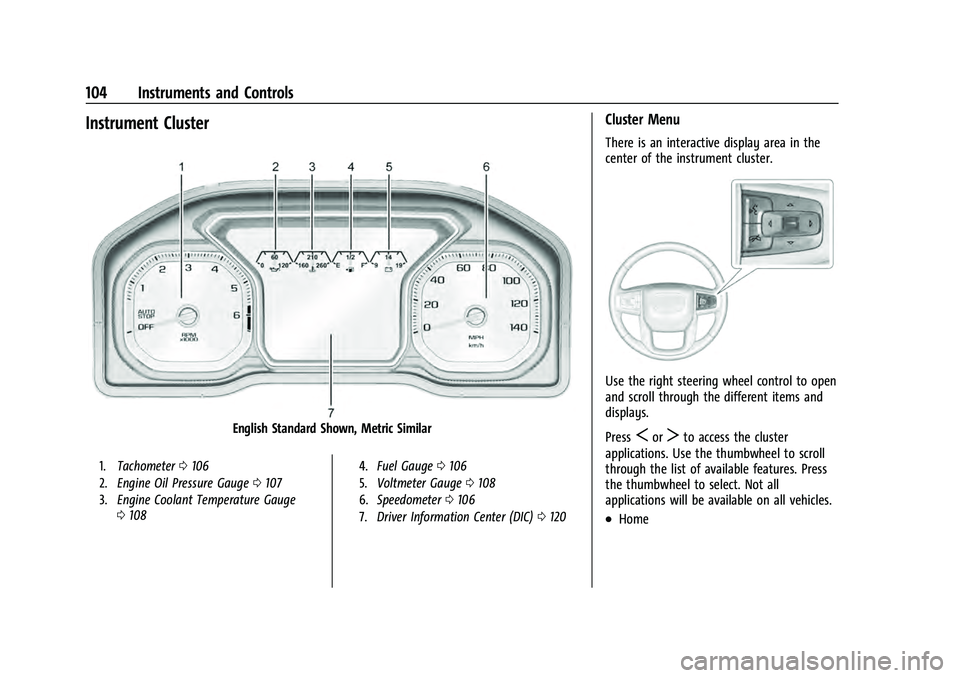
Instrument Cluster
English Standard Shown, Metric Similar
1.Tachometer 0106
2. Engine Oil Pressure Gauge 0107
3. Engine Coolant Temperature Gauge
0108 4.
Fuel Gauge 0106
5. Voltmeter Gauge 0108
6. Speedometer 0106
7. Driver Information Center (DIC) 0120
Cluster Menu
There is an interactive display area in the
center of the instrument cluster.
Use the right steering wheel control to open
and scroll through the different items and
displays.
Press
SorTto access the cluster
applications. Use the thumbwheel to scroll
through the list of available features. Press
the thumbwheel to select. Not all
applications will be available on all vehicles.
.Home
Page 109 of 433
GMC Yukon/Yukon XL/Denali Owner Manual (GMNA-Localizing-U.S./
Canada/Mexico-13690468) - 2021 - crc - 8/14/20
106 Instruments and Controls
Home :Press the thumbwheel to select the
available elements to display. Not all
elements will be available on all vehicles:
Speedometer, Speed Sign, Time, and Fuel
Range.
Display (Uplevel) : Press the thumbwheel to
enter the Display menu. Select to turn on or
off the compass or speed sign.
Speed Warning : The Speed Warning display
allows the driver to set a speed that they
do not want to exceed. To set the Speed
Warning, press the thumbwheel when Speed
Warning is displayed, or press the
thumbwheel on the main view to set the
speed value. Scroll to adjust the value. Press
the thumbwheel to set the speed. Once the
speed is set, this feature can be turned off
by pressing the thumbwheel while viewing
this page. If the selected speed limit is
exceeded, a pop-up warning is displayed
with a chime.
Software Information : Press the
thumbwheel while Software Information is
highlighted to display open source software
information.Speedometer
The speedometer shows the vehicle's speed
in either kilometers per hour (km/h) or
miles per hour (mph).
Odometer
The odometer shows how far the vehicle has
been driven, in either kilometers or miles.
The odometer is always displayed in the
bottom of the Driver Information
Center (DIC).
Trip Odometer
The trip odometer shows how far the
vehicle has been driven since the trip
odometer was last reset.
The trip odometer is accessed and reset
through the Driver Information Center (DIC).
See Driver Information Center (DIC) 0120.
Tachometer
The tachometer displays the engine speed in
revolutions per minute (rpm).
For vehicles with the Stop/Start system,
when the ignition is on, the tachometer
indicates the vehicle status. When pointing
to AUTO STOP, the engine is off but the vehicle is on and can move. The engine
could auto start at any time. When the
indicator points to OFF, the vehicle is off.
When the engine is on, the tachometer will
indicate the engine’s revolutions per minute
(rpm). The tachometer may vary by several
hundred rpm, during Auto Stop mode, when
the engine is shutting off and restarting.
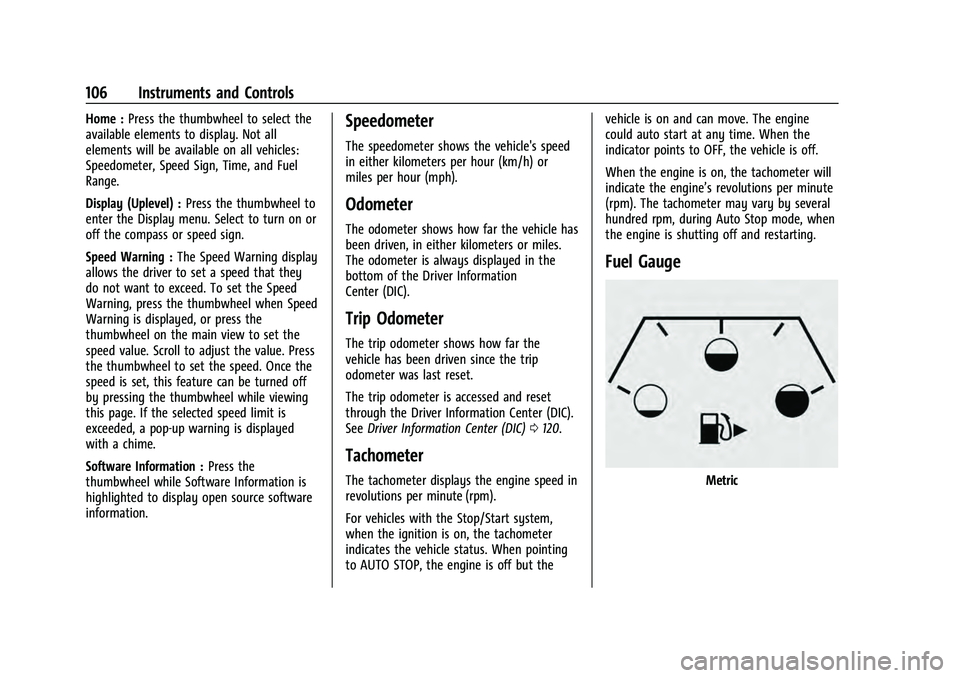
Fuel Gauge
Metric