check engine GREAT WALL FLORID 2008 Repair Manual
[x] Cancel search | Manufacturer: GREAT WALL, Model Year: 2008, Model line: FLORID, Model: GREAT WALL FLORID 2008Pages: 281, PDF Size: 43.97 MB
Page 276 of 281

Downloaded from www.Manualslib.com manuals search engine 269Vehicle Body
Fault classificationFault symptomFault diagnosisFault maintenance
Window panel
motion failure
Window panel (sunroof)
cannot open, rise, or close
from its initial position
Check if anything is blocking the guide rail
for window panel movement. Check whether
the mechanism moves smoothly or stiffly.
Check whether the mechanism is broken.
Check whether the guide rail is deformed.
Check whether the motor works normally.
Replace the sunroof guide rail assem-
bly. Replace the motor.
The window panel can-
not close while half-
opened or half-tilted
Diagnosis: Check whether there are oddities
impeding the window panel's movement .
Check whether the wind guard or rear roof
drip channel is arched or deformed.
Clean the objects and close the sun-
roof by force when the jam protection
function is started, then open it again
for operation. Replace the wind guard
and rear roof drip channel.
Sun visor push/pull
fault
Sun visor cannot open
or close normally
Check whether the guide rail for the sun visor
is blocked by oddities. Check whether the sun
visor bracket is broken.
Clean the oddities in the guide rail.
Change the sun visor. Change the sun
visor bracket.
The sun visor cannot open
and close completely
Check whether the front part of sun visor
arches. Check whether the sun visor lever has
been broken off.
Replace the sun visor. Replace the
sun visor lever.
Sunroof leakage fault Sunroof leakageCheck the clearance between the window
panel and the car roof hatch.
Adjust and enlarge the window panel
weatherstrip.
Check whether a build up of sand or dust ex-
ists on the surface of window panel weather-
strip.
Clean the weatherstrip surface and
car roof hatch.
Check the sealing conditions between the
guide rail & front roof drip channel and rear
roof drip channel.
Replace the sunroof guide rail assem-
bly.
Check whether the front roof drip channel
and rear roof drip channel are broken.
Replace the sunroof guide rail assem-
bly or rear roof drip channel.
Abnormal noiseThere is abnormal noise
when closing the sunroof
(1) Check the positioning of the closed win-
dow panel.
(2) Check whether the wind deflector spring is
in the right position.
(3) Check whether the rear roof drip channel's
fixed spring has broken off.
(4) Check whether the wind deflector buffer
rubber block has broken off.
(1) Adjust the window panel's position.
(2) Place the wind deflector spring in
the right position .
(3) Re-install the fixed spring.
(4) Re-install the rubber block.
There is abnormal
noise when the sun-
roof is operating
(1) Check whether the motor is working nor-
mally.
(2) Check whether oddities exist in the guide
rail for mechanism movement .
(3) Check the grease's conditions on the mov-
ing components .
(4) Check whether the moving components
are broken.
(1) Replace the motor.
(2) Clean out any contamination.
(3) Lubricate the components.
(4) Replace the components or the
sunroof guide rail assembly.
Troubleshooting
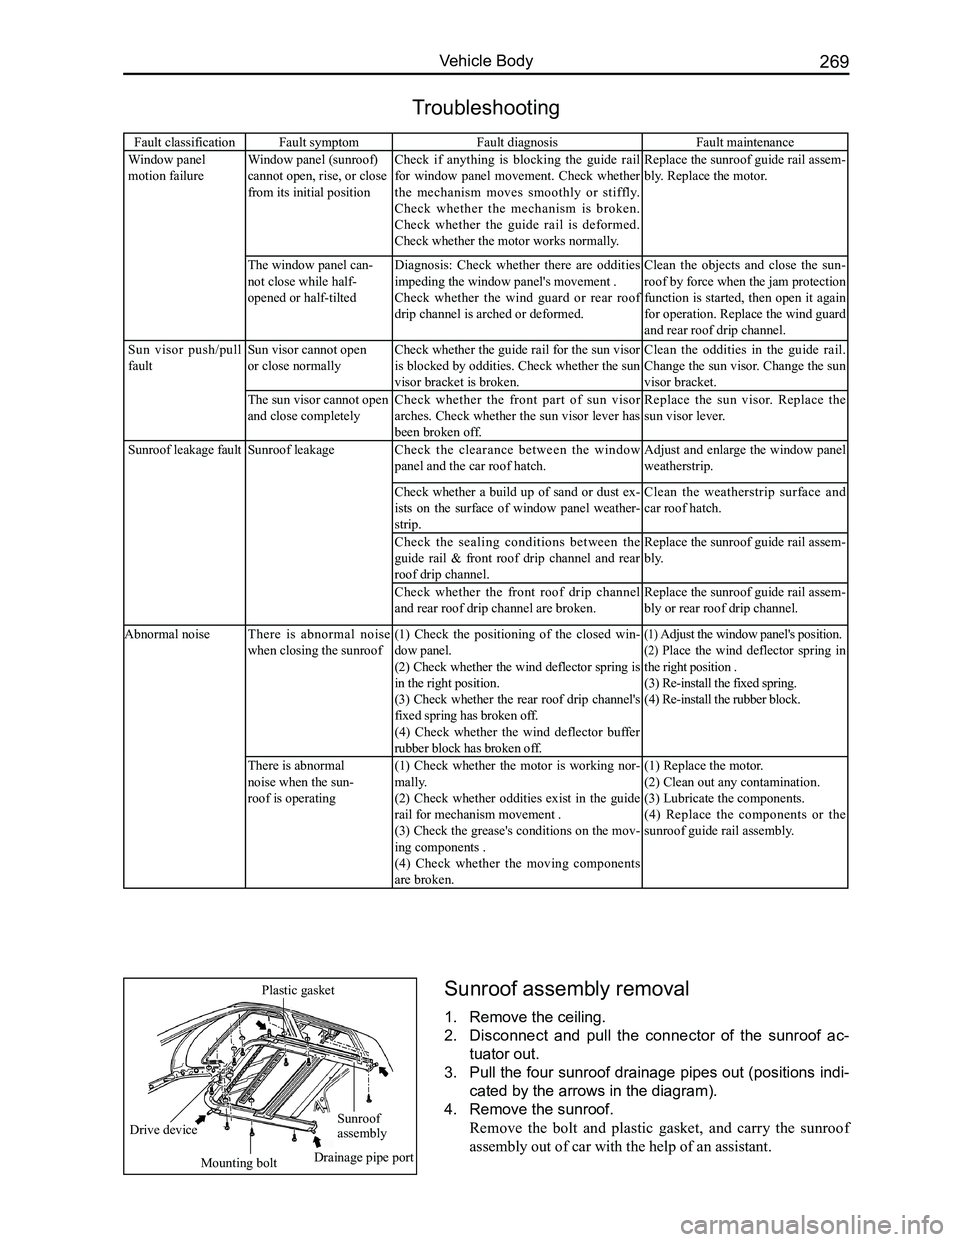
Sunroof assembly removal
1. Remove the ceiling.
2. Disconnect and pull the connector of the sunroof ac-
tuator out.
3. Pull the four sunroof drainage pipes out (positions indi-
cated by the arrows in the diagram).
4. Remove the sunroof.
Remove the bolt and plastic gasket, and carry the sunroof
assembly out of car with the help of an assistant.
Sunroof assembly
Mounting bolt
Drive device
Plastic gasket
Drainage pipe port
Page 278 of 281

Downloaded from www.Manualslib.com manuals search engine 271Vehicle Body
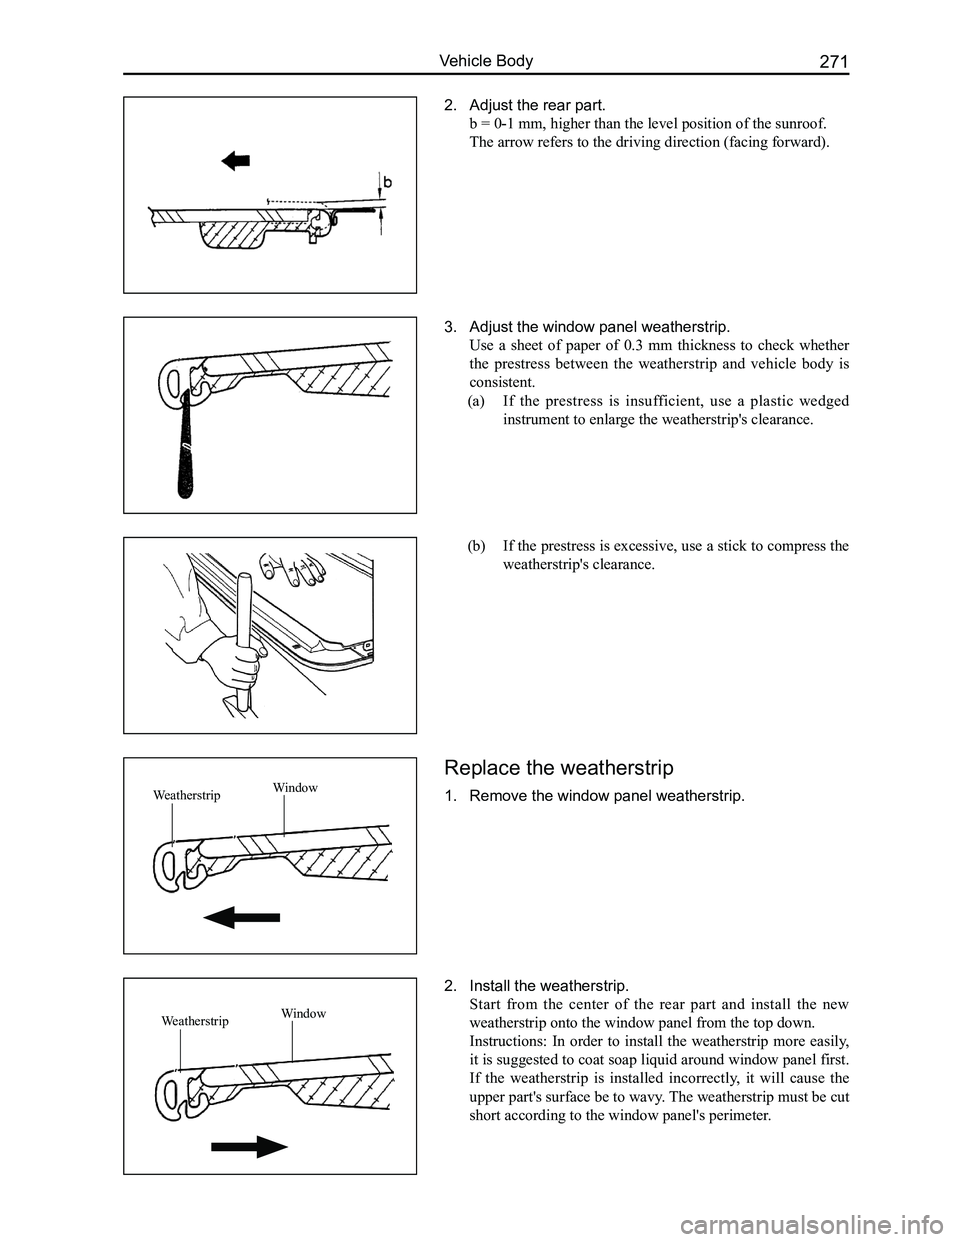
2. Adjust the rear part.
b = 0-1 mm, higher than the level position of the sunroof.
The arrow refers to the driving direction (facing forward).
3. Adjust the window panel weatherstrip.
Use a sheet of paper of 0.3 mm thickness to check whether
the prestress between the weatherstrip and vehicle body is
consistent.
(a) If the prestress is insufficient, use a plastic wedged
instrument to enlarge the weatherstrip's clearance.
(b) If the prestress is excessive, use a stick to compress the
weatherstrip's clearance.
Replace the weatherstrip
1. Remove the window panel weatherstrip.
2. Install the weatherstrip.
Start from the center of the rear part and install the new
weatherstrip onto the window panel from the top down.
Instructions: In order to install the weatherstrip more easily,
it is suggested to coat soap liquid around window panel first.
If the weatherstrip is installed incorrectly, it will cause the
upper part's surface be to wavy. The weatherstrip must be cut
short according to the window panel's perimeter.
WeatherstripWindow
WeatherstripWindow
Page 280 of 281

Downloaded from www.Manualslib.com manuals search engine 273Vehicle Body
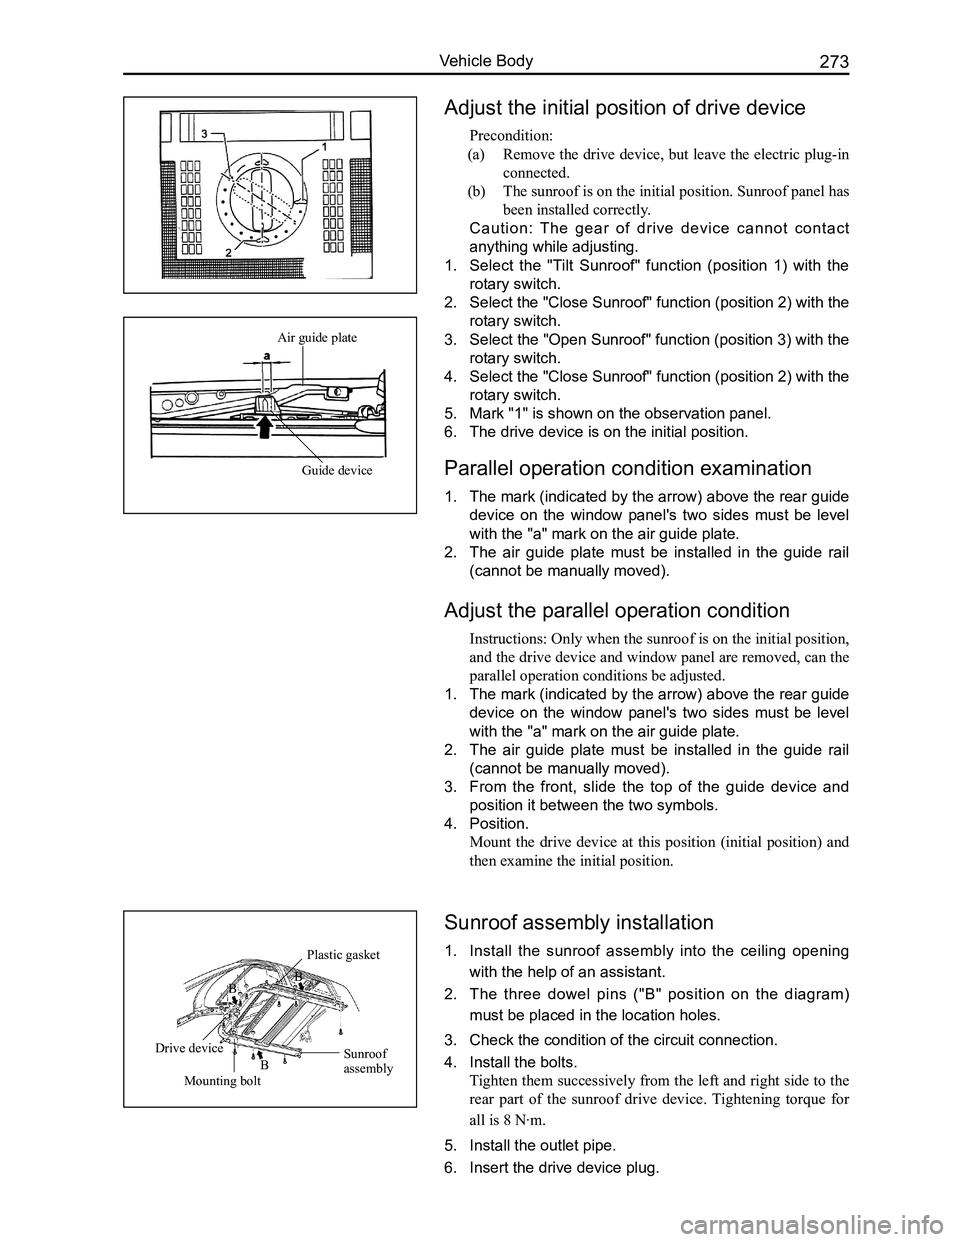
Adjust the initial position of drive device
Precondition:
(a) Remove the drive device, but leave the electric plug-in
connected.
(b) The sunroof is on the initial position. Sunroof panel has
been installed correctly.
Caution: The gear of drive device cannot contact
anything while adjusting.
1. Select the "Tilt Sunroof" function (position 1) with the
rotary switch.
2. Select the "Close Sunroof" function (position 2) with the
rotary switch.
3. Select the "Open Sunroof" function (position 3) with the
rotary switch.
4. Select the "Close Sunroof" function (position 2) with the
rotary switch.
5. Mark "1" is shown on the observation panel.
6. The drive device is on the initial position.
Parallel operation condition examination
1. The mark (indicated by the arrow) above the rear guide
device on the window panel's two sides must be level
with the "a" mark on the air guide plate.
2. The air guide plate must be installed in the guide rail
(cannot be manually moved).
Adjust the parallel operation condition
Instructions: Only when the sunroof is on the initial position,
and the drive device and window panel are removed, can the
parallel operation conditions be adjusted.
1. The mark (indicated by the arrow) above the rear guide
device on the window panel's two sides must be level
with the "a" mark on the air guide plate.
2. The air guide plate must be installed in the guide rail
(cannot be manually moved).
3. From the front, slide the top of the guide device and
position it between the two symbols.
4. Position.
Mount the drive device at this position (initial position) and
then examine the initial position.
Sunroof assembly installation
1. Install the sunroof assembly into the ceiling opening
with the help of an assistant.
2. The three dowel pins ("B" position on the diagram)
must be placed in the location holes.
3. Check the condition of the circuit connection.
4. Install the bolts.
Tighten them successively from the left and right side to the
rear part of the sunroof drive device. Tightening torque for
all is 8 N·m.
5. Install the outlet pipe.
6. Insert the drive device plug.
Air guide plate
Guide device
Sunroof assembly
Plastic gasket
Mounting bolt
Drive device
B
BB