airbag GREAT WALL FLORID 2008 Service Manual
[x] Cancel search | Manufacturer: GREAT WALL, Model Year: 2008, Model line: FLORID, Model: GREAT WALL FLORID 2008Pages: 281, PDF Size: 43.97 MB
Page 2 of 281
Downloaded from www.Manualslib.com manuals search engine PREFACE
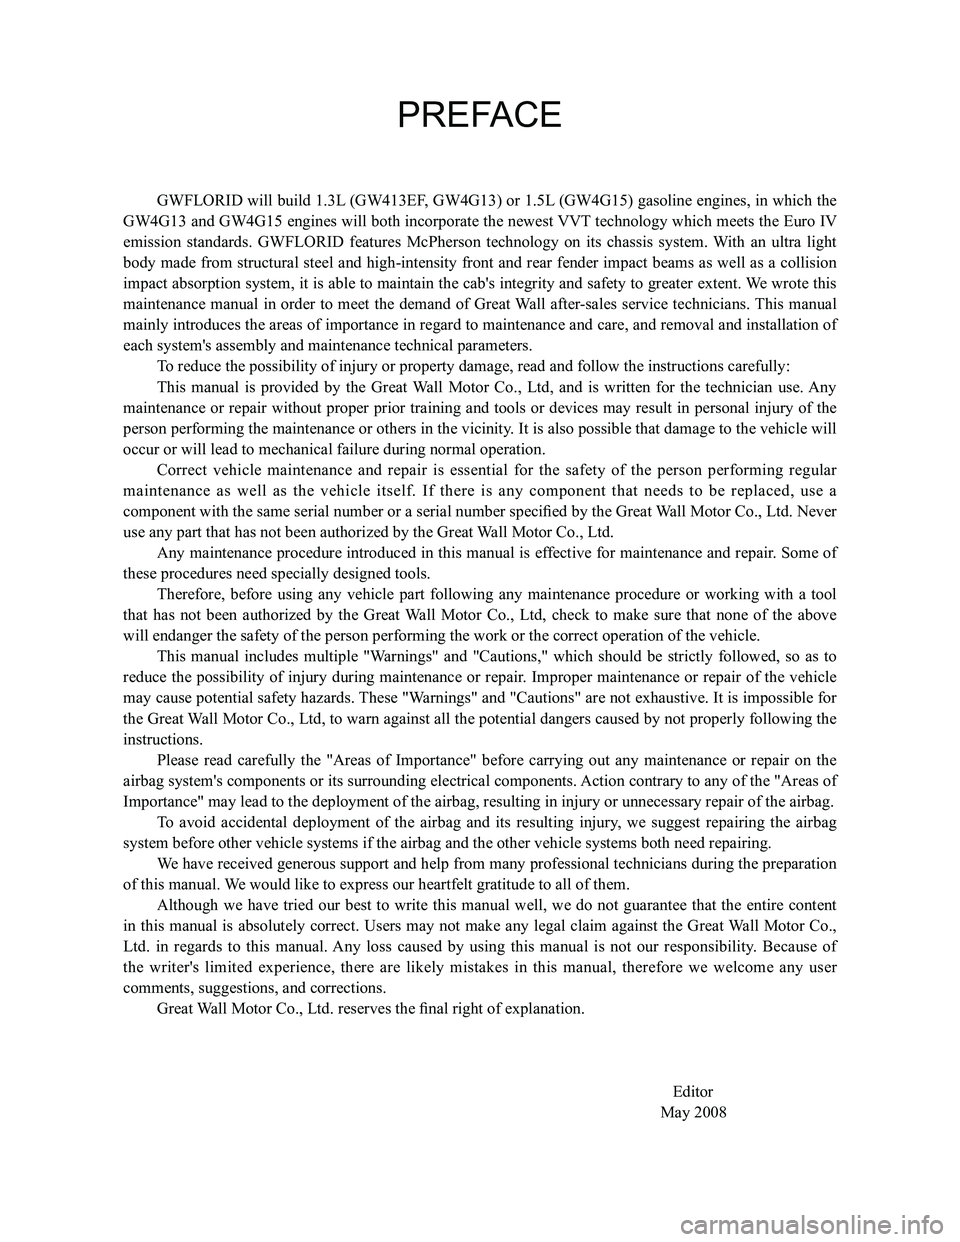
GWFLORID will build 1.3L (GW413EF, GW4G13) or 1.5L (GW4G15) gasoline engines, in which the
GW4G13 and GW4G15 engines will both incorporate the newest VVT technology which meets the Euro IV
emission standards. GWFLORID features McPherson technology on its chassis system. With an ultra light
body made from structural steel and high-intensity front and rear fender impact beams as well as a collision
impact absorption system, it is able to maintain the cab's integrity and safety to greater extent. We wrote this
maintenance manual in order to meet the demand of Great Wall after-sales service technicians. This manual
mainly introduces the areas of importance in regard to maintenance and care, and removal and installation of
each system's assembly and maintenance technical parameters.
To reduce the possibility of injury or property damage, read and follow t\
he instructions carefully:
This manual is provided by the Great Wall Motor Co., Ltd, and is written for the technician use. Any
maintenance or repair without proper prior training and tools or devices may result in personal injury of the
person performing the maintenance or others in the vicinity. It is also possible that damage to the vehicle will
occur or will lead to mechanical failure during normal operation.
Correct vehicle maintenance and repair is essential for the safety of the person performing regular
maintenance as well as the vehicle itself. If there is any component that needs to be replaced, use a
component with the same serial number or a serial number specified by the Great Wall Motor Co., Ltd. Never
use any part that has not been authorized by the Great Wall Motor Co., Ltd.
Any maintenance procedure introduced in this manual is effective for maintenance and repair. Some of
these procedures need specially designed tools.
Therefore, before using any vehicle part following any maintenance procedure or working with a tool
that has not been authorized by the Great Wall Motor Co., Ltd, check to make sure that none of the above
will endanger the safety of the person performing the work or the correc\
t operation of the vehicle.
This manual includes multiple "Warnings" and "Cautions," which should be strictly followed, so as to
reduce the possibility of injury during maintenance or repair. Improper maintenance or repair of the vehicle
may cause potential safety hazards. These "Warnings" and "Cautions" are not exhaustive. It is impossible for
the Great Wall Motor Co., Ltd, to warn against all the potential dangers caused by not properly following the
instructions.
Please read carefully the "Areas of Importance" before carrying out any maintenance or repair on the
airbag system's components or its surrounding electrical components. Action contrary to any of the "Areas of
Importance" may lead to the deployment of the airbag, resulting in injur\
y or unnecessary repair of the airbag.
To avoid accidental deployment of the airbag and its resulting injury, we suggest repairing the airbag
system before other vehicle systems if the airbag and the other vehicle \
systems both need repairing.
We have received generous support and help from many professional technicians during the preparation
of this manual. We would like to express our heartfelt gratitude to all of them.
Although we have tried our best to write this manual well, we do not guarantee that the entire content
in this manual is absolutely correct. Users may not make any legal claim against the Great Wall Motor Co.,
Ltd. in regards to this manual. Any loss caused by using this manual is not our responsibility. Because of
the writer's limited experience, there are likely mistakes in this manual, therefore we welcome any user
comments, suggestions, and corrections.
Great Wall Motor Co., Ltd. reserves the final right of explanation.
\
Editor
May 2008
Page 6 of 281
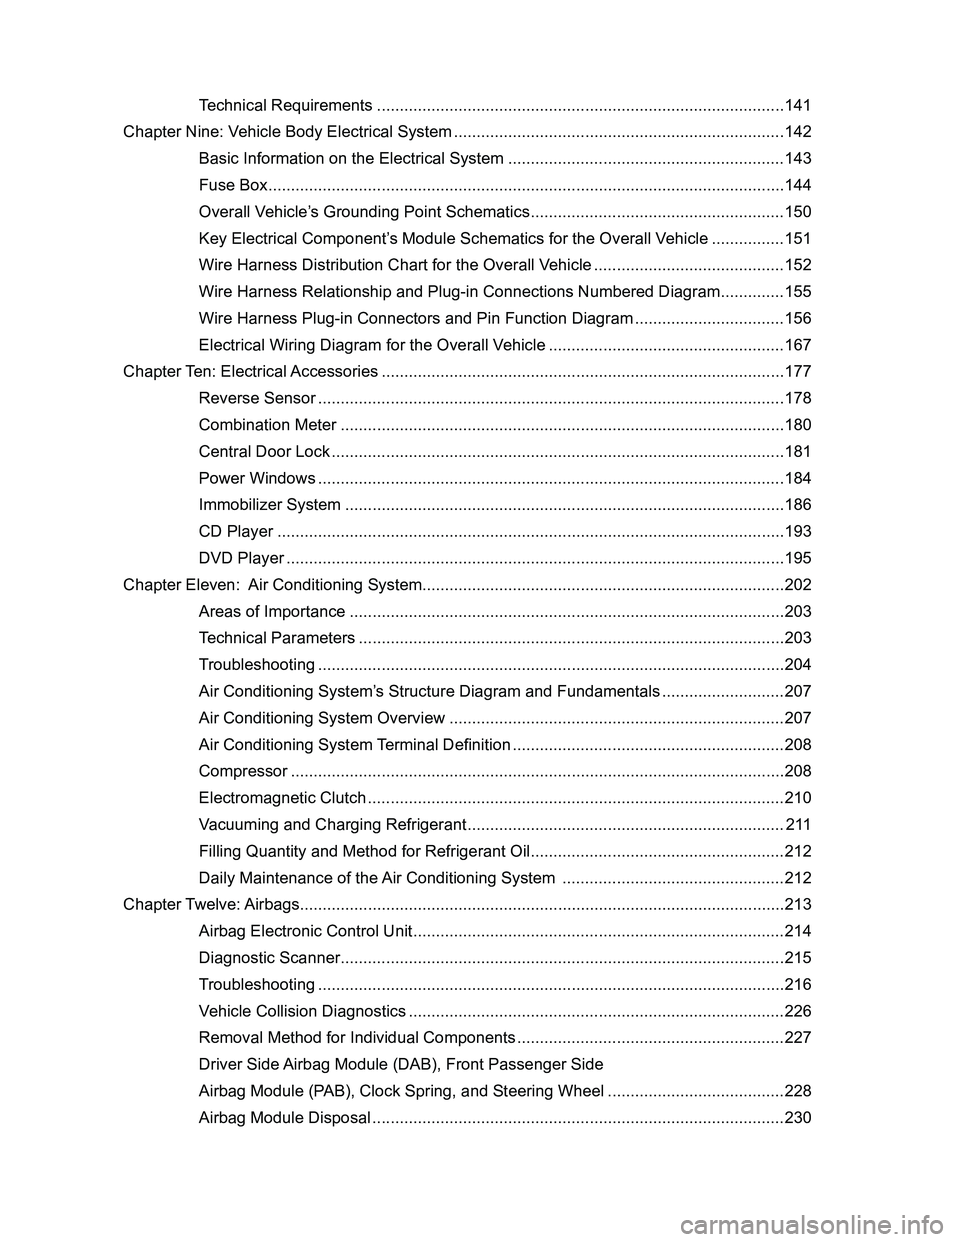
Downloaded from www.Manualslib.com manuals search engine Technical Requirements ..................................................................................\
........141
Chapter Nine: Vehicle Body Electrical System ........................................................................\
.142
Basic Information on the Electrical System .............................................................143
Fuse Box ...................................................................................\
...............................144
Overall Vehicle’s Grounding Point Schematics ........................................................150
Key Electrical Component’s Module Schematics for the Overall Vehicle ................151
Wire Harness Distribution Chart for the Overall Vehicle ..........................................152
Wire Harness Relationship and Plug-in Connections Numbered Diagram ..............155
Wire Harness Plug-in Connectors and Pin Function Diagram .................................156
Electrical Wiring Diagram for the Overall Vehicle ....................................................167
Chapter Ten: Electrical Accessories ........................................................................\
.................177
Reverse Sensor ..................................................................................\
.....................178
Combination Meter ..................................................................................\
................180
Central Door Lock ...................................................................................\
.................181
Power Windows ..................................................................................\
.....................184
Immobilizer System ..................................................................................\
...............186
CD Player ..................................................................................\
..............................193
DVD Player ..................................................................................\
............................195
Chapter Eleven: Air Conditioning System........................................................................\
........202
Areas of Importance ..................................................................................\
..............203
Technical Parameters ..................................................................................\
............203
Troubleshooting ..................................................................................\
.....................204
Air Conditioning System’s Structure Diagram and Fundamentals ...........................207
Air Conditioning System Overview ..........................................................................207
Air Conditioning System Terminal Definition ............................................................208
Compressor ..................................................................................\
...........................208
Electromagnetic Clutch ...................................................................................\
.........210
Vacuuming and Charging Refrigerant ......................................................................211
Filling Quantity and Method for Refrigerant Oil ........................................................212
Daily Maintenance of the Air Conditioning System .................................................212
Chapter Twelve: Airbags ........................................................................\
...................................213
Airbag Electronic Control Unit ..................................................................................214
Diagnostic Scanner ...................................................................................\
...............215
Troubleshooting ..................................................................................\
.....................216
Vehicle Collision Diagnostics ..................................................................................\
.226
Removal Method for Individual Components ...........................................................227
Driver Side Airbag Module (DAB), Front Passenger Side
Airbag Module (PAB), Clock Spring, and Steering Wheel .......................................228
Airbag Module Disposal ...................................................................................\
........230
Page 7 of 281
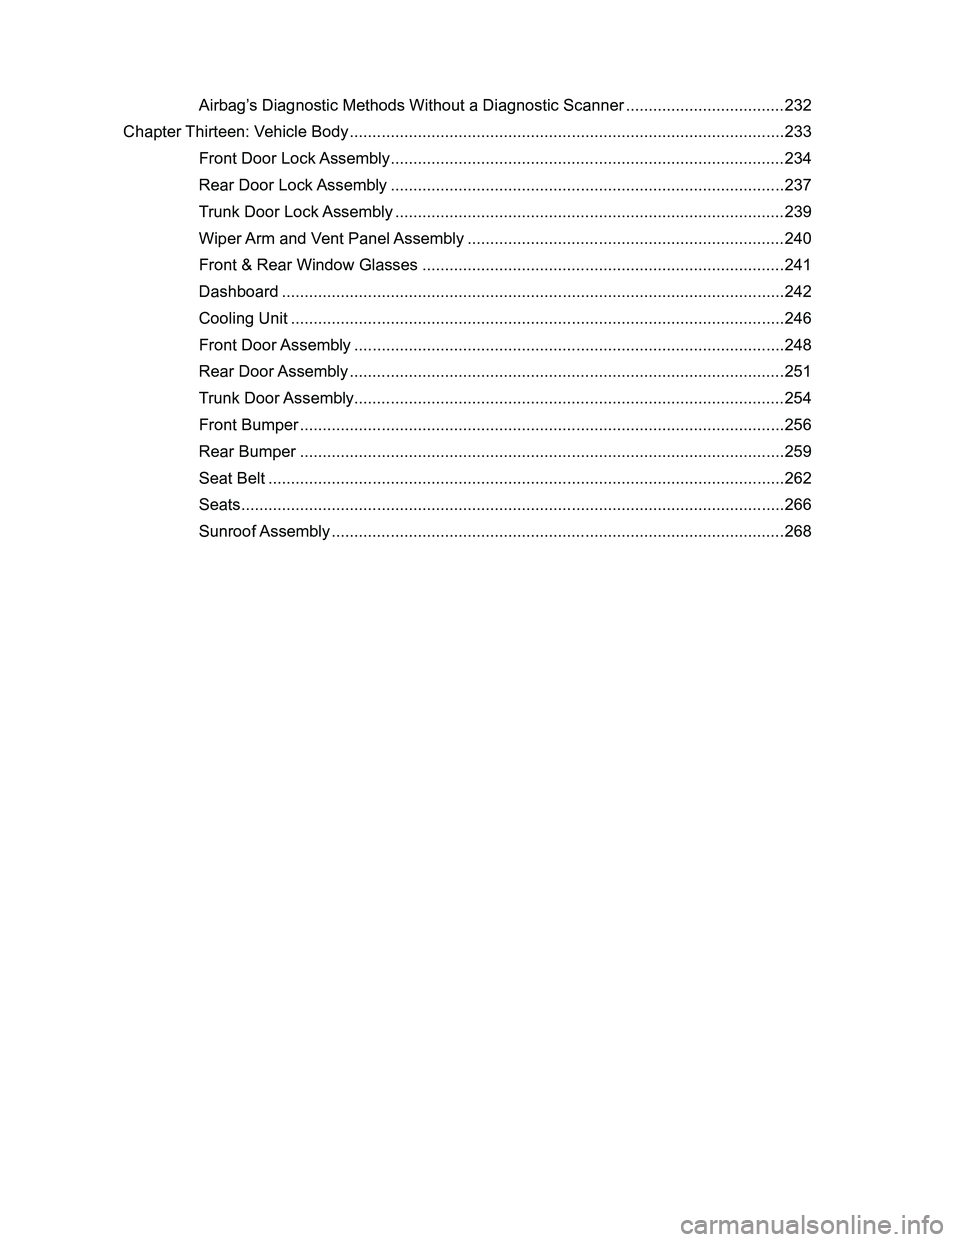
Downloaded from www.Manualslib.com manuals search engine Airbag’s Diagnostic Methods Without a Diagnostic Scanner ...................................232
Chapter Thirteen: Vehicle Body ........................................................................\
........................233
Front Door Lock Assembly ...................................................................................\
....234
Rear Door Lock Assembly ..................................................................................\
.....237
Trunk Door Lock Assembly ...................................................................................\
...239
Wiper Arm and Vent Panel Assembly ......................................................................240
Front & Rear Window Glasses ................................................................................241
Dashboard ..................................................................................\
.............................242
Cooling Unit ..................................................................................\
...........................246
Front Door Assembly ..................................................................................\
.............248
Rear Door Assembly ...................................................................................\
.............251
Trunk Door Assembly ...................................................................................\
............254
Front Bumper ...................................................................................\
........................256
Rear Bumper ..................................................................................\
.........................259
Seat Belt ..................................................................................\
................................262
Seats ...................................................................................\
.....................................266
Sunroof Assembly ...................................................................................\
.................268
Page 21 of 281
Downloaded from www.Manualslib.com manuals search engine GWFLORID Maintenance Manual14
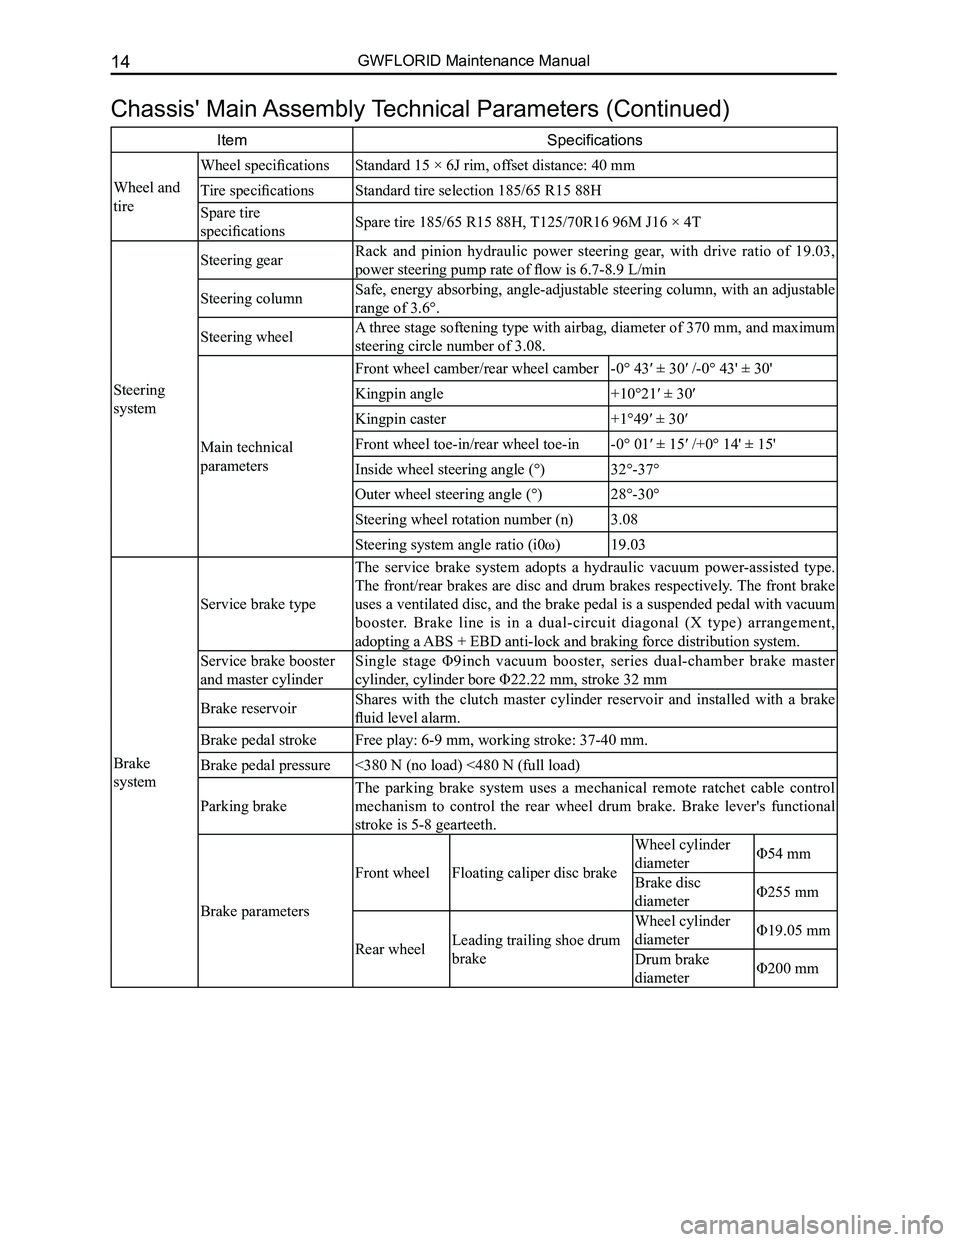
Chassis' Main Assembly Technical Parameters (Continued)
ItemSpecifications
Wheel and
tire
Wheel specificationsStandard 15 × 6J rim, offset distance: 40 mm
Tire specificationsStandard tire selection 185/65 R15 88H
Spare tire
specificationsSpare tire 185/65 R15 88H, T125/70R16 96M J16 × 4T
Steering
system
Steering gearRack and pinion hydraulic power steering gear, with drive ratio of 19.03,
power steering pump rate of flow is 6.7-8.9 L/min
Steering columnSafe, energy absorbing, angle-adjustable steering column, with an adjustable
range of 3.6°.
Steering wheelA three stage softening type with airbag, diameter of 370 mm, and maximum
steering circle number of 3.08.
Main technical
parameters
Front wheel camber/rear wheel camber-0° 43′ ± 30′ /-0° 43' ± 30'
Kingpin angle+10°21′ ± 30′
Kingpin caster+1°49′ ± 30′
Front wheel toe-in/rear wheel toe-in-0° 01′ ± 15′ /+0° 14' ± 15'
Inside wheel steering angle (°)32°-37°
Outer wheel steering angle (°)28°-30°
Steering wheel rotation number (n)3.08
Steering system angle ratio (i0ω)19.03
Brake
system
Service brake type
The service brake system adopts a hydraulic vacuum power-assisted type.
The front/rear brakes are disc and drum brakes respectively. The front brake
uses a ventilated disc, and the brake pedal is a suspended pedal with vacuum
booster. Brake line is in a dual-circuit diagonal (X type) arrangement,
adopting a ABS + EBD anti-lock and braking force distribution system.
Service brake booster
and master cylinder
Single stage Φ9inch vacuum booster, series dual-chamber brake master
cylinder, cylinder bore Φ22.22 mm, stroke 32 mm
Brake reservoirShares with the clutch master cylinder reservoir and installed with a brake
fluid level alarm.
Brake pedal strokeFree play: 6-9 mm, working stroke: 37-40 mm.
Brake pedal pressure<380 N (no load) <480 N (full load)
Parking brake
The parking brake system uses a mechanical remote ratchet cable control
mechanism to control the rear wheel drum brake. Brake lever's functional
stroke is 5-8 gearteeth.
Brake parameters
Front wheelFloating caliper disc brake
Wheel cylinder
diameterΦ54 mm
Brake disc
diameterΦ255 mm
Rear wheelLeading trailing shoe drum
brake
Wheel cylinder
diameterΦ19.05 mm
Drum brake
diameterΦ200 mm
Page 24 of 281
Downloaded from www.Manualslib.com manuals search engine 17Overall Parameters
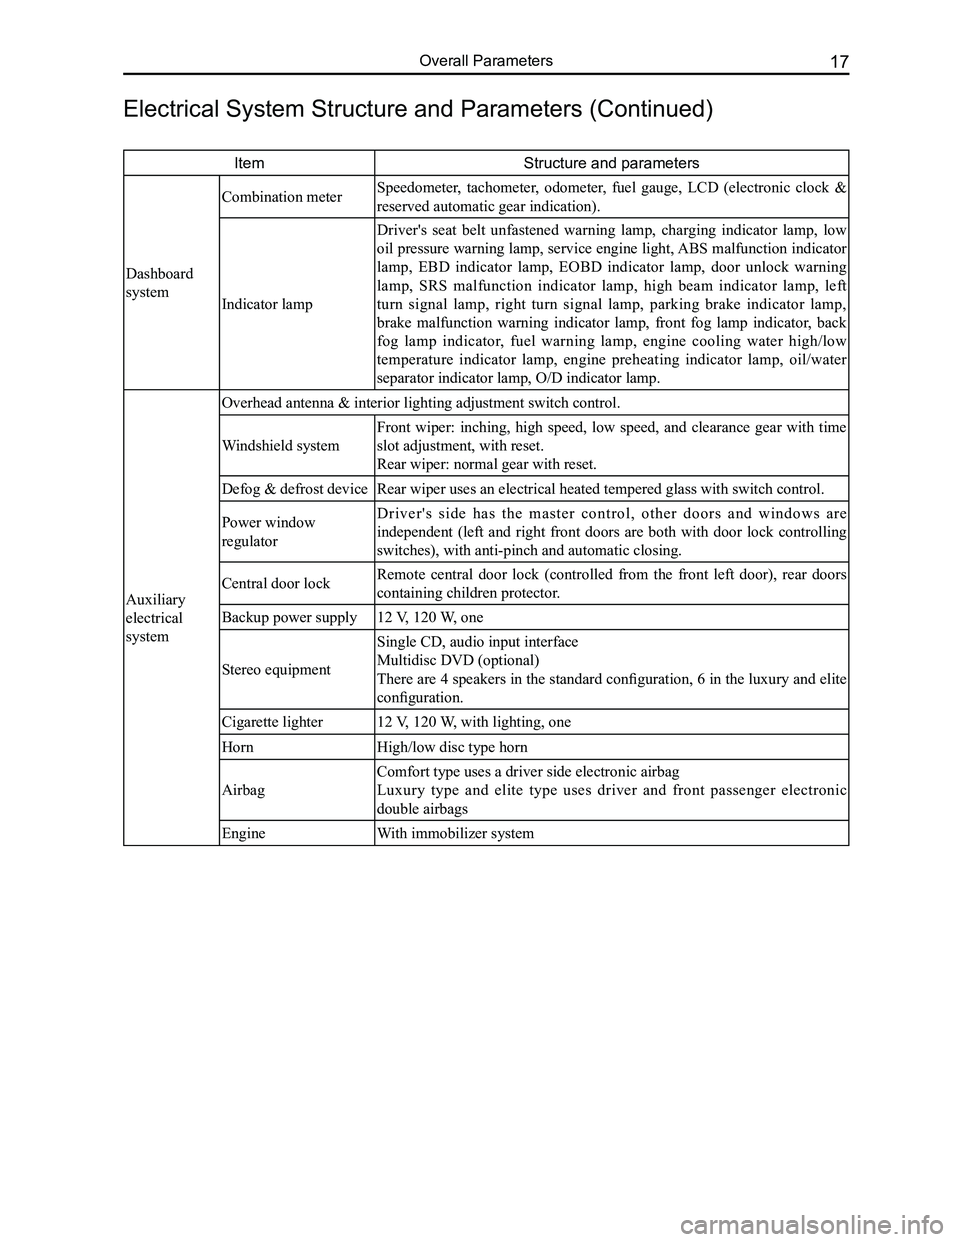
ItemStructure and parameters
Dashboard
system
Combination meter Speedometer, tachometer, odometer, fuel gauge, LCD (electronic clock &
reserved automatic gear indication).
Indicator lamp
Driver's seat belt unfastened warning lamp, charging indicator lamp, low
oil pressure warning lamp, service engine light, ABS malfunction indicator
lamp, EBD indicator lamp, EOBD indicator lamp, door unlock warning
lamp, SRS malfunction indicator lamp, high beam indicator lamp, left
turn signal lamp, right turn signal lamp, parking brake indicator lamp,
brake malfunction warning indicator lamp, front fog lamp indicator, back
fog lamp indicator, fuel warning lamp, engine cooling water high/low
temperature indicator lamp, engine preheating indicator lamp, oil/water
separator indicator lamp, O/D indicator lamp.
Auxiliary
electrical
system
Overhead antenna & interior lighting adjustment switch control.
Windshield system
Front wiper: inching, high speed, low speed, and clearance gear with time
slot adjustment, with reset.
Rear wiper: normal gear with reset.
Defog & defrost deviceRear wiper uses an electrical heated tempered glass with switch control.\
Power window
regulator
D r i v e r ' s s i d e h a s t h e m a s t e r c o n t r o l , o t h e r d o o r s a n d w i n d o w s a r e
independent (left and right front doors are both with door lock controlling
switches), with anti-pinch and automatic closing.
Central door lockRemote central door lock (controlled from the front left door), rear doors
containing children protector.
Backup power supply12 V, 120 W, one
Stereo equipment
Single CD, audio input interface
Multidisc DVD (optional)
There are 4 speakers in the standard configuration, 6 in the luxury and elite
configuration.
Cigarette lighter12 V, 120 W, with lighting, one
HornHigh/low disc type horn
Airbag
Comfort type uses a driver side electronic airbag
Luxury type and elite type uses driver and front passenger electronic
double airbags
EngineWith immobilizer system
Electrical System Structure and Parameters (Continued)
Page 144 of 281
Downloaded from www.Manualslib.com manuals search engine 137Steering System
Steering System Maintenance
Structure Introduction
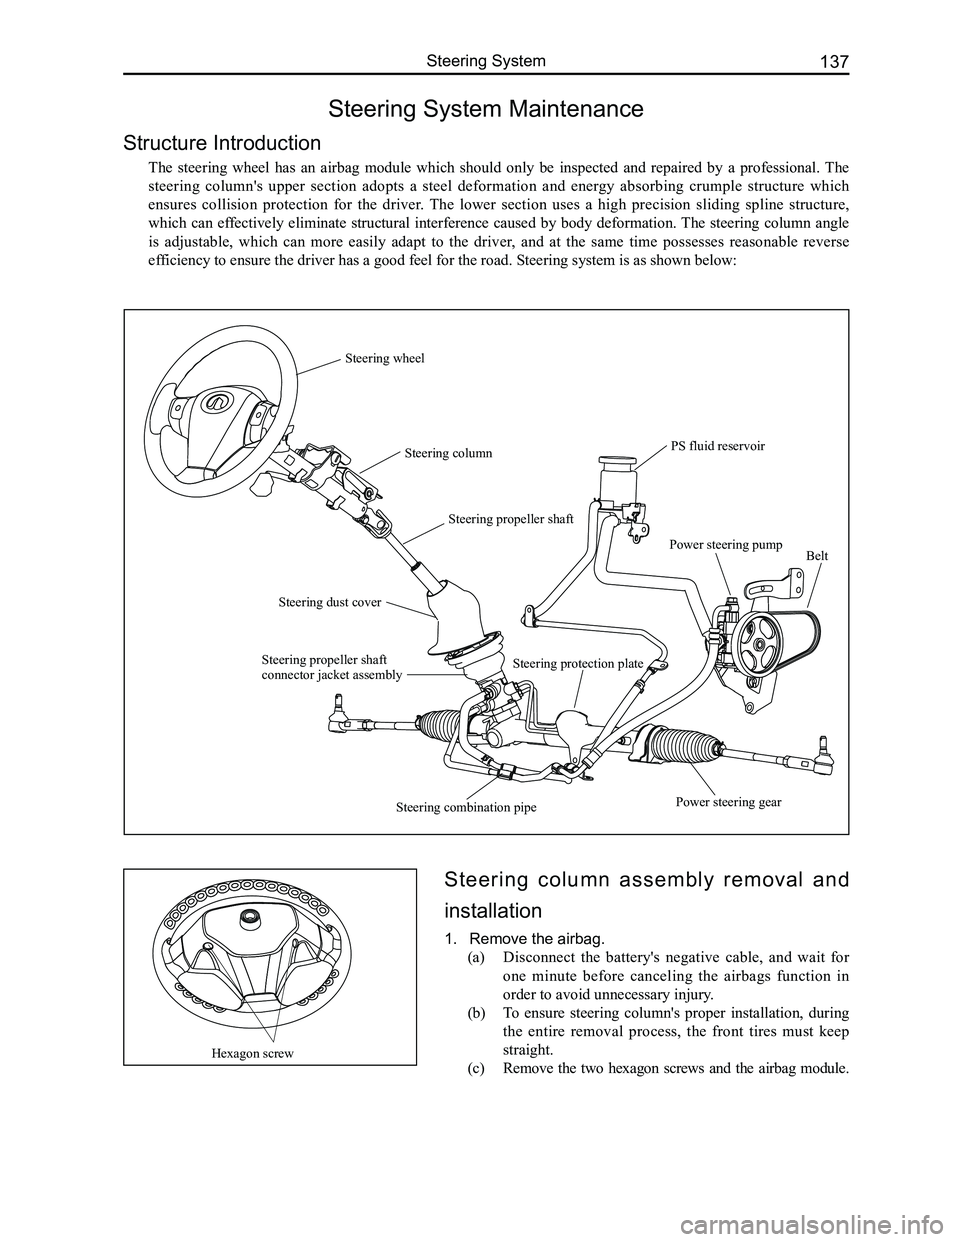
The steering wheel has an airbag module which should only be inspected and repaired by a professional. The
steering column's upper section adopts a steel deformation and energy absorbing crumple structure which
ensures collision protection for the driver. The lower section uses a high precision sliding spline structure,
which can effectively eliminate structural interference caused by body deformation. The steering column angle
is adjustable, which can more easily adapt to the driver, and at the same time possesses reasonable reverse
efficiency to ensure the driver has a good feel for the road. Steering sys\
tem is as shown below:
Steering column assembly removal and
installation
1. Remove the airbag.
(a) Disconnect the battery's negative cable, and wait for
one minute before canceling the airbags function in
order to avoid unnecessary injury.
(b) To ensure steering column's proper installation, during
the entire removal process, the front tires must keep
straight.
(c) Remove the two hexagon screws and the airbag module.
Hexagon screw
Steering wheel
Steering column
Steering propeller shaft
PS fluid reservoir
Power steering pumpBelt
Power steering gearSteering combination pipe
Steering propeller shaft connector jacket assembly
Steering dust cover
Steering protection plate
Page 151 of 281
Downloaded from www.Manualslib.com manuals search engine GWFLORID Maintenance Manual144
Double-colored wire: Primary color is Red, secondary color is Blue, mark\
ed as RBl.
0.5BrGr means Brown wire with a Gray fine wire, and sectional area is 0.\
5 mm2.
Areas of importance in circuit maintenance
1. Before operating any electronic devices, and when tools or maintenance devices may easily make
contact with an uncovered electronic terminal, please make sure to turn the ignition switch to the LOCK
position, and then disconnect the battery's negative cable to avoid injury or vehicle damage. When the
ignition switch is on the ON position, please do not disconnect the battery's connecting wire or take out
the power's fuse, regardless if the engine is running or not.Otherwise it would seriously damage the
ECU and related microelectronic devices such as sensors.
2. When changing the fuse, please make sure that the new fuse possesses the proper current rating,
and is not above or below this rating.
3. When repairing the wire harnesses of the airbag and pretensioner, only specified contact points,
plugs, and wires are allowed to be used.
4. Before repairing the wire harness, make sure to eliminate any factor that might cause damage,
for example, the edge of a vehicle body part is too sharp, or the used electronics are damaged or
corroded.
5. Shielded wire should not be repaired, it must be replaced entirely once it is damaged.
6. Unless it is specified during the test, please do not use an analog multimeter to test the ECU and
sensor, instead use a high-impedance digital multimeter (internal resistance should be ≥10 kΩ) or a
vehicle multimeter for inspection.
7. When inspecting the connector with a digital multimeter, take the waterproof rubber cover off the
connector, and tightly insert the test pen along the connecting terminal. Don't use too much force, as
to avoid cracking the connector.
Circuit inspection steps
The principle of troubleshooting is to confirm the "possible cause". Once the possible cause is confirmed, the
components that need to be inspected are limited to the components that are related to the possible cause. The
confirmed possible cause should be based on theory and be supported by facts, but not just by intuition. If
one tries to solve the problem but does not adopt the proper troubleshooting steps, it may make the problem
worse. Then the possible cause not only can't be confirmed, but also maintenance can't be performed properly.
Troubleshooting should adhere to the four steps below:
1. Observe the symptoms carefully, inspect if there is anything else abnormal, and record it.
2. While confirming the possible causes, study the circuit diagram carefully, and regard it as a whole
system in order to understand the circuit. Thorough knowledge of switches, relays, and other
electronic components is obligatory for proper analysis.
3. Inspect and eliminate the problems one by one until the cause is found.
4. After the malfunction is fixed, make sure to check if the inspected system is working properly, and also
check if the maintenance may have caused any new problems.
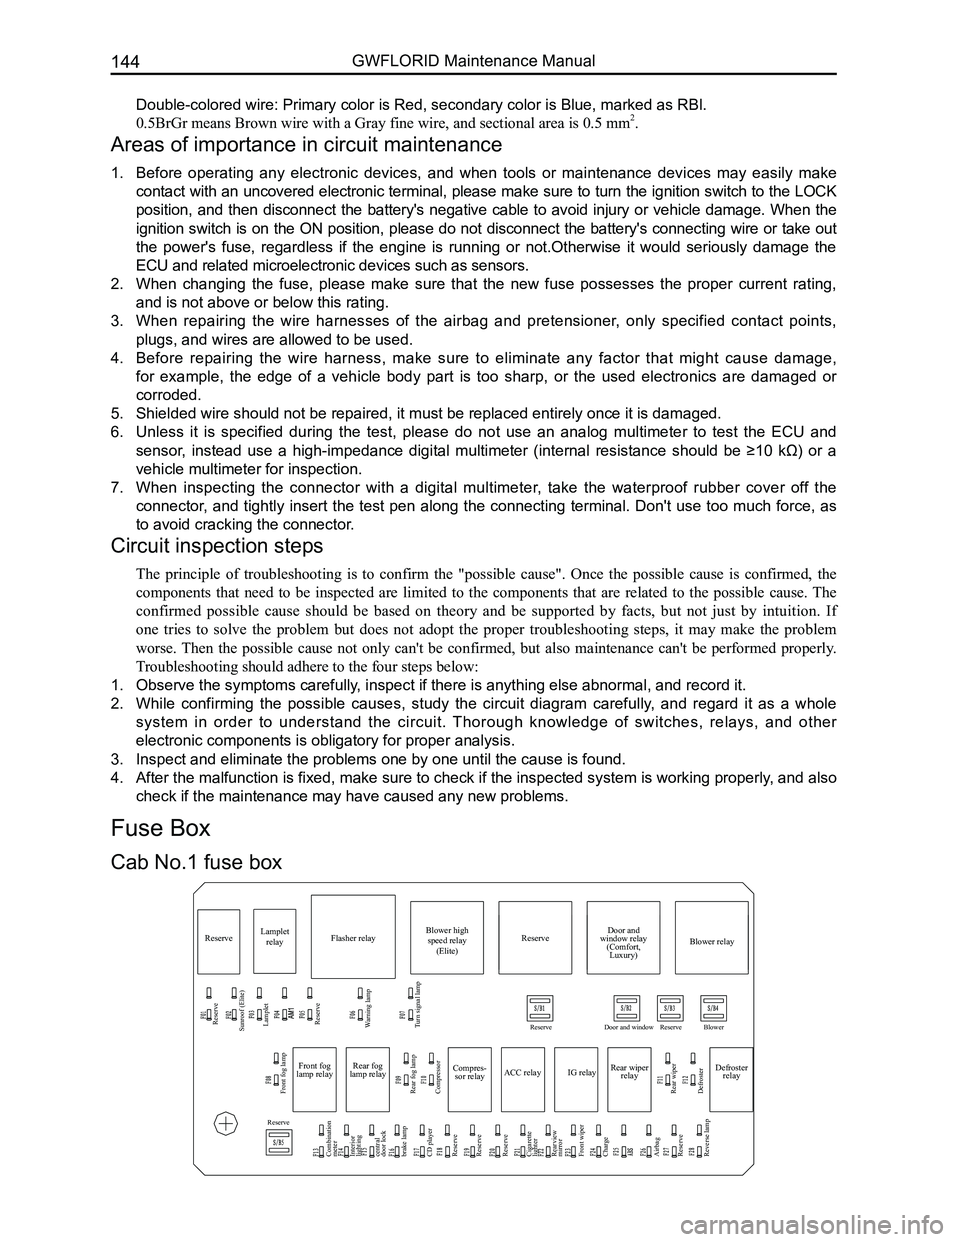
Compres-
sor relay
Reserve
Sunroof (Elite) Lamplet
Reserve
Reserve
Reserve
Reserve Door and window Reserve Blower
Lamplet
relay Flasher relay Blower high
speed relay (Elite) Door and
window relay (Comfort, Luxury) Blower relay
Reserve
Front fog lamp
Combination
meter
Interior
lighting
central
door lock
brake lamp
CD player
Reserve
Reserve
Reserve
Cigarette
lighter
Rearview
mirror
Front wiper
Charge
Airbag
Reserve
Reverse lamp Rear fog lamp
Rear wiper
Defroster Compressor
ACC relay
IG relayRear wiper
relay Defroster
relay
Front fog
lamp relay Rear fog
lamp relay
Warning lamp
Turn signal lamp
Cab No.1 fuse box
Fuse Box
Page 152 of 281
Downloaded from www.Manualslib.com manuals search engine 145Vehicle Body Electronic System
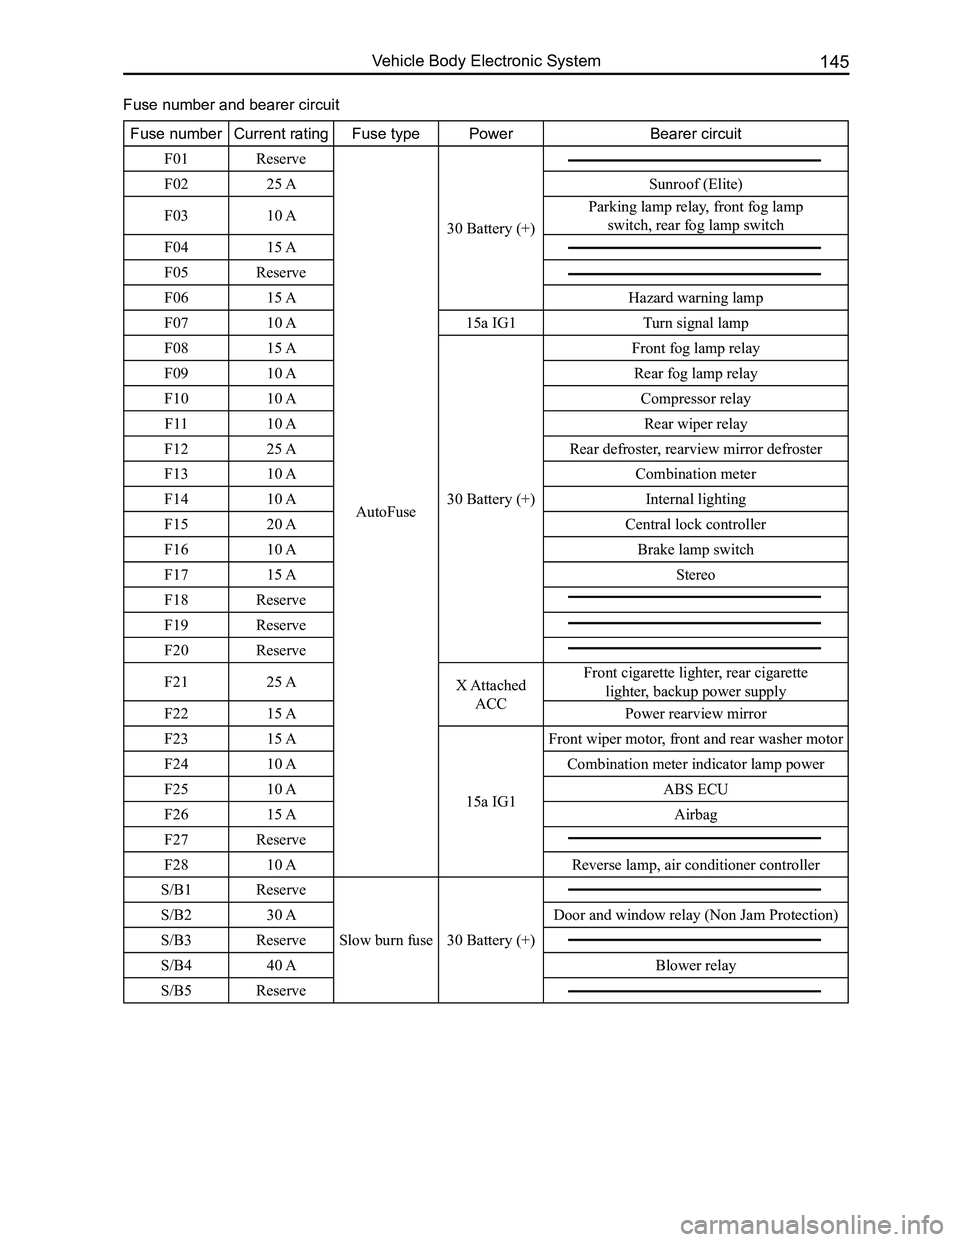
Fuse numberCurrent ratingFuse typePowerBearer circuit
F01Reserve
AutoFuse
30 Battery (+)
F0225 ASunroof (Elite)
F0310 AParking lamp relay, front fog lamp
switch, rear fog lamp switch
F0415 A
F05Reserve
F0615 AHazard warning lamp
F0710 A15a IG1 Turn signal lamp
F0815 A
30 Battery (+)
Front fog lamp relay
F0910 ARear fog lamp relay
F1010 ACompressor relay
F1110 ARear wiper relay
F1225 ARear defroster, rearview mirror defroster
F1310 ACombination meter
F1410 AInternal lighting
F1520 ACentral lock controller
F1610 ABrake lamp switch
F1715 AStereo
F18Reserve
F19Reserve
F20Reserve
F2125 AX Attached
ACC
Front cigarette lighter, rear cigarette
lighter, backup power supply
F2215 APower rearview mirror
F2315 A
15a IG1
Front wiper motor, front and rear washer motor
F2410 ACombination meter indicator lamp power
F2510 AABS ECU
F2615 AAirbag
F27Reserve
F2810 AReverse lamp, air conditioner controller
S/B1Reserve
Slow burn fuse 30 Battery (+)
S/B230 ADoor and window relay (Non Jam Protection)
S/B3Reserve
S/B440 ABlower relay
S/B5Reserve
Fuse number and bearer circuit
Page 155 of 281
Downloaded from www.Manualslib.com manuals search engine GWFLORID Maintenance Manual148
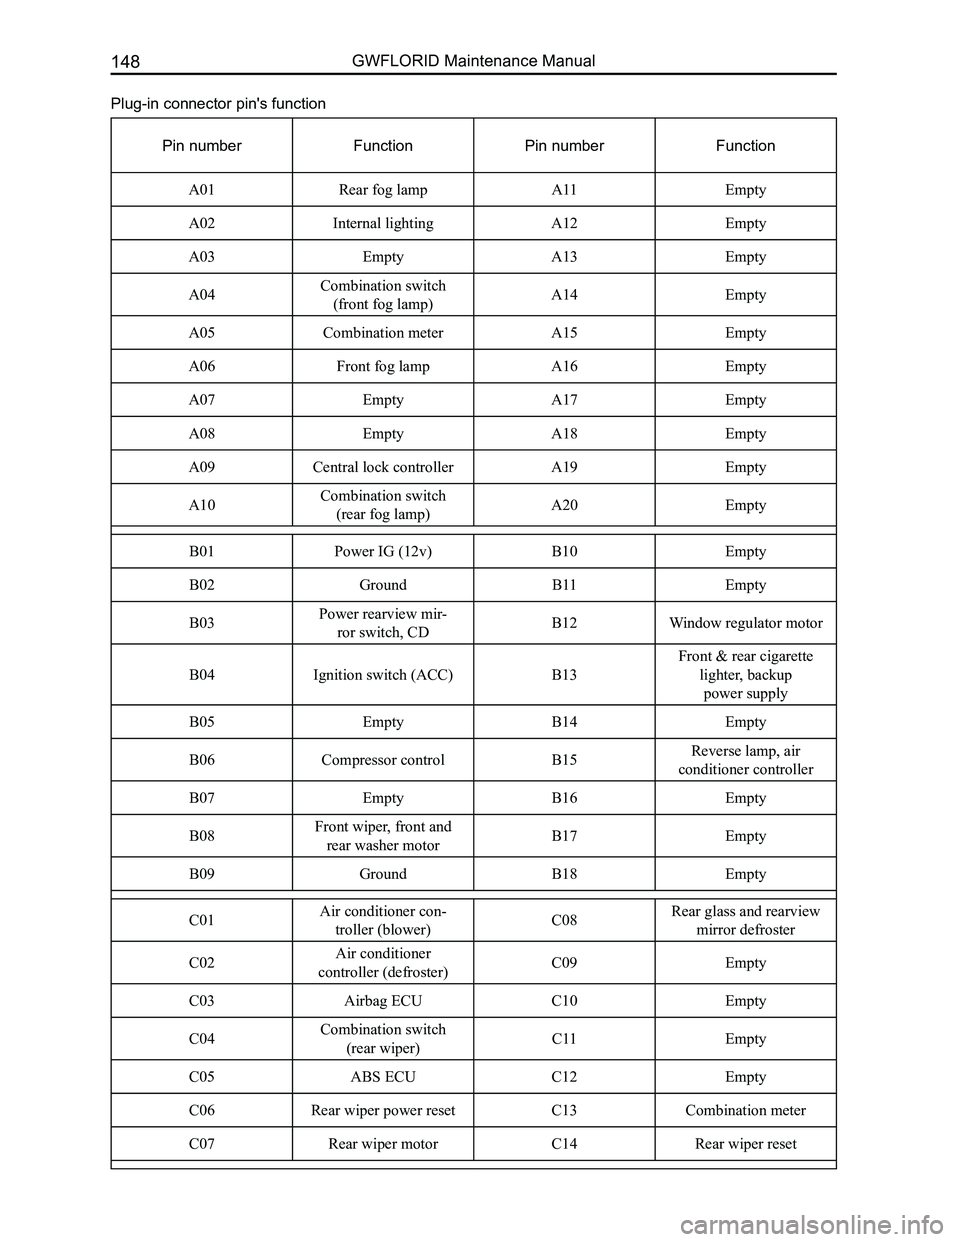
Plug-in connector pin's function
Pin numberFunctionPin numberFunction
A01Rear fog lampA11Empty
A02Internal lightingA12Empty
A03EmptyA13Empty
A04Combination switch
(front fog lamp)A14Empty
A05Combination meter A15Empty
A06Front fog lampA16Empty
A07EmptyA17Empty
A08EmptyA18Empty
A09Central lock controllerA19Empty
A10Combination switch
(rear fog lamp)A20Empty
B01Power IG (12v)B10Empty
B02GroundB11Empty
B03Power rearview mir-
ror switch, CDB12Window regulator motor
B04Ignition switch (ACC)B13
Front & rear cigarette
lighter, backup
power supply
B05EmptyB14Empty
B06Compressor controlB15Reverse lamp, air
conditioner controller
B07EmptyB16Empty
B08Front wiper, front and
rear washer motorB17Empty
B09GroundB18Empty
C01Air conditioner con-
troller (blower) C08Rear glass and rearview
mirror defroster
C02Air conditioner
controller (defroster) C09Empty
C03Airbag ECU C10Empty
C04Combination switch
(rear wiper) C11Empty
C05ABS ECUC12Empty
C06Rear wiper power resetC13Combination meter
C07Rear wiper motorC14Rear wiper reset
Page 158 of 281
Downloaded from www.Manualslib.com manuals search engine 151Vehicle Body Electronic System
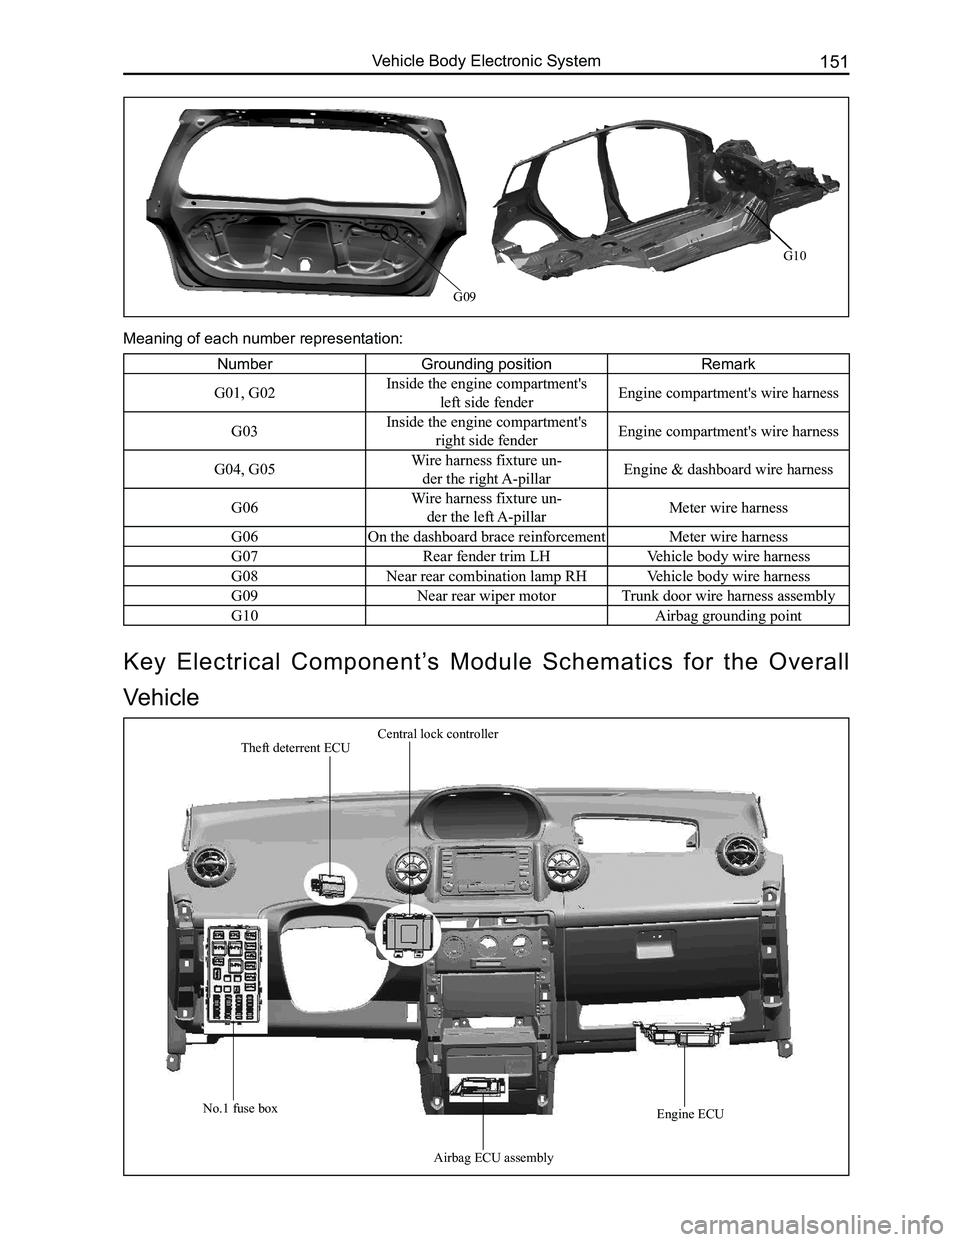
G09
NumberGrounding positionRemark
G01, G02Inside the engine compartment's
left side fenderEngine compartment's wire harness
G03Inside the engine compartment's
right side fenderEngine compartment's wire harness
G04, G05Wire harness fixture un-
der the right A-pillarEngine & dashboard wire harness
G06Wire harness fixture un-
der the left A-pillarMeter wire harness
G06 On the dashboard brace reinforcementMeter wire harness
G07Rear fender trim LHVehicle body wire harness
G08Near rear combination lamp RHVehicle body wire harness
G09Near rear wiper motorTrunk door wire harness assembly
G10Airbag grounding point
Meaning of each number representation:
Key Electrical Component’s Module Schematics for the Overall
Vehicle
Theft deterrent ECUCentral lock controller
No.1 fuse box
Airbag ECU assembly
Engine ECU
G10