wheel torque GREAT WALL FLORID 2008 Service Manual
[x] Cancel search | Manufacturer: GREAT WALL, Model Year: 2008, Model line: FLORID, Model: GREAT WALL FLORID 2008Pages: 281, PDF Size: 43.97 MB
Page 11 of 281
Downloaded from www.Manualslib.com manuals search engine GWFLORID Maintenance Manual4
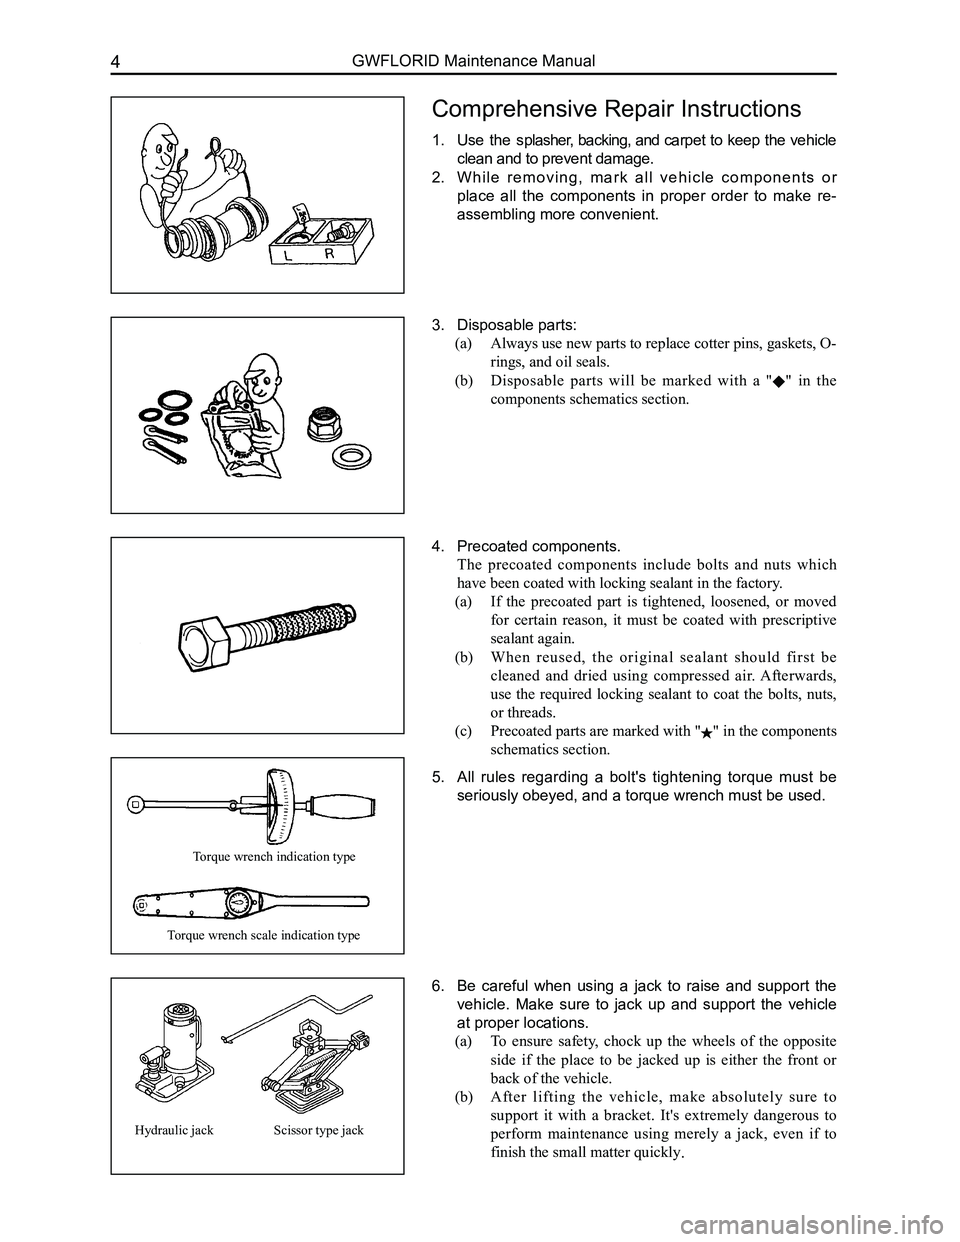
Comprehensive Repair Instructions
1. Use the splasher, backing, and carpet to keep the vehicle
clean and to prevent damage.
2. W h i l e r e m o v i n g , m a r k a l l v e h i c l e c o m p o n e n t s o r
place all the components in proper order to make re-
assembling more convenient.
3. Disposable parts:
(a) Always use new parts to replace cotter pins, gaskets, O-
rings, and oil seals.
(b) Disposable parts will be marked with a "" in the
components schematics section.
4. Precoated components.
The precoated components include bolts and nuts which
have been coated with locking sealant in the factory.
(a) If the precoated part is tightened, loosened, or moved
for certain reason, it must be coated with prescriptive
sealant again.
(b) When reused, the original sealant should first be
cleaned and dried using compressed air. Afterwards,
use the required locking sealant to coat the bolts, nuts,
or threads.
(c) Precoated parts are marked with "" in the components
schematics section.
5. All rules regarding a bolt's tightening torque must be
seriously obeyed, and a torque wrench must be used.
6. Be careful when using a jack to raise and support the
vehicle. Make sure to jack up and support the vehicle
at proper locations.
(a) To ensure safety, chock up the wheels of the opposite
side if the place to be jacked up is either the front or
back of the vehicle.
(b) After lifting the vehicle, make absolutely sure to
support it with a bracket. It's extremely dangerous to
perform maintenance using merely a jack, even if to
finish the small matter quickly.
Torque wrench indication type
Torque wrench scale indication type
Hydraulic jackScissor type jack
Page 16 of 281
Downloaded from www.Manualslib.com manuals search engine 9Overview
General Repair Methods and Operations
1. If a jack is needed, please kindly comply to the safety procedures liste\
d below.
2. Park the vehicle on a flat surface, stablize the front and the back wheels using any fixed object or tool,
jack up the vehicle, support it with the chassis, and then start the mai\
ntenance.
3. Disconnect the battery's negative cable before maintenance, in order to reduce the possibility of
damaging and burning out the cable due to a short circuit.
4. Cover the vehicle body, seats, and floor to prevent them from being damaged and polluted.
5. Handle brake fluid and antifreeze fluid carefully, because it may damage the vehicle's surface paint
and its surroundings.
6. Using the proper tools or basic tools that have been recommended and are purchasable is very
important in guaranteeing an effective and reliable maintenance result.
7. Dispose the used dowel pins, gaskets, O-rings, oil seals, lock washers, and self-locking nuts. Prepare
new parts for installation. Normal functions are not guaranteed if these\
parts are reused.
8. Store the removed parts in order and in groups to make reassembly more c\
onvenient.
9. Store bolts and nuts separately, because their hardness levels and designs are different according to
the installation locations.
10. Clean parts before they are inspected or reassembled. In addition, parts that come in contact with
engine oil also need to be cleaned, as well as checked for blockage by u\
sing compressed air.
11. Before installation, use engine oil or grease to lubricate the rotating and sliding sides of the necessary
parts.
12. When necessary, use sealant on gaskets to avoid leakage.
13. Please carefully comply to all tightening torque specifications of b\
olts and nuts.
14. After maintenance, check to make sure whether the repairs were performed correctly and whether the
malfunctions have been fixed.
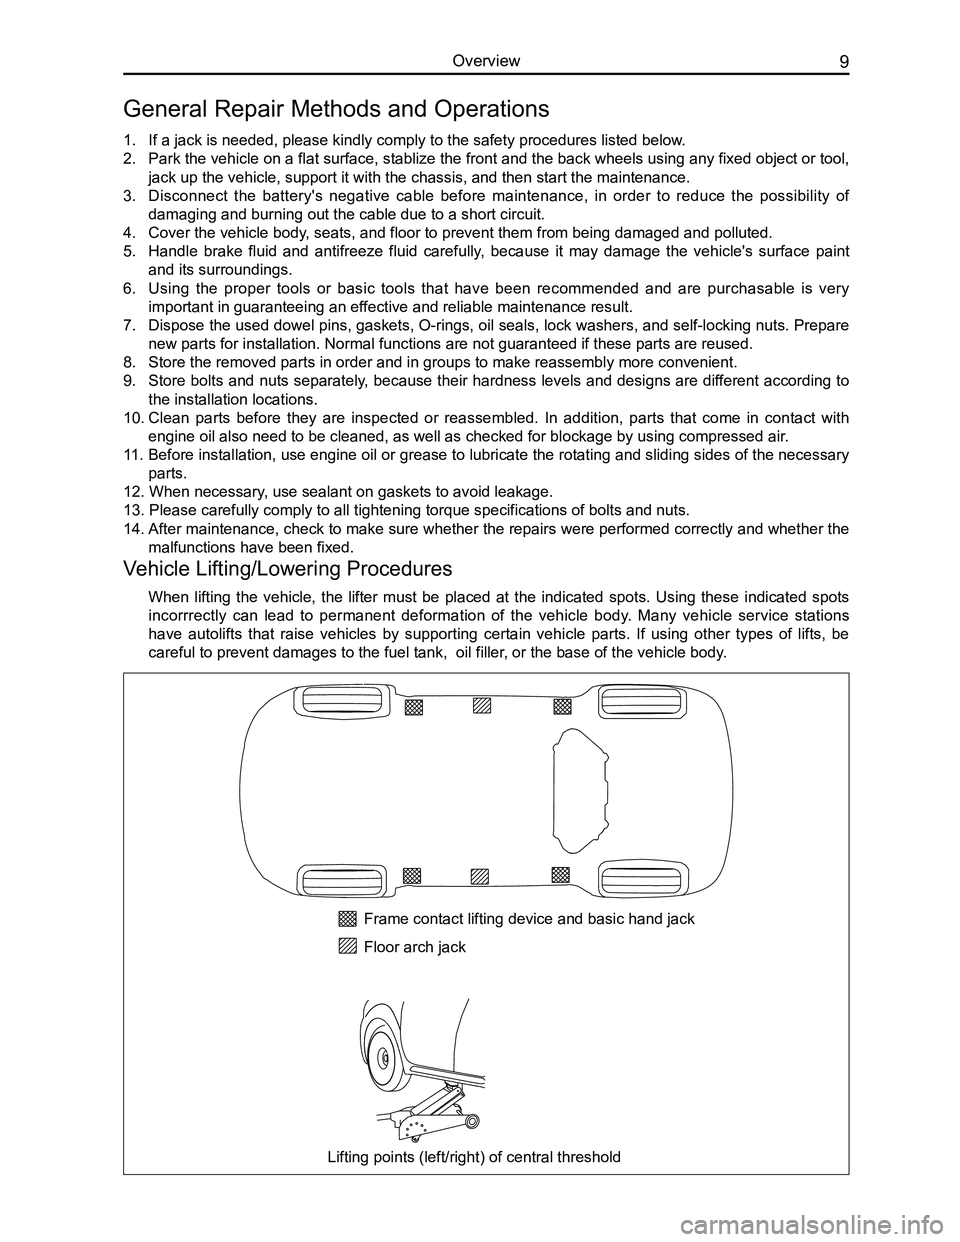
Vehicle Lifting/Lowering Procedures
When lifting the vehicle, the lifter must be placed at the indicated spots. Using these indicated spots
incorrrectly can lead to permanent deformation of the vehicle body. Many vehicle service stations
have autolifts that raise vehicles by supporting certain vehicle parts. If using other types of lifts, be
careful to prevent damages to the fuel tank, oil filler, or the base of the vehicle body.
Frame contact lifting device and basic hand jack
Floor arch jack
Lifting points (left/right) of central threshold
Page 20 of 281
Downloaded from www.Manualslib.com manuals search engine 13Overall Parameters
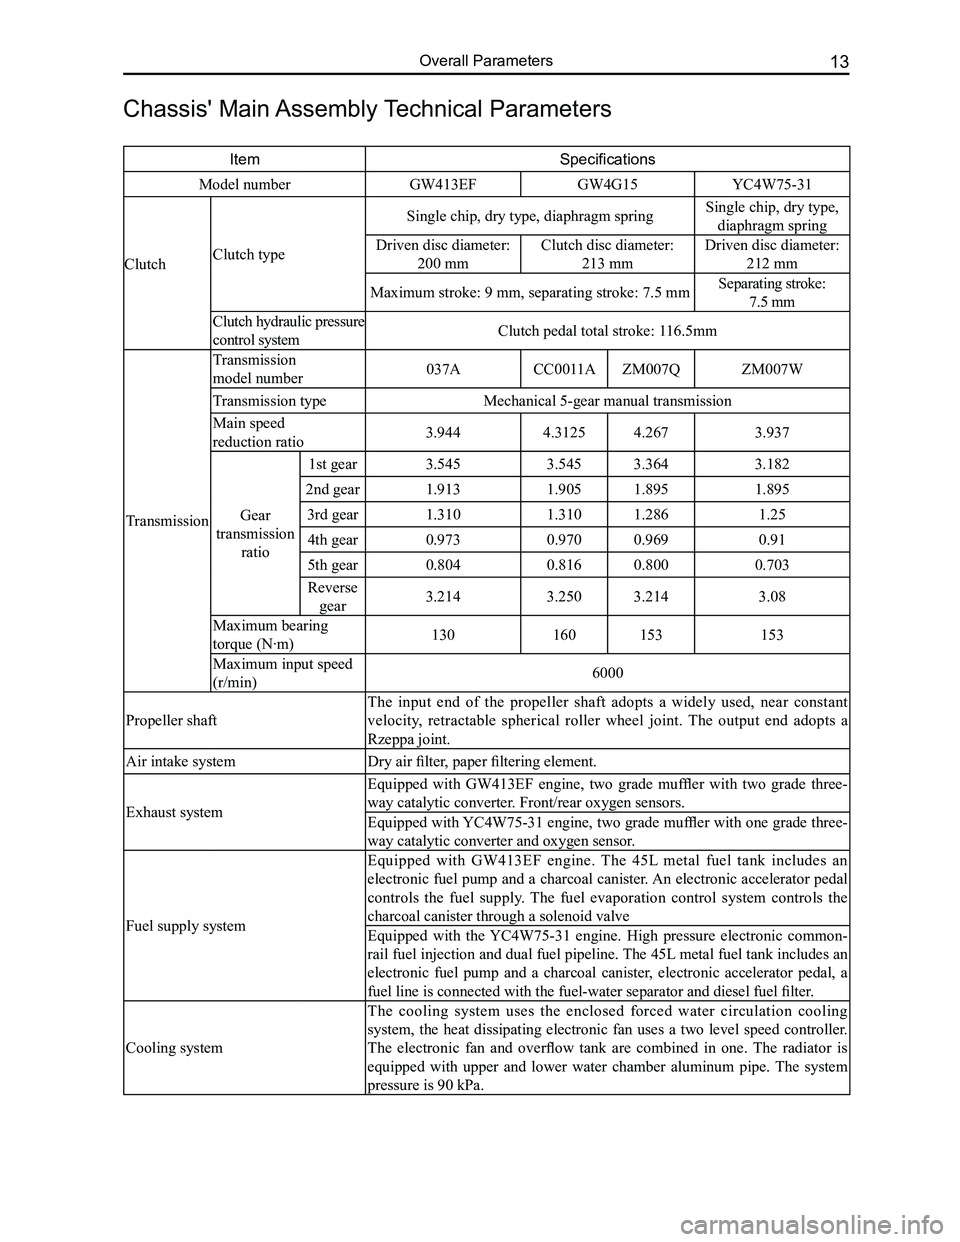
Chassis' Main Assembly Technical Parameters
ItemSpecifications
Model numberGW413EFGW4G15YC4W75-31
ClutchClutch type
Single chip, dry type, diaphragm springSingle chip, dry type,
diaphragm spring
Driven disc diameter:
200 mm
Clutch disc diameter:
213 mm
Driven disc diameter:
212 mm
Maximum stroke: 9 mm, separating stroke: 7.5 mmSeparating stroke:
7.5 mm
Clutch hydraulic pressure
control systemClutch pedal total stroke: 116.5mm
Transmission
Transmission
model number037ACC0011AZM007QZM007W
Transmission typeMechanical 5-gear manual transmission
Main speed
reduction ratio3.9444.31254.2673.937
Gear
transmission
ratio
1st gear3.5453.5453.3643.182
2nd gear1.9131.9051.8951.895
3rd gear1.3101.3101.2861.25
4th gear0.9730.9700.9690.91
5th gear0.8040.8160.8000.703
Reverse
gear3.2143.2503.2143.08
Maximum bearing
torque (N·m)130160153153
Maximum input speed
(r/min)6000
Propeller shaft
The input end of the propeller shaft adopts a widely used, near constant
velocity, retractable spherical roller wheel joint. The output end adopts a
Rzeppa joint.
Air intake systemDry air filter, paper filtering element.
Exhaust system
Equipped with GW413EF engine, two grade muffler with two grade three-
way catalytic converter. Front/rear oxygen sensors.
Equipped with YC4W75-31 engine, two grade muffler with one grade three-
way catalytic converter and oxygen sensor.
Fuel supply system
Equipped with GW413EF engine. The 45L metal fuel tank includes an
electronic fuel pump and a charcoal canister. An electronic accelerator pedal
controls the fuel supply. The fuel evaporation control system controls the
charcoal canister through a solenoid valve
Equipped with the YC4W75-31 engine. High pressure electronic common-
rail fuel injection and dual fuel pipeline. The 45L metal fuel tank includes an
electronic fuel pump and a charcoal canister, electronic accelerator pedal, a
fuel line is connected with the fuel-water separator and diesel fuel filter.
Cooling system
The cooling system uses the enclosed forced water circulation cooling
system, the heat dissipating electronic fan uses a two level speed controller.
The electronic fan and overflow tank are combined in one. The radiator is
equipped with upper and lower water chamber aluminum pipe. The system
pressure is 90 kPa.
Page 27 of 281
Downloaded from www.Manualslib.com manuals search engine GWFLORID Maintenance Manual20
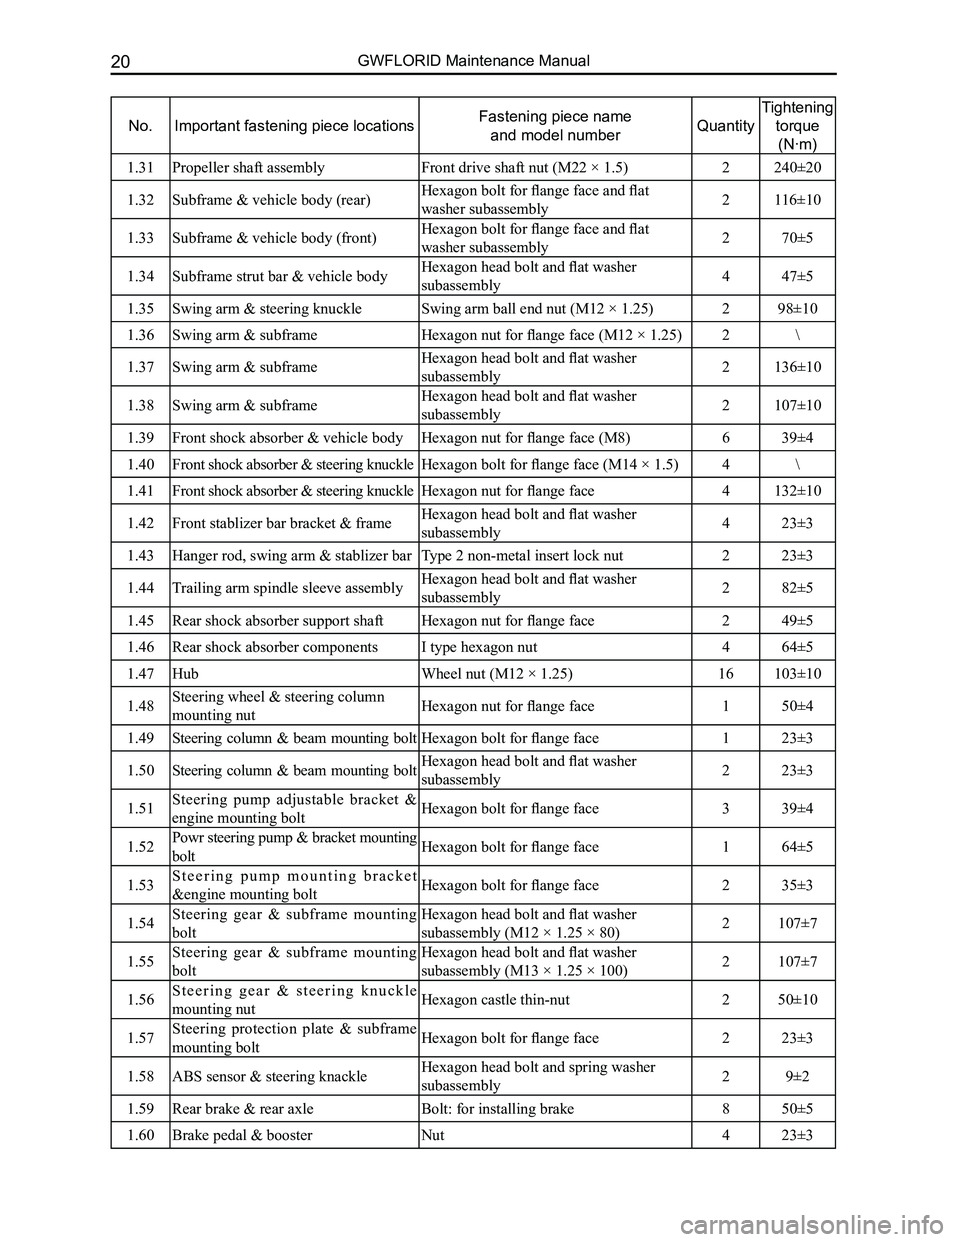
No.Important fastening piece locationsFastening piece name
and model numberQuantity
Tightening
torque
(N·m)
1.31Propeller shaft assemblyFront drive shaft nut (M22 × 1.5)2240±20
1.32Subframe & vehicle body (rear)Hexagon bolt for flange face and flat
washer subassembly2116±10
1.33Subframe & vehicle body (front)Hexagon bolt for flange face and flat
washer subassembly270±5
1.34Subframe strut bar & vehicle bodyHexagon head bolt and flat washer
subassembly447±5
1.35Swing arm & steering knuckleSwing arm ball end nut (M12 × 1.25)298±10
1.36Swing arm & subframeHexagon nut for flange face (M12 × 1.25)2\
1.37Swing arm & subframeHexagon head bolt and flat washer
subassembly2136±10
1.38Swing arm & subframeHexagon head bolt and flat washer
subassembly2107±10
1.39Front shock absorber & vehicle bodyHexagon nut for flange face (M8)639±4
1.40Front shock absorber & steering knuckleHexagon bolt for flange face (M14 × 1.5)4\
1.41Front shock absorber & steering knuckleHexagon nut for flange face4132±10
1.42Front stablizer bar bracket & frameHexagon head bolt and flat washer
subassembly423±3
1.43Hanger rod, swing arm & stablizer barType 2 non-metal insert lock nut223±3
1.44Trailing arm spindle sleeve assemblyHexagon head bolt and flat washer
subassembly282±5
1.45Rear shock absorber support shaftHexagon nut for flange face249±5
1.46Rear shock absorber componentsI type hexagon nut464±5
1.47Hub Wheel nut (M12 × 1.25)16103±10
1.48Steering wheel & steering column
mounting nutHexagon nut for flange face150±4
1.49Steering column & beam mounting boltHexagon bolt for flange face123±3
1.50Steering column & beam mounting boltHexagon head bolt and flat washer
subassembly223±3
1.51Steering pump adjustable bracket &
engine mounting boltHexagon bolt for flange face339±4
1.52Powr steering pump & bracket mounting
boltHexagon bolt for flange face164±5
1.53S t e e r i n g p u m p m o u n t i n g b r a c k e t
&engine mounting boltHexagon bolt for flange face235±3
1.54Steering gear & subframe mounting
bolt
Hexagon head bolt and flat washer
subassembly (M12 × 1.25 × 80)2107±7
1.55Steering gear & subframe mounting
bolt
Hexagon head bolt and flat washer
subassembly (M13 × 1.25 × 100)2107±7
1.56S t e e r i n g g e a r & s t e e r i n g k n u c k l e
mounting nutHexagon castle thin-nut250±10
1.57Steering protection plate & subframe
mounting boltHexagon bolt for flange face223±3
1.58ABS sensor & steering knackleHexagon head bolt and spring washer
subassembly29±2
1.59Rear brake & rear axleBolt: for installing brake850±5
1.60Brake pedal & boosterNut423±3
Page 44 of 281
Downloaded from www.Manualslib.com manuals search engine 37Clutch Operational System
Areas of Importance
1. Clutch Rigid Pipe Installation
Before installing, check to make sure that the rigid pipe flare contact area is in good condition, the pipeline is
clean, and that there is no foreign materials.
2. Clutch Hose Installation
Check the surface of the clutch hose to make sure that there is no scuffing and that the pipeline is clean.
3. Coat grease on the U-joint of the pedal and the master cylinder.
4. Strictly adhere to the set torque guidelines when tightening the pipe fittings.
Rigid pipe and the master cylinder: M10 16±2 N·m
Clutch rigid pipe and hose: M10 16±2 N·m
5. While the clutch system is undergoing the exhausting process, make sure that all the air bubbles in
the pipeline are cleared out. Then check the brake fluid level in the reservoir, it should be between
MIN and MAX.
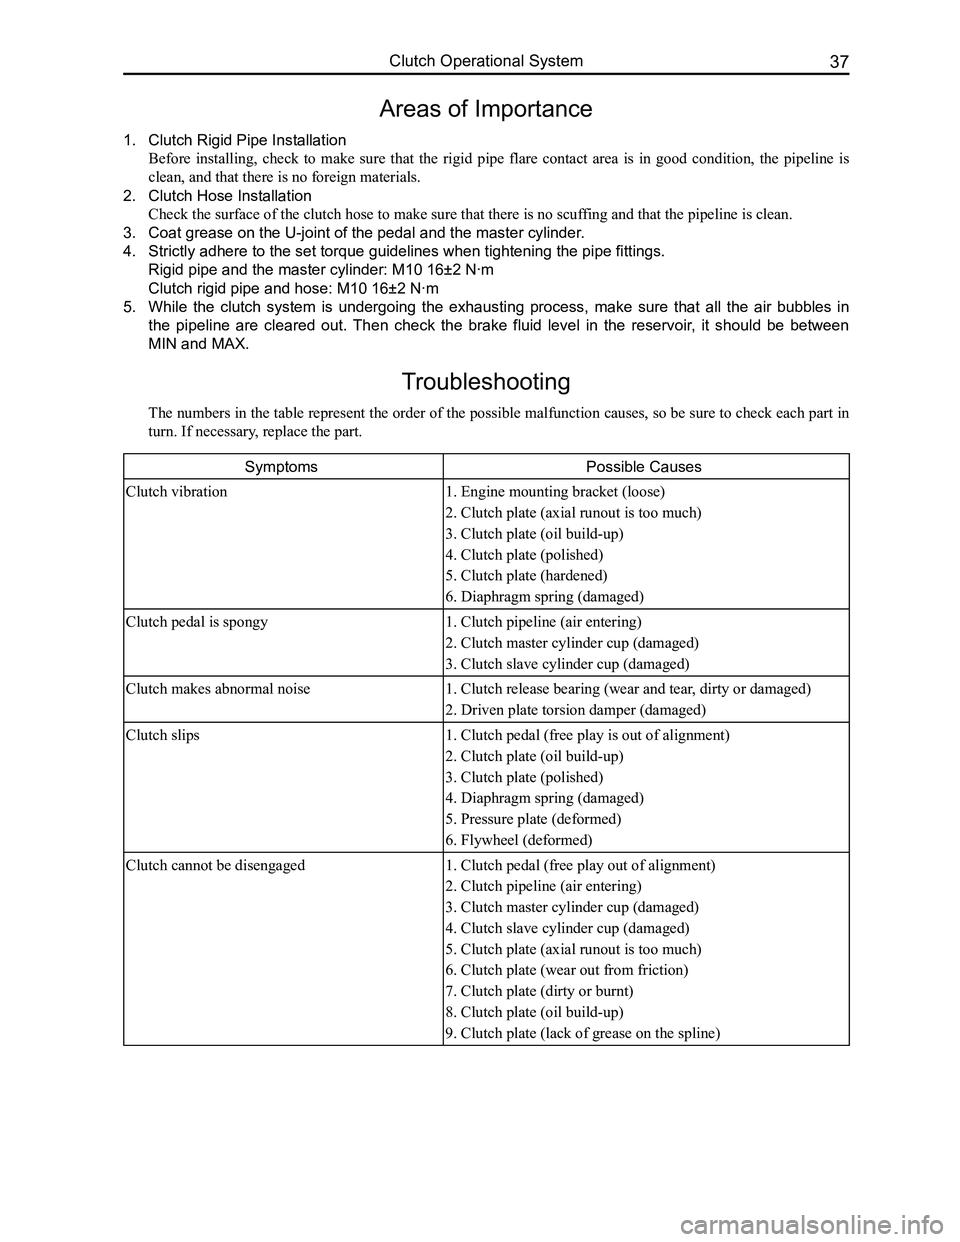
Troubleshooting
The numbers in the table represent the order of the possible malfunction causes, so be sure to check each part in
turn. If necessary, replace the part.
SymptomsPossible Causes
Clutch vibration1. Engine mounting bracket (loose)
2. Clutch plate (axial runout is too much)
3. Clutch plate (oil build-up)
4. Clutch plate (polished)
5. Clutch plate (hardened)
6. Diaphragm spring (damaged)
Clutch pedal is spongy1. Clutch pipeline (air entering)
2. Clutch master cylinder cup (damaged)
3. Clutch slave cylinder cup (damaged)
Clutch makes abnormal noise1. Clutch release bearing (wear and tear, dirty or damaged)
2. Driven plate torsion damper (damaged)
Clutch slips1. Clutch pedal (free play is out of alignment)
2. Clutch plate (oil build-up)
3. Clutch plate (polished)
4. Diaphragm spring (damaged)
5. Pressure plate (deformed)
6. Flywheel (deformed)
Clutch cannot be disengaged1. Clutch pedal (free play out of alignment)
2. Clutch pipeline (air entering)
3. Clutch master cylinder cup (damaged)
4. Clutch slave cylinder cup (damaged)
5. Clutch plate (axial runout is too much)
6. Clutch plate (wear out from friction)
7. Clutch plate (dirty or burnt)
8. Clutch plate (oil build-up)
9. Clutch plate (lack of grease on the spline)
Page 50 of 281
Downloaded from www.Manualslib.com manuals search engine 43Transmission
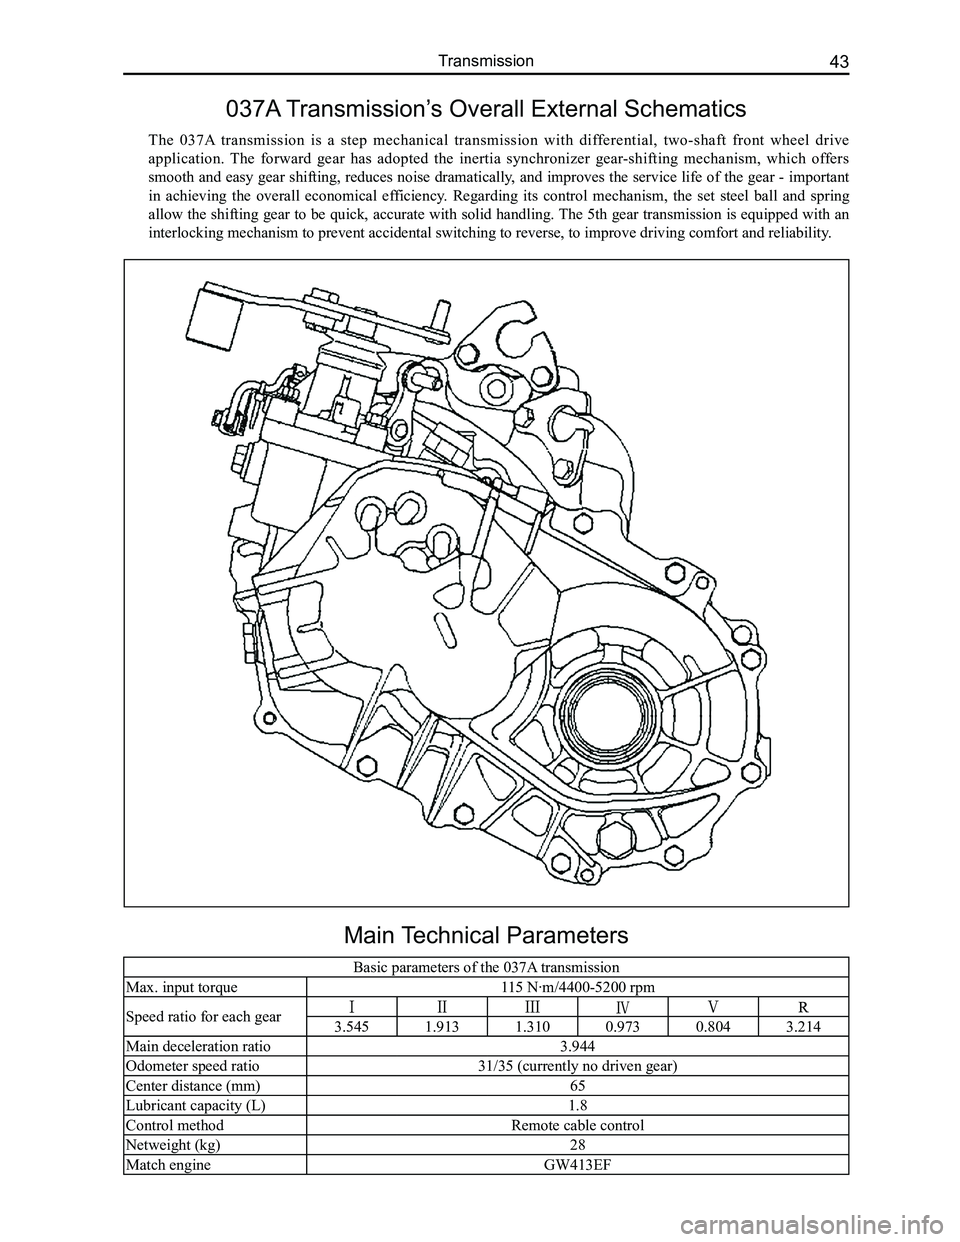
Main Technical Parameters
Basic parameters of the 037A transmission
Max. input torque115 N·m/4400-5200 rpm
Speed ratio for each gear3.5451.9131.3100.9730.8043.214
Main deceleration ratio3.944
Odometer speed ratio31/35 (currently no driven gear)
Center distance (mm)65
Lubricant capacity (L)1.8
Control methodRemote cable control
Netweight (kg)28
Match engineGW413EF
037A Transmission’s Overall External Schematics
The 037A transmission is a step mechanical transmission with differential, two-shaft front wheel drive
application. The forward gear has adopted the inertia synchronizer gear-shifting mechanism, which offers
smooth and easy gear shifting, reduces noise dramatically, and improves the service life of the gear - important
in achieving the overall economical efficiency. Regarding its control mechanism, the set steel ball and spring
allow the shifting gear to be quick, accurate with solid handling. The 5th gear transmission is equipped with an
interlocking mechanism to prevent accidental switching to reverse, to im\
prove driving comfort and reliability.
Page 79 of 281
Downloaded from www.Manualslib.com manuals search engine GWFLORID Maintenance Manual72
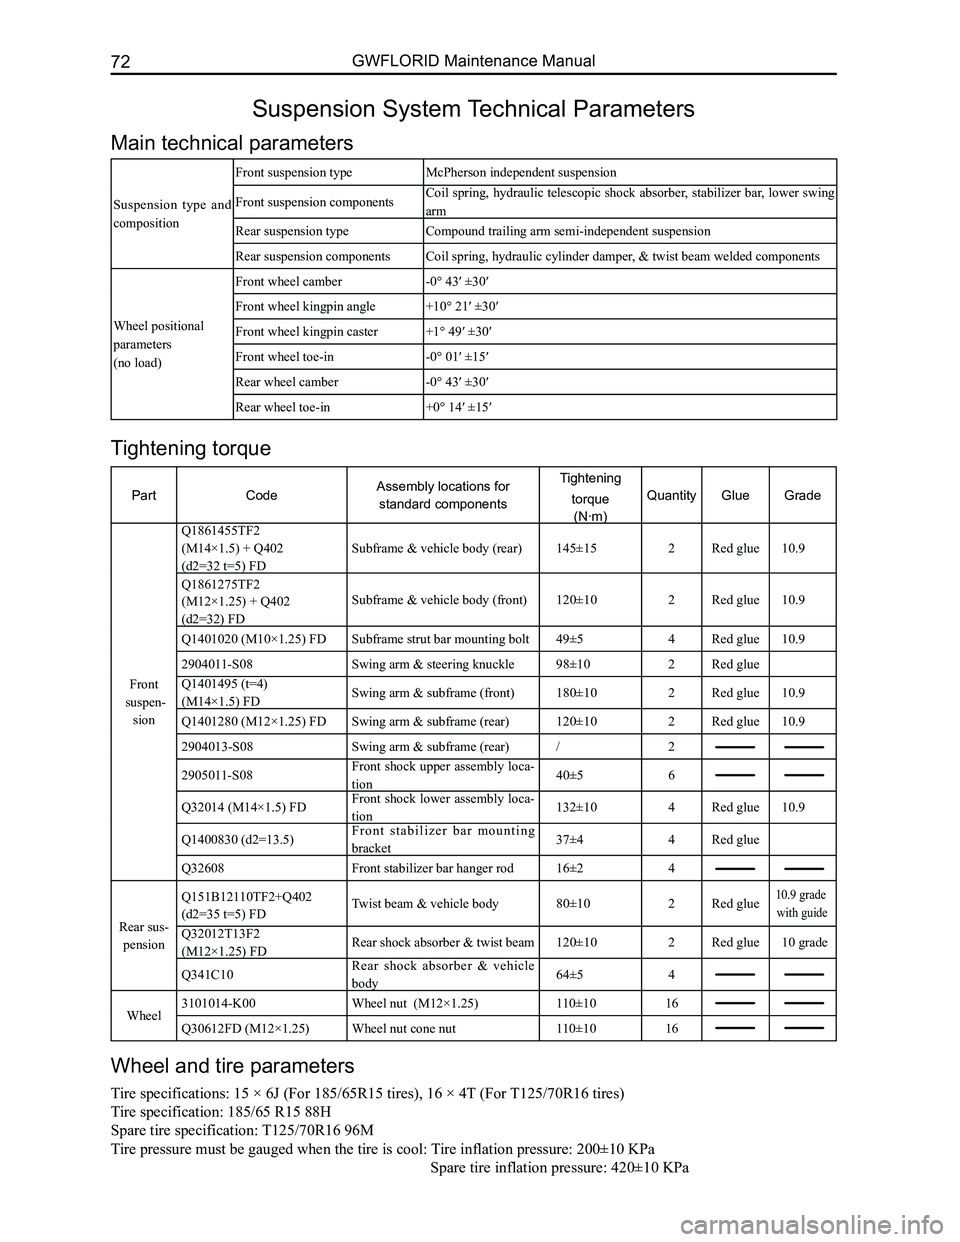
Suspension System Technical Parameters
Main technical parameters
Suspension type and
composition
Front suspension typeMcPherson independent suspension
Front suspension componentsCoil spring, hydraulic telescopic shock absorber, stabilizer bar, lower swing
arm
Rear suspension typeCompound trailing arm semi-independent suspension
Rear suspension componentsCoil spring, hydraulic cylinder damper, & twist beam welded components
Wheel positional
parameters
(no load)
Front wheel camber-0° 43′ ±30′
Front wheel kingpin angle+10° 21′ ±30′
Front wheel kingpin caster+1° 49′ ±30′
Front wheel toe-in-0° 01′ ±15′
Rear wheel camber-0° 43′ ±30′
Rear wheel toe-in+0° 14′ ±15′
Wheel and tire parameters
Tire specifications: 15 × 6J (For 185/65R15 tires), 16 × 4T (For T125/70R16 tires)
Tire specification: 185/65 R15 88H
Spare tire specification: T125/70R16 96M
Tire pressure must be gauged when the tire is cool: Tire inflation pressure: 200±10 KPa
Spare tir e inflation pressure: 420±10 KPa
Tightening torque
PartCodeAssembly locations for
standard components
Tightening
torque
(N·m)
QuantityGlueGrade
Front
suspen-
sion
Q1861455TF2
(M14×1.5) + Q402
(d2=32 t=5) FD
Subframe & vehicle body (rear)145±15 2Red glue10.9
Q1861275TF2
(M12×1.25) + Q402
(d2=32) FD
Subframe & vehicle body (front)120±102Red glue10.9
Q1401020 (M10×1.25) FDSubframe strut bar mounting bolt49±54Red glue10.9
2904011-S08Swing arm & steering knuckle98±102Red glue
Q1401495 (t=4)
(M14×1.5) FDSwing arm & subframe (front)180±102Red glue10.9
Q1401280 (M12×1.25) FDSwing arm & subframe (rear)120±102Red glue10.9
2904013-S08Swing arm & subframe (rear)/2
2905011-S08Front shock upper assembly loca-
tion40±56
Q32014 (M14×1.5) FDFront shock lower assembly loca-
tion132±104Red glue10.9
Q1400830 (d2=13.5)F r o n t s t a b i l i z e r b a r m o u n t i n g
bracket37±44Red glue
Q32608Front stabilizer bar hanger rod16±24
Rear sus-
pension
Q151B12110TF2+Q402
(d2=35 t=5) FDTwist beam & vehicle body80±102Red glue10.9 grade
with guide
Q32012T13F2
(M12×1.25) FDRear shock absorber & twist beam120±102Red glue10 grade
Q341C10Rear shock absorber & vehicle
body64±54
Wheel3101014-K00Wheel nut (M12×1.25)110±1016
Q30612FD (M12×1.25)Wheel nut cone nut110±1016
Page 80 of 281
Downloaded from www.Manualslib.com manuals search engine 73Suspension System
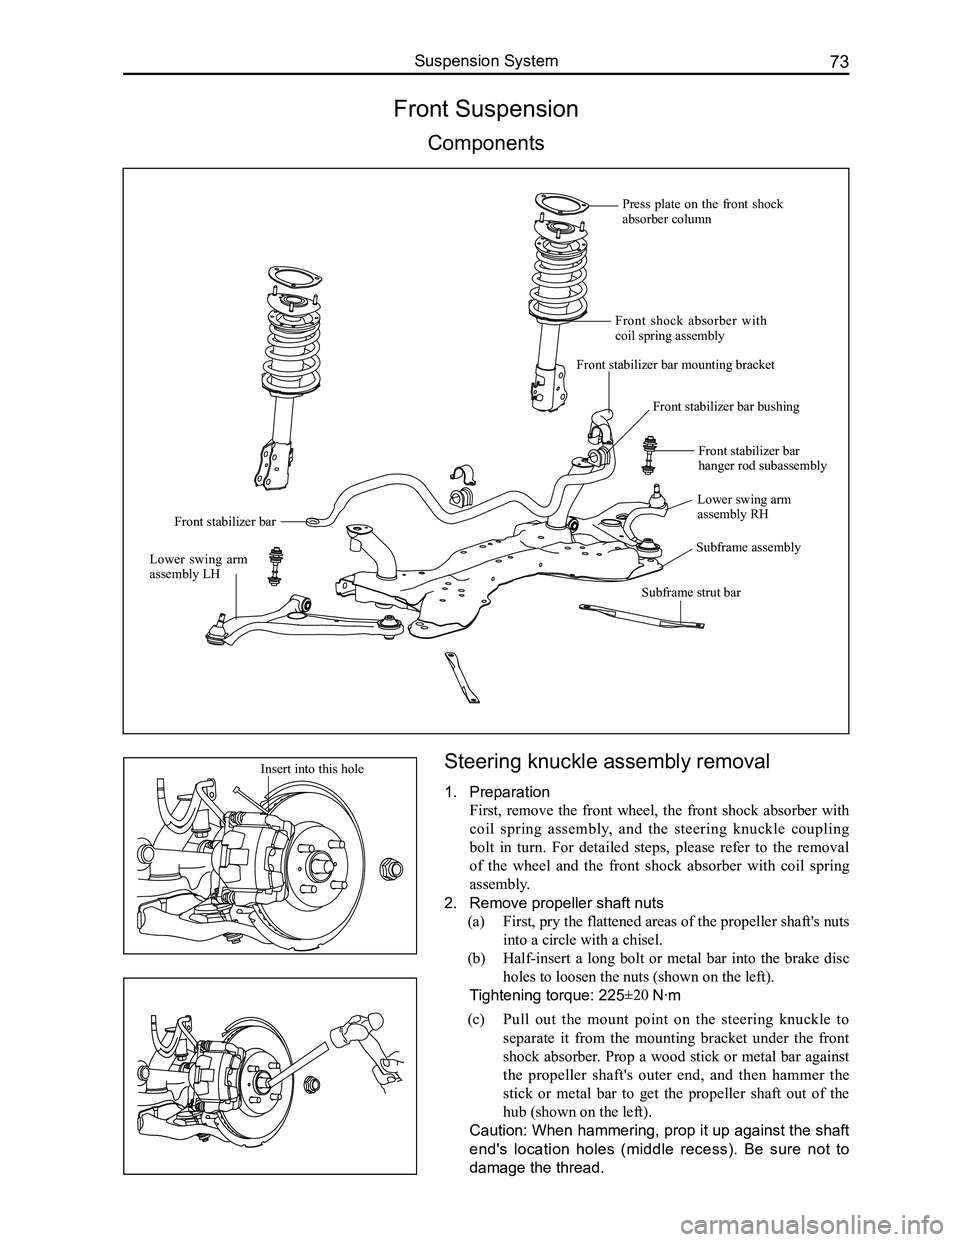
Steering knuckle assembly removal
1. Preparation
First, remove the front wheel, the front shock absorber with
coil spring assembly, and the steering knuckle coupling
bolt in turn. For detailed steps, please refer to the removal
of the wheel and the front shock absorber with coil spring
assembly.
2. Remove propeller shaft nuts
(a) First, pry the flattened areas of the propeller shaft's nuts
into a circle with a chisel.
(b) Half-insert a long bolt or metal bar into the brake disc
holes to loosen the nuts (shown on the left).
Tightening torque: 225±20 N·m
Front Suspension
Components
(c) Pull out the mount point on the steering knuckle to
separate it from the mounting bracket under the front
shock absorber. Prop a wood stick or metal bar against
the propeller shaft's outer end, and then hammer the
stick or metal bar to get the propeller shaft out of the
hub (shown on the left).
Caution: When hammering, prop it up against the shaft
end's location holes (middle recess). Be sure not to
damage the thread.
Insert into this hole
Press plate on the front shock absorber column
Front shock absorber with coil spring assembly
Front stabilizer bar mounting bracket
Front stabilizer bar bushing
Front stabilizer bar
Lower swing arm assembly RH
Lower swing arm assembly LH
Subframe assembly
Front stabilizer bar hanger rod subassembly
Subframe strut bar
Page 82 of 281
Downloaded from www.Manualslib.com manuals search engine 75Suspension System
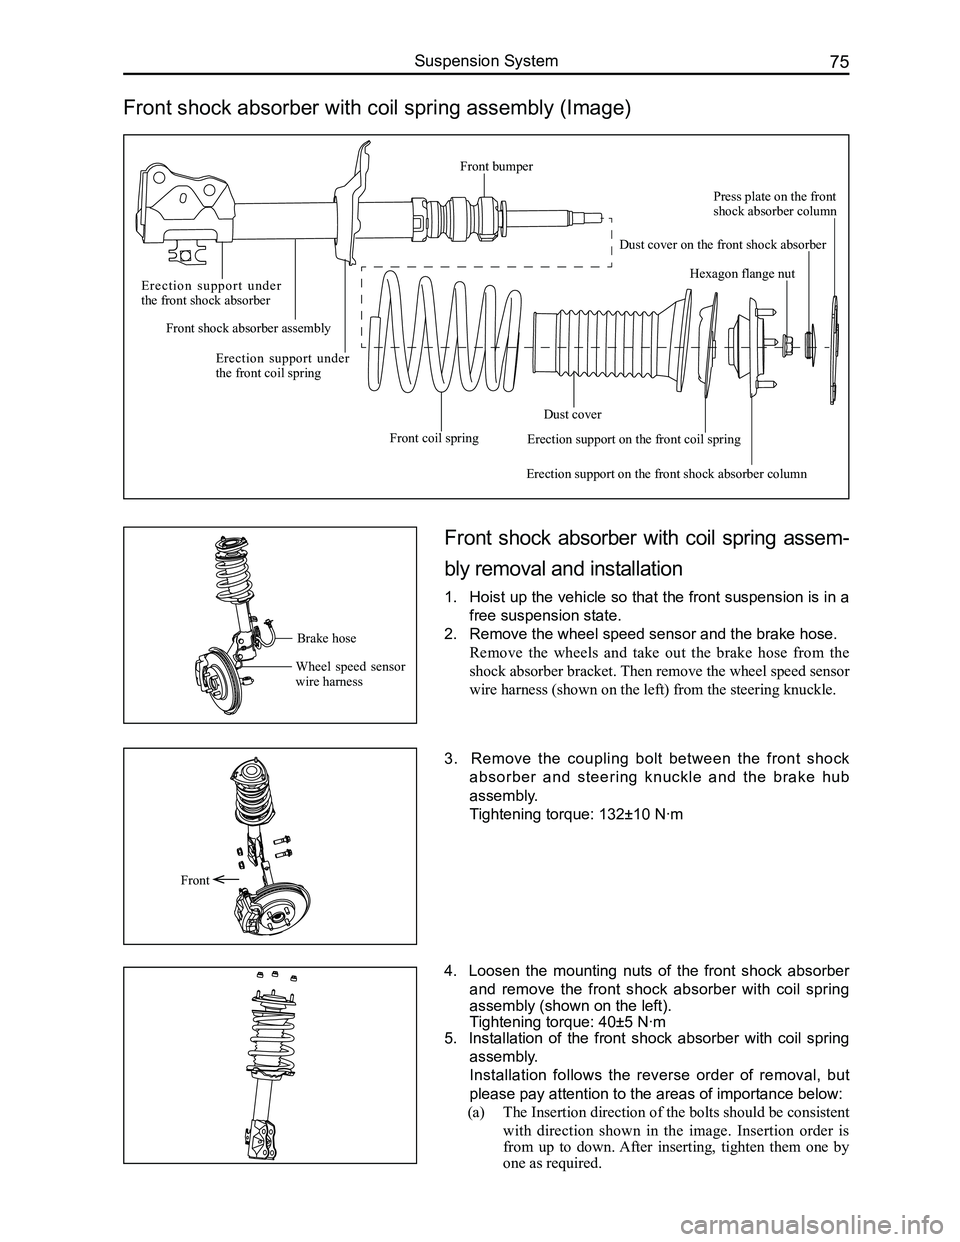
Front shock absorber with coil spring assembly (Image)
Front shock absorber with coil spring assem-
bly removal and installation
1. Hoist up the vehicle so that the front suspension is in a
free suspension state.
2. Remove the wheel speed sensor and the brake hose.
Remove the wheels and take out the brake hose from the
shock absorber bracket. Then remove the wheel speed sensor
wire harness (shown on the left) from the steering knuckle.
3. Remove the coupling bolt between the front shock
absorber and steering knuckle and the brake hub
assembly.
Tightening torque: 132±10 N·m
4. Loosen the mounting nuts of the front shock absorber
and remove the front shock absorber with coil spring
assembly (shown on the left).
Tightening torque: 40±5 N·m
5. Installation of the front shock absorber with coil spring
assembly.
Installation follows the reverse order of removal, but
please pay attention to the areas of importance below:
(a) The Insertion direction of the bolts should be consistent
with direction shown in the image. Insertion order is
from up to down. After inserting, tighten them one by
one as required.
Front
Brake hose
Wheel speed sensor wire harness
E r e c t i o n s u p p o r t u n d e r the front shock absorber
Front shock absorber assembly
Erection support under the front coil spring
Front coil spring
Dust cover
Erection support on the front shock absorber column
Hexagon flange nut
Press plate on the front shock absorber column
Dust cover on the front shock absorber
Erection support on the front coil spring
Front bumper
Page 85 of 281
Downloaded from www.Manualslib.com manuals search engine GWFLORID Maintenance Manual78
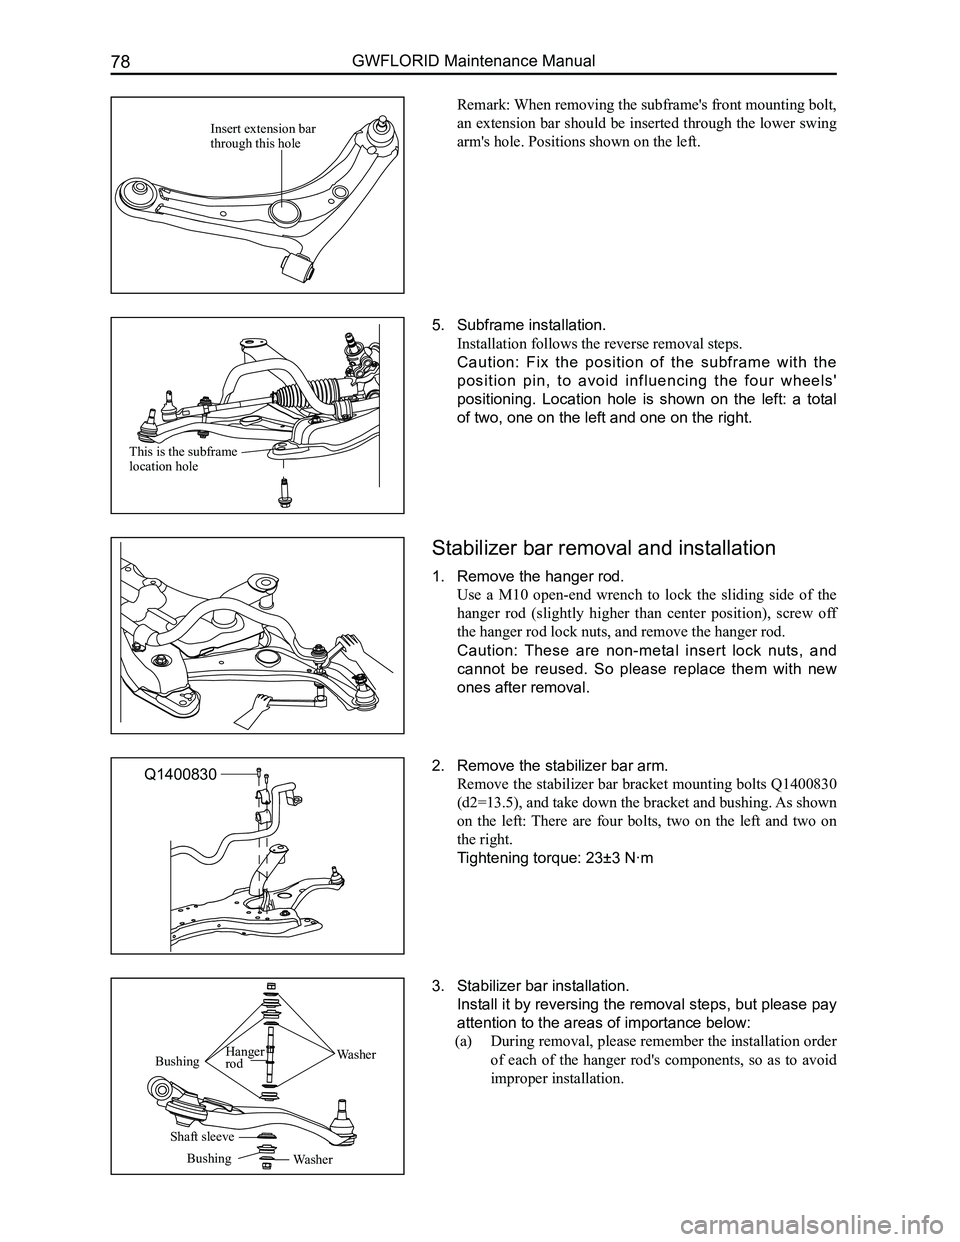
Remark: When removing the subframe's front mounting bolt,
an extension bar should be inserted through the lower swing
arm's hole. Positions shown on the left.
5. Subframe installation.
Installation follows the reverse removal steps.
Caution: Fix the position of the subframe with the
position pin, to avoid influencing the four wheels'
positioning. Location hole is shown on the left: a total
of two, one on the left and one on the right.
Stabilizer bar removal and installation
1. Remove the hanger rod.
Use a M10 open-end wrench to lock the sliding side of the
hanger rod (slightly higher than center position), screw off
the hanger rod lock nuts, and remove the hanger rod.
Caution: These are non-metal insert lock nuts, and
cannot be reused. So please replace them with new
ones after removal.
2. Remove the stabilizer bar arm.
Remove the stabilizer bar bracket mounting bolts Q1400830
(d2=13.5), and take down the bracket and bushing. As shown
on the left: There are four bolts, two on the left and two on
the right.
Tightening torque: 23±3 N·m
3. Stabilizer bar installation.
Install it by reversing the removal steps, but please pay
attention to the areas of importance below:
(a) During removal, please remember the installation order
of each of the hanger rod's components, so as to avoid
improper installation.
Insert extension bar through this hole
This is the subframe location hole
Q1400830
WasherBushingHanger rod
Shaft sleeve
BushingWasher