Engine HONDA ACCORD COUPE 2001 CF / 6.G Manual PDF
[x] Cancel search | Manufacturer: HONDA, Model Year: 2001, Model line: ACCORD COUPE, Model: HONDA ACCORD COUPE 2001 CF / 6.GPages: 372, PDF Size: 6.1 MB
Page 268 of 372
Air Conditioning System
Optional for U.S. DX model
Your car's air conditioning is a sealed system. Any major maintenance,
such as recharging, should be done
by a qualified mechanic. You can do a couple of things to make sure the
air conditioning works efficiently.
Periodically check the engine's
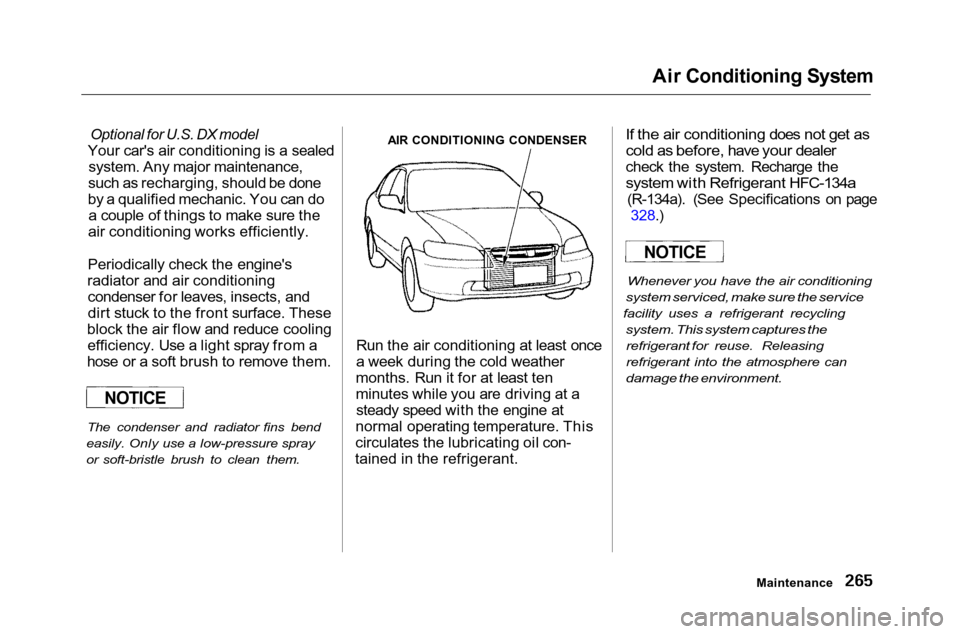
radiator and air conditioning condenser for leaves, insects, and
dirt stuck to the front surface. These
block the air flow and reduce cooling efficiency. Use a light spray from a
hose or a soft brush to remove them.
The condenser and radiator fins bend
easily. Only use a low-pressure spray
or soft-bristle brush to clean them.
AIR CONDITIONING CONDENSER
Run the air conditioning at least once
a week during the cold weather
months. Run it for at least ten
minutes while you are driving at a steady speed with the engine at
normal operating temperature. This
circulates the lubricating oil con-
tained in the refrigerant.
If the air conditioning does not get as
cold as before, have your dealer
check the system. Recharge the
system with Refrigerant HFC-134a
(R-134a). (See Specifications on page 328.)
Whenever you have the air conditioning
system serviced, make sure the service
facility uses a refrigerant recycling
system. This system captures the
refrigerant for reuse. Releasing
refrigerant into the atmosphere can
damage the environment.
Maintenance
NOTICE
NOTICE
Page 280 of 372
Lights
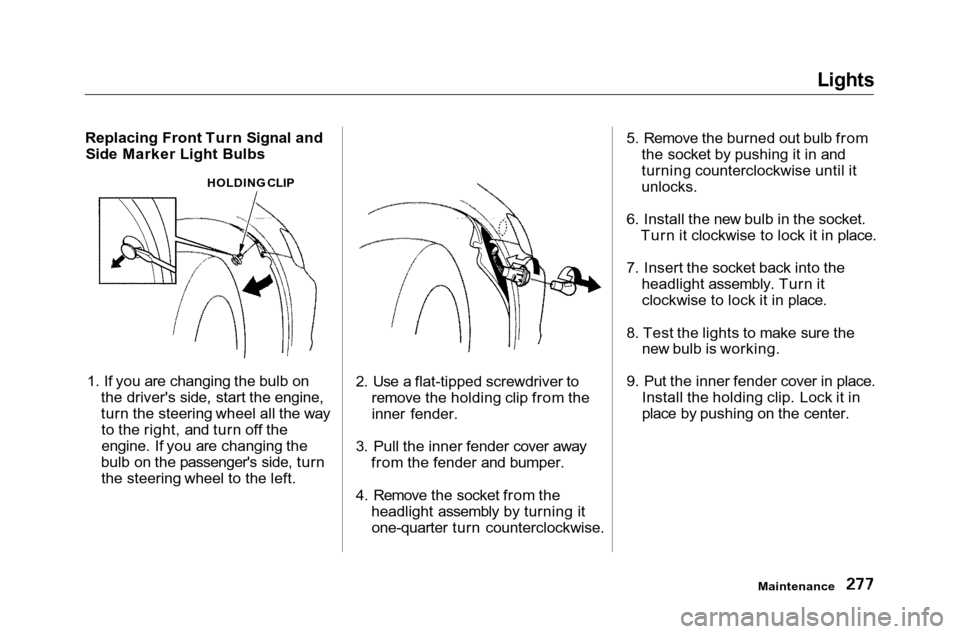
Replacing Front Turn Signal and Side Marker Light Bulbs
HOLDING CLIP
1. If you are changing the bulb on the driver's side, start the engine,
turn the steering wheel all the wayto the right, and turn off the
engine. If you are changing the
bulb on the passenger's side, turn the steering wheel to the left. 2. Use a flat-tipped screwdriver to
remove the holding clip from the
inner fender.
3. Pull the inner fender cover away from the fender and bumper.
4. Remove the socket from the headlight assembly by turning itone-quarter turn counterclockwise. 5. Remove the burned out bulb from
the socket by pushing it in and
turning counterclockwise until it
unlocks.
6. Install the new bulb in the socket. Turn it clockwise to lock it in place.
7. Insert the socket back into the headlight assembly. Turn itclockwise to lock it in place.
8. Test the lights to make sure the new bulb is working.
9. Put the inner fender cover in place. Install the holding clip. Lock it in
place by pushing on the center.
Maintenance
Page 288 of 372
Storing Your Car
If you need to park your car for an
extended period (more than one
month), there are several things you should do to prepare it for storage.
Proper preparation helps prevent
deterioration and makes it easier to
get your car back on the road. If
possible, store your car indoors.
Fill the fuel tank.
Change the engine oil and filter(see page 235).
Wash and dry the exterior completely.
Clean the interior. Make sure the
carpeting, floor mats, etc. are
completely dry.
Leave the parking brake off. Put
the transmission in Reverse (5-speed manual) or Park
(automatic).
Block the rear wheels.
If the car is to be stored for a
longer period, it should be supported on jackstands so the
tires are off the ground.
Leave one window open slightly (if
the car is being stored indoors).
Disconnect the battery.
Support the front wiper blade
arms with a folded towel or rag so
they do not touch the windshield.
To minimize sticking, apply a silicone spray lubricant to all door
and trunk seals. Also, apply a
vehicle body wax to the painted surfaces that mate with the door
and trunk seals. Cover the car with a "breathable"
cover, one made from a porous
material such as cotton.
Nonporous materials, such as
plastic sheeting, trap moisture,
which can damage the paint.
If possible, run the engine for a
while periodically (preferably once a month).
If you store your car for 12 months
or longer, have your Honda dealer
perform the inspections called for in
the 24 months/30,000 miles (48,000
km) maintenance schedule as soon as you take it out of storage (see
page 224). The replacements called
for in the maintenance schedule are not needed unless the car hasactually reached that time or mileage.
Maintenance
Page 298 of 372
Taking Care of the Unexpected
This section covers the more- common problems that motoristsexperience with their vehicles. It
gives you information about how to safely evaluate the problem and what
to do to correct it. If the problem has
stranded you on the side of the road,
you may be able to get going again. If not, you will also find instructions
on getting your car towed. Compact Spare Tire....................... 296
Changing a Flat Tire ..................... 297
If Your Engine Won't Start........... 302 Nothing Happens or theStarter Motor OperatesVery Slowly............................. 303
The Starter Operates Normally................................. 304
Jump Starting................................. 304 If Your Engine Overheats............. 307
Low Oil Pressure Indicator.......... 309Charging System Indicator........... 310
Malfunction Indicator Lamp ........ 311 Readiness Codes........................ 312
Brake System Indicator................ 313 Closing the Moonroof................... 314
Fuses............................................... 315 Checking and Replacing........... 316
Emergency Towing....................... 320
Taking Care of the Unexpected
Page 305 of 372
Changing a Flat Tire, If Your Engine Won't Start
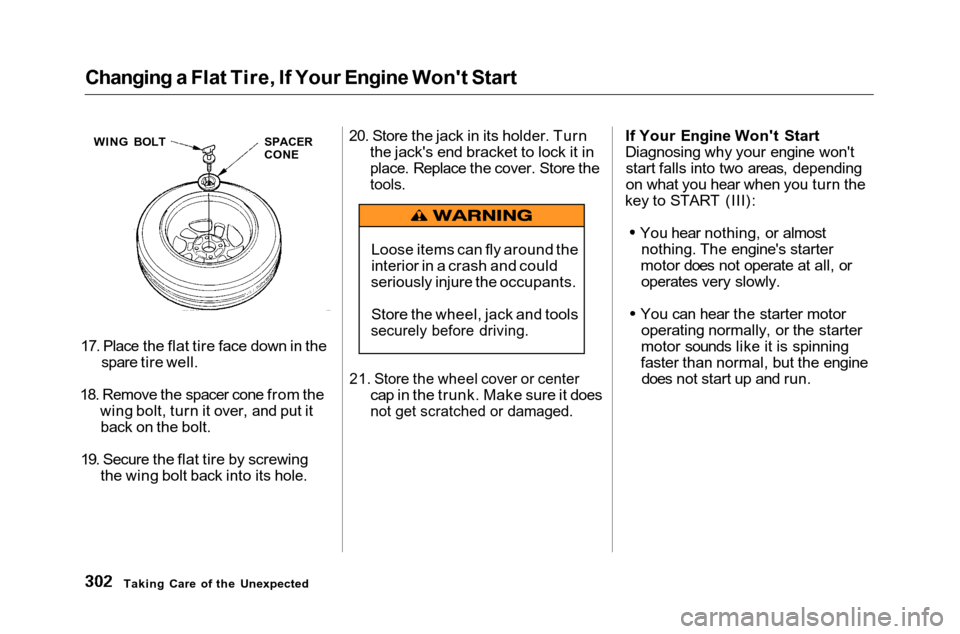
17. Place the flat tire face down in the spare tire well.
18. Remove the spacer cone from the wing bolt, turn it over, and put itback on the bolt.
19. Secure the flat tire by screwing the wing bolt back into its hole. 20. Store the jack in its holder. Turn
the jack's end bracket to lock it in
place. Replace the cover. Store the
tools.
21. Store the wheel cover or center
cap in the trunk. Make sure it does
not get scratched or damaged.
If Your Engine Won't Start
Diagnosing why your engine won't
start falls into two areas, depending
on what you hear when you turn the
key to START (III):
You hear nothing, or almostnothing. The engine's starter
motor does not operate at all, or operates very slowly.
You can hear the starter motor operating normally, or the starter
motor sounds like it is spinning
faster than normal, but the engine does not start up and run.
Taking Care of the Unexpected Loose items can fly around the
interior in a crash and could
seriously injure the occupants.
Store the wheel, jack and tools
securely before driving.
WING BOLT
SPACER
CONE
Page 306 of 372
If Your Engine Won't Start
Nothing Happens or the Starter Motor Operates Very Slowly
When you turn the ignition switch to START (III), you do not hear the
normal noise of the engine trying tostart. You may hear a clicking sound
or series of clicks, or nothing at all.
Check these things:
Your car has the ImmobilizerSystem. You should use a
properly-coded master or valet key
to start the engine (see page 57).
A key that is not properly coded will cause the immobilizer systemindicator in the dash panel to blink
rapidly. Check the transmission interlock.
If you have a manual transmission,
the clutch pedal must be pushed all the way to the floor or the
starter will not operate. With an
automatic transmission, it must be
in Park or Neutral.
Turn the ignition switch to ON (II).
Turn on the headlights and check their brightness. If the headlightsare very dim or don't light at all,
the battery is discharged. See
Jump Starting on page 304. Turn the ignition switch to START
(III). If the headlights do not dim,
check the condition of the fuses. If
the fuses are OK, there is proba-
bly something wrong with the electrical circuit for the ignitionswitch or starter motor. You will
need a qualified technician to
determine the problem. (See
Emergency Towing on page 320 .)
If the headlights dim noticeably or
go out when you try to start the engine, either the battery is dis-
charged or the connections arecorroded. Check the condition of
the battery and terminal connec-
tions (see page 260). You can
then try jump starting the car from a booster battery (see page 304).
Taking Care of the Unexpected
Page 307 of 372
If Your Engine Won't Start, Jump Starting
The Starter Operates Normally In this case, the starter motor's
speed sounds normal, or even faster
than normal, when you turn the
ignition switch to START (III), but
the engine does not run.
Are you using the proper startingprocedure? Refer to Starting the
Engine on page 193 .Do you have fuel? Turn the
ignition switch to ON (II) for a
minute and watch the fuel gauge.
The low fuel level warning light may not be working, so you werenot reminded to fill the tank.
There may be an electrical problem, such as no power to the
fuel pump. Check all the fuses (see page 315).
If you find nothing wrong, you will
need a qualified technician to find
the problem. See Emergency
Towing on page 320 . Jump Starting
If your car's battery has run down,
you may be able to start the engine
by using a booster battery. Although
this seems like a simple procedure,
you should take several precautions.
You cannot start a Honda with an automatic transmission by pushing
or pulling it. To jump start your car, follow these
directions closely:
1. Open the hood and check the physical condition of the battery(see page 260). In very cold
weather, check the condition of the electrolyte. If it seems slushy
or like ice, do not try jump starting
until it thaws.
If a battery sits in extreme cold, the electrolyte inside can freeze.
Attempting to jump start with a frozen battery can cause it to rupture.
2. Turn off all the electrical acces- sories: climate control, stereo
system, lights, etc.
Put the transmission in Neutral or
Park and set the parking brake.
Taking Care of the Unexpected
A battery can explode if you do
not follow the correct procedure,
seriously injuring anyone nearby.
Keep all sparks, open flames,
and smoking materials away
from the battery.
NOTICE
Page 308 of 372
Jump Starting
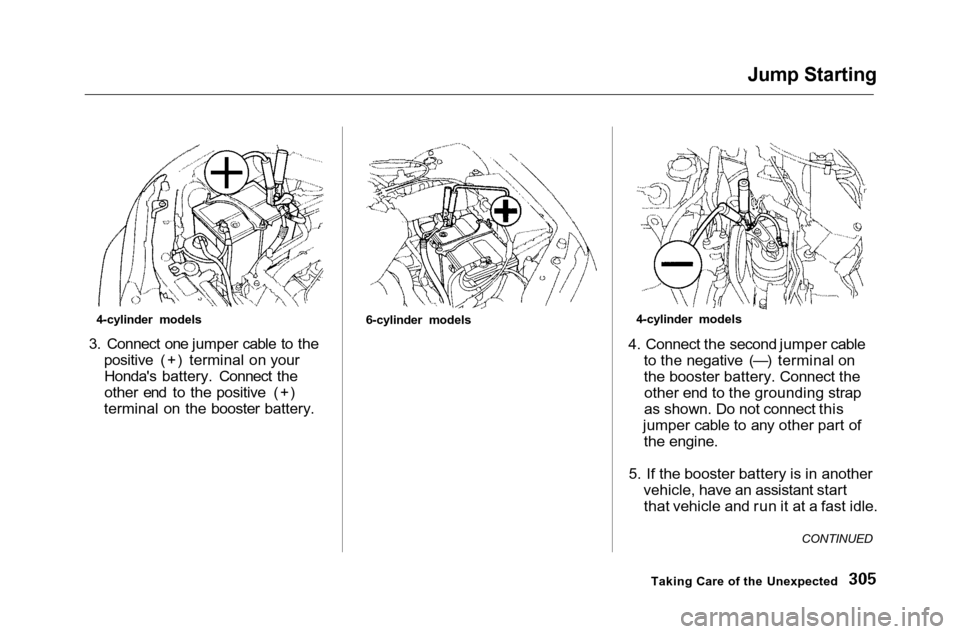
3. Connect one jumper cable to the positive (+) terminal on yourHonda's battery. Connect the
other end to the positive (+)
terminal on the booster battery. 4. Connect the second jumper cable
to the negative (—) terminal on
the booster battery. Connect theother end to the grounding strap
as shown. Do not connect this
jumper cable to any other part of the engine.
5. If the booster battery is in another vehicle, have an assistant startthat vehicle and run it at a fast idle.
Taking Care of the Unexpected CONTINUED
4-cylinder models
6-cylinder models 4-cylinder models
Page 310 of 372
If Your Engine Overheats
The pointer of your car's tempera- ture gauge should stay in the mid-range under most conditions. It may
go higher if you are driving up a long steep hill on a very hot day. If it
climbs to the red mark, you should
determine the reason.
Driving with the temperature gauge
pointer at the red mark can cause serious damage to your engine.
Your car can overheat for several
reasons, such as lack of coolant or a
mechanical problem. The only
indication may be the temperature
gauge climbing to or above the red mark. Or you may see steam or
spray coming from under the hood.
In either case, you should take
immediate action.
1. Safely pull to the side of the road.
Put the transmission in Neutral or
Park and set the parking brake.
Turn off the heating and cooling system and all other accessories.
Turn on the hazard warning indicators.
2. If you see steam and/or spray coming from under the hood, turn
off the engine.
3. If you do not see steam or spray, leave the engine running and
watch the temperature gauge. If the high heat is due to overloading (climbing a long, steep hill on a
hot day with the A/C running, for example), the engine should start
to cool down almost immediately.
If it does, wait until the tempera-
ture gauge comes down to the mid-
point then continue driving.
CONTINUED
Taking Care of the Unexpected
Steam and spray from an
overheated engine can
seriously scald you.
Do not open the hood if steam
is coming out.
NOTICE
Page 311 of 372
If Your Engine Overheats
4. If the temperature gauge stays at the red mark, turn off the engine.
5. Wait until you see no more signs of steam or spray, then open the
hood.
6. Look for any obvious coolant leaks, such as a split radiator hose.
Everything is still extremely hot,so use caution. If you find a leak, it
must be repaired before you
continue driving (see Emergency
Towing on page 320).
7. If you don't find an obvious leak, check the coolant level in the
radiator reserve tank (see page 184). If the level is below the
MIN mark, add coolant to halfway
between the MIN and MAX marks.
8. If there was no coolant in the reserve tank, you may also have to
add coolant to the radiator. Let the
engine cool down until the pointer reaches the middle of the tempera-
ture gauge, or lower, before check- ing the radiator.
9. Using gloves or a large heavy cloth, turn the radiator cap
counterclockwise, without pushing
down, to the first stop. This
releases any remaining pressure in
the cooling system. After the
pressure releases, push down on
the cap and turn it until it comes
off. 10. Start the engine and set the
temperature control dial tomaximum (climate control to
FULL AUTO at 90°F/32°C). Add
coolant to the radiator up to the
base of the filler neck. If you do
not have the proper coolant mixture available, you can add
plain water. Remember to have
the cooling system drained and refilled with the proper mixture as
soon as you can.
11. Put the radiator cap back on tightly. Run the engine and watch
the temperature gauge. If it goes
back to the red mark, the engine
needs repair. (See Emergency
Towing on page 320.)
12. If the temperature stays normal, check the coolant level in the
radiator reserve tank. If it has
gone down, add coolant to the MAX mark. Put the cap back on
tightly.
Taking Care of the Unexpected
Removing the radiator cap
while the engine is hot can
cause the coolant to spray out, seriously scalding you.
Always let the engine and radiator cool down before
removing the radiator cap.