fuel fill door release HONDA ACCORD COUPE 2017 9.G Quick Guide
[x] Cancel search | Manufacturer: HONDA, Model Year: 2017, Model line: ACCORD COUPE, Model: HONDA ACCORD COUPE 2017 9.GPages: 84, PDF Size: 7.3 MB
Page 5 of 84

2 || 3
S
AFETYVISUAL INDEX
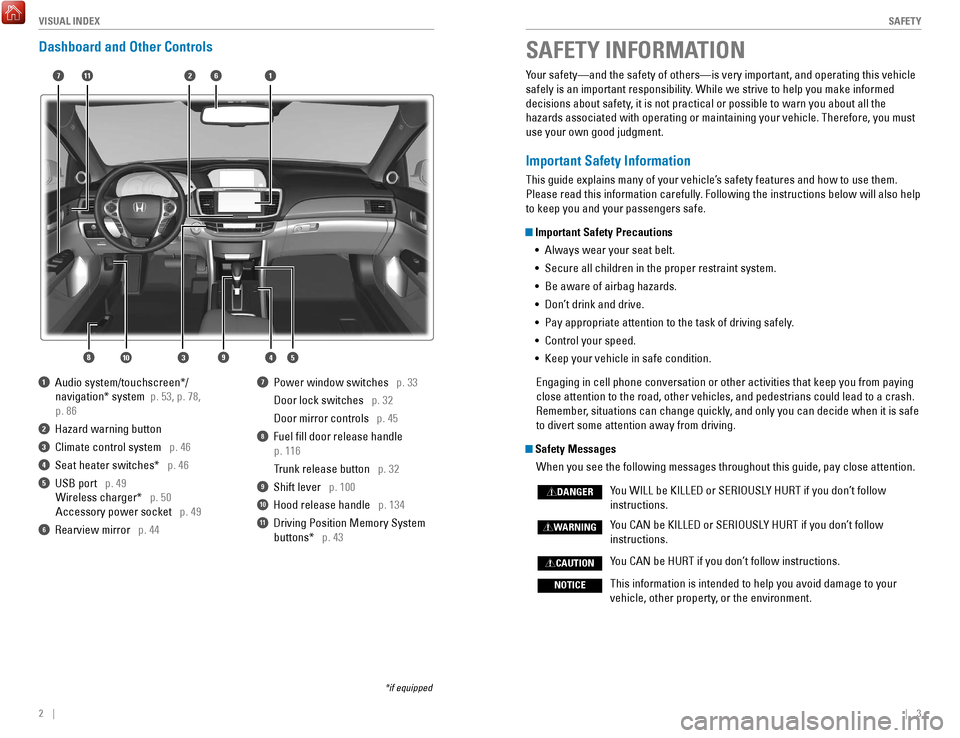
Dashboard and Other Controls
1 Audio system/touchscreen*/
navigation* system p. 53, p. 78,
p. 86
2 Hazard warning button
3 Climate control system p. 46
4 Seat heater switches* p. 46
5 USB port p. 49 Wireless charger* p. 50
Accessory power socket p. 49
6 rearview mirror p. 44
7 Power window switches p. 33
Door lock switches p. 32
Door mirror controls p. 45
8 Fuel fill door release handle
p. 116
Trunk release button
p. 32
9 Shift lever p. 100
10 Hood release handle p. 134
11 Driving Position Memory System
buttons* p. 43
*if equipped
SAFETY INFORMATION
2
4
71
8
6
3
Your safety—and the safety of others—is very important, and operati\
ng this vehicle
safely is an important responsibility. While we strive to help you make informed
decisions about safety, it is not practical or possible to warn you about all the
hazards associated with operating or maintaining your vehicle. Therefore\
, you must
use your own good judgment.
Important Safety Information
This guide explains many of your vehicle’s safety features and how to use them.
Please read this information carefully. Following the instructions below will also help
to keep you and your passengers safe.
Important Safety Precautions
•
Always wear your seat belt.
•
Secure all children in the proper restraint system.
•
Be aware of airbag hazards.
•
Don’t drink and drive.
•
Pay appropriate attention to the task of driving safely.
•
Control your speed.
•
Keep your vehicle in safe condition.
engaging in cell phone conversation or other activities that keep you fro\
m paying
close attention to the road, other vehicles, and pedestrians could lead \
to a crash.
remember
, situations can change quickly, and only you can decide when it is safe
to divert some attention away from driving.
Safety Messages
When you see the following messages throughout this guide, pay close att\
ention.
You WILL be KILLeD or SerIoUSL
Y HU
rT if you don’
t follow
instructions.
You CAN be KILLeD or SerIoUSL
Y HU
rT if you don’
t follow
instructions.
You CAN be HUrT if you don’
t follow instructions.
This information is intended to help you avoid damage to your
vehicle, other property, or the environment.
DANGER
WARNING
CAUTION
NOTICE
5910
11
Page 16 of 84

24 || 25
I
NSTRUMENT PANELINSTRUMENT PANEL
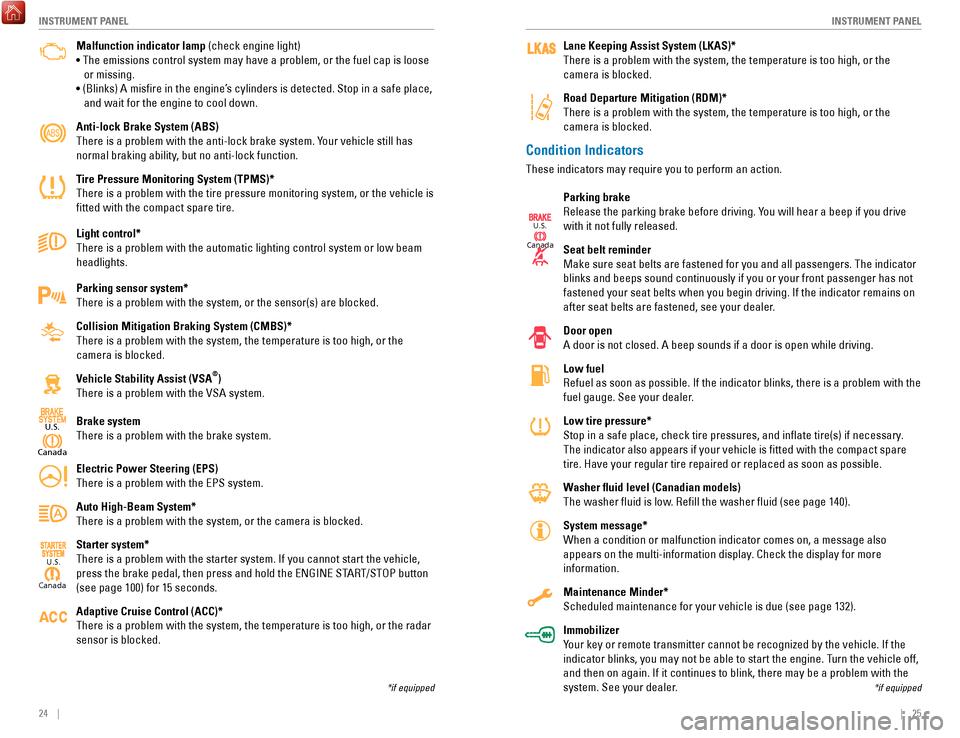
Malfunction indicator lamp (check engine light)
• The emissions control system may have a problem, or the fuel cap is\
loose
or missing.
• (Blinks) A
misfire in the engine’
s cylinders is detected. Stop in a safe place,
and wait for the engine to cool down.
Anti-lock Brake System (ABS)
There is a problem with the anti-lock brake system. Your vehicle still has
normal braking ability, but no anti-lock function.
Tire Pressure Monitoring System (TPMS)*
There is a problem with the tire pressure monitoring system, or the vehi\
cle is
fitted with the compact spare tire.
Light control*
There is a problem with the automatic lighting control system or low bea\
m
headlights.
Parking sensor system*
There is a problem with the system, or the sensor(s) are blocked.
Collision Mitigation Braking System (CMBS)*
There is a problem with the system, the temperature is too high, or the \
camera is blocked.
Vehicle Stability Assist (VSA
®)
There is a problem with the
vSA system.
Brake system
There is a problem with the brake system.
Electric Power Steering (EPS)
There is a problem with the
ePS system.
Auto High-Beam System*
There is a problem with the system, or the camera is blocked.
Starter system*
There is a problem with the starter system. If you cannot start the vehi\
cle,
press the brake pedal, then press and hold the
eNGINe ST
A
rT/SToP button
(see page 100) for 15 seconds.
Adaptive Cruise Control (ACC)*
There is a problem with the system, the temperature is too high, or the \
r
adar
sensor is blocked.
Canad a
U.S.
*if equipped
Condition Indicators
These indicators may require you to perform an action.
Parking brake
release the parking brake before driving. Y
ou will hear a beep if you drive
with it not fully released.
Seat belt reminder
Make sure seat belts are fastened for you and all passengers. The indicator
blinks and beeps sound continuously if you or your front passenger has not
fastened your seat belts when you begin driving. If the indicator remain\
s on
after seat belts are fastened, see your dealer.
Door open
A door is not closed. A beep sounds if a door is open while driving.
Low fuel
refuel as soon as possible. If the indicator blinks, there is a problem w\
ith t
he
fuel gauge. See your dealer.
Low tire pressure*
Stop in a safe place, check tire pressures, and inflate tire(s) if n\
ecessary.
The indicator also appears if your vehicle is fitted with the compact \
spare
tire. Have your regular tire repaired or replaced as soon as possible.
Washer fluid level (Canadian models)
The washer fluid is low.
refill the washer fluid (see page 140).
System message*
When a condition or malfunction indicator comes on, a message also
appears on the multi-information display
. Check the display for more
information.
Maintenance Minder*
Scheduled maintenance for your vehicle is due (see page 132).
Immobilizer
Your key or remote transmitter cannot be recognized by the vehicle. If th\
e
indicator blinks, you may not be able to start the engine. Turn the vehicle off,
and then on again. If it continues to blink, there may be a problem with\
the
system. See your dealer.
*if equipped
Lane Keeping Assist System (LKAS)*
There is a problem with the system, the temperature is too high, or the \
camera is blocked.
Road Departure Mitigation (RDM)*
There is a problem with the system, the temperature is too high, or the \
camera is blocked.
Canad a
U.S.
Canada
U.S.
Page 62 of 84

116 || 117
HANDLING THE UNEXPECTED
DRIVING
Refueling
Use the proper fuel and refueling procedure to ensure the best performan\
ce and
safety of your vehicle.
Fuel Information
Use of unleaded gasoline of 87 octane or higher is recommended.
•
Honda recommends ToP TIer Detergent Gasoline where available.
•
Do NoT use gasoline containing more than 15% ethanol.
•
Do NoT use gasoline containing methanol.
•
Do NoT use gasoline containing MMT
.
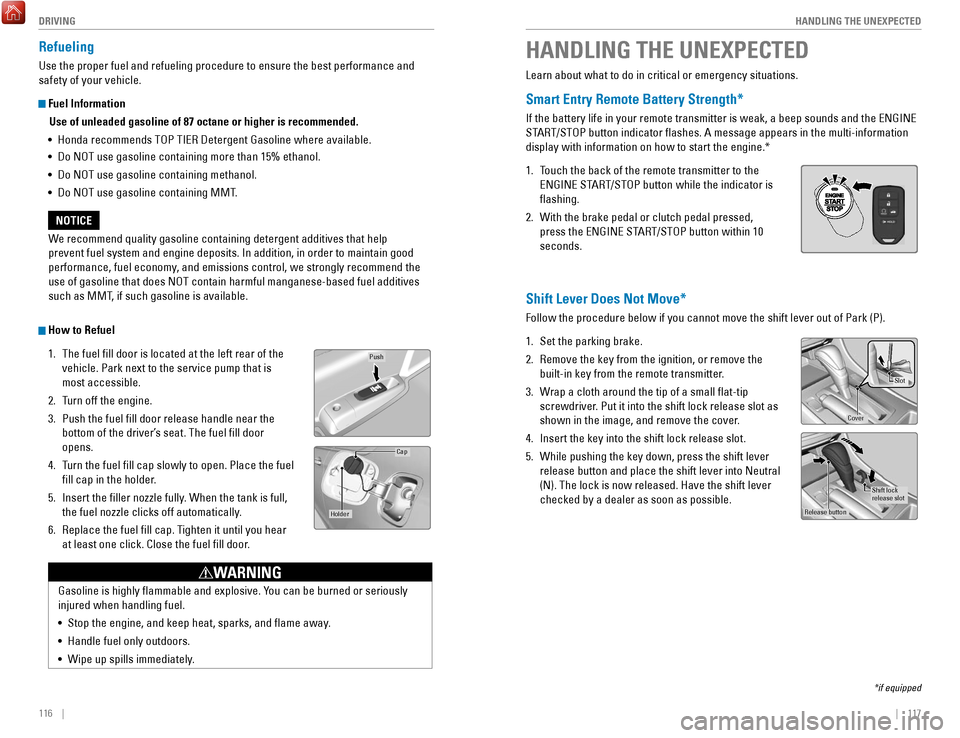
How to Refuel1.
The fuel fill door is located at the left rear of the
vehicle. Park next to the service pump that is
most accessible.
2.
Turn off the engine.
3.
Push the fuel fill door release handle near the
bottom of the driver’s seat. The fuel fill door
opens.
4.
Turn the fuel fill cap slowly to open. Place the fuel
fill cap in the holder
.
5.
Insert the filler nozzle fully. When the tank is full,
the fuel nozzle clicks off automatically
.
6.
replace the fuel fill cap. T
ighten it until you hear
at least one click. Close the fuel fill door.
Push
Cap
Holder
Gasoline is highly flammable and explosive. You can be burned or seriously
injured when handling fuel.
•
Stop the engine, and keep heat, sparks, and flame away.
•
Handle fuel only outdoors.
•
Wipe up spills immediately.
WARNING
We recommend quality gasoline containing detergent additives that help
prevent fuel system and engine deposits. In addition, in order to mainta\
in good
performance, fuel economy, and emissions control, we strongly recommend the
use of gasoline that does N
oT contain harmful manganese-based fuel additives
such as MMT
, if such gasoline is available.
NOTICE
HANDLING THE UNEXPECTED
Learn about what to do in critical or emergency situations.
Smart Entry Remote Battery Strength*
If the battery life in your remote transmitter is weak, a beep sounds an\
d the eNGINe
STA
rT/SToP button indicator flashes. A message appears in the multi-information\
display with information on how to start the engine.*
1.
Touch the back of the remote transmitter to the
eNGINe ST
A
rT/SToP button while the indicator is
flashing.
2.
With the brake pedal or clutch pedal pressed,
press the
eNGINe ST
A
rT/SToP button within 10
seconds.
Shift Lever Does Not Move*
Follow the procedure below if you cannot move the shift lever out of Par\
k (P).
1.
Set the parking brake.
2.
remove the key from the ignition, or remove the
built-in key from the remote transmitter
.
3.
Wrap a cloth around the tip of a small flat-tip
screwdriver
. Put it into the shift lock release slot as
shown in the image, and remove the cover.
4.
Insert the key into the shift lock release slot.
5.
While pushing the key down, press the shift lever
release button and place the shift lever into Neutral
(N). The lock is now released. Have the shift lever
checked by a dealer as soon as possible.
*if equipped
Slo t
Cove r
Release button
Shift lock
release slot
FPO