change wheel HONDA ACCORD HYBRID 2014 9.G User Guide
[x] Cancel search | Manufacturer: HONDA, Model Year: 2014, Model line: ACCORD HYBRID, Model: HONDA ACCORD HYBRID 2014 9.GPages: 561, PDF Size: 20.3 MB
Page 210 of 561
Continued209
uuAudio System Basic OperationuPlaying AM/FM Radio
Features
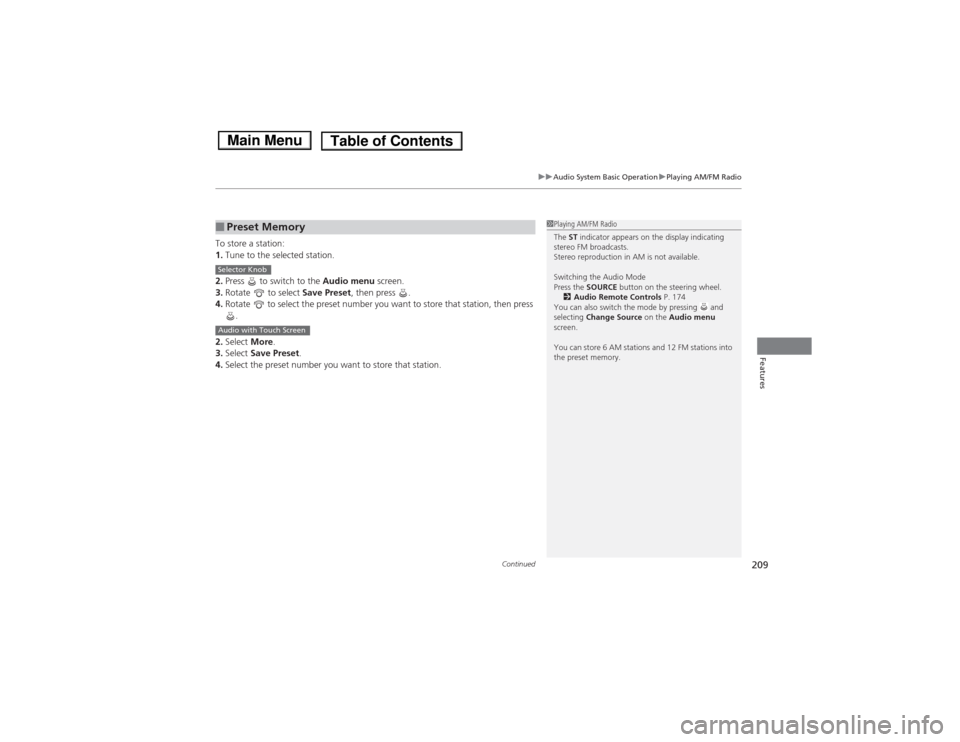
To store a station: 1.Tune to the selected station.
2. Press to switch to the Audio menu screen.
3. Rotate to select Save Preset, then press .
4. Rotate to select the preset number you want to store that station, then press
.
2. Select More.
3. Select Save Preset .
4. Select the preset number you want to store that station.
■Preset Memory1Playing AM/FM Radio
The ST indicator appears on the display indicating
stereo FM broadcasts.
Stereo reproduction in AM is not available.
Switching the Audio Mode
Press the SOURCE button on the steering wheel.
2 Audio Remote Controls P. 174
You can also switch the mode by pressing and selecting Change Source on the Audio menu
screen.
You can store 6 AM stations and 12 FM stations into
the preset memory.
Selector Knob
Audio with Touch Screen
Main MenuTable of Contents
Page 249 of 561
uuAudio System Basic OperationuPlaying AM/FM Radio
248
Features
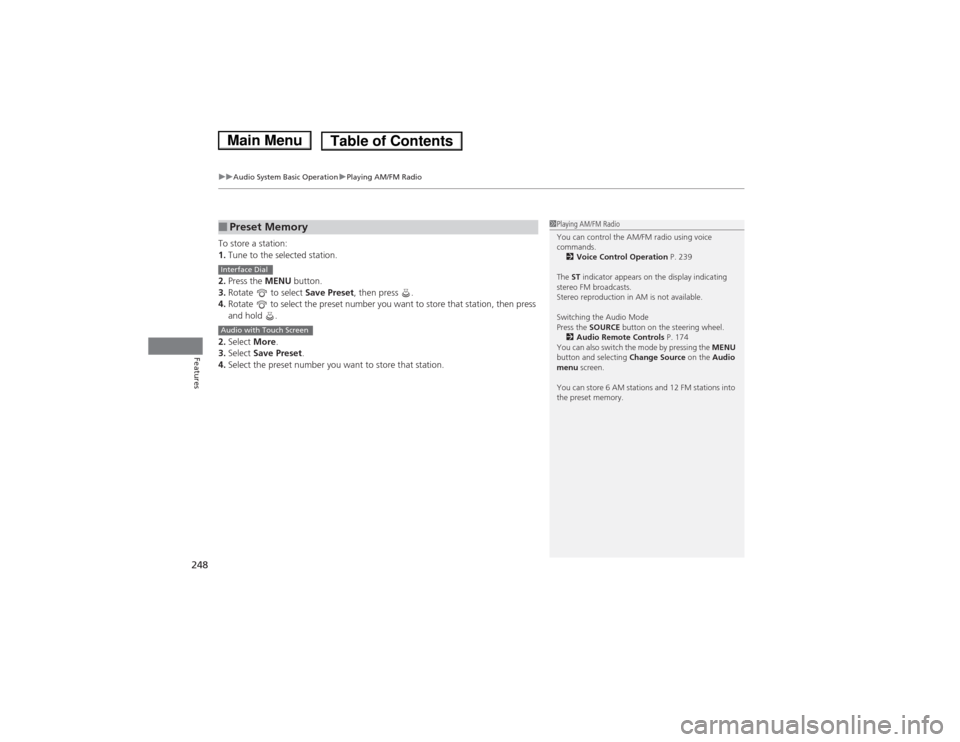
To store a station: 1. Tune to the selected station.
2. Press the MENU button.
3. Rotate to select Save Preset, then press .
4. Rotate to select the preset number you want to store that station, then press
and hold .
2. Select More.
3. Select Save Preset .
4. Select the preset number you want to store that station.
■Preset Memory1Playing AM/FM Radio
You can control the AM/FM radio using voice commands.
2 Voice Control Operation P. 239
The ST indicator appears on the display indicating
stereo FM broadcasts.
Stereo reproduction in AM is not available.
Switching the Audio Mode
Press the SOURCE button on the steering wheel.
2 Audio Remote Controls P. 174
You can also switch the mode by pressing the MENU
button and selecting Change Source on the Audio
menu screen.
You can store 6 AM stations and 12 FM stations into
the preset memory.
Interface Dial
Audio with Touch Screen
Main MenuTable of Contents
Page 334 of 561
333
Continued
Features
Bluetooth
® HandsFreeLink ®
Bluetooth® HandsFreeLink ® (HFL) allows you to place and receive phone calls using
your vehicle’s audio system, without handling your cell phone.
Using HFL
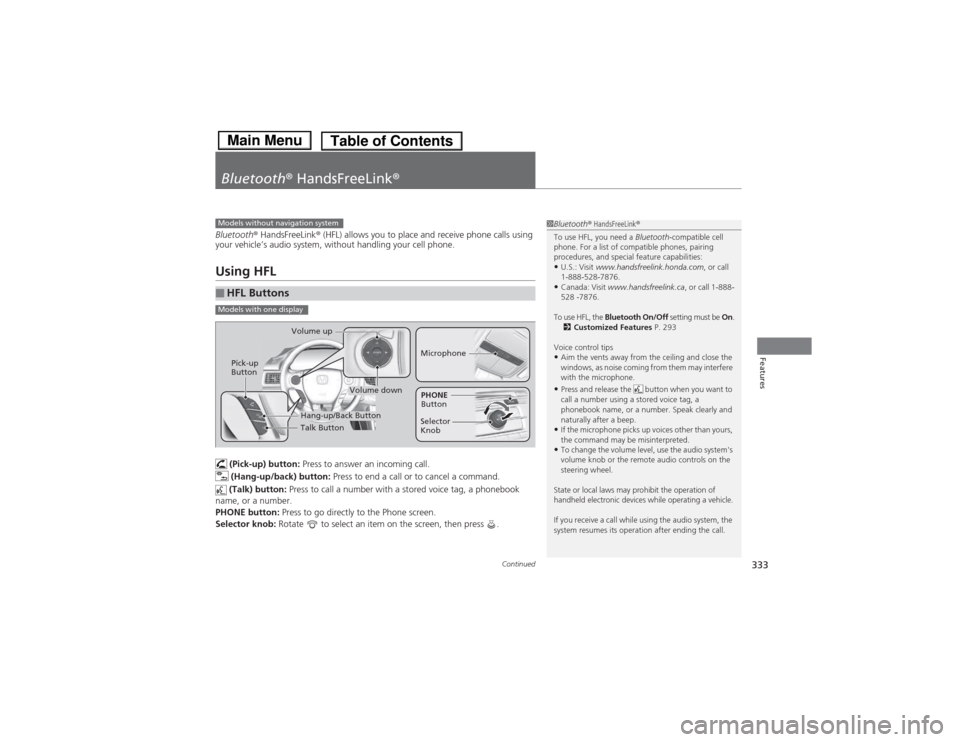
(Pick-up) button: Press to answer an incoming call.
(Hang-up/back) button: Press to end a call or to cancel a command.
(Talk) button: Press to call a number with a stored voice tag, a phonebook
name, or a number.
PHONE button: Press to go directly to the Phone screen.
Selector knob: Rotate to select an item on the screen, then press .
■HFL Buttons
1Bluetooth® HandsFreeLink ®
To use HFL, you need a Bluetooth-compatible cell
phone. For a list of compatible phones, pairing
procedures, and special feature capabilities:• U.S.: Visit www.handsfreelink.honda.com , or call
1-888-528-7876.
• Canada: Visit www.handsfreelink.ca , or call 1-888-
528 -7876.
To use HFL, the Bluetooth On/Off setting must be On.
2 Customized Features P. 293
Voice control tips • Aim the vents away from the ceiling and close the
windows, as noise coming from them may interfere
with the microphone.
• Press and release the button when you want to
call a number using a stored voice tag, a
phonebook name, or a number. Speak clearly and
naturally after a beep.
• If the microphone picks up voices other than yours,
the command may be misinterpreted.
• To change the volume level, use the audio system's
volume knob or the remote audio controls on the
steering wheel.
State or local laws may prohibit the operation of
handheld electronic devices while operating a vehicle.
If you receive a call while using the audio system, the
system resumes its operation after ending the call.Models without navigation system
Models with one display
Talk Button
Volume up
Microphone
Hang-up/Back Button
Pick-up
Button
Volume down
Selector KnobPHONE
Button
Main MenuTable of Contents
Page 371 of 561
370
Features
Bluetooth® HandsFreeLink ®
Bluetooth® HandsFreeLink ® (HFL) allows you to place and receive phone calls using
your vehicle’s navigation system, without handling your cell phone.
Using HFL
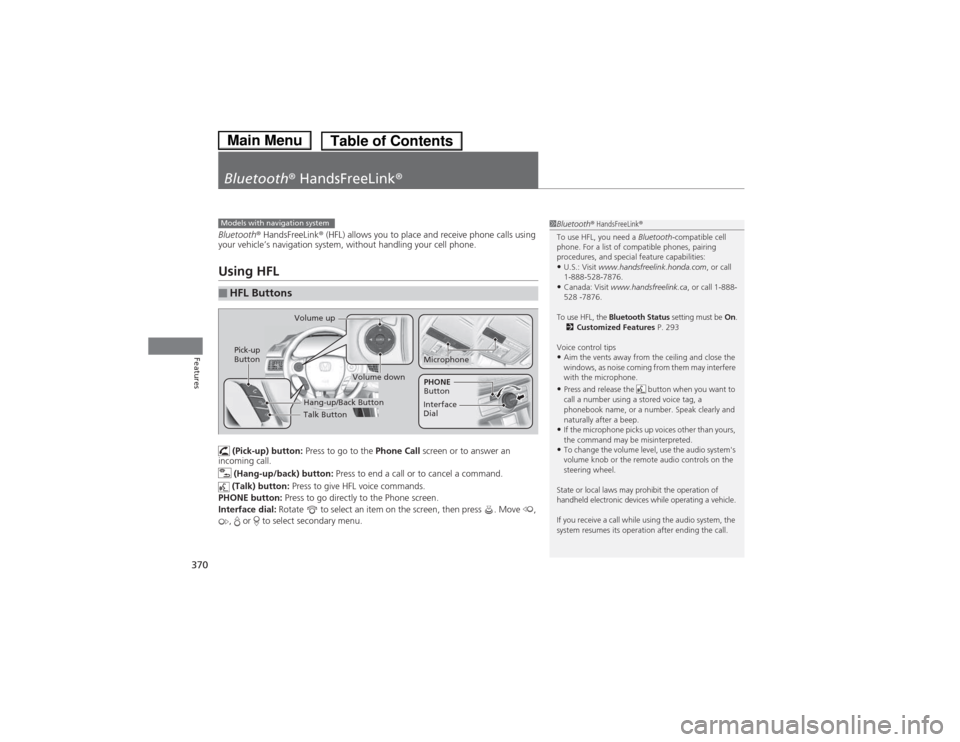
(Pick-up) button: Press to go to the Phone Call screen or to answer an
incoming call.
(Hang-up/back) button: Press to end a call or to cancel a command.
(Talk) button: Press to give HFL voice commands.
PHONE button: Press to go directly to the Phone screen.
Interface dial: Rotate to select an item on the screen, then press . Move ,
, or to select secondary menu.
■HFL Buttons
1Bluetooth ® HandsFreeLink ®
To use HFL, you need a Bluetooth-compatible cell
phone. For a list of compatible phones, pairing
procedures, and special feature capabilities:
• U.S.: Visit www.handsfreelink.honda.com , or call
1-888-528-7876.
• Canada: Visit www.handsfreelink.ca , or call 1-888-
528 -7876.
To use HFL, the Bluetooth Status setting must be On.
2 Customized Features P. 293
Voice control tips
• Aim the vents away from the ceiling and close the
windows, as noise coming from them may interfere
with the microphone.
• Press and release the button when you want to
call a number using a stored voice tag, a
phonebook name, or a number. Speak clearly and
naturally after a beep.
• If the microphone picks up voices other than yours,
the command may be misinterpreted.
• To change the volume level, use the audio system's
volume knob or the remote audio controls on the
steering wheel.
State or local laws may prohibit the operation of
handheld electronic devices while operating a vehicle.
If you receive a call while using the audio system, the
system resumes its operation after ending the call.Models with navigation system
Talk Button
Volume up
Hang-up/Back Button
Pick-up
Button
Volume down
Interface Dial
PHONE
Button
Microphone
Main MenuTable of Contents
Page 421 of 561
420
uuWhen DrivinguShifting
Driving
Shifting
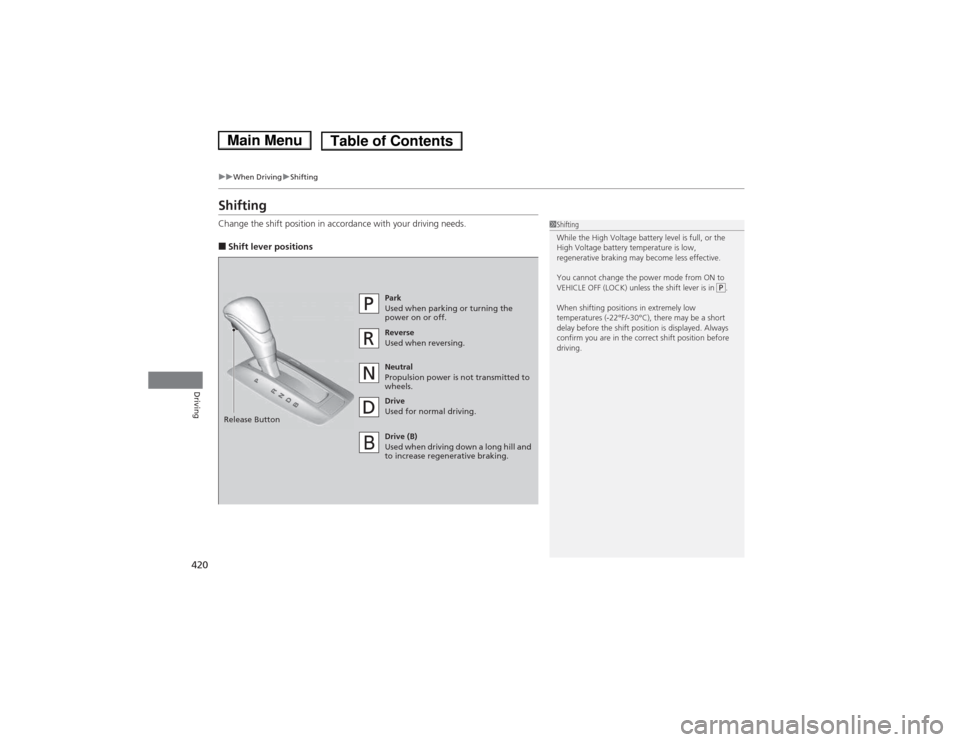
Change the shift position in accordance with your driving needs. ■Shift lever positions
1Shifting
While the High Voltage battery level is full, or the
High Voltage battery temperature is low,
regenerative braking may become less effective.
You cannot change the power mode from ON to
VEHICLE OFF (LOCK) unless the shift lever is in P.
When shifting positions in extremely low
temperatures (-22°F/-30°C), there may be a short
delay before the shift position is displayed. Always
confirm you are in the correct shift position before
driving.
Park
Used when parking or turning the
power on or off.
Reverse Used when reversing.
Neutral
Propulsion power is not transmitted to wheels.
Drive
Used for normal driving.
Release Button
Drive (B)
Used when driving down a long hill and
to increase regenerative braking.
Main MenuTable of Contents
Page 432 of 561
Continued431
uuWhen DrivinguAdaptive Cruise Control (ACC)*
Driving
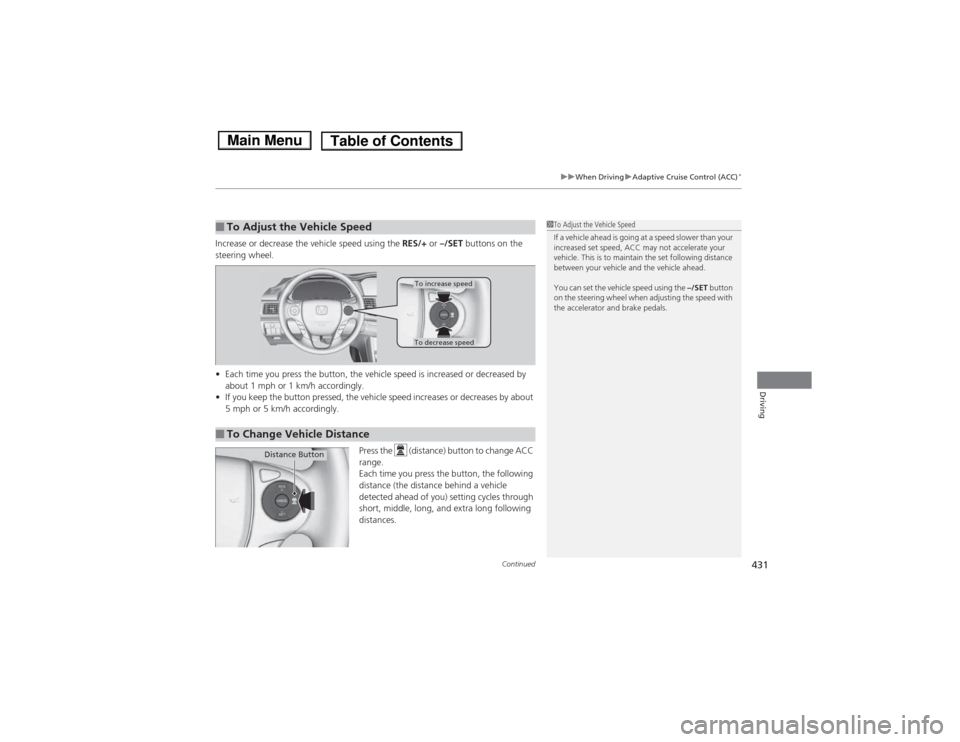
Increase or decrease the vehicle speed using the
RES/+ or –/SET buttons on the
steering wheel. • Each time you press the button, the vehicle speed is increased or decreased by
about 1 mph or 1 km/h accordingly.
• If you keep the button pressed, the vehicle speed increases or decreases by about
5 mph or 5 km/h accordingly.
Press the (distance) button to change ACC range.
Each time you press the button, the following
distance (the distance behind a vehicle
detected ahead of you) setting cycles through
short, middle, long, and extra long following
distances.
■To Adjust the Vehicle Speed1To Adjust the Vehicle Speed
If a vehicle ahead is going at a speed slower than your
increased set speed, ACC may not accelerate your
vehicle. This is to maintain the set following distance
between your vehicle and the vehicle ahead.
You can set the vehicle speed using the –/SET button
on the steering wheel when adjusting the speed with
the accelerator and brake pedals.
■To Change Vehicle Distance
To increase speed
To decrease speed
Distance Button
Main MenuTable of Contents
Page 443 of 561
442
uuWhen DrivinguLane Departure Warning (LDW)*
Driving
LDW may not activate or may not recognize lanes, and may activate even when
keeping in the middle of a lane under the following conditions.
■LDW Limitations
Condition
●
When you drive in bad weather (rain, fog, etc.).
● A heavy load in the rear or modifications to the suspension tilts your vehicle.
● An abnormal tire condition is detected (wrong tire size, flat tire, etc.).
● When the windshield is blocked by dirt, mud, leaves, wet snow, etc.
● When the temperature inside the system is high.
● A sudden change between light and dark such as an entrance or exit of a tunnel.
● You drive into the sunlight (e.g. at dawn or dusk).
● When the windshield is dirty or cloudy.
● When you drive in the shadows of trees, buildings, etc.
● When you drive on a wet road surface following another vehicle.
uThe camera may perceive the tire tracks in the water as lane lines.
● When there is snow or wheel tracks on the side of the road.
● When the road has many repaired areas or erased lines.
● When the vehicle is running over painted signs or crosswalk markings.
● When you drive in a lane with worn-out lane markings.
Main MenuTable of Contents
Page 446 of 561
445
uuWhen DrivinguLaneWatchTM
Continued
Driving
LaneWatch TM
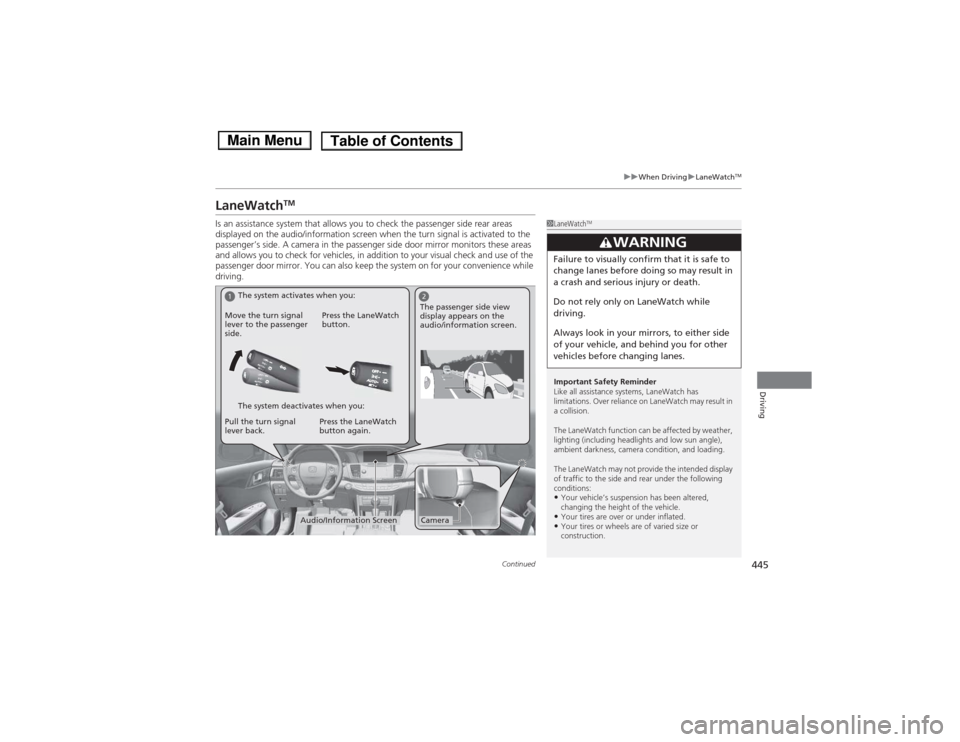
Is an assistance system that allows you to check the passenger side rear areas
displayed on the audio/information screen when the turn signal is activated to the
passenger’s side. A camera in the passenger side door mirror monitors these areas
and allows you to check for vehicles, in addition to your visual check and use of the
passenger door mirror. You can also keep the system on for your convenience while
driving.
1LaneWatch TM
Important Safety Reminder
Like all assistance systems, LaneWatch has
limitations. Over reliance on LaneWatch may result in a collision.
The LaneWatch function can be affected by weather,
lighting (including headlights and low sun angle),
ambient darkness, camera condition, and loading.
The LaneWatch may not provide the intended display
of traffic to the side and rear under the following
conditions: • Your vehicle’s suspension has been altered,
changing the height of the vehicle.
• Your tires are over or under inflated.
• Your tires or wheels are of varied size or
construction.
3WARNING
Failure to visually confirm that it is safe to
change lanes before doing so may result in
a crash and serious injury or death.
Do not rely only on LaneWatch while
driving.
Always look in your mirrors, to either side
of your vehicle, and behind you for other
vehicles before changing lanes.
12
CameraAudio/Information Screen
Move the turn signal
lever to the passenger
side.
Press the LaneWatch
button.
Pull the turn signal
lever back. Press the LaneWatch button again. The passenger side view
display appears on the
audio/information screen.
The system activates when you:
The system deactivates when you:
Main MenuTable of Contents
Page 448 of 561
447
uuWhen DrivinguTire Pressure Monitoring System (TPMS)
Continued
Driving
Tire Pressure Monitoring System (TPMS)
Instead of directly measuring the pressure in each tire, the TPMS on this vehicle
monitors and compares the rolling radius and rotational characteristics of each
wheel and tire while you are driving to determine if one or more tires are
significantly under-inflated. This will cause the low tire pressure/TPMS indicator to
come on and a message to appear on the multi-information display.
You must start TPMS calibration every time you: •Adjust the pressure in one or more tires.
• Rotate the tires.
• Replace one or more tires.
Before calibrating the TPMS:• Set the cold tire pressure in all four tires.
2 Checking Tires P. 493
Make sure:• The vehicle is at a complete stop.
• The shift lever is in
(P .
• The power mode is in ON.
■TPMS Calibration
1Tire Pressure Monitoring System (TPMS)
The system does not monitor the tires when driving at low speed.
Conditions such as low ambient temperature and
altitude change directly affect tire pressure and can
trigger the low tire pressure/TPMS indicator to come on.
Tire pressure checked and inflated in: •Warm weather can become under-inflated in
colder weather.
• Cold weather can become over-inflated in warmer weather.
The low tire pressure indicator will not come on as a
result of over inflation.
The TPMS may not function properly if tire type and
size are mixed. Make sure to use the same size and
type of tire. 2 Checking and Maintaining Tires P. 493
The low tire pressure/TPMS indicator may come on
with a delay or may not come on at all when:
• You rapidly accelerate, decelerate, or turn the
steering wheel.
• You drive on snowy or slippery roads.
• Snow chains are used.
The low tire pressure/TPMS indicator may come on
under the following conditions:• There is a heavier and uneven load on the tires than
the condition at calibration.
• Snow chains are used.
Main MenuTable of Contents
Page 458 of 561
457
Driving
Multi-View Rear Camera
About Your Multi-View Rear Camera
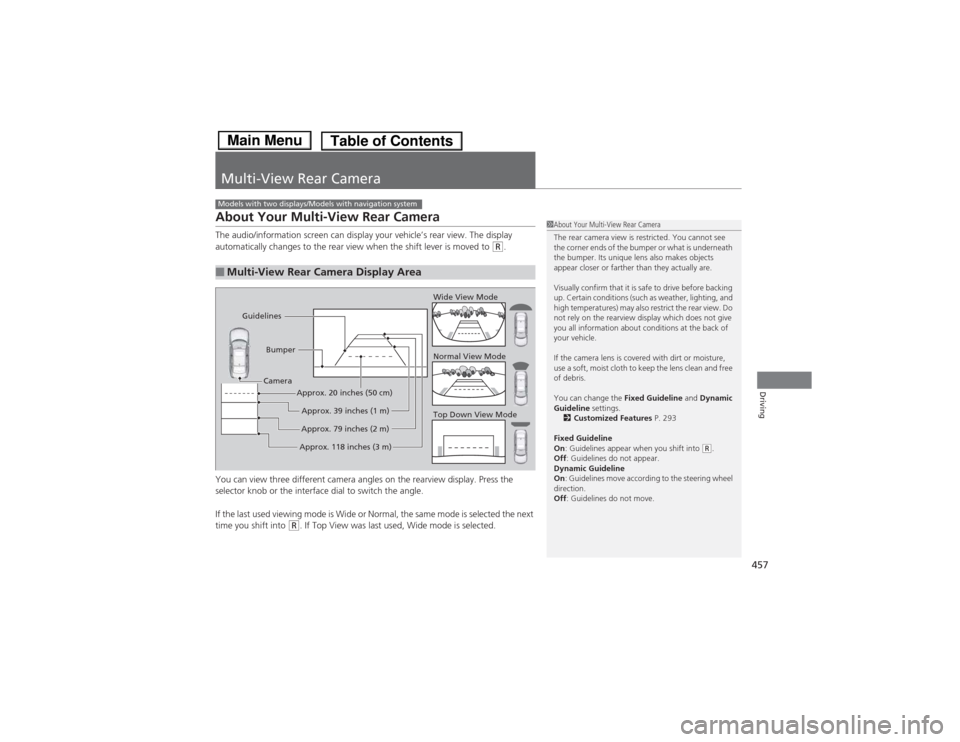
The audio/information screen can display your vehicle’s rear view. The display
automatically changes to the rear view when the shift lever is moved to
(R.
You can view three different camera angles on the rearview display. Press the
selector knob or the interface dial to switch the angle.
If the last used viewing mode is Wide or Normal, the same mode is selected the next
time you shift into
(R . If Top View was last used, Wide mode is selected.
■Multi-View Rear Camera Display Area
Models with two displays/Models with navigation system
1About Your Multi-View Rear Camera
The rear camera view is restricted. You cannot see
the corner ends of the bumper or what is underneath
the bumper. Its unique lens also makes objects
appear closer or farther than they actually are.
Visually confirm that it is safe to drive before backing
up. Certain conditions (such as weather, lighting, and
high temperatures) may also restrict the rear view. Do
not rely on the rearview display which does not give
you all information about conditions at the back of your vehicle.
If the camera lens is covered with dirt or moisture,
use a soft, moist cloth to keep the lens clean and free
of debris.
You can change the Fixed Guideline and Dynamic
Guideline settings.
2 Customized Features P. 293
Fixed Guideline On : Guidelines appear when you shift into
(R.
Off : Guidelines do not appear.
Dynamic Guideline On : Guidelines move according to the steering wheel
direction. Off : Guidelines do not move.
Top Down View Mode
Normal View Mode
Wide View Mode
Guidelines
Bumper
Camera
Approx. 118 inches (3 m)Approx. 79 inches (2 m)Approx. 39 inches (1 m)
Approx. 20 inches (50 cm)
Main MenuTable of Contents