display HONDA ACCORD HYBRID 2017 9.G Quick Guide
[x] Cancel search | Manufacturer: HONDA, Model Year: 2017, Model line: ACCORD HYBRID, Model: HONDA ACCORD HYBRID 2017 9.GPages: 80, PDF Size: 10.35 MB
Page 43 of 80
78 || 79
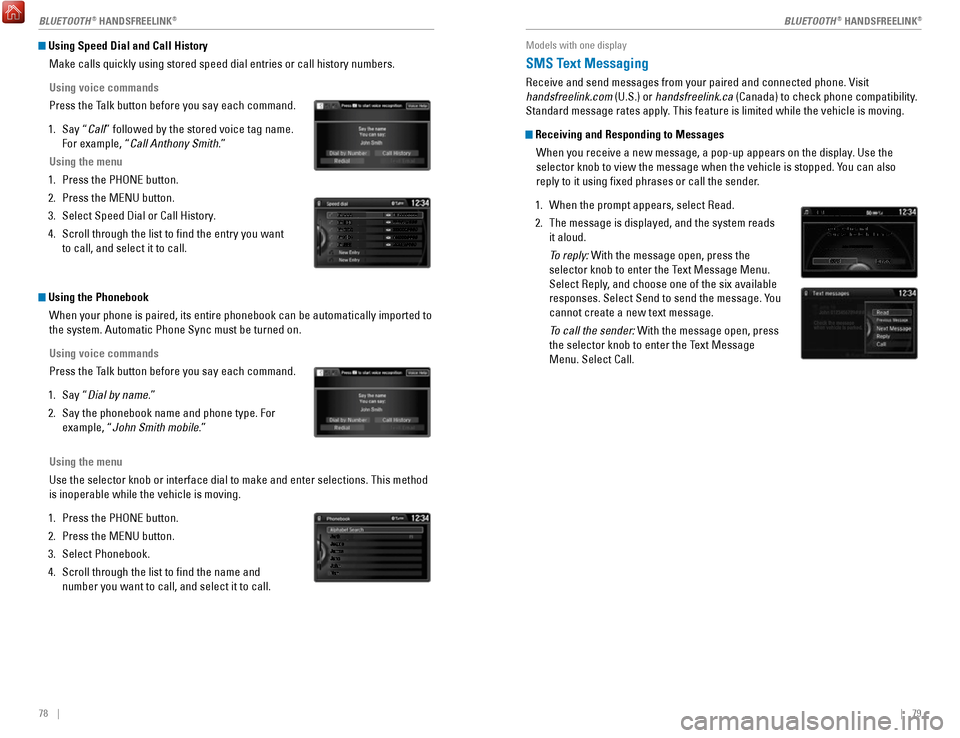
Using Speed Dial and Call History
Make calls quickly using stored speed dial entries or call history numbe\
rs.
Using voice commands
Press the Talk button before you say each command.
1.
Say “Call” followed by the stored voice tag name.
For example, “
Call Anthony Smith.”
Using the menu
1.
Press the PHoNe button.
2.
Press the MeNU button.
3.
Select Speed Dial or Call History.
4.
Scroll through the list to find the entry you want
to call, and select it to call.
Mr.AAA111AAA####
555EEE#### 444DDD#### 333CCC####
222BBB####
Mr.EEE Mr.DDD
Mr.CCC
Mr.BBB
Using the Phonebook When your phone is paired, its entire phonebook can be automatically imp\
orted to
the system. Automatic Phone Sync must be turned on.
Using voice commands
Press the Talk button before you say each command.
1.
Say “Dial by name.”
2.
Say the phonebook name and phone type. For
example, “John Smith mobile.”
Using the menu
Use the selector knob or interface dial to make and enter selections. Th\
is method
is inoperable while the vehicle is moving.
1.
Press the PHoNe button.
2.
Press the MeNU button.
3.
Select Phonebook.
4.
Scroll through the list to find the name and
number you want to call, and select it to call.
Models with one display
SMS Text Messaging
receive and send messages from your paired and connected phone. visit
handsfreelink.com (U.S.) or handsfreelink.ca (Canada) to check phone compatibility.
Standard message rates apply. This feature is limited while the vehicle is moving.
Receiving and Responding to Messages
When you receive a new message, a pop-up appears on the display. Use the
selector knob to view the message when the vehicle is stopped. You can also
reply to it using fixed phrases or call the sender.
1.
When the prompt appears, select read.
2.
The message is displayed, and the system reads
it aloud.
To reply: With the message open, press the
selector knob to enter the T
ext Message Menu.
Select
reply, and choose one of the six available
responses. Select Send to send the message. Y
ou
cannot create a new text message.
To call the sender: With the message open, press
the selector knob to enter the T
ext Message
Menu. Select Call.
BLUETOOTH® HANDSFreeLINK®BLUETOOTH® HANDSFreeLINK®
Page 44 of 80
80 || 81
Models with touchscreen
Basic HFL Operation
Make and receive phone calls using the vehicle’s audio system, without handling
your phone.
visit handsfreelink.com
(U.S.) or handsfreelink.ca (Canada) to check
phone compatibility.
If your iPhone is connected to Apple CarPlay or Android Auto, calls can \
only be
made through Apple CarPlay or Android Auto, not through Bluetooth HandsFreeLink.
To reduce the potential for driver distraction, certain manual functions \
may be
inoperable or grayed out while the vehicle is moving. Stop or pull over \
to perform
the function. Voice commands are also available.
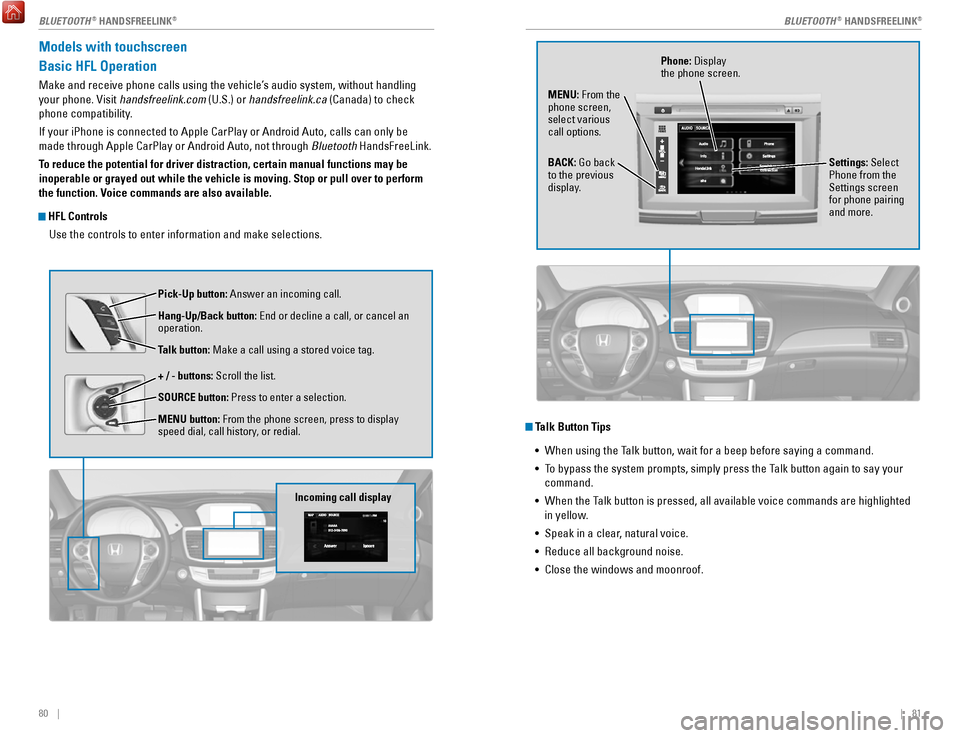
HFL Controls
Use the controls to enter information and make selections.
Pick-Up button: Answer an incoming call.
Hang-Up/Back button:
end or decline a call, or cancel an
operation.
Talk button:
Make a call using a stored voice tag.
+ / - buttons: Scroll the list.
SOURCE button: Press to enter a selection.
MENU button: From the phone screen, press to display
speed dial, call history, or redial.
Incoming call display
Talk Button Tips •
When using the Talk button, wait for a beep before saying a command.
•
To bypass the system prompts, simply press the Talk button again to say your
command.
•
When the Talk button is pressed, all available voice commands are highlighted
in yellow
.
•
Speak in a clear, natural voice.
•
reduce all background noise.
•
Close the windows and moonroof.
Phone: Display
the phone screen.
MENU: From the
phone screen,
select various
call options.
BACK: Go back
to the previous
display. Settings: Select
Phone from the
Settings screen
for phone pairing
and more.
BLUETOOTH® HANDSFreeLINK®BLUETOOTH® HANDSFreeLINK®
Page 46 of 80
84 || 85
Using Speed Dial and Call History
Make calls quickly using stored speed dial entries or call history numbe\
rs.
Using voice commands
Press the Talk button before you say each command.
1.
Say “Dial by name.”
2.
Say the stored voice tag name. For example,
“John Smith.”
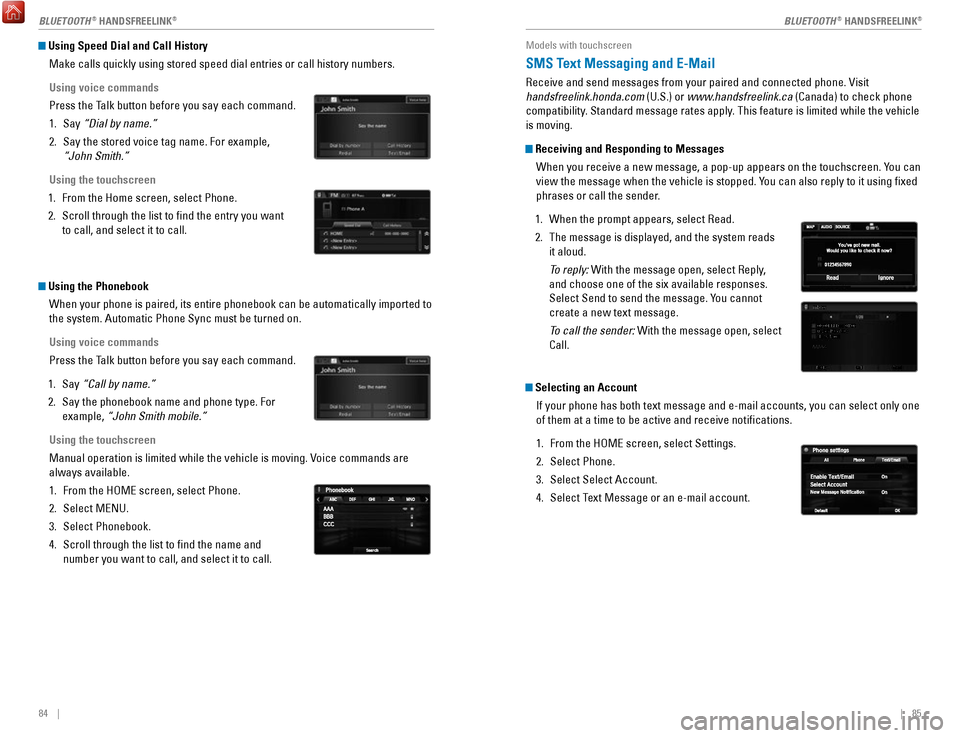
Using the touchscreen
1.
From the Home screen, select Phone.
2.
Scroll through the list to find the entry you want
to call, and select it to call.
Using the Phonebook When your phone is paired, its entire phonebook can be automatically imp\
orted to
the system. Automatic Phone Sync must be turned on.
Using voice commands
Press the Talk button before you say each command.
1.
Say “Call by name.”
2.
Say the phonebook name and phone type. For
example, “John Smith mobile.”
Using the touchscreen
Manual operation is limited while the vehicle is moving.
voice commands are
always available.
1.
From the HoMe screen, select Phone.
2.
Select MeNU.
3.
Select Phonebook.
4.
Scroll through the list to find the name and
number you want to call, and select it to call.
Models with touchscreen
SMS Text Messaging and E-Mail
receive and send messages from your paired and connected phone. visit
handsfreelink.honda.com (U.S.) or www .handsfreelink.ca (Canada) to check phone
compatibility. Standard message rates apply. This feature is limited while the vehicle
is moving.
Receiving and Responding to Messages
When you receive a new message, a pop-up appears on the touchscreen. You can
view the message when the vehicle is stopped. You can also reply to it using fixed
phrases or call the sender.
1.
When the prompt appears, select read.
2.
The message is displayed, and the system reads
it aloud.
To reply: With the message open, select reply,
and choose one of the six available responses.
Select Send to send the message. Y
ou cannot
create a new text message.
To call the sender: With the message open, select
Call.
Selecting an Account
If your phone has both text message and e-mail accounts, you can select \
only one
of them at a time to be active and receive notifications.
1.
From the HoMe screen, select Settings.
2.
Select Phone.
3.
Select Select Account.
4.
Select Text Message or an e-mail account.
BLUETOOTH® HANDSFreeLINK®BLUETOOTH® HANDSFreeLINK®
Page 47 of 80
86 || 87
Models with touchscreen
HondaLink® Assist
Automatically attempts to connect and talk to an operator who can locate\
your
vehicle and send emergency help in the event of a collision.
visit www
.hondalink.
com (U.S.) or honda.ca/hondalinkassist (Canada) for more information.
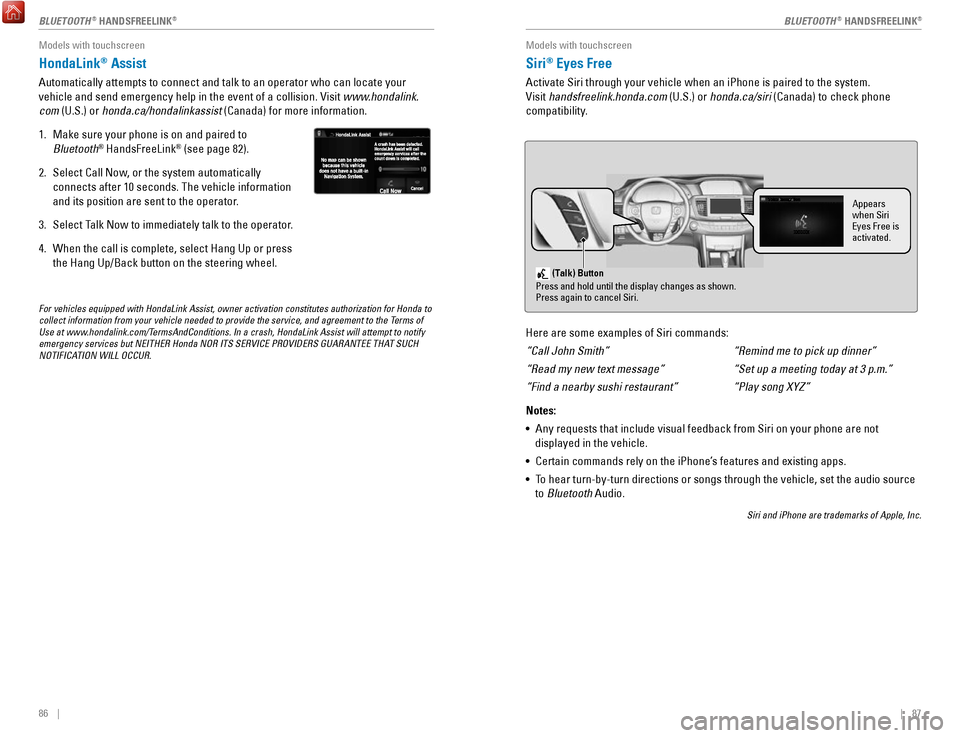
1.
Make sure your phone is on and paired to
Bluetooth® HandsFreeLink® (see page 82).
2.
Select Call Now, or the system automatically
connects after 10 seconds. The vehicle information
and its position are sent to the operator.
3.
Select Talk Now to immediately talk to the operator.
4.
When the call is complete, select Hang Up or press
the Hang Up/Back button on the steering wheel.
For vehicles equipped with HondaLink Assist, owner activation constitute\
s authorization for Honda to
collect information from your vehicle needed to provide the service, and\
agreement to the Terms of
Use at www.hondalink.com/TermsAndConditions. In a crash, HondaLink Assist will attempt to notify
emergency services but NEITHER Honda NOR ITS SERVICE PROVIDERS GUARANTEE\
THAT SUCH
NOTIFICATION WILL OCCUR.
Models with touchscreen
Siri® Eyes Free
Activate Siri through your vehicle when an iPhone is paired to the syste\
m.
visit handsfreelink.honda.com
(U.S.) or honda.ca/siri (Canada) to check phone
compatibility.
(Talk) Button
Press and hold until the display changes as shown.
Press again to cancel Siri.
Appears
when Siri
Eyes Free is
activated.
Here are some examples of Siri commands:
“Call John Smith”
“Read my new text message”
“Find a nearby sushi restaurant”
Notes:
•
Any requests that include visual feedback from Siri on your phone are no\
t
displayed in the vehicle.
•
Certain commands rely on the iPhone’s features and existing apps.
•
To hear turn-by-turn directions or songs through the vehicle, set the aud\
io source
to Bluetooth
Audio.
Siri and iPhone are trademarks of Apple, Inc.
“Remind me to pick up dinner”
“Set up a meeting today at 3 p.m.”
“Play song XYZ”
BLUETOOTH® HANDSFreeLINK®BLUETOOTH® HANDSFreeLINK®
Page 48 of 80
88 || 89
NAVIGATION
NAVIGATION
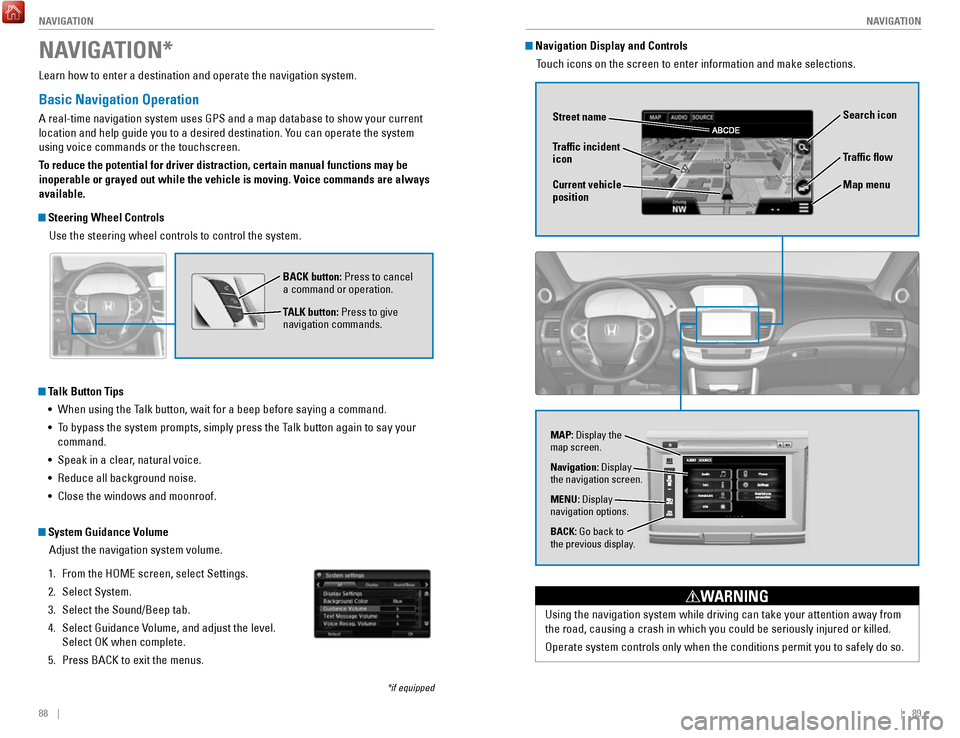
Learn how to enter a destination and operate the navigation system.
Basic Navigation Operation
A real-time navigation system uses GPS and a map database to show your current
location and help guide you to a desired destination. You can operate the system
using voice commands or the touchscreen.
To reduce the potential for driver distraction, certain manual functions \
may be
inoperable or grayed out while the vehicle is moving. Voice commands are always
available.
Steering Wheel Controls
Use the steering wheel controls to control the system.
NAVIGATION*
*if equipped
BACK button: Press to cancel
a command or operation.
TALK button: Press to give
navigation commands.
Talk Button Tips•
When using the Talk button, wait for a beep before saying a command.
•
To bypass the system prompts, simply press the Talk button again to say your
command.
•
Speak in a clear, natural voice.
•
reduce all background noise.
•
Close the windows and moonroof.
System Guidance Volume Adjust the navigation system volume.
1.
From the HoMe screen, select Settings.
2.
Select System.
3.
Select the Sound/Beep tab.
4.
Select Guidance volume, and adjust the level.
Select
oK when complete.
5.
Press BACK to exit the menus.
Using the navigation system while driving can take your attention away f\
rom
the road, causing a crash in which you could be seriously injured or kil\
led.
operate system controls only when the conditions permit you to safely do \
so.
WARNING
Navigation Display and Controls Touch icons on the screen to enter information and make selections.
Navigation: Display
the navigation screen.
BACK: Go back to
the previous display. MENU: Display
navigation options.
Traffic flow
Current vehicle
position Traffic incident
icon
Search icon
Map menu
MAP: Display the
map screen.
Street name
Page 50 of 80
92 || 93
NAVIGATION
NAVIGATION
Saved Places
Save locations so you can quickly route to them.
Saving a location
1.
From the map screen, press MeNU.
2.
Select Where To?.
3.
Select enter Search.
4.
enter the address or place name.
5.
Select the destination name when it appears on
the map screen.
6.
Select the menu icon.
7.
Select Save.
8.
Select oK.
You can also save your current location. From the
map screen, select the vehicle icon. Select Save.
enter a name for the location.
Select Done. Select
oK.
Routing to a saved location
1.
From the map screen, press MeNU.
2.
Select Where To?.
3.
Select Saved.
4.
Select the destination from the list.
5.
Select Go!.
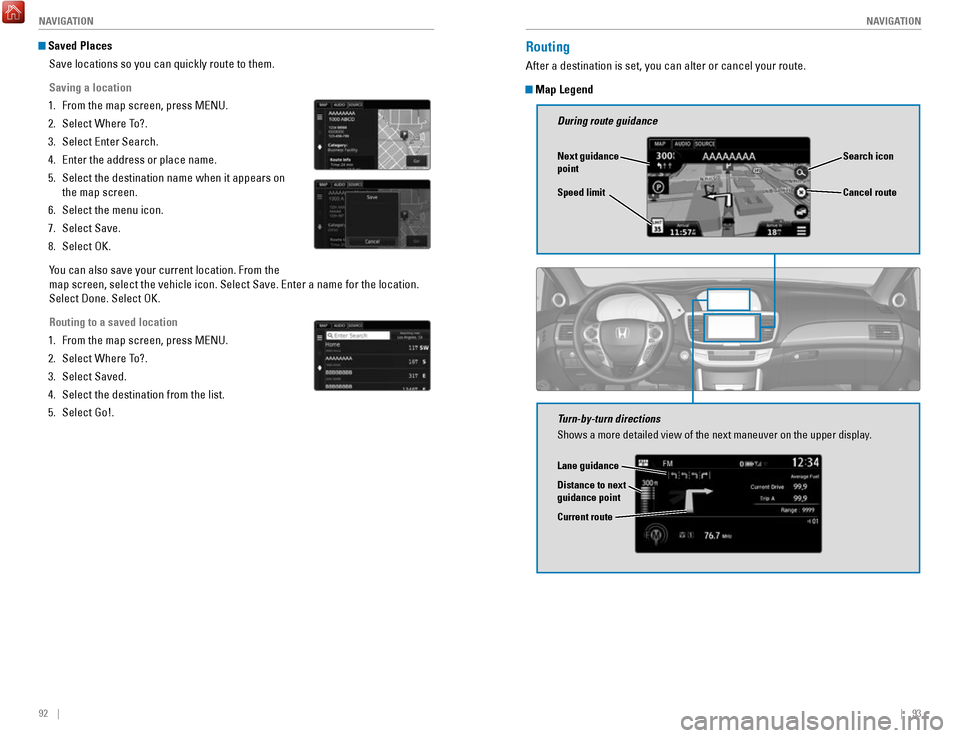
Routing
After a destination is set, you can alter or cancel your route.
Map Legend
During route guidance
Next guidance
point
Speed limit Search icon
Turn-by-turn directions
Shows a more detailed view of the next maneuver on the upper display.
Distance to next
guidance point Lane guidance
Cancel route
Current route
Page 51 of 80
94 || 95
DRIVING
NAVIGATION
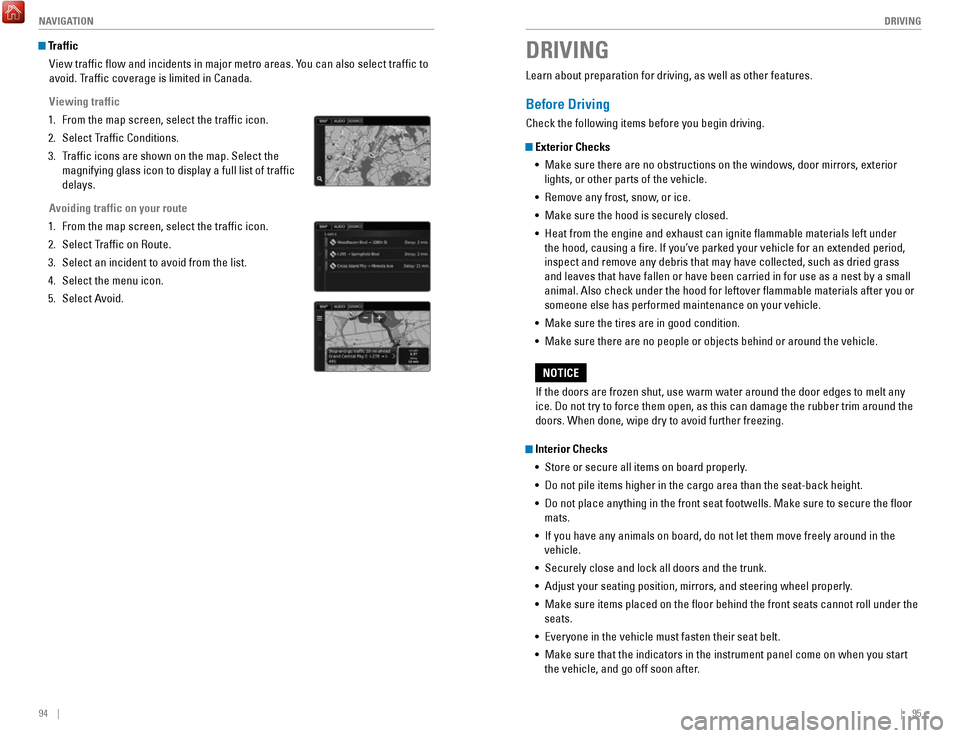
Traffic
view traffic flow and incidents in major metro areas. You can also select traffic to
avoid. T
raffic coverage is limited in Canada.
Viewing traffic
1.
From the map screen, select the traffic icon.
2.
Select Traffic Conditions.
3.
Traffic icons are shown on the map. Select the
magnifying glass icon to display a full list of traffic
delays.
Avoiding traffic on your route
1.
From the map screen, select the traffic icon.
2.
Select Traffic on route.
3.
Select an incident to avoid from the list.
4.
Select the menu icon.
5.
Select Avoid.
DRIVING
Learn about preparation for driving, as well as other features.
Before Driving
Check the following items before you begin driving.
Exterior Checks •
Make sure there are no obstructions on the windows, door mirrors, exteri\
or
lights, or other parts of the vehicle.
•
remove any frost, snow, or ice.
•
Make sure the hood is securely closed.
•
Heat from the engine and exhaust can ignite flammable materials left u\
nder
the hood, causing a fire. If you’ve parked your vehicle for an exte\
nded period,
inspect and remove any debris that may have collected, such as dried gra\
ss and leaves that have fallen or have been carried in for use as a nest by\
a small animal. Also check under the hood for leftover flammable materials aft\
er you or
someone else has performed maintenance on your vehicle.
•
Make sure the tires are in good condition.
•
Make sure there are no people or objects behind or around the vehicle.
Interior Checks •
Store or secure all items on board properly.
•
Do not pile items higher in the cargo area than the seat-back height.
•
Do not place anything in the front seat footwells. Make sure to secure t\
he floor
mats.
•
If you have any animals on board, do not let them move freely around in \
the
vehicle.
•
Securely close and lock all doors and the trunk.
•
Adjust your seating position, mirrors, and steering wheel properly.
•
Make sure items placed on the floor behind the front seats cannot roll\
under the
seats.
•
everyone in the vehicle must fasten their seat belt.
•
Make sure that the indicators in the instrument panel come on when you s\
tart
the vehicle, and go off soon after.
If the doors are frozen shut, use warm water around the door edges to me\
lt any
ice. Do not try to force them open, as this can damage the rubber trim a\
round the
doors. When done, wipe dry to avoid further freezing.
NOTICE
Page 55 of 80
102 || 103
DRIVING
DRIVING
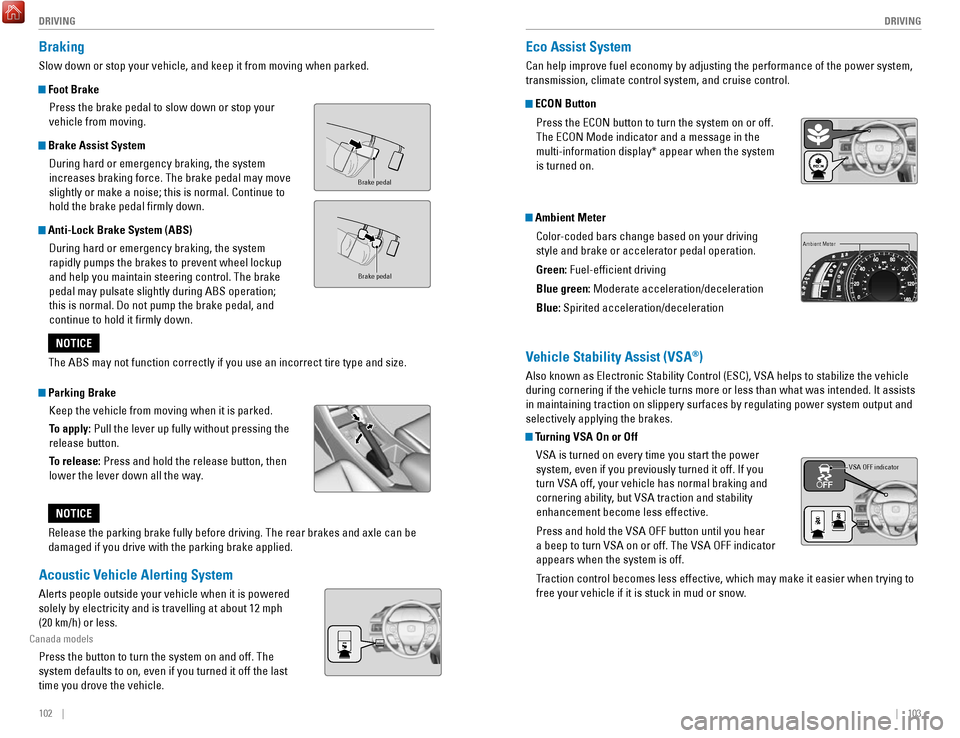
Braking
Slow down or stop your vehicle, and keep it from moving when parked.
Foot Brake
Press the brake pedal to slow down or stop your
vehicle from moving.
Brake Assist System During hard or emergency braking, the system
increases braking force. The brake pedal may move
slightly or make a noise; this is normal. Continue to
hold the brake pedal firmly down.
Anti-Lock Brake System (ABS) During hard or emergency braking, the system
rapidly pumps the brakes to prevent wheel lockup
and help you maintain steering control. The brake
pedal may pulsate slightly during ABS operation;
this is normal. Do not pump the brake pedal, and
continue to hold it firmly down.
Parking BrakeKeep the vehicle from moving when it is parked.
To apply: Pull the lever up fully without pressing the
release button.
To release: Press and hold the release button, then
lower the lever down all the way.
Brake peda l
Brake pedal
The ABS may not function correctly if you use an incorrect tire type and\
size.
NOTICE
release the parking brake fully before driving. The rear brakes and axle \
can be
damaged if you drive with the parking brake applied.
NOTICE
Acoustic Vehicle Alerting System
Alerts people outside your vehicle when it is powered
solely by electricity and is travelling at about 12 mph
(20 km/h) or less.
Canada models
Press the button to turn the system on and off. The
system defaults to on, even if you turned it off the last
time you drove the vehicle.
Eco Assist System
Can help improve fuel economy by adjusting the performance of the power \
system,
transmission, climate control system, and cruise control.
ECON Button
Press the
eCoN button to turn the system on or off.
The
eCoN Mode indicator and a message in the
multi-information display* appear when the system
is turned on.
Ambient Meter
Color-coded bars change based on your driving
style and brake or accelerator pedal operation.
Green: Fuel-efficient driving
Blue green: Moderate acceleration/deceleration
Blue: Spirited acceleration/deceleration
Ambient Meter
Vehicle Stability Assist (VSA®)
Also known as electronic Stability Control (eSC), vSA helps to stabilize the vehicle
during cornering if the vehicle turns more or less than what was intende\
d. It assists
in maintaining traction on slippery surfaces by regulating power system \
output and
selectively applying the brakes.
Turning VSA On or Off
vSA is turned on every time you start the power
system, even if you previously turned it off. If you
turn
vSA off, your vehicle has normal braking and
cornering ability, but
vSA traction and stability
enhancement become less effective.
Press and hold the
vSA oFF button until you hear
a beep to turn
vSA on or off. The vSA oFF indicator
appears when the system is off.
Traction control becomes less effective, which may make it easier when t
rying to
free your vehicle if it is stuck in mud or snow.
VSA OFF indicator
Page 56 of 80
104 || 105
DRIVING
DRIVING
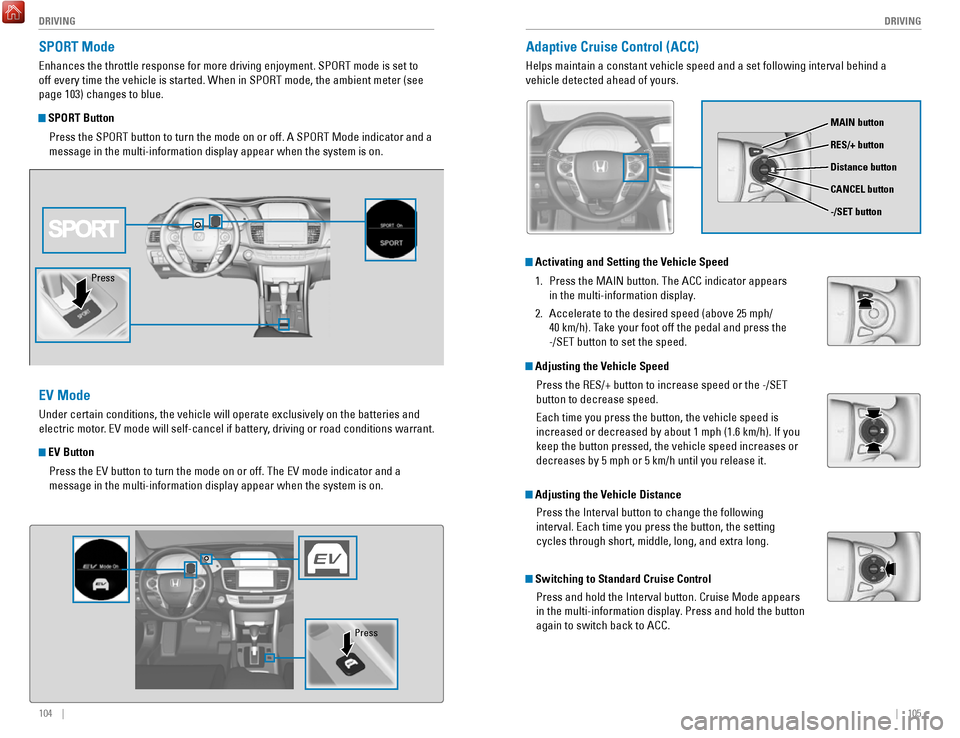
SPORT Mode
enhances the throttle response for more driving enjoyment. SPorT mode is set to
off every time the vehicle is started. When in SP
orT mode, the ambient meter (see
page 103) changes to blue.
SPORT Button
Press the SP
orT button to turn the mode on or off. A SPorT Mode indicator and a
message in the multi-information display appear when the system is on.
EV Mode
Under certain conditions, the vehicle will operate exclusively on the ba\
tteries and
electric motor.
ev mode will self-cancel if battery, driving or road conditions warrant.
EV Button
Press the
ev button to turn the mode on or off. The ev mode indicator and a
message in the multi-information display appear when the system is on.
Press
Press
Adaptive Cruise Control (ACC)
Helps maintain a constant vehicle speed and a set following interval beh\
ind a
vehicle detected ahead of yours.
Activating and Setting the Vehicle Speed
1.
Press the MAIN button. The ACC indicator appears
in the multi-information display.
2.
Accelerate to the desired speed (above 25 mph/
40 km/h). Take your foot off the pedal and press the
-/S
eT button to set the speed.
Adjusting the Vehicle Speed
Press the
reS/+ button to increase speed or the -/SeT
button to decrease speed.
each time you press the button, the vehicle speed is
increased or decreased by about 1 mph (1.6 km/h). If you
keep the button pressed, the vehicle speed increases or
decreases by 5 mph or 5 km/h until you release it.
Adjusting the Vehicle Distance
Press the Interval button to change the following
interval.
each time you press the button, the setting
cycles through short, middle, long, and extra long.
Switching to Standard Cruise Control
Press and hold the Interval button. Cruise Mode appears
in the multi-information display. Press and hold the button
again to switch back to ACC.
MAIN button
RES/+ button
CANCEL button
-/SET button
Distance button
Page 57 of 80
106 || 107
DRIVING
DRIVING
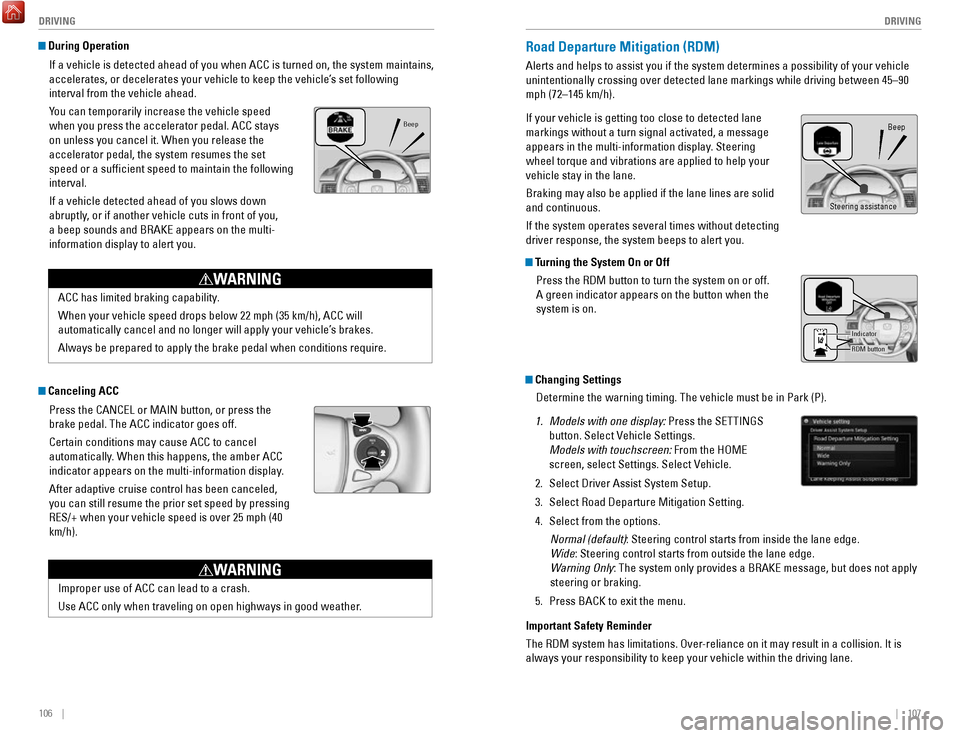
During Operation
If a vehicle is detected ahead of you when ACC is turned on, the system \
maintains,
accelerates, or decelerates your vehicle to keep the vehicle’s set following
interval from the vehicle ahead.
You can temporarily increase the vehicle speed
when you press the accelerator pedal. ACC stays
on unless you cancel it. When you release the
accelerator pedal, the system resumes the set
speed or a sufficient speed to maintain the following
interval.
If a vehicle detected ahead of you slows down
abruptly, or if another vehicle cuts in front of you,
a beep sounds and B
rAKe appears on the multi-
information display to alert you.
ACC has limited braking capability.
When your vehicle speed drops below 22 mph (35 km/h), ACC will
automatically cancel and no longer will apply your vehicle’
s brakes.
Always be prepared to apply the brake pedal when conditions require.
WARNING
Canceling ACC
Press the CANC
eL or MAIN button, or press the
brake pedal. The ACC indicator goes off.
Certain conditions may cause ACC to cancel
automatically. When this happens, the amber ACC
indicator appears on the multi-information display
.
After adaptive cruise control has been canceled,
you can still resume the prior set speed by pressing
reS/+ when your vehicle speed is over 25 mph (40
km/h).
Improper use of ACC can lead to a crash.
Use ACC only when traveling on open highways in good weather.
WARNING
Beep
Road Departure Mitigation (RDM)
Alerts and helps to assist you if the system determines a possibility of\
your vehicle
unintentionally crossing over detected lane markings while driving betwe\
en 45–90
mph (72–145 km/h).
If your vehicle is getting too close to detected lane
markings without a turn signal activated, a message
appears in the multi-information display. Steering
wheel torque and vibrations are applied to help your
vehicle stay in the lane.
Braking may also be applied if the lane lines are solid
and continuous.
If the system operates several times without detecting
driver response, the system beeps to alert you.
Changing Settings
Determine the warning timing. The vehicle must be in Park (P).
1.
Models with one display: Press the SeTTINGS
button. Select
vehicle Settings.
Models with touchscreen: From the H
oMe
screen, select Settings. Select
vehicle.
2.
Select Driver Assist System Setup.
3.
Select road Departure Mitigation Setting.
4.
Select from the options. Normal (default): Steering control starts from inside the lane edge.
Wide: Steering control starts from outside the lane edge.
W
arning Only: The system only provides a B
rAKe message, but does not apply
steering or braking.
5.
Press BACK to exit the menu.
Important Safety Reminder
The
rDM system has limitations. over-reliance on it may result in a collision. It is
always your responsibility to keep your vehicle within the driving lane.\
Beep
Turning the System On or Off
Press the
rDM button to turn the system on or off.
A green indicator appears on the button when the
system is on.
RDM button
Indicator
Steering assistance