fuel HONDA ACCORD SEDAN 2001 Owner's Manual (in English)
[x] Cancel search | Manufacturer: HONDA, Model Year: 2001, Model line: ACCORD SEDAN, Model: HONDA ACCORD SEDAN 2001Pages: 372, PDF Size: 6.1 MB
Page 1 of 372

2001 Accord Sedan Online Reference Owner's Manual
Use these links (and links throughout this manual) to navigate through this reference.
For a printed owner's manual, click on authorized manuals or go to www.helminc.com. Contents
Introduction ......................................................................................................................................... i
A Few Words About Safety.................................................................................................................ii
Your Vehicle at a Glance.....................................................................................................................2
Driver and Passenger Safety ..............................................................................................................5
Proper use and care of your vehicle's seat belts, and Supplemental Restraint System.
Instruments and Controls.................................................................................................................51
Instrument panel indicator and gauge, and how to use dashboard and steering column controls.
Comfort and Convenience Features ..............................................................................................109
How to operate the climate control system, the audio system, and other convenience features.
Before Driving..................................................................................................................................177
What gasoline to use, how to break-in your new vehicle, and how to load luggage and other cargo.
Driving ..............................................................................................................................................191
The proper way to start the engine, shift the transmission, and park, plus towing a trailer.
Maintenance.....................................................................................................................................219
The Maintenance Schedule shows you when you need to take your vehicle to the dealer.
Appearance Care..............................................................................................................................287
Tips on cleaning and protecting your vehicle. Things to look for if your vehicle ever needs body repairs.
Taking Care of the Unexpected......................................................................................................295
This section covers several problems motorists sometimes experience, and how to handle them.
Technical Information.....................................................................................................................323
ID numbers, dimensions, capacities, and technical information.
Warranty and Customer Relations (U.S. and Canada)................................................................339
A summary of the warranties covering your new Acura, and how to contact us.
Authorized Manuals (U.S. only)......................................................................................................345
How to order manuals and other technical literature.
Index...................................................................................................................................................... I
Service Information Summary
A summary of information you need when you pull up to the fuel pump.
Accord Value Package Audio System
Owner's Identification Form
Page 5 of 372
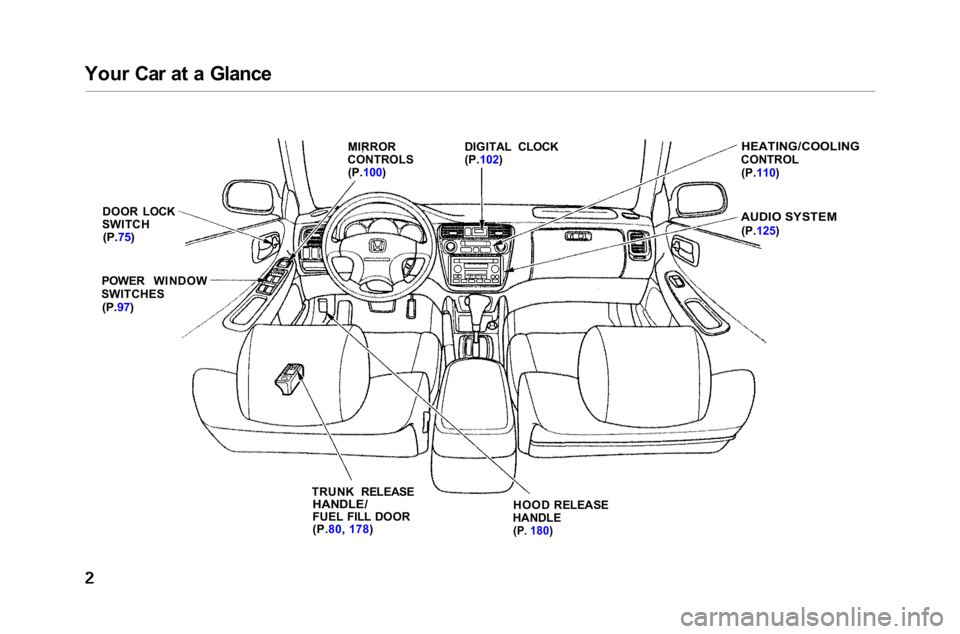
Your Car at a Glance
DOOR LOCK
SWITCH
(P.75)
POWER WINDOW
SWITCHES
(P.97)
MIRROR
CONTROLS (P.100)
HEATING/COOLING
CONTROL (P.110)
AUDIO SYSTEM
(P.125)
TRUNK RELEASE
HANDLE/
FUEL FILL DOOR
(P.80, 178) HOOD RELEASE
HANDLE
(P.
180)
DIGITAL CLOCK
(P.102)
Page 54 of 372
Instruments and Controls
This section gives information about
the controls and displays thatcontribute to the daily operation of
your Honda. All the essential
controls are within easy reach.
Control Locations............................ 52
Indicator Lights................................ 53
Gauges.............................................. 58
Speedometer................................ 58
Tachometer.................................. 58
Odometer...................................... 58
Trip Meter.................................... 59
Temperature Gauge.................... 59
Fuel Gauge................................... 59
Maintenance Required
Indicator.................................... 60
Controls Near the Steering Wheel........................................ 61
Headlights.................................... 62
Automatic Lighting Off Feature...................................... 63
Daytime Running Lights............. 63 Instrument Panel Brightness..... 63
Turn Signals................................. 64
Windshield Wipers...................... 64
Windshield Washers................... 66
Hazard Warning........................... 66
Rear Window Defogger.............. 66
Steering Wheel Adjustment....... 67
Steering Wheel Controls ................ 68 Cruise Control.............................. 68
Remote Audio Controls .............. 70
Keys and Locks................................ 71
Keys...............................................71
Immobilizer System..................... 72
Ignition Switch............................. 73
Door Locks................................... 74
Power Door Locks....................... 75
Remote Transmitter.................... 76Childproof Door Locks............... 80
Trunk............................................ 80 Inside Trunk Opener................... 82
Glove Box..................................... 82
HomeLink Universal Transmitter......... 83
Seat Adjustments............................. 88
Front Seat Adjustments.............. 88
Driver's Seat Manual Height
Adjustment............................... 89
Driver's Seat Power Height
Adjustment............................... 89
Driver's Seat Full Power
Adjustments............................. 90
Driver's Lumbar Support............ 91
Front Passenger's Seat
Adjustments............................. 92
Head Restraints........................... 92
Folding Rear Seat........................ 93
Rear Seat Armrest....................... 94
Trunk Pass-through Cover......... 95
Seat Heaters..................................... 96
Power Windows............................... 97
Moonroof.......................................... 98
Mirrors.............................................. 99
Adjusting the Power Mirrors... 100
Parking Brake................................ 101
Digital Clock................................... 102
Console Compartment.................. 103
Coin Box......................................... 103
Beverage Holder............................ 104
Sun Visor......................................... 105
Vanity Mirror................................. 105
Sunglasses Holder......................... 106
Accessory Power Socket.............. 106
Interior Lights................................ 107
Instruments and Controls
Page 55 of 372
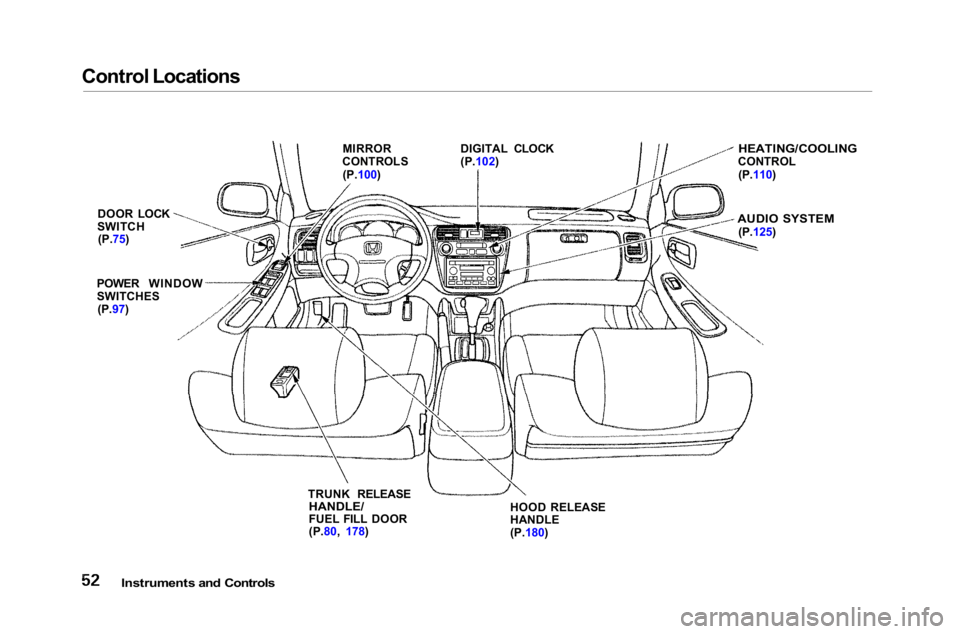
Control Locations
Instruments and Controls
MIRROR
CONTROLS
(P.100) DIGITAL CLOCK
(P.102)
HEATING/COOLING
CONTROL
(P.110)
AUDIO SYSTEM
(P.125)
HOOD RELEASE
HANDLE
(P.180)
TRUNK RELEASE
HANDLE/
FUEL FILL DOOR
(P.80, 178)
DOOR LOCK
SWITCH (P.75)
POWER WINDOW
SWITCHES (P.97)
Page 56 of 372
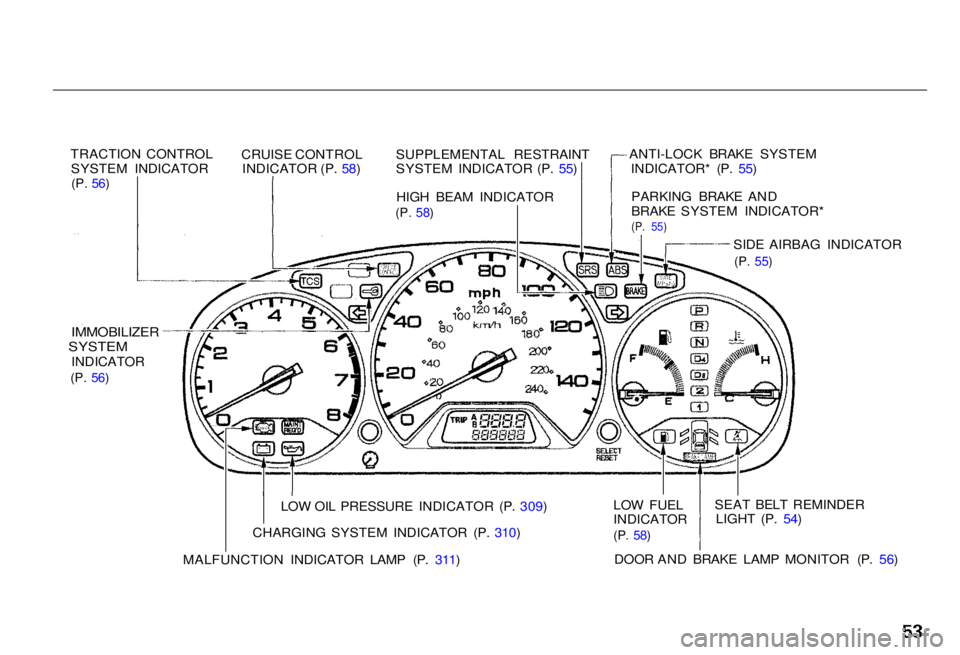
Indicator Lights
TRACTION CONTROLSYSTEM INDICATOR
(P. 56)
CRUISE CONTROLINDICATOR (P. 58)SUPPLEMENTAL RESTRAINT SYSTEM INDICATOR (P. 55)
HIGH BEAM INDICATOR
(P. 58)
ANTI-LOCK BRAKE SYSTEMINDICATOR* (P. 55)
PARKING BRAKE AND BRAKE SYSTEM INDICATOR*
(P. 55)
SIDE AIRBAG INDICATOR
(P. 55)
IMMOBILIZER
SYSTEM
INDICATOR
(P. 56)
LOW OIL PRESSURE INDICATOR (P. 309)
CHARGING SYSTEM INDICATOR (P. 310)
MALFUNCTION INDICATOR LAMP (P. 311)
LOW FUEL INDICATOR
(P. 58)
SEAT BELT REMINDERLIGHT (P. 54)
DOOR AND BRAKE LAMP MONITOR (P. 56)
* The U.S. instrument panel is shown. Differences for the Canadian models are noted in the text.
Instruments and Controls
TRACTION CONTROLSYSTEM INDICATOR
(P. 56)
CRUISE CONTROLINDICATOR (P. 58)SUPPLEMENTAL RESTRAINT SYSTEM INDICATOR (P. 55)
HIGH BEAM INDICATOR
(P. 58)
ANTI-LOCK BRAKE SYSTEMINDICATOR* (P. 55)
PARKING BRAKE AND BRAKE SYSTEM INDICATOR*
(P. 55)
SIDE AIRBAG INDICATOR
(P. 55)
IMMOBILIZER
SYSTEM
INDICATOR
(P. 56)
LOW OIL PRESSURE INDICATOR (P. 309)
CHARGING SYSTEM INDICATOR (P. 310)
MALFUNCTION INDICATOR LAMP (P. 311)
LOW FUEL INDICATOR
(P. 58)
SEAT BELT REMINDERLIGHT (P. 54)
DOOR AND BRAKE LAMP MONITOR (P. 56)
Page 60 of 372
Indicator Lights
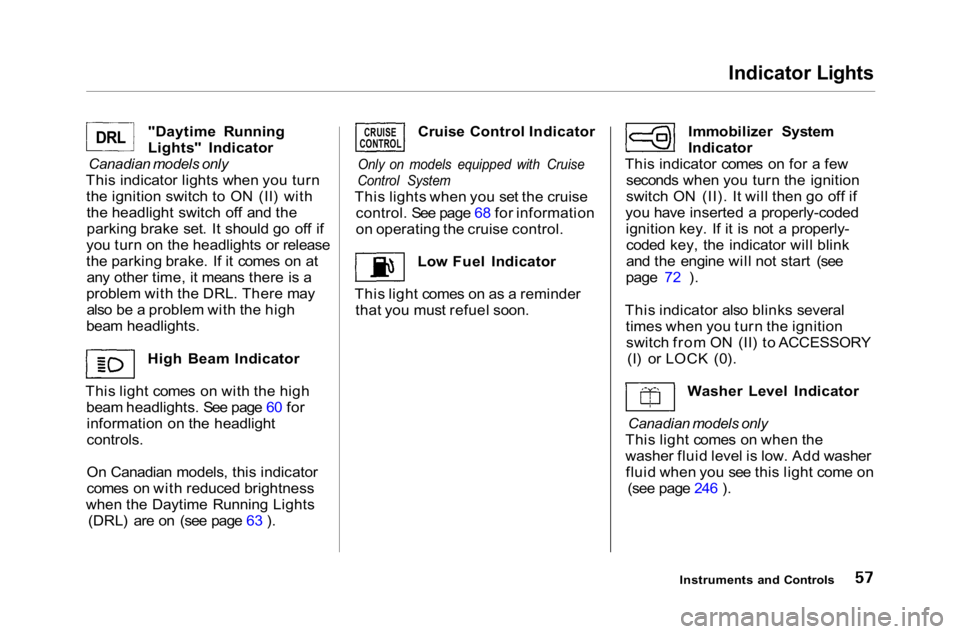
"Daytime Running
Lights" Indicator
Canadian models only
This indicator lights when you turn the ignition switch to ON (II) withthe headlight switch off and the
parking brake set. It should go off if
you turn on the headlights or release
the parking brake. If it comes on at any other time, it means there is a
problem with the DRL. There may also be a problem with the high
beam headlights.
High Beam Indicator
This light comes on with the high beam headlights. See page 60 forinformation on the headlight
controls.
On Canadian models, this indicator
comes on with reduced brightness
when the Daytime Running Lights (DRL) are on (see page 63 ). Cruise Control Indicator
Only on models equipped with Cruise
Control System
This lights when you set the cruise control. See page 68 for information
on operating the cruise control.
Low Fuel Indicator
This light comes on as a reminder that you must refuel soon. Immobilizer System
Indicator
This indicator comes on for a few seconds when you turn the ignition
switch ON (II). It will then go off if
you have inserted a properly-coded ignition key. If it is not a properly-coded key, the indicator will blink
and the engine will not start (see
page 72 ).
This indicator also blinks several times when you turn the ignitionswitch from ON (II) to ACCESSORY (I) or LOCK (0).
Washer Level Indicator
Canadian models only
This light comes on when the
washer fluid level is low. Add washer fluid when you see this light come on (see page 246 ).
Instruments and Controls
CRUISE
CONTROL
DRL
Page 61 of 372
Gauges
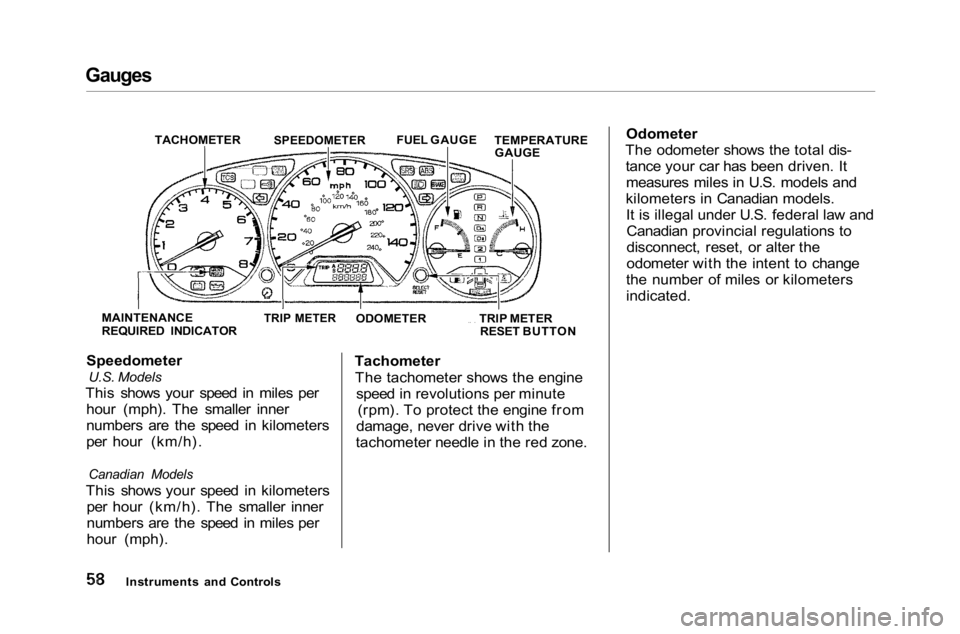
Speedometer
U.S. Models
This shows your speed in miles per hour (mph). The smaller inner
numbers are the speed in kilometers
per hour (km/h).
Canadian Models
This shows your speed in kilometers per hour (km/h). The smaller inner
numbers are the speed in miles per
hour (mph). Tachometer
The tachometer shows the engine speed in revolutions per minute (rpm). To protect the engine from
damage, never drive with the
tachometer needle in the red zone. Odometer
The odometer shows the total dis- tance your car has been driven. Itmeasures miles in U.S. models and
kilometers in Canadian models. It is illegal under U.S. federal law andCanadian provincial regulations to
disconnect, reset, or alter the
odometer with the intent to change
the number of miles or kilometers
indicated.
Instruments and Controls
TACHOMETER
SPEEDOMETER
FUEL GAUGE
TEMPERATURE
GAUGE
TRIP METER RESET BUTTON
ODOMETER
TRIP METER
MAINTENANCE
REQUIRED INDICATOR
Page 62 of 372
Gauges
Trip Meter
This meter shows the number of miles (U.S.) or kilometers (Canada)driven since you last reset it.
There are two trip meters: Trip A and Trip B. Switch between these
displays by pressing the Select/
Reset button repeatedly. Each trip
meter works independently, so you
can keep track of two different
distances.
To reset a trip meter, display it and then press and hold the Select/Reset
button until the number resets to "0.0". Both trip meters will reset if
the vehicle's battery goes dead or isdisconnected. Temperature Gauge
This shows the temperature of the engine's coolant. During normal
operation, the pointer should rise
from the bottom white mark to about
the middle of the gauge. In severe driving conditions, such as very hot
weather or a long period of uphill driving, the pointer may rise to near
the upper grey zone. If it reaches the
red (Hot) mark, pull safely to the side of the road. Turn to page 239 for
instructions and precautions on
checking the engine's cooling
system.
Fuel Gauge
This shows how much fuel you have. It is most accurate when the car is on
level ground. It may show slightly
more or less than the actual amount
when you are driving on curvy or hilly roads.
4-cylinder models
The gauge stays at the same fuel level reading after you turn off the
ignition. When you add fuel, the
gauge slowly changes to the new reading after you turn the ignitionswitch back ON (II).
6-cylinder models
The needle returns to the bottom after you turn off the ignition. The
gauge shows the fuel level reading immediately after you turn the
ignition switch back ON (II).
Instruments and Controls
Page 75 of 372
Keys and Locks
Immobilizer System
The Immobilizer System protects your car from theft. A properly- coded master or valet key must be
used in the ignition switch for the engine to start. If an improperly-
coded key (or other device) is used,
the engine's fuel system is disabled.
When you turn the ignition switch to ON (II), the Immobilizer System
indicator should come on for a few seconds, then go out. If the indicator
starts to blink, it means the system
does not recognize the coding of the
key. Turn the ignition switch to LOCK (0), remove the key, reinsert
it, and turn the switch to ON (II)
again.
The system may not recognize your key's coding if another immobilizerkey or other metal object is near theignition switch when you insert the
key. To make sure the system
recognizes the key code: Do not keep other immobilizer
keys on the same key ring. Use a plastic or leather key fob,
not metal.
Keep other keys away from your
vehicle's key and the ignition switch while trying to start the
engine.
If the system repeatedly does not
recognize the coding of your key, contact your Honda dealer.
This indicator will also blink several times when you turn the ignitionswitch from ON (II) to ACCESSORY (I) or LOCK (0).
Do not attempt to alter this system or add other devices to it. Electrical
problems could result that may make
your car undriveable. If you have lost your key and you
cannot start the engine, contact your
Honda dealer.
As required by the FCC: This device complies with Part 15 of the
FCC rules. Operation is subject to the
following two conditions: (1) This device may not cause harmful interference, and (2) this device must accept any
interference received, including
interference that may cause undesired
operation.
Changes or modifications not expressly
approved by the party responsible for compliance could void the user's
authority to operate the equipment.
This device complies with Industry
Canada Standard RSS-210.
Operation is subject to the following two
conditions: (1) this device may not cause
interference, and (2) this device must
accept any interference that may cause undesired operation of the device.
Instruments and Controls
Page 180 of 372

Before Driving
Before you begin driving your Honda,
you should know what gasoline to use, and how to check the levels of
important fluids. You also need to
know how to properly store luggage or packages. The information in this
section will help you. If you plan to
add any accessories to your car,
please read the information in this section first. Break-in Period.............................. 178
Gasoline.......................................... 178
Service Station Procedures .......... 178 Filling the Fuel Tank................. 178Opening the Hood..................... 180 Oil Check................................ 182
Engine Coolant Check.......... 184
Fuel Economy................................ 185 Vehicle Condition...................... 185Driving Habits............................ 185
Accessories and Modifications.... 186 Carrying Cargo.............................. 188
Before Driving