HONDA CIVIC 1991 Repair Manual
Manufacturer: HONDA, Model Year: 1991, Model line: CIVIC, Model: HONDA CIVIC 1991Pages: 136, PDF Size: 1.33 MB
Page 61 of 136
Engine Exhaust Gas Warning
A properly maintained car is your best protection against exhaust
gas entering the passenger compartment.
The exhaust system should be thoroughly inspected by a compe-
tent mechanic whenever:
The car is raised for oil change.You notice a change in the sound of the exhaust. The exhaust system or the rear or underside of the car is
damaged.
Avoid breathing exhaust gases. They contain carbon monoxide,
which is a colorless, odorless gas that can cause loss of con-
sciousness and eventual death. If you suspect that exhaust gas is entering the passenger compartment, have the cause deter-mined and corrected as soon as possible. If you must driveunder these conditions, drive only with all windows fully open. Do not drive with the hatch/trunk lid open. An open hatch/trunk
may draw exhaust gases into the passenger compartment. If
you must drive with the hatch/trunk open, drive only with all the
windows wide open. Do not run the engine in confined areas, such as garages, any
longer than necessary to move the car in or out.
If you must sit in a parked car with the engine running for more
than a short time, adjust the heating/ventilation system as
follows:
1.Set the function lever to the position.
2.Set the temperature control dial for best comfort. 3.Set the recirculation lever to the position.
4.Turn the fan to the highest speed.
NOTE:
To insure proper operation of the car's ventilation system, keep the
front air inlet clear of snow, mud, leaves or other obstructions.ProCarManuals.comMain Menu s t
Page 62 of 136
Shifting the 4 or 5 Speed
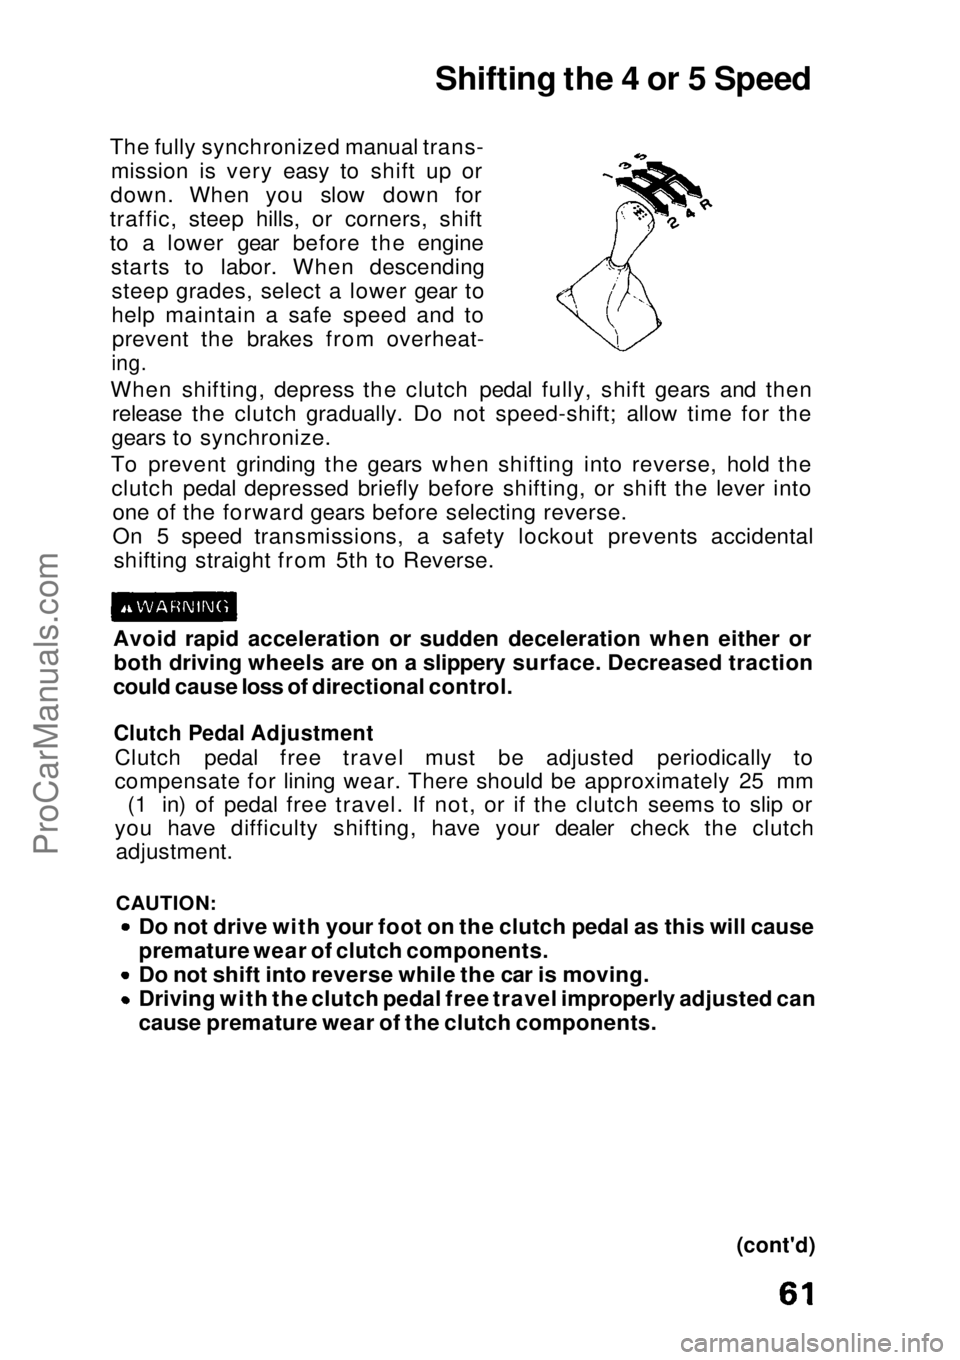
The fully synchronized manual trans- mission is very easy to shift up or
down. When you slow down for
traffic, steep hills, or corners, shift
to a lower gear before the engine starts to labor. When descendingsteep grades, select a lower gear to
help maintain a safe speed and toprevent the brakes from overheat-
ing.
When shifting, depress the clutch pedal fully, shift gears and then release the clutch gradually. Do not speed-shift; allow time for the
gears to synchronize.
To prevent grinding the gears when shifting into reverse, hold the clutch pedal depressed briefly before shifting, or shift the lever into one of the forward gears before selecting reverse.
On 5 speed transmissions, a safety lockout prevents accidentalshifting straight from 5th to Reverse.
Avoid rapid acceleration or sudden deceleration when either or both driving wheels are on a slippery surface. Decreased traction
could cause loss of directional control.
Clutch Pedal Adjustment
Clutch pedal free travel must be adjusted periodically to
compensate for lining wear. There should be approximately 25 mm (1 in) of pedal free travel. If not, or if the clutch seems to slip or
you have difficulty shifting, have your dealer check the clutch adjustment.
CAUTION:
Do not drive with your foot on the clutch pedal as this will cause
premature wear of clutch components.
Do not shift into reverse while the car is moving. Driving with the clutch pedal free travel improperly adjusted can
cause premature wear of the clutch components.
(cont'd)ProCarManuals.comMain Menu s t
Page 63 of 136
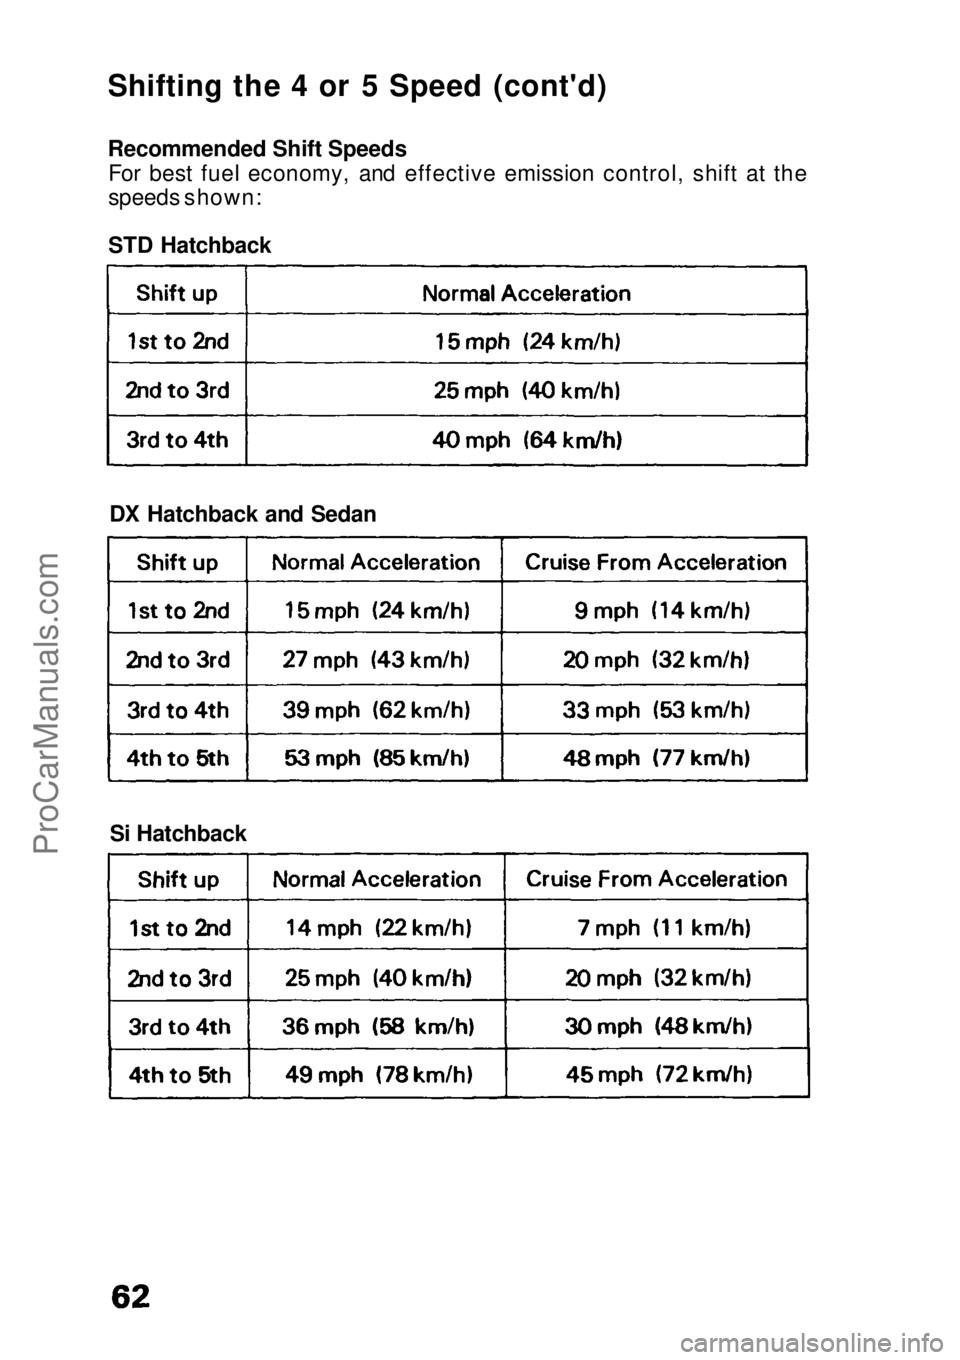
Shifting the 4 or 5 Speed (cont'd)
Recommende
d
Shift Speeds
For best fuel economy, and effective emission control, shift at the
speeds shown:
STD Hatchback
DX Hatchback and Sedan
Si Hatchback
ProCarManuals.comMain Menu s t
Page 64 of 136
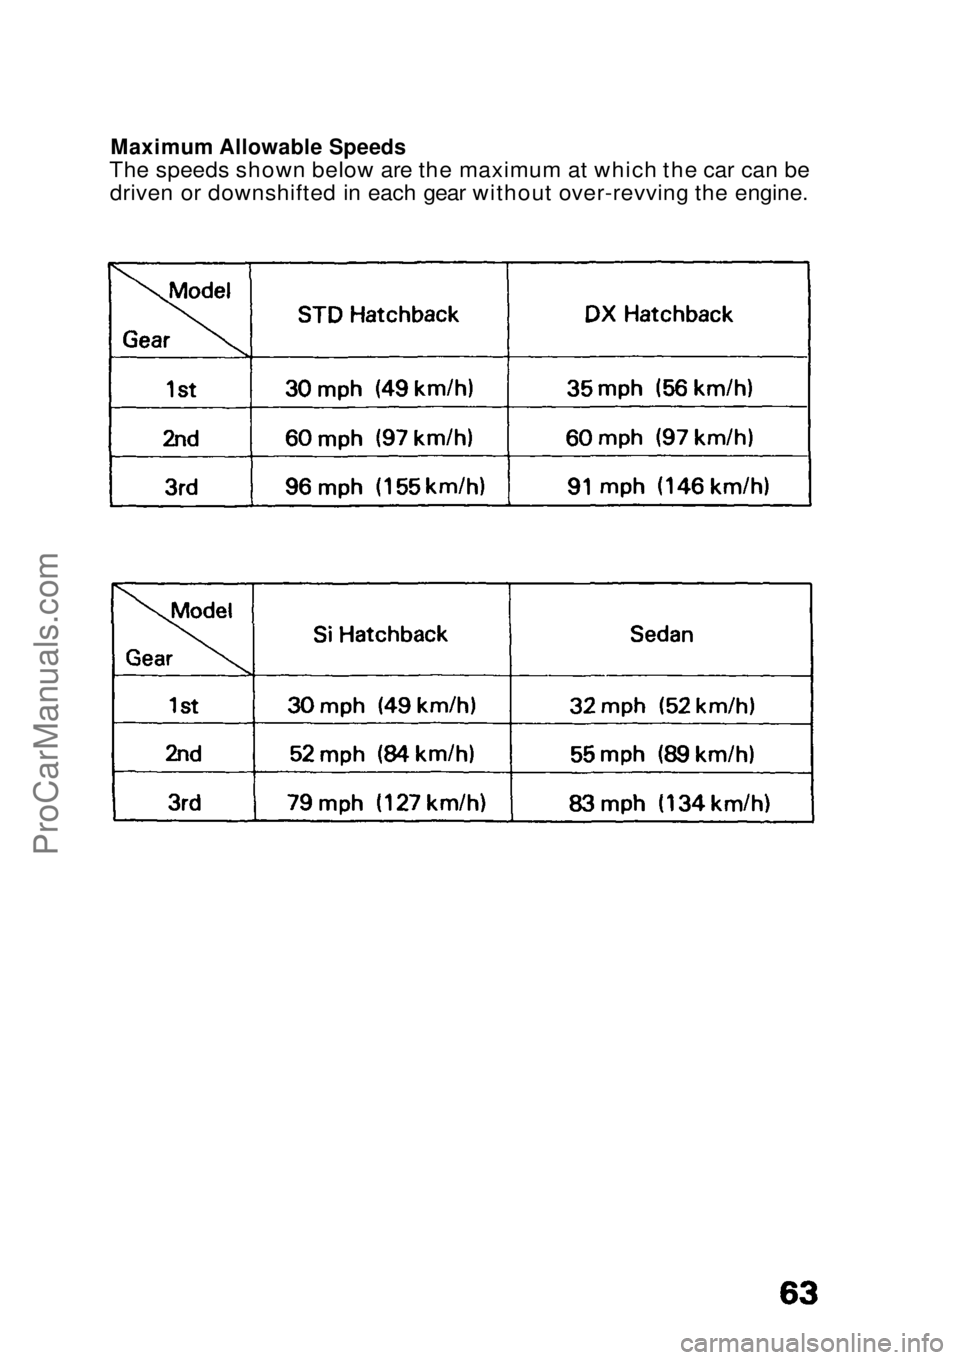
Maximum Allowable Speeds
The speeds shown below are the maximum at which the car can be driven or downshifted in each gear without over-revving the engine.ProCarManuals.comMain Menu s t
Page 65 of 136
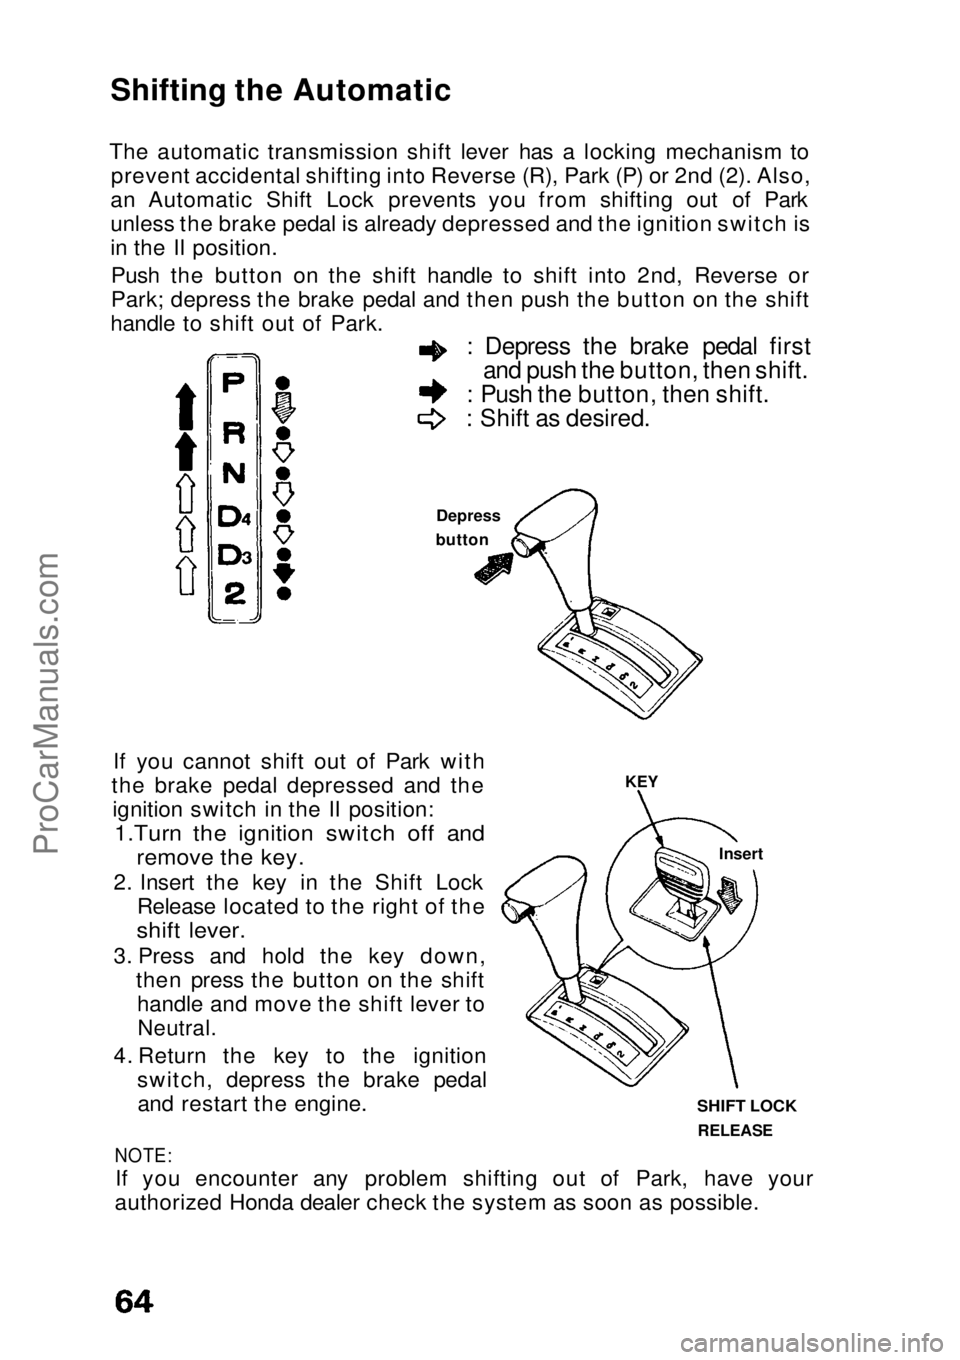
Shifting the Automatic
The automatic transmission shift lever has a locking mechanism to prevent accidental shifting into Reverse (R), Park (P) or 2nd (2). Also,
an Automatic Shift Lock prevents you from shifting out of Park
unless the brake pedal is already depressed and the ignition switch is
in the II position.
Push the button on the shift handle to shift into 2nd, Reverse or
Park; depress the brake pedal and then push the button on the shift
handle to shift out of Park. : Depress the brake pedal first
and push the button, then shift.
: Push the button, then shift.
: Shift as desired.
Depress
button
SHIFT LOCK
RELEASE
KEY
Insert
If you cannot shift out of Park with
the brake pedal depressed and the ignition switch in the II position:
1.Turn the ignition switch off and
remove the key.
2. Insert the key in the Shift Lock Release located to the right of the
shift lever.
3. Press and hold the key down, then press the button on the shifthandle and move the shift lever to
Neutral.
4. Return the key to the ignition switch, depress the brake pedaland restart the engine.
NOTE:
If you encounter any problem shifting out of Park, have your
authorized Honda dealer check the system as soon as possible.ProCarManuals.comMain Menu s t
Page 66 of 136

Operating Tips
For smoother operation, apply the brakes when shifting from
Neutral or Park to a forward or reverse gear.
When parking: bring the car to a stop with the foot brake, hold the brake on and shift into Park, set the hand brake and then turn off
the engine.
NOTE:
Your 4 speed automatic transmission is equipped with a torque
converter lock-up clutch. Because of this, you may notice what
feels like an extra shift as the clutch engages.
CAUTION:
Shift into P only after the car has come to a complete stop.
Shift into or out of R only after the car has come to a complete
stop.
Do not "rev-up" the engine when the brake is on and the shift
lever is in D4, D3, 2 or R.
When stopped on a hill, use the brakes to hold your position, not
the accelerator pedal.
Do not shift from N or P into D4, D3, 2 or R when the engine is
above idle speed. Before shifting into gear, make sure your foot is firmly on the brake pedal. Do not rest your hand on the shift lever or push the shift button
while driving.
(cont'd)ProCarManuals.comMain Menu s t
Page 67 of 136

Driving Technique
D4-4th
Use the D4 range for normal in-town and highway driving. The car
will start off in 1st and shift automatically to 2nd, 3rd, and 4th. The
further down you push the accelerator, the later the transmission will shift and the faster the car will accelerate.
D3-3rd
Use of D3 will allow the transmission to start off in 1st and shift
automatically to 2nd and 3rd. Use D3 when climbing grades to
prevent the transmission from "hunting" between 3rd and 4th gear;
or when increased braking is needed.
NOTE: If rapid acceleration is necessary, depress the accelerator to the
floor; the transmission will automatically shift down according to
load and engine speed. This applies to both D4 and D3 ranges.
2-2nd Use 2nd gear for increased engine braking when driving downhill,
and increased power when driving uphill; also for driving on slippery roads, and freeing the car from mud or sand, where 1st gear could provide too much power and cause skidding or wheelspin. The
maximum recommended speed in 2nd gear is:
62 mph (100 km/h)
R-Reverse
CAUTION:
Shift into or out of reverse only after the car has come to a
complete stop; the transmission may be damaged if you shift
while the car is moving.
P-Park
CAUTION:
Use this position when starting the engine, or when parking. Shift
into Park only when the car is COMPLETELY stopped.
N-Neutral
Use when starting the engine or during prolonged idling in traffic.
Shifting the Automatic (cont'd)ProCarManuals.comMain Menu s t
Page 68 of 136

Your Honda automobile must be properly maintained to ensure that
it is in peak operating condition and the emission levels are within
the standards set by the Federal Clean Air Act. The following instructions and maintenance procedures are basedon the assumption that your car will be used exclusively for thepurpose for which it was designed:
1.To carry passengers and cargo within the load limits shown on the label in the glove box.
2. To be driven on reasonable road surfaces within legal limits.
3. To generally be driven daily over a distance of several miles.
4. Use gasoline from pumps labeled unleaded, with a pump octane number of 86 or higher. The pump octane number is an average of
the Research (R) octane and Motor (M) octane numbers.
NOTE: Failures which occur due to a lack of maintenance will not be
covered under warranty.
The Required Maintenance Schedule* specifies all maintenance
required to keep your car in peak operating condition. Work should
be done by a Honda dealer but may be done by any qualified service
facility or individual who is competent in this type of work.
Maintenance, replacement, or repair of emission control devices
and systems may be done by any automotive repair establishment
or individual using parts that are "certified" to EPA standards.
After the maintenance has been done, be sure to complete theMaintenance Records on pages 71 — 73. All required maintenance is
considered normal owner operating cost and you will be charged for it by your dealer.
* For vehicles sold in California, maintenance operations indicated by *3 on page 70 are recommended by the manufacturer. Othermaintenance operations are required by California regulations and
condition the emission warranty.
Maintenance Schedule and RecordsProCarManuals.comMain Menu s t
Page 69 of 136

Check the following items at each fuel stop:
1. Engine oil level.
2. Radiator coolant level.
Check the following items periodically: 1. Brakes: for braking efficiency, brake pedal travel and hydraulic
fluid level.
2. Lights: for operation of headlights, taillights, side marker lights, stoplights, turn signals and back-up lights.
3. Tires: for correct pressures (including spare); inspect for cuts and uneven or excessive wear. Rotate every 7,500 miles (12,000 km)
in the pattern shown on page 97.
4. Steering: for excessive play or vibration while driving. 5. Exhaust system: for leaks or loose mounts.
6. Wipers: for operation of windshield wipers and washer, and condition of wiper blades.
7. Seat belts: for condition of fabric and buckles, and operation of the restraint mechanism.
8. Battery condition.
9. Clutch adjustment (clutch pedal free travel).
(cont'd)ProCarManuals.comMain Menu s t
Page 70 of 136
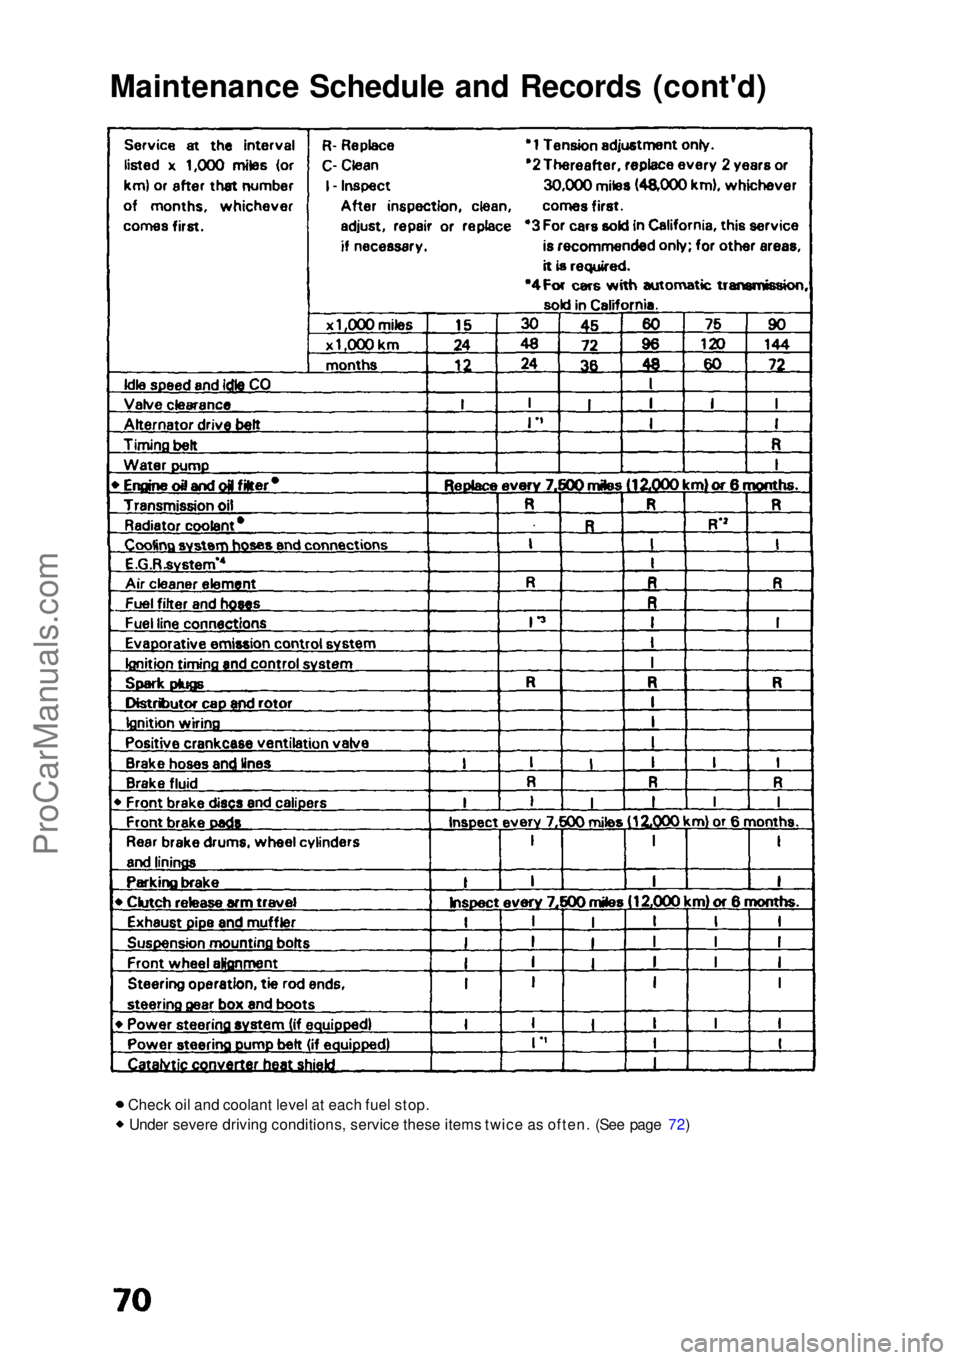
Maintenance Schedule and Records (cont'd)
Check oil and coolant level at each fuel stop.Under severe driving conditions, service these items twice as often. (See page 72)ProCarManuals.comMain Menu s t