HONDA CIVIC 1991 Manual Online
Manufacturer: HONDA, Model Year: 1991, Model line: CIVIC, Model: HONDA CIVIC 1991Pages: 136, PDF Size: 1.33 MB
Page 81 of 136
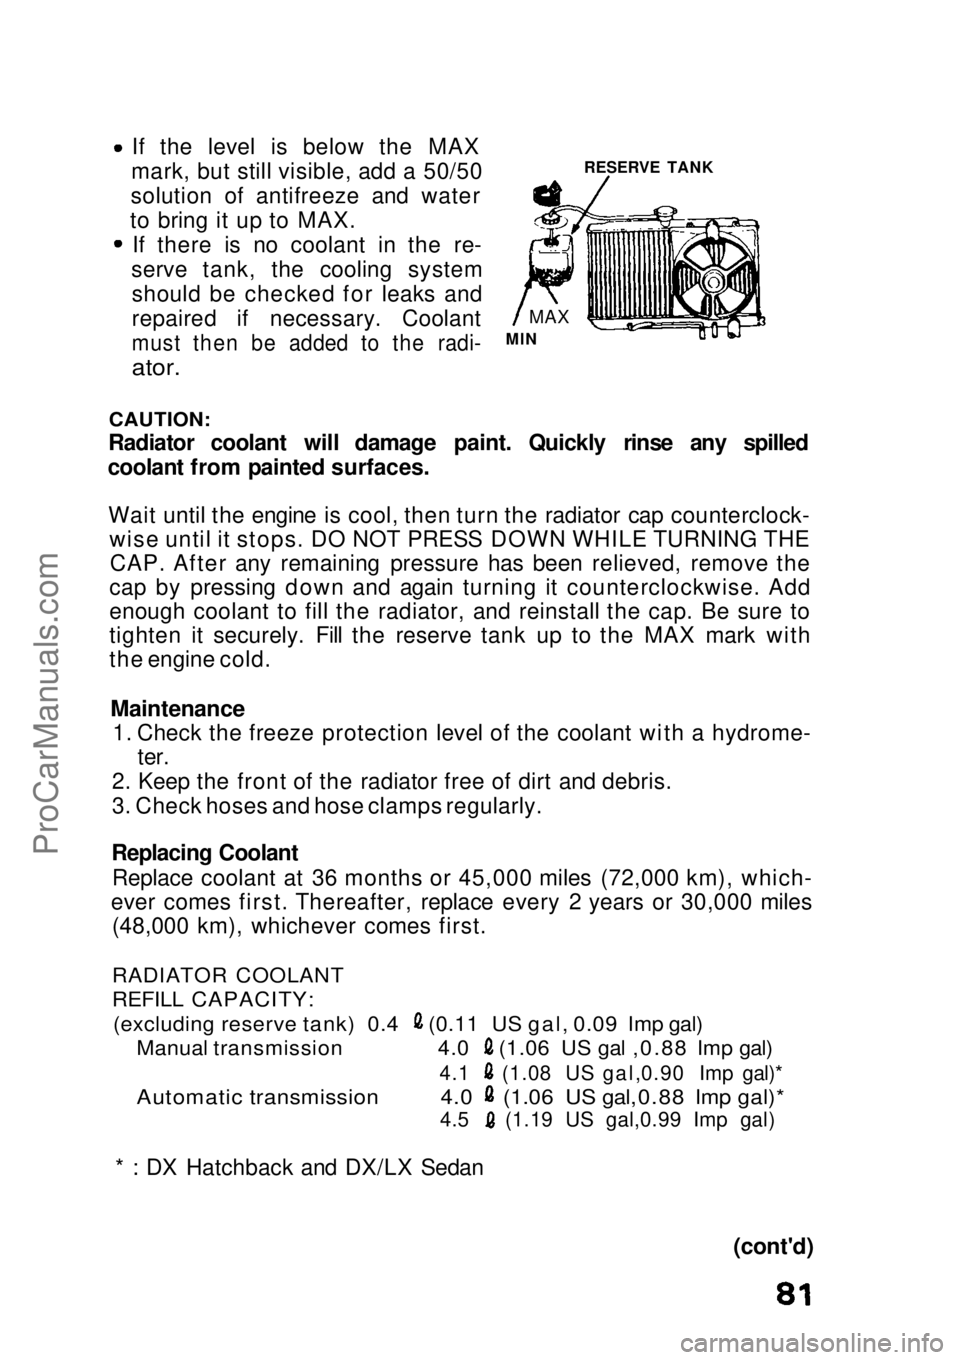
RESERVE TANKIf the level is below the MAX
mark, but still visible, add a 50/50
solution of antifreeze and water
to bring it up to MAX. If there is no coolant in the re-
serve tank, the cooling system should be checked for leaks and
repaired if necessary. Coolant
must then be added to the radi-
ator.
CAUTION:
Radiator coolant will damage paint. Quickly rinse any spilled
coolant from painted surfaces.
Wait until the engine is cool, then turn the radiator cap counterclock- wise until it stops. DO NOT PRESS DOWN WHILE TURNING THECAP. After any remaining pressure has been relieved, remove the
cap by pressing down and again turning it counterclockwise. Add
enough coolant to fill the radiator, and reinstall the cap. Be sure to
tighten it securely. Fill the reserve tank up to the MAX mark with
the engine cold.
Maintenance
1. Check the freeze protection level of the coolant with a hydrome- ter.
2. Keep the front of the radiator free of dirt and debris.
3. Check hoses and hose clamps regularly.
Replacing Coolant Replace coolant at 36 months or 45,000 miles (72,000 km), which-
ever comes first. Thereafter, replace every 2 years or 30,000 miles (48,000 km), whichever comes first.
(cont'd)
MAX
MIN
RADIATOR COOLANT
REFILL CAPACITY:
(excluding reserve tank) 0.4 (0.11 US gal, 0.09 Imp gal)
Manual transmission 4.0 (1.06 US gal ,0.88 Imp gal)
4.1 (1.08 US gal,0.90 Imp gal)*
Automatic transmission 4.0 (1.06 US gal,0.88 Imp gal)*
4.5 (1.19 US gal,0.99 Imp gal)
* : DX Hatchback and DX/LX Sedan
ProCarManuals.comMain Menu s t
Page 82 of 136
Cooling System (cont'd)
1. Set the heater temperature control dial to maximum heat.
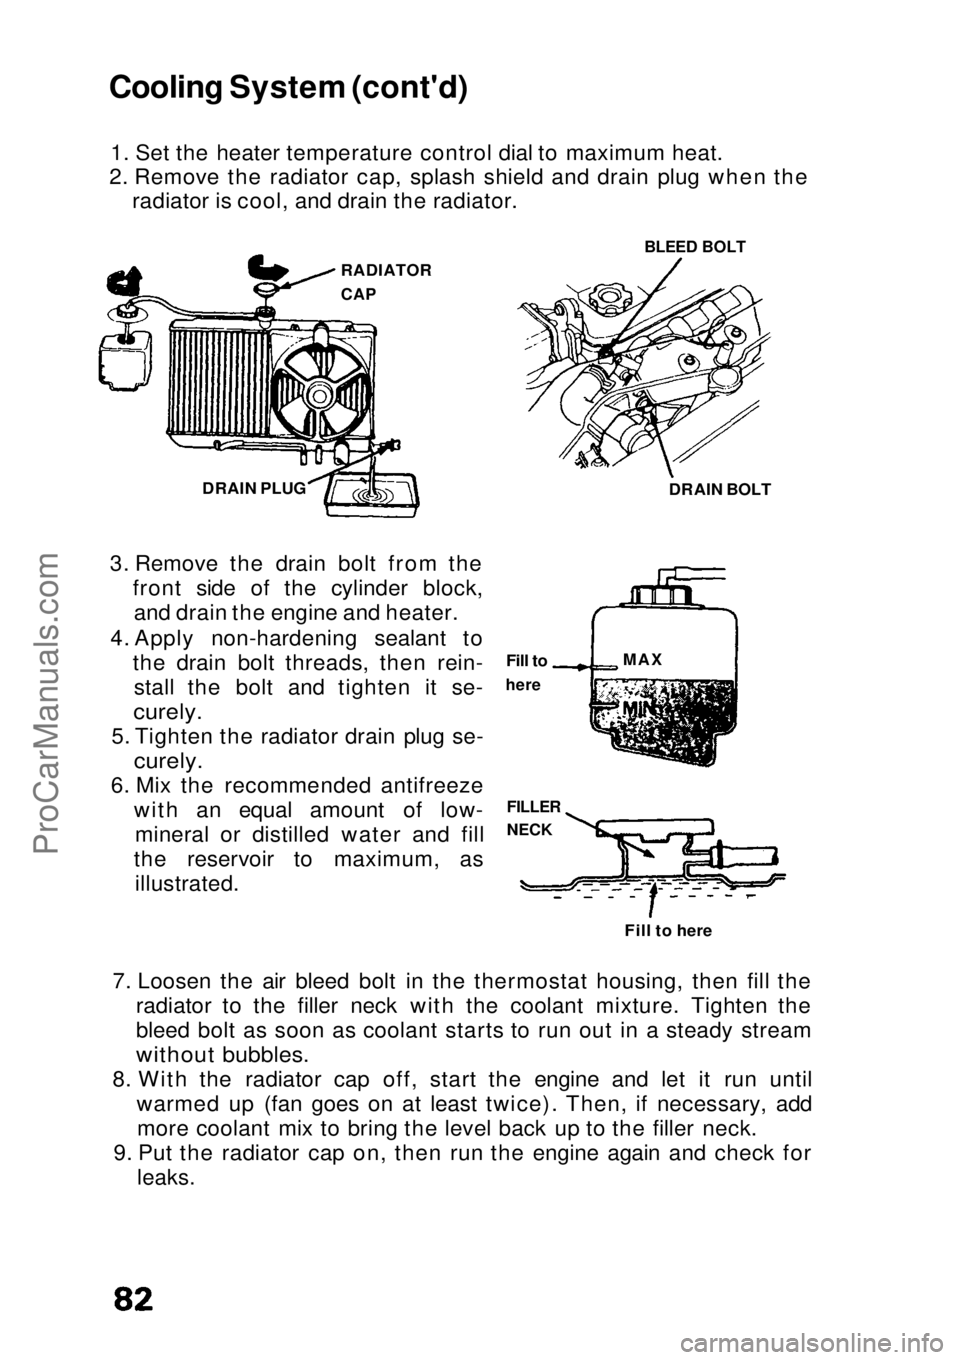
2. Remove the radiator cap, splash shield and drain plug when the radiator is cool, and drain the radiator.
3. Remove the drain bolt from the front side of the cylinder block,and drain the engine and heater.
4. Apply non-hardening sealant to the drain bolt threads, then rein-stall the bolt and tighten it se-
curely.
5. Tighten the radiator drain plug se-
curely.
6. Mix the recommended antifreeze with an equal amount of low-mineral or distilled water and fill
the reservoir to maximum, as illustrated.
7. Loosen the air bleed bolt in the thermostat housing, then fill the radiator to the filler neck with the coolant mixture. Tighten the
bleed bolt as soon as coolant starts to run out in a steady stream
without bubbles.
8. With the radiator cap off, start the engine and let it run until warmed up (fan goes on at least twice). Then, if necessary, addmore coolant mix to bring the level back up to the filler neck.
9. Put the radiator cap on, then run the engine again and check for
leaks.
RADIATOR
CAP
BLEED BOLT
DRAIN BOLT
DRAIN PLUG
Fill to
here
FILLER
NECK
Fill to here
MAXProCarManuals.comMain Menu s t
Page 83 of 136
Brakes
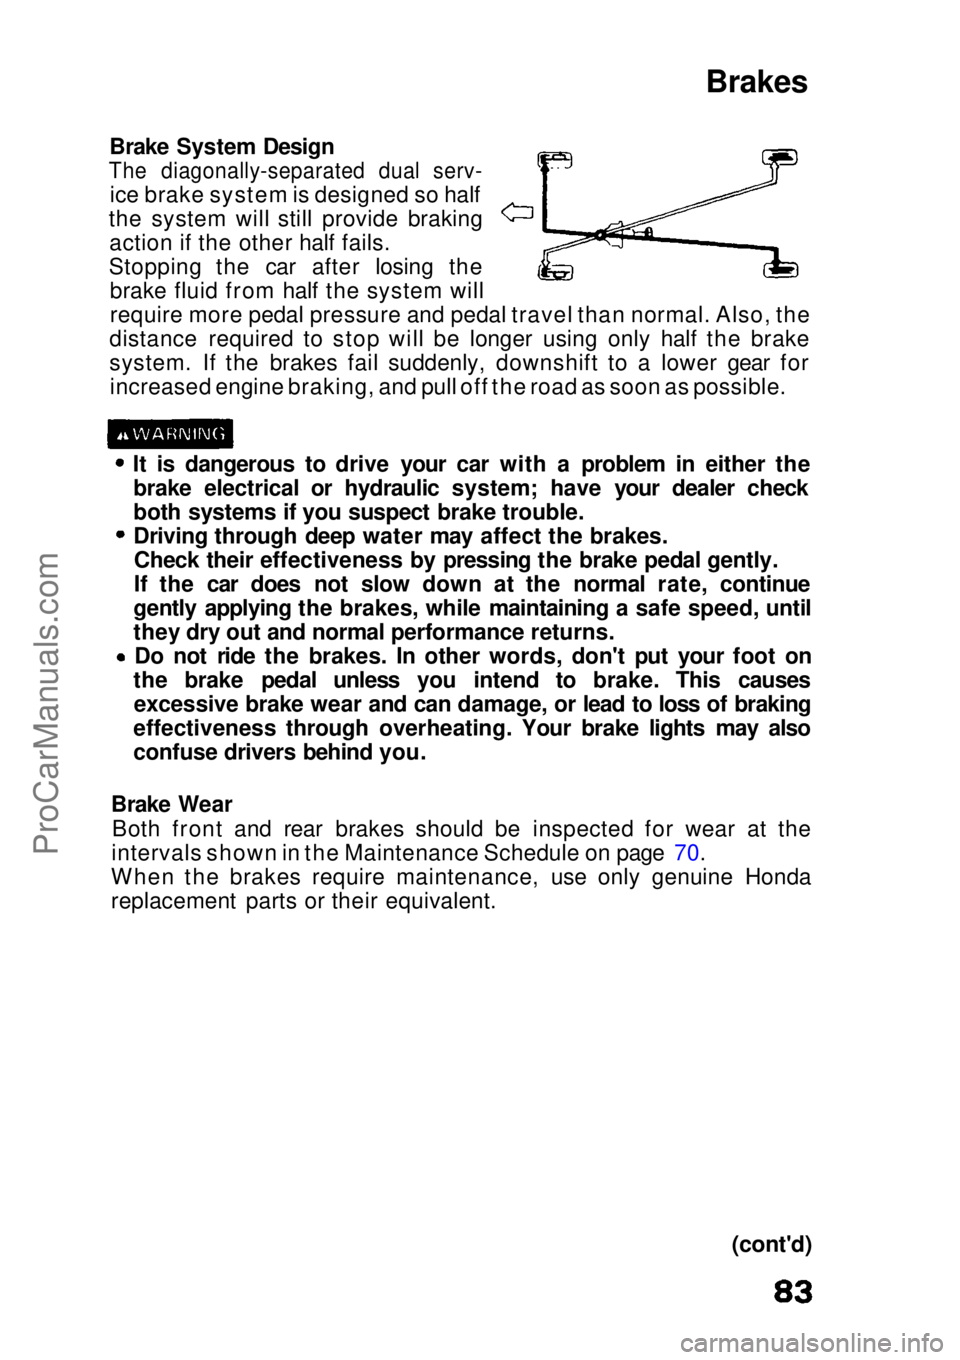
Brake System Design
The diagonally-separated dual serv-
ice brake system is designed so half
the system will still provide braking action if the other half fails.
Stopping the car after losing the brake fluid from half the system will
require more pedal pressure and pedal travel than normal. Also, the
distance required to stop will be longer using only half the brake
system. If the brakes fail suddenly, downshift to a lower gear for increased engine braking, and pull off the road as soon as possible.
It is dangerous to drive your car with a problem in either thebrake electrical or hydraulic system; have your dealer check
both systems if you suspect brake trouble.
Driving through deep water may affect the brakes.Check their effectiveness by pressing the brake pedal gently.
If the car does not slow down at the normal rate, continue
gently applying the brakes, while maintaining a safe speed, until
they dry out and normal performance returns. Do not ride the brakes. In other words, don't put your foot on
the brake pedal unless you intend to brake. This causes excessive brake wear and can damage, or lead to loss of braking
effectiveness through overheating. Your brake lights may also
confuse drivers behind you.
Brake Wear Both front and rear brakes should be inspected for wear at the
intervals shown in the Maintenance Schedule on page 70.
When the brakes require maintenance, use only genuine Honda
replacement parts or their equivalent.
(cont'd)ProCarManuals.comMain Menu s t
Page 84 of 136
Brakes (cont'd)
Front Brake Wear Indicators
Your car is equipped with audible front brake wear indicators. When
the brake pads wear to point that they should be replaced, they will make a "screeching" sound when the wheels are rolling and when
the brakes are applied.
NOTE:
Due to some driving habits or climates, brakes may "squeal" when
you first apply them or when you have them partially applied; this is normal, and does not indicate excessive wear. The wear indicator
makes a "screeching" sound while the brakes are applied.
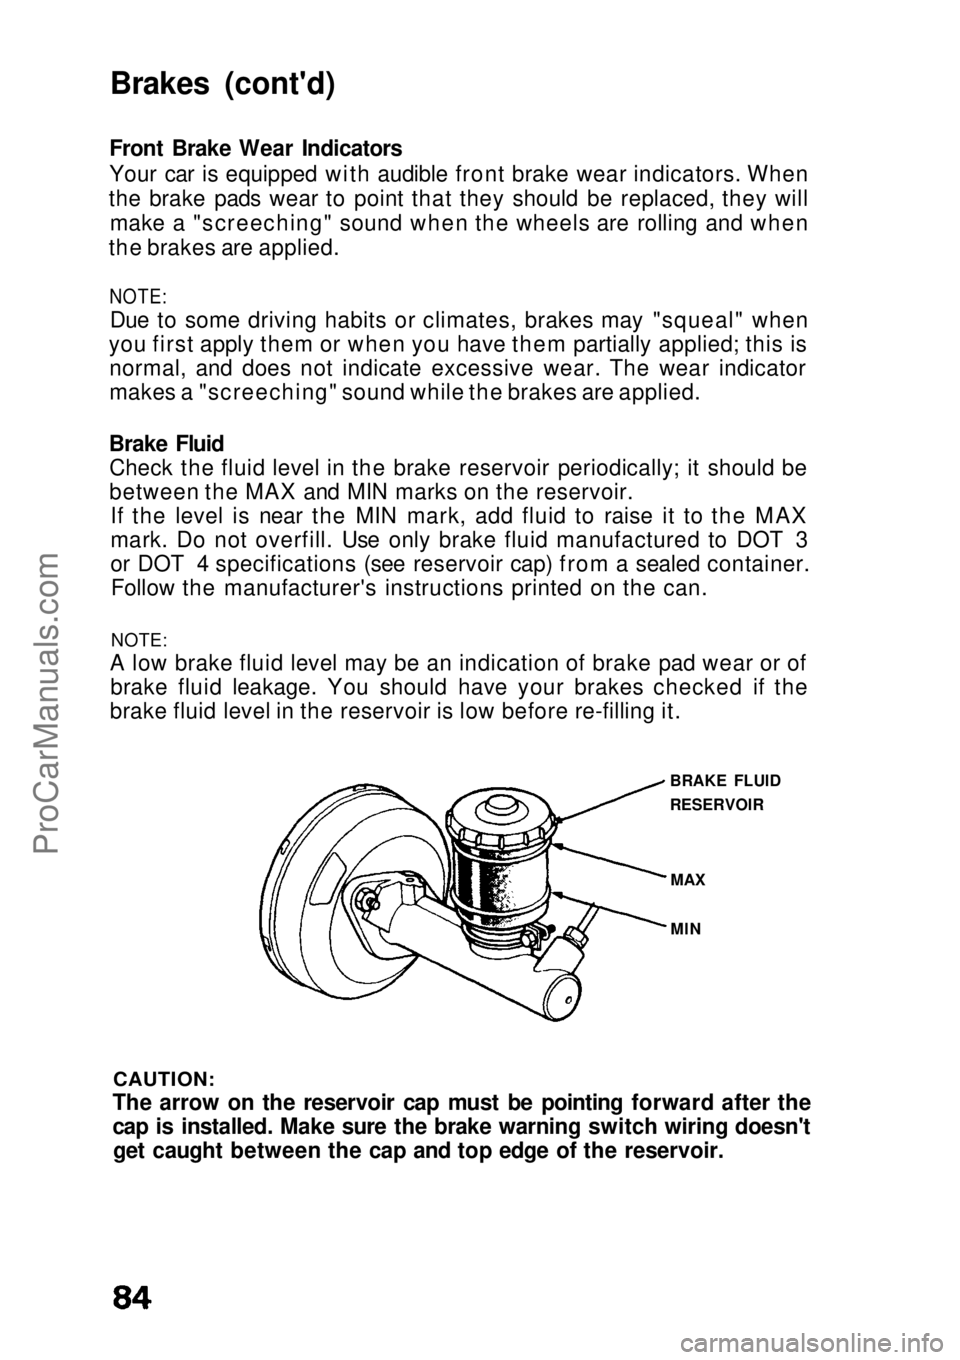
Brake Fluid Check the fluid level in the brake reservoir periodically; it should be
between the MAX and MIN marks on the reservoir. If the level is near the MIN mark, add fluid to raise it to the MAX
mark. Do not overfill. Use only brake fluid manufactured to DOT 3
or DOT 4 specifications (see reservoir cap) from a sealed container.Follow the manufacturer's instructions printed on the can.
NOTE:
A low brake fluid level may be an indication of brake pad wear or of brake fluid leakage. You should have your brakes checked if the
brake fluid level in the reservoir is low before re-filling it.
BRAKE FLUID
RESERVOIR
CAUTION:
The arrow on the reservoir cap must be pointing forward after the
cap is installed. Make sure the brake warning switch wiring doesn't get caught between the cap and top edge of the reservoir. MAX
MINProCarManuals.comMain Menu s t
Page 85 of 136
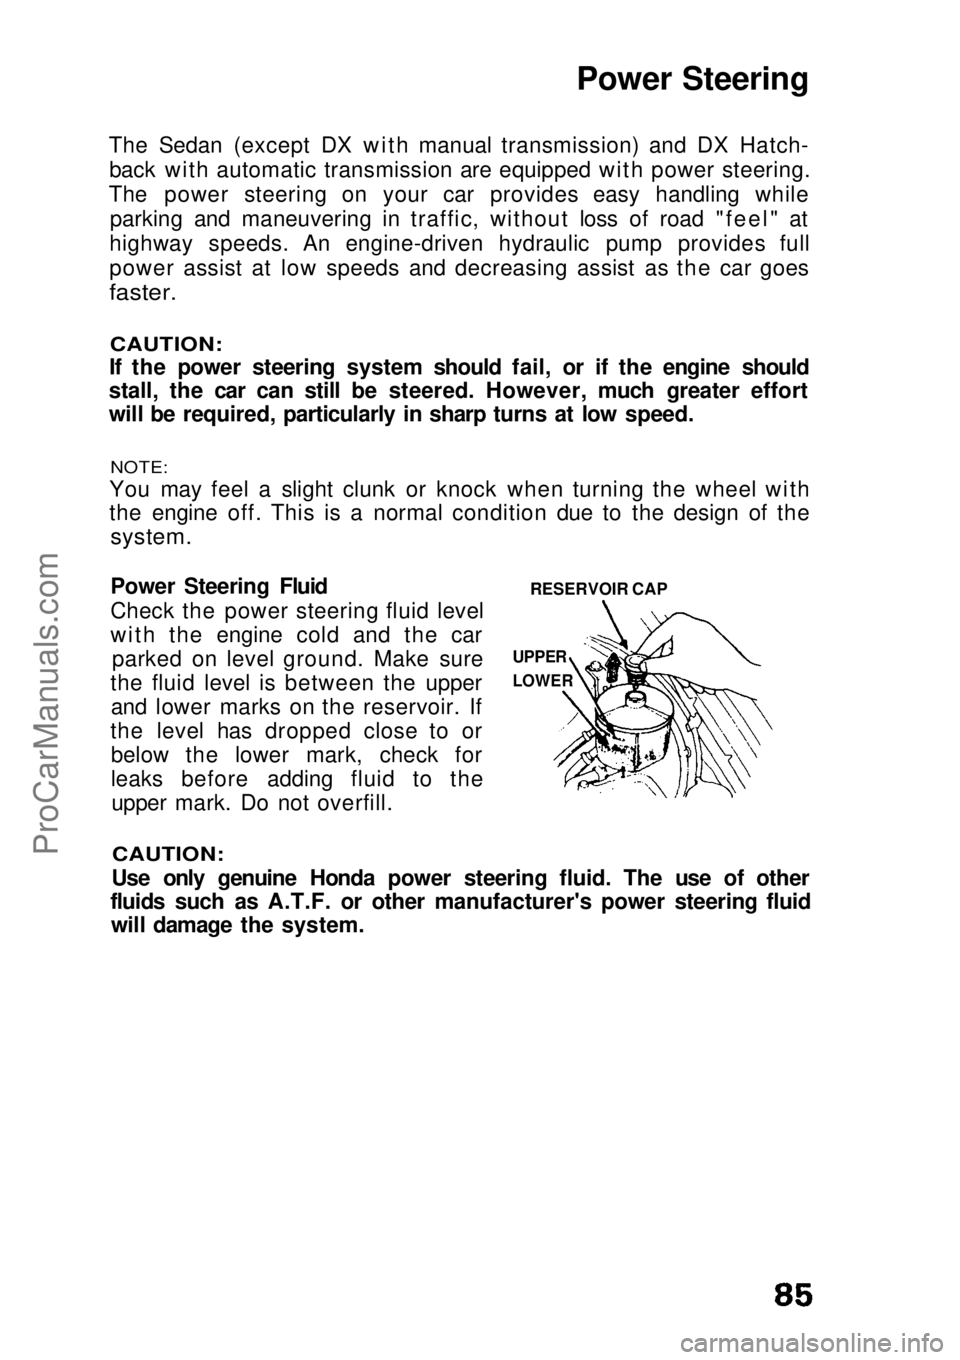
Power Steering
The Sedan (except DX with manual transmission) and DX Hatch- back with automatic transmission are equipped with power steering.
The power steering on your car provides easy handling while parking and maneuvering in traffic, without loss of road "feel" at
highway speeds. An engine-driven hydraulic pump provides full
power assist at low speeds and decreasing assist as the car goes
faster.
CAUTION:
If the power steering system should fail, or if the engine should
stall, the car can still be steered. However, much greater effort
will be required, particularly in sharp turns at low speed.
NOTE:
You may feel a slight clunk or knock when turning the wheel with
the engine off. This is a normal condition due to the design of the
system.
RESERVOIR CAP
UPPER
LOWER
Power Steering Fluid
Check the power steering fluid level
with the engine cold and the car
parked on level ground. Make sure
the fluid level is between the upper and lower marks on the reservoir. If
the level has dropped close to or below the lower mark, check for
leaks before adding fluid to theupper mark. Do not overfill.
CAUTION:
Use only genuine Honda power steering fluid. The use of other
fluids such as A.T.F. or other manufacturer's power steering fluid will damage the system.ProCarManuals.comMain Menu s t
Page 86 of 136
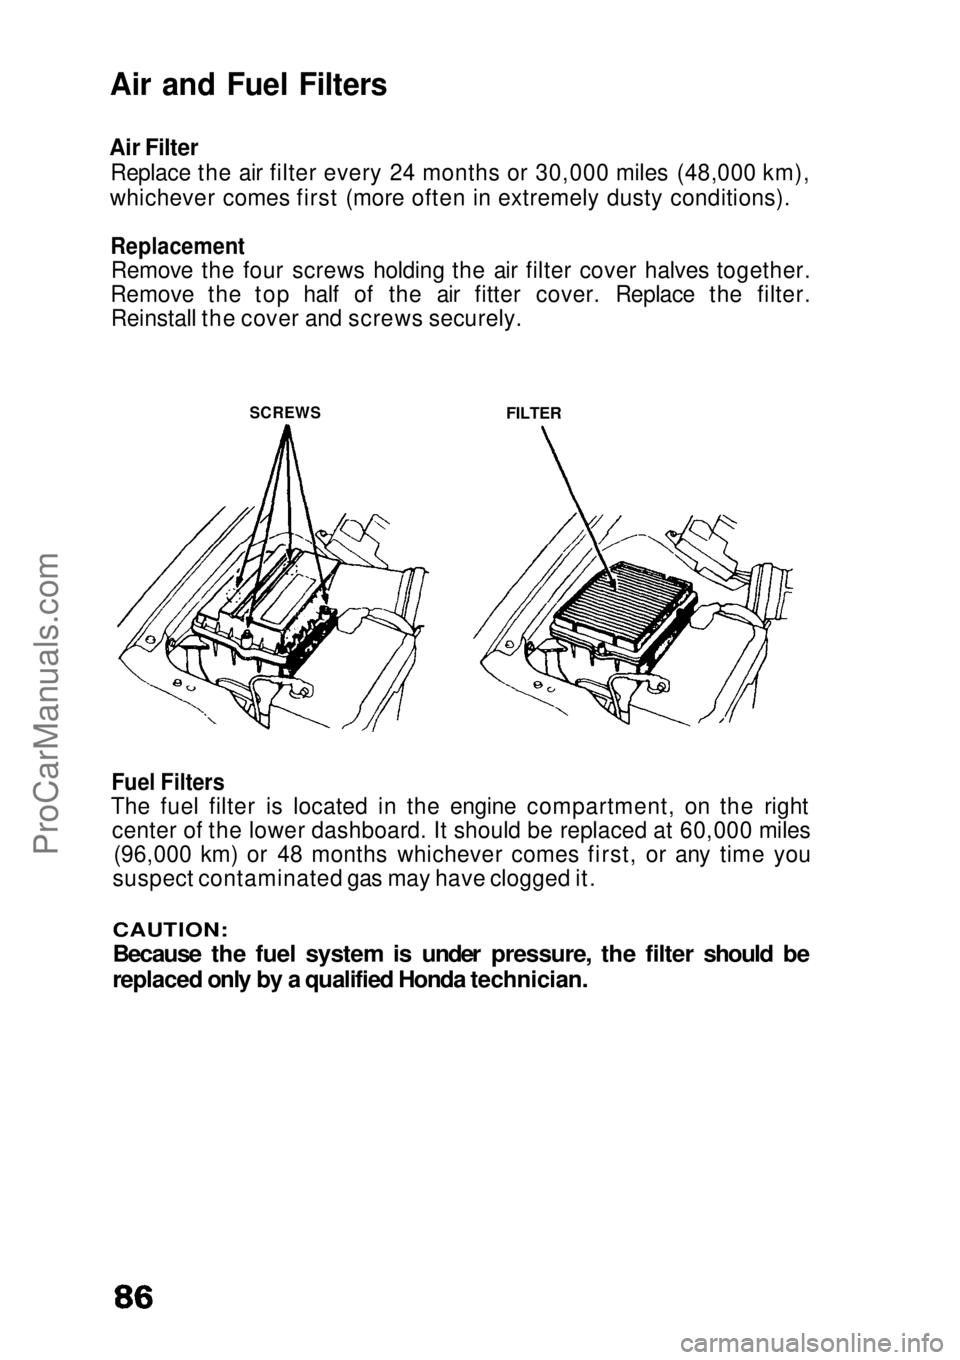
Air and Fuel Filters
Air Filter Replace the air filter every 24 months or 30,000 miles (48,000 km),
whichever comes first (more often in extremely dusty conditions).
Replacement
Remove the four screws holding the air filter cover halves together.
Remove the top half of the air fitter cover. Replace the filter. Reinstall the cover and screws securely.
SCREWS
FILTER
Fuel Filters
The fuel filter is located in the engine compartment, on the right center of the lower dashboard. It should be replaced at 60,000 miles (96,000 km) or 48 months whichever comes first, or any time you
suspect contaminated gas may have clogged it.
CAUTION:
Because the fuel system is under pressure, the filter should be
replaced only by a qualified Honda technician.ProCarManuals.comMain Menu s t
Page 87 of 136
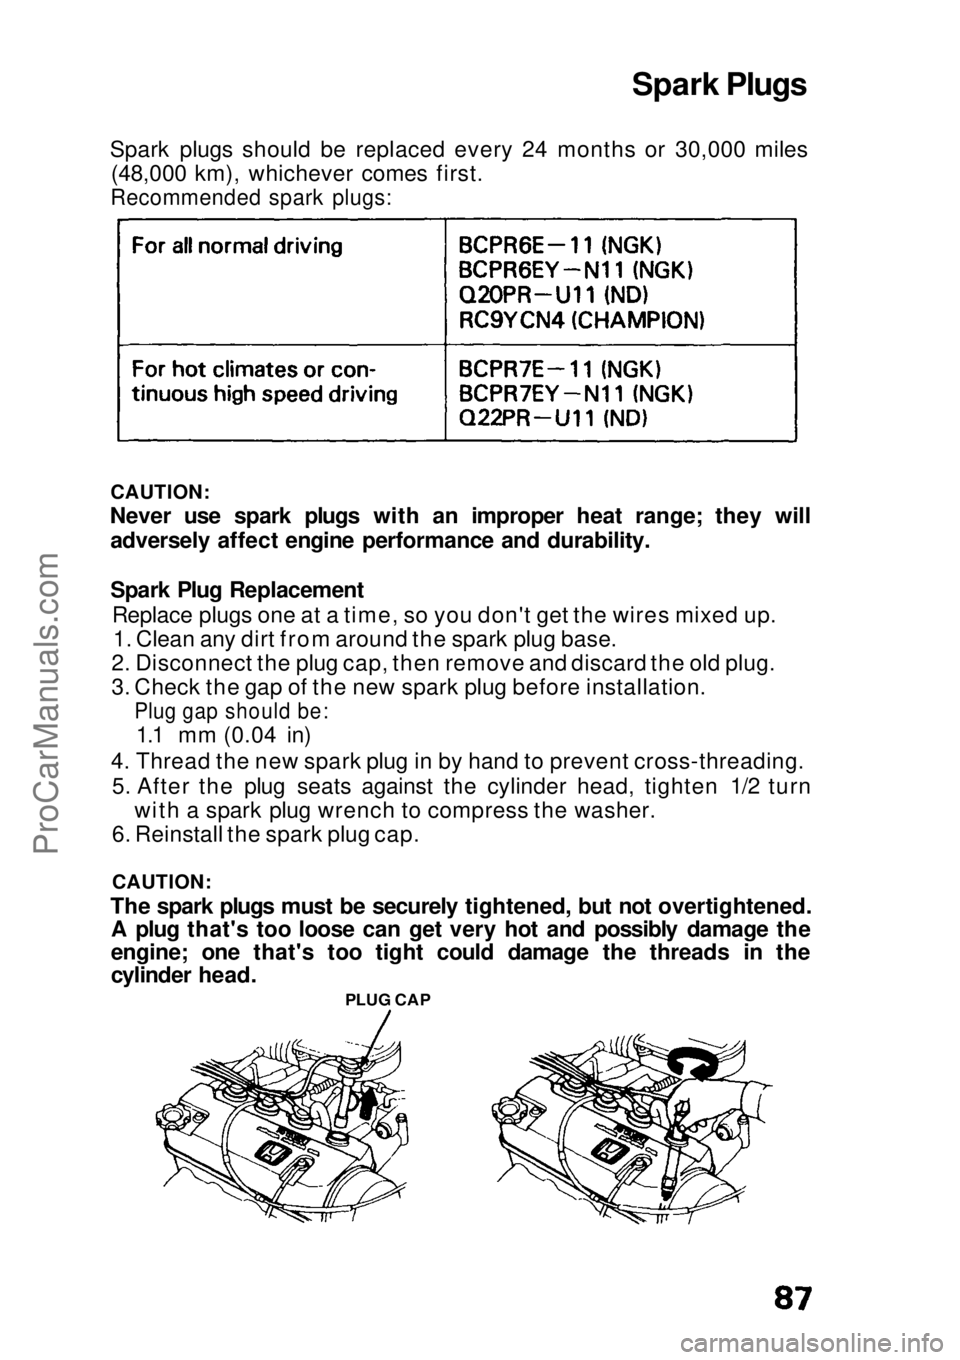
Spark Plugs
Spark plugs should be replaced every 24 months or 30,000 miles (48,000 km), whichever comes first.
Recommended spark plugs:
CAUTION:
Never use spark plugs with an improper heat range; they will adversely affect engine performance and durability.
Spark Plug Replacement
Replace plugs one at a time, so you don't get the wires mixed up.1. Clean any dirt from around the spark plug base.
2. Disconnect the plug cap, then remove and discard the old plug.
3. Check the gap of the new spark plug before installation.
Plug gap should be:
1.1 mm (0.04 in)
4. Thread the new spark plug in by hand to prevent cross-threading. 5. After the plug seats against the cylinder head, tighten 1/2 turn with a spark plug wrench to compress the washer.
6. Reinstall the spark plug cap.
CAUTION:
The spark plugs must be securely tightened, but not overtightened. A plug that's too loose can get very hot and possibly damage the
engine; one that's too tight could damage the threads in the
cylinder head. PLUG CAPProCarManuals.comMain Menu s t
Page 88 of 136
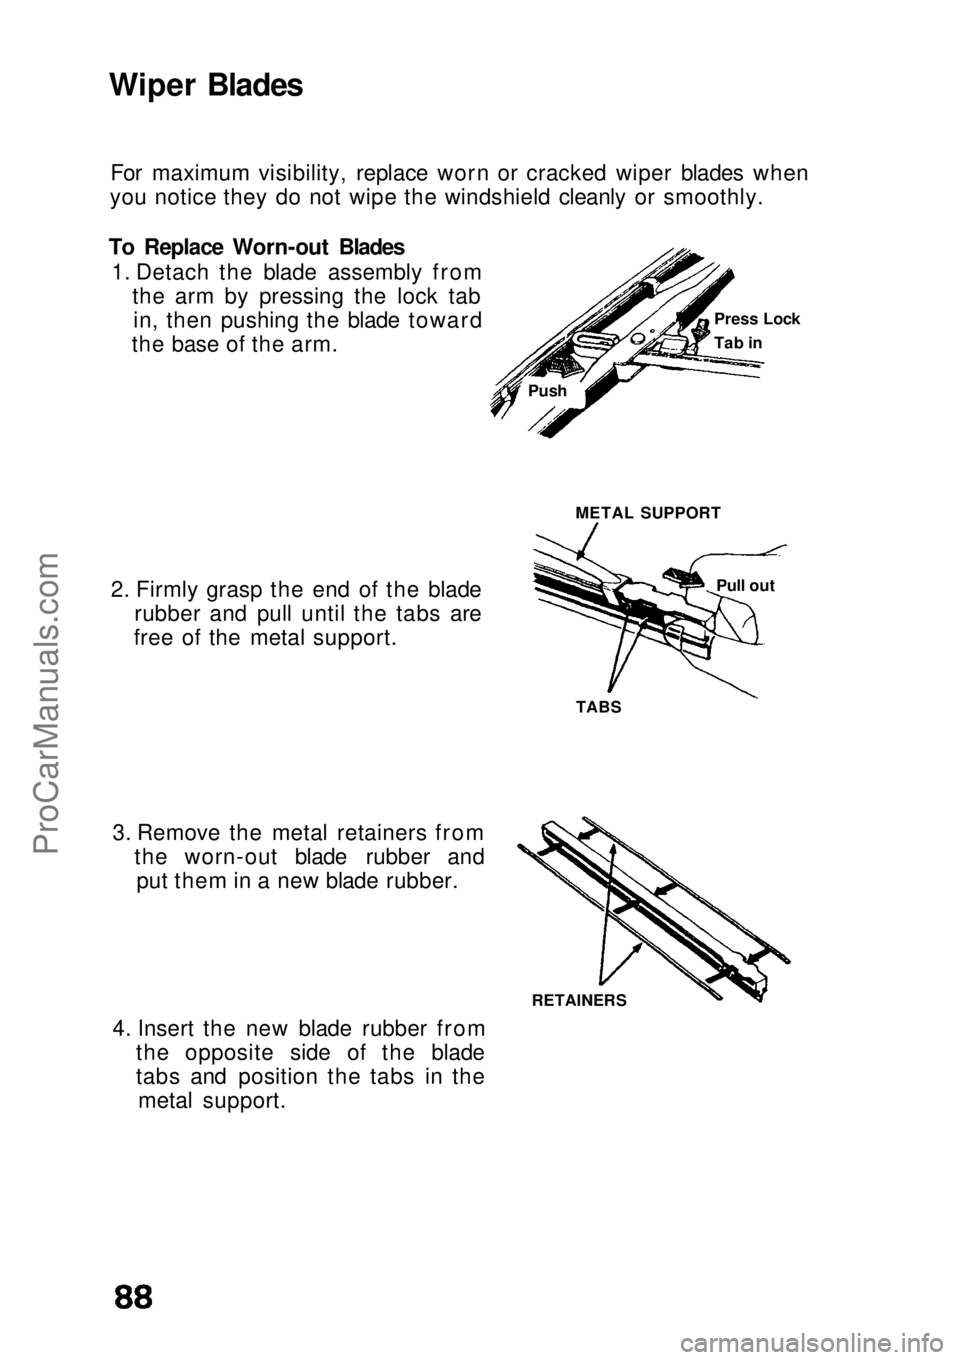
Wiper Blades
For maximum visibility, replace worn or cracked wiper blades when
you notice they do not wipe the windshield cleanly or smoothly.
To Replace Worn-out Blades 1. Detach the blade assembly from the arm by pressing the lock tabin, then pushing the blade toward
the base of the arm.
METAL SUPPORT
2. Firmly grasp the end of the blade rubber and pull until the tabs are
free of the metal support.
TABS
3. Remove the metal retainers from the worn-out blade rubber andput them in a new blade rubber.
RETAINERS
4. Insert the new blade rubber from the opposite side of the blade
tabs and position the tabs in themetal support. Press Lock
Tab in
Push
Pull outProCarManuals.comMain Menu s t
Page 89 of 136
Battery
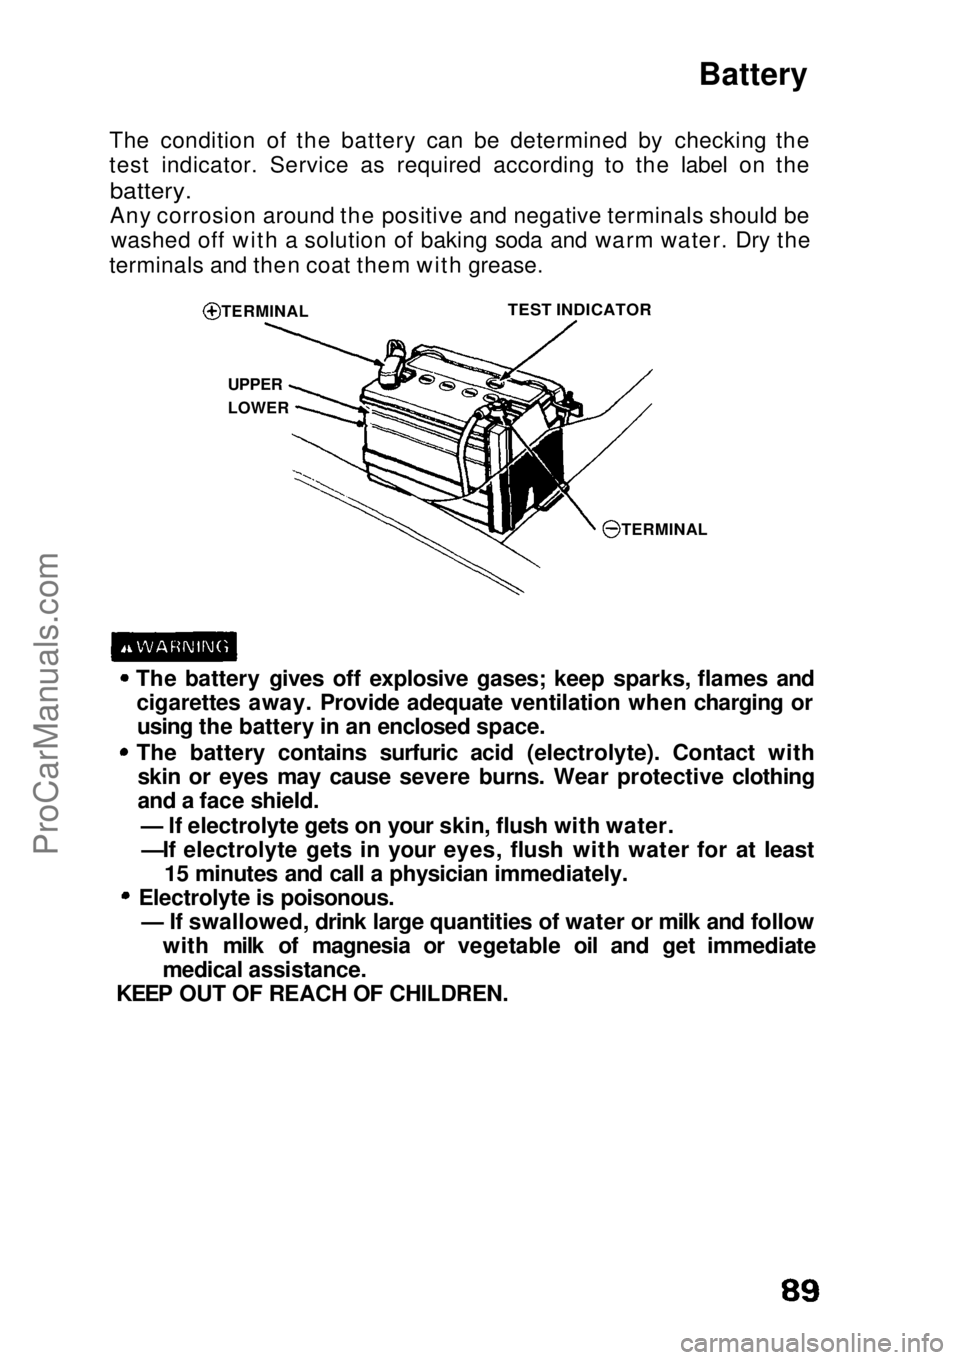
The condition of the battery can be determined by checking the
test indicator. Service as required according to the label on the
battery.
Any corrosion around the positive and negative terminals should be washed off with a solution of baking soda and warm water. Dry the
terminals and then coat them with grease.
TERMINAL
UPPER
LOWER
TEST INDICATOR
TERMINAL
The battery gives off explosive gases; keep sparks, flames and cigarettes away. Provide adequate ventilation when charging orusing the battery in an enclosed space.
The battery contains surfuric acid (electrolyte). Contact with skin or eyes may cause severe burns. Wear protective clothing
and a face shield.
— If electrolyte gets on your skin, flush with water.—If electrolyte gets in your eyes, flush with water for at least 15 minutes and call a physician immediately.
Electrolyte is poisonous. — If swallowed, drink large quantities of water or milk and follow with milk of magnesia or vegetable oil and get immediate
medical assistance.
KEEP OUT OF REACH OF CHILDREN.ProCarManuals.comMain Menu s t
Page 90 of 136
Fuse Replacement
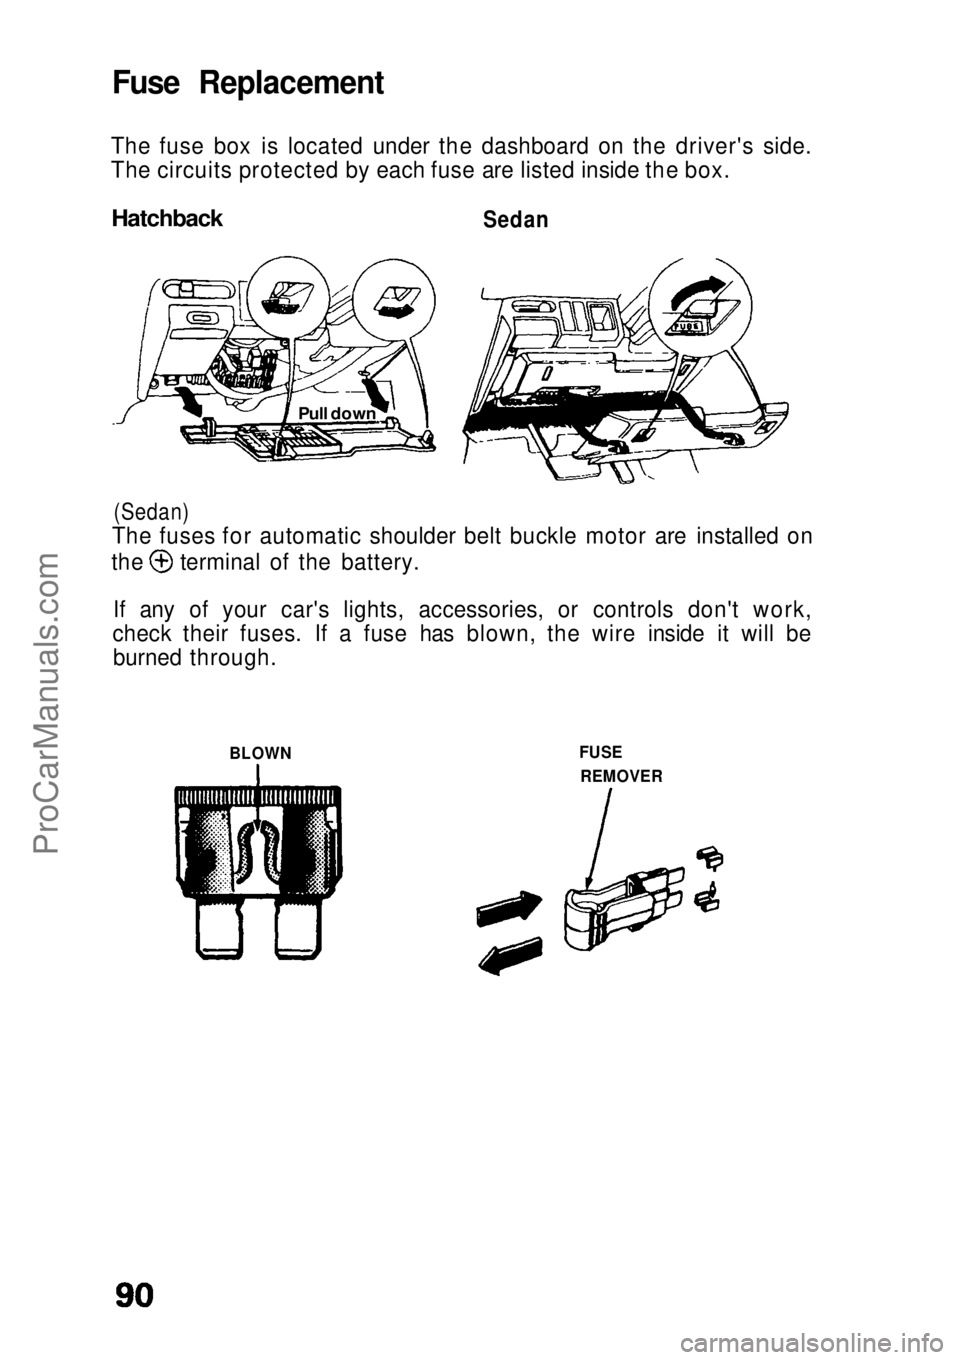
The fuse box is located under the dashboard on the driver's side.
The circuits protected by each fuse are listed inside the box.
Hatchback
Sedan
(Sedan)
The fuses for automatic shoulder belt buckle motor are installed on the terminal of the battery.
If any of your car's lights, accessories, or controls don't work,
check their fuses. If a fuse has blown, the wire inside it will be burned through.
BLOWN FUSE
REMOVER
Pull downProCarManuals.comMain Menu s t