HONDA CIVIC 1999 6.G Workshop Manual
Manufacturer: HONDA, Model Year: 1999, Model line: CIVIC, Model: HONDA CIVIC 1999 6.GPages: 2189, PDF Size: 69.39 MB
Page 621 of 2189
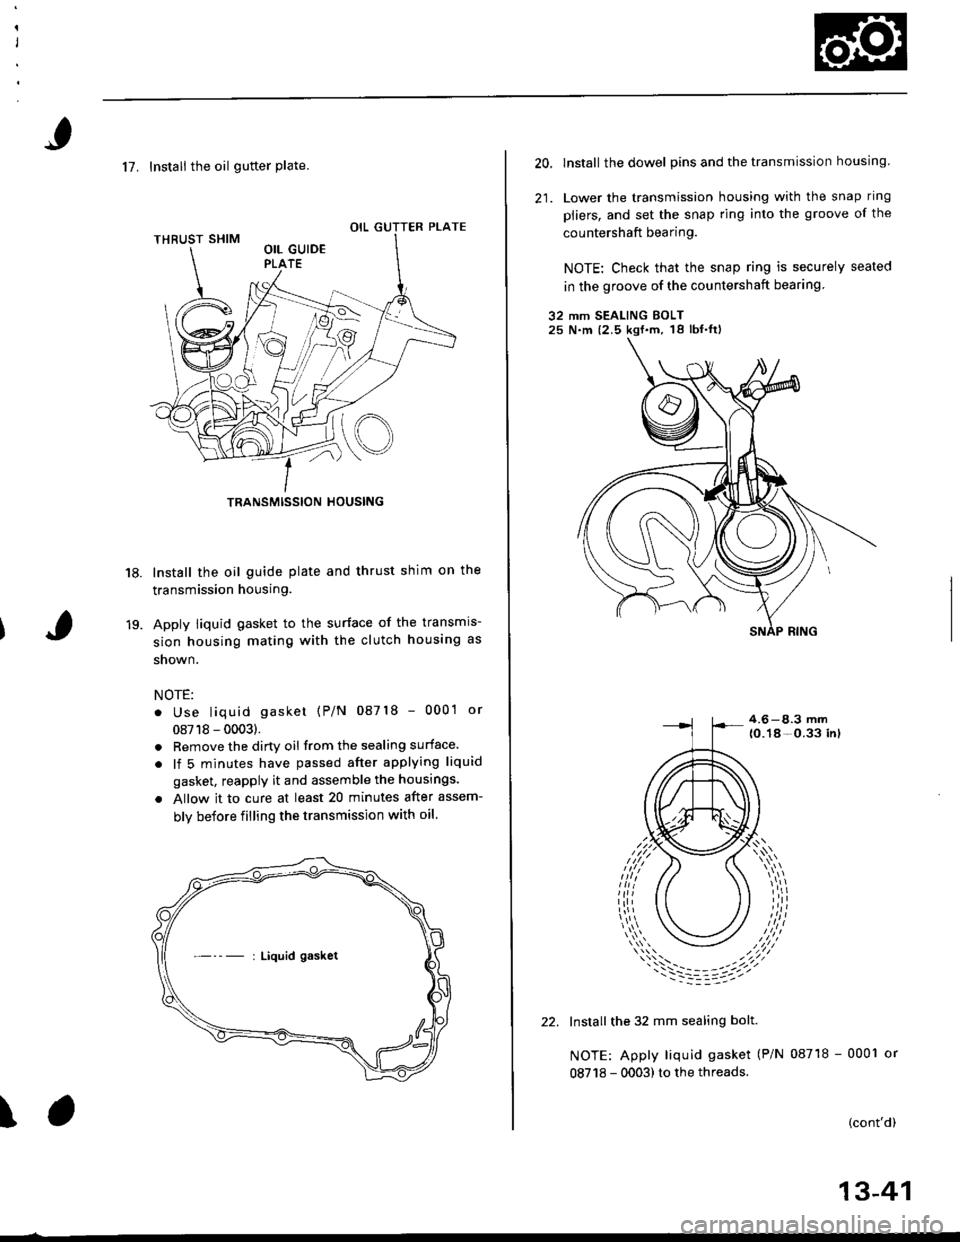
17. Instali the oil gutter Plate.
Install the oil guide plate and thrust shim on the
transmission housing.
Apply Iiquid gasket to the surface of the transmis-
sion housing mating with the clutch housing as
shown.
NOTE:
. Use liquid gasket {P/N 08718 - 0001 or
08718 - 0003).
. Remove the dirty oil fromthesealing surface.
. lf 5 minutes have passed after applying liquid
gasket, reapply it and assemble the housings.
. Allow it to cure at least 20 minutes after assem-
bly before filling the transmission with oil.
18.
19.
\
OIL GUTTER PTATE
TRANSMISSION HOUSING
Liquid gasket
20.lnstall the dowel pins and the transmission housing.
Lower the transmission housing with the snap ring
pliers, and set the snap ring into the groove of the
countershaft bearing.
NOTE: Check that the snap ring is securely seated
in the groove of the countershaft bearing
32 mm SEALING EOLT25 N.m (2.5 kgf.m, 18lbf.ftl
4.6 -8.3 mm10.14-0.33 inl
Install the 32 mm sealing bolt.
NOTE: Apply liquid gasket (P/N 08718 - 0001
08718 - 0003) to the threads.
(cont'd)
22.
13-41
Page 622 of 2189
Transmission
Reassembly (cont'd)
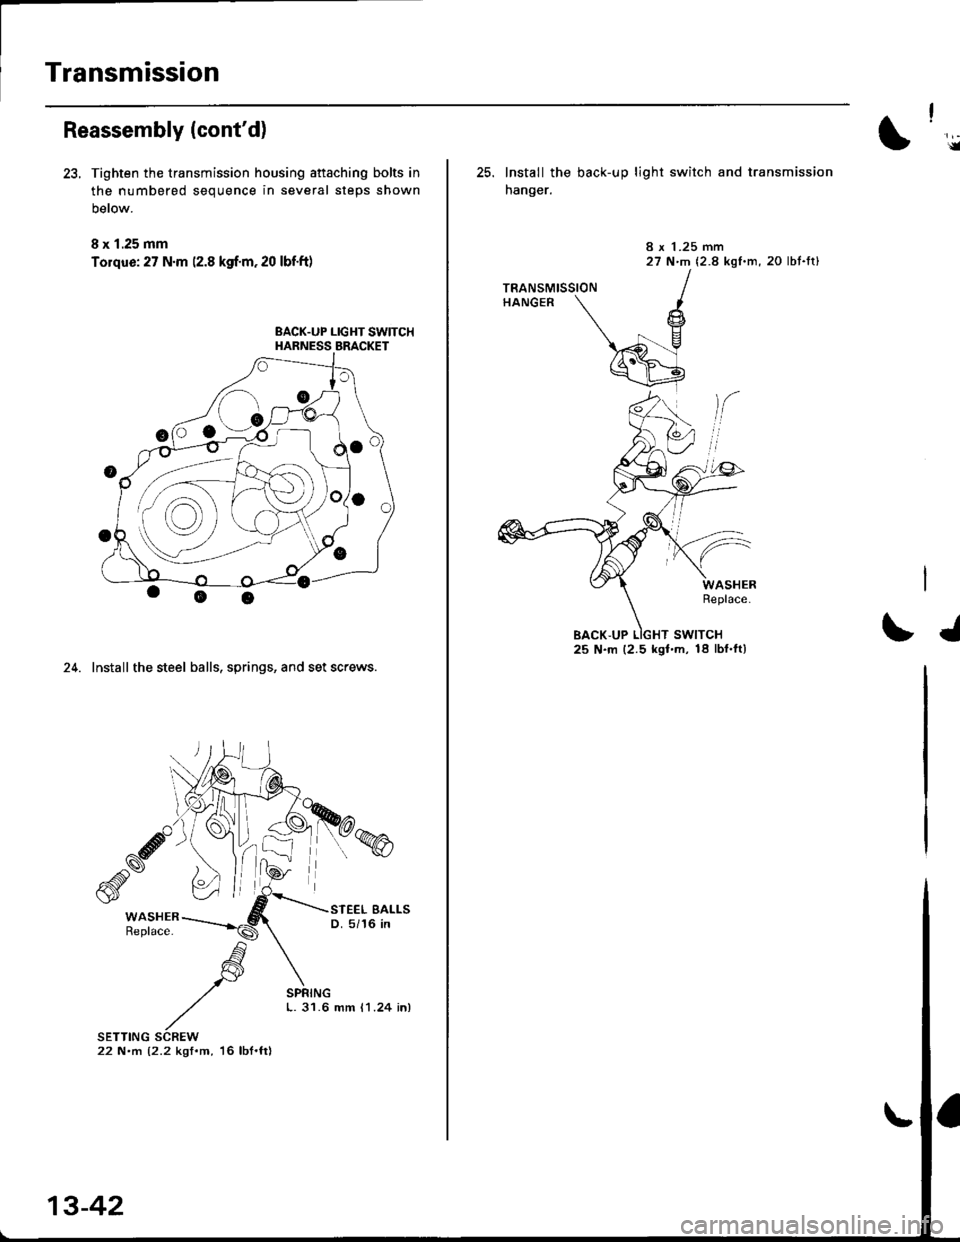
23, Tighten the transmission housing aftaching bolts in
the numbered sequence in several steps shown
Delow.
8 x 1.25 mm
Tolque: 27 N.m 12.8 kgf.m. 20 lbf.ft)
EACK.UP LIGHT SWITCHHARNESS BRACKET
24. Install the steel balls, springs, and set screws.
K)w
s
WASHERReplace.
STEEL EALLSD. 5i 16 in
SETTING SCREW22 N.m 12.2 kgf.m, 16 lbf.ftl
//-',, o/I .--"-4
;'c'-9,/t-)
13-42
L. 31.6 mm 11.24 in)
25. Install the back-up light switch and transmission
hanger.
8 x 1.25 mm27 N.m 12.8 kgl.m, 20 lbt.lrl
TRANSMISSIONHANGER
I./25 N.m (2.5 kgt.m, 18 lbf.ft)
Page 623 of 2189
Oil Seals
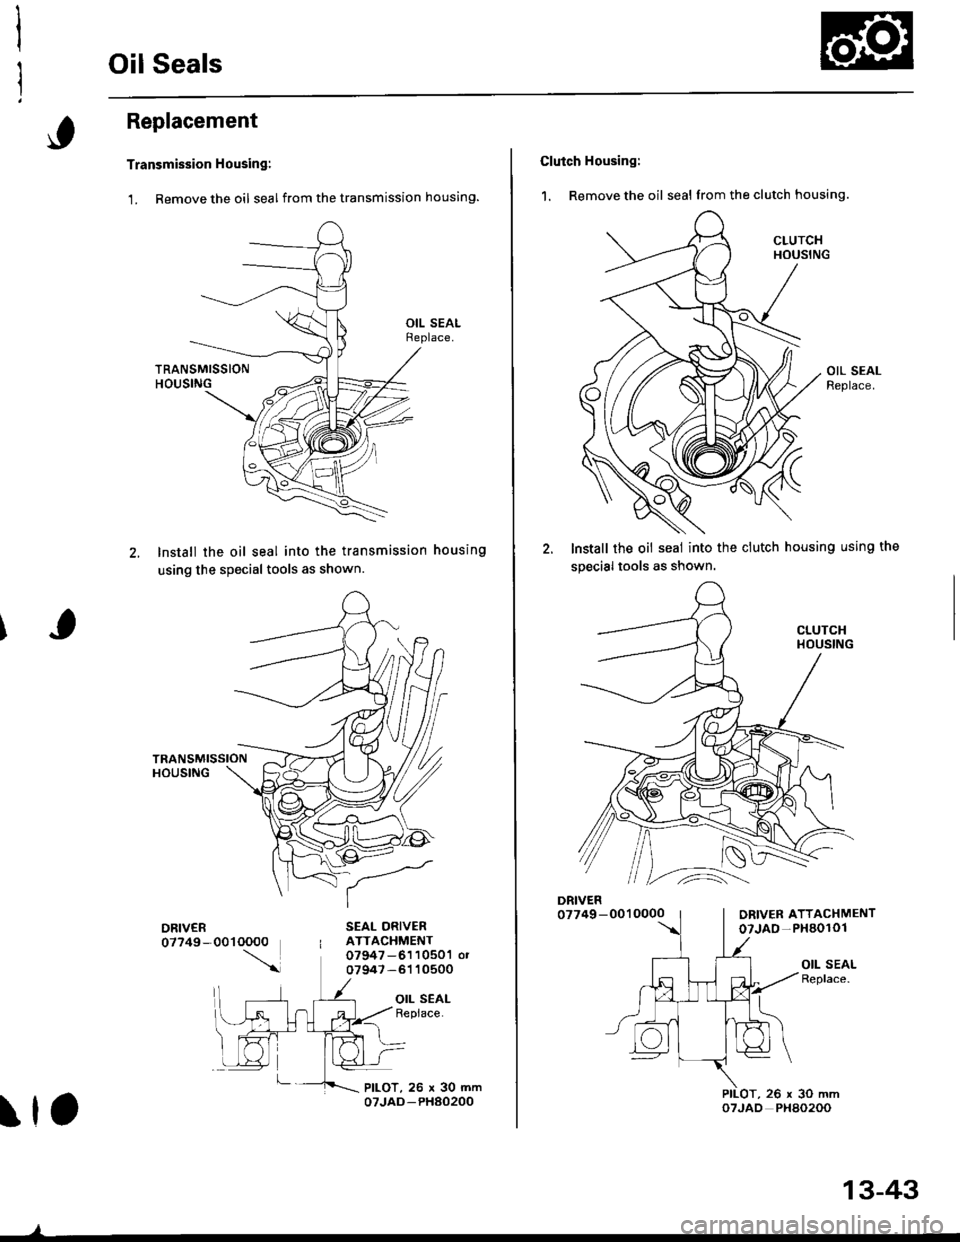
Replacement
Transmission Housing:
1. Remove the oil seal from the transmission housing.
lnstall the oil seal into the transmission housing
using the special tools as shown.
SEAL ORIVERATTACHMENT07947-6110501 or07947-6110500
OIL SEALReplace.
,OTJAD PHAO2OO
13-43
Clutch Housing:
1. Remove the oil seal from the clutch housing.
lnstall the oil seal into the ciutch housing using the
specialtools as shown.
ORIVER ATTACHMENToTJAO -PXaO101
OIL SEALReplace.
,26x30mm
Page 624 of 2189
Gearshift Mechanism
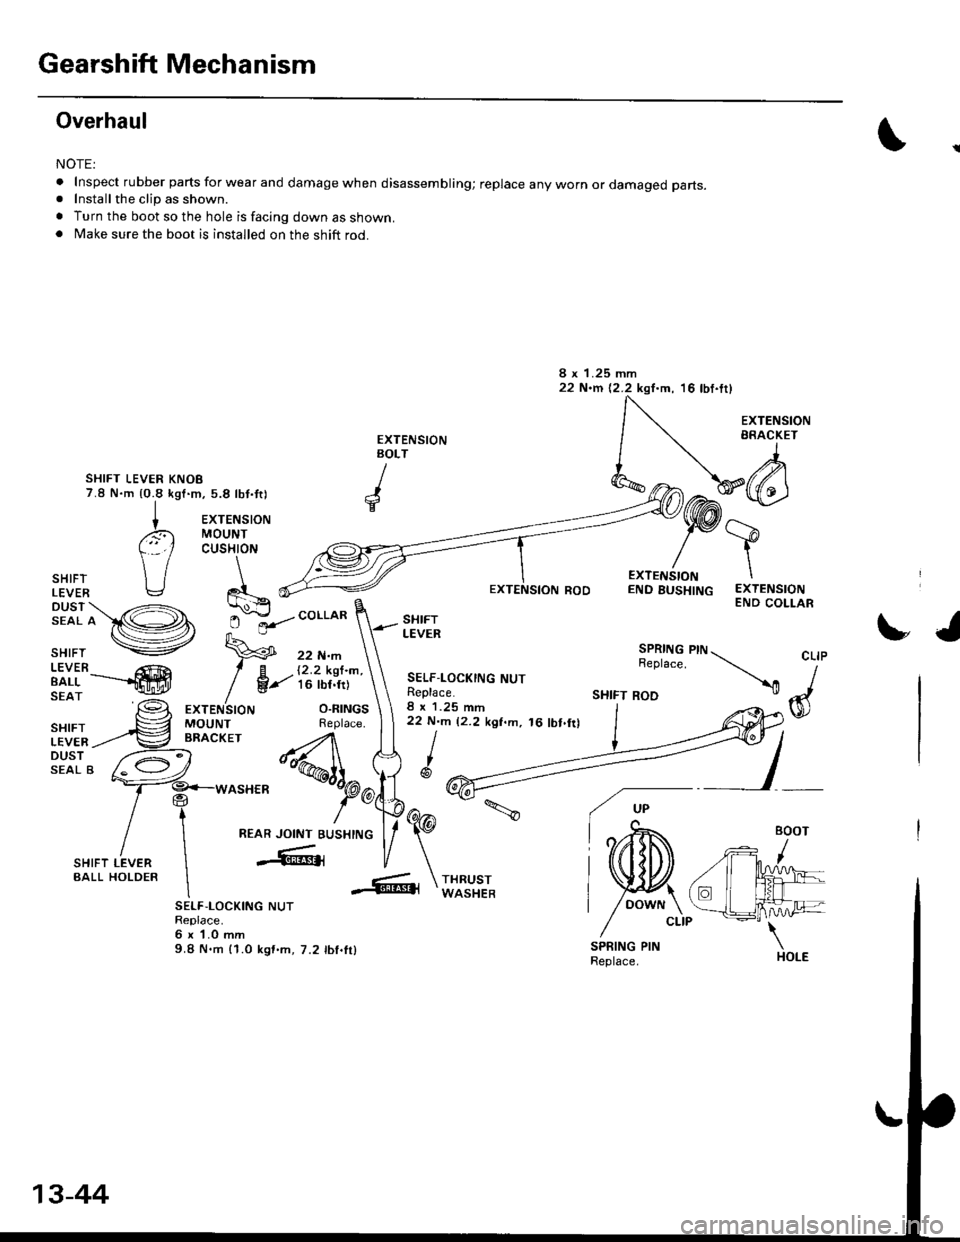
Overhaul
NOTE:
.Inspectrubberpartsforwearanddamagewhendisassembling;replaceanywornordamagedparts.
. Install the clip as shown.
. Turn the boot so the hole is facing down as shown.. Make sure the boot is installed on the shift rod.
SHIFT LEVER KNOE7.8 N.m {0.8 kgf.m,5.8 lbt.tt)
EXTENSIONBOLT
)
searr'p)) p f*** \-ii,,l?'"
SHIFT -Vvvvvvvvvvvvvvvv�l tlourur Replace. | 1 22 N'm 12.2 ksf'm, 16 lbt.ftl
ii,".i'----....-.9 / g-ia',rf,',,"' sELF-LocKrNG Nur
sEAr '6 .rrr*(,o"" o-","o, ;":'i:;u --
CLIP
dul/
/,1: MOUNT
l': I cusHroN ,€\/\/-sSHIFT l / /-LEVER \, et- ffi
PY:,'\1^l lW -"or.o*Dusr .- \5".o.o)@1 -o-E "ot'o'
sHlFr \:/ Q,gD 22 N.m
IiUei__-.....p anecxer ,-/n I I I
?!il, e* ^.-.-n{wl\^fr J"r^r"
7****r
""'%ilf
t@
t1
t\sHrFT LEVER IBALL HOLDER
\
REAR JorN*lr,""17E@
_6,
L\
EXTENSION
SELF-LOCKING NUTReplace.6 x '1.0 mm9.8 N.m {1.0 kgf.m, 7.2 lbf.lr}
tJSPRING PINReplace.
-6r
16 tbf.trl
13-44
Page 625 of 2189
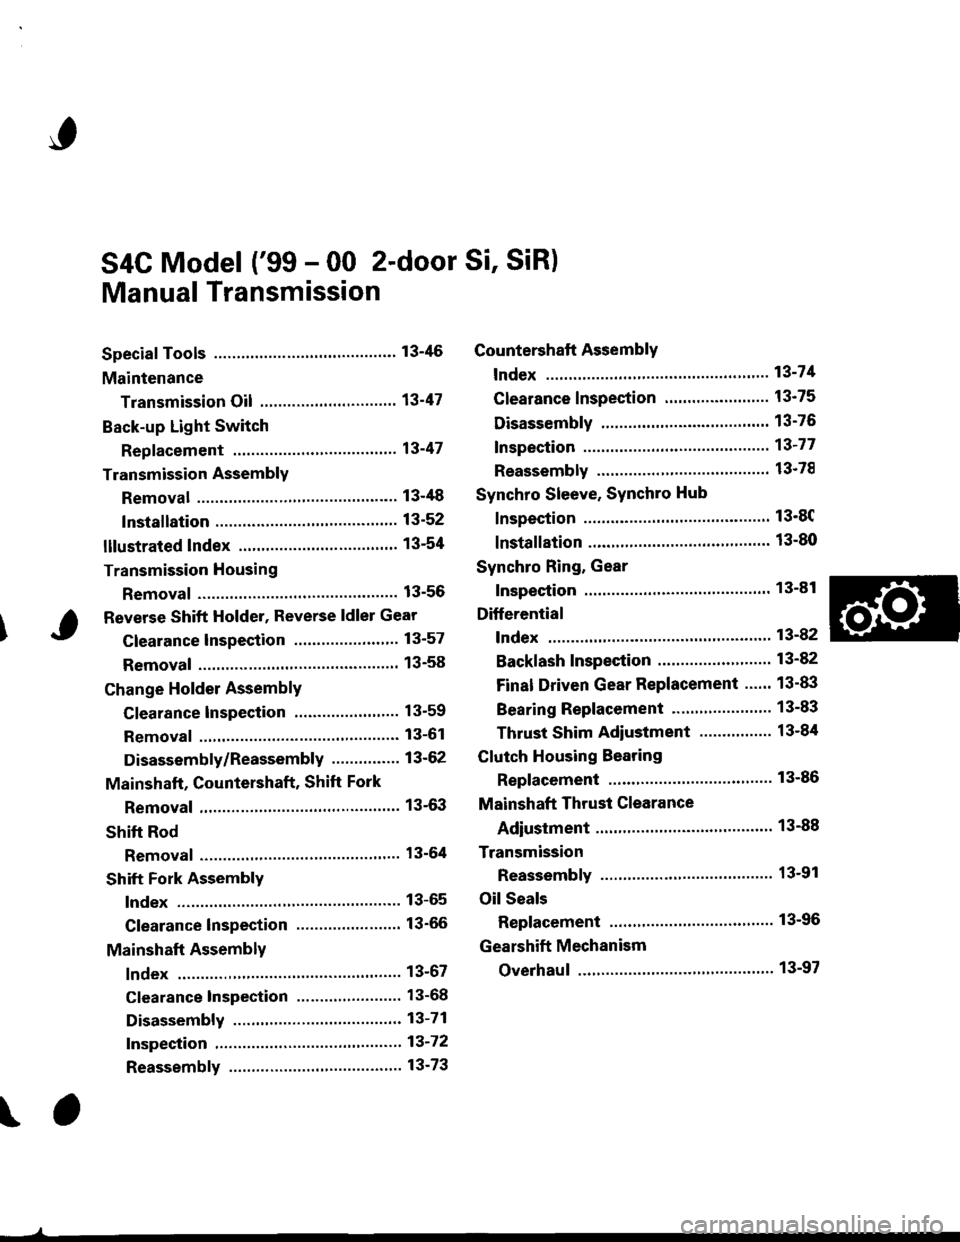
S4C Model ('99 - 00 2-door Si, SiR)
Manual Transmission
Special Tools ............' 13-46
Maintenance
Transmission Oi1 ...................'.......... 13-47
Back-up Light Switch
Repfacement ...""" 13'47
Transmission Assembly
Removal ......'.......... 13-/tB
lnstallation ............. 13-52
lllustrated lndex ................................... 13-54
Transmission Housing
Removal ................. 13-55
Beverse Shift Holder, Reverse ldler Gear
Clearance lnspection ...................".. 13-57
Removal ................. 13-58
Change Holder Assembly
Clearance lnspection .................".... 13-59
Removal ....,,........... 13-61
Disassembly/Reassembly ............... 1 3-62
Mainshaft, Countershaft, Shift Fork
Removal ................. 13-63
Shift Rod
Removal .........."'.... 13-64
Shift Fork Assembly
lndex ................ ...... 13-65
Clearance lnspection .............'......... 13'66
Mainshaft Assembly
lndex ............"" ...... 13-67
Clearance lnspection ....................... 13-68
Disassembly .......... 13-71
fnspection '."'.......', 13'72
Reassembly .......'... 13-73
Countershaft Assembly
fndex ................ "....13-71
Glearance Inspection'......'...........'... 1 3'75
Disassembly .......... 13-76
fnspection .'............13'77
Reassembly "......... 13'78
Synchro Sleeve, Synchro Hub
Inspection .............. 13'8C
Installation ............. 13-80
Synchro Ring, Gear
Inspection .'............ 13-81
Differential
lndex ................ ...... 13-82
Backlash Inspection ..."..........."'...... 1 3-82
Final Driven Gear Replacement ...... 13-83
Bearing Replacement ....."'.......""'.. 13-83
Thrust Shim Adiustment ......""'..... 13-84
Clutch Housing Bearing
Replacement ..'...... 13-86
Mainshaft Thrust Glearance
Adiustment '.........'. 13-88
Transmission
Reassembly ."'....... 13-91
Oil Seals
Replacement ..'...... 13-96
Gearshift Mechanism
Overhaul ................ 13-97
\
Page 626 of 2189
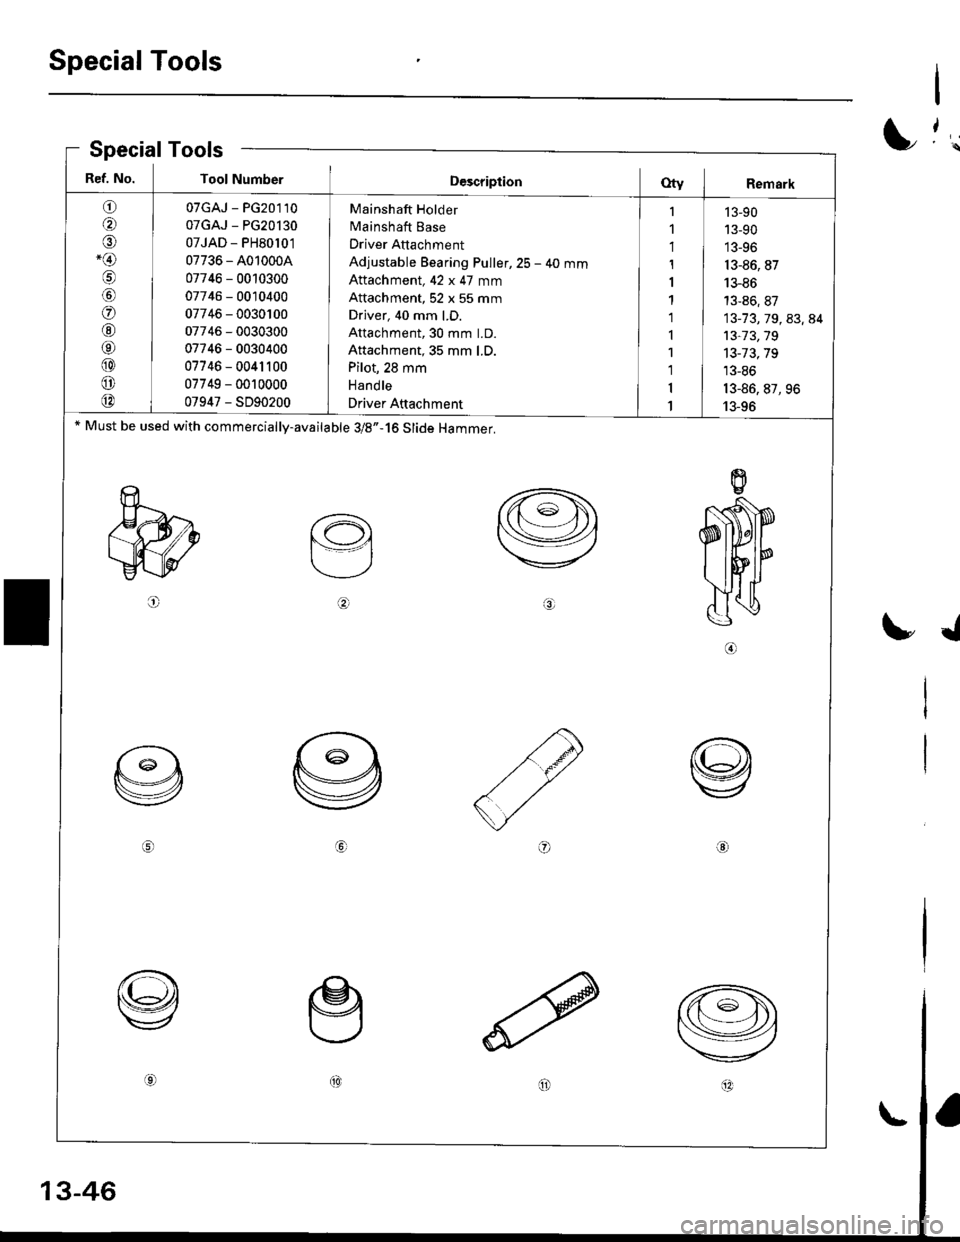
Special Tools
SpecialTools
I
I
I
./
Ref. No. Tool NumberD€scriptionOty I Remark
o
@
o-@
@
o
@
@
@
o
@
07GAJ - PG20110
07GAJ - PG20l30
07JAD - PH80l0'1
07736 - A010004
07746 - 0010300
07746 - 0010400
07746 - 0030100
07746 - 0030300
07746 - 0030400
07746 - 0041100
07749 - 0010000
07947 - SD90200
Mainshaft Holder
Mainshaft Base
Driver Attachment
Adjustable Bearing Puller,25 - 40 mm
Attachment, 42 x 47 mm
Attachment, 52 x 55 mm
Driver, 40 mm LD.
Attachment, 30 mm LD.
Attachment, 35 mm LD.
Pilot, 28 mm
Hand le
Driver Attachment
I
1
1
1
I
1'l
I
1
1
1'I
13-90
13-90
13-96
13-86, 87
13-86
13-86, 87
13-73,79,83,84
13-73,19
13-73,79
13-86
13-86,87,96
13-96* Must be used with commercially-available 3/8,,-16 Slide Hammer.
o
aol@(t4^
Page 627 of 2189
MaintenanceBack-up Light Switch
\
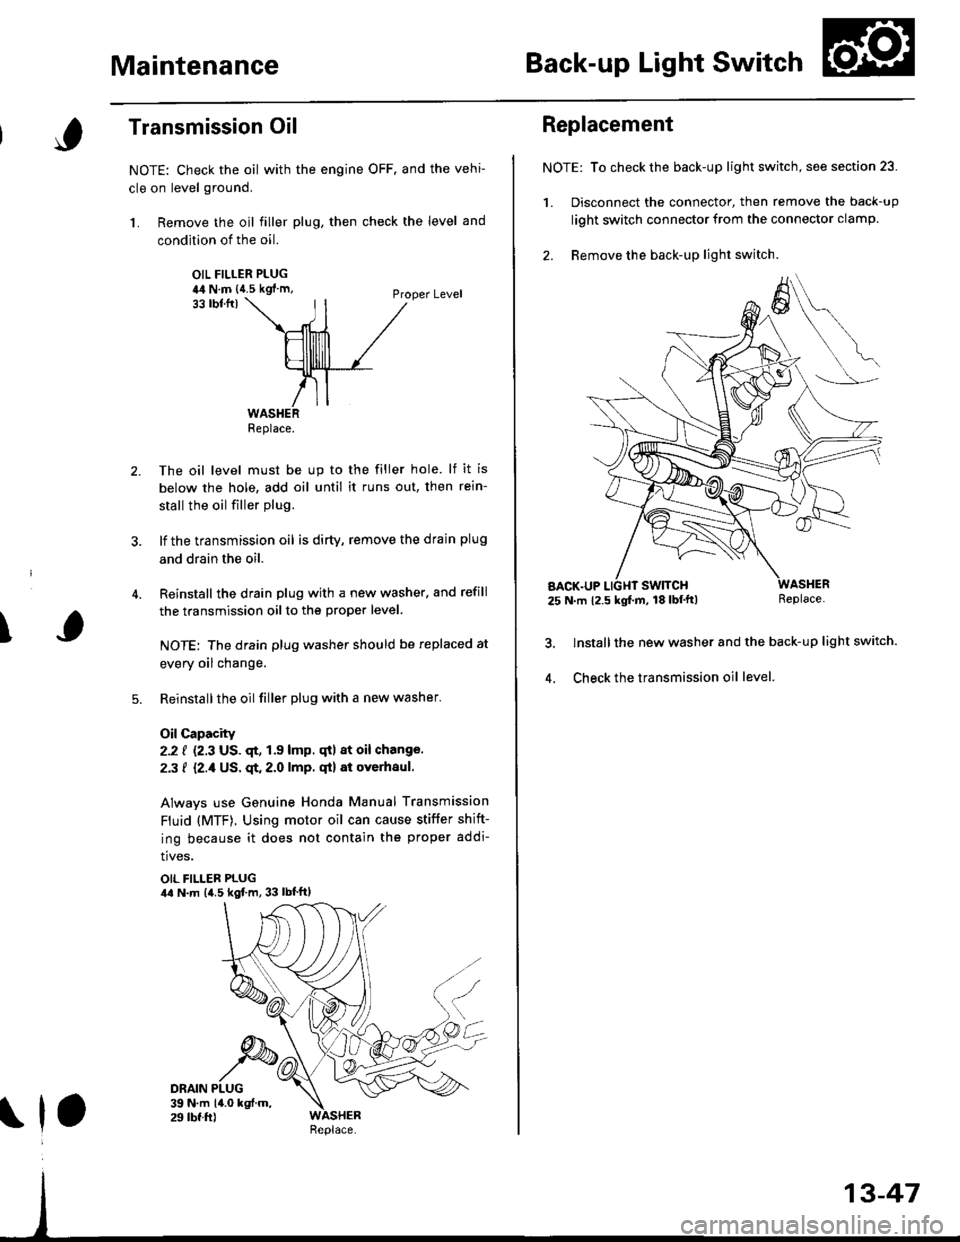
Transmission Oil
NOTE: Check the oil with the engine OFF. and the vehi-
cle on level ground.
1. Remove the oil filler plug, then check the level and
condition of the oil.
OIL FILLER PLUGia4 N.m {{.5 kgf'm,Proper Level33 tbtfrl
The oil level must be up to the filler hole. lf it is
below the hole, add oil until it runs out, then rein-
stall the oil filler plug.
lf the transmission oil is dirty, remove the drain plug
and drain the oil.
Reinstall the drain plug with a new washer. and refill
the transmission oil to the proper level.
NOTE: The drain plug washer should be replaced at
every oil change.
Reinstallthe oilfiller plug with a new washer.
Oil Capacity
2.2 f {2.3 US. qt, 1.9 lmp. qtl at oil change.
2.3 f {2./f US. qt. 2.0 lmp. qt} at overhaul.
Always use Genuine Honda Manual Transmission
Fluid (MTF). Using motor oil can cause stiffer shift-
ing because it does not contain the proper addi-
tives.
OIL FILLER PLUGila N.m {4.5 kgf.m, 33 lbt'ftl
Replace.
\1,
Replacement
NOTE: To check the back-up light switch, see section 23.
1. Disconnect the connector, then remove the back-up
light switch connector from the connector clamp.
2. Remove the back-up lighr switch.
AACK.UP25 N.m 12.5 kgf.m, 18 lbf'tt)Replace.
lnstall the new washer and the back-up light switch.
Check the transmission oil level.4.
Page 628 of 2189
Transmission Assembly
l
,
{
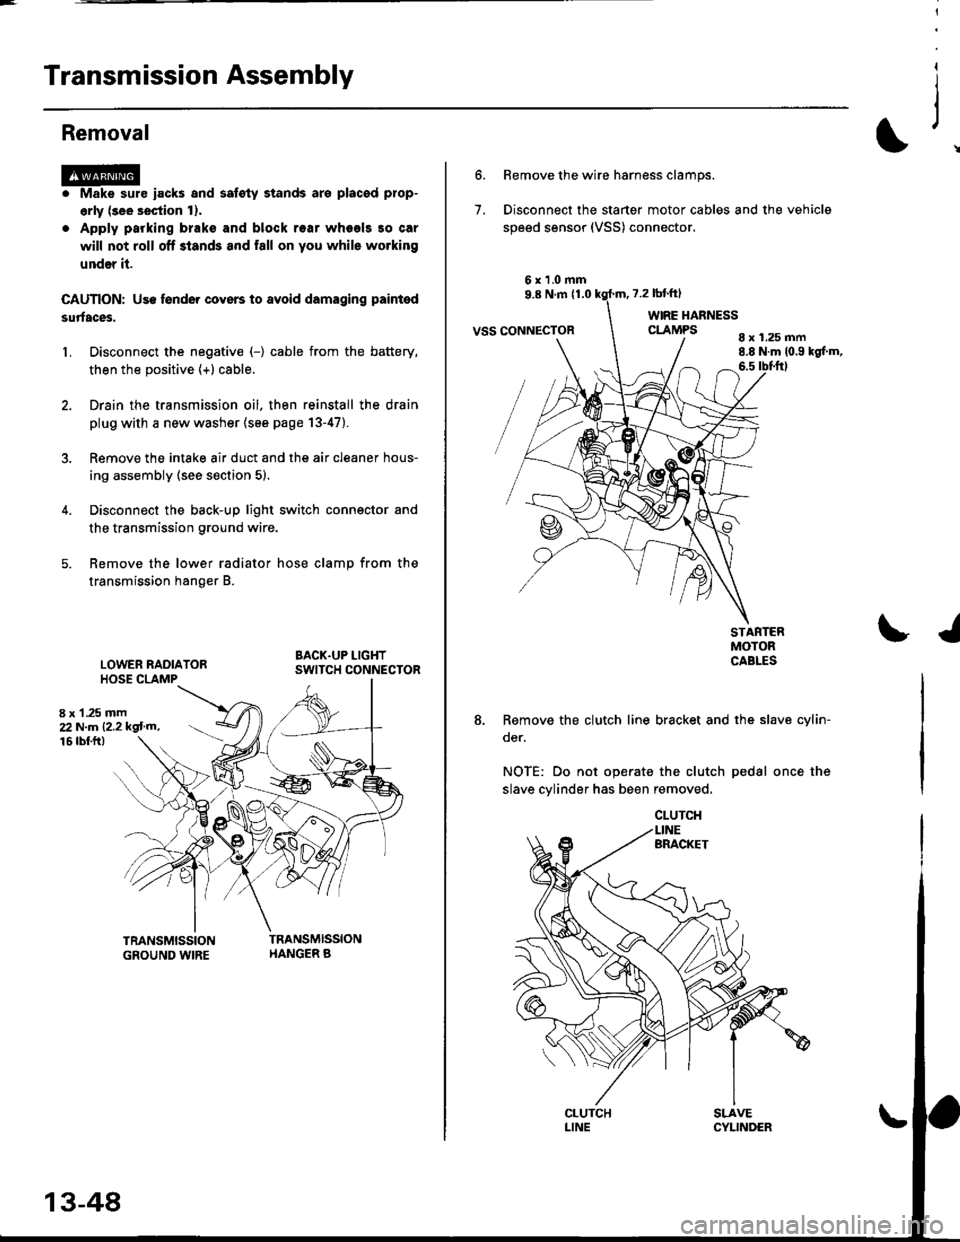
Removal
@Make sure iacks and safoty stands are placad plop-
erly (3ee section l).
Apply parking braks and block rear wheels so car
will not roll off stands and fall on you while working
under il.
CAUTION: Us6 fonder cove6 to avoid damaging painted
sudaces.
Disconnect the negative (-) cable from the battery,
then the positive (+l cable.
Drain the transmission oil. then reinstall the drain
plug with a new washer (see page 13-47).
Remove the intake air duct and the air cleaner hous-
ing assembly (see s€ction 5).
Disconnect the back-up light switch connector and
the transmission ground wire.
Remove the lower radiator hose clamp from the
transmission hanger B.
L
8 x 1 .25 mm22Nm12.2kgl'm�,
LOWER RADIATORHOSE CLAMP
16 rbtft)
13-48
7.
Bemove the wire harness clamps.
Disconnect the starter motor cables and the vehicle
speed sensor (VSS) connector.
8 x 1.25 mm8.8 N.m (0.9 kgf.m,6.5 tbtftl
STARTERMOTORCABLES
8. Remove the clutch line bracket and the slav6 cylin-
oer.
NOTE: Do not operate the clutch pedal once the
slave cylinder has been removed.
\J
Page 629 of 2189
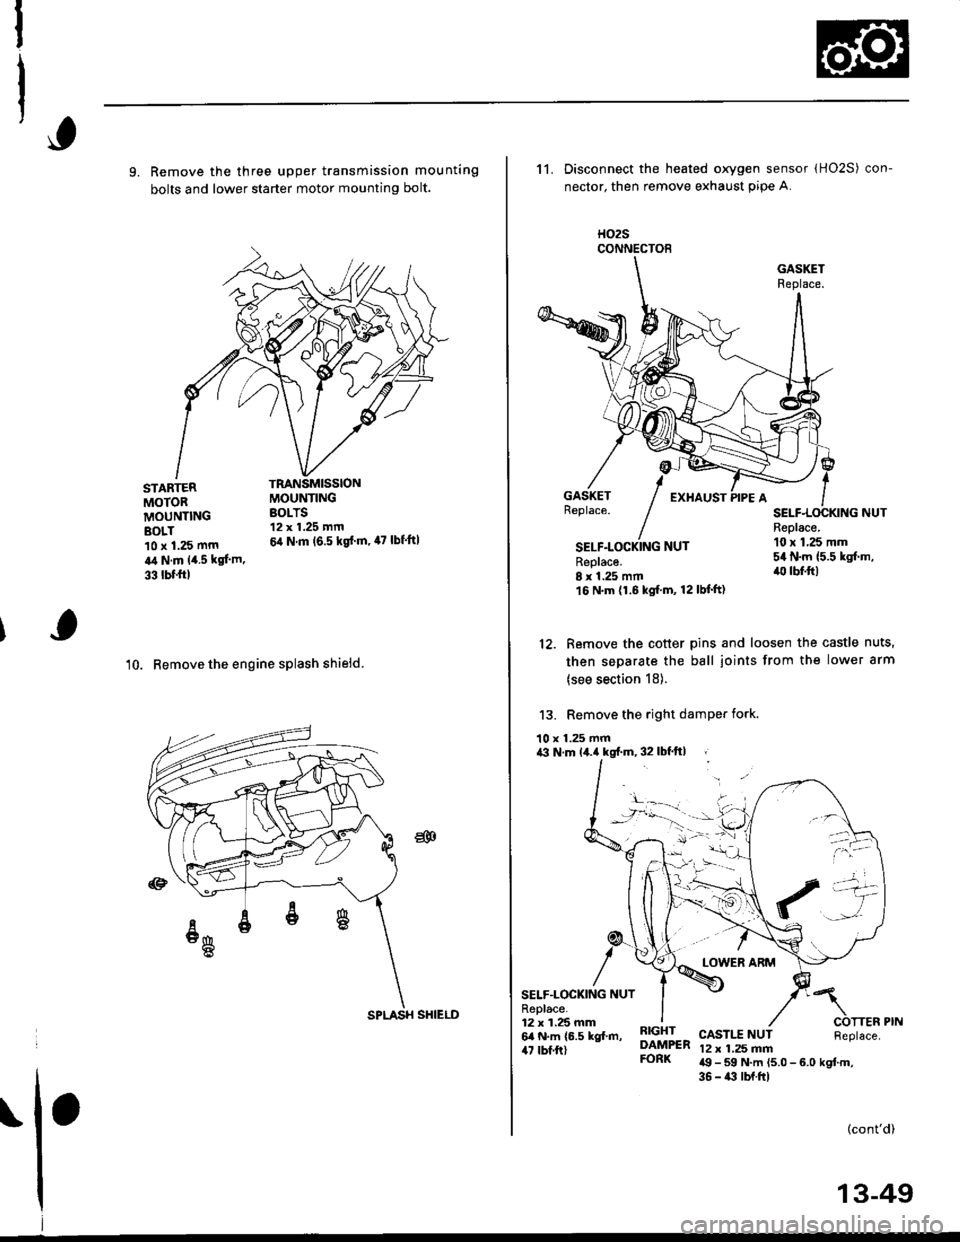
9. Remove the three upper transmission mounting
bolts and lower starter motor mounting bolt.
'10. Remove the engine splash shieid.
TRANSMISSIONMOUNTINGBOLTS12 x 1.25 mm
6,1 N.m (6.5 kgd m, 47 lbf'ft|
STARTERMOTORMOUNTINGBOLT10 x 1.25 mm
a,t N.m 14.5 kgl.m.
33 tbf.trl
CONNECTOE
11. Disconnect the heated oxygen sensor (HO2S) con-
nector, then remove exhaust pip€ A.
H02S
SELF.LOCKING NUTReplace.8 r 1.25 mm16 N.m (1.6 kgf.m, 12lbf'ft)
Replace.10 x 1,25 mm54 N.m {5.5 kgf.m,'lll lbf.ft)
12. Remove the cotter pins and loosen the castle nuts,
then separate the ball joints from the lower arm
(see section 18).
13. Remove the right damPer fork.
10 x 1.25 mma3 N.m lil.a kgf.m, 32 lbf'ft| ,
SELF.LOCKING NUTR6place.12 x 1.25 mm6a N.m (6.5 kgl.m,47 rbf ft)
RIGHTDAMPERFORK
CASTI.T NUT12 x 1,25 mma9 - 59 N.m (5.0 - 6.0 kgtm,36 - i(t lbf.ftl
(cont'd)
!-
ria -11: \/-/
't'''-a
SPLASH SHIELD
13-49
Page 630 of 2189
Transmission Assembly
Removal(cont'd)
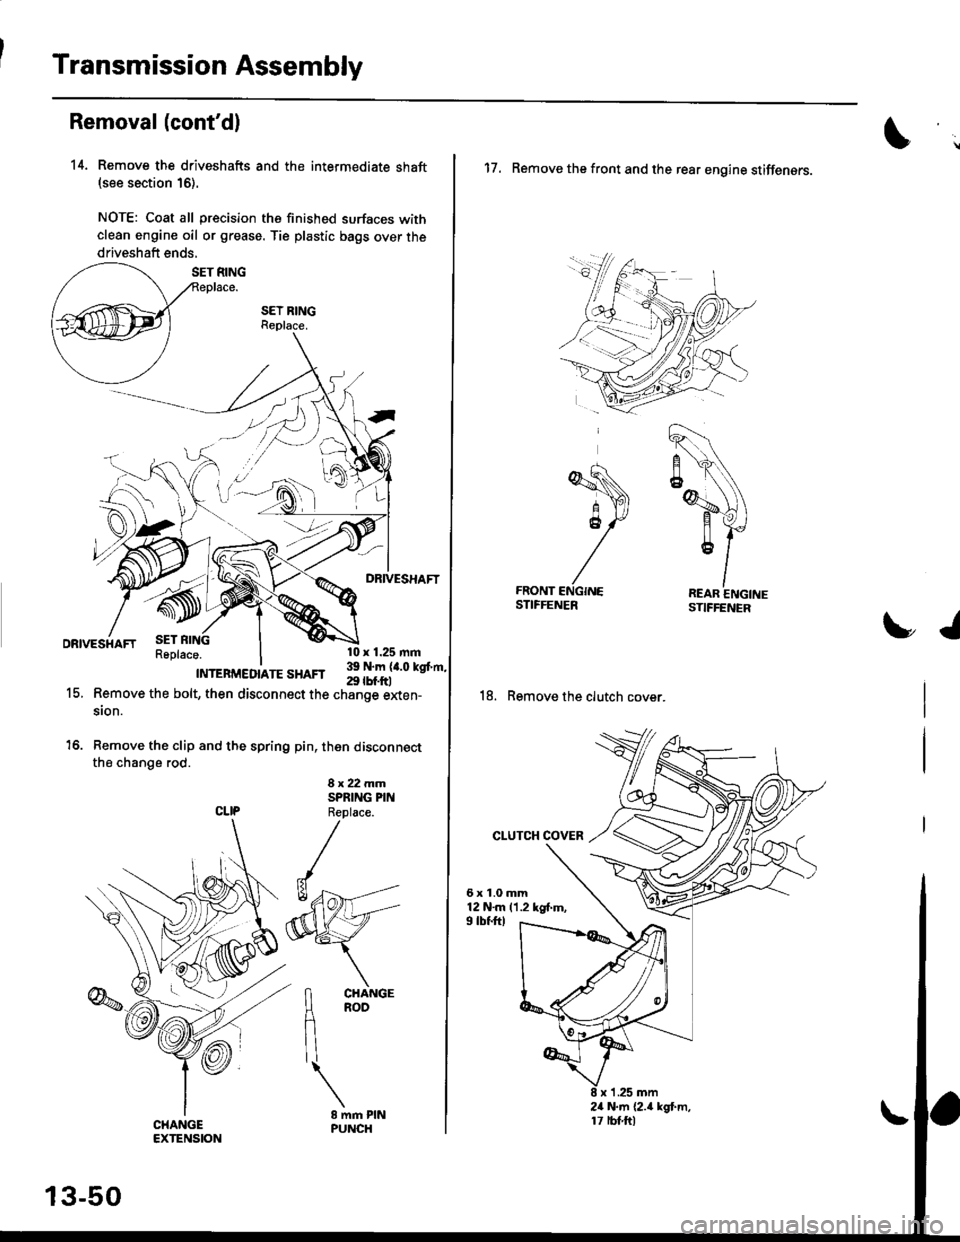
14. Remove the driveshafts and the intermediate shaft(see section 16).
NOTE: Coat all precision the finished surfaces with
clean engine oil or grease. Tie plastic bags over the
driveshaft ends,
Remove the bolt, then disconnect the change elden-
sion.
Remove the clip and the spring pin, then disconnectthe change rod.
8x22mmSPRING PINCLIP Replace.
15.
13-50
17. Remove the front and the rear engine stiffensrs.
18. Remove the clutch cover.
CLUTCH COVER
6x1.0mm12 N.m (1.2 kg{.m,9 tbf.ftl
x 'l .25 mm
tJ
24 N.m {2.4 kgt m,17 rbt ftl