turn signal HONDA CIVIC 2002 7.G User Guide
[x] Cancel search | Manufacturer: HONDA, Model Year: 2002, Model line: CIVIC, Model: HONDA CIVIC 2002 7.GPages: 1139, PDF Size: 28.19 MB
Page 328 of 1139
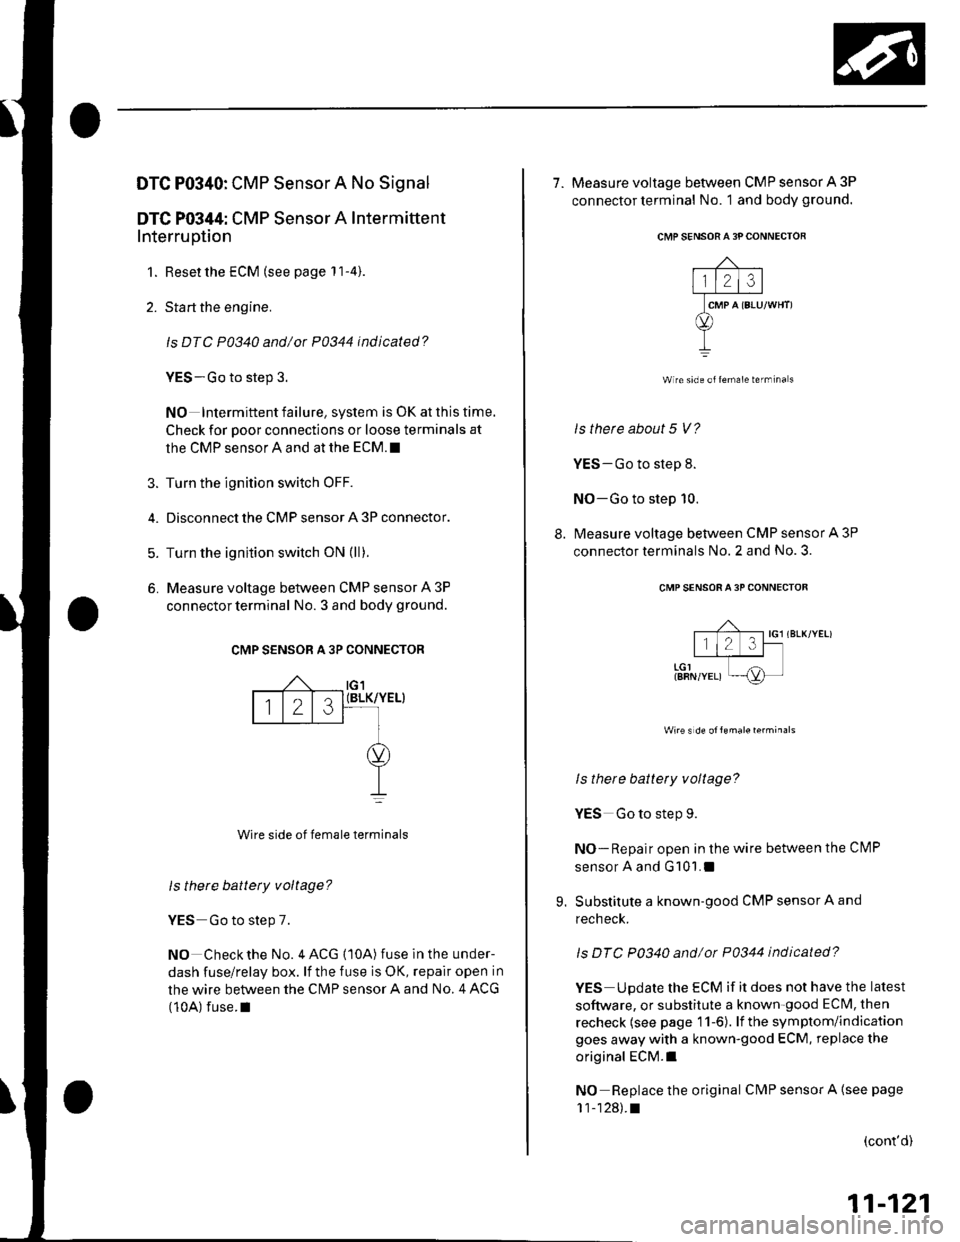
DTC P0340: CMP Sensor A No Signal
DTG P0344: CMP Sensor A Intermittent
Interruption
1. Reset the ECM (see page '11-4).
2. Start the engine.
ls DTC P0340 and/or P0344 indicated?
YES-Go to step 3.
NO Intermittent failure, system is OK at this time.
Check for poor connections or loose terminals at
the CMP sensor A and at the ECM.I
3. Turn the ignition switch OFF.
4. Disconnect the CMP sensor A 3P connector.
5. Turn the ignition switch ON (ll).
6. Measure voltage between CMP sensor A 3P
connector terminal No. 3 and body ground.
CMP SENSOR A 3P CONNECTOR
(BLK/YEL}
Wire side of female terminals
ls there battety voltage?
YES Go to step 7.
NO Check the No. 4 ACG {10A) fuse in the under-
dash fuse/relay box. lf the fuse is OK, repair open in
the wire between the CN4P sensor A and No. 4 ACG
(10A) fuse.I
tG1
123
7. Measure voltage between CMP sensor A 3P
connector terminal No. 1 and body ground.
CMP SENSORA 3P CONNECTOR
Wire side olfemale termina s
ls therc about 5 V?
YES-Go to step 8.
NO-Go to step 10.
8. Measure voltage between CMP sensor A 3P
connector terminals No. 2 and No. 3.
CMP SENSOR A 3P CONNECTOF
;f-;-1 ,o, ,r.*,"r.,
I l1 J l-t
,-or---T--I{8RN/YEL) ni-
ls there battety voltage?
YES Go to step 9.
NO-Repair open in the wire between the Cl\4P
sensor A and G101.1
9. Substitute a known-good CMP sensor A and
recheck.
ls DTC P0340 and/ot P0344 indicated?
YES Update the ECM if it does not have the latest
software, or substitute a known-good ECM, then
recheck (see page 11-6). lf the symptom/indication
goes away with a known-good ECM, replace the
original ECM.I
NO Replace the original CMP sensor A {see page
11-128).t
(cont'd)
11-121
Page 340 of 1139
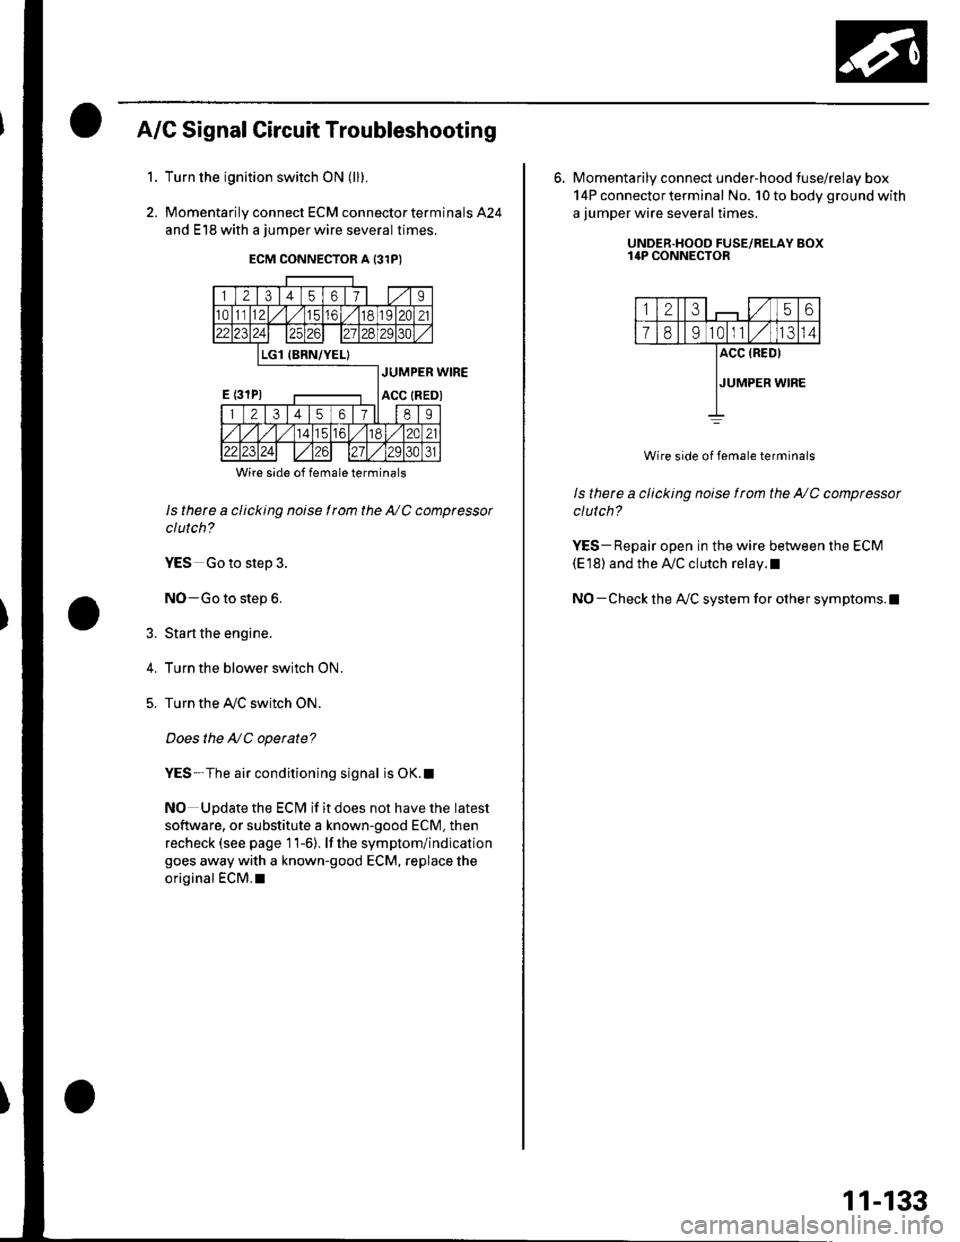
A/G Signal Circuit Troubleshooting
Turn the ignition switch ON (ll).
Momentarily connect ECM connector terminals 424
and E18 with a jumper wire several times.
1.
2.
5.
Wire side of female terminals
ls there a clicking noise I rom the NC compressor
clutch?
YES Go to step 3.
NO-Go to step 6.
Sta rt the engine.
Turn the blower switch ON.
Turn the Ay'C switch ON.
Does the NC operate?
YES-The air conditioning signal is OK.I
NO Update the ECM if it does not have the latest
software, or substitute a known-good ECM. then
recheck (see page 11-6). lf the symptom/indication
goes away with a known-good ECM, replace the
original €CM.l
6. Momentarily connect under-hood tuse/relay box
14P connector terminal No. 10 to body ground with
a jumper wire several times.
UNDER.HOOD FUSE/RELAY BOXI4P CONNECTOR
12356
1891011IJ14
ACC (RED)
JUMPER WIRE
Wire side of female terminals
ls there a clicking noise f rom the NC compressor
clutch?
YES- Repair open in the wire between the ECM(E'18) and the Ay'C clutch relay.l
NO- Check the A/C system for other symptoms.l
11-133
Page 341 of 1139
ldle Gontrol System
't.
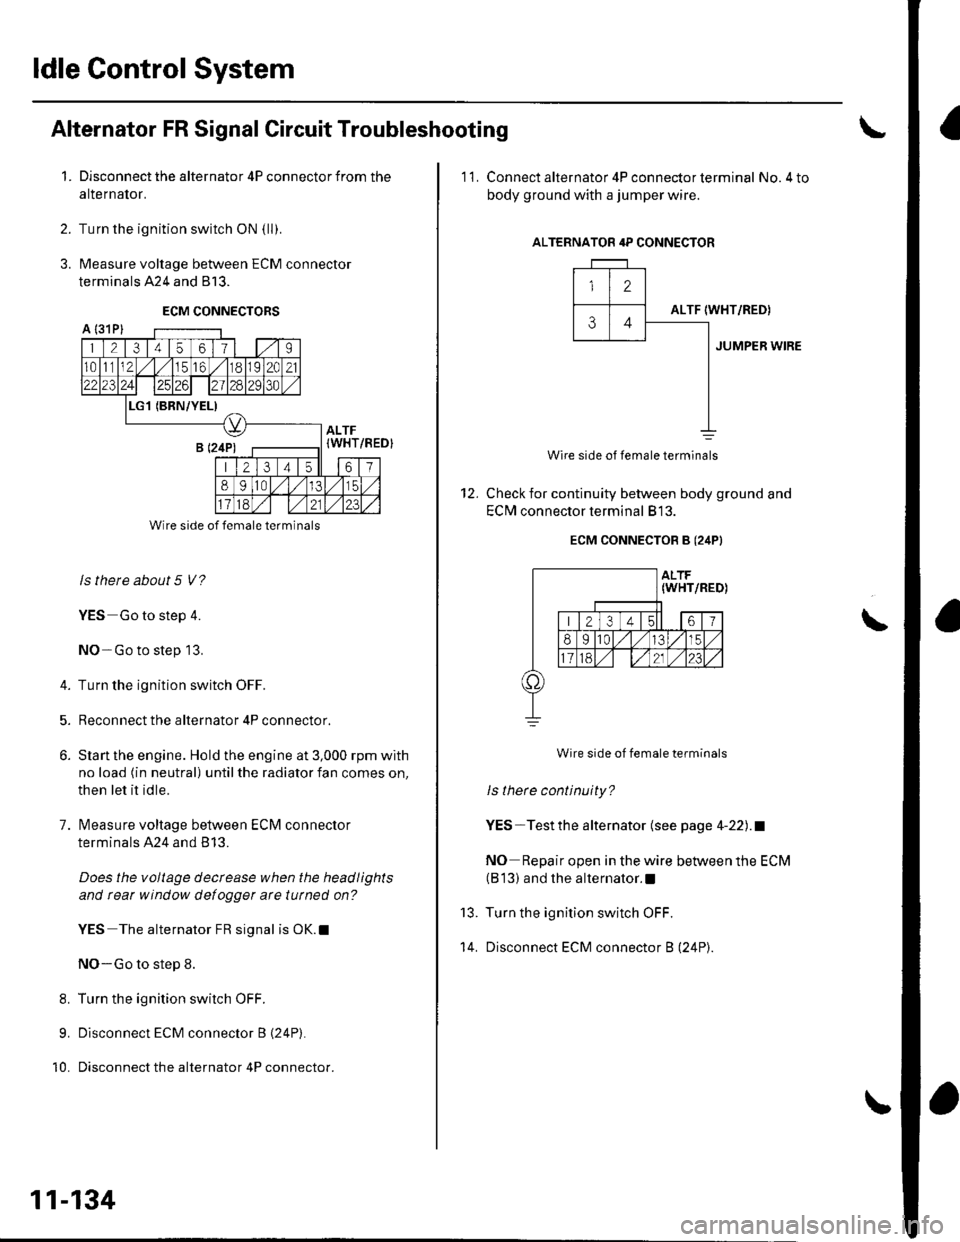
Alternator FR Signal Circuit Troubleshooting
Disconnect the alternator 4P connector from the
alternalor.
Turn the ignition switch ON {ll).
Measure voltage between ECM connector
terminals 424 and 813.
ECM CONNECTORS
2.
3.
A l31Pl
1 21345611 | 1.,'I
1011112,/56,/r8119l2C21
2312428129130
L(BRN/YEL)
ALTF(WHT
213 4t561
89ltal,/l/15
Wire side of female terminals
ls there about 5 V?
YES Go to step 4.
NO-Go to step 13.
4. Turn the ignition switch OFF.
5. Reconnect the alternator 4P connector.
6. Slan the engine. Hold the engine at 3,000 rpm with
no load (in neutral) until the radiator fan comes on,
then let it idle.
7. lvleasure voltage between ECM connector
terminals A24 and B 13.
Does the voltage decrease when the headlights
and rear window defogger arc tutned on?
YES The alternator FR signal is OK.l
NO-Go to step 8.
8. Turn the ignition switch OFF.
9. Disconnect ECM connector B (24P).
10. Disconnect the alternator 4P connector.
/REDI
11-134
'11. Connect alternator 4P con necto r term inal No.4 to
body ground with a jumper wire.
ALTERNATOR 4P CONNECTOR
12
ALTF34IWHT/RED)
JUMPER WIRE
12.
Wire side of female terminals
Check for continuity between body ground and
EClvl connector terminal 813.
ECM CONNECTOB B (24PI
Wire side of female terminals
ls there continuity?
YES-Testthe alternator (see page 4-22).1
NO Repair open in the wire between the ECM(B 13) and the alternator.l
Turn the ignition switch OFF.
Disconnect ECM connector B (24P).
\
13.
't 4.
Page 342 of 1139
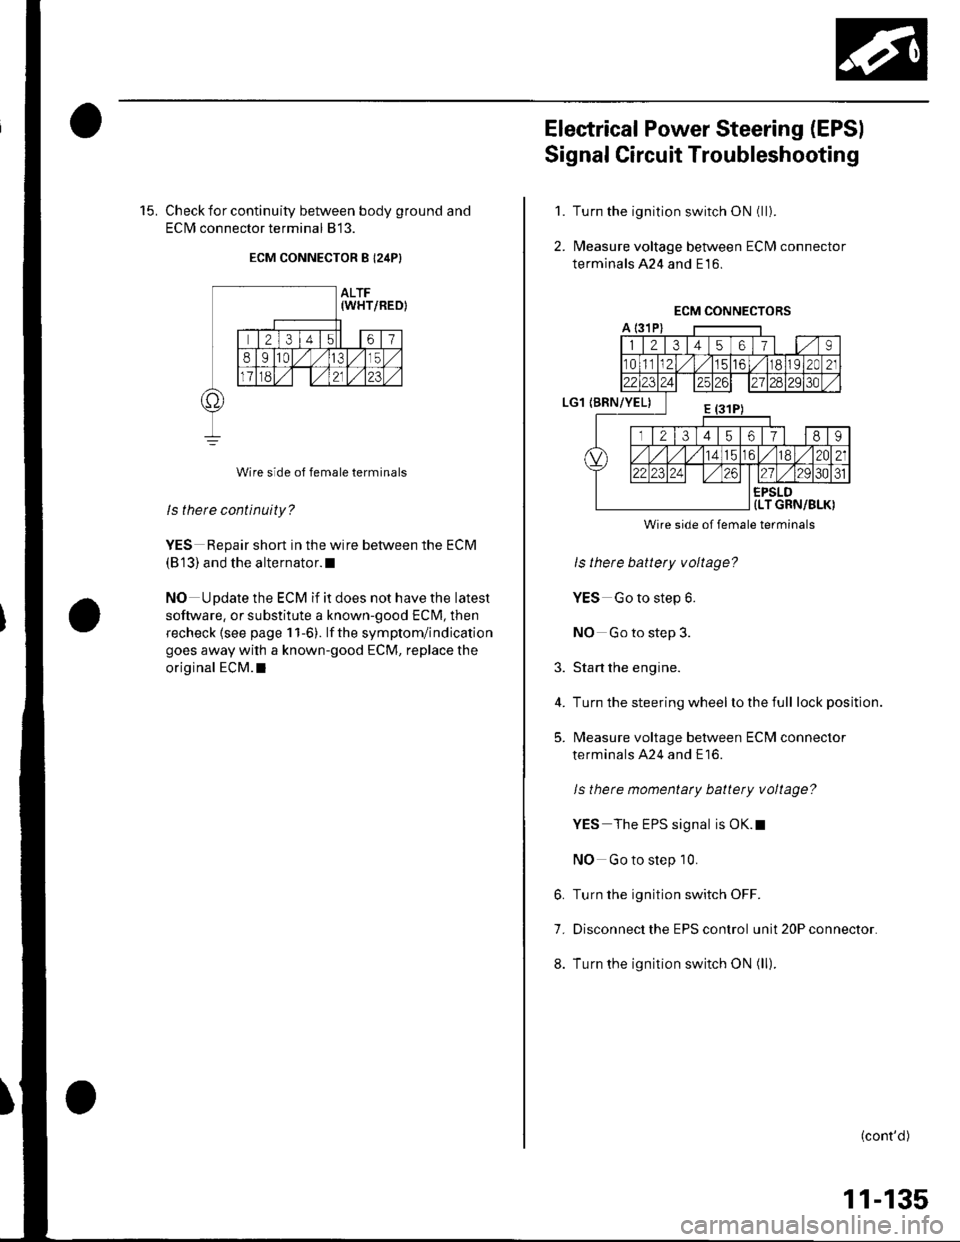
15. Check for continuity between body ground and
ECIM connector terminal 813.
ECM CONNECTOR B I24P}
Wire side of female terminals
ls there continuity?
YES Repair short in the wire between the ECM
(813) and the alternator.l
NO Update the ECM if it does not have the latest
software, or substitute a known-good ECM, then
recheck lsee page 1 1-6). lf the symptom/indication
goes away with a known-good ECM, replace the
original ECM.I
Electrical Power Steering (EPSI
Signal Circuit Troubleshooting
Turn the ignition switch ON (ll).
l\4easure voltage between ECM connector
terminals 424 and E16.
1.
2.
3.
4.
5.
Wire side of female terminals
ls there battery voltage?
YES Go to step 6.
NO Go to step 3.
Start the engine.
Turn the steering wheel lo the full lock position.
l\4easure voltage between ECM connector
terminals A24 and E16.
ls there momentaty battery voltage?
YES The EPS signal is OK.t
NO Go to step 10.
6. Turn the ignition switch OFF.
7. Disconnect the EPS control unit 20P connector.
8. Turn the ignition switch ON (ll).
(cont'd)
11-135
Page 343 of 1139
ldle Control System
Electrical Power Steering (EPSI Signal Circuit Troubleshooting (cont'd)
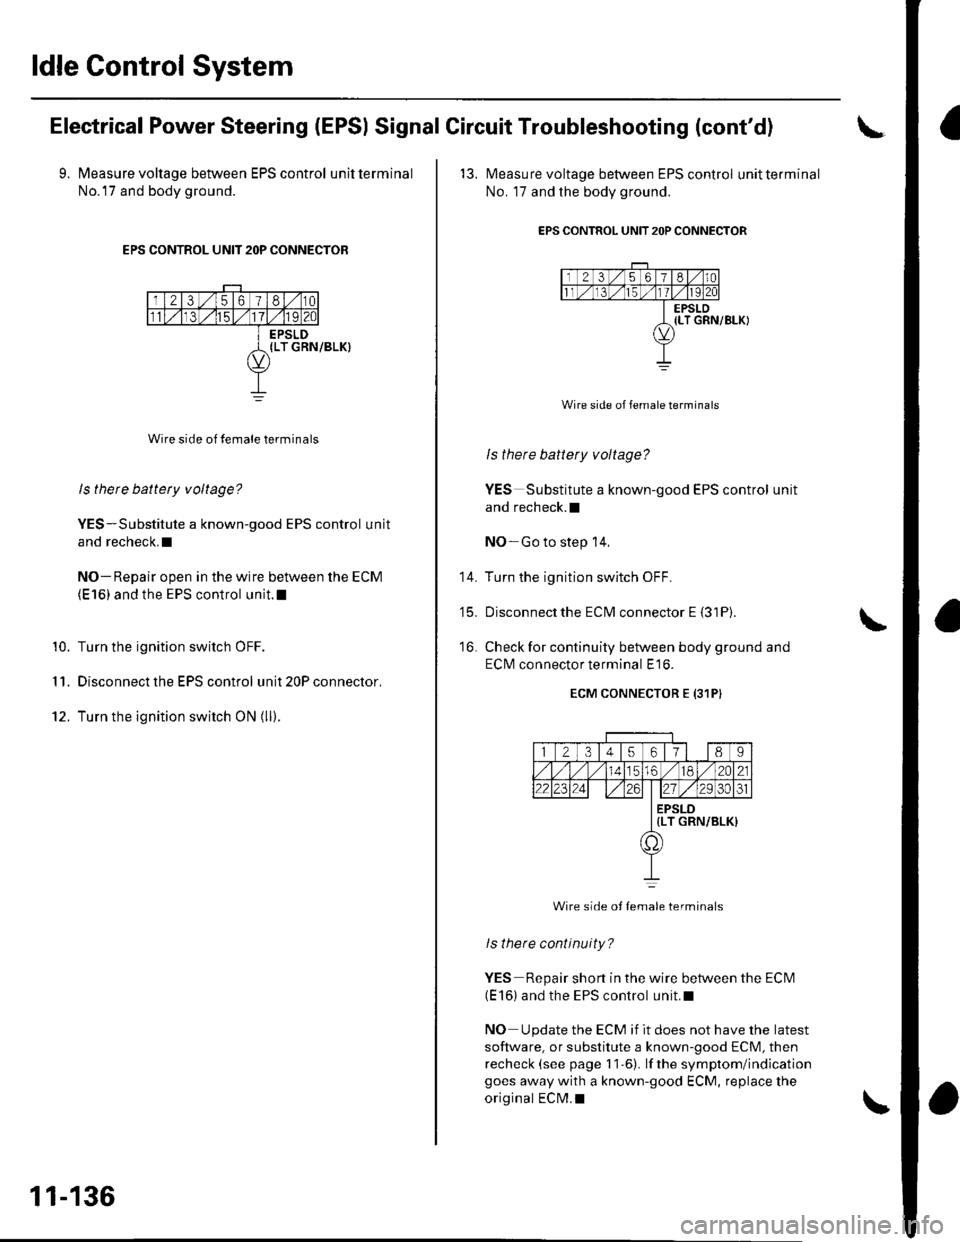
9. Measure voltage between EPS control unitterminal
No.l7 and body ground.
EPS CONTROL UNIT 2OP CONNECTOR
Wire side of female terminals
ls there battety voltage?
YES-Substitute a known-good EPS control unit
and recheck.I
NO- Repair open in the wire between the ECM(E 16) and the EPS control unit.l
Turn the ignition switch OFF.
Disconnect the EPS control unit 20P connector.
Turn the ignition switch ON (ll).
10.
I '�I.
12.
11-136
'13. l\4easure voltage between EPS control unitterminal
No. 17 and the body ground.
EPS CONTROL UNIT 2OP CONNECTOR
Wire side of female terminals
ls there battery voltage?
YES Substitute a known-good EPS control unit
and recheck.l
NO-Go to step 14,
Turn the ignition switch OFF.
Disconnectthe ECM connector E {31P).
Check for continuity between body ground and
ECI\4 connector terminal E16.
ECM CONNECTOR E {31PI
14.
t5_
16.
12345617l 189
56./182A21
2223zi ./29 30ol
EPSLD{LT GRN/BLK)
a,
Wire side ot Iemale terminals
lsthere continuity?
YES Repair short in the wire between the ECN4(E 16) and the EPS control unit.l
NO Update the ECM if it does not have the latest
software, or substitute a known-good ECM, then
recheck (see page 11-6). lf the symptom/indicationgoes away with a known-good ECM, replace the
original ECM.I
Page 500 of 1139
Steering
Steering Wheel Installation
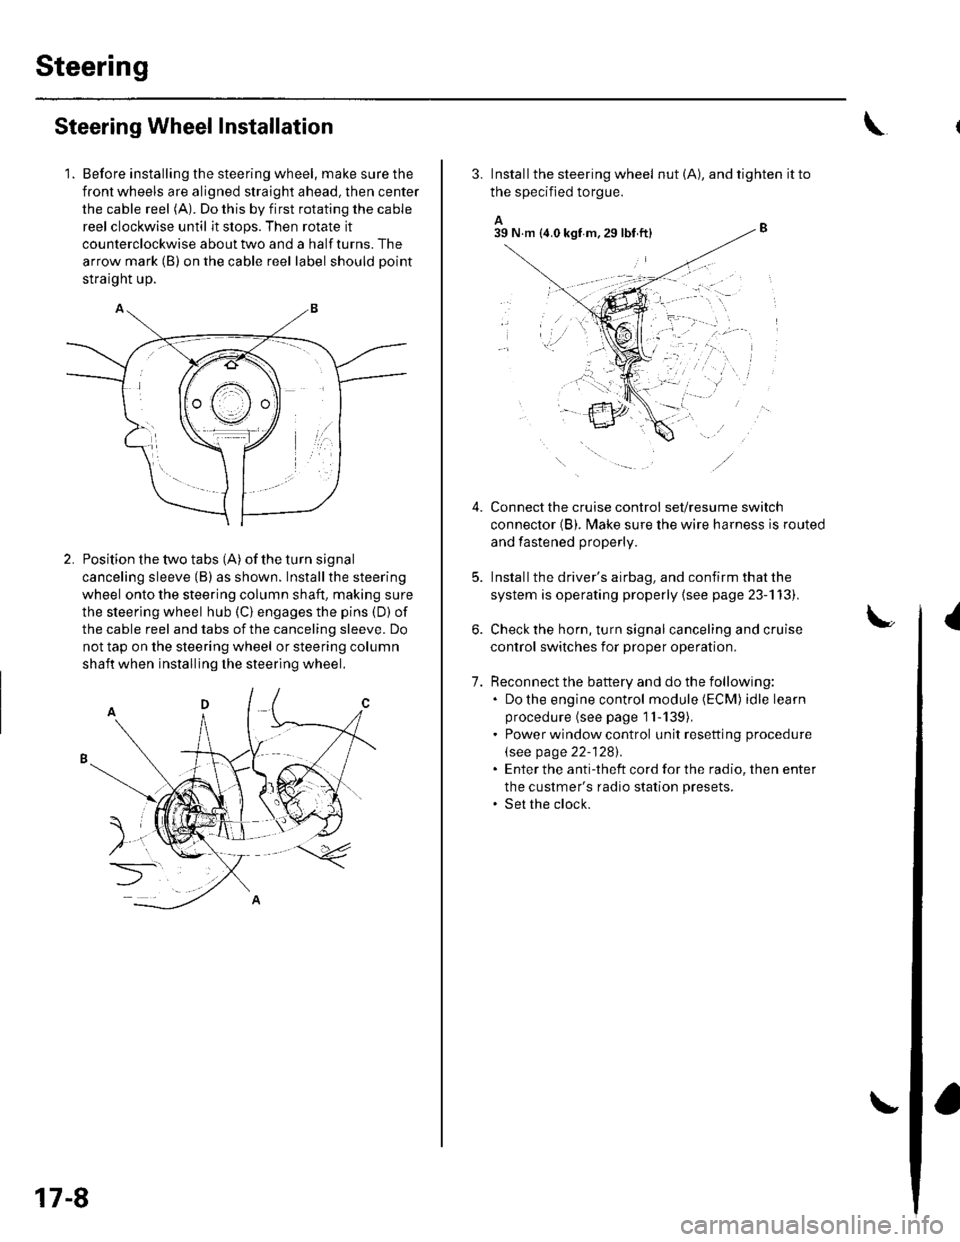
1. Before installing the steering wheel, make sure the
front wheels are aligned straight ahead, then center
the cable reel (A). Do this by first rotating the cable
reel clockwise until it stops. Then rotate it
counterclockwise about two and a half turns. The
arrow mark (B) on the cable reel label should point
straight up.
Position the two tabs (A) of the turn signal
canceling sleeve (B) as shown. Installthe steering
wheel onto the steering column shaft, making sure
the steerlng wheel hub (C) engages the pins (D) of
the cable reel and tabs of the canceling sleeve. Do
not tap on the steering wheel or steering column
shaft when installing the steering wheel.
17-8
3. Install the steering wheel nut (A), and tighten it to
the specified torgue.
A_B39 N.m (4.0 kgf m.29lbt ftl
Connect the cruise control set/resume switch
connector (B). fvlake sure the wire harness is routed
and fastened properly.
Install the driver's airbag, and confirm that the
system is operating properly {see page 23-113).
Check the horn, turn signal canceling and cruise
control switches for proper operation.
Reconnect the battery and do the following:. Do the engine control module (ECM) idle learn
procedure (see page 1l-139),. Power window control unit resetting procedure
\see page 22-1281.. Enter the anti-theft cord for the radio, then enter
the custmer's radio station presets.. Set the clock.
{
7.
lr,',,t
;. _,:!
'' '1i::..'.' l
Page 502 of 1139
Steering
Steering Column Removal
lnstallation
1.
4.
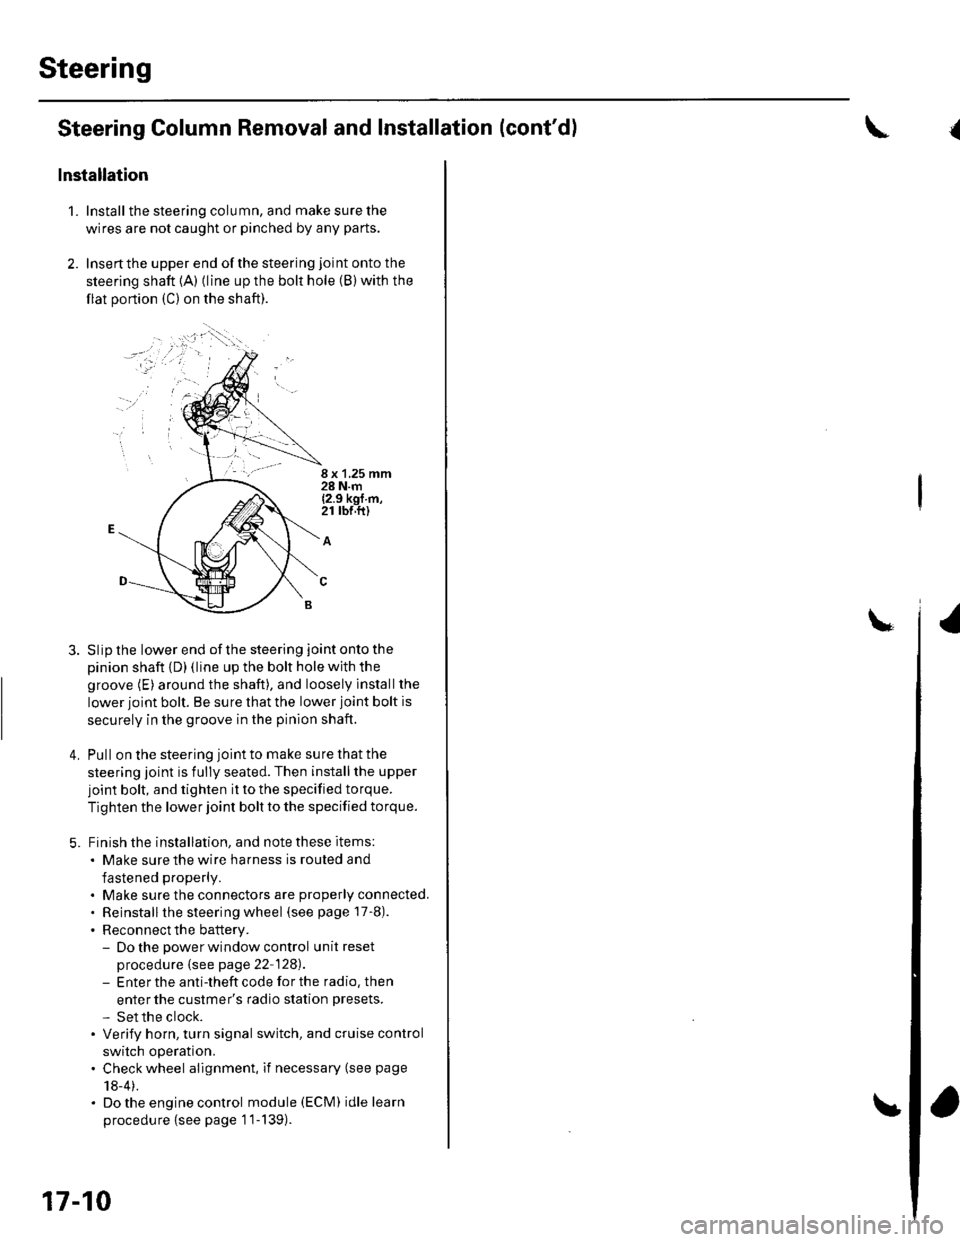
Install the steering column, and make sure the
wires are not caught or pinched by any parts.
Insertthe upper end ofthe steering joint onto the
steering shaft {A) (line up the bolt hole (B) with the
flat portion (C) on the shaft).
8 x 1,25 mm28 N.m{2.9 kgf m,21 rbr.ft)
A
Slip the lower end of the steering joint onto the
pinion shaft {D) (line up the bolt hole with the
groove (E) around the shaft), and loosely lnstallthe
lower joint bolt. Be sure that the lower joint bolt is
securely in the groove in the pinion shaft.
Pull on the steering joint to make su re that the
steering joint is fully seated. Then installthe upper
joint bolt, and tighten it to the specified torque.
Tighten the lower joint bolt to the specified torque.
Finish the installation, and note these items:
. Make sure the wire harness is routed and
fastened properly.
. Make sure the connectors are properly connected.. Reinstallthe steering wheel (see page 17-8).
. Reconnect the battery.- Do the power window control unitreset
procedure {see page 22-128).- Enter the anti-theft code for the radio, then
enter the custmer's radio station presets.
- Set the clock.. Verify horn, turn signal switch, and cruise control
switch operation.. Check wheel alignment, if necessary (see page
18-4).. Do the engine control module (ECM) idle learn
procedu re {see page '11-139).
17-10
and Installation (cont'd){
Page 509 of 1139
EPS Components
aGeneral Troubleshooting Information
EPS Indicator
Under normal conditions, the EPS indicator comes on when
the ignitlon switch is turned to the ON (ll) position, then goes
off after the engine is started. This indicates that the bulb and
its circuit are operating correctly.
lf there is any trouble in the system after the engine is started,
the EPS indicator will stay on, and the power assist is turned
off.
When EPS indicator light comes on, the control unit
memorizes the DTC. In this case, the control unit will not
activate the EPS system after the engine starts again, but it
keeps the EPS indicator on.
When DTC 12, 16, 17, 18 or 67 is stored in the control unit, the
EPS indicator will stay on until the DTC is erased. When a
problem is detected and the EPS indicator comes on, there are
cases when the indicator stays on untilthe ignition switch is
turned 0FF, and cases when the indicator goes off
automatically when the system returns to normal. Even though
the system is operating normally, the EPS indicator will come
on under the following conditions:
Condition '1:
. The vehicle was traveling at least 12.4 mph (20 km/h), then. A rapid change in vehicle speed was detected, then. The vehicle (or the vehicle speed sensor signal) stopped for
at least 5 seconds. The engine speed was still 'l,640rpmorhigherforatleastS
seconds
Condition 2:
After the vehicle (or the vehicle speed sensor signal) has
stopped for at least 10 seconds, yet the engine speed was still
1,640 rpm or higherfor at least 20 seconds.
Condition 3:
When the engine speed is 280 rpm or less, and the vehicle is traveling at
a speed of 6,2 mph (10 km/h) or more for 3 seconds.
To determine the actual cause ofthe problem, question the
customer about the conditions during which the problem
occured, taking the above conditions into consideration.
Diagnostic Trouble Code (DTCI
. lf the CPU cannot be activated, or itfails,the EPS indicator
comes on, but the DTC is not memorized.. The memory can hold any number of DTCS. However, when
the same DTC is detected more than once, the most recent
DTC is written over the prior DTC, therefore only one
occurrence is memorized.. The DTCS are indicated repeatedly untilthe ignition switch is
turned OFF.. lf the DTC is not memorized,the EPS indicator blinks.
. The DTCS are memorized in the EEPRO| (non-volatile
memory) therefore the memorized DTCS cannot be erased
by disconnecting the battery. Perform the specified
procedures to clear DTCS.
Self-diagnosis
Self-diagnosis can be classified into two categories:.Initial diagnosis: performed right after the engine
starts and until the EPS indicator goes off.. Regular diagnosis: performed right after the initial
diagnosis until the ignition switch is turned OFF.
The EPS control unit performs the following functions
when a problem is detected by self-diagnosis;
'1. Turns on the EPS indicator.
2. Memorizes the DTC.
3. Stops power assist and manual steering operation
begrns.
NOTE:. When DTC 23 (a problem with the circuit for
engine speed signal) is detected, the power
assist will return to normal when the vehicle
speed is 0.62 mph (1 km/h) or above.. Fot DfCs 22,23, 64, or 66 the EPS indicator goes
off automatically when the system relurns to
normal. For all other codes, the EPS indicator
goes off when the system is OK after the ignition
switch is turned from OFF to ON (ll).
Restriction on Power Assist Operation
Repeated extreme steering force. such as turning the
steering wheel continuously back-and-forth with the
vehicle stopped, causes an increase of power
consumption in the EPS motor. The increase of electric
current causes the motor to heat up. Because this heat
adversely affects the system, the control unit monitors
the electric current of the motor.
When the control unit detects heat build-up in the motor,
it reduces the electric current to the motor gradually to
protect the system, and it restricts the power assist
operation. The EPS indicator does not come on during
this function.
When steering torque is not applied to the steering
wheel, or when the ignition is turned off, and the motor
cools, the control unit will restore the power assist
gradually until it's fully restored (after approximately 15
minutes maximum).
17-18
Page 510 of 1139
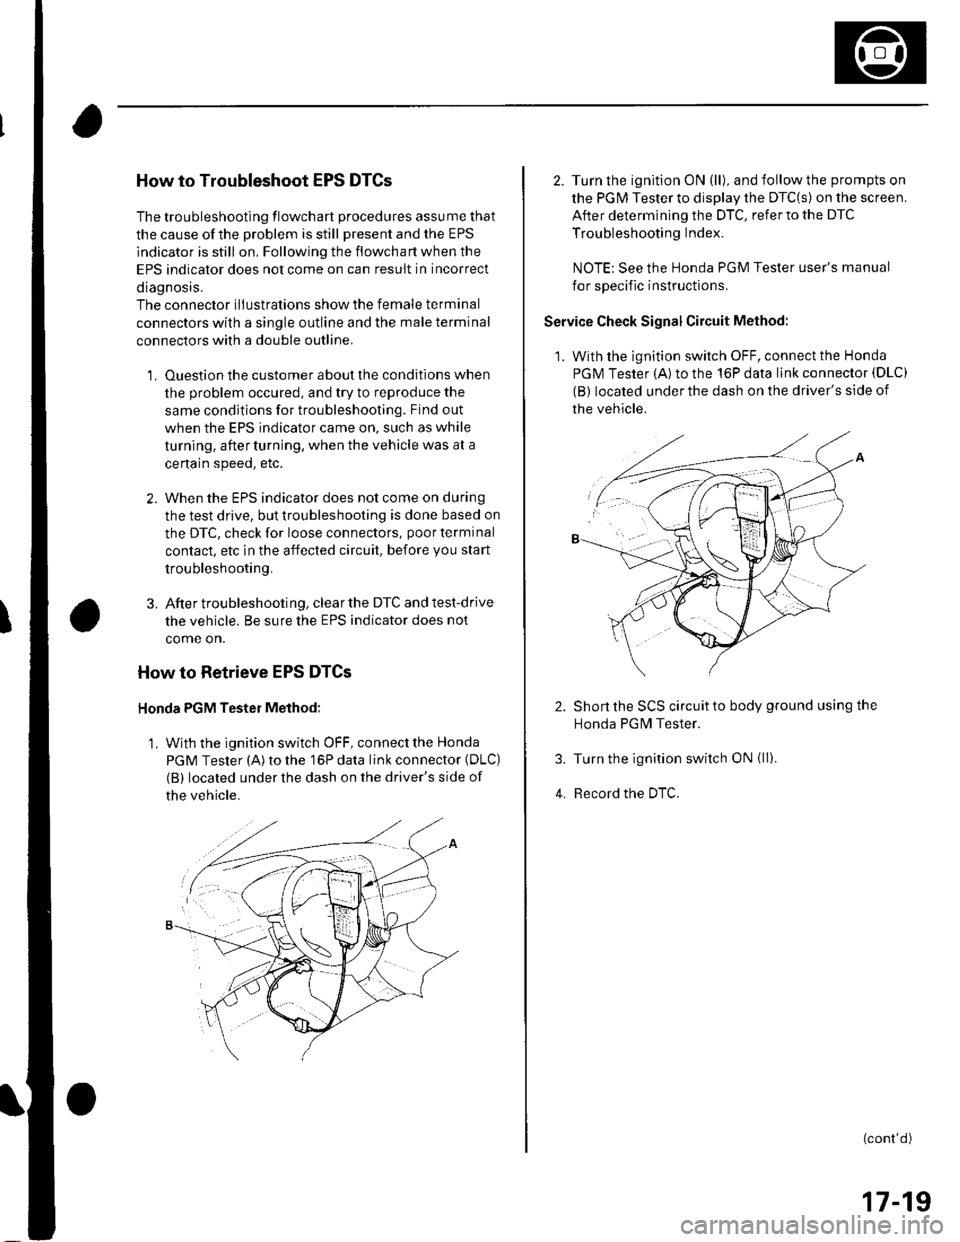
How to Troubleshoot EPS DTCs
The troubleshooting flowchart procedures assume that
the cause of the problem is still present and the EPS
indicator is still on, Following the flowchart when the
EPS indicator does not come on can result in incorrect
diagnosis.
The connector iliustrations show the female terminal
connectors with a single outline and the male terminal
connectors with a double outline.
1. Ouestion the customer about the conditions when
the problem occured, and try to reproduce the
same conditions for troubleshooting. Find out
when the EPS indicator came on, such as while
turning. afterturning, when the vehicle was at a
ce rta in speed, etc.
2. When the EPS indicator does not come on during
the test drive, but troubleshooting is done based on
the DTC, check for loose connectors, poor terminal
contact. etc in the affected circuit, before you start
troubleshooting.
3. After trou bleshooting, clear the DTC and test-drive
the vehicle. Be sure the EPS indicator does not
come on.
How to Retrieve EPS DTCs
Honda PGM Tester Method:
1, With the ignition switch OFF, connect the Honda
PGM Tester (A) to the 16P data link connector (DLC)
(B) located under the dash on the driver's side of
the vehicle.
2. Turn the ignition ON (ll), and follow the prompts on
the PGM Tester to display the DTC(s) on the screen.
After determining the DTC, refer to the DTC
Troubleshooting Index.
NOTE: See the Honda PGM Tester user's manual
for specific instructions.
Service Check Signal Circuit Method:
1. With the ignition switch OFF, connect the Honda
PGM Tester (A)to the 16P data link connector (DLC)
(B) located under the dash on the driver's side of
the vehicle.
Short the SCS circuit to body ground using the
Honda PGN4 Tester.
Turn the ignition switch ON {ll).
Record the DTC.
(cont'd)
17-19
Page 512 of 1139
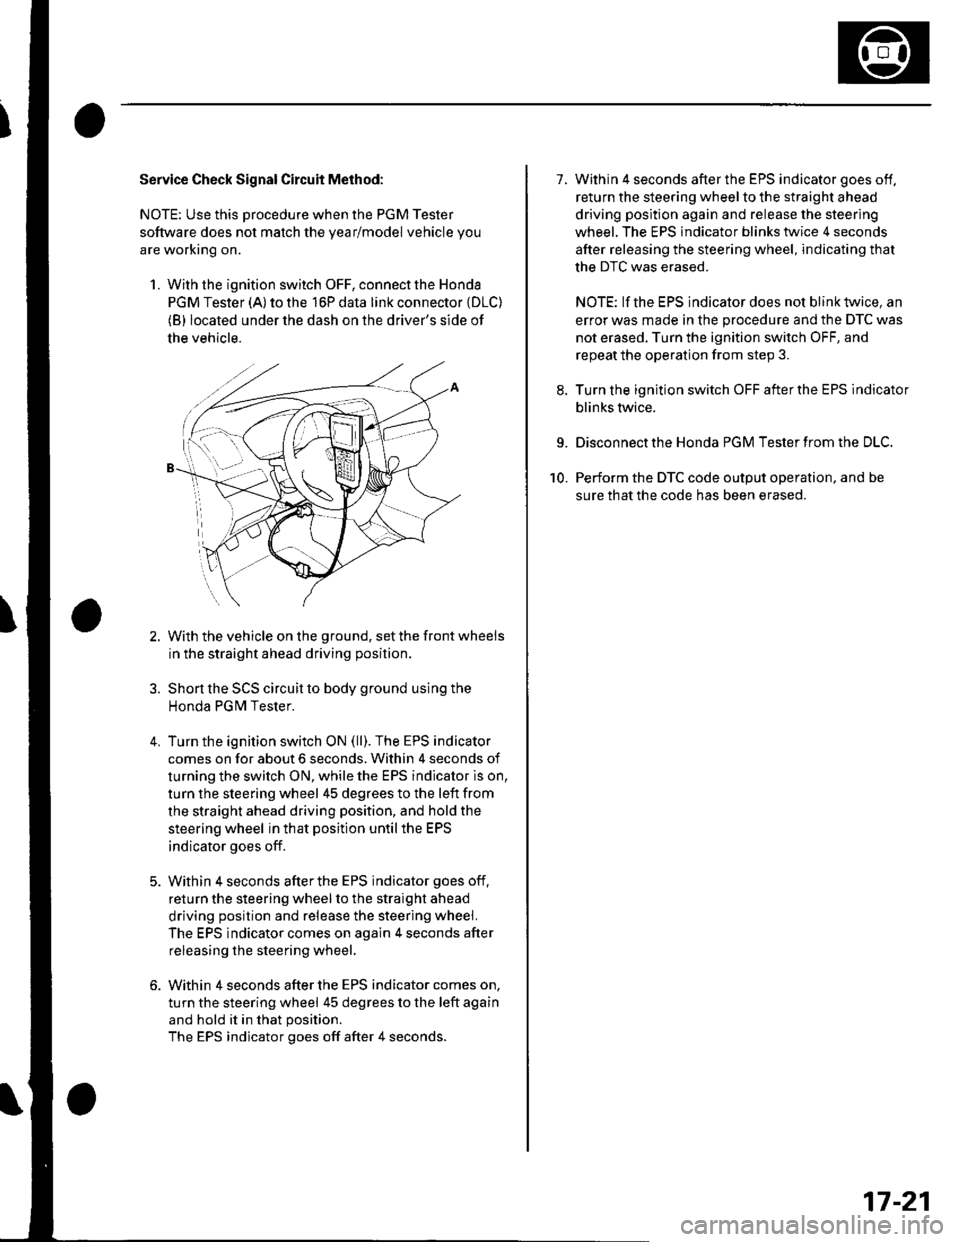
Service Check Signal Circuit Method:
NOTE: Use this procedure when the PGM Tester
software does not match the yearlmodel vehicle you
are working on.
1. With the ignition switch OFF, connect the Honda
PGM Tester (A) to the 16P data link connector {DLC)(B) located under the dash on the driver's side of
the vehicle.
With the vehicle on the ground, set the front wheels
in the straight ahead driving position.
Short the SCS circuit to body ground using the
Honda PGM Tester.
Turn the ignition switch ON (ll). The EPS indicator
comes on for about 6 seconds. Within 4 seconds of
turning the switch ON, while the EPS indicator is on,
turn the steering wheel 45 degrees to the left from
the straight ahead driving position, and hold the
steering wheel in that position until the EPS
indicator goes off.
Within 4 seconds afterthe EPS indicator goes off,
return the steering wheel to the straight ahead
driving position and release the steering wheel.
The EPS indicator comes on again 4 seconds after
releasing the steering wheel,
Within 4 seconds after the EPS indicator comes on,
turn the steering wheel 45 degrees to the left again
and hold it in that position.
The EPS indicator goes off after 4 seconds.
4.
1.Within 4 seconds after the EPS indicator goes off,
return the steering wheel to the straight ahead
driving position again and release the steering
wheel. The EPS indicator blinks twice 4 seconds
after releasing the steering wheel, indicating that
the DTC was erased.
NOTE: If the EPS indicator does not blink twice, an
error was made in the procedure and the DTC was
not erased. Turn the ignition switch OFF, and
repeat the operation from step 3.
Turn the ignition switch OFF afterthe EPS indicator
blinks twice.
9. Disconnect the Honda PGM Tester from the DLC.
10. Perform the DTC code output operation, and be
sure that the code has been erased.
17-21