dtc HONDA CIVIC 2003 7.G Workshop Manual
[x] Cancel search | Manufacturer: HONDA, Model Year: 2003, Model line: CIVIC, Model: HONDA CIVIC 2003 7.GPages: 1139, PDF Size: 28.19 MB
Page 641 of 1139
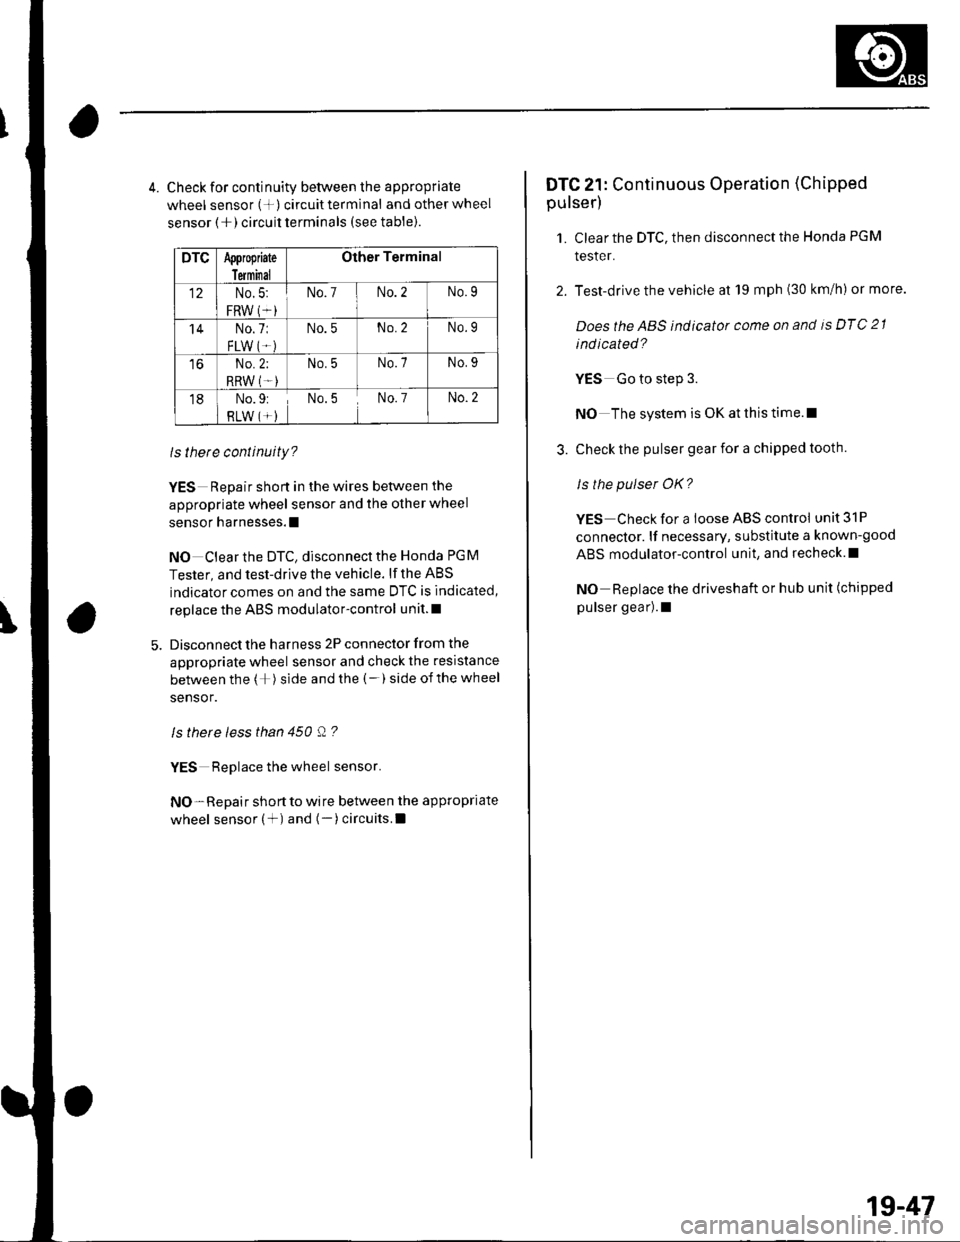
4. Check for continuity between the appropriate
wheel sensor (+) circuittermlnal and otherwheel
sensor (+) circuit terminals (see table).
DTCAppropiate
Terminal
Other Terminal
12No.5:
FRW (*i
No.7No.2No.9
'14No.7:
FLW IT.)
No.5No.2No.9
toNo.2;
RRW (T-)
No.5No.7No.9
18No.9:
RLW (*)No.5No. 7No.2
ls there continuity?
YES Repair short in the wires between the
appropriate wheel sensor and the other wheel
sensor harnesses.l
NO Clear the DTC, disconnect the Honda PGM
Tester, and test-drive the vehicle. lf the ABS
indicator comes on and the same DTC is indicated,
replace the ABS modulator-control unit.l
Disconnect the harness 2P connector from the
appropriate wheel sensor and check the resistance
between the (+) side and the (-) side ofthe wheel
sensor.
ls there less than 450 Q ?
YES Replace the wheel sensor.
NO- Repair short to wire between the appropriate
wheel sensor (+) and (-)circuits.l
DTC 21: Continuous Operation (Chipped
pulser)
1. Clear the DTC, then disconnect the Honda PGM
tesler.
2. Test-drive the vehicle at 19 mph (30 km/h) or more.
Doesthe ABS indicator come on and is DTC 21
ind icated?
YES Go to step 3.
NO The system is OK at this time.l
3. Check the pulser gear for a chipped tooth.
ls the pulser OK?
YES Check for a loose ABS control unit 31P
connector. lf necessary, substitute a known-good
ABS modulator-control unit, and recheck.l
NO Replace the driveshaft or hub unit (chipped
pulser gear).1
1g-47
Page 642 of 1139
ABS Components
DTC Troubleshooting (cont'd)
DTC 31, 32. 33, 34, 35, 36, 37, 38: Solenoid
1. Clear the DTC, then disconnect the Honda PGN4
Tester.
2. Test-drive the vehicle.
Does the ABS ind icator come on and are DT Cs 31,
32, 33, 34, 35, 36, 37, 38 indicated?
YES Replace the ABS modulator-control unit.t
NO The system is OK at this time. t
19-48
DTC 51: Motor Locked
'1. Check the No. 10 (40A)fuse in the under-hoodfuse/
retay Dox.
ls the tuse OK?
YES-Reinstall the fuse, and go to step 2.
NO- Replace the fuse, and recheck.l
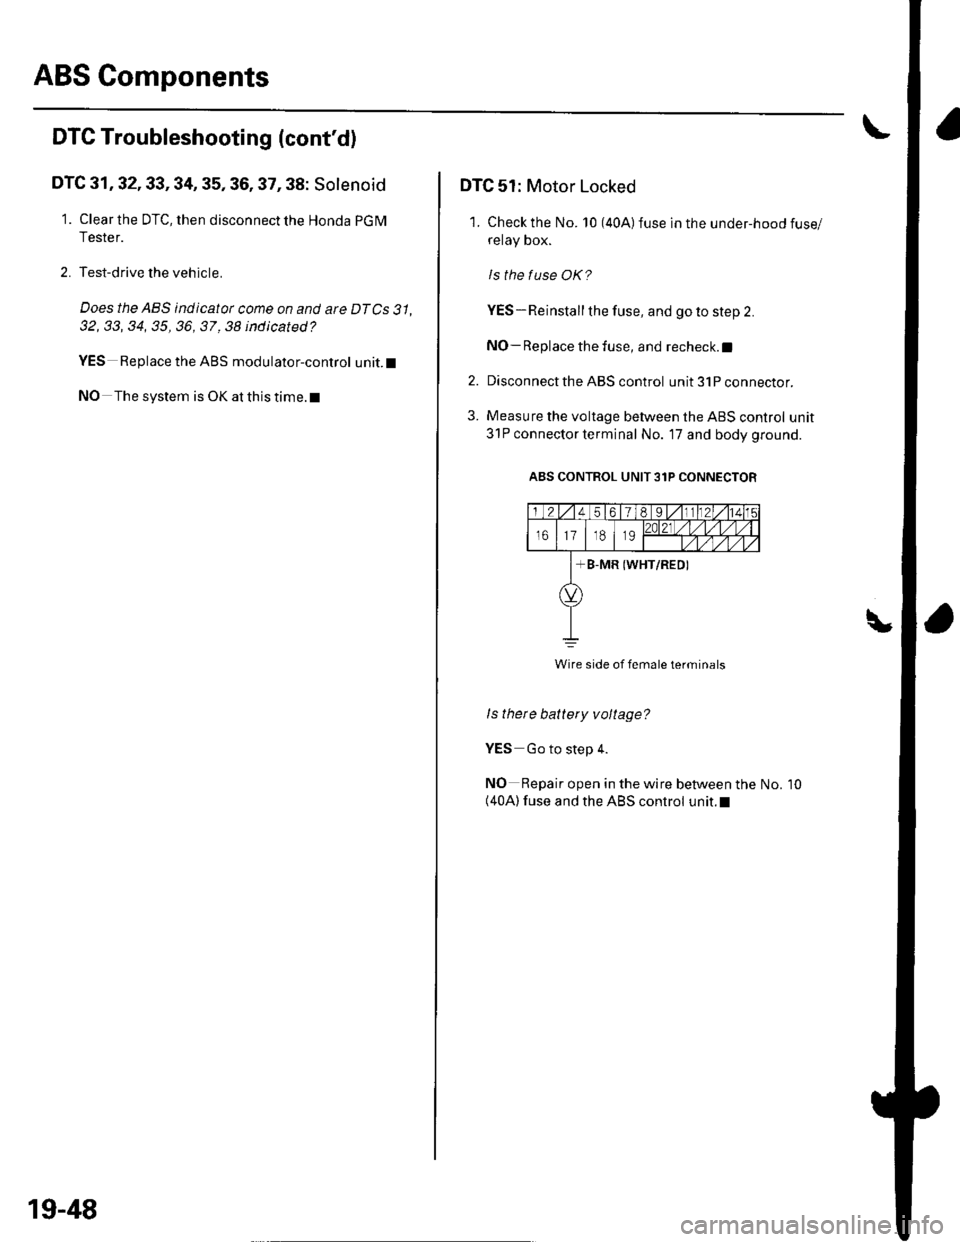
2. Disconnect the ABS control unit 31P connector.
3. Measure the voltage between the ABS control unit
31P connector terminal No. 17 and body ground.
ABS CONTROL UNIT 31P CONNECTOR
I
Wire side of female terminals
ls thete battery voltage?
YES Go to step 4.
NO Repair open in the wire between the(40A) fuse and the ABS control unit.l
No. 10
Page 643 of 1139
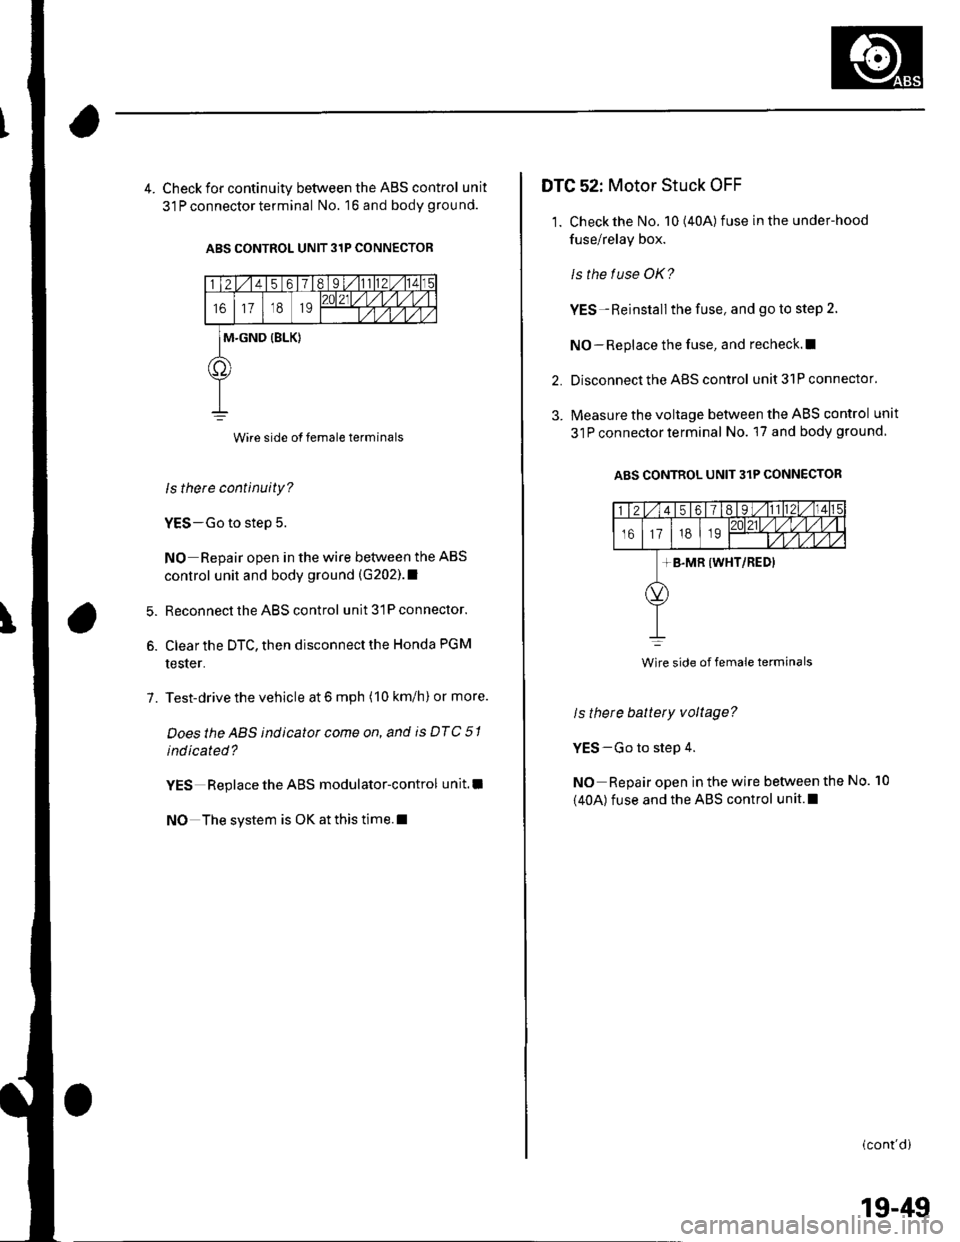
4. Check for continuity between the ABS control unit
31 P connector terminal No. 16 and body grou nd.
ABS CONTROL UNIT 31P CONNECTOR
Wire side of female terminals
ls there continuity?
YES-Go to step 5.
NO Repair open in the wire between the ABS
control unit and body ground (G202).1
Reconnect the ABS control unit 31P connector.
Clear the DTC, then disconnect the Honda PGM
tester.
Test-drive the vehicle at 6 mph (10 km/h) or more.
Doesthe ABS indicator come on, and is DTC 51
indicated?
YES Replace the ABS modulator-control unit.l
NO The system is OK at this time.l
6.
7.
DTG 52: Motor Stuck OFF
1. Check the No. 10(40A) fuse in the under-hood
fuse/relay box.
ls the f use OK?
YES-Reinstall the fuse, and go to step 2.
NO-Replace the fuse, and recheck.l|
Disconnect the ABS control unit 31P connector.
Measure the voltage between the ABS control unit
31P connector terminal No. 17 and body ground
ABS CONTROL UNIT 31P CONNECTOR
2.
3.
ls there battery voltage?
YES-Go to step 4.
NO Repair open in the wire between the
(40A) fuse and the ABS control unit.l
No. 10
(cont'di
Wire side of female terminals
19-49
Page 644 of 1139
ABS Components
DTC Troubleshooting (cont'dl
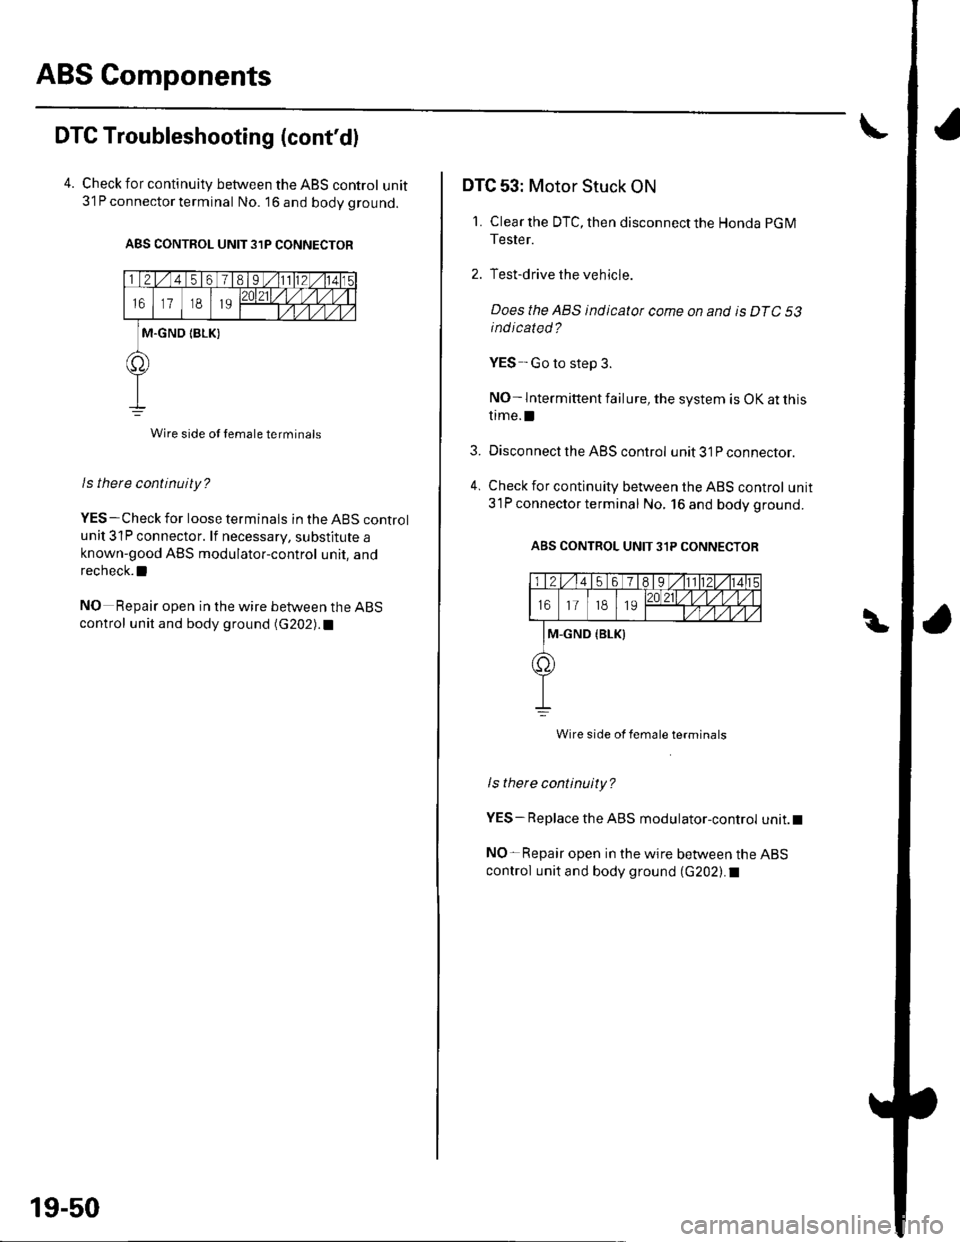
4. Check for continuitv between the ABS control unit31P connector terminal No. 16and bodyground.
ABS CONTROL UNIT 31P CONNECTOR
Wire side ol female terminals
ls there continuity?
YES-Check for loose terminals in the ABS control
unit 31P connector. lf necessary, substitute aknown-good ABS modulator-control unit, and
recheck.l
NO Repair open in the wire between the ABS
control unit and body ground (G202).1
19-50
3.
DTC 53: Motor Stuck ON
1. Clear the DTC, then disconnect the Honda pG M
Tester.
2. Test-drive the vehicle.
Does the ABS indicatot come on and is DTC 53
indicated?
YES -Go to step 3.
NO- lntermittent failure, the system is OK at this
trme.l
Disconnect the ABS control unit 31P connector.
Check for continuity between the ABS control unit
31P connector terminal No, 16 and bodyground.
ABS CONTROL UNIT 3,IP CONNECTOR
Wire side of female terminals
ls therc continuity?
YES-Replace the ABS modulator-control unit.t
NO-Repair open in the wire between the ABS
control unit and body ground (G202).I
Page 645 of 1139
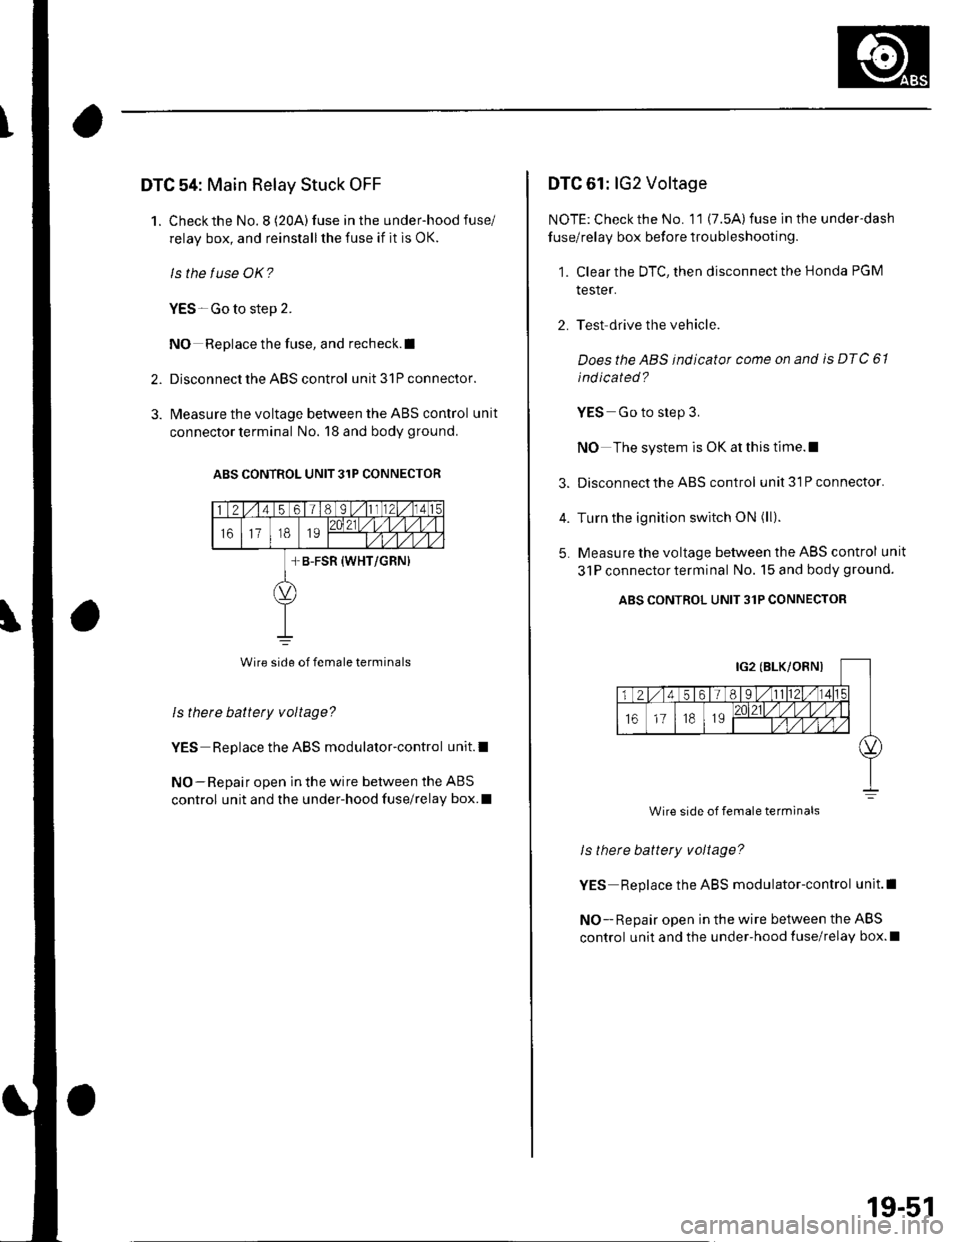
DTC 54: Main Relay Stuck OFF
1. Checkthe No.8 (20A) fuse in the under-hood fuse/
relay box, and reinstallthe fuse if it is OK.
ls the f use OK?
YES-Go to step 2.
NO Replace the fuse, and recheck.l
2. Disconnect the ABS control unit 31P connector.
3. l\4easure the voltage between the ABS control unit
connector terminal No. 18 and body ground.
ABS CONTROL UNIT 31P CONNECIOR
Wire side of female terminals
Is there battety voltage?
YES Replace the ABS modulator-control unit.l
NO-Repair open in the wire between the ABS
control unit and the under-hood fuse/relay box.I
DTC 61: lG2 Voltage
NOTE: Check the No. 11 (7.5A) fuse in the under-dash
fuse/relay box before troubleshooting.
1. Clear the DTC, then disconnect the Honda PGM
tesler.
2. Test drive the vehicle.
Doesthe ABS indicator come on and is DTC 61
ind icated ?
YES Go to step 3.
NO The system is OK at this time.l
3. Disconnect the ABS control unit3lPconnector.
4. Turn the ignition switch ON (ll).
5. Measure the voltage between the ABS control unit
31P connectorterminal No. 15 and body ground.
ABS CONTROL UNIT 31P CONNECTOR
ls there battery voltage?
YES Replace the ABS modulator-control unit.l
NO - Repair open in the wire between the ABS
control unit and the under-hood {use/relay box.l
Wire side of female terminals
19-51
Page 646 of 1139
ABS Components
DTC Troubleshooting (cont'd)
DTC 81: CPU (Central Processing Unit)
1. Clear the DTC, then disconnect the Honda PGM
Tester.
2. Test-drive the vehicle.
Does the ABS indicator come on and is DTC 81
indicated ?
YES Replace the ABS modulator-control unit.l
NO-The system is OK at this time. t
19-52
ABS Indicator Gircuit
Troubleshooting
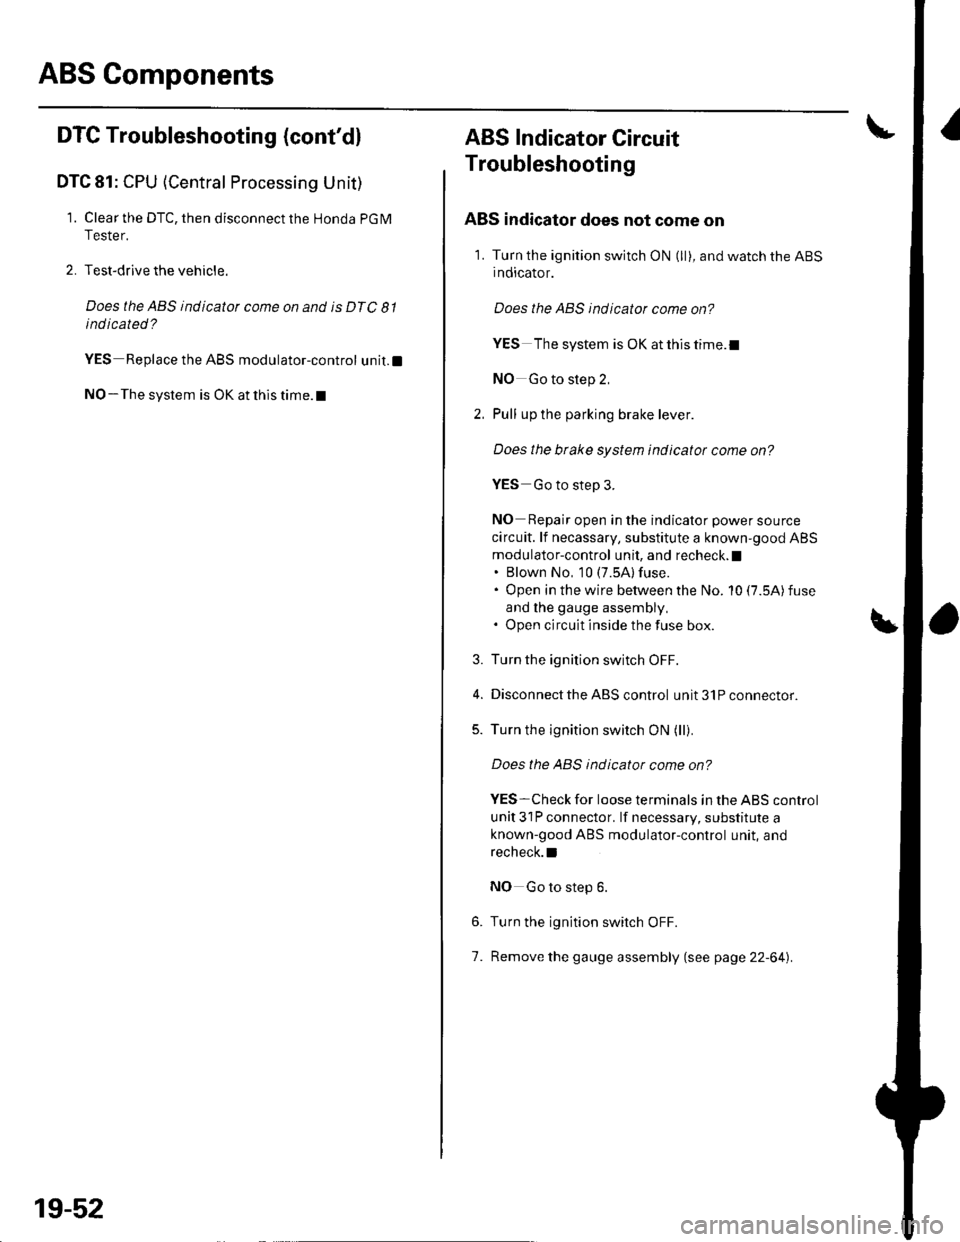
ABS indicator does not come on
1. Turn the ignition switch ON (ll), and watch the ABS
indicator.
Does the ABS indicator come on?
YES The system is OK at this time.I
NO Go to step 2,
Pull up the parking brake lever.
Does the btake system indicator come on?
YES Go to step 3.
NO Repair open in the indicator power source
circuit. lf necassary, substitute a known-good ABS
modulator-control unit, and recheck. I. Blown No, 10 (7.5A) fuse.. Open in the wire between the No. 10 (7.5A)fuse
and lhe gauge assembly,. Open circuit inside the fuse box.
Turn the ignition switch OFF.
Disconnect the ABS control unit 31P connector.
Turn the ignition switch ON (ll).
Does the ABS indicator come on?
YES-Check for loose terminals in the ABS control
unit 31P connector. lf necessary, substitute a
known-good ABS modulator-control unit, and
recheck.l
NO Go to step 6.
Turn the ignition switch OFF.
Remove the gauge assembly (see page 22-64).
3.
5.
6.
7.
Page 649 of 1139
Brake System Indicator Gircuit Troubleshooting
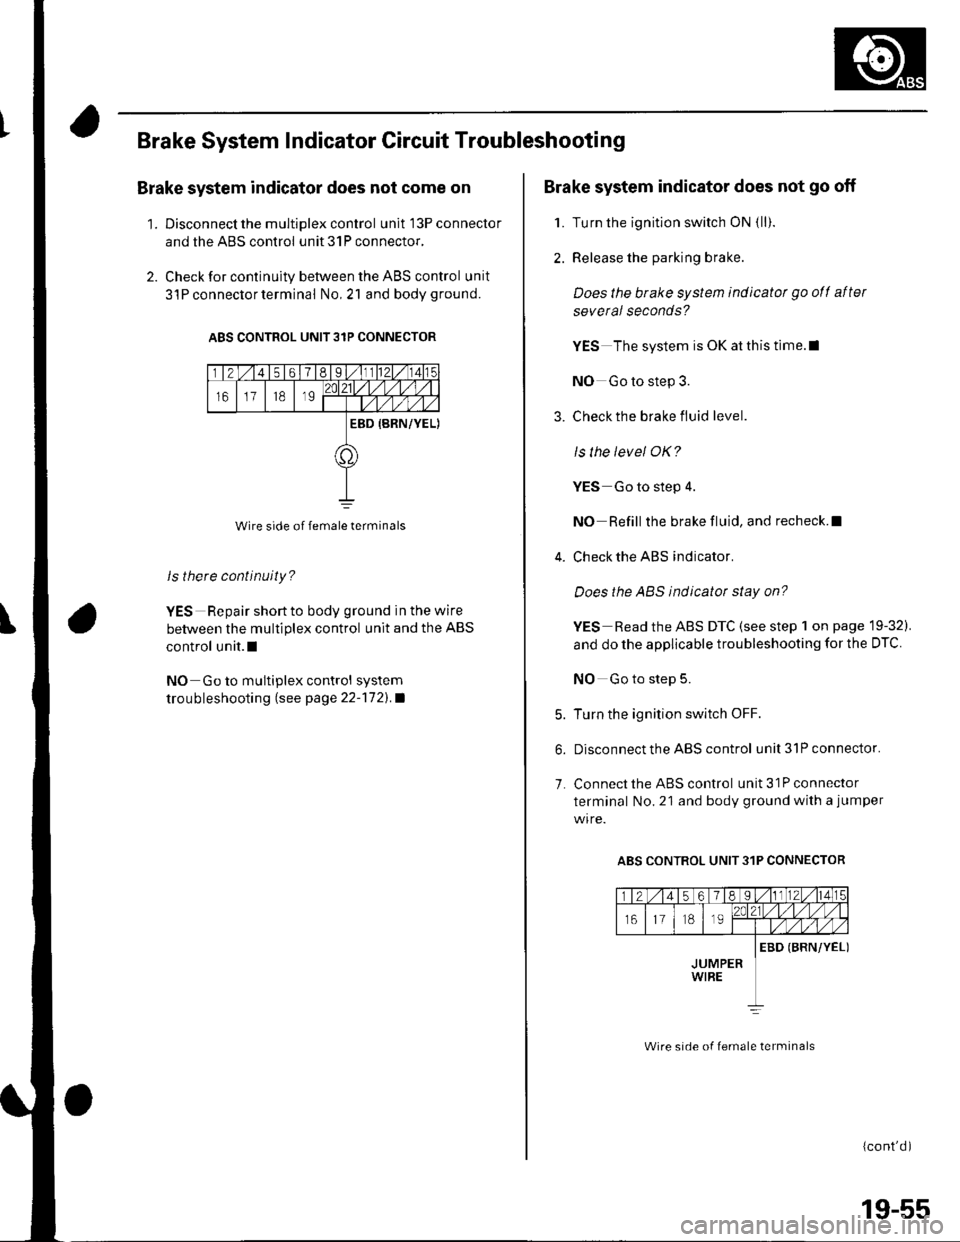
Brake system indicator does not come on
'1. Discon nect the m ultiplex contro I unit l3Pconnector
and the ABS control unit 31P connector.
2. Check for continuity between the ABS control unit
3l P connector terminal No,21 and bodyground.
ABS CONTROL UNIT 31P CONNECTOR
Wire side of female terminals
ls there continuity?
YES Repair short to body ground in the wire
between the multiplex control unit and the ABS
control unit.l
NO Go to multiplex control system
trou bleshooting lsee page 22''172).a
Brake system indicator does not go off
1. Turn the ignition switch ON {ll).
2. Release the parking brake.
Does the brake system indicatot go ofl after
several seconds?
YES The system is OK at this time.l
NO Go to step 3.
3. Check the brake fluid level.
ls the level OK?
YES Go to step 4.
NO Refill the brake fluid, and recheck.l
4. Check the ABS indicator.
Does the ABS indicator stay on?
YES Read the ABS DTC (see step 1 on page 19-32).
and do the applicable troubleshooting for the DTC
NO Go to step 5.
5. Turn the ignition switch OFF.
6. Disconnect the ABS control unit3lPconnector.
7. Connect the ABS control unit 31P connector
terminal No. 21 and body ground with a jumper
ABS CONTROL UNIT 31P CONNECTOR
(cont'd )
Wire srde of lemale lerminals
19-55
Page 773 of 1139
21-2
z t-'5
z t-o
z t-o
21-8
21-9
21-10
21-11
21-14
z t- to
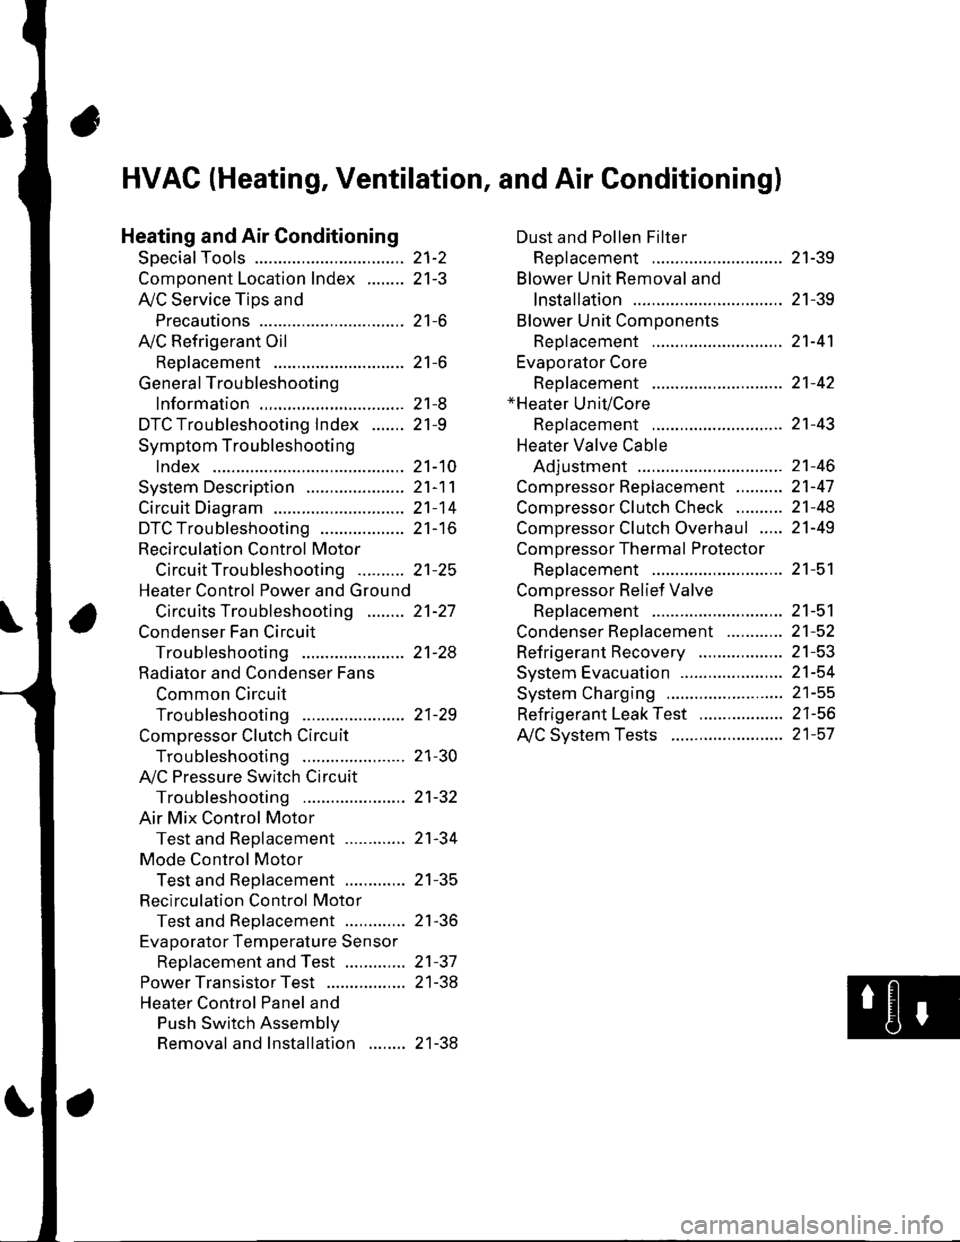
HVAC (Heating, Ventilation, and Air Gonditioningl
Heating and Air Conditioning
SpecialTools
Comoonent Location lndex ........
A/C Service Tios and
Precautions
A,/C Refrigerant Oil
ReDlacement
General Troubleshooting
lnformation
DTC Troubleshooting Index .......
Symptom Troubleshooting
1ndex..............
System Description .....................
Circuit Diagram
DTC Troubleshooting ..................
Recirculation Control Motor
CircuitTroubleshooting .......... 21-25
Heater Control Power and Ground
Circuits Troubleshooting ........ 21-27
Condenser Fan Circuit
Troubleshooting ...................... 21-28
Radiator and Condenser Fans
Common Circuit
Troubfeshooting ...................... 21-29
Compressor Clutch Circuit
Troubleshooting ...................... 21-30
A,/C Pressure Switch Circuit
Troubleshooting ...................... 21-32
Air Mix Control Motor
Test and Reolacement ............. 21-34
Mode Control Motor
Test and Replacement ............. 21-35
Recirculation Control Motor
Test and Reolacement ............. 21-36
Evaporator Temperature Sensor
Reolacement and Test ............. 21-31
Power Transistor Test ................. 21 -38
Heater Control Panel and
Push Switch Assemblv
Removal and Installation ........ 21-38
Dust and Pollen Filter
Reolacement ..21-39
Blower Unit Removal and
lnstallation ...... 21-39
Blower Unit Comoonents
ReDlacement ............................ 21-41
Evaporator Core
Reolacement ..21-42*Heater Unit/Core
ReDlacement ..21-43
Heater Valve Cable
Adjustment .....21-46
CompressorReplacement .......... 21-47
Comoressor Clutch Check .......... 21-48
Comoressor Clutch Overhaul ..... 21-49
Compressor Thermal Protector
Reo1acement ............................ 21-51
Comoressor Relief Valve
Reolacement ............................ 21-51
Condenser Reolacement ............ 21-52
Refrigerant Recovery .................. 21-53
System Evacuation ...................... 21-54
System CharginS ......................... 21-55
Refrigerant LeakTest .................. 21-56
A,/C Svstem Tests ........................ 21-57
Page 780 of 1139
Heating and Air Conditioning
General Troubleshooting Information
How to Retrieve a DTC
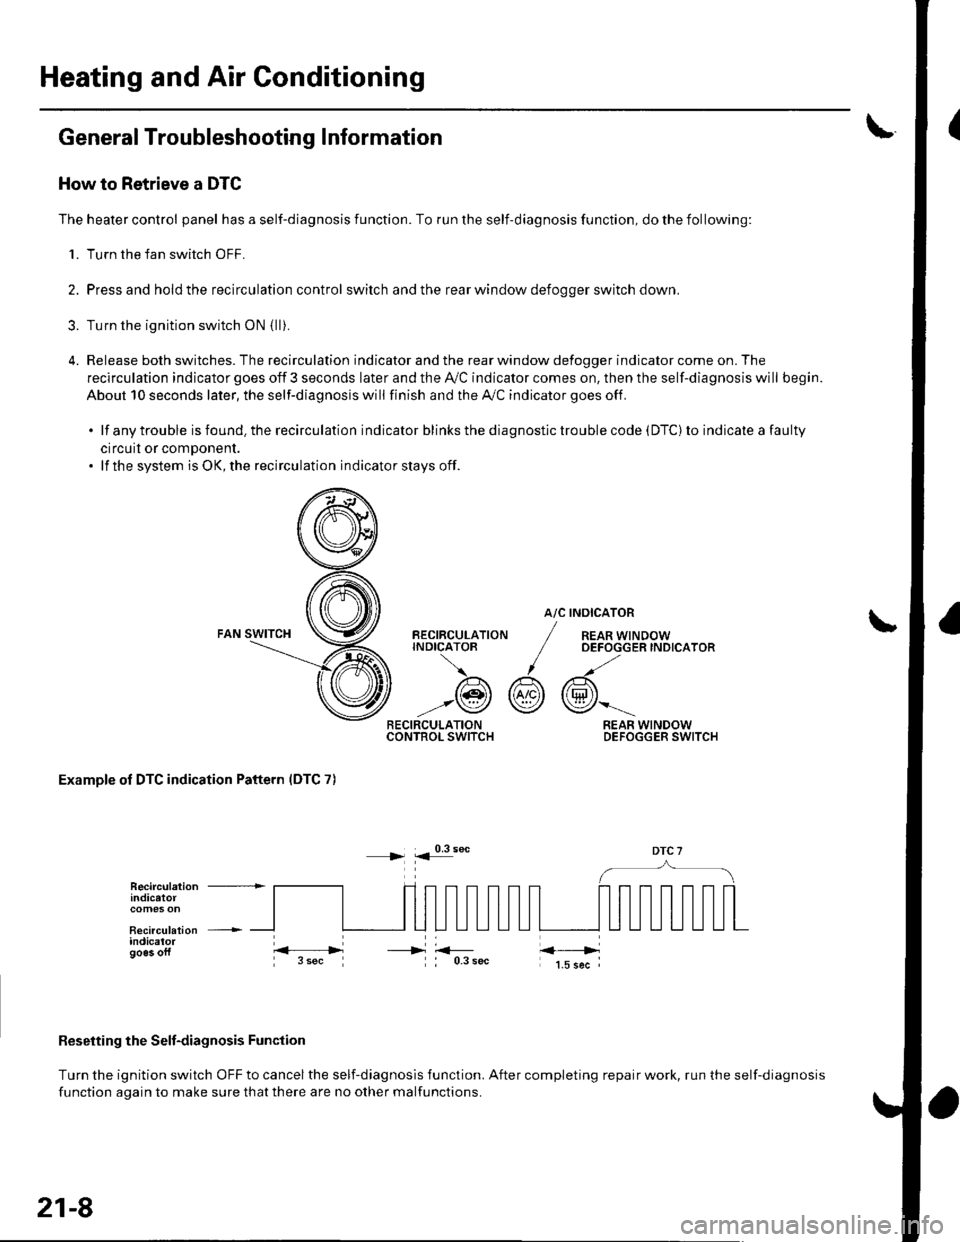
The heater control panel has a self-diagnosis function. To run the self-diagnosis function, do the following:
1. Turn the fan switch OFF.
2. Pressand holdthe recirculation control switch andthe rear window defoooer switch down.
3. Turn the ignition switch oN {lli.
4. Release both switches. The recirculation indicator and the rear window defogger indicator come on. The
recirculation indicator goes off 3 seconds later and the Ay'C indicator comes on. then the self-diagnosis will begin.
About 10 seconds later, the self-diagnosis will finish and the A,/C indicator goes off.
.lfanytroubleisfound.therecirculationindicatorblinksthediagnostictroublecode(DTC)toindicateafaulty
circuil or comDonent.. lf the system is OK, the recirculation indicator stays off.
atc
@r
RECIRCULATIONCONTROL SWITCH
BECIRCULATIONINDICATOB
/A\
-:@
INOICATOR
REAR WINDOWOEFOGGER INDICATOR
REAR WINDOWDEFOGGER SWITCH
Examole of DTC indication Pattern IDTC 7)
DTC 7
Reseiting the Selt-diagnosis Function
Turn the ignition switch OFF to cancel the self-diagnosis function. After completing repair work, run the self-diagnosis
function aoain to make sure thatthere are no other malfunctions.
Recirculation +indicatot
Recirculation +indicalorgo6s oft----->
21-8
Page 781 of 1139
DTC Troubleshooting Index
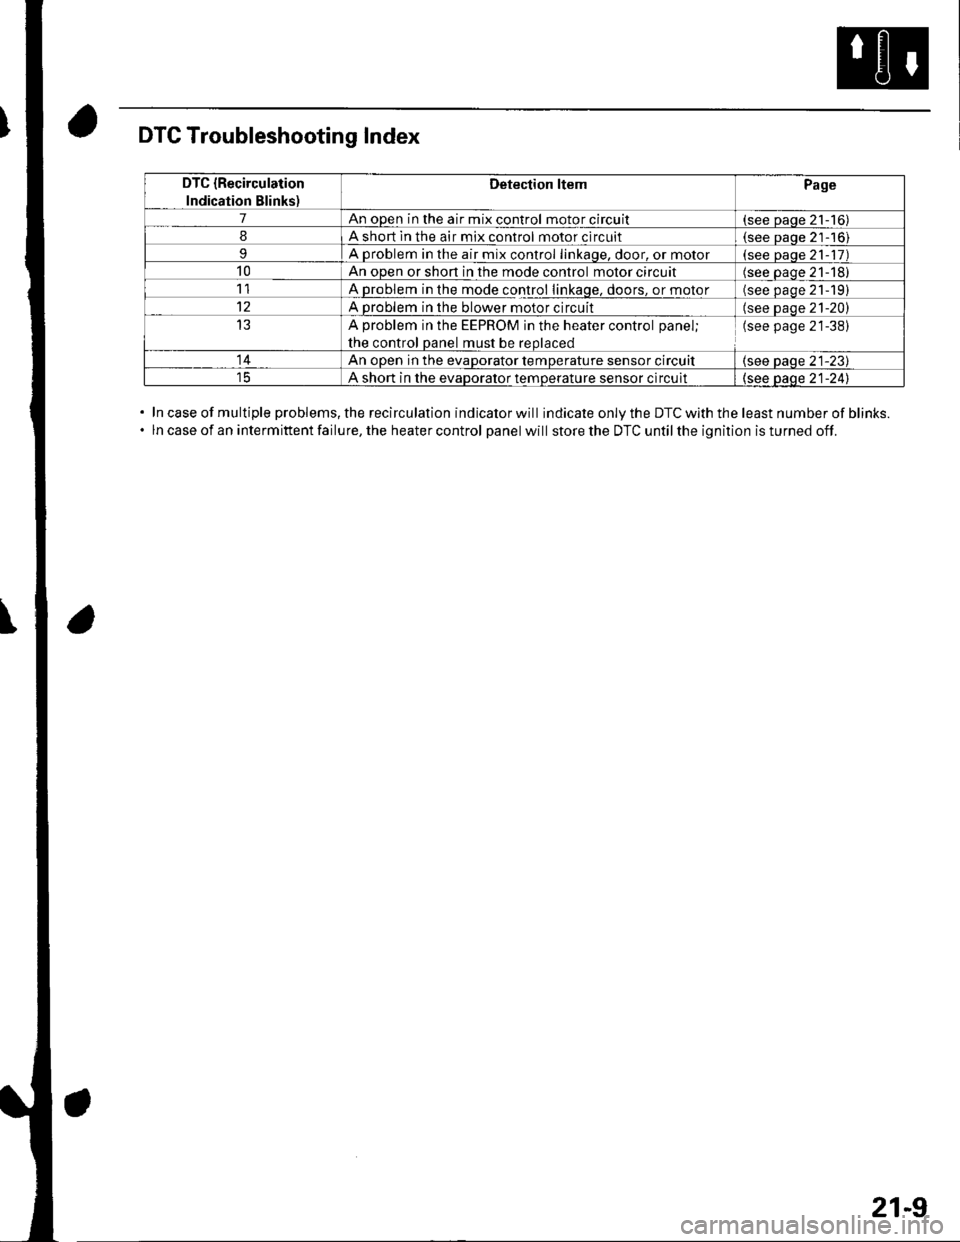
In case of multiple problems, the recirculation indicator will indicate only the DTC with the least number of blinks.
ln case of an intermittent failure, the heater control panel will store the DTC until the ignition is turned off.
DTC {Recirculation
Indication Blinks)
Detection ltemPage
7An open in the air mix control motor circuit(see paqe 21-16)
8A short ln the air mix control motor circuit(see Daoe 21-'16)
9A problem in the air mix control linkaqe, door, or motor(see paqe 21- 17)
10An open or shon in the mode control motor circuit(see oaqe 21-18)
11A problem in the mode control linkage, doors, or motor(see paqe 21191
12A problem in the blower motor circuit(see paqe 21-20)
13A problem in the EEPROM in the heater control panel;
the control oanel must be reolaced
(see page 21-38)
14An ooen in the evaDorator temDerature sensor circuit(see paqe 21-23)
A short in the evaDoralor temoerature sensor circuit(see oaqe 21-241
21-9