Ignition switch HONDA CIVIC 2003 7.G Workshop Manual
[x] Cancel search | Manufacturer: HONDA, Model Year: 2003, Model line: CIVIC, Model: HONDA CIVIC 2003 7.GPages: 1139, PDF Size: 28.19 MB
Page 528 of 1139
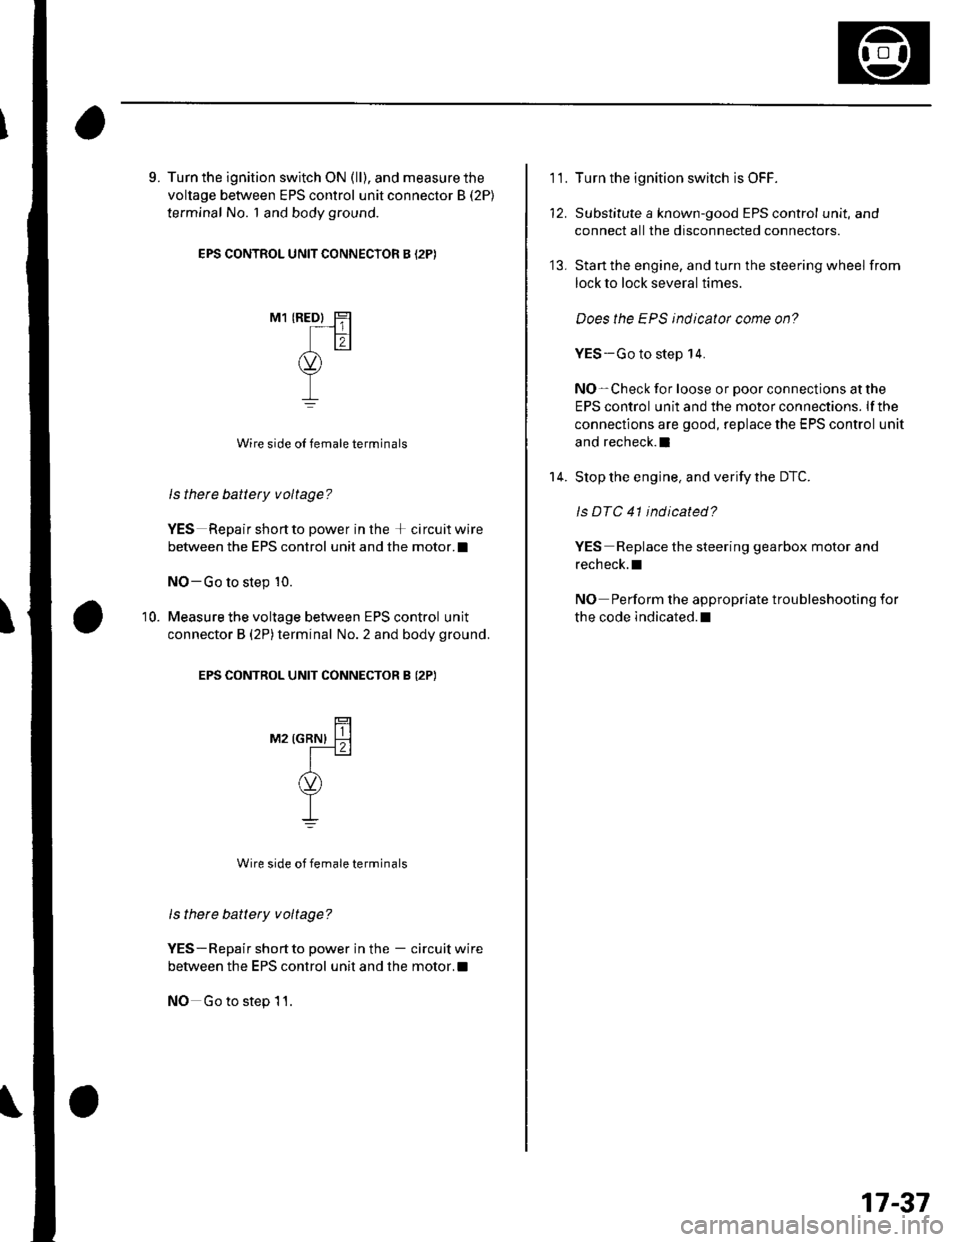
9. Turn the ignition switch ON (ll), and measure the
voltage between EPS control unit connector B (2P)
terminal No. 1 and body ground
EPS CONTROL UNIT CONNECTOR B (2P)
M1 IREDI Hr-_ -1 ||
tr,<.)\uL,/Y
I
Wire side oI female terminals
Is there battety voltage?
YES Repair short to power in the + circuit wire
between the EPS control unit and the motor.I
NO-Go to step 10.
Measure the voltage between EPS control unit
connector B (2P)terminal No.2 and body ground.
EPS CONTROL UNIT CONNECTOR B (2P)
10.
raz rcnrrrr l{l-t . I
I(v)
YI
Wire side of female terminals
ls there battery voltage?
YES-Repair shortto power in the - circuitwire
between the EPS control unit and the motor.!
NO Go to step 11.
11.Turn the ignition switch is OFF.
Substitute a known-good EPS control unit, and
connect all the disconnected connectors.
Start the engine, and turn the steering wheel from
lock to lock several times.
Does the EPS indicator come on?
YES-Go to step 14.
NO-Check for loose or poor connections atthe
EPS control unit and the motor connections. lfthe
connections are good, replace the EPS control unit
and recheck.l
Stop the engine, and verity the DTC.
ls DTC 41 ind icated?
YES Replace the steering gearbox motor and
recheck.l
NO Perform the appropriate troubleshooting for
the code indicated.l
13.
14.
17-37
Page 529 of 1139
EPS Components
{DTC Troubleshooting (cont'd)
DTC 42,45: Motor Driven Current
1. Clear the DTC.
2. Sta rt the engine.
3. Turn the steering wheel from lock-to-lock several
times, and wait 10 seconds or more.
Does the EPS indicator come on?
YES- Go to step 4.
NO-Check for loose wires or poor connections. lf
the connections are good, the system is OK at this
time.I
Stop the engine, and verify the DTC.
ls DTC 42 or 45 indicated?
YES-Go to step 5.
NO- Perform the appropriate troubleshooting for
the code indicated.I
Make sure the ignition switch is OFF, then
disconnect EPS control unit B connector (2P) and
the motor 2P connector.
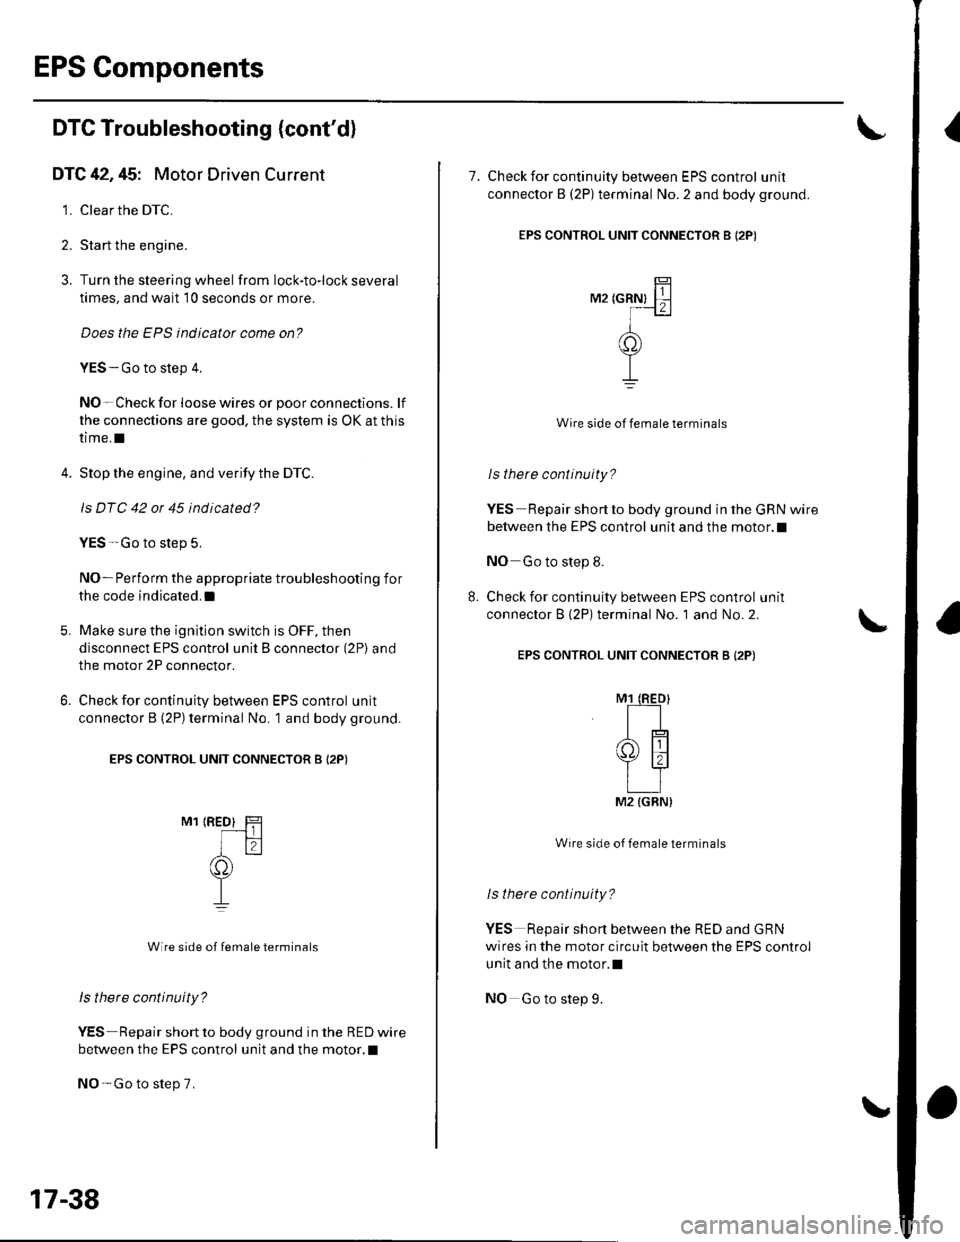
Check for continuity between EPS control unit
connector B (2P)terminal No. 1 and body ground.
EPS CONTROL UNIT CONNECTOR B I2P)
M1 IRED} H
I f2-l
(C))
TI
Wire side of female terminals
ls there continuity?
YES Repair short to body ground in the RED wire
between the EPS control unit and the motor,I
NO-Go to step 7.
6.
17-38
7. Check for continuity between EPS control unit
connector B (2Plterminal No.2 and body ground.
EPS CONTROL UNIT CONNECTOR B I2PI
r',rz tcnnrt ll
-]-(o)
TI
Wire side of female terminals
lsthere continuity?
YES Repair short to body ground in the GRN wire
between the EPS control unit and the motor.l
NO Go to step 8.
Check for continuity between EPS control unit
connector B (2P) terminal No. 1 and No. 2.
EPS CONTROL UNIT CONNECTOR B {2P)
Wire side of female terminals
ls there continuity?
YES Repair short between the RED and GRN
wires in the motor circuit between the EPS control
unit and the motor.l
NO Go to step 9.
M2 {GRN)
Page 530 of 1139
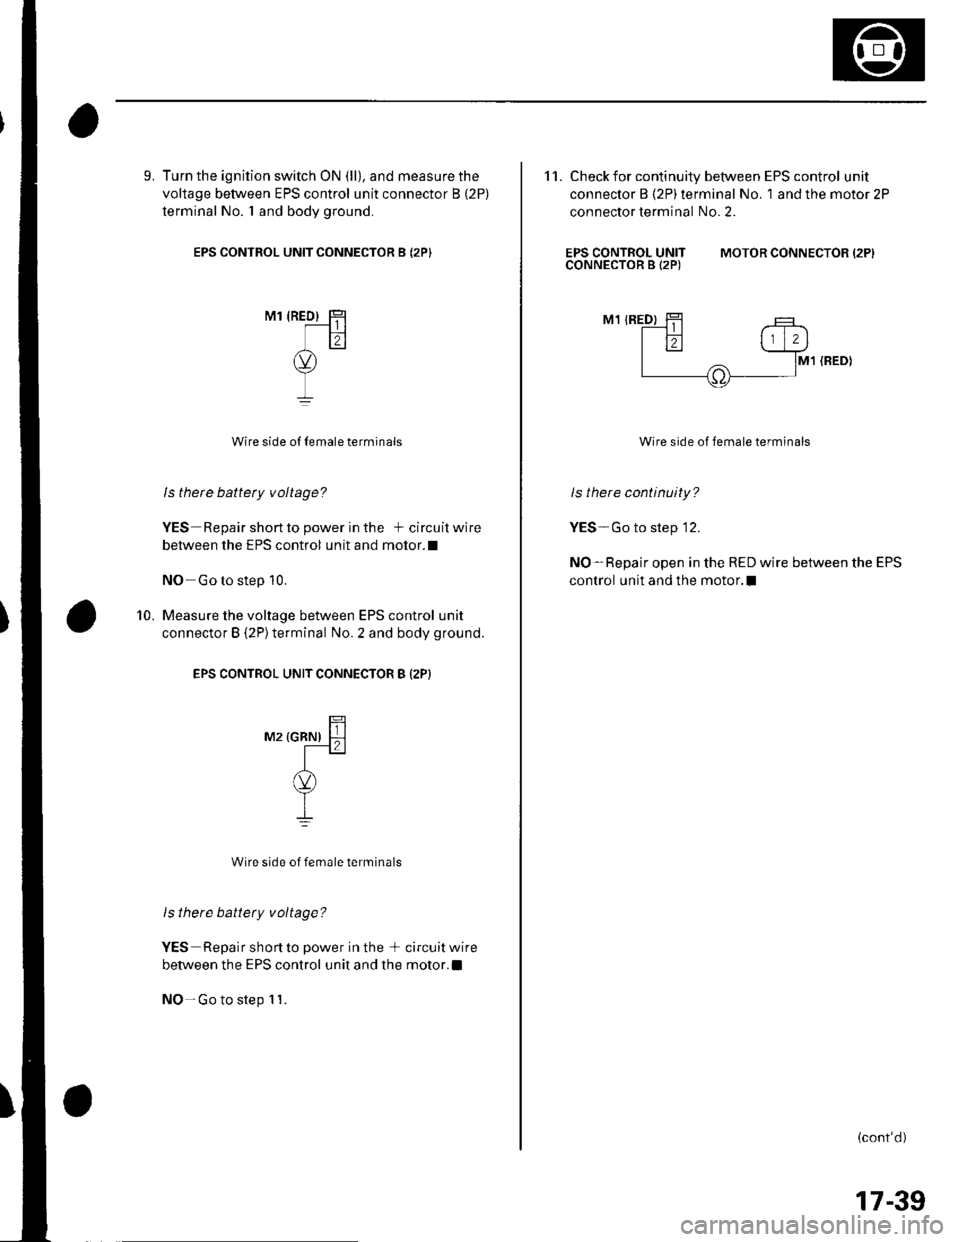
9. Turn the ignition switch ON (ll), and measure the
voltage between EPS control unit connector B (2P)
terminal No. I and body ground.
EPS CONTROL UNIT CONNECTOR B (2PI
M1 {RED} HT-----l | |lil
(v)
I
I
Wire side o{ Iemale terminals
ls there battety voltage?
YES-Repair short to power in the + circuit wire
between the EPS control unit and motor.l
NO Go to step 10.
Measure the voltage between EPS control unit
connector B {2P}terminal No. 2 and body ground.
EPS CONTROL UNIT CONNECTOR B (2P}
mz rcnrur ll-l
A(v)
YI
Wire side of female terminals
ls there battery voltage?
YES Repair short to power in the + circuitwire
between the EPS control unit and the motor.a
NO- Go to step 1 1.
10.
11. Check for continuity between EPS control unit
connector B (2P) terminal No. 1 and the motor 2P
connector terminal No. 2.
EPS CONTROL UNITCONNECTOR B 12P)MOTOR CONNECTOR {2PI
M1 IRED)
M1 (RED}
Wire side of female terminals
ls there continuity?
YES-Go to step '12.
NO-Repair open in the RED wire between the EPS
control unit and the motor.l
(cont'd)
17-39
Page 532 of 1139
DTC tli|: Motor Driven Current is Excessively
Hish
1. Clear the DTC.
2. Start the engine.
3. Turn the steering wheel from lock-to-lock several
times, and wait '10 seconds or more.
Does the EPS indicator come on?
YES Go to step 4.
NO-Check for loose wires or poor connections. lf
the connections are good, the system is OK at this
ttme.I
4. Stop the engine, and verify the DTC.
ls DTC 43 indicated?
YES Go to step 5.
NO-Perform the appropriate troubleshooting for
the code indicated.I
5. Make sure the ignition switch is OFF, then
disconnect EPS control unit connector B (2P) and
the motor 2P connector.
6. Turn the ignition switch ON (ll).
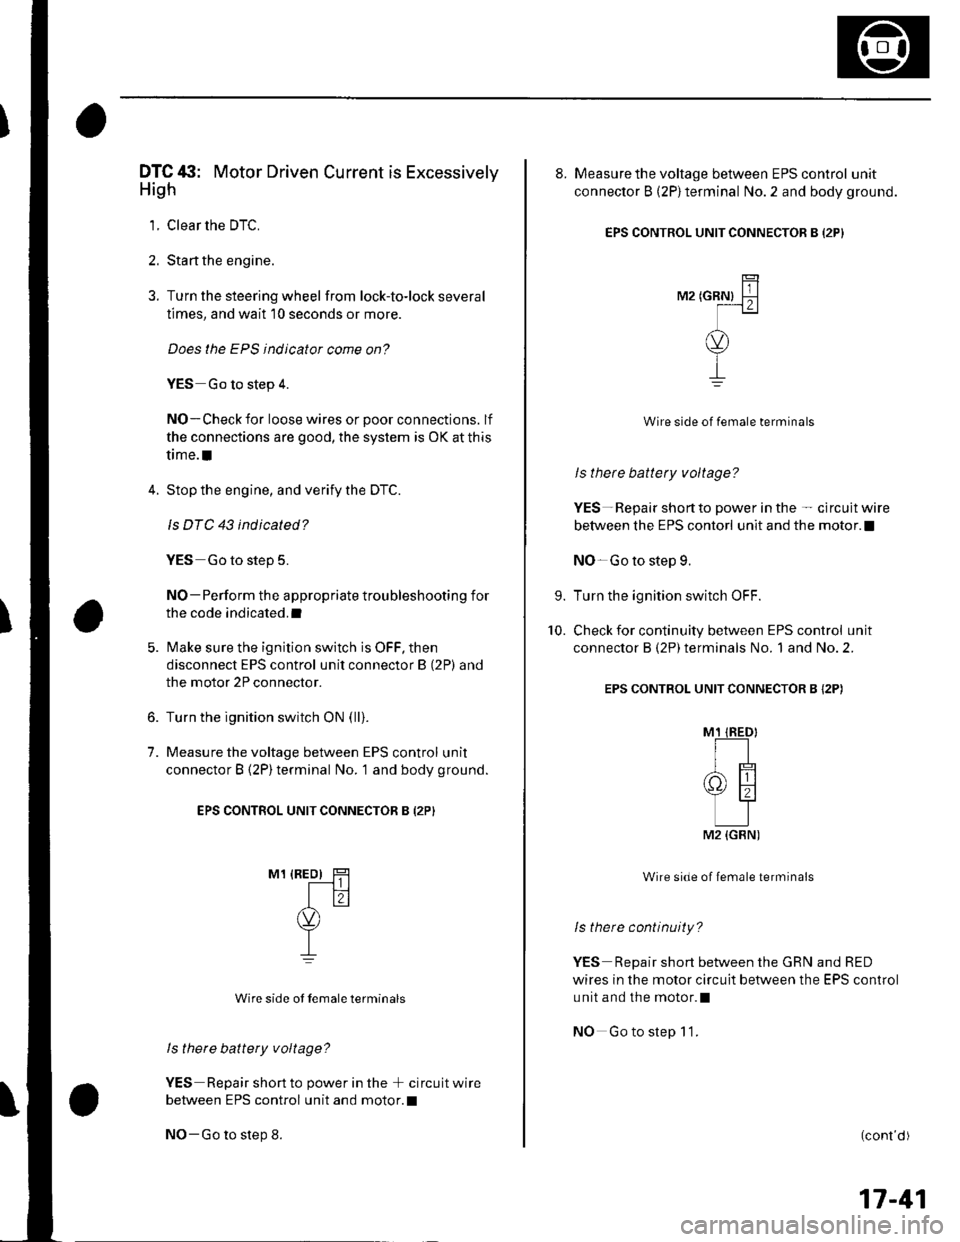
7. Measure the voltage between EPS control unit
connector B (2P)terminal No. '1 and body ground.
EPS CONTROL UNIT CONNECTOR B {2P}
M1 {REo) HT------t I I
Itr(v)
T-L
Wire side ot Iemale terminals
ls therc battery voltage?
YES Repair short to power in the + circuit wire
between EPS control unit and motor.l
NO-Go to step 8.
8. Measure the voltage between EPS control unit
connector B (2P)terminal No. 2 and body ground.
EPS CONTROL UNIT CONNECTOR B I2PI
TilM2 tcRNl F-lf---1 z I
(v)
Y
I
Wire side of female terminals
ls there battety voltage?
YES- Repair short to power in the - circuit wire
between the EPS contorl unit and the motor. !
NO-Go to step 9.
Turn the ignition switch OFF.
Check for continuity between EPS control unit
connector B (2P) terminals No. 1 and No. 2.
EPS CONTROL UNIT CONNECTOR B {2P)
Wire side of female terminals
ls there continuity?
YES Repair short between the GRN and RED
wires in the motor circuit between the EPS control
unit and the motor.l
NO Gotostep 11.
9.
10.
(cont d)
17-41
M2 {GBN)
Page 538 of 1139
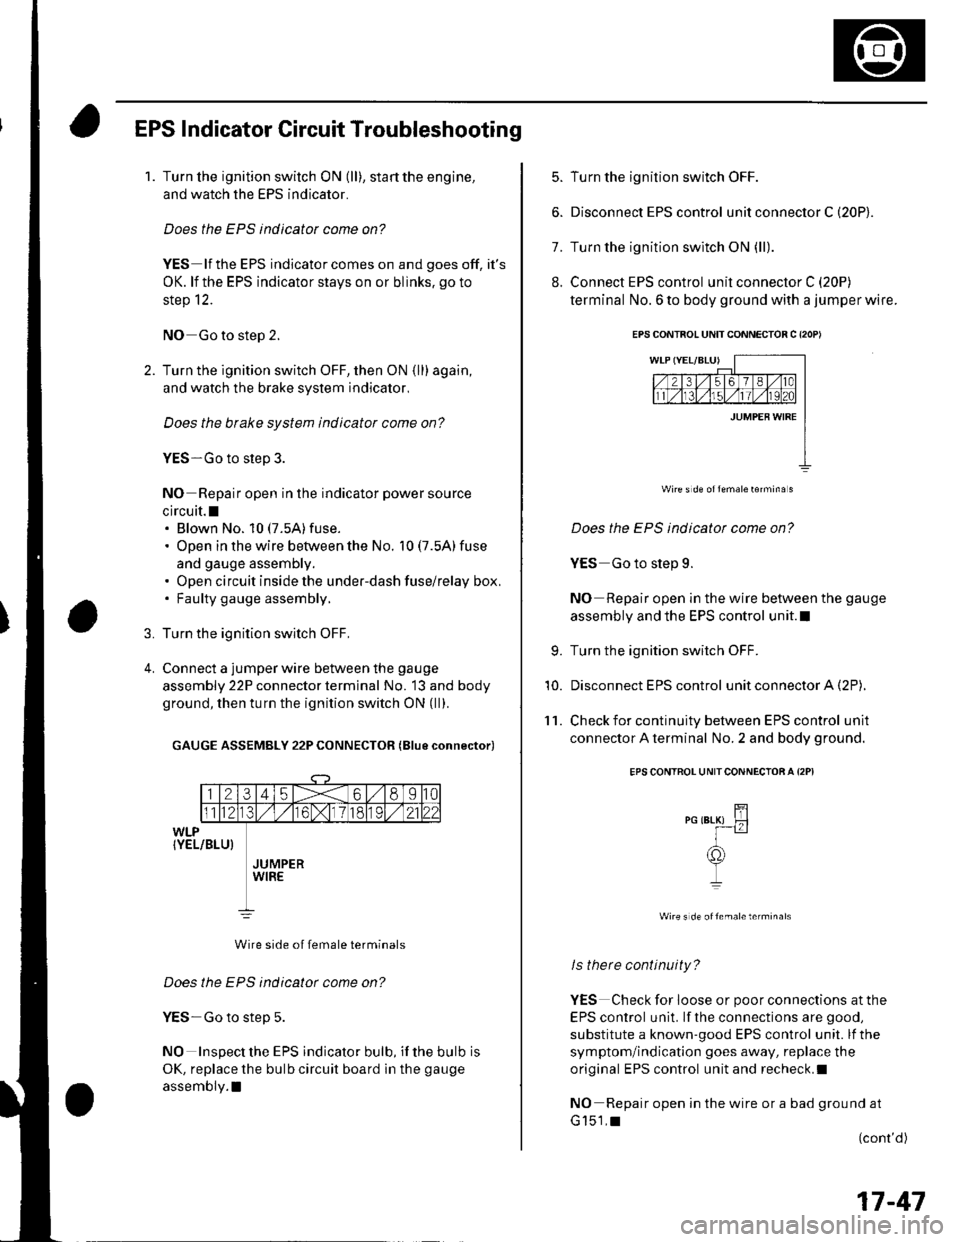
EPS Indicator Circuit Troubleshooting
1.Turn the ignition switch ON (ll), start the engine,
and watch the EPS indicator.
Does the EPS indicator come on?
YES lf the EPS indicator comes on and goes off, it's
OK. lf the EPS indicator stays on or blinks. go to
step 12.
NO Go to step 2.
Turn the ignition switch OFF, then ON (ll) again,
and watch the brake system indicator,
Does the brake system indicator come on?
YES-Go to step 3.
NO Repair open in the indicator power source
circuit.l. Blown No. 10 (7.5A)fuse.
. Open in the wire between the No. 10 (7.5A) fuse
and gauge assembly.. Open circuit inside the under-dash fuse/relay box,. Faulty gauge assembly.
Turn the ignition switch OFF,
Connect a jumper wire between the gauge
assembly 22P connector terminal No. 13 and body
ground, then turn the ignition switch ON (ll).
GAUGE ASSEMBLY 22P CONNECTOR (Blue connector)
Wire side of female terminals
Does the EPS indicator come on?
YES-Go to step 5.
NO Inspect the EPS indicator bulb, if the bulb is
OK, replace the bulb circuit board in the gauge
assembly.l
3.
4.
5. Turn the ignition switch OFF.
6. Disconnect EPS control u n it connector C (20P).
7. Turn the ignition switch ON (ll).
8. Connect EPS control unit connector C (20P)
terminal No. 6 to body ground with a jumper wire.
Wire s d€ oflemale16rmina s
Does the EPS indicatot come on?
YES Go to step 9.
NO Repair open in the wire between the gauge
assembly and the EPS control unit.l
Turn the ignition switch OFF.
Disconnect EPS control unit connector A (2P),
Check for continuity between EPS control unit
connector A terminal No. 2 and body ground.
EPS CONTROL UNITCONNECTOA A I2PI
wire s de oftemale terminals
ls there continuity?
YES Check for loose or poor connections at the
EPS control unit. lf the connections are good,
substitute a known-good EPS control unit. lf the
symptom/indication goes away, replace the
original EPS control unit and recheck.I
NO Repair open in the wire or a bad ground at
G151,t(cont'd)
9.
10.
'l 1.
EPS CONTBOL UNIT CONNECTOB C {2OP)
17-47
Page 539 of 1139
EPS Components
I
12.
EPS Indicator Circuit Troubleshooting (cont'dl
Turn the ignition switch OFF.
Disconnect EPS control unit connector C (20P).
Turn the ignition switch ON (ll).
Does the EPS indicator come on?
YES-Repair short to ground in the YEUBLU wire
between the gauge assembly and the EPS control
unit, or replace the bulb circuit board in the gauge
assembly.l
NO-Go to step 15.
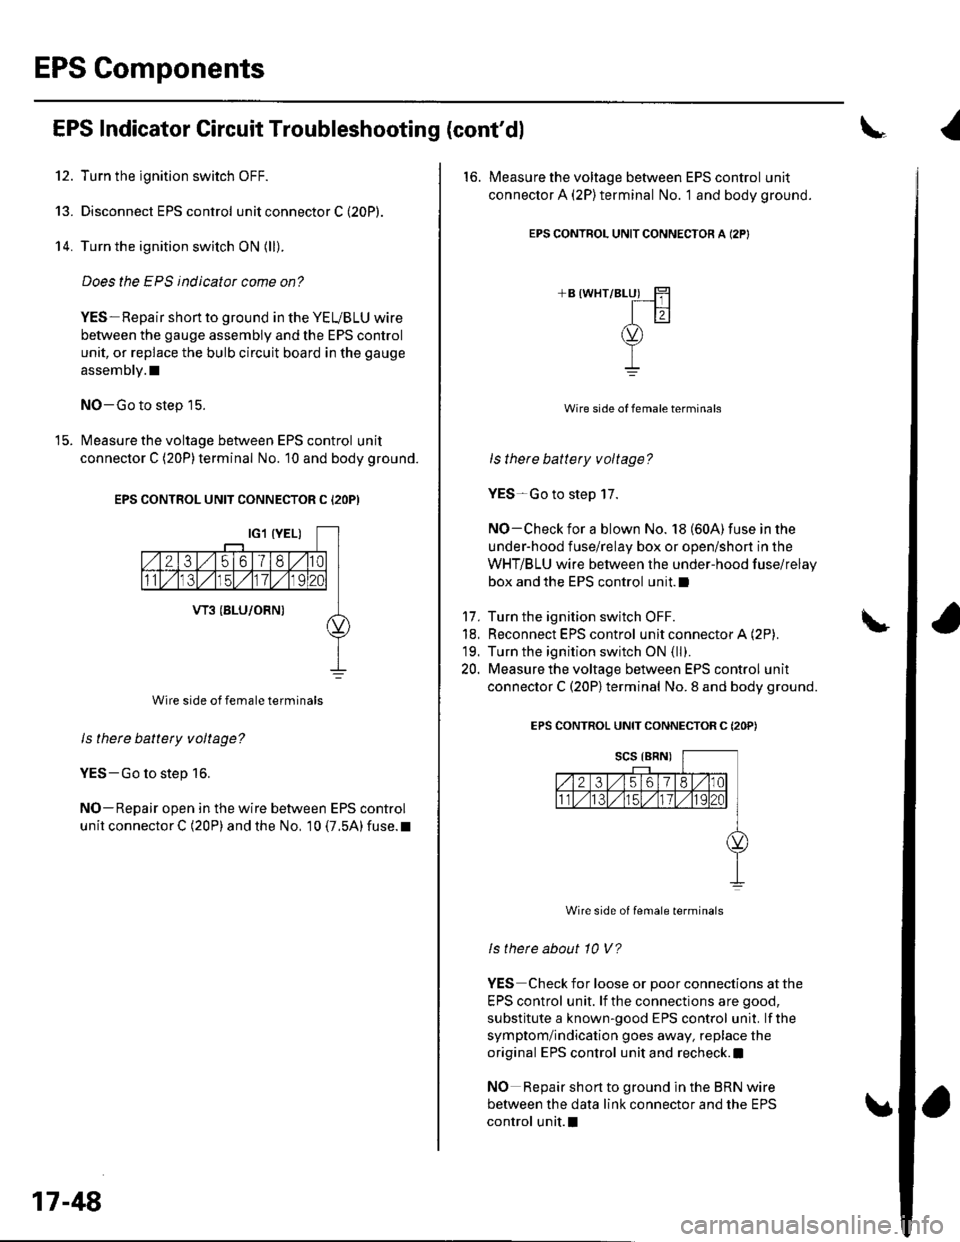
Measure the voltage between EPS control unit
connector C (20P)terminal No. 10 and body ground.
EPS CONTROL UNIT CONNECTOR C I2OP)
Wire side of female terminals
ls there battery voltage?
YES-Go to step 16.
NO-Repair open in the wire between EPS control
unit connector C (20P) and the No, 10 (7.5A) fuse. t
13.
14.
17-48
16. Measure the voltage between EPS control unit
connector A (2P)terminal No. '1 and body ground.
EPS CONTROL UNITCONNECTON A (2P}
+B (WHT/BLUI H
Itr
v-L
17.
18,
19.
20.
Wire side of female terminals
ls there battery voltage?
YES-Go to step 17.
NO-Check for a blown No. 18 (604) fuse in the
under-hood fuse/relay box or open/short in the
WHT/BLU wire between the under-hood fuse/relay
box and the EPS control unit.l
Turn the ignition switch OFF.
Reconnect EPS control unit connector A (2P).
Turn the ignition switch ON (ll).
Measure the voltage between EPS control unit
connector C (20P)terminal No. 8 and body ground.
EPS CONTROL UNIT CONNECTOR C (2OP)
Wire side of female terminals
ls therc about 10 V?
YES Check for loose or poor connections at the
EPS control unit. lf the connections are good,
substitute a known-good EPS control unit. lf the
symptom/indication goes away, replace the
original EPS control unit and recheck.l
NO Repair short to ground in the BRN wire
between the data link connector and the EPS
control unit.I
Page 613 of 1139
Gonventional Brake Components
IBrake Booster Test
Functional Test
1. With the engine stopped, press the brake pedal
several times to deplete the vacuum reservoir, thenpress the pedal hard, and hold itfor 15 seconds. lfthe pedal sinks, either the master cylinder is
bypassing internally, or the brake system (master
cylinder, lines. modulator, or calipers) is leaking.
2. Start the engine with the brake pedal pressed. lf thepedal sinks slightly, the vacuum booster is workingproperly. lf the pedal height does not vary, thebooster or check valve is faulty.
3. With the engine running, press the brake pedal
lightly. lfthe brake pedal sinks more than 1O mm
{3/8 in, ) in 3 minutes, the master cylinder is faulty.A slight change in pedal height when the Ay'C
compressor cycles on and off is normal. (The A,/C
compressor load changes the vacuum available tothe booster.)
Leak Test
1. Press the brake pedal with the engine running, thenstop the engine. lf the pedal height does not vary
while pressed for 30 seconds, the vacuum boosteris OK. lf the pedal rises, the booster is faulty.
2. With the engine stopped, press the brake pedal
several times using normal pressure. When thepedal is first pressed, it should oe row.
On consecutive applications, the pedal height
should gradually rise. lfthe pedal position does notvarv, check the booster check valve.
19-18
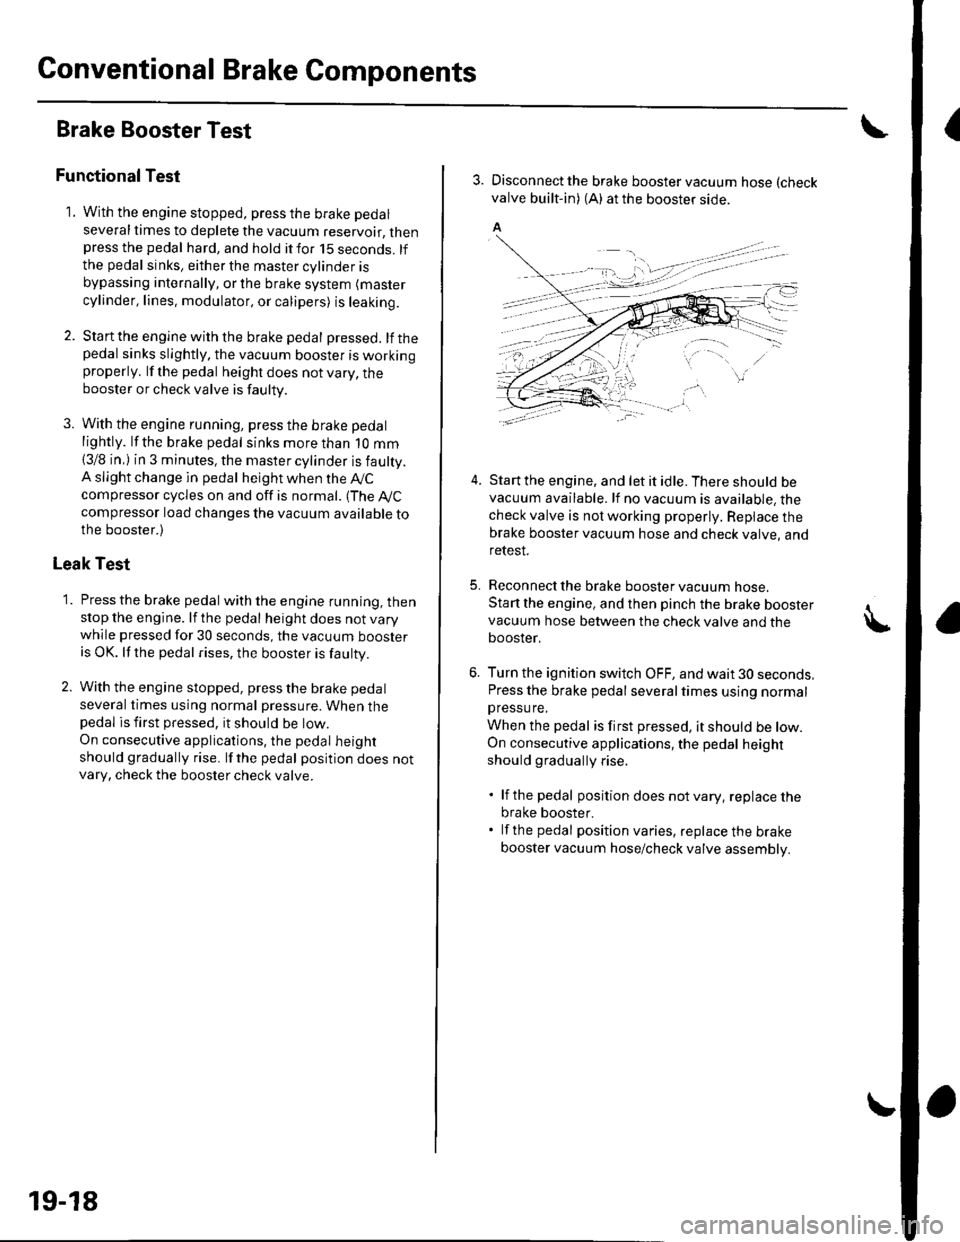
3. Disconnect the brake booster vacuum hose (check
valve built-in) (A) at the booster side.
5.
4.Start the engine, and let it idle. There should bevacuum available. lf no vacuum is available, thecheck valve is not working properly. Repiace thebrake booster vacuum hose and check valve, andrelesI.
Reconnect the brake booster vacuum nose.
Start the engine, and then pinch the brake boostervacuum hose between the check valve and thebooster,
Turn the ignition switch OFF, and wait 30 seconds,Press the brake pedal several times using normalpressu re,
When the pedal is first pressed, it should be low.On consecutive applications, the pedal height
should gradually rise.
. lf the pedal position does notvary, replacethe
brake booster.. lf the pedal position varies, replace the brake
booster vacuum hose/check valve assembly.
Page 625 of 1139
General Troubleshooting Information
ABS Indicator
. lf the system is OK,theABS indicator goes off 2
seconds after turning the ignition switch ON (ll)
without starting the engine, and then comes on again
and goes off 2 seconds later after starting the engine.
This occurs because the ABS control unitisturned
on by the lG2 power source.. The ABS indicator comes on when the ABS control
unit detects a problem in the system. However, even
though the system is operating properly, the indicator
will come on under these conditions:- Only the drive wheels rotate- One drive wheel is stuck- The vehicle goes into a spin- The ABS continues to operate for a long time.- The vehicle is subjected to an electrical signal
disturbance
To determine the actual cause of the problem, question
the customer about the problem. taking the above
condilions into consideration.
. When a Droblem is detected and lhe ABS indicator
comes on, there are cases when the indicator stays
on until the ignition switch is turned OFF, and cases
when the indicator goes off automatically when the
sYstem returns to normal.- DTC 61: The ABS indicator goes off automatically
when the system returns to normal.- DTC 11, 13,15,17 ,31,32,33, 34, 35, 36, 37, 38, 54,
or 81: The ABS indicator stays on until the ignition
switch is turned OFF whether or not the system
returns to normal.- DfC 12, 14, 16, 1a,21,51,52, or 53; The ABS
indicator goes off when the vehicle is driven again
and the system is OK after the ignition switch is
turned from OFF to ON {ll}.
Diagnostic Trouble Code {DTCI
. The memory can hold three DTCS. However, when
the same DTC is detected more than once, the more
recent DTC is written over the earlier one.
Therefore, when the same problem is detected
repeatedly, it is memorized as a single DTC.. The DTCs are in the order they occurred, beginning
with the most recent.. The DTCS are memorized in the EEPROM (non-
volatile memory). Therefore. the memorized DTCs
are not cleared when the battery is disconnected, the
ignition switch is turned off, or the system returns to
normal. Do the specified procedures to clear the
DTCs.
Self-diagnosis
. Self-diagnosis can be classified into two categories:- Initial diagnosis:
Done right after the engine starts and until the ABS
indicator goes off- Regular diagnosis:
Done rightafterthe initial diagnosis until the
ignition switch is turned OFF. When a problem is detected by self-diagnosis, the
system does the following:- Turns the ABS indicator on- Memorizes the DTC- Stops ABS control
Kickback
The pump motor operates when the ABS is functioning,
and the fluid in the reservoir is forced out to the master
cylinder, causing kickback at the brake pedal.
Pump Motor
. The pump motor operates when the ABS is
functioning.. The ABS control unit checks the pump motor
operation when the vehicle is started the first time
after the ignition switch is turned ON (ll). You may
hear the motor operate at this time, but it is normal.
(cont'd)
19-31
Page 626 of 1139
ABS Components
General Troubleshooting Information (cont'd)
How to Troubleshoot ABS DTCs
The troubleshooting flowchart procedures assume that
the cause of the oroblem is still Dresent and the ABS
indicator is still on. Following the flowchart when the
ABS indicator does not come on can result in incorrect
diagnosis.
The connector illustrations show the female terminal
connectors with a single outline and the male terminal
connectors with a double outline.
1. Ouestion the customer about the conditions when
the problem occured, and try to reproduce the
same conditions for troubleshooting. Find out
when the ABS indicator came on, such as during
ABS control, after ABS control, when the vehicle
was at a certain speed, etc.
2. When the ABS indicator does not come on during
the test-drive, but troubleshooting is done based on
the DTC, check for loose connectors. poor terminal
contact, etc., before you start troubleshooting.
3. After troubleshooting, clear the DTC,disconnect the
Honda PGM Tester. and test-drive the vehicle.
Make sure the ABS indicator does not come on.
How to Retrieve ABS DTCs
Honda PGM Tester Method:
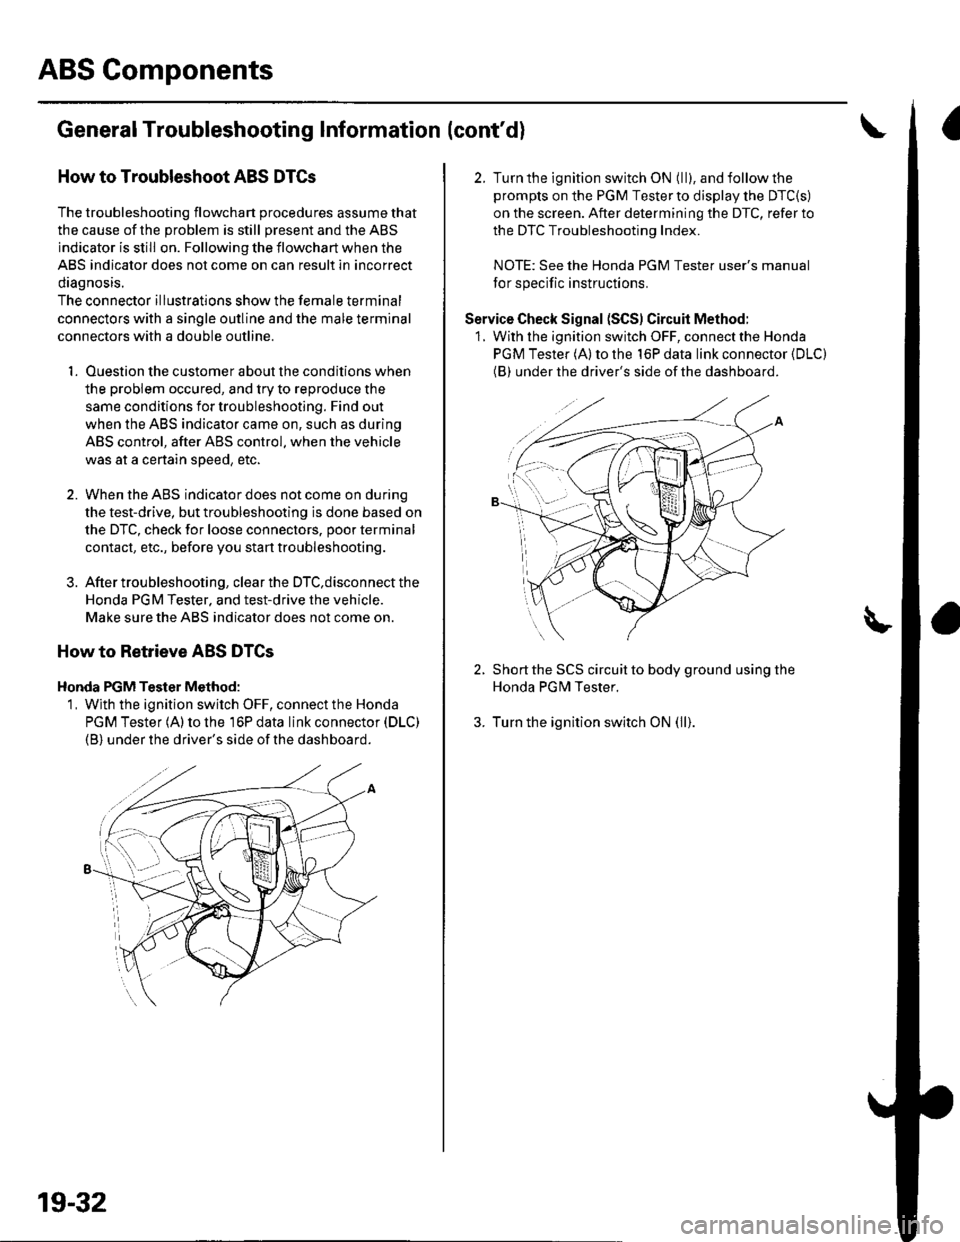
1, Wjth the ignition switch OFF, connect the Honda
PGM Tester (A) to the 16P data link connector (DLC)
(B) under the driver's side of the dashboard.
19-32
2. Turn the ignition switch ON (ll), and follow the
prompts on the PGM Tester to display the DTC{S)
on the screen. After determining the DTC, refer to
the DTC Troubleshooting Index.
NOTE: See the Honda PGM Tester user's manual
for specific instructions.
Service Check Signal (SCS) Circuit Method:
1. With the ignition switch OFF, connect the Honda
PGM Tester (A) to the 16P data link connector (DLC)
(BI under the driver's side of the dashboard.
2. Short the SCS circuit to body ground using the
Honda PGM Tester.
3. Turn the ignition switch ON (ll).
Page 627 of 1139
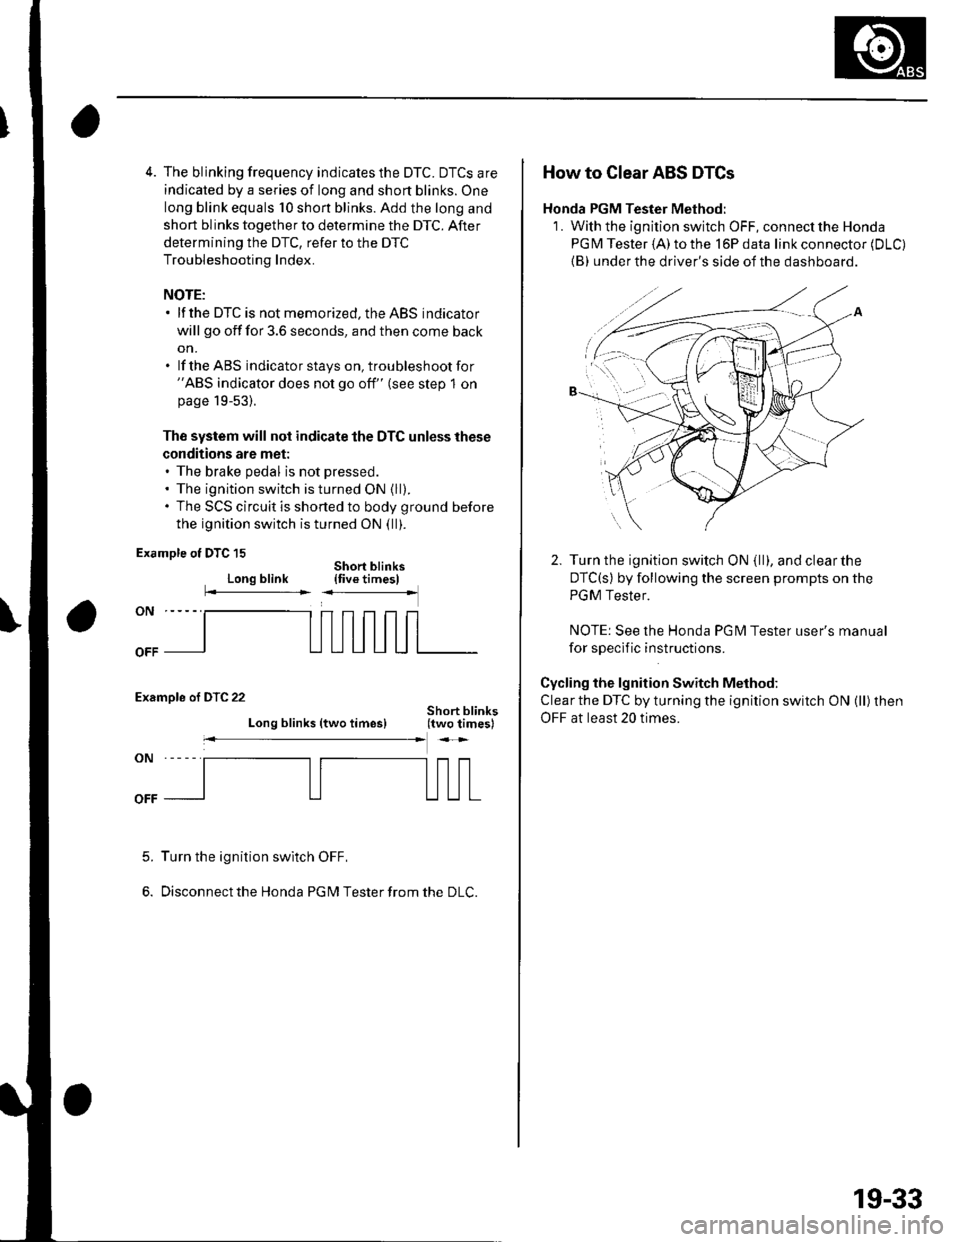
4. The blinking frequency indicates the DTC. DTCS are
indicated by a series of long and short blinks. One
long blink equals 10 shon blinks. Add the long and
short blinks together to determine the DTC. After
determining the DTC, refer to the DTC
Troubleshooting Index.
NOTE:. lf the DTC is not memorized, the ABS indicator
will go off for 3.6 seconds, and then come back
on.. lf the ABS indicatorstays on, troubleshootfor"ABS indicator does not go off" (see step 1 onpage 19-53).
Th€ system will not indicate the DTC unless these
conditions are met:. The brake pedal is not pressed.. The ignition switch is turned ON {ll).. The SCS circuit is shorted to body ground before
the ignition switch is turned ON (ll).
Example ot DTC 15
Long blinkShort blinks{five timesl
Examole of DTC 22
Long blinks (two times)
Turn the ignition swltch OFF,
Disconnect the Honda PG M Tester from the DLC.
5.
How to Clear ABS DTCs
Honda PGM Tester Method:
1. With the ignition switch OFF, connect the Honda
PGM Tester (A)to the l6Pdata link connector (DLC)
{B} under the driver's side of the dashboard.
Turn the ignition switch ON (ll), and clearthe
DTC(s) by following the screen prompts on the
PGM Tester.
NOTE: See the Honda PG l\4 Tester user's manual
for sDeclf ic instructions.
Cycling the lgnition Switch Method:
Clear the DTC by turning the ignition switch ON (ll) then
OFF at least 20 times.
19-33