Timing HONDA CIVIC 2003 7.G User Guide
[x] Cancel search | Manufacturer: HONDA, Model Year: 2003, Model line: CIVIC, Model: HONDA CIVIC 2003 7.GPages: 1139, PDF Size: 28.19 MB
Page 110 of 1139
t
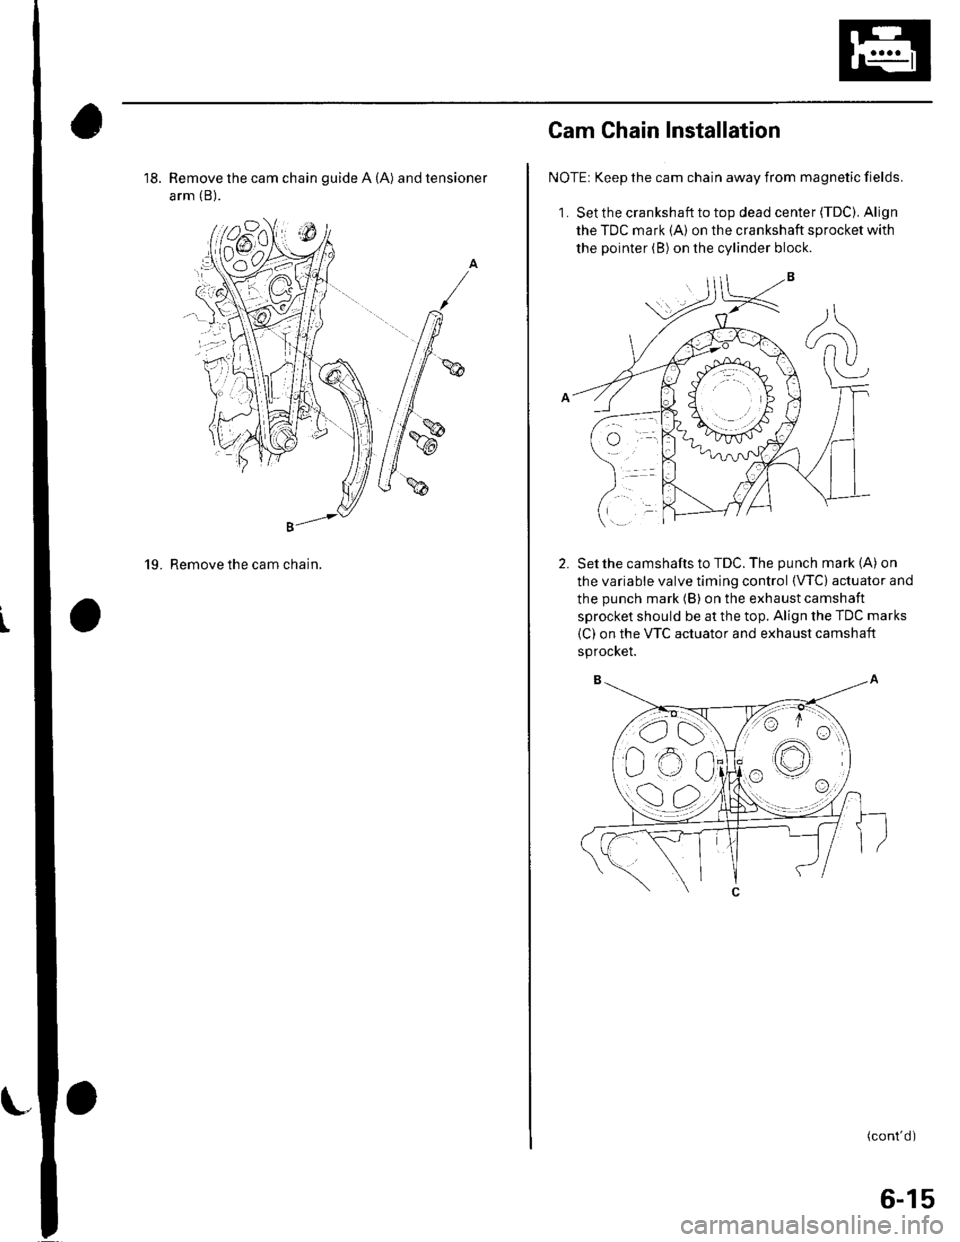
18. Remove the cam chain guide A (A) and tensioner
arm (B).
g"'-
19. Remove the cam chain.
,ot./6. | \{n$1J;
Cam Chain Installation
NOTE: Keep the cam chain away from magnetic fields.
1. Set the crankshaft to top dead center (TDC). Align
the TDC mark {A) on the crankshaft sprocket with
the pointer (B) on the cylinder block.
Setthe camshafts to TDC. The punch mark (A) on
the variable valve timing control {VTC) actuator and
the punch mark (B) on the exhaust camshaft
sprocket should be at the top. Align the TDC marks
(C) on the VTC actuator and exhaust camshaft
sprocKet.
(cont'd )
6-15
Page 114 of 1139
19.
20.
lnstall the variable valve timing control (VTC) oil
control solenoid valve (see step 1 on page 11'127).
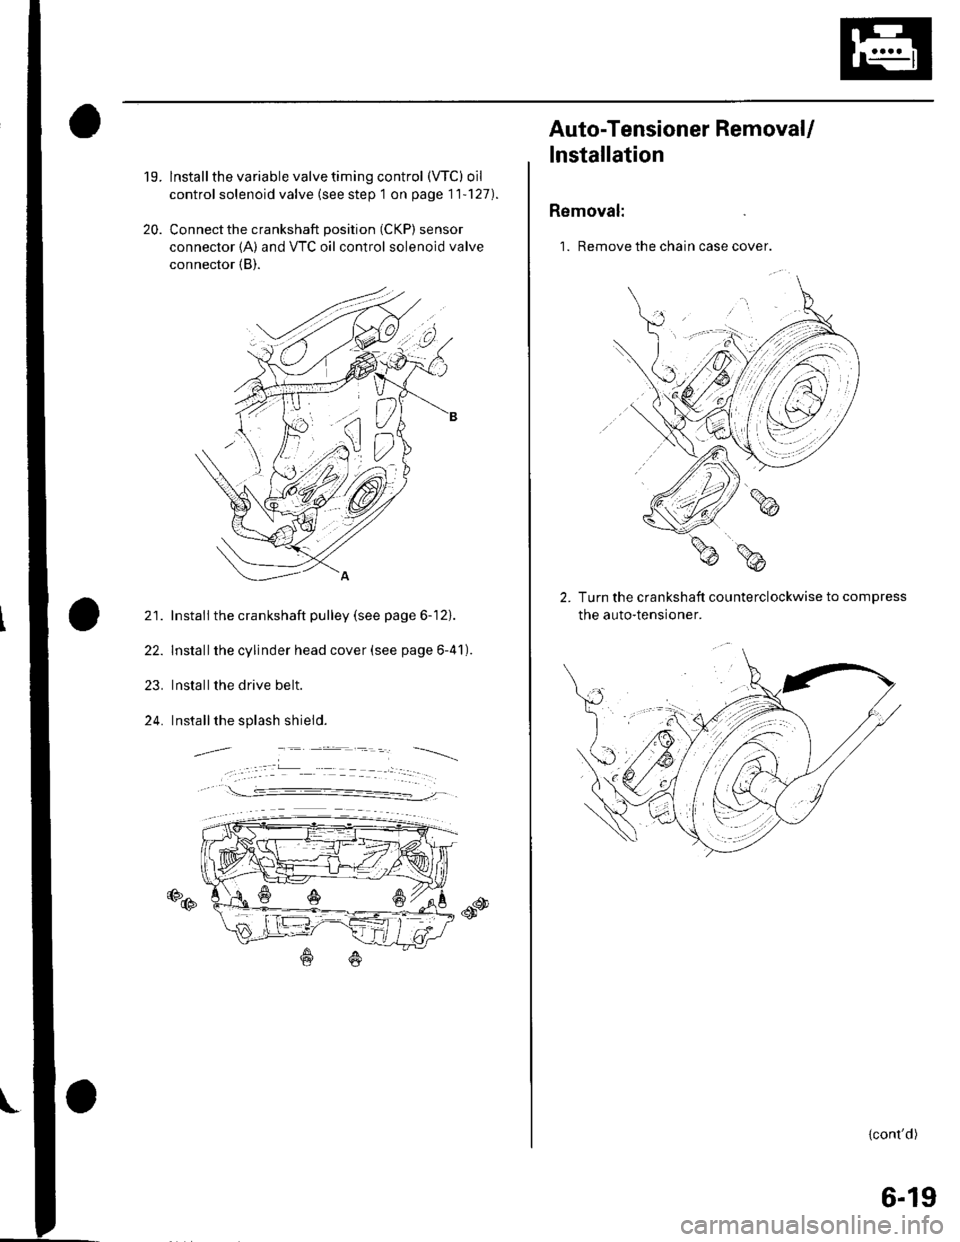
Connect the crankshaft position (CKP) sensor
connector {A) and VTC oil control solenoid valve
connector (B).
21. Install the crankshaft pulley (see page 6-12).
22. Installthe cylinder head cover (see page 6-41).
23. Installthe drive belt.
24. Installthe splash shield.
€D@
Auto-Tensioner RemovaU
lnstallation
Removal:
1. Remove the chain case cover.
Turn the crankshaft counterclockwise to compress
the auto-tensroner.
{cont'd)
6-19
Page 119 of 1139
Cylinder Head
tJ.
Cylinder Head Removal (cont'd)
Remove the rocker arm assembly (see page 6-26).
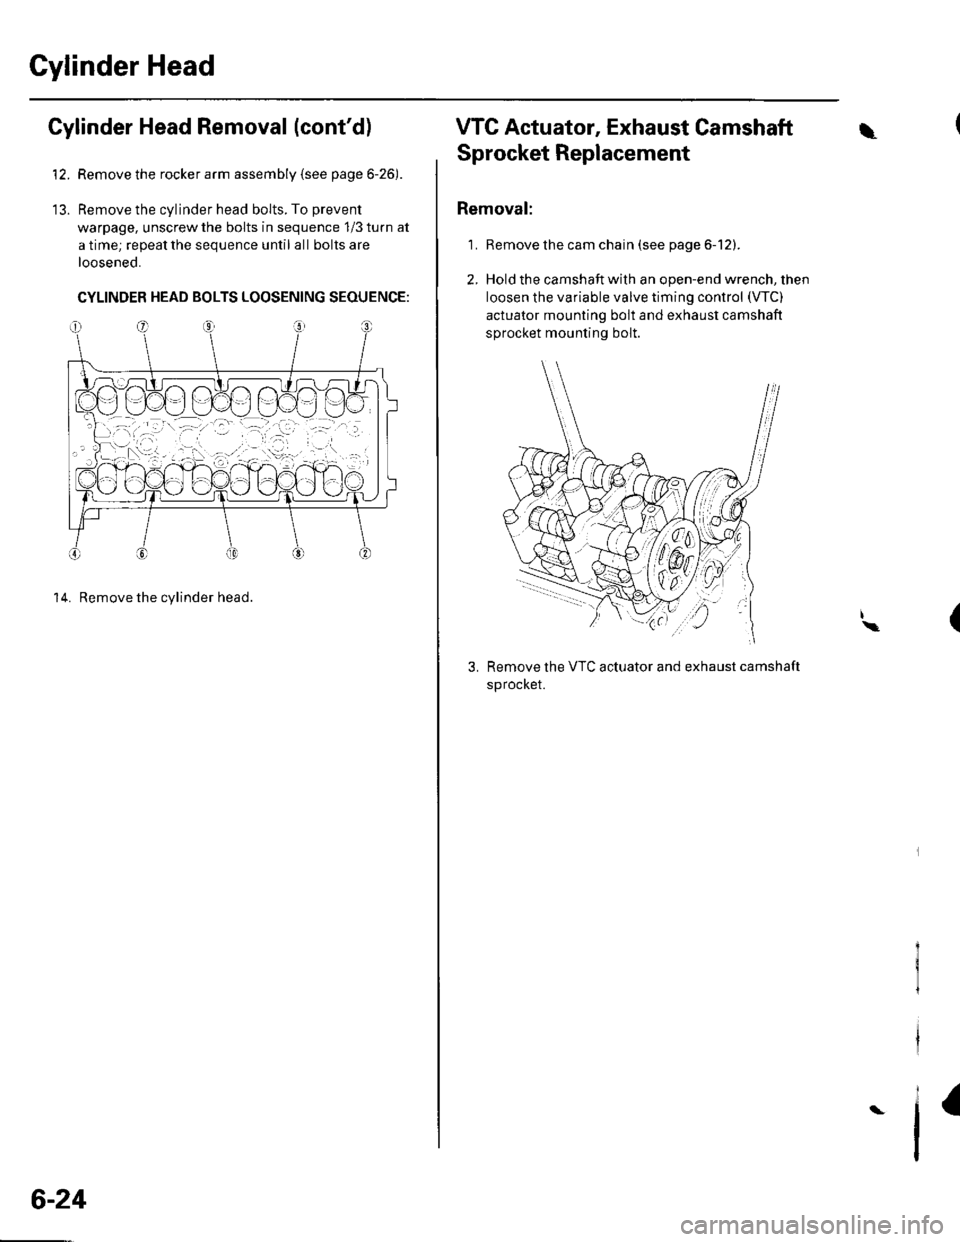
Remove the cylinder head bolts. To prevent
warpage, unscrew the bolts in sequence 1/3 turn at
a time; repeat the sequence until all bolts are
loosened.
CYLINDER HEAD BOLTS LOOSENING SEQUENGE:
14. Remove the cylinder head.
6-24
VTC Actuator, Exhaust Camshaft\
Sprocket Replacement
Removal:
1. Remove the cam chain (see page 6-12).
2. Hold the camshaft with an open-end wrench, then
loosen the variable valve timing control (VTC)
actuator mounting bolt and exhaust camshaft
sprocket mounting bolt.
Remove the VTC actuator and exhaust camshaft
sprocket.
I\(
I
Page 133 of 1139
Cylinder Head
Rocker Arm Assembly Installation
:,ean and dry the No. 5 rocker shaft holder mating
surfaces.
eeassemble the rocker arm assembly (see page 6-
21 t.
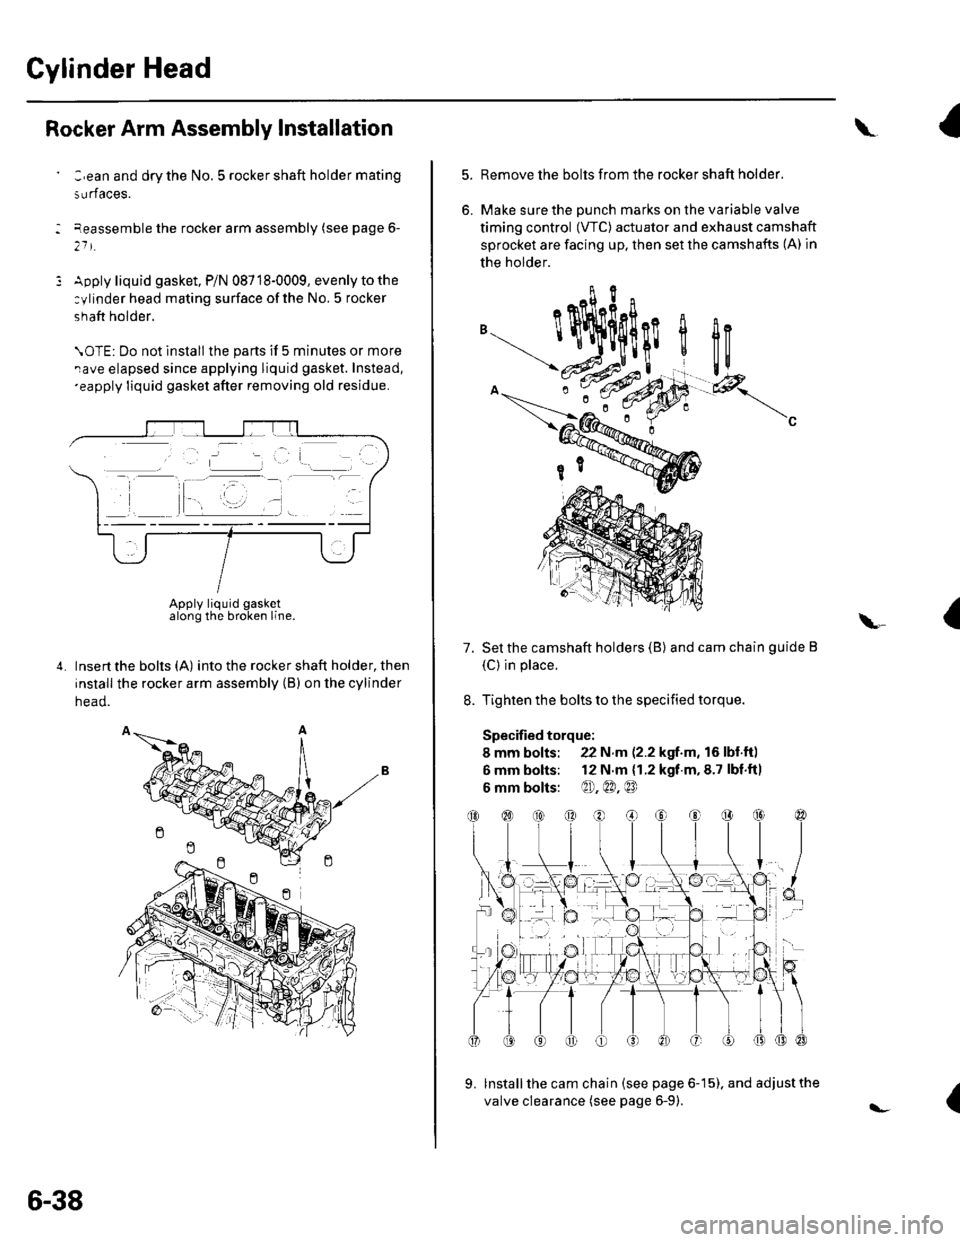
Apply liquid gasket, P/N 08718-0009, evenly to the
:ylinder head mating surface ofthe No. 5 rocker
shaft holder.
\OTE: Do not lnstall the parts if 5 minutes or more
rave elapsed since applying liquid gasket. Instead,'eapply liquid gasket after removing old residue.
Insert the bolts (A) into the rocker shaft holder, then
install the rocker arm assembly (B) on the cylinder
head.
Apply liquid gasketalong the broken line.
6-38
l-
\
5.
6.
Remove the bolts from the rocker shaft holder.
Make sure the DUnch marks on the variable valve
timing control (VTC) actuator and exhaust camshaft
sprocket are facing up. then set the camshafts (A) in
the holder.
Set the camshaft holders (B) and cam chain guide B
(C) in place.
Tighten the bolts to the specified torque.
Specified torque:
8 mm bolts: 22 N.m (2.2 kgf.m, 16 lbl.ft)
6 mm bolts: 12 N.m {1.2 kgf.m,8.7 lbf.fil
6 mm bolts: @),@.@
lnstall the cam chain (see page 6-15). and adjust the
valve clearance (see page 6-9).
I
flc
a\-
7.
{
Page 136 of 1139
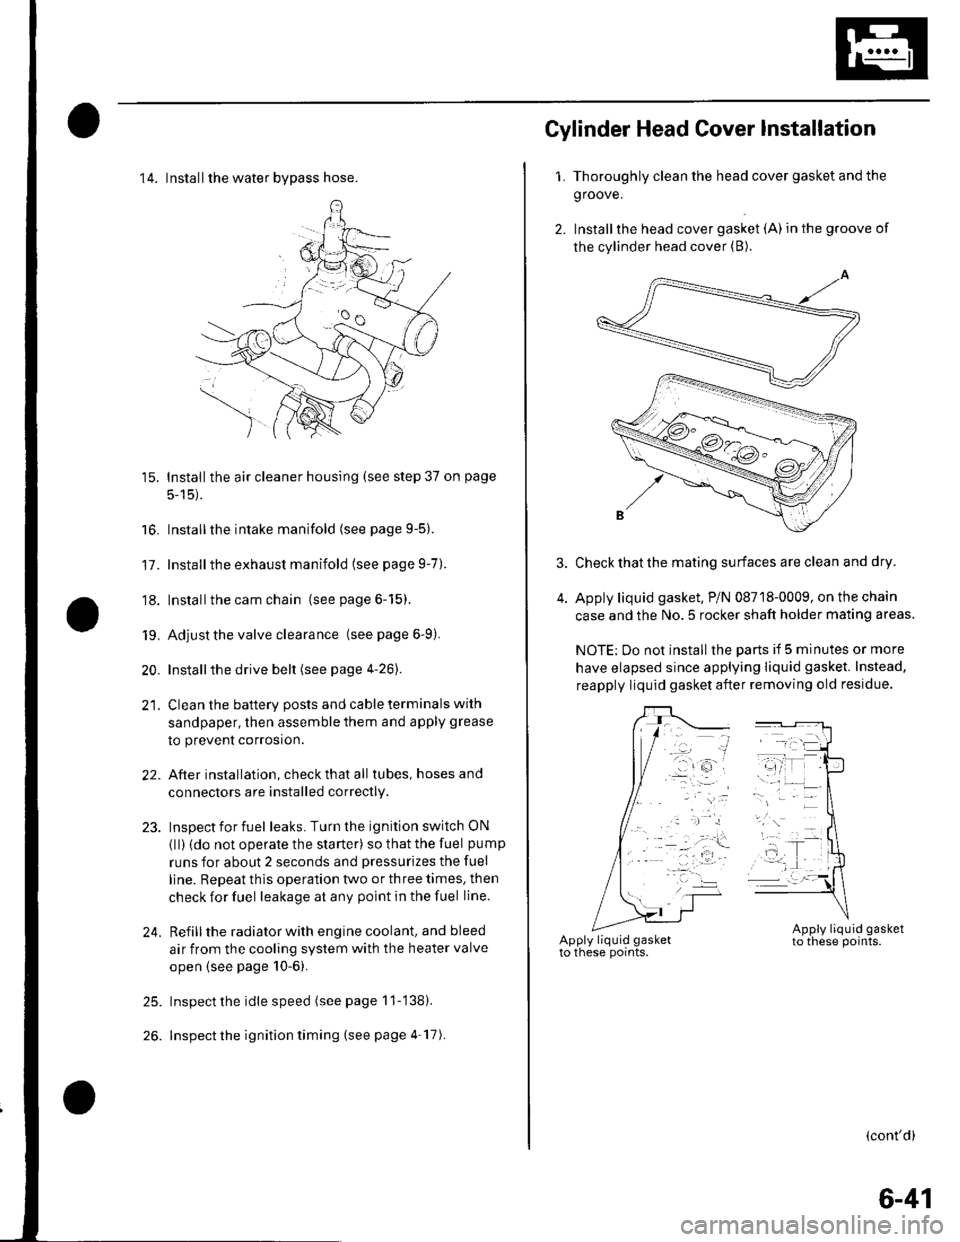
14. Installthe water bvpass hose.
15. Installthe air cleaner housing (see step 37 on page
5-15).
16. Installthe intake manifold (see page 9-5).
17. Installthe exhaust manifold (see page 9-7).
'18. Installthe cam chain (see page 6-15).
19. Adjust the valve clearance (seepage6-9).
20. Installthe drive belt (see page 4-26).
21. Clean the battery posts and cable terminals with
sandpaper, then assemble them and apply grease
to prevent corrosion.
22. After installation, checkthatall tubes, hosesand
connectors are installed correctly.
23. Inspectforfuel leaks. Turn the ignition switch ON
{ll) {do not operate the starter) so that the fuel pump
runs for about 2 seconds and pressurizes the fuel
line. Repeat thls operation two or three times, then
check for fuel leakage at any point in the fuel line.
24. Refillthe radiator with engine coolant, and bleed
air from the cooling system with the heater valve
open (see page 10-6).
25. Inspect the idle speed (see page 11-'138).
26. Inspect the ignition timing (see page 4-17).
Gylinder Head Cover lnstallation
1. Thoroughly clean the head cover gasket and the
groove.
2. Installthe head cover gasket (A) in the groove of
the cylinder head cover (B).
Check that the mating surfaces are clean and dry.
Apply liquid gasket. P/N 08718-0009, on the chain
case and the No.5 rocker shaft holder mating areas.
NOTE: Do not install the parts if 5 minutes or more
have elapsed since applying liquid gasket. Instead,
reapply liquid gasket after removing old residue.
(cont'd)
6-41
Page 214 of 1139
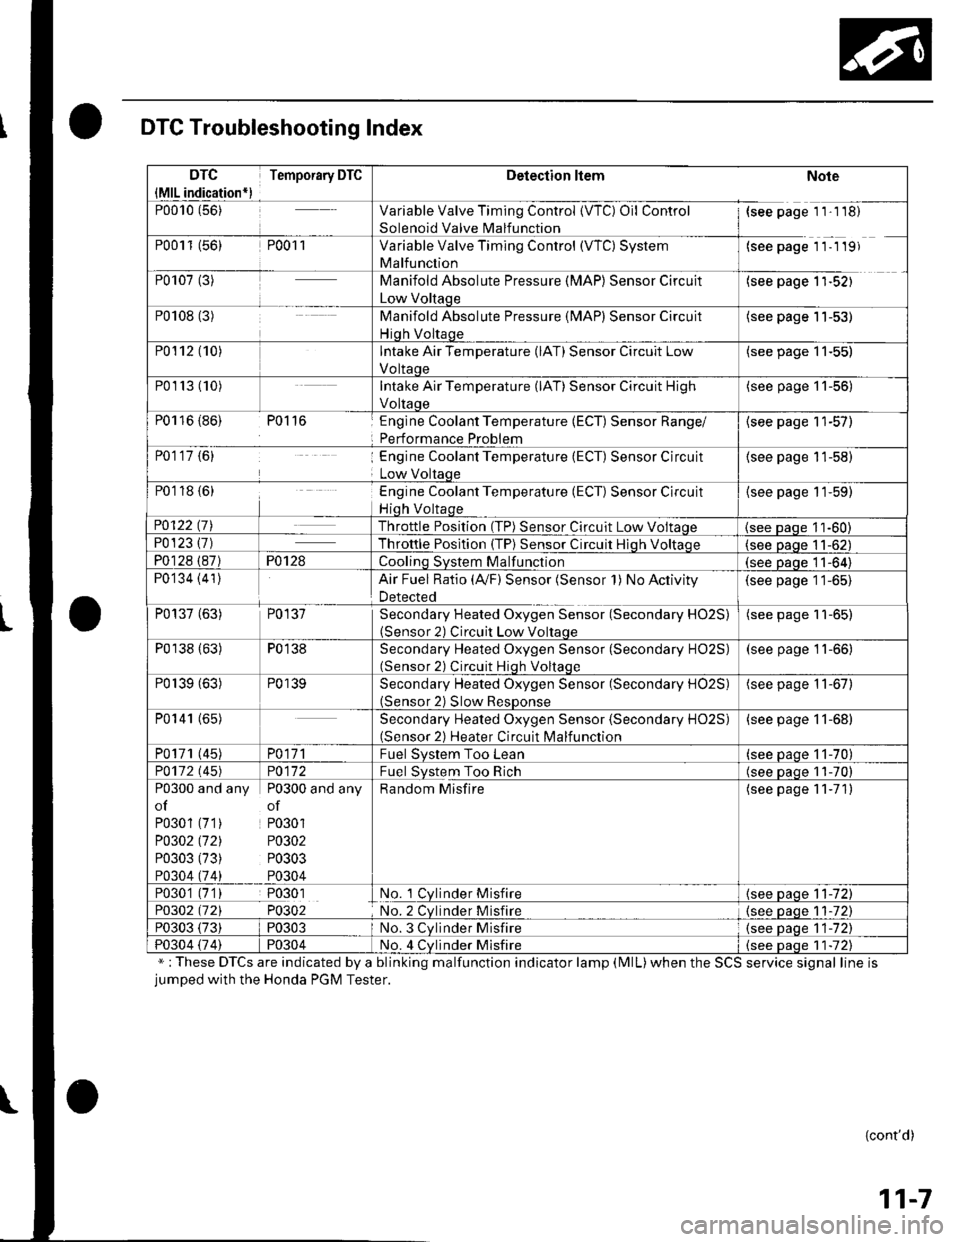
DTC Troubleshooting Index
";These DTCs are indicated by a blinking malfunction indicator lamp (MlL)when the SCS service signal line isjumped with the Honda PGM Tester.
{cont'd)
11-7
DTC
{MlL indication*)
Temporary DTCDetection ltemNote
P0010 (56)Variable Valve Timing Control {VTC) Oil Control
Solenoid Valve Malfunction
{see page 1 1'1 18)
P0011 (56)P001 1Variable Valve Timing Control (WC) System
Malfunction
(see page 11- 1 19)
P0107 (3)Manifold Absolute Pressure (MAP) Sensor Circuit
Low Voltaqe
(see page 1'l-521
P0108 (3)Manifold Absolute Pressure (MAP) Sensor Circuit
Hiqh Voltaqe
(see page 11-53)
P0112 (10)Intake Air Temperature (lAT) Sensor Circuit Low
Voltaoe
(see page 11-55)
P01r3 (10)Intake Air Temperature (lAT) Sensor Circuit High
Voltaoe
(see page '11-56)
P0116 {86) P0116Englne Coolant Temperature (ECT) Sensor Range/
Performance Problem
{see page 11-57)
P0117 {6)Engine Coolant Temperature (ECT) Sensor Circuit
Low Voltaqe
(see page 11-58)
P0118 {6)Engine Coolant Temperature (ECT) Sensor Circuit
Hiqh Voltaqe
{see page 11-59)
P0122 t7\Throttle Position (TP) Sensor Circuit Low Voltaqe(see Daqe 11-60)P0123 {7)Throttle Posltion (TP) Sensor Circuit Hiqh Voltaoe(see paqe 11-62)
P0128 (87)P0128Coolinq SVStem Malfunction(see Daqe 11-64)
P0134 (41)Air Fuel Ratio (Ay'F) Sensor (Sensor 1) No Activity
Detected
(see page 11-65)
P0137 (63)P0137Secondary Heated Oxygen Sensor (Secondary HO2S)(Sensor 2) Circuit Low Voltaqe
(see page 11-65)
P0138 (63)P0138Secondary Heated Oxygen Sensor (Secondary HO2S)(Sensor 2) Circuit Hiqh Voltaqe
(see page 11-66)
P0139 (63)P0139Secondary Heated Oxygen Sensor (Secondary H02S)(Sensor 2) Slow ResDonse
(see page 11-67)
P0141 (65)Secondary Heated Oxygen Sensor (Secondary H02S)(Sensor 2) Heater Circuit Malfunction
(see page 11-68)
P0171 (45)PO\11Fuel Svstem Too Lean(see paqe 11-70)
PO112 l'45)PO\l2Fuel System Too Rich(see oaoe 11-70)
P0300 and any P0300 and any
of of
P0301 (71) P0301
PO302 (721 P0302
P0303 (73) P0303
P0304 (74) P0304
Random Misfire(see page 11-71)
P0301 (7'1) P0301No. 1 Cylnder Misfire{see page 11-72)
P0302 (721 P0302No. 2 Cvlnder Misfire{see paqe 1 1-72)
P0303 (73)P0303No. 3 Cvlnder Misfire(see oaqe 11-72)
P0304 {74)P0304No. 4 Cvlnder Misfire{see Daqe 1 1-72)
Page 217 of 1139
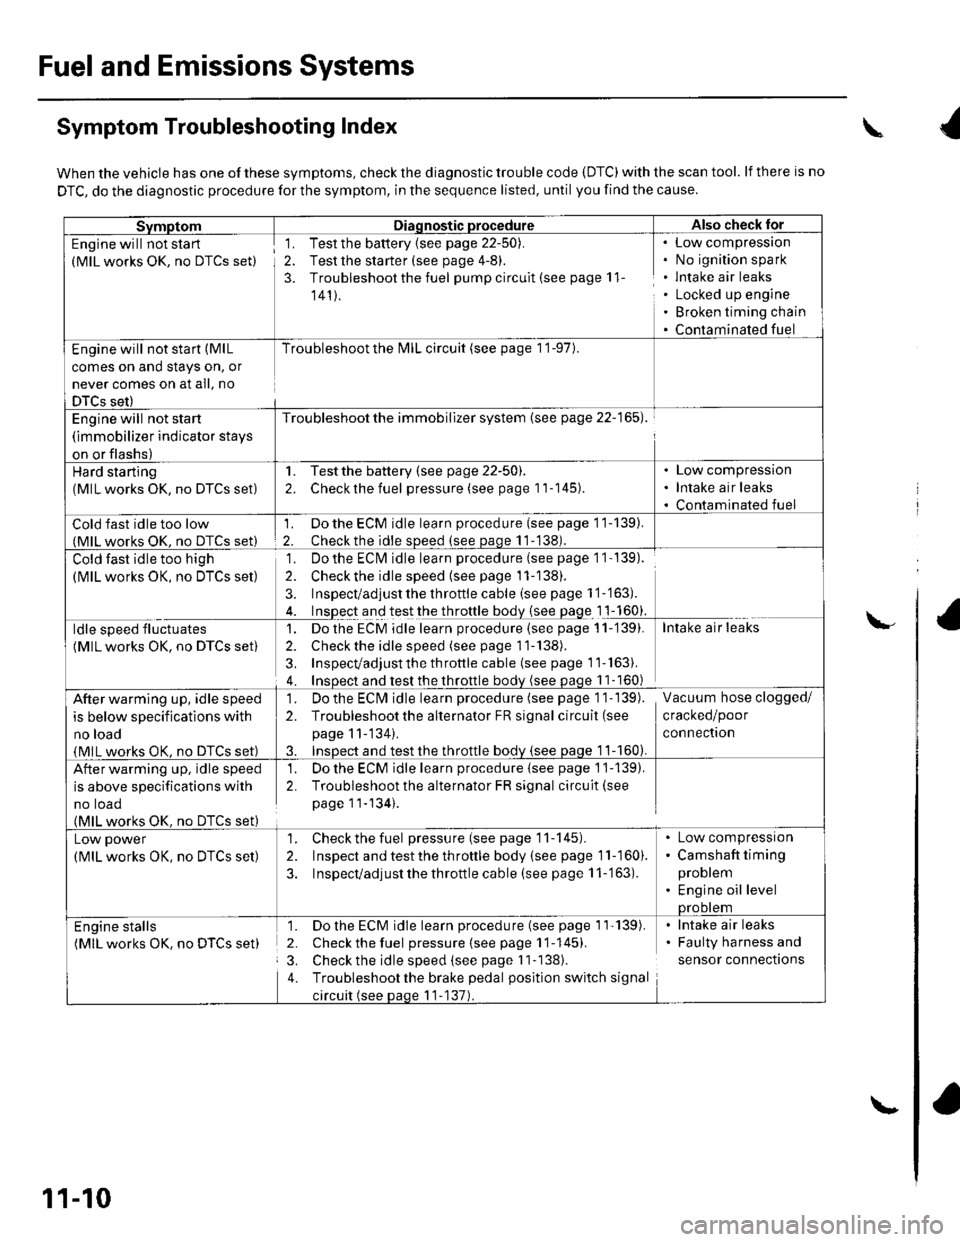
Fuel and Emissions Systems
Symptom Troubleshooting Index
When the vehicle has one of these symptoms, check the diagnostic trouble code (DTC) with the scan tool. lf there is no
DTC, do the diagnostic procedure for the symptom, in the sequence listed, until you find the cause.
SvmotomDiaqnostic procedureAlso check lor
Engine will not sta rt
(MlL works OK, no DTCS set)
1. Test the battery {see page 22-50).
2. Test the starter (see page 4-8).
3. Troubleshoot the fuel pump circult (see page 11
141).
Low compressron
No ignition spark
lntake air leaks
Locked up engine
Broken timing chain
Contaminated fuel
Engine will not start (MlL
comes on and stays on, or
never comes on at all, no
DTCS set)
Troubleshoot the l\4lL circuit (see page 1 '1-97).
Engine will not start
(immobilizer indicator stays
on or flashs)
Troubleshoot the immobilizer system (see page 22-165).
Hard starting(MlL works OK, no DTCS set)
1. Testthe battery (see page 22-50).
2. Checkthe fuel pressure (see page 11-145).
Low compression
Intake air leaks
Contaminated fuel
Cold fast idle too low(MlL works OK. no DTCS set)
1. Do the ECM idle learn procedure (see page 11-139).
2. Checkthe idle sDeed (see paqe 11-138).
Cold fast idle too high
(MlL works OK, no DTCS set)
Do the ECI\4 idle learn procedure (see page 1 1- 139).
Checkthe idle speed {see page 11-138).
Inspect/adjust the throttle cable (see page 1 '1-'163).
Inspect and test the throttle body {see page 1 1-160}.
']�
2.
3.
ldle speed fluctuates
(MlL works OK, no DTCS set)
1. Dothe ECM idle learn procedure (see page 11-'139).
2. Check the idle speed (see page 11-138).
3, Inspecvadjust th e throttle cable (see page 11''163).
4. Insoect and test the throttle bodv (see paqe 11- 160)
Intake air leaks
After warming up, idle speed
is below specifications with
no load
{MlL works OK, no DTCS set)
1. Do the ECIVI idle learn procedure (see page 1 1- 139).
2. Troubleshootthe alternator FR signal circuit (see
page 11-'134).
3. InsDect and test the throttle bodv {see paqe 1 1-160).
Vacuum hose clogged/
cracked/poor
connectron
After warming up, idle speed
is above specifications with
no toao(MlL works OK. no DTCS set)
1. Do the ECM idle learn procedure {see page 1'j-139).
2. Troubleshoot the alternator FR signal circuit(see
page 11-134).
Low power
(MlL works OK, no DTCS set)
1. Check the fuel pressure(seepagell-145).
2. Inspect and test the th roftle body (see page 11-160).
3. Inspecvadjust the throttle cable (see page 11-'163).
Low compressron
Camshaft timing
problem
Engine oil levelprootem
Engine stalls(MlL works OK. no DTCS set)
1. Do the ECM idle learn procedure (see page 1'l'139).
2. Check the fuel pressure{seepagell-145).
3. Check the idle speed (see page I 1-138).
4. Troubleshootthe brake pedal position switch signal
circuit (see paqe 11-137).
lntake air leaks
Faulty harness and
sensor connections
\
\-
11-10
\-
Page 221 of 1139
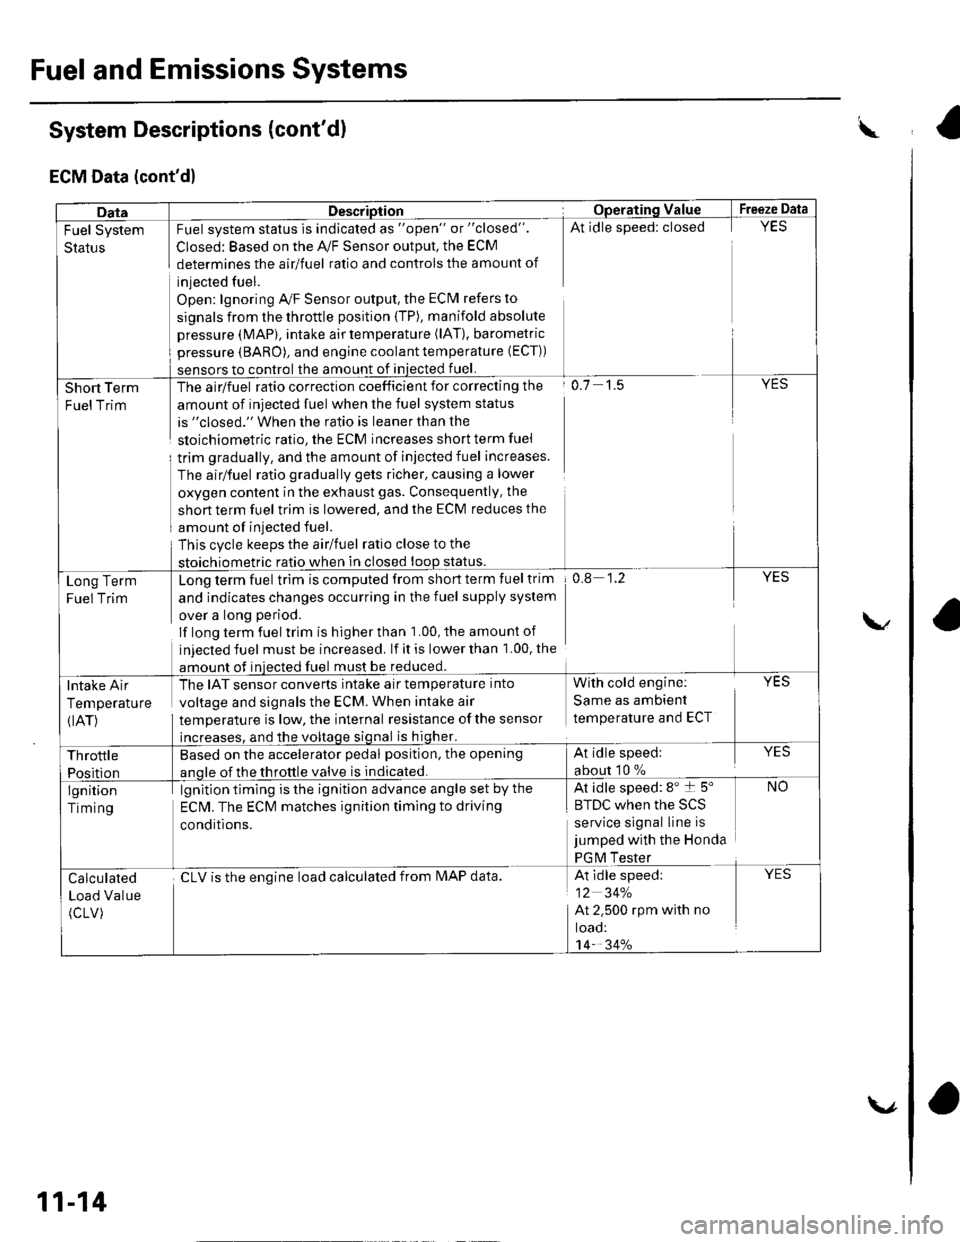
Fuel and Emissions Systems
System Descriptions (cont'd)
ECM Data (cont'd)
w
DataDescriptionOpera'ting ValueFreeze Data
Fuel System
Status
Fuel system status is indicated as "open" or "closed".
Closed: Based on the A,/F Sensor output, the ECM
determines the airlfuel ratio and controls the amount of
injected fuel.
Open: lgnoring Ay'F Sensor output, the ECM refers to
signals from the throttle position {TP), manifold absolute
pressure (MAP), intake air temperature (lAT), barometric
pressure (BARO), and engine coolant temperature (ECT))
sensors to control the amount of iniected fuel.
At idle speed: closedYES
Short Term
FuelTrim
The airlfuel ratio correction coefficient for correcting the
amount of injected fuel when the fuel system status
is "closed." When the ratio is leaner than the
sloichiometric ratio, the ECM increases short term fuel
trim gradually, and the amount of iniected fuel increases.
The airlfuel ratio gradually gets richer, causing a lower
oxygen content in the exhaust gas. Consequently, the
short term fuel trim is lowered, and the ECM reduces the
amount of injected fuel.
This cvcle keeps the airlfuel ratio close to the
stoichiometric ratio when in closed loop status.
o.7 1.5YES
Long Term
Fuel Trim
Long term fuel trim is computed from short term fuel trim
and indicates changes occurring in the fuel supply system
over a long period.
lf long term fuel trlm is higher than 1.00, the amounl of
injected fuel must be increased. lf it is lower than 1.00, the
amount of injected fuel must be reduced.
0.8 1.2YES
Intake Air
Temperature
{IAT)
The IAT sensor converts intake air temperature into
voltage and signals the ECM. When intake air
temperature is low, the internal resistance ofthe sensor
increases, and the voltage signal is higher.
With cold engine:
Same as ambient
temperature and ECT
YES
Throttle
Position
Based on the accelerator pedal position, the opening
anole of the throttle valve is indicated.
At idle speed:
about 10 %
YES
lgnition
Timing
lgnition timing is the ignition advance angle set by the
ECM. The ECM matches ignition timing to driving
conditions.
At idle speed: 8" t 5"
|' tuL wnen rne >L)
service signal line is
jumped with the Honda
PGM Tester
NO
Calculated
Load Value
(cLV)
cLV is the enoine load calculated from IMAP data.At idle speed:
12 34%
At 2.500 rpm with no
toao:'t4- 34%
YES
11-14
\.,
ra
Page 233 of 1139
Fuel and Emissions Systems
System Descriptions (cont'd)
PGM-FI System
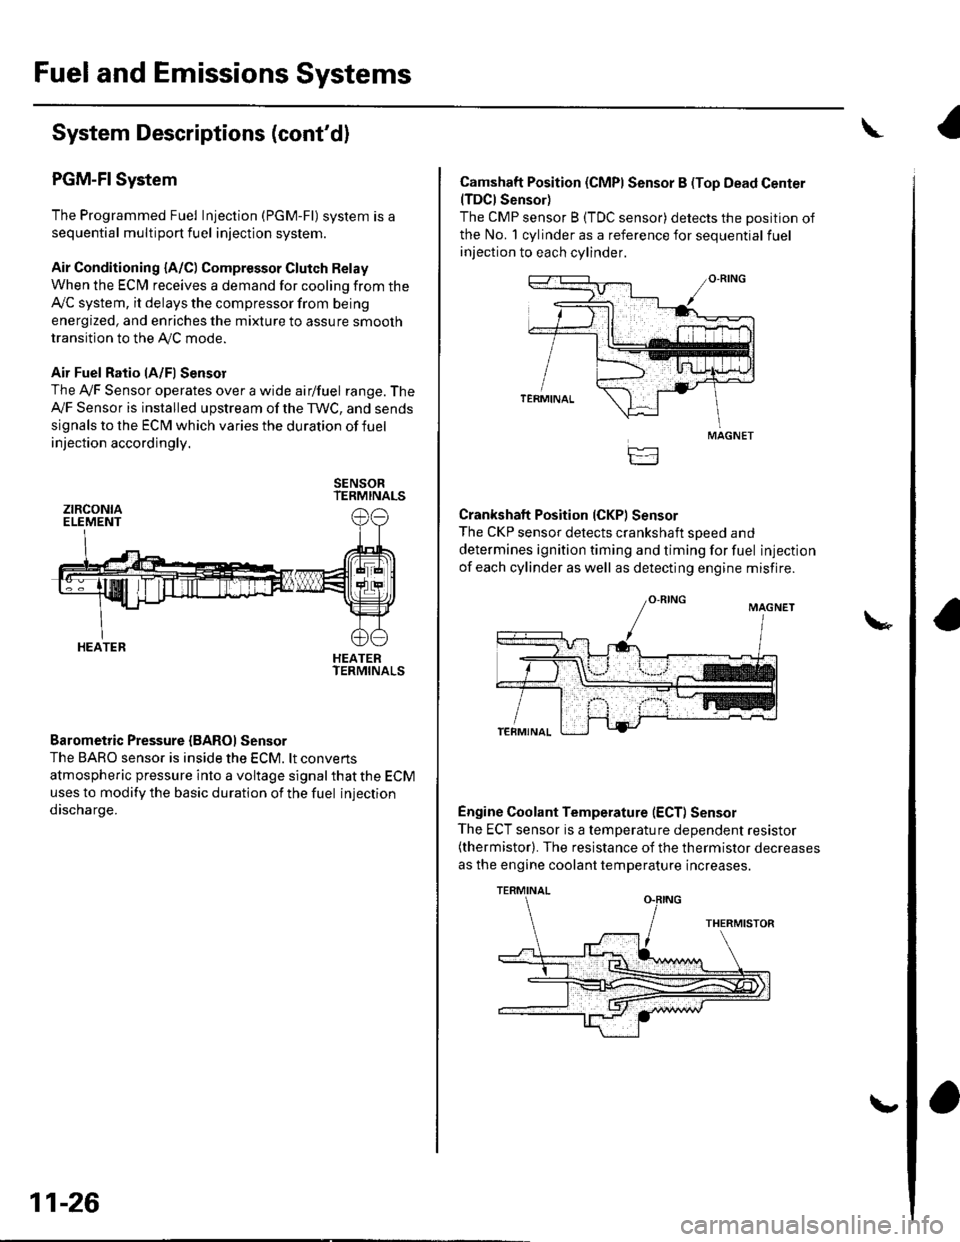
The Programmed Fuel Injection (PGM-Fl) system is a
sequential multiport fuel injection system.
Air Conditioning {A/C) Compressor Glutch Relay
When the ECfM receives a demand for cooling from the
Ay'C system, it delays the compressor from being
energized, and enriches the mixture to assure smooth
transition to the AVC mode.
Air Fuel Ratio lA/Fl Sensor
The Ay'F Sensor operates over a wide airlfuel range. The
Ay'F Sensor is installed upstream of the TWC, and sends
signals to the ECM which varies the duration of fuel
injection accordingly.
SENSORTERMINALS
HEATERTERMINALS
Barometric Pressure {BAROI Sensor
The BARO sensor is inside the ECM. lt convens
atmospheric pressure into a voltage signal that the ECM
uses to modify the basic duration of the fuel injection
discharge.
ztRcoNtaELEMENT
HEATER
11-26
\,
Camshaft Position (CMPI Sensor B (Top Dead Center(TDCI Sensor)
The CMP sensor B (TDC sensor) detects the position of
the No. 1 cylinder as a reference for sequential fuel
injection to each cylinder.
Crankshaft Position (CKPI Sensor
The CKP sensor detects crankshaft soeed and
determines ignition timing and timing for fuel injection
of each cylinder as well as detecting engine misfire.
Engine Coolant Temperature (ECT) Sensor
The ECT sensor is a temperature dependent resistor(thermistor). The resistance of the thermistor decreases
as the engine coolant temperature increases.
MAGNET
TERMINAL
Page 234 of 1139
lgnition Timing Control
The ECM contains the memory for basic ignition timing
at various engine speeds and manifold absolute
pressure. lt also adjusts the timing according to engine
coolant temperature.
Iniector Timing and Duration
The ECM contains the memory for basic discharge
duration at various engine speeds and manifold
pressures. The basic discharge duration, after being
read out from the memory, is further modified by
signals sent from various sensors to obtain the final
discharge duration.
By monitoring long term fuel trim, the ECM detects long
term malfunctions in the fuel system and sets a
Diagnostic Trouble Code {DTC).
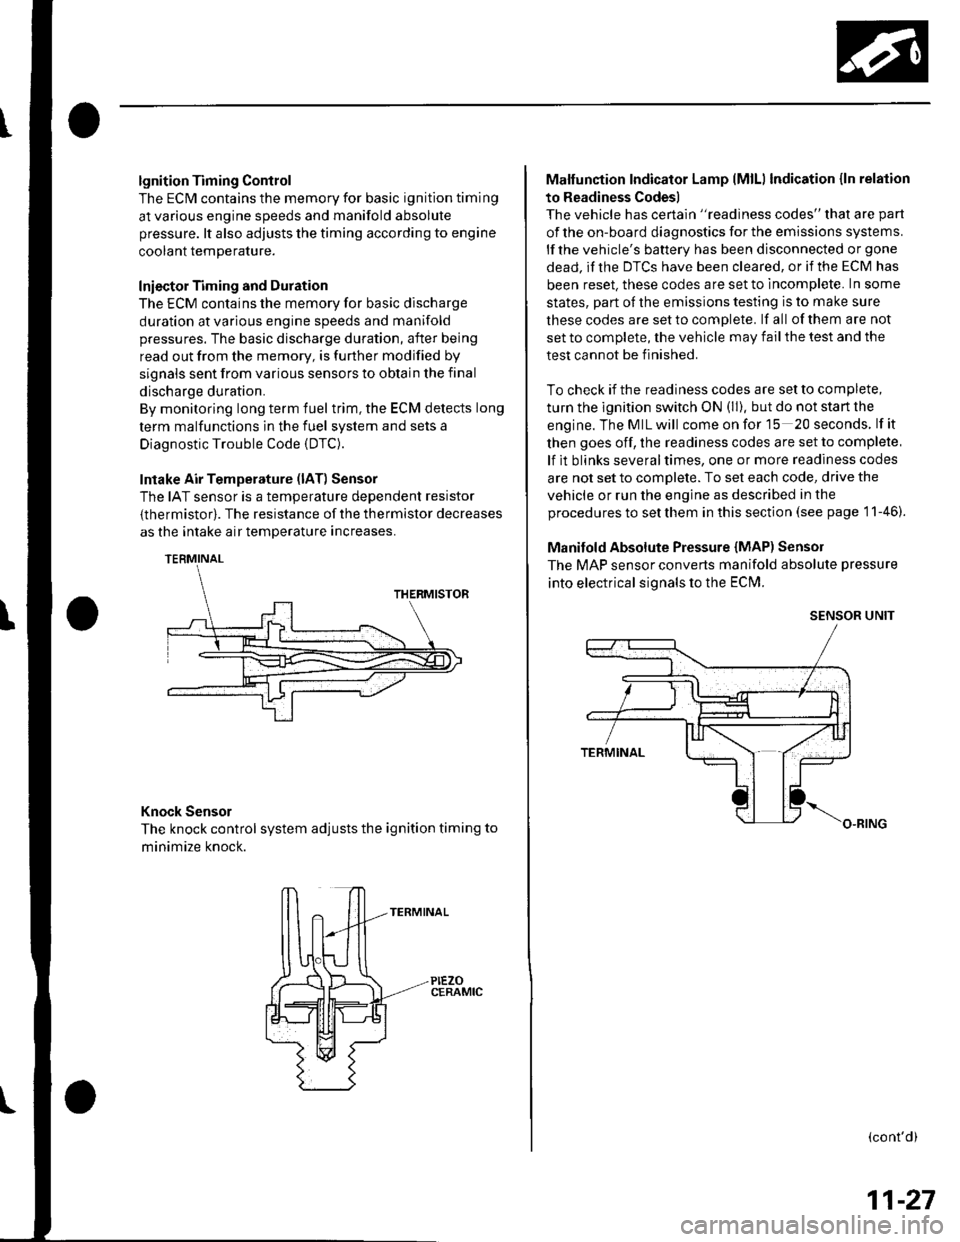
Intake Air Temperature (lAT) Sensor
The IAT sensor is a temperature dependent resistor
{thermistor). The resistance of the thermistor decreases
as the intake air temDerature increases.
Knock Sensor
The knock control system adjusts the ignition timing to
minimize knock.
PIEZOCERAMIC
Malfunction Indicator Lamp lMlLl Indication {ln relation
to Readiness Codes)
The vehicle has certain "readiness codes" that are part
of the on-board diagnostics for the emissions systems.
lf the vehicle's baftery has been disconnected or gone
dead. if the DTCS have been cleared, or if the ECM has
been reset. these codes are set to incomplete. In some
states, part of the emissions testing is to make sure
these codes are set to comDlete. lf all of them are not
set to complete, the vehicle may fail the test and the
test cannot be finished.
To check if the readiness codes are set to complete,
turn the ignition switch ON (ll). but do not start the
engine.TheMILwill comeonforlS 20seconds. lf it
then goes off, the readiness codes are set to complete,
lf it blinks severaltimes, one or more readiness codes
are not set to comolete. To set each code, drive the
vehicle or run the engine as described in the
procedures to set them in this section (see page 1 1-46).
Manifold Absolute Pressure {MAP) Senso]
The MAP sensor converts manifold absolute pressure
into electrical signals to the ECM.
SENSOR UNIT
(cont'd)
11-27