check engine HONDA CIVIC 2003 7.G Workshop Manual
[x] Cancel search | Manufacturer: HONDA, Model Year: 2003, Model line: CIVIC, Model: HONDA CIVIC 2003 7.GPages: 1139, PDF Size: 28.19 MB
Page 4 of 1139
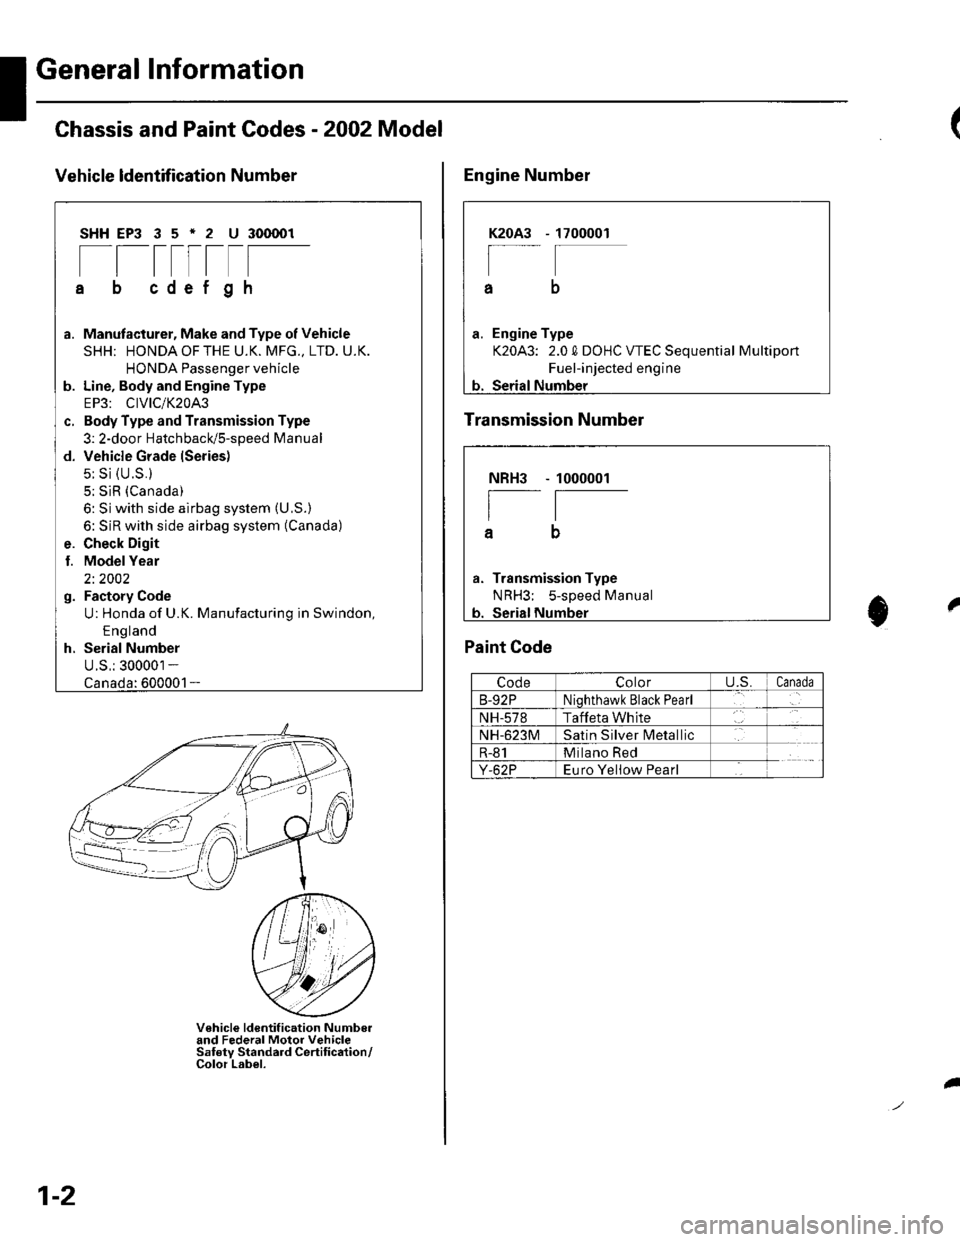
General Information
Chassis and Paint Codes - 2OO2 Model
Vehicle ldentffi cation Number
SHHEP3 35'2 U 300001
[[tttrtF
cdef gh
a. Manufacturer, Make and Type of Vehicle
SHH; HONDAOFTHE U.K. MFG., LTD. U.K.
HONDA Passenger vehicle
b. Line, Body and Engine Type
EP3: CIVIC/K20A3
c. Body Type and Transmission Type
3: 2-door HatchbacUs-speed Manual
d. Vehicle Grade lSeries)
5: Si {U.S.}
5; SiR (Canada)
6: Si with side airbag system (U,S.)
6: SiR with side airbag system (Canada)
e. Check Digit
l. ModelYear
2i 2002
g. Factory Code
U: Honda of U.K. Manufacturing in Swindon,
E ng land
h. Serial Number
U.S,: 300001 -
1-
V€hicle ldentif ication Numbo.and Federal Motor VehicleSaf ety Standard Certif ication/Color Label.
1-2
I
1700001K2OA3
a
a. Engine Type
K20A3: 2.0 0 DOHC VTEC Sequential Multiport
Fuel-injected engine
b. Serial Number
Engine Number
Transmission Number
Paint Code
CodeColoru.s.Canada
B-92PNiqhthawk Black Pearl
NH-578Taffeta White
NH-623MSatin Silver lvletallic
R-81Milano Red
Y-62PEuro Yeliow Pearl
NBH3
I
a
Transmission Type
NRH3; s-sDeed Manual
1000001
t0
Page 5 of 1139
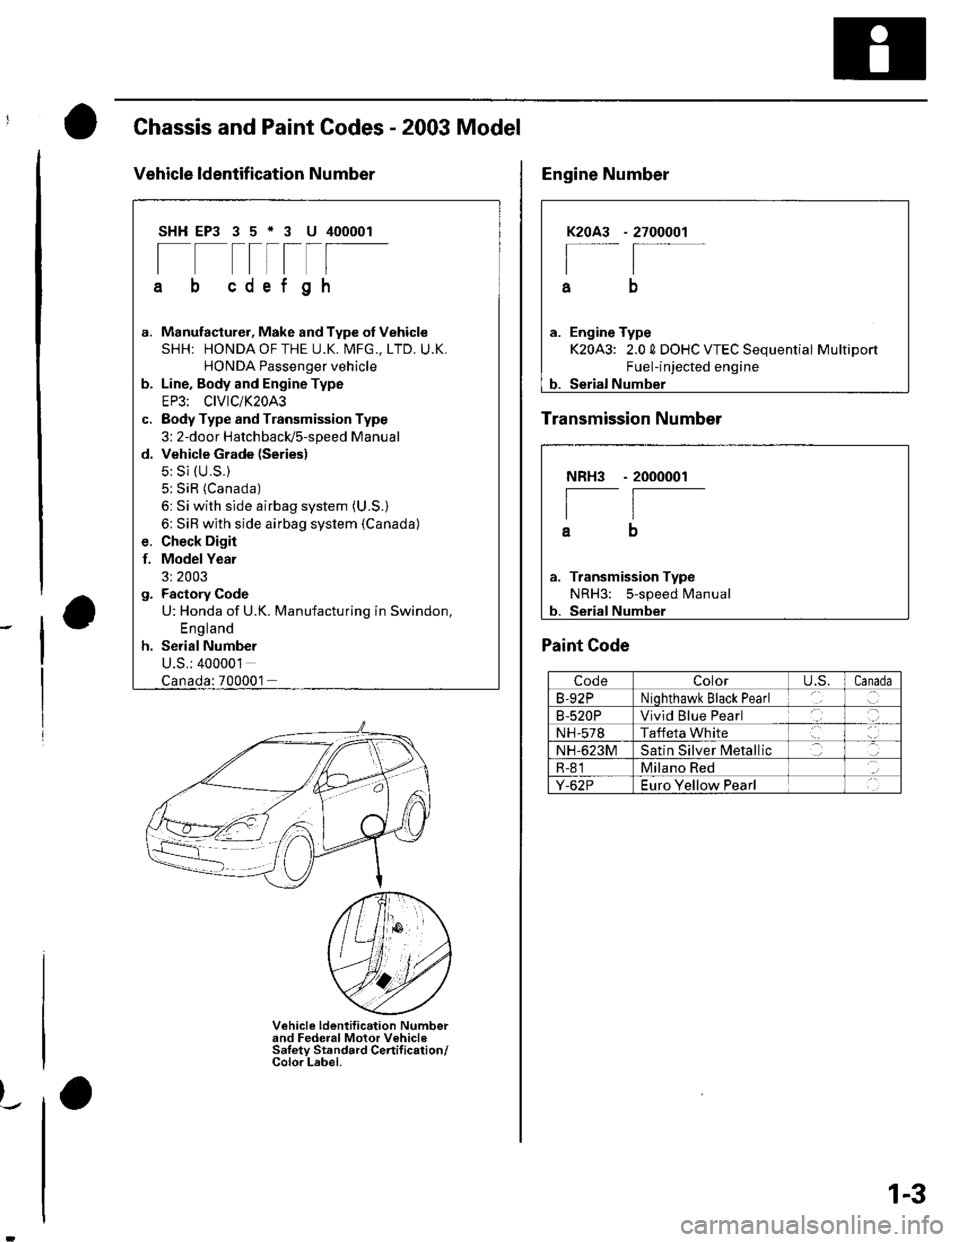
Chassis and Paint Codes - 2003 Model
Vehicle ldentif ication Number
SHHEP3 35*3 U 400001
[--t-rlF
cdef gh
G.
d.
Manufacturer, Make and Type of Vehicle
SHH: HONDAOFTHE U.K. MFG., LTD. U.K.
HONDA Passenger vehicle
Line. Body and Engine Type
EP3: CIVIC/K20A3
Body Type and Transmission Type
3: 2-door HatchbacldS-speed Manual
Vehicle Grade (Series)
5: Si (U.S.)
5: SiR (Canada)
6: Si with side airbag system (U.S.)
6: SiR with side airbag system (Canada)
Check Digir
Model Year
3: 2003
Factory Code
U: Honda of U.K. Manufacturing in Swindon,
England
Serial Number
U.S.: 400001
f.
:700001
Vehicle ldentification Numberand Federal Motor VehicleSaletv Standard Certif ication/Color Label.
)_.
2700001K2OA3
I
a
a. Engine Type
K20A3: 2.0 0 DOHC VTEC Sequential Multiport
Fuel-injected engine
b. Serial Number
Engine Number
Transmission Number
NRH3
I
a
Transmission Type
NRH3: 5-speed Manual
Serial Number
- 2000001
Paint Code
CodeColorU,S.Canada
B-92PNiohthawk Black Pearl
B-520PVivid Blue Pearl
NH-578Taffeta White
NH-623MSatin Silver N4etallic
R-81Milano Red
Y-62PEuro Yellow Pearl
1-3
Page 14 of 1139
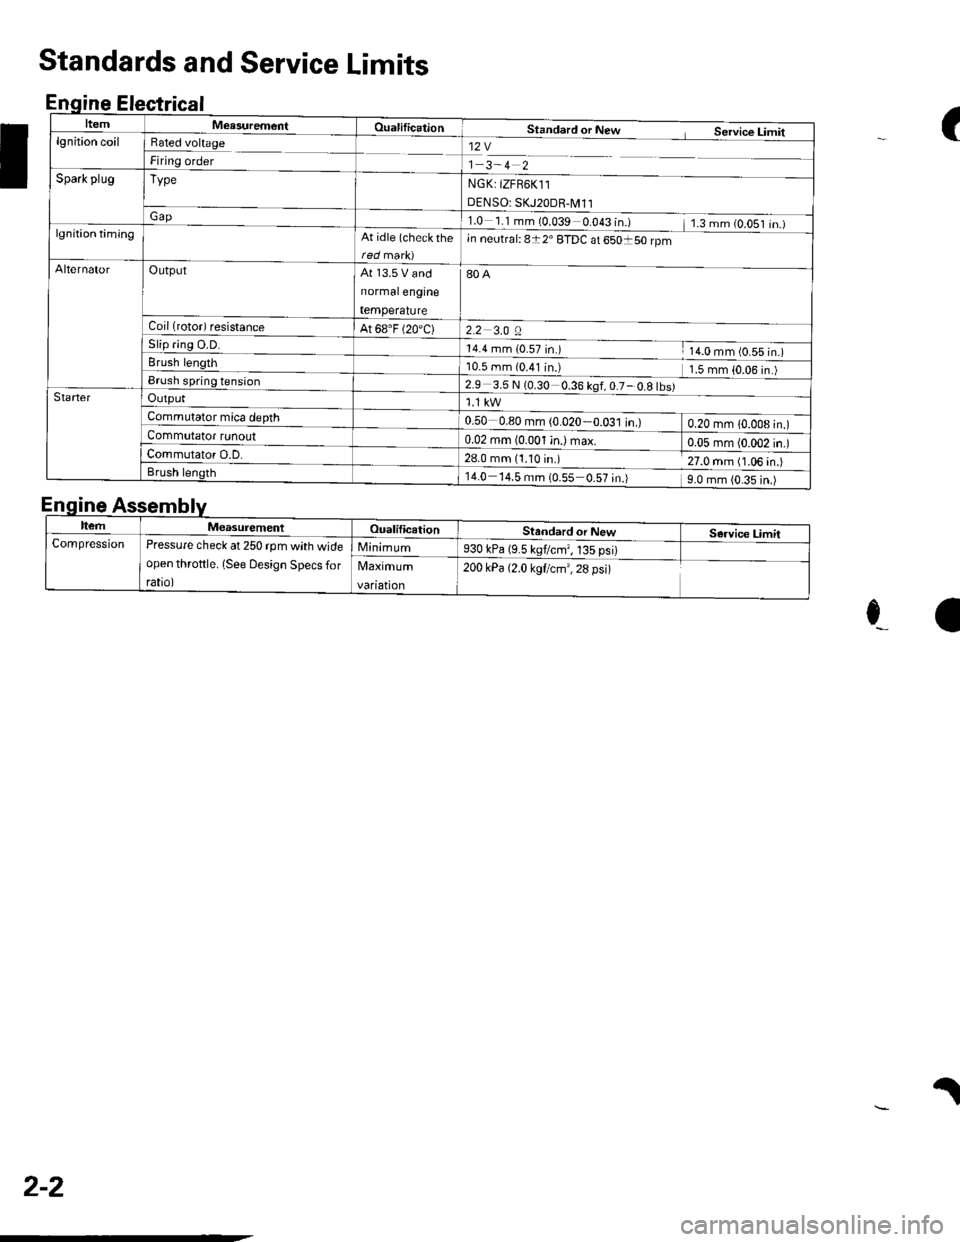
ne
ItemMeasurementOualificationStandard or New Service Limitlgnition coilRated voltage
Firing order12V
1 3-4 2
NGK: tZFB6K11
DENSO: SKJ20DR-M11
1.0 1.1mm(0.039 0.043 in.) 1.3mm(O.OS1 in.)
Spark plugType
Gap
lgnition timingAt idle (check rhein neutral: 8t2' ETDC at 650150 rpm
AlternatorOutputAt 13.5 V and
normalengine
temperature
80A
2.2 3.0 ACoil lrotor) resistanceAt 68.F (20'C)
5|lp flng u.u.14.4 mm {0_57 in.) 14.0 mm (0.55 in.)Brush length10.5 mm (0.41 in.l 1.5 mm {0.06 in.)Brush spring tension2.9 3.5 N (0.30 0.36 kgf,0.7-0.8 tbs)StarterOutput
Commutator mica depth0.50 0.80 mm (0.020-0.031 in.) 0.20 mm 1O.OO8 in.)Commutator tunouto:BlalqryL4i) max o.o5 mm (0.002 in.)Commutator O.D.28.0 mm (1.10 in.) 27.0 mm (1.06 in.)Brush length14.0 14.5 mm {0.55 0.57 in.) 9.0 mm {0.35 in.)
(
I
Standards and Service Limits
Enqine Electrical
E
e_a
.l
nqtne
ItemMeasurementOualificationStandard or NewService LimitCompressionPressure check at 250 rpm with wide
open throftle. (See Design Specs for
rato,
Minimum930 kPa (9.5 kgflcmr, 135 psi)
Maximum
vanatton
200 kPa {2.0 kgf/cm',28 psi)
2-2
Page 31 of 1139
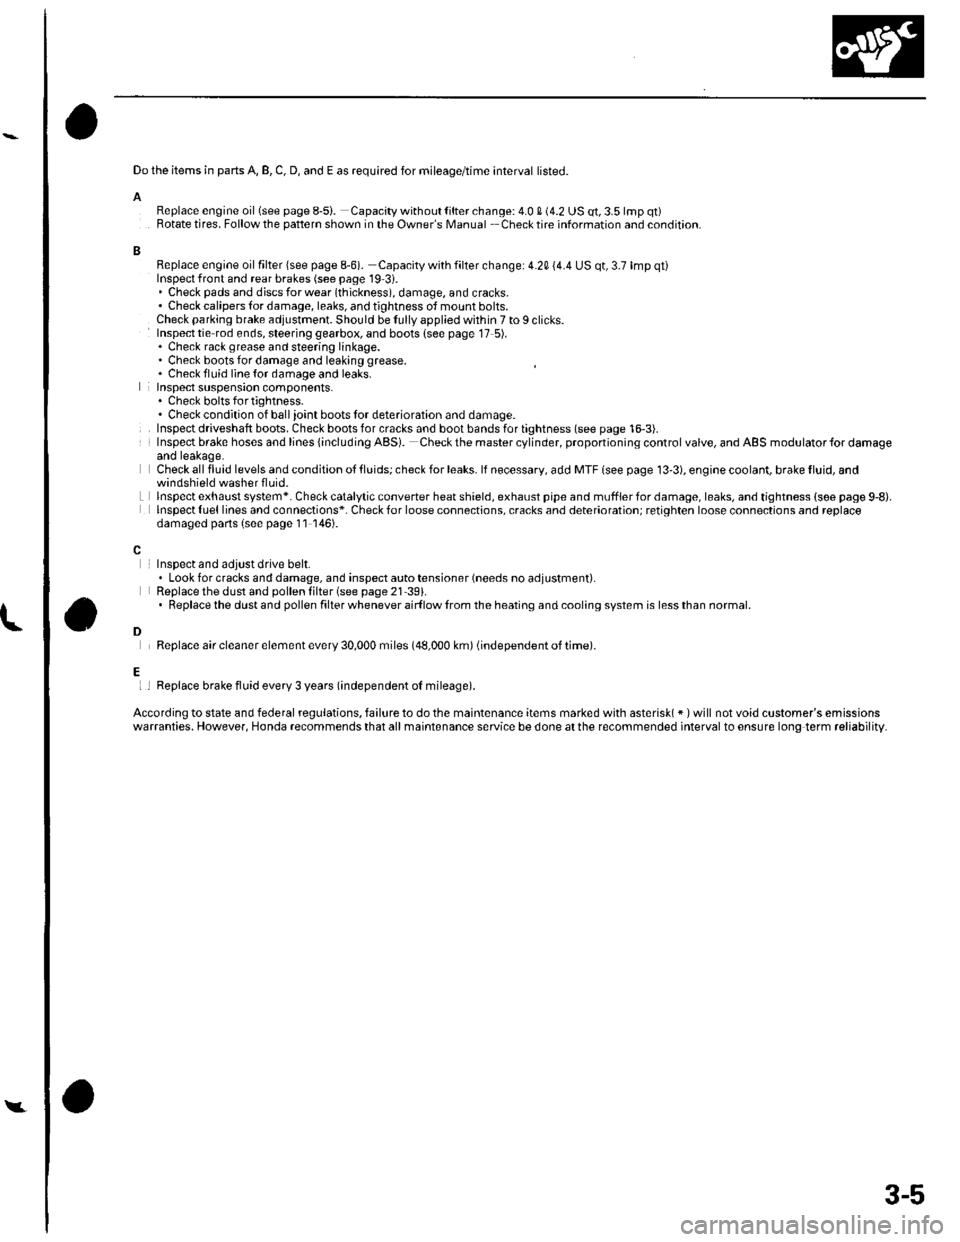
Do the items in parts A, B, C, D, and E as required for mileage/time interval listed.
AReplace engine oillsee page 8-5i. Capacity without lilter change: 4.0 S (4.2 US qt, 3.5 lmp qt)Rotate tires. Follow the pattern shown in the Owner's Manual Checktire information and condition.
BReplace engine oil filter lsee page 8-6). Capacity with filter change: 4.20 (4.4 US qt, 3.7 lmp qt)Inspect front and rear brakes (see page 19 3i.. Check pads and djscs for wear (thickness), damage, and cracks.' Check calipers tor damage, leaks, and tjghtness ot mount bolts.Check parking brake adjustment. Should be Iully applied within 7 to I clicks.Inspect tie rod ends, steering gearbox, and boots {see page 17 5).. Check rack grease and steering linkage.. Check boots for damage and leaking grease. Chack fluid line {or damage and leaks.lnspect suspension components.. Chock bolts fo r tig htness.. Check condition of ball ioint boots lor deterioration and damage.Inspect driveshaft boots. Check boots for cracks and boot bands for tightness (see page 16-3).Insp€ct brake hoses and lines {including ABS). Checkthe mastercylinder, proponioning control valve, and ABS modulator{or damageand leakage.Check all fluid levels and condition ot tluids; check for leaks. lf necessary, add MTF lsee page 13'3), engioe coolant, brake fluid, and
Lwindshield washer fluid.lnspectexhaust system*. Check catalytic converter heatshield, exhaust pipe and mufflerfordamage,leaks, and tightness {soe page 9,8).lnspect {uel lines and connections*. Check for loose connections, cracks and deterioration; retighten loose connoctions and replacedamaged parts (s€e page 11 146).
InsDect and adiust drive belt.. Look for cracks and damage, and inspect auto tensioner (needs no adjustment).Replace the dust and pollen lilter (see page 21 39).. Replacethe dustand pollen filter whenever airf low lrom the heating and cooling system is lessthan normal.
Replace air cleaner element every 30,000 miles (48,000 km) (independent of time).
l
D
Ei I Replace brake fluid every 3 years (independent oI mileage).
According to state and federal regulations, failure to do the maintenance items marked with asterisk( * ) will not void customer's emissionswarranties. However, Honda recommends that all maintsnance service be done at the recommended interval to ensure long term reliability.
Y
3-5
Page 33 of 1139
L
A
I
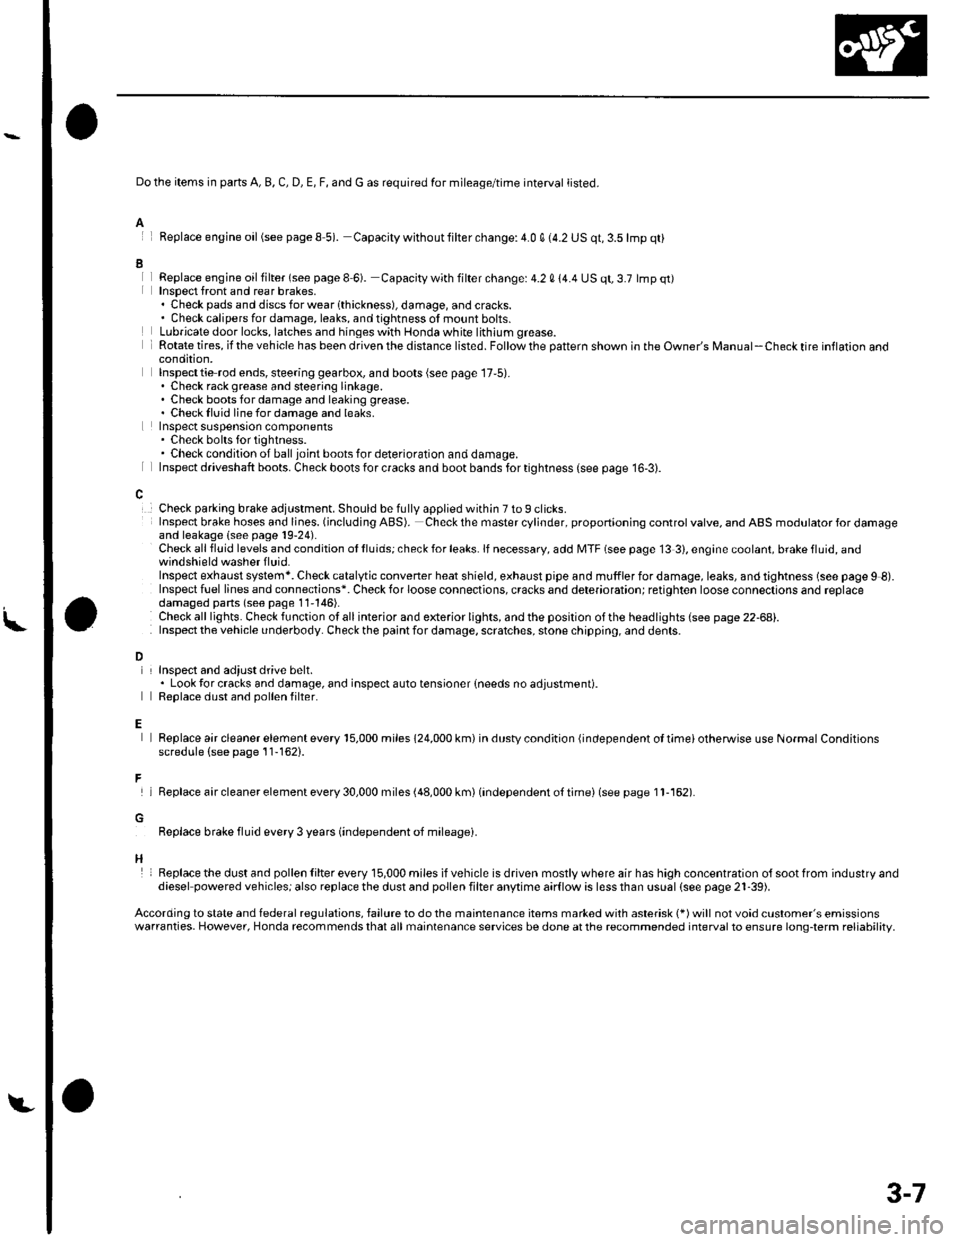
Do the items in parts A, B, C, D, E, F, and G as required for mileage/time interval listed.
Feplace engine oil(see pageS 5). Capacity withoutlilter change:4.0 q (4.2 US qt,3.5lmp qt)
Replace engjne oil filter (see page I 6). Capacity with filter change: 4.2 0 14.4 US qt, 3.7 lmp qt)Insoect front and rear brakes,. Check pads and discsforwearlthickness), damage, andcracks.. Check calipers for damage, leaks, and tightness of mount bolts.Lubricate door locks, latches and hinges with Honda white lithium grease.Rotate tires, if the vehicle has been driven the distance listed. Follow the pattern shown in the Owner's Manual-Check tire inflaron aoocondition,Inspecttie rod ends, steering gearbox, and boots (see page 17,5).. Check rack grease and steering linkage.. Check boots for damage and leaking grease.. Checklluid linefordamage and leaks.Inspect suspensron components. Check bolts for tightness.. Check condition of ball joint boots for deterioration and damage.Inspect driveshaft boots. Check boots for cracks and boot bands for tightness (see page 16-3).
Check parking brake adjustment. Should be fully applied within 7 to 9 clicks.Insp€ct brake hoses and lioes. (including ABS). Check the master cylinder, proportioning control valve, and ABS modulator for damageand leakage (see page 19-24).Check all fluid levels and condition ot lluids; check for leaks. lf necessary, add MTF (see page 13 3), engine coolant, brake fluid, andwindshield washer f luid.Inspect exhaust system*. Check catalytic converter heat shield, exhaust pipe and muffler for damage, leaks, and tightness (see page 9 8).Inspect fuel lines and connections*. Check for loose connections, cracks and deterioration; retighten loose connections and replacedamaged pans (seo page 11'146).Check alllights. Checkfunction otallinterior and exterior lights, andthe position ofthe headlights (see page 22-68).Inspect the v€hicle underbody. Check the paint for damage, scratches, stone chippin0, and dents.
L
D
E
F
H
InsDect and adiust drive belt.. Look tor cracks and damage, and inspect auto tensioner {needs no adjustment).Reolace dust and oollen filter.
Replace air cleaner element every 15,000 miles 124,000 km) in dustv condition {independent ol timei otherwise use Normal Conditionsscredule (see page 11-162).
lReplaceaircleanerelementevery30,000miles(48,000km)(independento{timei(seepagell-162).
Replace brake fluid every 3 years (independent oJ mileagei.
Replacethe dust and pollen Iilter every 15,000 miles ifvehicle is driven mostlywhere air has high concentration olsootfrom industryanddiesel powered vehiclesj also replace the dust and pollen filter anytime aarflow is less than ussal (see pags 21-39).
According to state and federal regulations, failure to do the maintenance items marked with asterisk (*) will not void customer's emissionswarranties. However, Honda recommends that all maintenance services be done at the recommended interval to ensure long-term reliability,
3-7
Page 34 of 1139
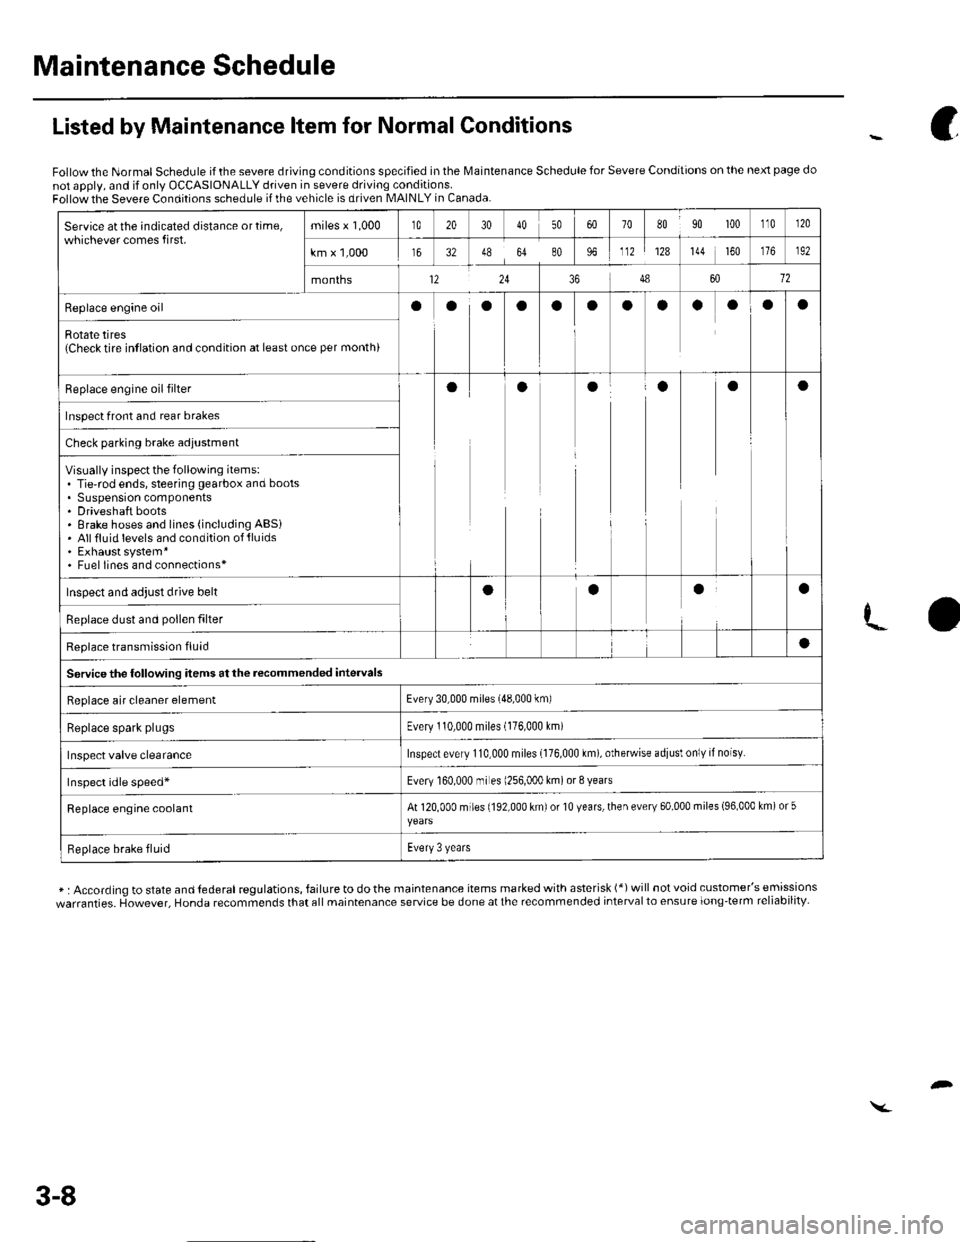
Maintenance Schedule
Service atthe indicated distance ortime,whichever comes first.miles x 1,000t020304050708090 100110r20
km x 1,000163248648096112128144 160192
months12243486012
Replace engine oilooooaooaaoOa
Rotate tires{Check tire intlation and condition at least once per month)
Replace engine oil filterooaaaa
Inspect front and rear brakes
Check parking brake adjustment
Visually inspect the following items:. Tie-rod ends, steering gearbox and boots. Suspension components. Driveshaft boots. Brake hoses and lines (including ABSi. Allfluid levels and condition of{luids. Exhaust system*. Fuel lines and connections*
Inspect and adjust drive beltaaaa
Replace dust and pollen filter
Reolace transmission fluid
Servicethe following items at the recommended intervals
a
Replace air cleaner elementEvery 30,000 miles (48,000 km)
Replace spark plugsEvery 110,000 miles (176,000 Lm)
Inspect valve clearanceInspect every 110,000 miles {176,000 km), otherwise adiusl only if noisy.
Inspect idle speed*Every 160.000 mr es 1256,000 km) or 8 years
Replace engine coolantAt 120,000 miles (192,000 km) or 10 years, then every 60,000 miles (96,000 km) or 5
Replace brake fluidEvery 3 years
Listed by Maintenance ltem for Normal Conditions
Follow the Normal Schedule if the severe driving conditions specified in the lMaintenance Schedule for Severe Conditions on the next page do
not apply, and if only OCCASIONALLY driven in severe driving conditions.Follow the Severe Conditions schedule if the vehicle is driven MAINLY in Canada.
* : According to state and lederal regulations, failure to do the maintenance items marked with asterisk (*) will not void customer's emissions
warranties. However, Honda recommends that all maintenance service be done at the recommended interval to ensure long-term reliability-
c
3-8
Page 35 of 1139
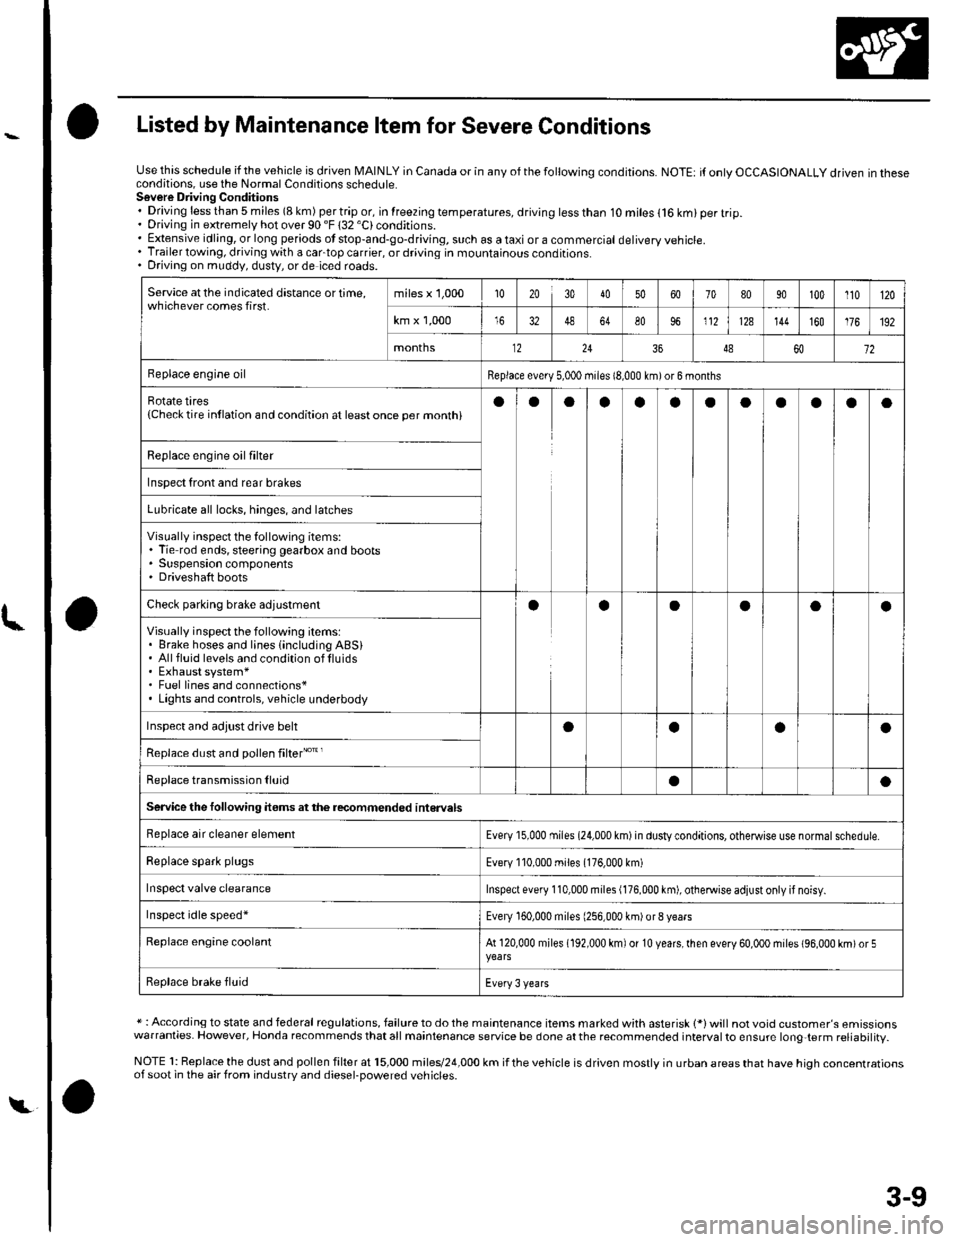
Listed by Maintenance ltem for Severe Conditions
Use this schedule if the vehicle is driven MAINLY in Canada or in anv of the followina conditions.NOTE: it only OCCASIONALLY driven in theseconditions, use the Normal Conditions schedute.Sovere Driving Conditions. Driving less than 5 miles (8 km) per trip or, in lreezing temperatures, driving less than. Driving in extremely hot over 90 "F 132 'C)conditions.10 miles (16 km) per trip.
. Extensive idling, or long periods ot stop-and-go-driving, such as a taxi or a commercial delivery vehicle.. Trailer towing, driving with a cartop carrier, or driving in mountainous conditions.. Driving on muddy, dusty, or de iced roads.
Service at the indicated distance or time,whichever comes first.miles x 1,000102030405060708090100110120
km x 1,0001648648096112128144160176192
months122436486072
Replace engine oilReplace every 5,000 miies 18,000 km)or 6 months
Rotate tires{Checktire intlation and condition at leastonce per monthiaoaaoaaoaaao
Replace engine oil fiher
Inspect front and rear brakes
Lubricate all locks, hinges, and latches
Visually inspect the following items:. Tie rod ends, steering gearbox and boots. Suspension components' Driveshaft boots
Checl parking brale adjuslmentaaOaoa
Visually inspect the following items:. Brake hoses and lines {including ABSi. Allfluid levels and condition oflluids. Exhaust system*. Fuel lines and connections*. Lights and controls, vehicle underbody
Inspect and adjust drive behoaoa
Replace dust and pollen filter"o't'
Replace transmission lluidaa
Service the following items atthe recommended interuals
Replace air cleaner elementEvery 15,000 miies (24,000 km) in dusty conditions, otheMise use normal schedule.
Replace spark plugsEvery 110,000 miles (176,000 km)
Inspect valve clearanceInspect every 110,000 miles (176,000 km), otheMise adiust only if noisy.
Inspect idle speed'Every 160,000 miles (256,000 km)or8 vears
Replace engine coolantAt 120,000 miles (192,000 km) of 10 years,lhen every 60,000 miles (96,000 km)or 5
Replace brake fluidEvery 3 years
* : According to state and federal regulations, failure to do the maintenance items marked with asterisk 1*)will not void customer's emissionswarranties. However, Honda recommends that all maintenance service be done at the recommended interval to ensure long{erm reliabilitv.
NOTE 1: Replace the dust and pollen filter at 15,000 miles/24,000 km if the vehicle is driven mostly in urban areas that have high concentrationsof soot in the air from industrv and diesel-Dowered vehicles.
t,
3-9
Page 40 of 1139
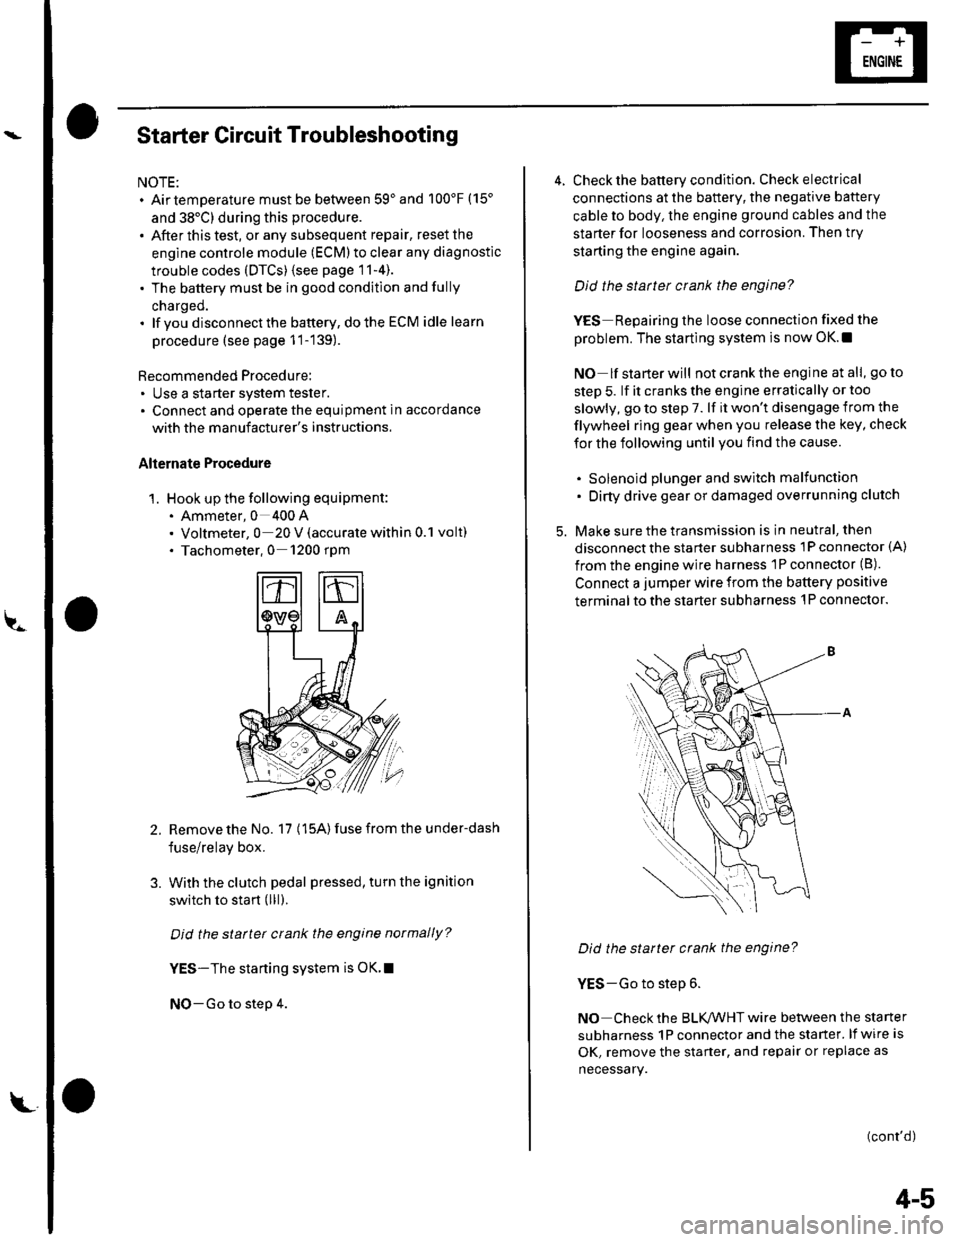
Starter Circuit Troubleshooting
NOTE:. Airtemperature must be between 59'and 100'F (15'
and 38'C) during this procedure.
. After this test, or any subsequent repair, reset the
engine controle module (ECM) to clear any diagnostlc
trouble codes (DTCS) {see page 11-4).. The battery must be in good condition and fully
charged.. lf you disconnect the baftery, do the ECM idle learn
procedure (see page 11-139).
Recommended Procedure:. Use a starter system tester.. Connect and operate the equipment in accordance
with the manuf acturer's instructions.
Alternate Procedure
1. Hook up the following equipment:. Ammeter, 0 400 A. Voltmeter, 0 20 V (accurate within 0.1 volt). Tachometer,0 1200 rpm
2.Remove the No. 17 (15A) fuse from the under-dash
fuse/relay box.
With the clutch pedal pressed, turn the ignition
switch to start (lll).
Did the starter crank the engine normally?
YES-The starting system is OK.I
NO-Go to step 4.
3.
L
4-5
4. Check the battery condition. Check electrical
connections at the battery, the negative baftery
cable to body, the engine ground cables and the
starter for looseness and corrosion. Then try
starting the engine again.
Did the statter crank the engine?
YES Repairing the loose connection fixed the
problem. The starting system is now OK.!
NO lf starterwill notcranktheengine atall, goto
step 5. lf it cranks the engine erratically or too
slowly, go to step 7. lf it won't disengage from the
flywheel ring gear when you release the key, check
for the following until you find the cause.
. Solenoid plunger and switch malfunction. Dirty drive gear or damaged overrunning clutch
5. Make sure the transmission is in neutral, then
disconnect the starter subharness 1P connector (A)
from the engine wire harness 'lP connector (B).
Connect a jumper wire from the battery positive
terminal to the starter subharness 'l P connector.
Did the starter crank the engine?
YES-Go to step 6.
NO Check the BLK,ANHT wire between the starter
subharness 1P connector and the starter. lf wire is
OK, remove the starter, and repair or replace as
necessary.
(cont'd)
Page 41 of 1139
Starting System
Starter Circuit Troubleshooting
(cont'dl
6. Check the following items in the order listed untilyou find the open circuit.
. Check the BLIVWHT wire and connectors
between the under-dash fuse/relay box and theignition switch, and between the under-dash
fuse/relay box and the starter.. Check the ignition switch {see page 22-53).. Check the clutch interlock switch and connector.. Check the starter cut relay (see page 22-51).. Check LT GRN wire between the starter cut relayl
under-dash fuse/relay box and the clutch
interlock switch.. Check the BLK wire between the clutch interlock
switch and G501.
7, Check the cranking voltage and current draw.
ls ctanking voltage greatet than or equal to 8.7 V
and current draw less than or equal to 230 A?
YES-Go to step 8.
NO Replace the starter. or remove and
disassemble it, and check these items until you find
the cause.
. Starter armature dragging. Shorted armatu re winding. Excessive drag in engine
8. Check the engine speed while cranking the engine.
ls the engine speed above 100 tpm?
YES Go to step 9.
NO-Replace the starter, or remove and
disassemble it, and check for the following untilyou find the cause.
. Excessively worn starter brushes. Open circuit in commutator brushes. Open circuit in starter armature commutator
segments. Dirty or damaged helical splines or drive gear. Faulty drive gear clutch
9. Remove the starter, and inspect its drive gear andthe flywheel ring gear for damage. Replace anydamaged pans.I
4-6
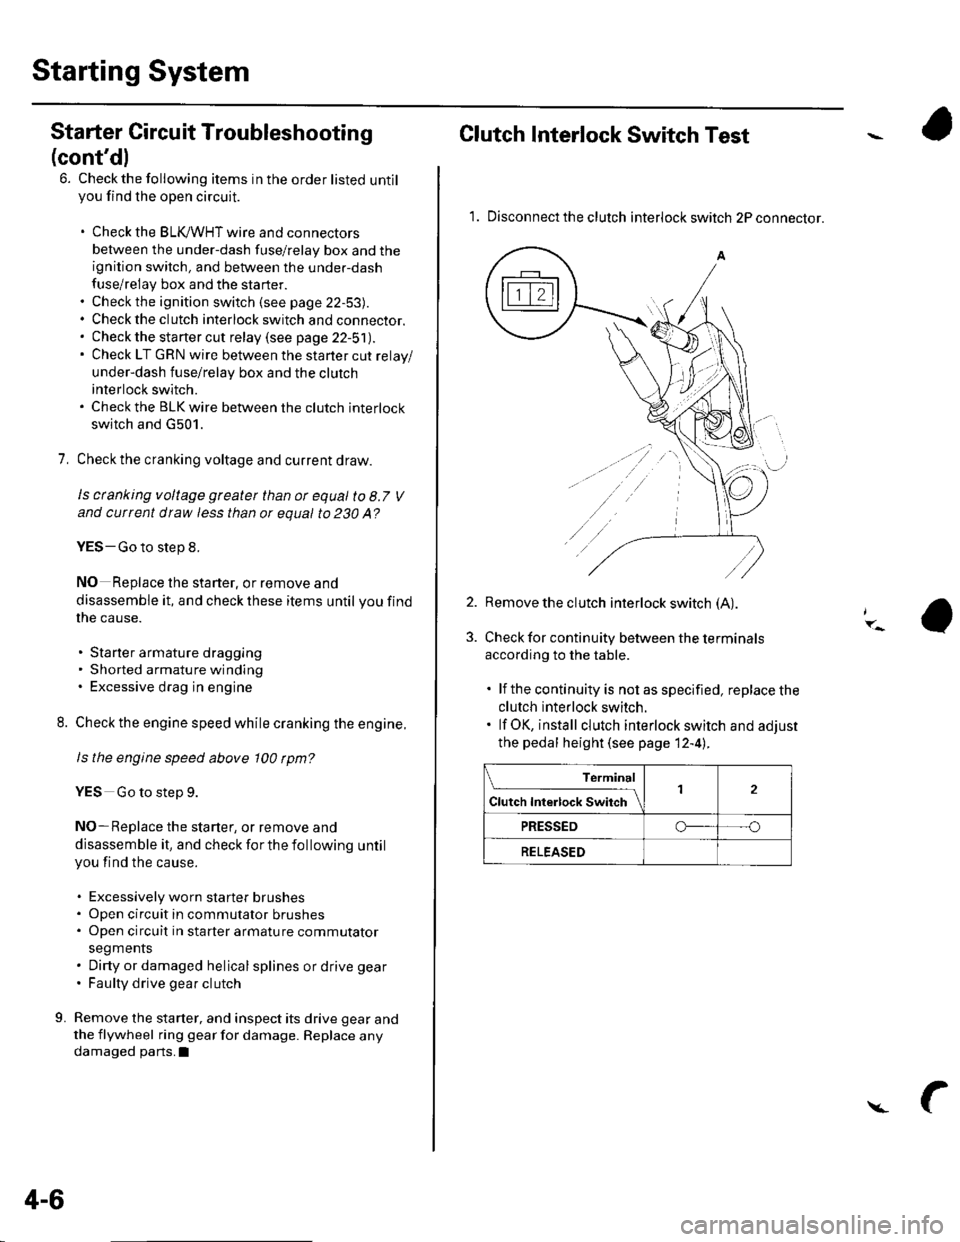
Clutch Interlock Switch Test
1. Disconnect the clutch interlock switch 2P connector.
2. Remove the clutch interlock switch (A).
Check for continuity between the terminals
according to the table.
. lf the continuity is not as specified, replace the
clutch interlock switch.. lf OK, install clutch interlock switch and adjust
the pedal height (see page 12-4l..
Terminal
Cl","f ri"t.tf ."tS""*Jrl2
PRESSEDo--- --o
RELEASED
Page 52 of 1139
lgnition Timing Inspection
1.
4.
5.
Connect the Honda PGM Tester to the data link
connector (DTC), and check for DTC'S. lf a DTC is
present, diagnose and repair the cause before
inspecting the ignition timing.
Startthe engine. Hold the engine at 3,000 rpm with
no load (in Neutral) until the radiator fan comes on,
then let it idle.
Check the idle speed (see page 11-138).
Follow the tester's prompts in the "SCS" menu
{see the tester operator's manual),
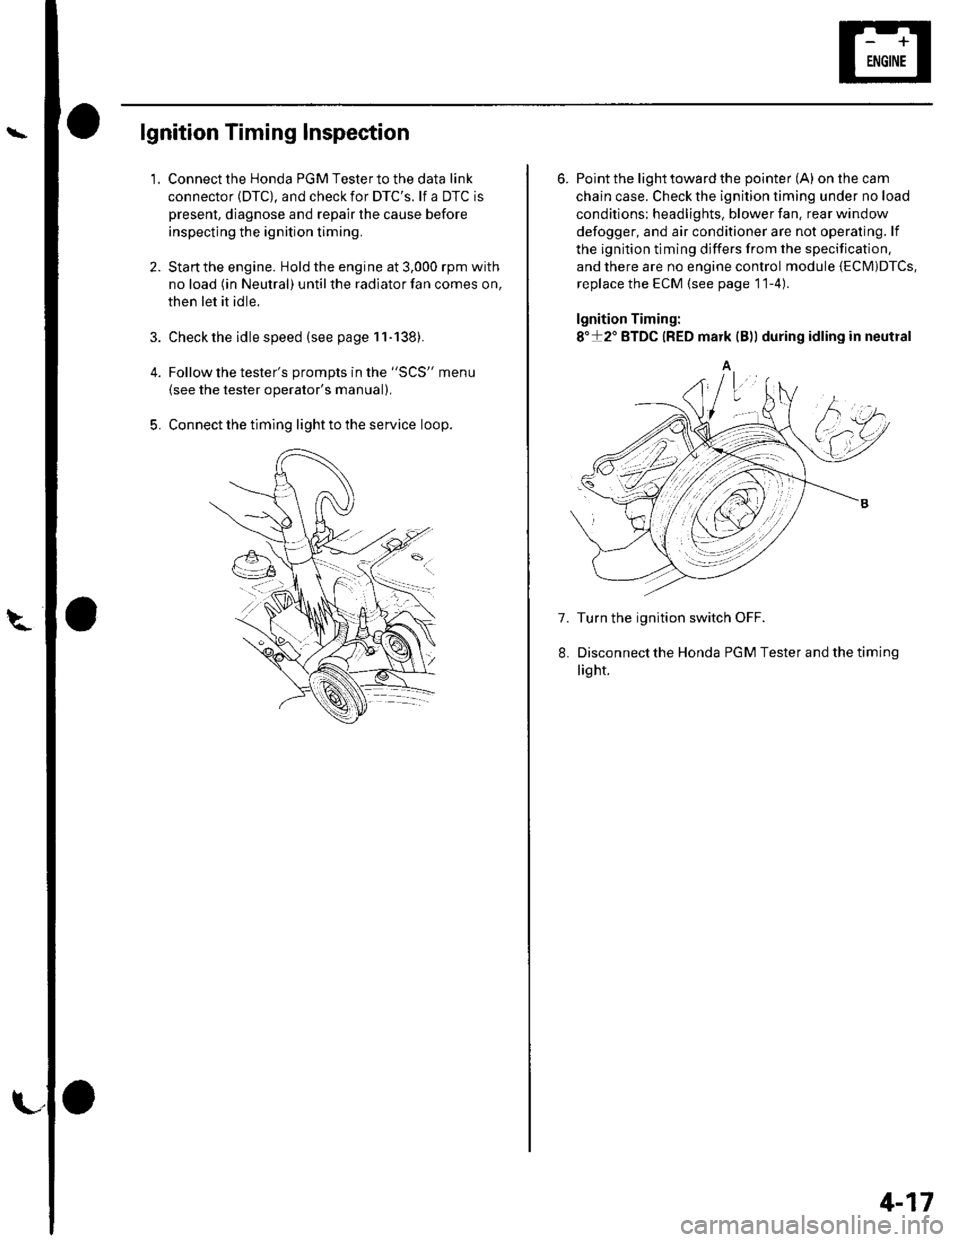
Connect the timing light to the service loop.
o
6. Point the light toward the pointer (A) on the cam
chain case. Check the ignition timing under no load
conditions: headlights, blower fan. rear window
defogger, and air conditioner are not operaling. lf
the ignition timing differs from the specification,
and there are no engine control module {ECM)DTcs,
replace the ECM (see page 11-4)
lgnition Timing:
8"+2" BTDC {RED mark {B)) during idling in neutral
A
7. Turn the ignition switch OFF.
Disconnectthe Honda PGM Tester and thetiming
light.
4-17