fuel HONDA CIVIC COUPE 1998 Owners Manual
[x] Cancel search | Manufacturer: HONDA, Model Year: 1998, Model line: CIVIC COUPE, Model: HONDA CIVIC COUPE 1998Pages: 251, PDF Size: 2.04 MB
Page 1 of 251
1998 Civic Coupe Online Reference Owner's Manual
Use these links (and links throughout this manual) to navigate through\
this reference.
For a printed owner's manual, click on authorized manuals or go to www.h\
elminc.com.
Contents
Introduction ........................................................................\
........................ .........................................
i
A Few Words About Safety........................................................................\
.........................................ii
Driver and Passenger Safety ........................................................................\
......................................3
Proper use and care of your vehicle's seat belts, and Supplemental Restr\
aint System.
Instruments and Controls........................................................................\
.........................................49
Instrume nt panel indicator and gauge, and how to use dashboard and steering colu\
mn controls.
Comfort and Convenience Features ........................................................................\
...................... 85
How to operate the climate control system, the audio system, and other c\
onvenience features.
Before Driving........................................................................\
......................................................... 107
What gasoline to use, how to break-in your new vehicle, and how to load luggage and other cargo.
Driving ........................................................................\
..................................................................... 119
The proper way to start the engine, shift the transmission, and park, pl\
us towing a trailer.
Maintenance........................................................................\
.............................................................141
The Maintenance Schedule shows you when you need to take you r vehicle to the dealer.
Appearance Care........................................................................\
......................................................199
Tips on cleaning and protecting your vehicle. Things to look for if your\
vehicle ever needs body repairs.
Taking Care of the Unexpected........................................................................\
..............................205
This section covers several problems motorists sometimes experience, an d how to handle them.
Technical Information........................................................................\
.............................................229
ID numbers, dimensions, capacities, and technical information.
Warranty and Customer Relations (U.S. and Canada)................................................................243
A summary of the warranties covering your new Acura, and how to contact \
us.
Authorized Manuals (U.S. only)........................................................................\
..............................249
How to order manuals and other technical literature.
Index........................................................................\
............................................................................. I
A summary of information you need when you pull up to the fuel pump. Service Information Summary Owner's Identification
Page 51 of 251
Instruments and Controls
This section gives information about the controls and displays that
contribute to the daily operation of
your Honda. All the essential
controls are within easy reach.
Control Locations............................ 50
Indicator Lights................................ 51
Gauges.............................................. 55
Speedometer................................ 55
Tachometer.................................. 55 Odometer...................................... 55
Trip Meter.................................... 55 Fuel Gauge................................... 56
Temperature Gauge.................... 56
Maintenance Required
Indicator.................................... 57
Controls Near the Steering
Wheel........................................58
Headlights.................................... 59
Daytime Running Lights............. 59
Instrument Panel Brightness..... 60
Turn Signals................................. 60
Windshield Wipers...................... 61
Windshield Washers................... 61
Hazard Warning........................... 62
Rear Window Defogger.............. 62
Steering Wheel Adjustment....... 63
Steering Wheel Controls ................ 64
Cruise Control.............................. 64
Keys and Locks................................ 67
Keys...............................................67
Ignition Switch............................. 67
Door Locks................................... 68
Power Door Locks....................... 69
Remote Transmitter.................... 70
Trunk............................................ 73
Seat Adjustments............................. 74
Front Seat Adjustments.............. 74
Rear Seat Access......................... 75
Head Restraints........................... 75
Folding Rear Seat............................ 76
Power Windows............................... 77
Moonroof.......................................... 79
Mirrors.............................................. 79
Adjusting the Power Mirrors..... 80
Parking Brake.................................. 80
Glove Box......................................... 81
Beverage Holder.............................. 82
Accessory Power Socket................ 83
Ashtrays............................................ 83
Interior Light.................................... 84
Instruments and ControlsMain Menu s t
Page 52 of 251
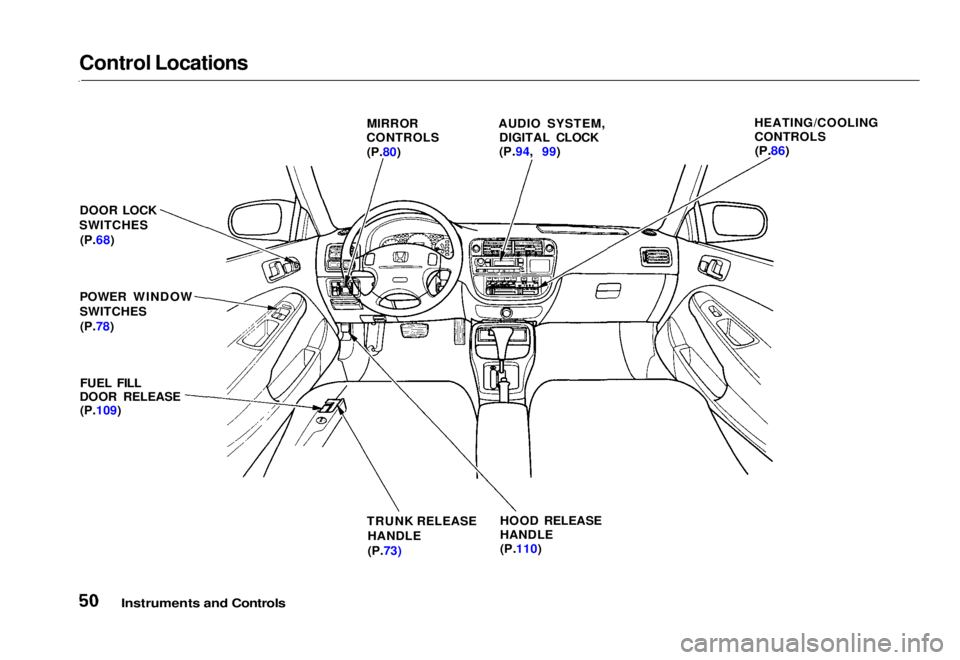
Control Locations
Instruments and Controls
MIRROR
CONTROLS
(P.80) AUDIO SYSTEM,
DIGITAL CLOCK
(P.94, 99) HEATING/COOLING
CONTROLS
(P.86)
DOOR LOCK
SWITCHES (P.68)
POWER WINDOW
SWITCHES (P.78)
FUEL FILL
DOOR RELEASE (P.109)
TRUNK RELEASE
HANDLE
(P.73) HOOD RELEASE
HANDLE
(P.110)Main Menu Table of Contents s t
Page 53 of 251
Indicator Lights
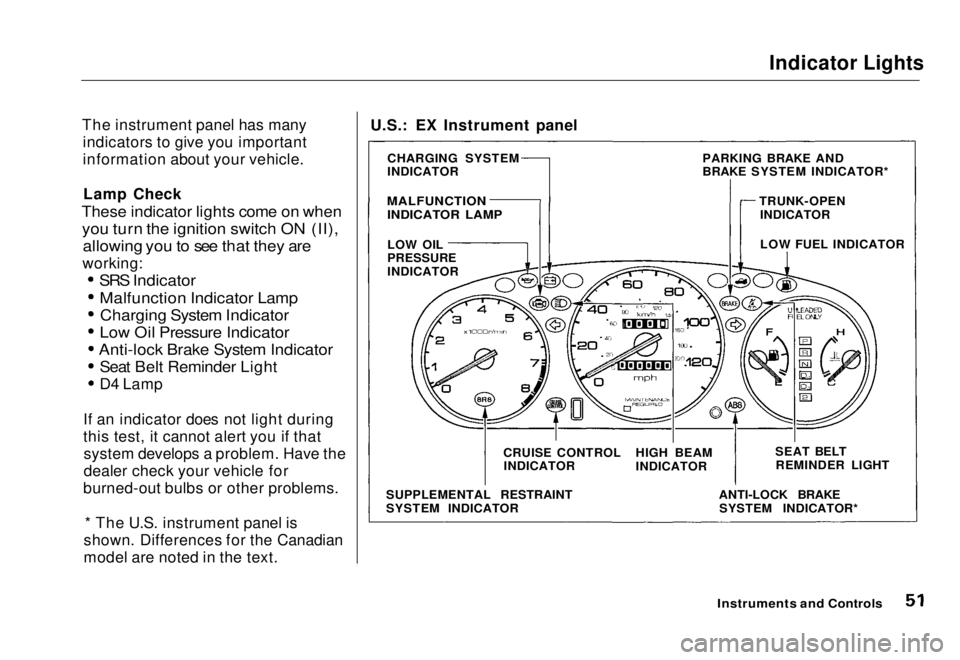
The instrument panel has many indicators to give you important
information about your vehicle.
Lamp Check
These indicator lights come on when
you turn the ignition switch ON (II), allowing you to see that they are
working:
SRS Indicator
Malfunction Indicator LampCharging System Indicator
Low Oil Pressure Indicator
Anti-lock Brake System Indicator
Seat Belt Reminder Light
D4 Lamp
If an indicator does not light during
this test, it cannot alert you if that system develops a problem. Have the
dealer check your vehicle for
burned-out bulbs or other problems.
* The U.S. instrument panel is
shown. Differences for the Canadian
model are noted in the text.
Instruments and Controls
U.S.: EX Instrument panel
CHARGING SYSTEM
INDICATOR
MALFUNCTION
INDICATOR LAMP
LOW OIL
PRESSURE
INDICATOR
SUPPLEMENTAL RESTRAINT
SYSTEM INDICATOR CRUISE CONTROL
INDICATOR HIGH BEAM
INDICATOR
ANTI-LOCK BRAKESYSTEM INDICATOR* SEAT BELT
REMINDER LIGHT
LOW FUEL INDICATOR
PARKING BRAKE AND
BRAKE SYSTEM INDICATOR*
TRUNK-OPENINDICATORMain Menu Table of Contents s t
Page 54 of 251
Indicator Lights
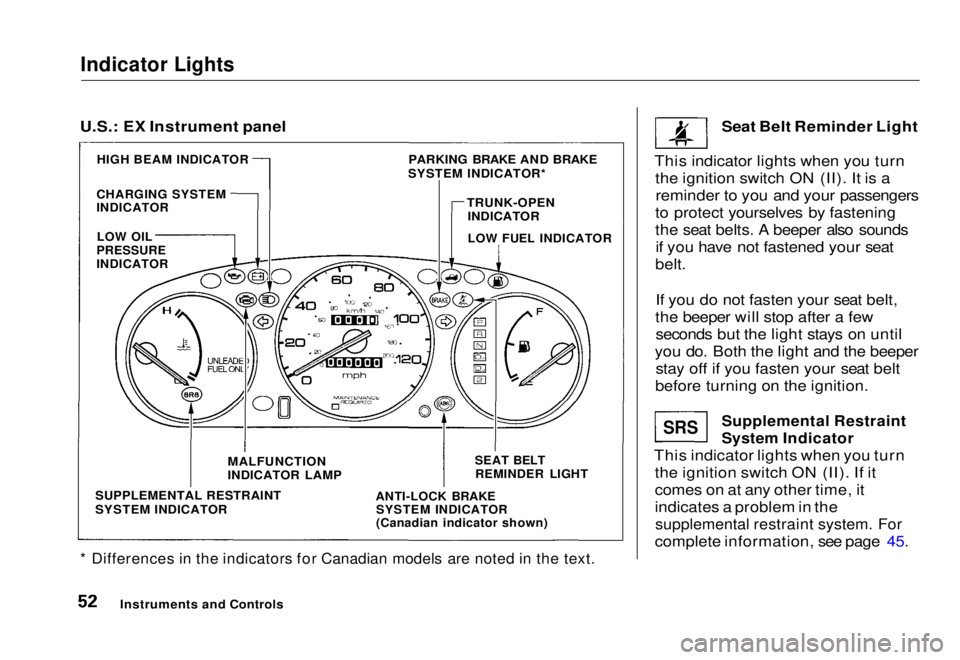
* Differences in the indicators for Canadian models are noted in the text.
Seat Belt Reminder Light
This indicator lights when you turn the ignition switch ON (II). It is areminder to you and your passengers
to protect yourselves by fastening
the seat belts. A beeper also sounds if you have not fastened your seat
belt.
If you do not fasten your seat belt,
the beeper will stop after a few seconds but the light stays on until
you do. Both the light and the beeper stay off if you fasten your seat belt
before turning on the ignition.
Supplemental Restraint
System Indicator
This indicator lights when you turn the ignition switch ON (II). If it
comes on at any other time, it
indicates a problem in the
supplemental restraint system. For
complete information, see page 45.
Instruments and Controls
SRS
U.S.: EX Instrument panel
PARKING BRAKE AND BRAKE
SYSTEM INDICATOR*
HIGH BEAM INDICATOR
CHARGING SYSTEM
INDICATOR
TRUNK-OPEN
INDICATOR
LOW FUEL INDICATOR
LOW OIL
PRESSURE
INDICATOR
SUPPLEMENTAL RESTRAINT
SYSTEM INDICATOR
MALFUNCTION
INDICATOR LAMP
ANTI-LOCK BRAKE
SYSTEM INDICATOR
(Canadian indicator shown)
SEAT BELT
REMINDER LIGHTMain Menu Table of Contents s t
Page 56 of 251
Indicator Lights
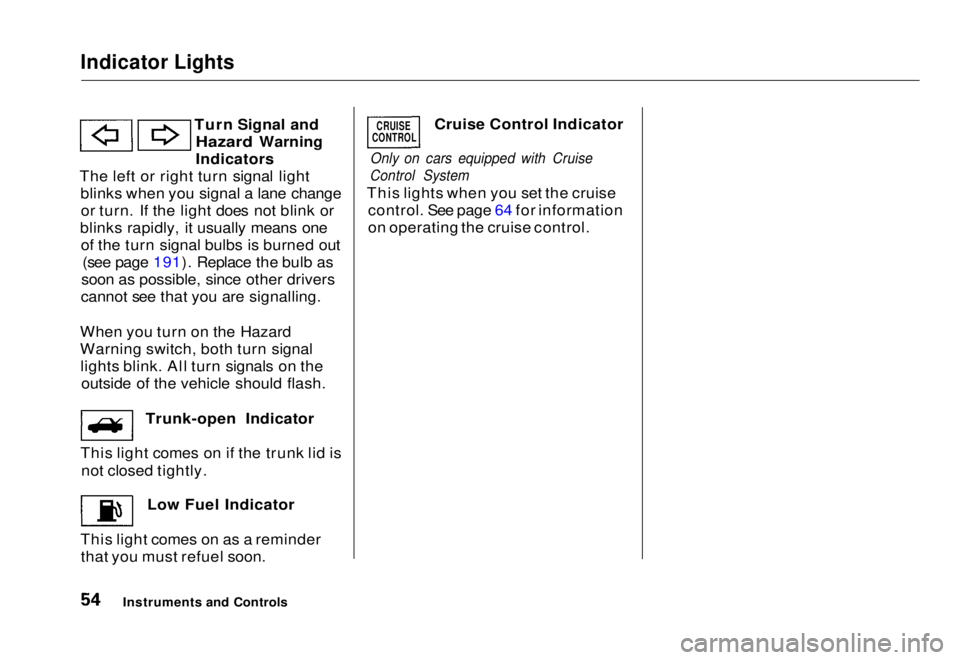
Turn Signal and
Hazard Warning
Indicators
The left or right turn signal light blinks when you signal a lane changeor turn. If the light does not blink or
blinks rapidly, it usually means one of the turn signal bulbs is burned out (see page 191). Replace the bulb as
soon as possible, since other drivers
cannot see that you are signalling.
When you turn on the Hazard
Warning switch, both turn signal lights blink. All turn signals on the outside of the vehicle should flash. Trunk-open Indicator
This light comes on if the trunk lid is not closed tightly. Low Fuel Indicator
This light comes on as a reminder that you must refuel soon. Cruise Control Indicator
Only on cars equipped with Cruise
Control System
This lights when you set the cruise control. See page 64 for information
on operating the cruise control.
Instruments and Controls
CRUISE
CONTROLMain Menu Table of Contents s t
Page 57 of 251
Gauges
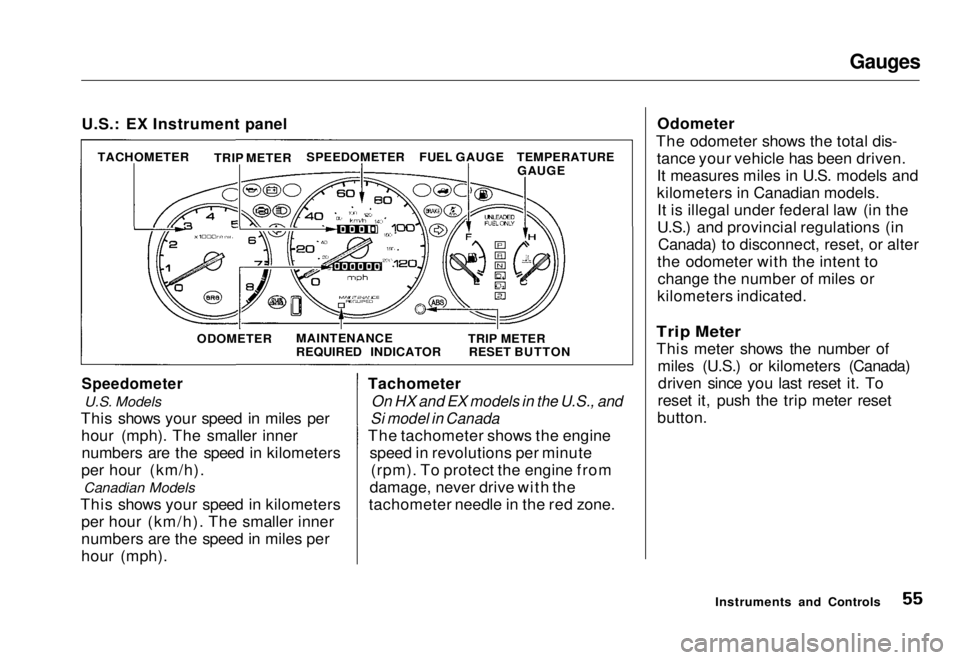
U.S.: EX Instrument panel
Speedometer
U.S. Models
This shows your speed in miles per hour (mph). The smaller innernumbers are the speed in kilometers
per hour (km/h). Canadian Models
This shows your speed in kilometers per hour (km/h). The smaller inner
numbers are the speed in miles per
hour (mph). Tachometer
On HX and EX models in the U.S., and
Si model in Canada
The tachometer shows the engine speed in revolutions per minute(rpm). To protect the engine from
damage, never drive with the
tachometer needle in the red zone. Odometer
The odometer shows the total dis- tance your vehicle has been driven.
It measures miles in U.S. models and
kilometers in Canadian models.It is illegal under federal law (in the
U.S.) and provincial regulations (in Canada) to disconnect, reset, or alter
the odometer with the intent to change the number of miles or
kilometers indicated.
Trip Meter
This meter shows the number of miles (U.S.) or kilometers (Canada)driven since you last reset it. To
reset it, push the trip meter reset
button.
Instruments and Controls
TACHOMETER
TRIP METER
SPEEDOMETER
FUEL GAUGE
ODOMETER MAINTENANCE
REQUIRED INDICATOR TRIP METER
RESET BUTTON TEMPERATURE
GAUGEMain Menu Table of Contents s t
Page 58 of 251
Gauges
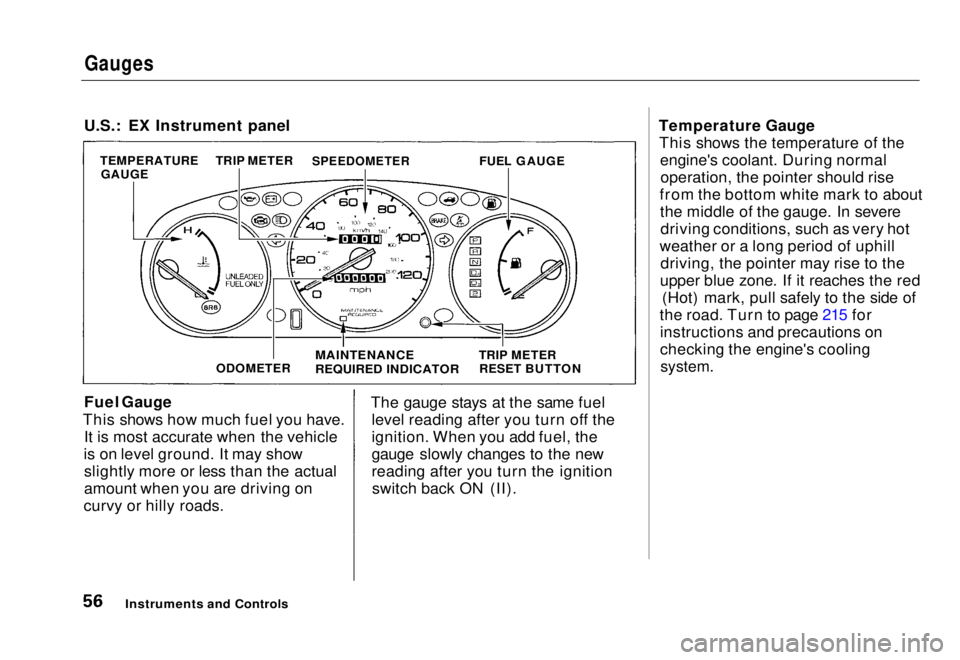
U.S.: EX Instrument panel
Fuel Gauge
This shows how much fuel you have. It is most accurate when the vehicle
is on level ground. It may show slightly more or less than the actual
amount when you are driving on
curvy or hilly roads. The gauge stays at the same fuel
level reading after you turn off the
ignition. When you add fuel, the
gauge slowly changes to the new
reading after you turn the ignitionswitch back ON (II). Temperature Gauge
This shows the temperature of the engine's coolant. During normaloperation, the pointer should rise
from the bottom white mark to about the middle of the gauge. In severedriving conditions, such as very hot
weather or a long period of uphill driving, the pointer may rise to the
upper blue zone. If it reaches the red (Hot) mark, pull safely to the side of
the road. Turn to page 215 for instructions and precautions on
checking the engine's cooling
system.
Instruments and Controls
TEMPERATURE
GAUGE TRIP METER
SPEEDOMETER
FUEL GAUGE
ODOMETER
MAINTENANCE
REQUIRED INDICATOR
TRIP METER
RESET BUTTONMain Menu Table of Contents s t
Page 109 of 251
Before Driving
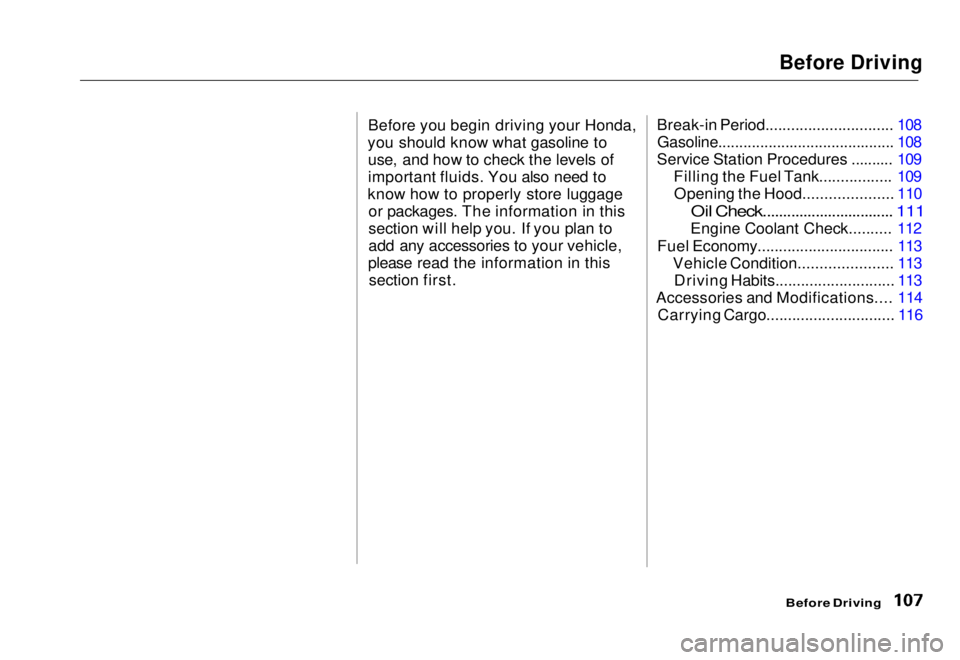
Before you begin driving your Honda,
you should know what gasoline to use, and how to check the levels of
important fluids. You also need to
know how to properly store luggage or packages. The information in this
section will help you. If you plan to
add any accessories to your vehicle,
please read the information in this section first.
Break-in Period.............................. 108
Gasoline.......................................... 108
Service Station Procedures .......... 109 Filling the Fuel Tank................. 109Opening the Hood..................... 110
Oil Check................................ 111
Engine Coolant Check.......... 112
Fuel Economy................................ 113 Vehicle Condition...................... 113Driving Habits............................ 113
Accessories and Modifications.... 114 Carrying Cargo.............................. 116
Before DrivingMain Menu s t
Page 110 of 251
Break-in Period, Gasoline
Break-in Period
Help assure your vehicle's future
reliability and performance by paying
extra attention to how you drive during the first 600 miles (1,000 km).
During this period:
Avoid full-throttle starts and rapid
acceleration.
Avoid hard braking. New brakes
need to be broken-in by moderate
use for the first 200 miles (300
km).
You should follow these same re-
commendations with an overhauled
or exchanged engine, or when the
brakes are relined.
Gasoline
Your Honda is designed to operate on unleaded gasoline with a pump
octane number of 86 or higher. Use
of a lower octane gasoline can cause
a persistent, heavy metallic rapping
noise in the engine that can lead to mechanical damage.
We recommend gasolines containing detergent additives that help prevent
fuel system and engine deposits.
Using gasoline containing lead willdamage your vehicle's emission
controls. This contributes to air
pollution.
In Canada, some gasolines contain
an octane-enhancing additive called
MMT. If you use such gasolines,
your emission control system performance may deteriorate and
the Malfunction Indicator Lamp on
your instrument panel may turn on.If this happens, contact your
authorized Honda dealer for service.
Before DrivingMain Menu Table of Contents s t