stop start HONDA CIVIC COUPE 1998 Owners Manual
[x] Cancel search | Manufacturer: HONDA, Model Year: 1998, Model line: CIVIC COUPE, Model: HONDA CIVIC COUPE 1998Pages: 251, PDF Size: 2.04 MB
Page 92 of 251
Heating and Cooling
To Cool with A/C
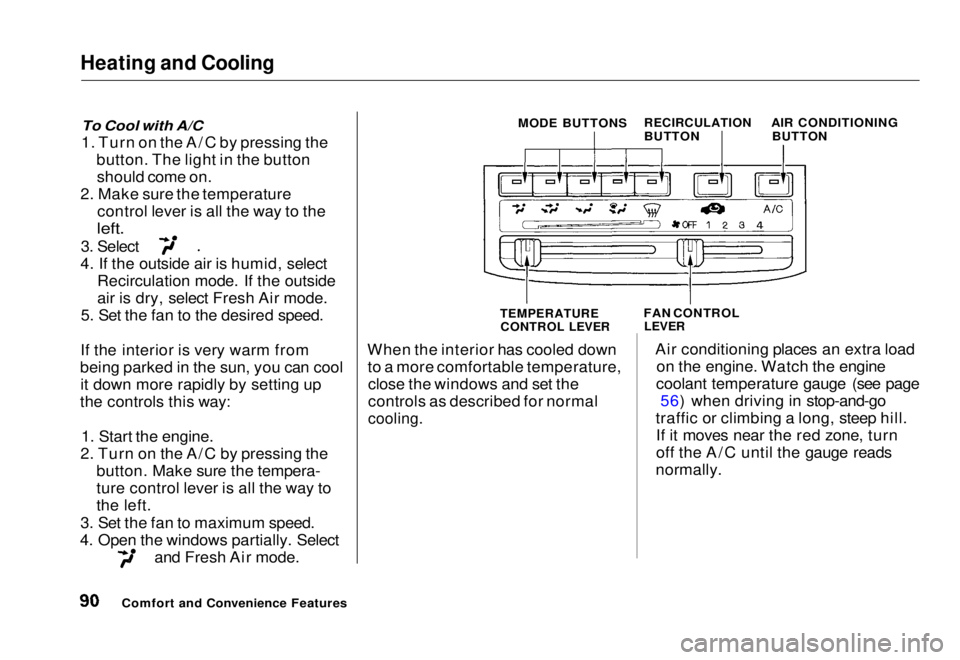
1. Turn on the A/C by pressing the button. The light in the buttonshould come on.
2. Make sure the temperature control lever is all the way to the
left.
3. Select
4. If the outside air is humid, select Recirculation mode. If the outside
air is dry, select Fresh Air mode.
5. Set the fan to the desired speed.
If the interior is very warm from
being parked in the sun, you can cool it down more rapidly by setting up
the controls this way:
1. Start the engine.
2. Turn on the A/C by pressing the button. Make sure the tempera-
ture control lever is all the way to
the left.
3. Set the fan to maximum speed.
4. Open the windows partially. Select and Fresh Air mode. When the interior has cooled down
to a more comfortable temperature,close the windows and set the
controls as described for normal
cooling.
Air conditioning places an extra load
on the engine. Watch the engine
coolant temperature gauge (see page 56) when driving in stop-and-go
traffic or climbing a long, steep hill. If it moves near the red zone, turn
off the A/C until the gauge reads
normally.
Comfort and Convenience Features MODE BUTTONS
RECIRCULATION
BUTTON AIR CONDITIONING
BUTTON
TEMPERATURE CONTROL LEVER
FAN CONTROL
LEVERMain Menu Table of Contents s t
Page 96 of 251
Audio System
AM/FM Stereo Audio System
Your Honda's audio system provides clear reception on both AM and FM
bands, while the preset buttons allow
you to easily select your favorite stations.
A cassette player, CD player or CD changer is available as optional
equipment. The cassette player is
standard on the Si model in Canada.
Operating the Radio
The ignition switch must be in
ACCESSORY (I) or ON (II) to operate the audio system. Turn the
system on by pressing the PWR/
VOL knob or the AM/FM button.
Adjust the volume by turning the
knob.
The band and frequency that the radio was last tuned to is displayed.
To change bands, press the AM/FM button. On the FM band, ST will bedisplayed if the station is broadcast-
ing in stereo. Stereo reproduction on
AM is not available.
You can use any of three methods to find radio stations on the selected
band: TUNE, SEEK, or the Preset
buttons.
TUNE — Use the TUNE/SEEK bar to tune the radio to a desired frequency. Press the right side ( )
to tune to a higher frequency, or the left side ( ) to tune to a lower
frequency. The frequency numbers
will start to change rapidly. Release the bar when the display reaches thedesired frequency. To change the
frequency in small increments, press and release the TUNE/SEEK bar
quickly.
SEEK — The SEEK function searches the band for a station with
a strong signal. To activate it, press
the TUNE/SEEK bar until you hear a beep, then release it. Depending on
which side of the bar you press, the system scans upward or downward
from the current frequency. It stops
when it finds a station with a strong
signal.
Preset — You can store the fre- quencies of your favorite radio
stations in the six preset buttons.
Each button will store one frequency
on the AM band, and two on the FM
band.
Comfort and Convenience FeaturesMain Menu Table of Contents s t
Page 127 of 251
Automatic Transmission
Driving
CONTINUED
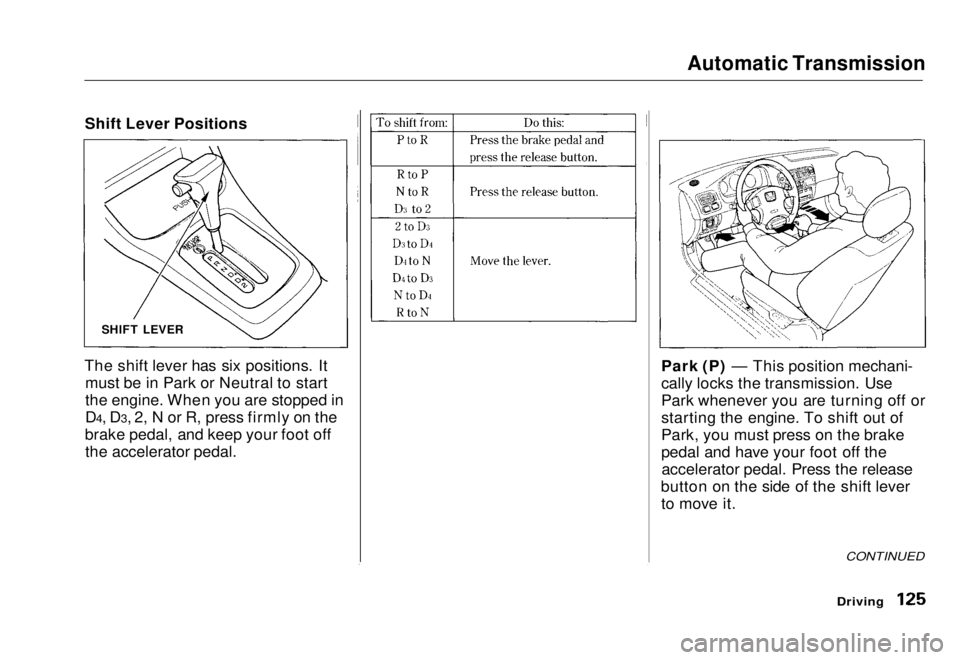
Park (P) — This position mechani-
cally locks the transmission. Use
Park whenever you are turning off or
starting the engine. To shift out of
Park, you must press on the brake
pedal and have your foot off the
accelerator pedal. Press the release
button on the side of the shift lever to move it.
The shift lever has six positions. It
must be in Park or Neutral to start
the engine. When you are stopped in
D4, D3, 2, N or R, press firmly on the
brake pedal, and keep your foot off the accelerator pedal. SHIFT LEVER
Shift Lever PositionsMain Menu Table of Contents s t
Page 128 of 251
Automatic Transmission
If you have done all of the above andstill cannot move the lever out of
Park, see Shift Lock Release on page
128.
You must also press the release button to shift into Park. To avoidtransmission damage, come to acomplete stop before shifting into
Park. The shift lever must be in Park
before you can remove the key from
the ignition switch. Reverse (R) — To shift to Reverse
from Park, see the explanation under
Park. To shift to Reverse from
Neutral, come to a complete stop and
then shift. Press the release button before shifting into Reverse from
Neutral.
Neutral (N) — Use Neutral if you
need to restart a stalled engine, or ifit is necessary to stop briefly with
the engine idling. Shift to Park posi-
tion if you need to leave the vehicle
for any reason. Press on the brake pe- dal when you are moving the shift
lever from Neutral to another gear.
Drive (D4) — Use this position for
your normal driving. The transmis- sion automatically selects a suitable
gear for your speed and acceleration.
You may notice the transmission shifting up at higher speeds when
the engine is cold. This helps the
engine warm up faster. Drive (D3) —This position is similar
to D4, except only the first three
gears are selected. Use D3 to provide
engine brakin g
when going down a
steep hill. D3 can also keep the
transmission from cycling between
third and fourth gears in stop-and-go driving.
For faster acceleration when in D3 or
D4, you can get the transmission to
automatically downshift by pushing
the accelerator pedal to the floor.
The transmission will shift down one or two gears, depending on your
speed.
DrivingMain Menu Table of Contents s t
Page 129 of 251
Automatic Transmission
Second (2) — To shift to Second,
press the release button on the side of the shift lever. This position locks
the transmission in second gear. It does not downshift to first gear
when you come to a stop. Second gives you more power when climbing,and increased engine braking when
going down steep hills. Use second
gear when starting out on a slippery surface or in deep snow. It will help
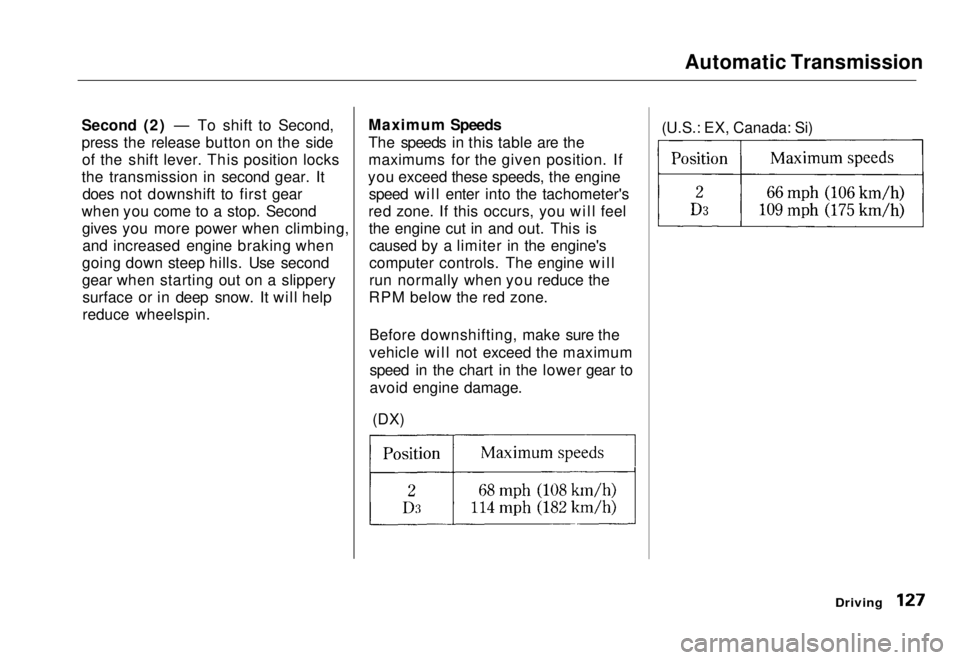
reduce wheelspin. Maximum Speeds
The speeds in this table are the
maximums for the given position. If
you exceed these speeds, the engine speed will enter into the tachometer's
red zone. If this occurs, you will feel the engine cut in and out. This iscaused by a limiter in the engine's
computer controls. The engine will
run normally when you reduce the
RPM below the red zone.
Before downshifting, make sure the
vehicle will not exceed the maximumspeed in the chart in the lower gear to
avoid engine damage.
(DX) (U.S.: EX, Canada: Si)
DrivingMain Menu Table of Contents s t
Page 131 of 251
Automatic Transmission (CVT)
Continuously Variable
Transmission (CVT)
On HX model
Honda's Continuously Variable
automatic transmission's unique design provides a smooth, constant
flow of power. It is electronically controlled for more precise operation
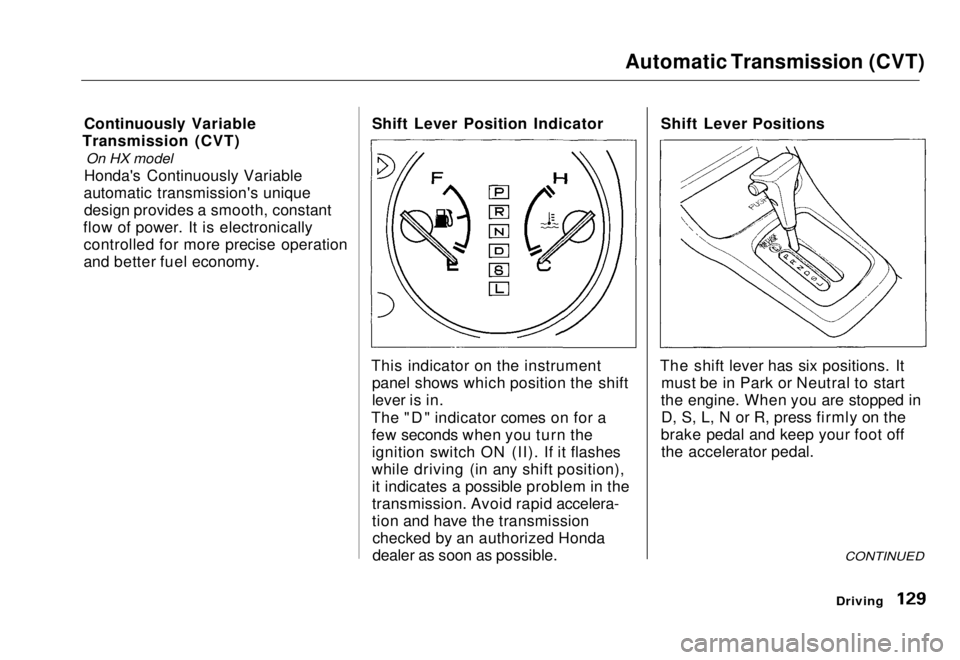
and better fuel economy. Shift Lever Position Indicator
This indicator on the instrument panel shows which position the shift
lever is in.
The "D" indicator comes on for a few seconds when you turn theignition switch ON (II). If it flashes
while driving (in any shift position), it indicates a possible problem in the
transmission. Avoid rapid accelera-
tion and have the transmissionchecked by an authorized Honda
dealer as soon as possible. Shift Lever Positions
The shift lever has six positions. It must be in Park or Neutral to start
the engine. When you are stopped in D, S, L, N or R, press firmly on the
brake pedal and keep your foot off the accelerator pedal.
CONTINUED
DrivingMain Menu Table of Contents s t
Page 132 of 251
Automatic Transmission (CVT)
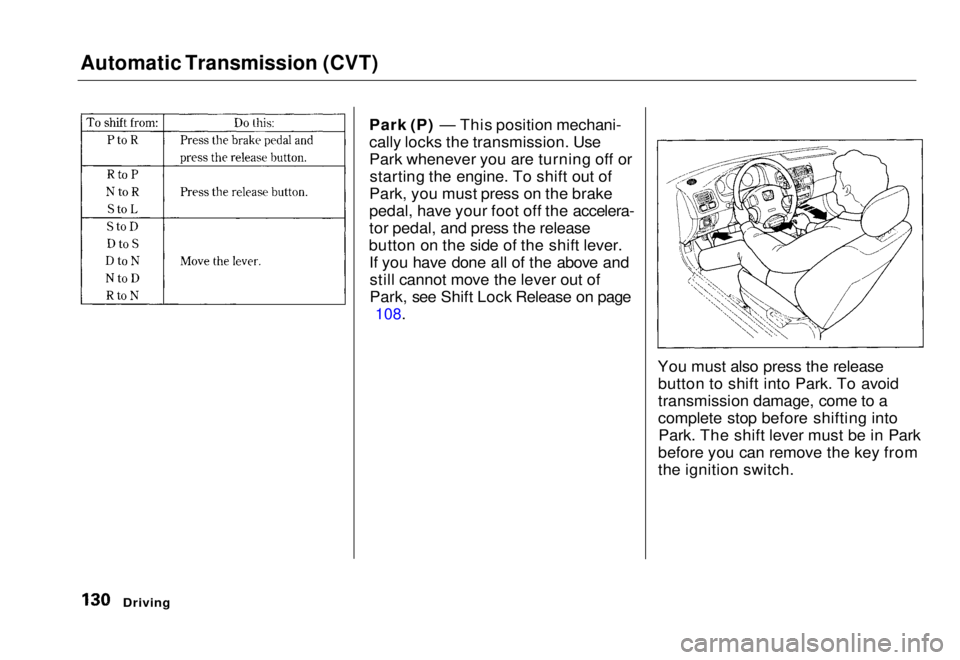
Park (P) — This position mechani-
cally locks the transmission. Use
Park whenever you are turning off orstarting the engine. To shift out of
Park, you must press on the brake
pedal, have your foot off the accelera-
tor pedal, and press the release
button on the side of the shift lever. If you have done all of the above andstill cannot move the lever out of
Park, see Shift Lock Release on page
108.
You must also press the releasebutton to shift into Park. To avoid
transmission damage, come to a
complete stop before shifting intoPark. The shift lever must be in Park
before you can remove the key from
the ignition switch.
DrivingMain Menu Table of Contents s t
Page 133 of 251

Automatic Transmission (CVT)
Reverse (R) — To shift from Re-
verse to Park, see the explanation under Park. To shift to Reverse fromNeutral, come to a complete stop
first. Press the release button before shifting into Reverse from Neutral.
Neutral (N) — Use Neutral if you need to restart a stalled engine, or if
it is necessary to stop briefly with
the engine idling. Always shift to Park position if you need to leave the
vehicle for any reason. Press on the brake pedal when you are moving
the shift lever from Neutral toanother position. Drive (D) — Use this position for
your normal driving. The transmis- sion automatically adjusts to keep
the engine at the best speed for driving conditions. To help the
engine warm up faster, the transmis-
sion will select ratios that allow the
engine to run at higher speeds when
it is cold.
Second (S) — Selecting Second
shifts the transmission into a lower
range of ratios for better accelera-
tion and increased engine braking. Use Second when you are goingdown a steep hill, or in stop-and-go
driving.
Low (L) — To shift to Low, press
the release button on the side of the shift lever. Use Low to get more
power when climbing, and for
maximum engine braking when
going down steep hills.
For faster acceleration when in D, S
or L, the transmission will
automatically "kick down" to a lower
range of ratios by pushing the accelerator pedal to the floor.
DrivingMain Menu Table of Contents s t
Page 139 of 251
The Braking System
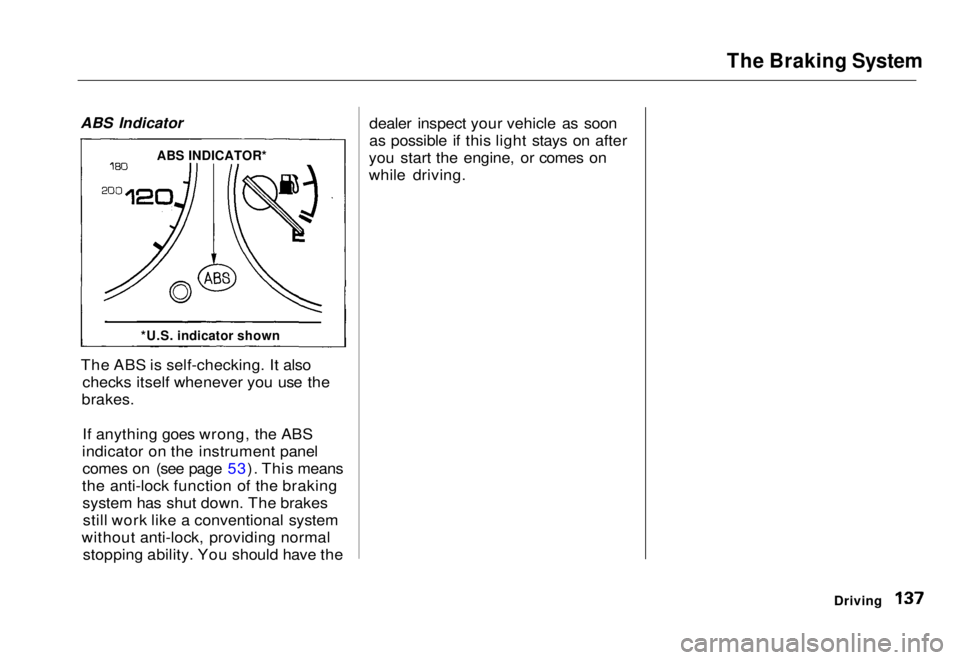
ABS Indicator
The ABS is self-checking. It also checks itself whenever you use the
brakes.
If anything goes wrong, the ABS
indicator on the instrument panel comes on (see page 53). This means
the anti-lock function of the braking system has shut down. The brakesstill work like a conventional system
without anti-lock, providing normal stopping ability. You should have the dealer inspect your vehicle as soon
as possible if this light stays on after
you start the engine, or comes on
while driving.
Driving
ABS INDICATOR*
*U.S. indicator shownMain Menu Table of Contents s t
Page 216 of 251
If Your Engine Overheats
4. If the temperature gauge stays at
the red mark, turn off the engine.
5. Wait until you see no more signs of steam or spray, then open the
hood.
6. Look for any obvious coolant leaks, such as a split radiator hose.
Everything is still extremely hot, so use caution. If you find a leak, it
must be repaired before you continue driving (see Emergency
Towing on page 227).
7. If you don't find an obvious leak, check the coolant level in the
radiator reserve tank (see page112). If the level is below the
MIN mark, add coolant to halfway
between the MIN and MAX marks.
8. If there was no coolant in the reserve tank, you may also have to
add coolant to the radiator. Let the
engine cool down until the pointer reaches the middle of the tempera-
ture gauge, or lower, before check- ing the radiator.
9. Using gloves or a large heavy cloth, turn the radiator cap
counterclockwise, without pushingdown, to the first stop. This
releases any remaining pressure in
the cooling system. After the
pressure releases, push down on
the cap and turn it until it comes off. 10.Start the engine and set the
temperature control lever tomaximum. Add coolant to the
radiator up to the base of the filler
neck. If you do not have the
proper coolant mixture available,
you can add plain water. Remember to have the coolingsystem drained and refilled with
the proper mixture as soon as you
can.
11.Put the radiator cap back on tightly. Run the engine and watch
the temperature gauge. If it goes
back to the red mark, the engineneeds repair. (See EmergencyTowing on page 227).
12.1f the temperature stays normal, check the coolant level in the
radiator reserve tank. If it has
gone down, add coolant to the MAX mark. Put the cap back on
tightly.
Taking Care of the Unexpected
Removing the radiator cap
while the engine is hot can
cause the coolant to spray out,
seriously scalding you.
Always let the engine and radiator cool down before
removing the radiator cap.Main Menu Table of Contents s t